This article provides a detailed guide on leveraging the Service Console Navigator to open an App UI in Oracle Fusion Service. Key points include:
- An overview of the Oracle Fusion Service Console and its features
- Steps to enable navigation and embedding for a page in Oracle Visual Builder Studio
- A step-by-step process to navigate to your App UI in Oracle CX Service, including configuring a button to trigger navigation
- Detailed explanation of navigation payload parameters and their usage
- Additional examples for navigating to specific pages or URLs
An overview of the Oracle Fusion Service Console and its features
This extension in Oracle Fusion Service Center will give you the following results:
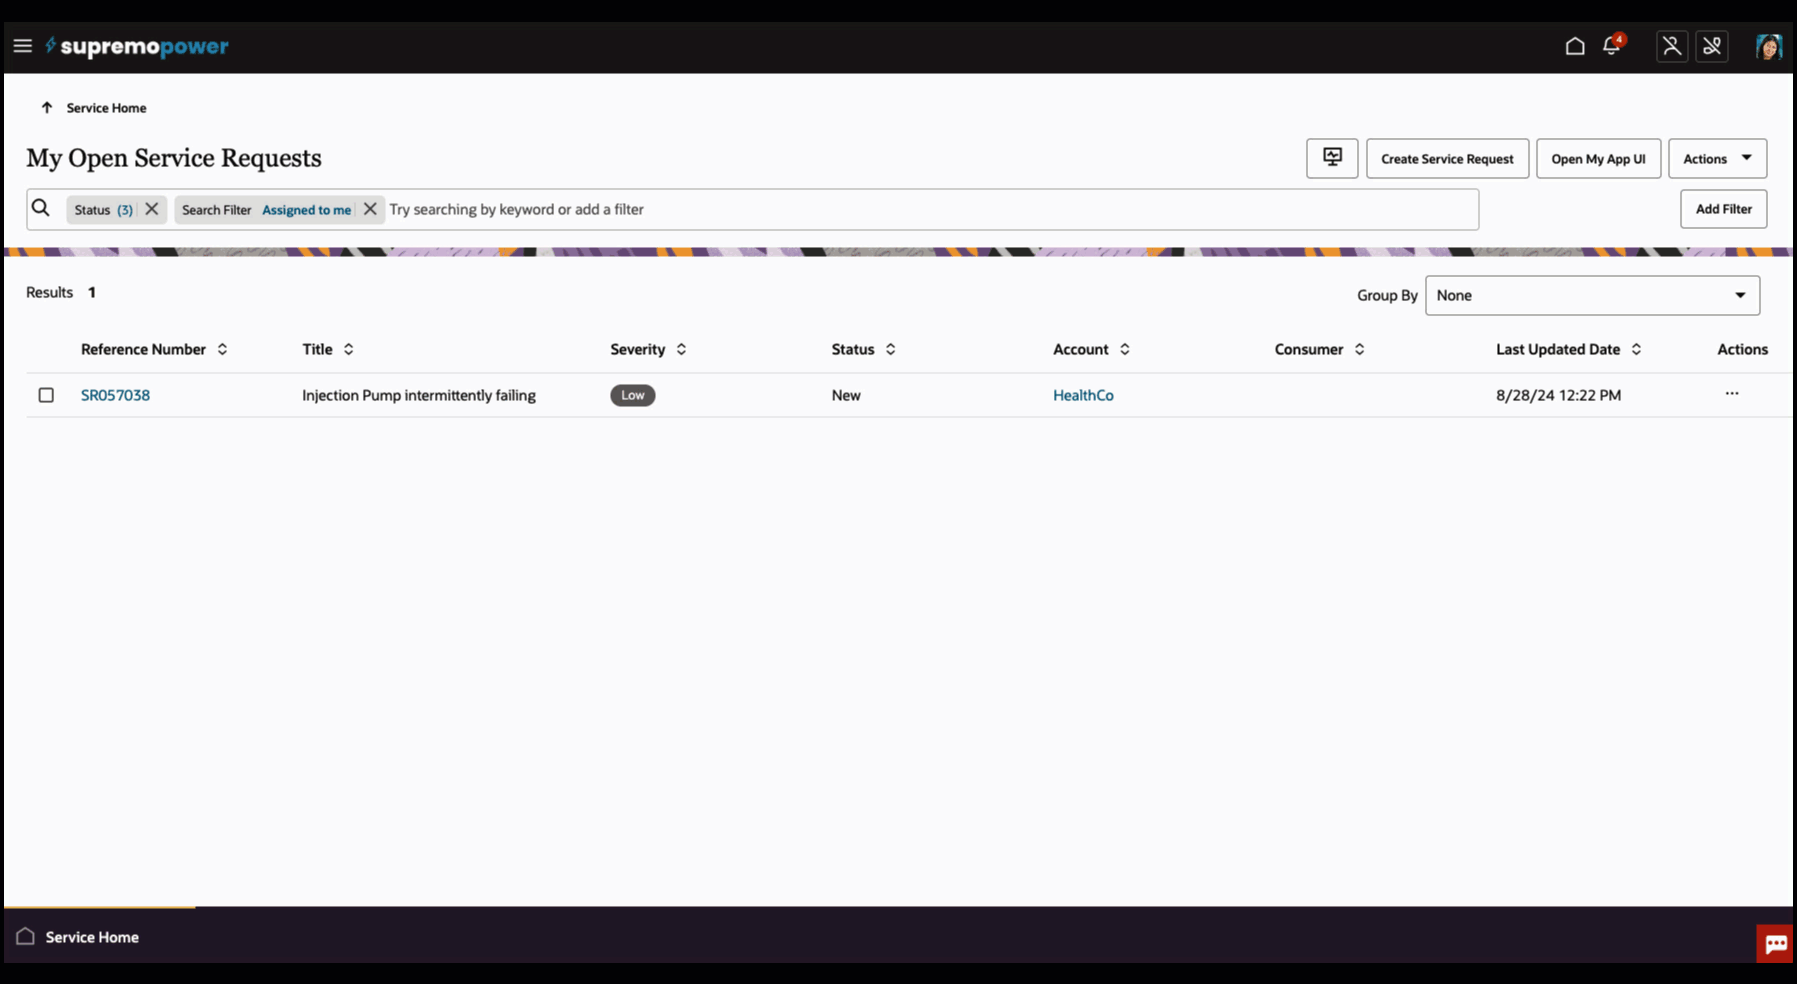
The Oracle Fusion Service Console is a specialized mode within Fusion Service that allows agents to work on multiple tasks simultaneously without leaving the main screen. It’s particularly useful for agents handling chats and phone calls, as they can have several tabs open within the app to work efficiently.
Key features of the Service Console include:
- Multi-tasking: Agents can manage multiple customer interactions at once
- In-app tabs: Allows for efficient navigation between different tasks without switching browser tabs
Here’s an example of how an agent can work on multiple customer interactions at the same time.

Steps to enable navigation and embedding for a page in Oracle Visual Builder Studio
Now that we understand the basics of Oracle Fusion Service Console, let’s look at how you can extend your application. We’ll explore how you can use same feature that allows in-app navigation in your extensions.
We’ll start with the assumption that you’ve created a new application in Oracle Visual Builder Studio and that this application is built using standard VB Components. For example, if you’re using an application created by the CX Extension Generator, the following steps won’t apply to your situation and I will be covering it in another article.
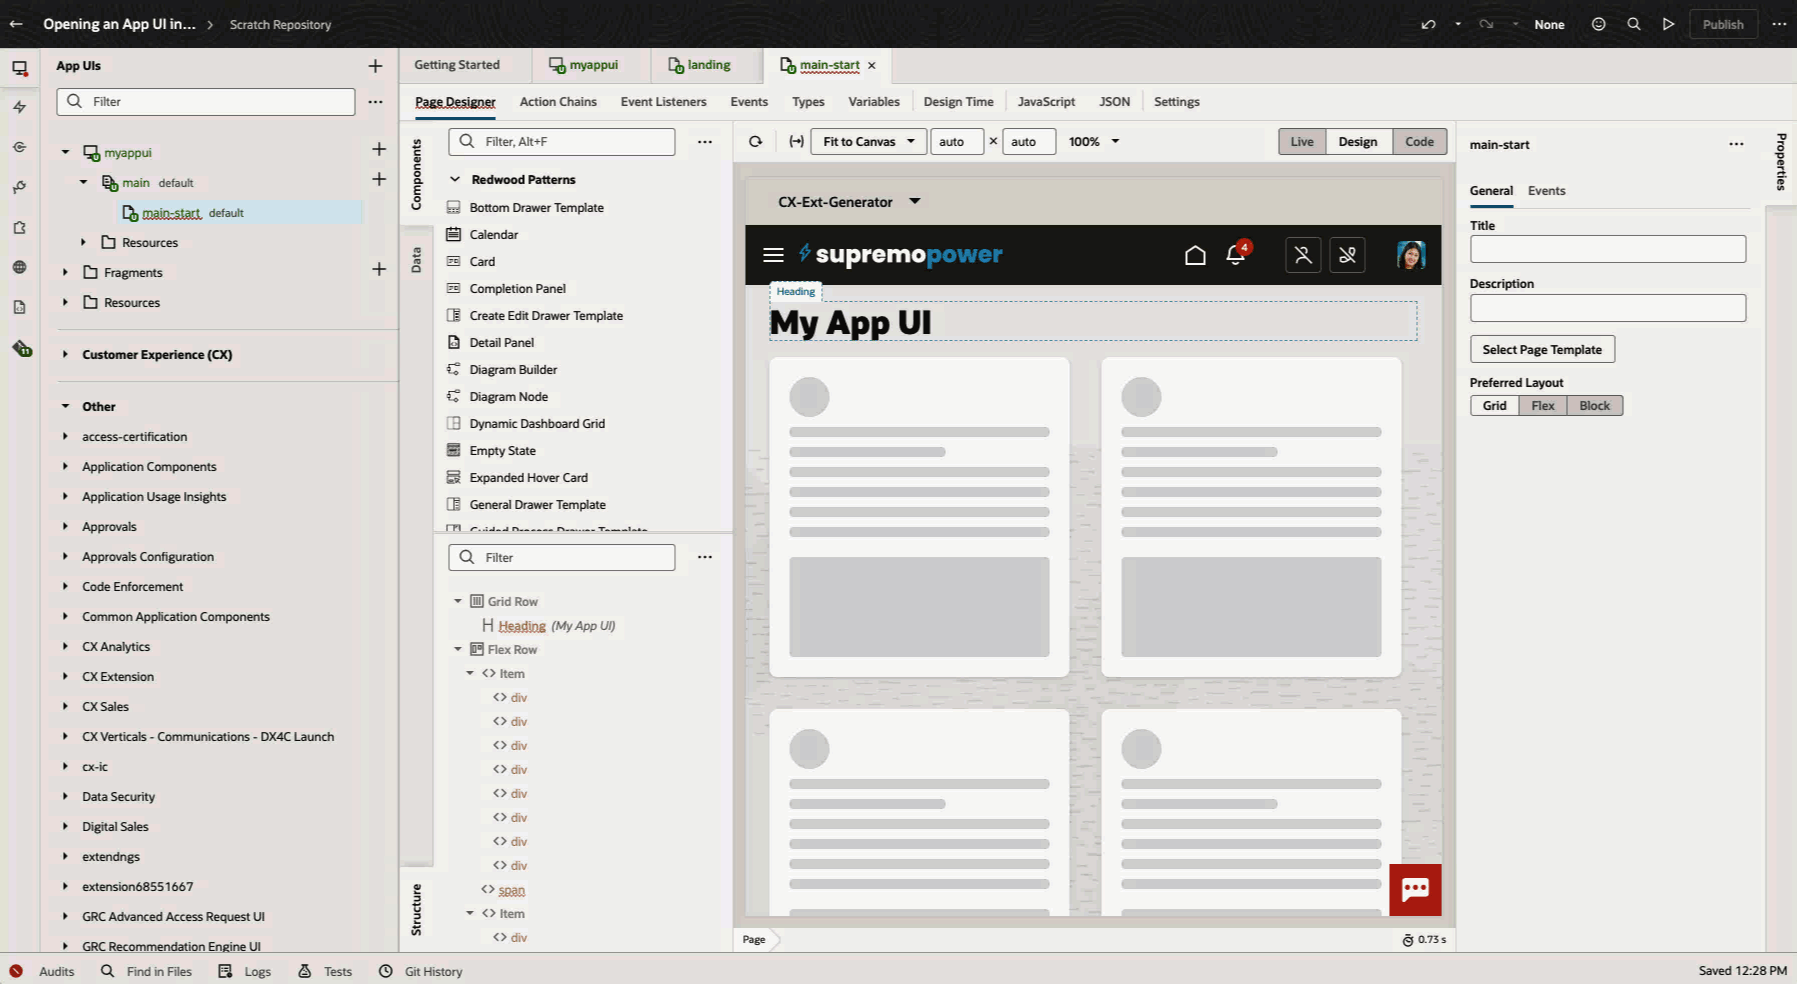
Let’s get our hands on and within Oracle Visual Builder Studio, select your page within the application built. Go to JSON and the instructions as below to let other applications to navigate and embed this page.
Here is the node you want to add to the JSON:
"navigation": {
    "fromExternal": "enabled",
    "embeddable": "enabled"
 }
And here are the steps expected.
A step-by-step process to navigate to your App UI in Oracle CX Service, including configuring a button to trigger navigation
Let’s learn how to make the Service Request Landing Page open our App UI Page using the Service Console’s in-app navigation feature.
Here’s a simple explanation of how navigation works. Please, keep this basic concept in mind so you can apply the same concept in other use case when extending Fusion Service:
- Navigation is done through an action chain
- An action chain is triggered by an event
- Events can be things like clicking a button, clicking a link, or responding to something that happens in the app
How to Navigate to Your App UI in Oracle CX Service.
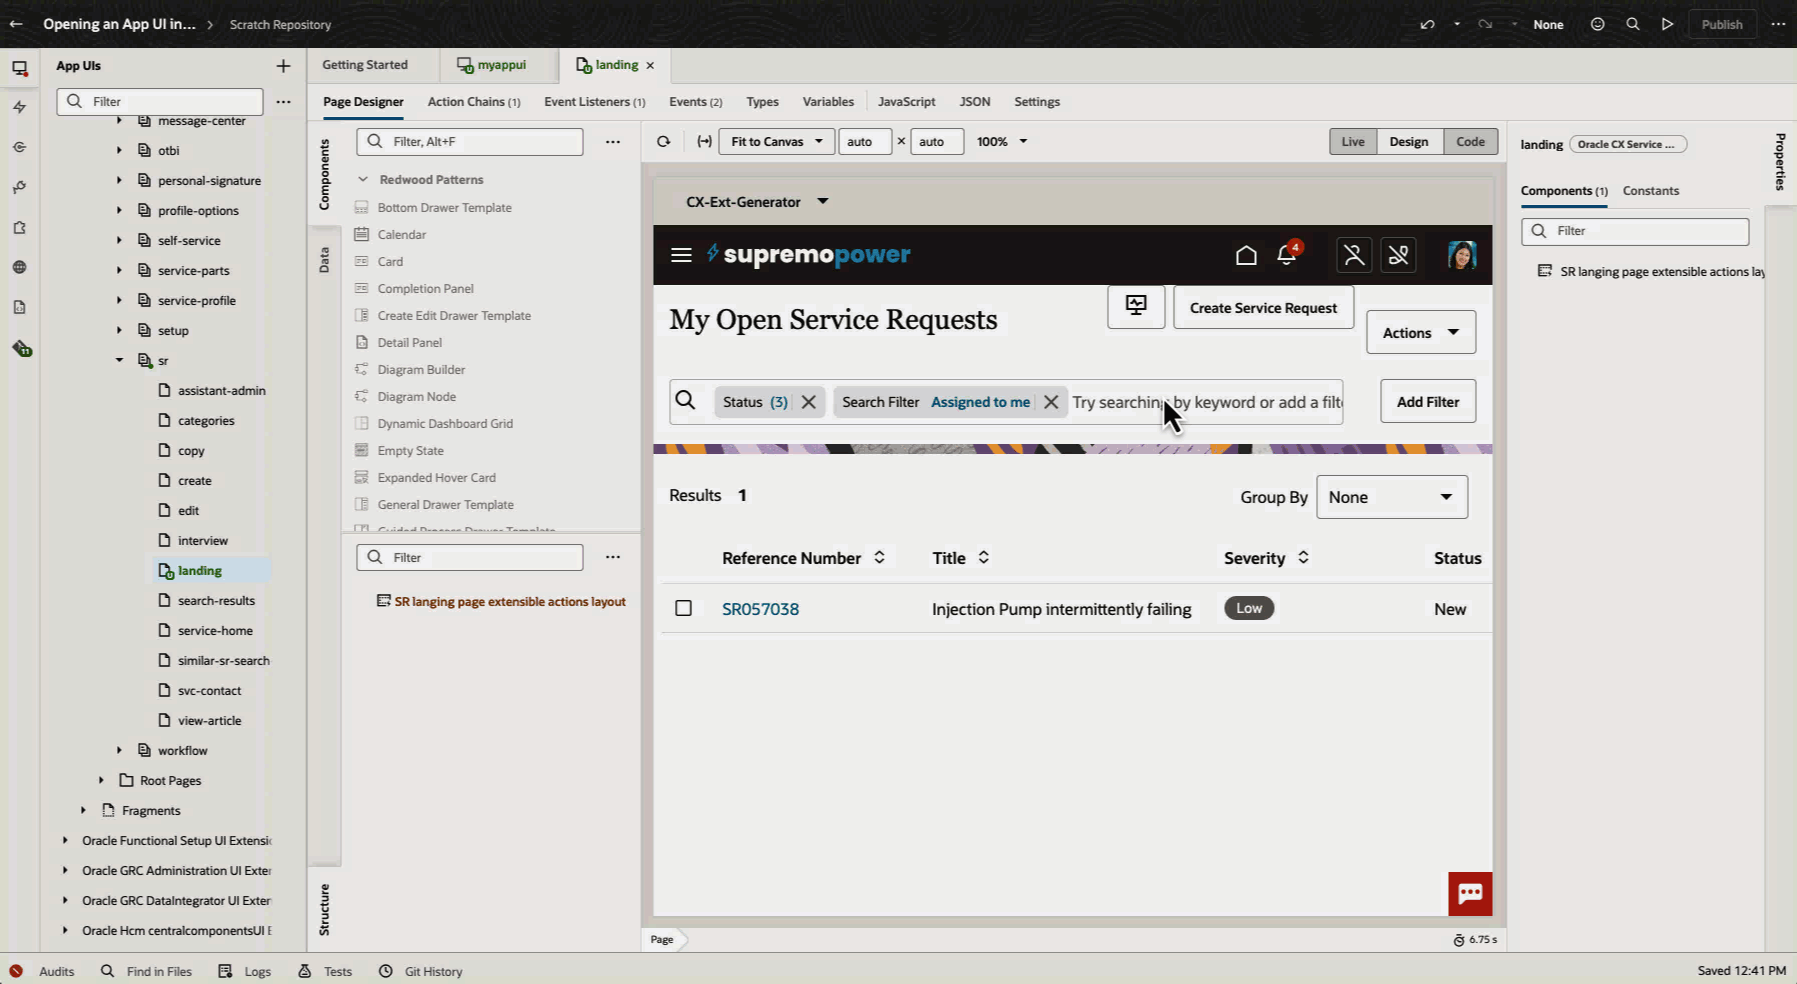
Follow these simple steps to open your App UI using the Service Console’s navigation feature:
- Open the Oracle CX Service UI Extension App
- Go to service > ec > sr > landing
- Find and select the “SR landing page extensible action layout” component
- In the properties panel:
- Create a new case
- Add a new section
- Open the new section
- Add a Button:
- Look for “Button” in the component pallet
- Drag it into your template
- Set up the Button:
- Click on the Button you just added
- In the properties panel, go to the “Event” tab
- Add a new event to “ojAction”
- Open the new action chain
- Configure the action:
- In the action chain, choose “Fire Event”
- Set it to trigger “svcNavigate (Oracle CX Service UI Extension App)”
- Switch from Design to Code view
- Add the navigation details (payload) to your event
Note: In future updates, you won’t need to code the payload manually.
By following these steps, you’ll create a button that opens your App UI within the Service Console.
payload: {
          key: 'APP_UI_${Math.random()}',
          application: 'myappui',
          flow: 'main',
          page: 'main-start',
          isSecondaryTab: false,
          replaceTab: false,
          tabInfo: {
            label: 'App UI in MSI'
          }
        },
Tip: The label and any parameter can use variables for dynamic values. For example, in the standard application, we use the Service Request Title as the label when opening a Service Request in a new tab. This helps users easily identify which in-app tab they’ve opened.
Detailed explanation of navigation payload parameters and their usage
Here is a table with the parameters that you can use in the payload.
| Name | Type | Default | Description | ||||||||||||
|---|---|---|---|---|---|---|---|---|---|---|---|---|---|---|---|
| application | String | service | Name of an application to be navigated. | ||||||||||||
| flow | String | sr | Name of a flow to be navigated. Default is SR flow. | ||||||||||||
| page | String | – | Name of a Page to be navigated. Required Parameter | ||||||||||||
| pageParams | Object | – | Page input parameters. Provided an object containing all input parameters required by a Page to be navigated. | ||||||||||||
| isSecondaryTab | Boolean | false | Provide True if navigation is a secondary Tab. i.e. Page is already opened in a MSI tab and further navigation should happen within the same Tab but in form of Secondary Tab. | ||||||||||||
|
|
|||||||||||||||
| tabInfo | An Object containing information about a Tab.
|
||||||||||||||
| key | String | – | Key to be associated with a Tab and also this drives to open new MSI Tab. This key can be used to retrieve Tab information. | ||||||||||||
| URL | String | – | URL to be navigated. If provided Navigation just opens that URL in a new browser tab. | ||||||||||||
Now it’s time to test your work. You can preview your extension to see how it looks and functions. After you’re satisfied with the results, you can deploy your extension to make it available for use.
Additional examples for navigating to specific pages or URLs
Navigate to a SR edit page from the Service Center landing page
"parameters": {
   "id": "application:svcNavigation",
   "params": {
   "page": "edit",
   "pageParams": {"srNumber":"{{$chain.variables.puid}}"},
   "key": "{{ $chain.variables.puid }}",
   "tabInfo": {
   "label": "{{ $chain.variables.records[$chain.variables.currentIndex].Title ?   $chain.variables.records[$chain.variables.currentIndex].Title : $chain.variables.puid }}"
    }
    }
 }
Navigate to a particular URL
payload: {
URL : ‘https://www.oracle.com‘
},
tabInfo:{
extraAttributes : {
openInBrowserTab : true
}
}
Thanks, Edson