The Proofread Agent feature in Oracle B2C Service leverages AI-driven services to help agents deliver clear, professional, and grammatically accurate responses to customers. Administrators can configure the Proofread Agent feature to provide AI-based suggestions from various Generative AI services, including Oracle OCI GEN AI Chat, Azure Open AI, or any REST API generative AI service. The Proofread Agent is available in the BUI JUNE II release, available on non-production sites June 06, 2025 and on production sites June 27, 2025.
How Proofread Agent works?
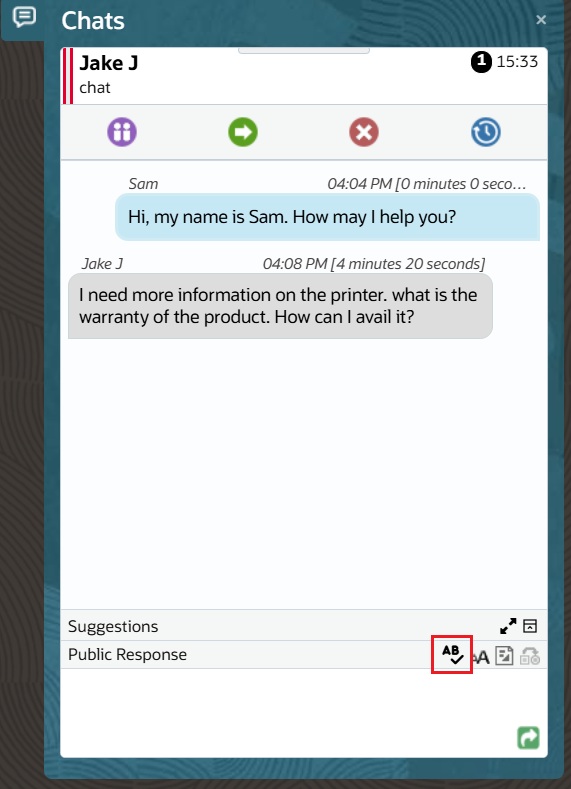
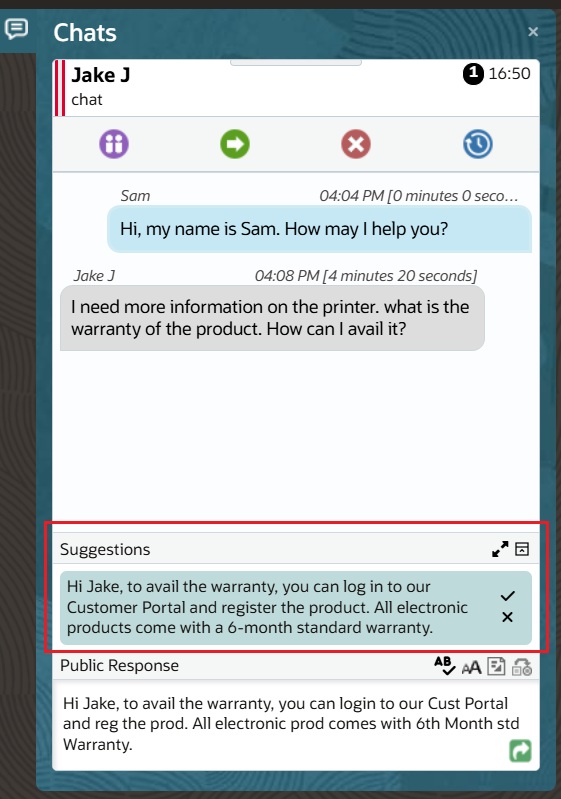
Agents can access Proofread Agent directly within the Public Response toolbar. After composing a message, clicking the “Proofread” button provides AI-generated improvements, displayed in a suggestion panel above the response box.
- Accept a suggestion: Click the checkmark to replace the response with the AI-suggested revision
- Dismiss a suggestion: Click the cross-mark to keep the original message
- Flexible UI options: Undock and reposition the suggestion panel within the Browser UI for convenience
Customize Proofread Agent for your Business Needs
Proofread Agent supports Oracle’s “Bring Your Own” AI approach, allowing businesses to fine-tune AI prompts for tailored improvements. Whether adjusting grammar corrections, preserving product names, or ensuring a polite tone, administrators have full control over AI configurations to match their unique communication standards.
Get Started with Proofread Agent Today!
Proofread Agent is available as part of the B2C Service 25C release, helping agents communicate more effectively and professionally. To learn how to enable and configure this feature, check out Answer 13008 : Requirements to configure Proofread Agent for Chat in the Browser User Interface.
How to configure Proofread Agent for Chat
This section provides information on how to configure the Chat Proofread Agent feature with the following data sources:
3. Others
External Objects & Integration Configuration
An External Objects Connection is required for connecting the Proofread Agent feature with sources like OCI Generative AI, Azure Open AI or Other REST endpoints. Follow the steps in this documentation to configure the External Object Connection.
- Within the Browser UI
- Navigate to Administration > External Objects & Integrations
- External Object Home Page will list all existing connections
- To configure the Proofread Agent endpoint, create a new External Object connection. If you plan to test multiple AI service providers with this feature (e.g., OCI Generative AI, Azure Open AI), each provider requires a unique endpoint. Therefore, you must create a separate External Object connection for each AI service.
- Select “Add New” for creating a new External Object Connection. Provide the API endpoints of the service provider and include the necessary authentication details. Ensure that you add the required headers or query parameters as specified by your service provider.
- OCI Gen AI Chat:
The base url for OCI Gen AI connection can be formed by appending the inference API url with the chat endpoint.
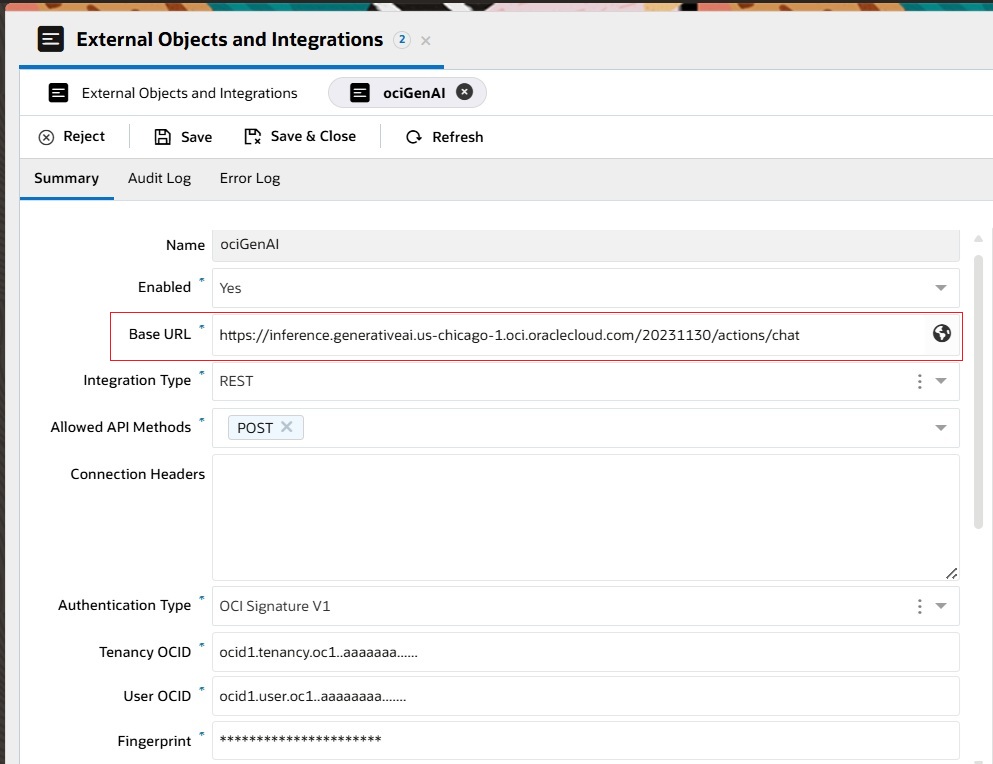
OCI GenAI Chat External Object Connection - Azure Open AI:
The base url and api-key can be obtained from the deployment section in Azure Open AI foundry portal.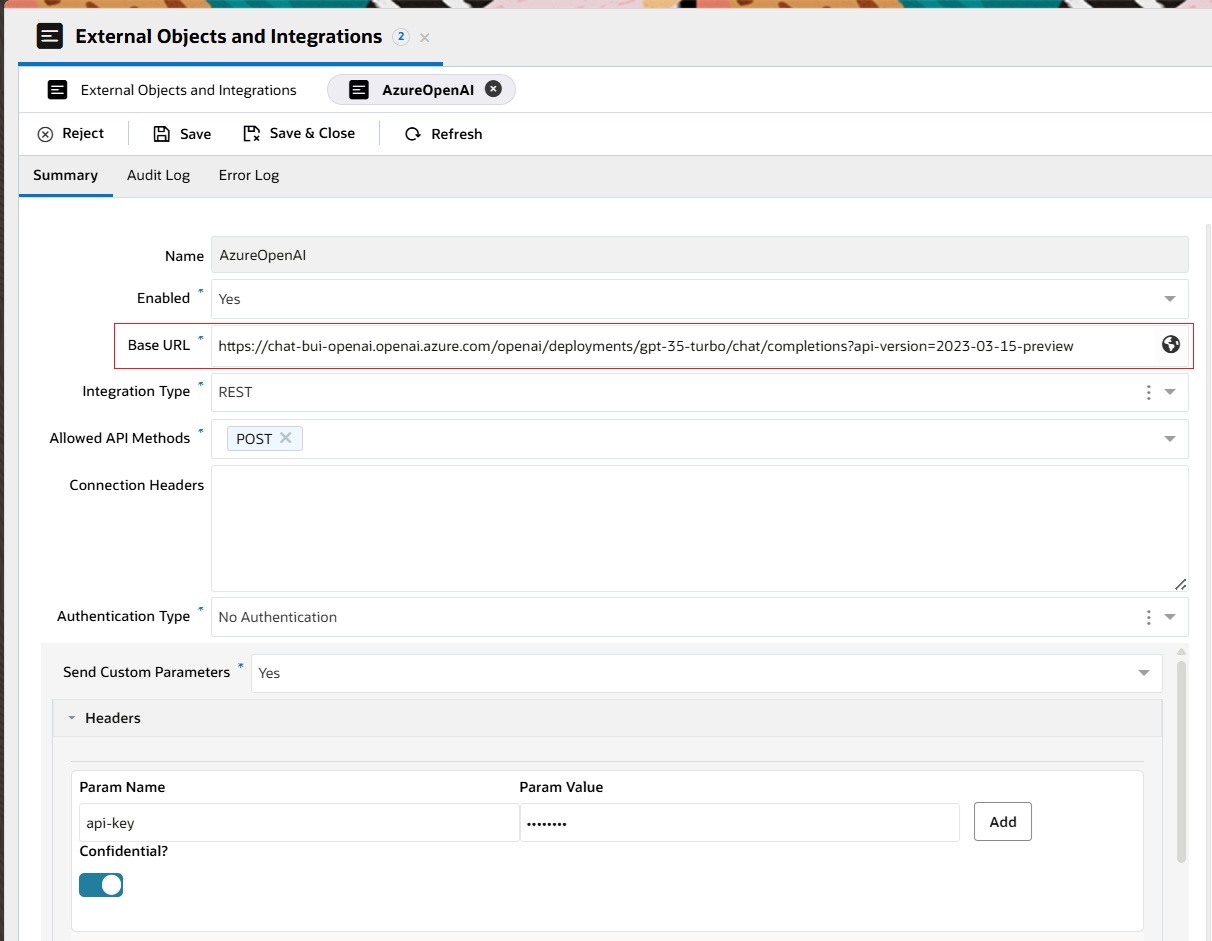
Azure Open AI External Object Connection
- OCI Gen AI Chat:
- Save the changes
1. OCI Gen AI Chat
OCI Generative AI is a fully managed Oracle Cloud Infrastructure service that provides a set of state-of-the-art, customizable large language models (LLMs) that cover a wide range of use cases. Common use cases include chat, text generation, summarization and creating text embeddings. OCI Generative AI supports Cohere and Meta models. Refer to OCI Generative AI documentation for more details.
Follow these steps to configure the Proofread Agent feature with an OCI Generative AI Cohere tenancy:
- Set-up an External Objects connection with your OCI Generative AI Cohere endpoint. Refer to the External Object Configuration documentation for more details
- Set-up the Proofread Agent connection for your chat agents
- Within the Browser UI
- Navigate to Administration > Live Chat Configuration > Proofread Agent
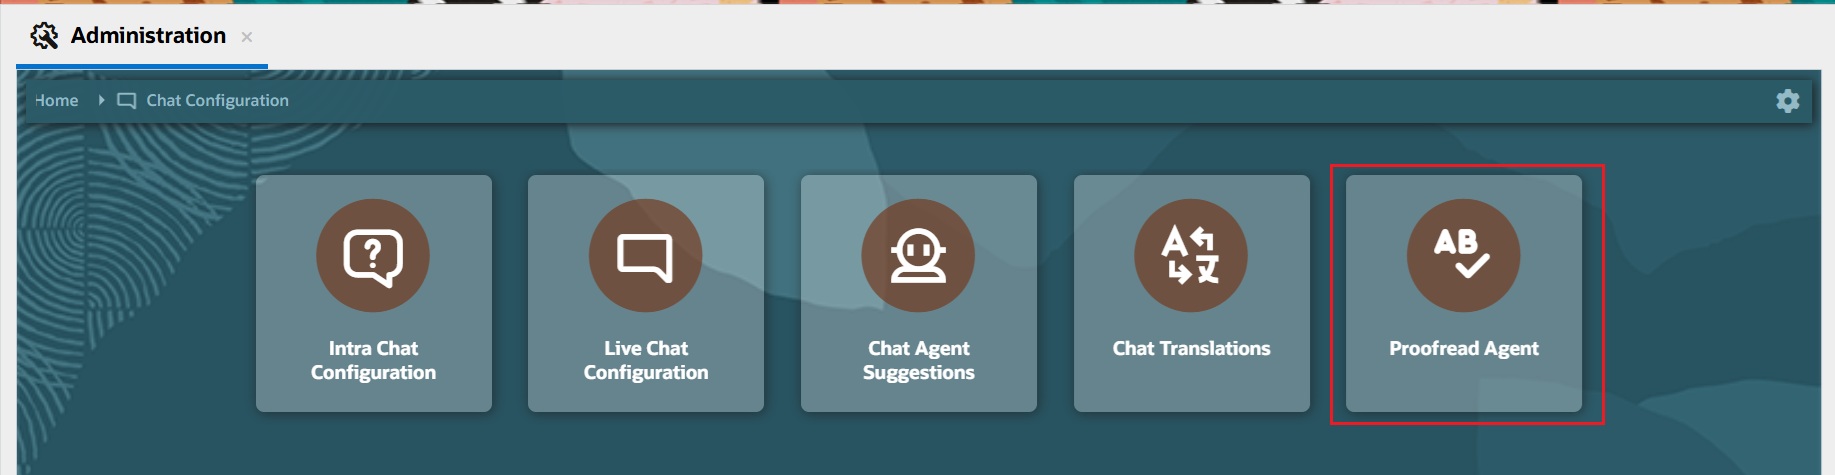
Proofread Agent Admin Tile
- The table for Proofread Agent shows a list of existing connections
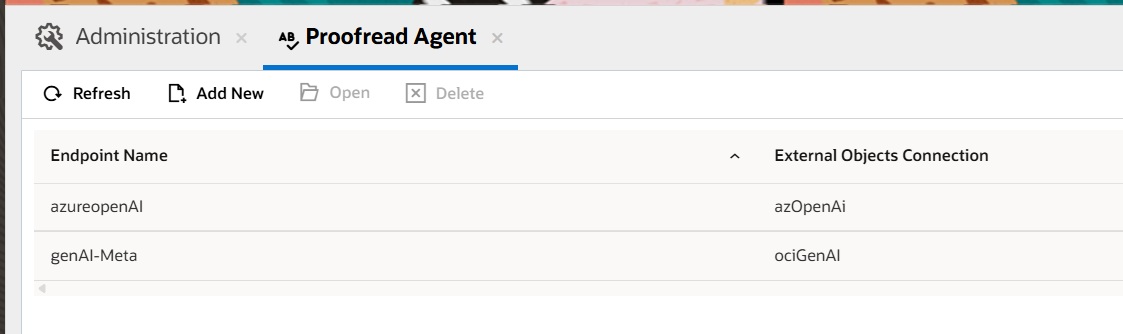
Proofread Agent Admin Configuration List - Select “Add New” to create a new connection
- Complete the following fields on the left side of the page for this connection:
- Name – Any meaningful name for the Proofread Agent connection.
- Provider – This refers to the AI service provider used to configure the Proofread Agent feature. The menu offers the following options: ‘OCI Gen AI Agent’, ‘OCI Gen AI Chat’, ‘Azure Open AI’, and ‘Other’. Select ‘OCI Gen AI Agent’ from the menu.
- Connection – This menu displays all the ‘External Object & Integration’ connections saved in the interface.
- Created – This auto-populated field displays the time when the connection was created.
- Notes – Enter any relevant notes for the connection.
- Created By – This auto-populated field shows the name of the administrator who created the Proofread Agent connection.
- Updated – This auto-populated field shows the time when the Proofread Agent connection was last updated.
- Updated By – This auto-populated field displays the name of the administrator who last updated the Proofread Agent connection.
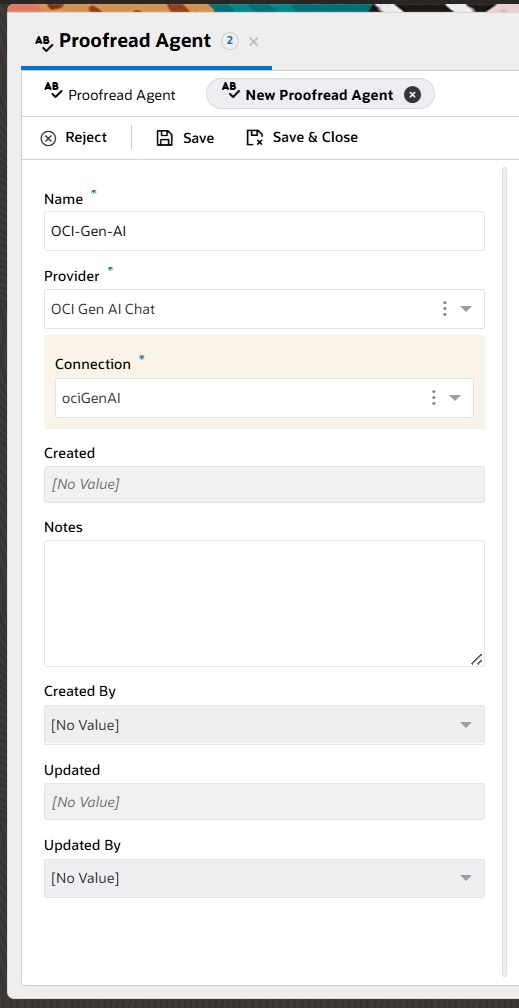
Proofread Agent Admin Left Side Panel
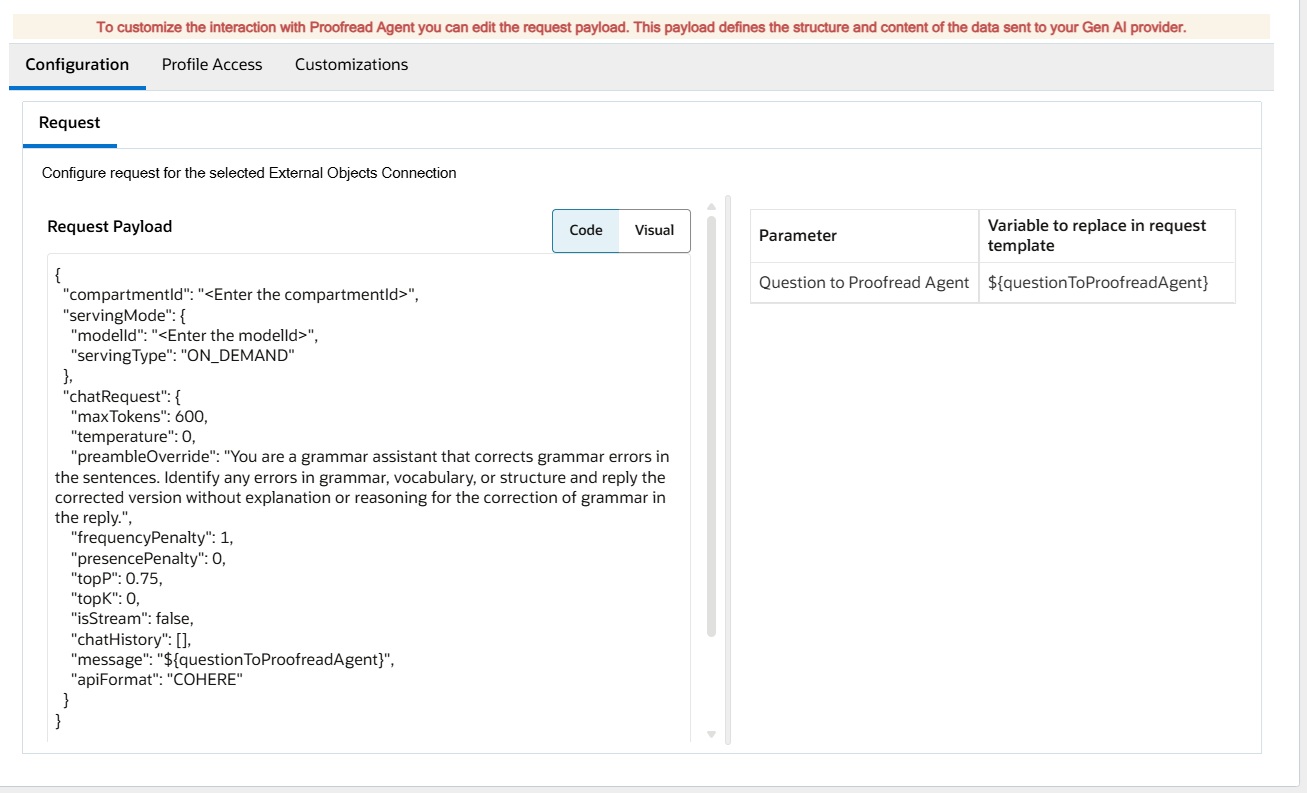
- Navigate to the Configurations tab, then Request:
- This tab allows the administrator to configure the request structure for the selected AI service connection. The request payload must be provided, which includes both ‘Code’ and ‘Visual’ views. In the ‘Code’ view, the administrator needs to copy and paste the request payload structure from the AI service API documentation they are using, which will be used to send requests from Oracle B2C Service Browser UI to the AI service API endpoint in runtime. For OCI Gen AI Chat, the request payload structure is pre-populated by default, but the administrator can modify it if necessary. On the right side, there is a mapping for ‘Parameter’ to ‘Variable to replace in request template,’ which the administrator can also adjust if needed. The administrator can adjust the prompt sent in the request payload to the AI service. The administrator can use the OCI Gen AI Playground to test the various parameters to best suite their usecase by referring to this OCI Gen AI Playground documentation.
- This tab allows the administrator to configure the request structure for the selected AI service connection. The request payload must be provided, which includes both ‘Code’ and ‘Visual’ views. In the ‘Code’ view, the administrator needs to copy and paste the request payload structure from the AI service API documentation they are using, which will be used to send requests from Oracle B2C Service Browser UI to the AI service API endpoint in runtime. For OCI Gen AI Chat, the request payload structure is pre-populated by default, but the administrator can modify it if necessary. On the right side, there is a mapping for ‘Parameter’ to ‘Variable to replace in request template,’ which the administrator can also adjust if needed. The administrator can adjust the prompt sent in the request payload to the AI service. The administrator can use the OCI Gen AI Playground to test the various parameters to best suite their usecase by referring to this OCI Gen AI Playground documentation.
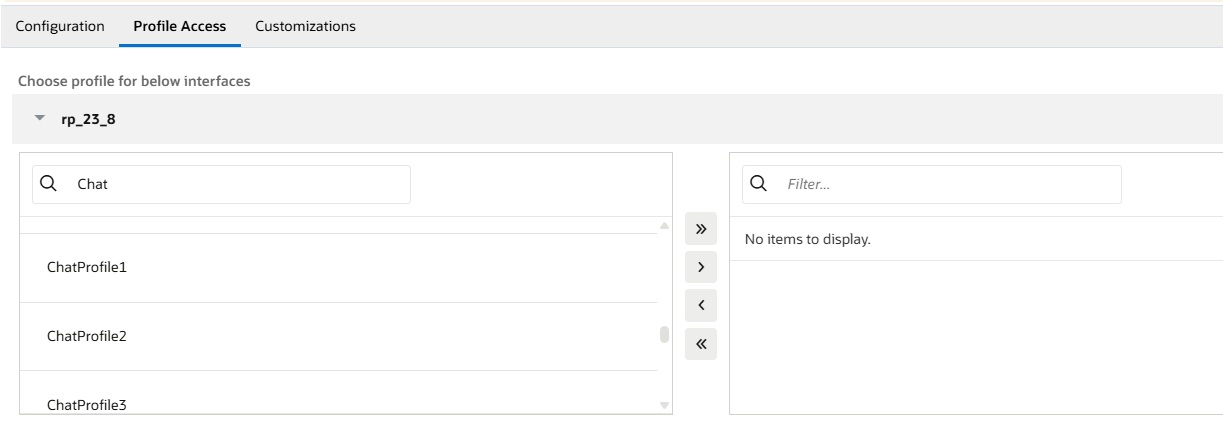
- Navigate to the Profile Access tab to assign profiles to this connection:
- In this section, the administrator must select and move the profiles to the right side for which agents need access to the configured Proofread Agent. The permission settings are applied per interface, meaning the administrator must assign permissions to the profiles for each individual interface. Please note that a single profile cannot have multiple Proofread Agent configurations within the same interface.
- In this section, the administrator must select and move the profiles to the right side for which agents need access to the configured Proofread Agent. The permission settings are applied per interface, meaning the administrator must assign permissions to the profiles for each individual interface. Please note that a single profile cannot have multiple Proofread Agent configurations within the same interface.
-
If desired, navigate to the Customizations tab to configure the following options:
-
Enrich Request Extensibility Action: The administrator can modify or perform operations on the questions that support agents ask the Proofread Agent feature through extensions. To do this, the administrator needs to create an extension and add the extension action name here. The extension must be uploaded to the site via Navigation -> Extension Manager, and the necessary permissions must be granted. This extension will be executed before the request is sent to the configured AI service.
-
Enrich Response Extensibility Action: The administrator can modify or perform operations on the response fetched from the AI service through extensions. To achieve this, the administrator must create an extension and specify the extension action name here. The extension needs to be uploaded to the site via Navigation -> Extension Manager, and the required permissions must be granted. This extension will be executed on the AI service’s response before it is displayed to the support agent in the Proofread Agent Suggestions panel.
-
- Save your changes.
2. Azure Open AI
Azure OpenAI Service provides REST API access to OpenAI’s powerful language models like GPT-4o, GPT-4o mini, GPT-4, GPT-3.5-Turbo etc. These models can be easily configured for the Agent Suggestions feature. Refer to Azure Open AI documentation for details
Follow these steps to configure the Proofread Agent feature with an Azure Open AI tenancy:
- Set-up an External Objects connection with your OCI Generative AI Cohere endpoint. Refer to the External Object Configuration documentation for more details
- Set-up the Proofread Agent connection for your chat agents
- Within the Browser UI
- Navigate to Administration > Live Chat Configuration > Proofread Agent
Proofread Agent Admin Tile
- The table for Proofread Agent shows a list of existing connections
- Select “Add New” to create a new connection
- Complete the following fields on the left side of the page for this connection:
- Name – Any meaningful name for the Proofread Agent connection.
- Provider – This refers to the AI service provider used to configure the Proofread Agent feature. The menu offers the following options: ‘OCI Gen AI Agent’, ‘OCI Gen AI Chat’, ‘Azure Open AI’, and ‘Other’. Select ‘Azure Open AI‘ from the menu.
- Connection – This menu displays all the ‘External Object & Integration’ connections saved in the interface.
- Created – This auto-populated field displays the time when the connection was created.
- Notes – Enter any relevant notes for the connection.
- Created By – This auto-populated field shows the name of the administrator who created the Proofread Agent connection.
- Updated – This auto-populated field shows the time when the Proofread Agent connection was last updated.
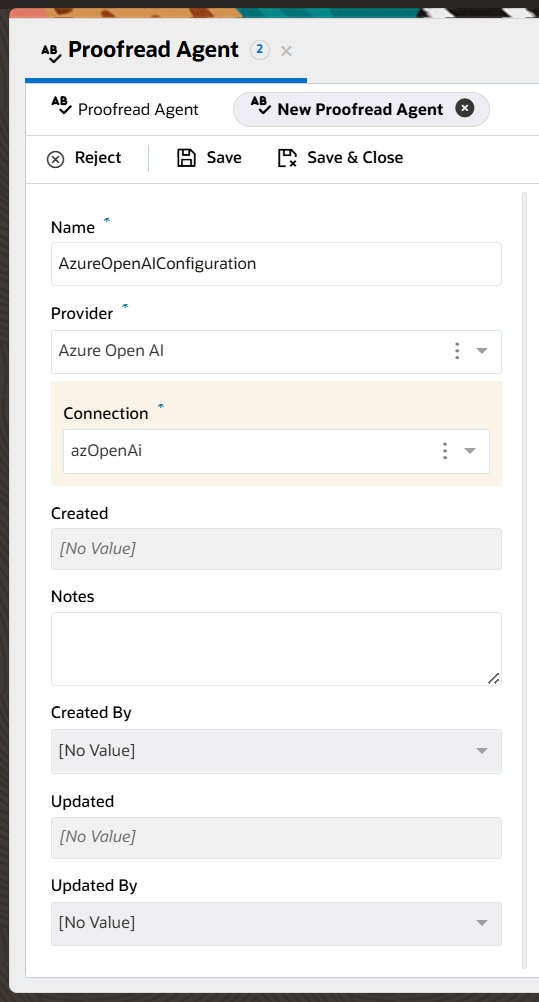
Proofread Agent Admin Left Side Panel
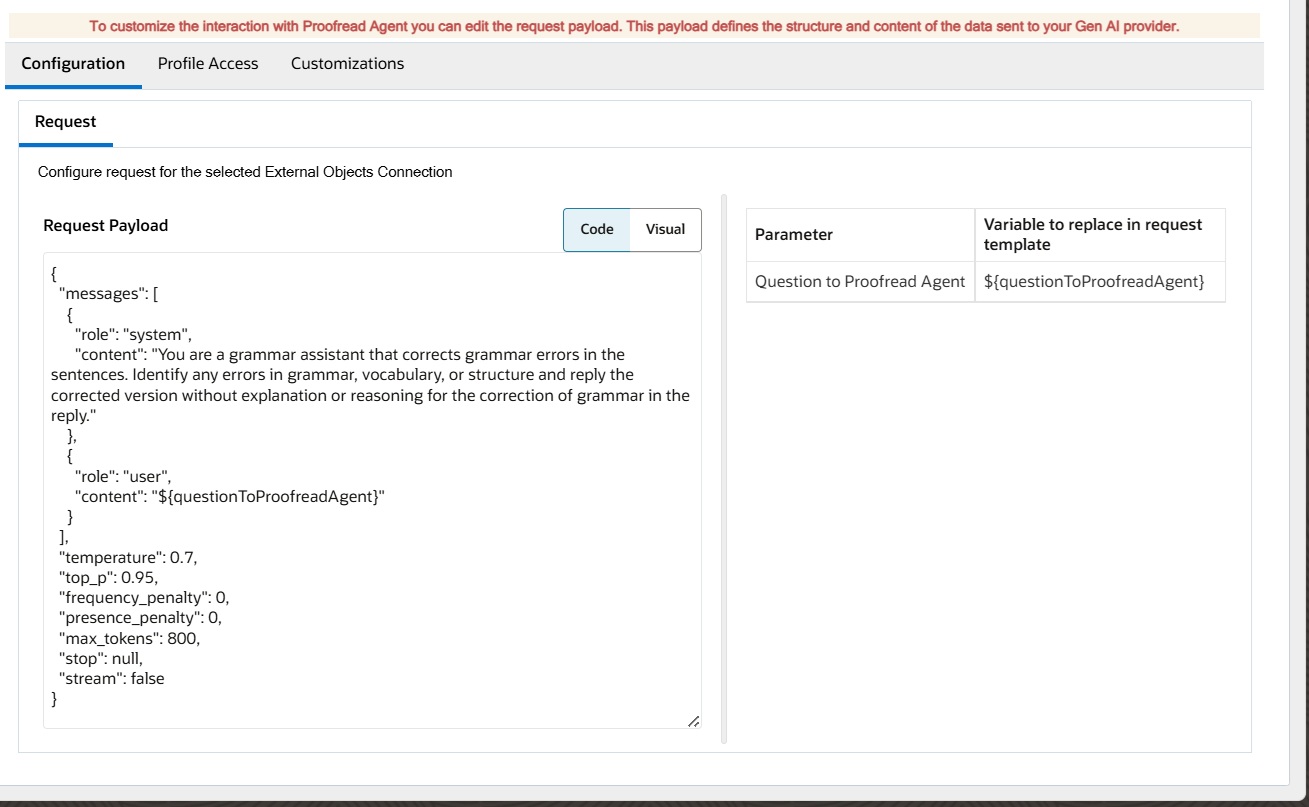
- Navigate to the Configurations tab, then Request:
- This tab allows the administrator to configure the request structure for the selected AI service connection. The request payload must be provided, which includes both ‘Code’ and ‘Visual’ views. In the ‘Code’ view, the administrator needs to copy and paste the request payload structure from the AI service API documentation they are using, which will be used to send requests from Oracle B2C Service Browser UI to the AI service API endpoint in runtime. For Azure Open AI, the request payload structure is pre-populated by default, but the administrator can modify it if necessary. On the right side, there is a mapping for ‘Parameter’ to ‘Variable to replace in request template,’ which the administrator can also adjust if needed. The administrator can adjust the prompt sent in the request payload to the AI service.
- This tab allows the administrator to configure the request structure for the selected AI service connection. The request payload must be provided, which includes both ‘Code’ and ‘Visual’ views. In the ‘Code’ view, the administrator needs to copy and paste the request payload structure from the AI service API documentation they are using, which will be used to send requests from Oracle B2C Service Browser UI to the AI service API endpoint in runtime. For Azure Open AI, the request payload structure is pre-populated by default, but the administrator can modify it if necessary. On the right side, there is a mapping for ‘Parameter’ to ‘Variable to replace in request template,’ which the administrator can also adjust if needed. The administrator can adjust the prompt sent in the request payload to the AI service.
- Navigate to the Profile Access tab to assign profiles to this connection:
- In this section, the administrator must select and move the profiles to the right side for which agents need access to the configured Proofread Agent. The permission settings are applied per interface, meaning the administrator must assign permissions to the profiles for each individual interface. Please note that a single profile cannot have multiple Proofread Agent configurations within the same interface.
- In this section, the administrator must select and move the profiles to the right side for which agents need access to the configured Proofread Agent. The permission settings are applied per interface, meaning the administrator must assign permissions to the profiles for each individual interface. Please note that a single profile cannot have multiple Proofread Agent configurations within the same interface.
-
If desired, navigate to the Customizations tab to configure the following options:
-
Enrich Request Extensibility Action: The administrator can modify or perform operations on the questions that support agents ask the Proofread Agent feature through extensions. To do this, the administrator needs to create an extension and add the extension action name here. The extension must be uploaded to the site via Navigation -> Extension Manager, and the necessary permissions must be granted. This extension will be executed before the request is sent to the configured AI service.
-
Enrich Response Extensibility Action: The administrator can modify or perform operations on the response fetched from the AI service through extensions. To achieve this, the administrator must create an extension and specify the extension action name here. The extension needs to be uploaded to the site via Navigation -> Extension Manager, and the required permissions must be granted. This extension will be executed on the AI service’s response before it is displayed to the support agent in the Proofread Agent Suggestions panel.
-
-
Save your changes.
3. Other (REST Endpoints)
In addition to the providers mentioned above, the Proofread Agent feature for chat can integrate with any AI REST endpoint. To enable proofreading, the REST endpoint must be configured as an External Object.
Follow these steps to configure the Proofread Agent feature with ‘Other’ (REST endpoint):
- Set-up an External Objects connection with your OCI Generative AI Cohere endpoint. Refer to the External Object Configuration documentation for more details
- Set-up the Proofread Agent connection for your chat agents
- Within the Browser UI
- Navigate to Administration > Live Chat Configuration > Proofread Agent
Proofread Agent Admin Config Tile
- The table for Proofread Agent shows a list of existing connections:
- Select “Add New” to create a new connection.
- Complete the following fields on the left side of the page for this connection:
- Name – Any meaningful name for the Proofread Agent connection.
- Provider – This refers to the AI service provider used to configure the Proofread Agent feature. The menu offers the following options: ‘OCI Gen AI Agent’, ‘OCI Gen AI Chat’, ‘Azure Open AI’, and ‘Other’. Select ‘Other‘ from the menu.
- Connection – This menu displays all the ‘External Object & Integration’ connections saved in the interface.
- Created – This auto-populated field displays the time when the connection was created.
- Notes – Enter any relevant notes for the connection.
- Created By – This auto-populated field shows the name of the administrator who created the Proofread Agent connection.
- Updated – This auto-populated field shows the time when the Proofread Agent connection was last updated.
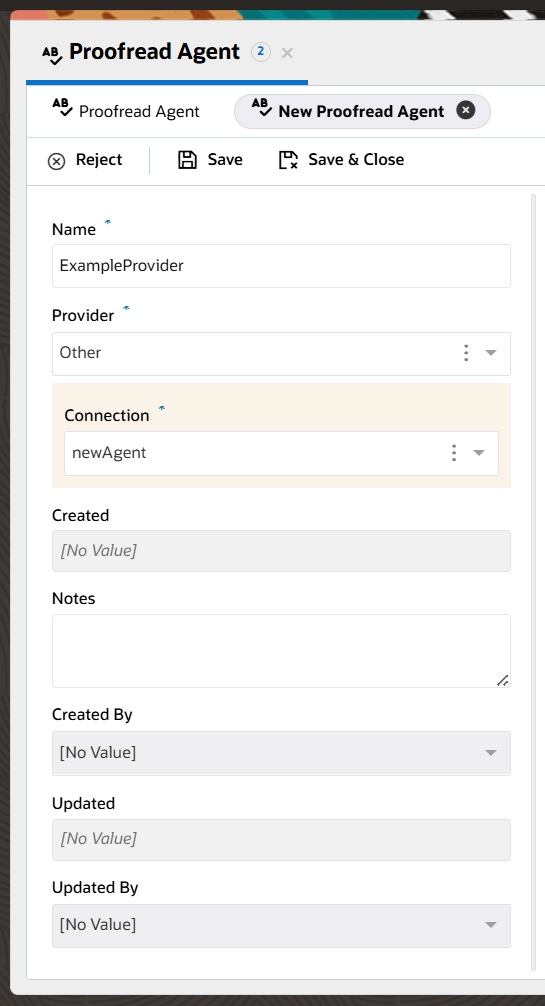
Proofread Agent Admin Left Side Panel
- Navigate to the Configurations tab
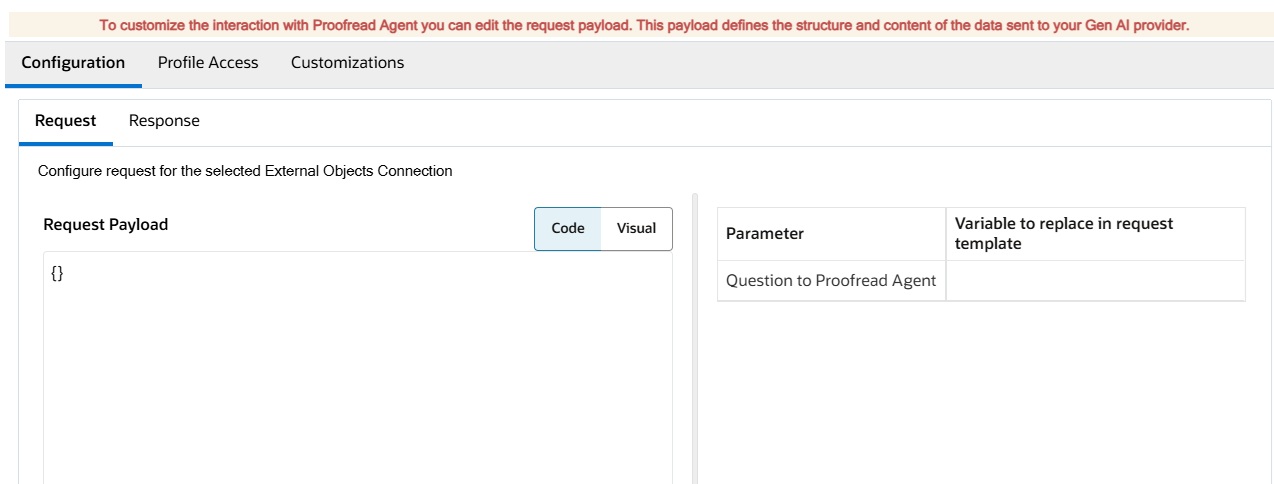
- Request: This tab allows the administrator to configure the request structure for the selected AI service connection. The request payload must be provided, which includes both ‘Code’ and ‘Visual’ views. In the ‘Code’ view, the administrator needs to copy and paste the request payload structure from the AI service API documentation they are using, which will be used to send requests from Oracle B2C Service Browser UI to the AI service API endpoint in runtime. For the “Other” type, the request payload structure is empty by default, and the administrator has to add the request payload for the corresponding provider. On the right side, there is a mapping for ‘Parameter’ to ‘Variable to replace in request template’, which the administrator has to add based on the response structure of the provider. The administrator can add the proofread prompt in the request payload to the AI service.
- Response: This applies only when the ‘Provider’ is set to ‘Other’. In this section, the expected response payload structure and the parameter-to-variable mapping from the AI service should be added.
- Navigate to the Profile Access tab to assign profiles to this connection:
- In this section, the administrator must select and move the profiles to the right side for which agents need access to the configured Proofread Agent. The permission settings are applied per interface, meaning the administrator must assign permissions to the profiles for each individual interface. Please note that a single profile cannot have multiple Proofread Agent configurations within the same interface.
- In this section, the administrator must select and move the profiles to the right side for which agents need access to the configured Proofread Agent. The permission settings are applied per interface, meaning the administrator must assign permissions to the profiles for each individual interface. Please note that a single profile cannot have multiple Proofread Agent configurations within the same interface.
-
If desired, navigate to the Customizations tab to configure the following options:
-
Enrich Request Extensibility Action: The administrator can modify or perform operations on the questions that support agents ask the Proofread Agent feature through extensions. To do this, the administrator needs to create an extension and add the extension action name here. The extension must be uploaded to the site via Navigation -> Extension Manager, and the necessary permissions must be granted. This extension will be executed before the request is sent to the configured AI service.
-
Enrich Response Extensibility Action: The administrator can modify or perform operations on the response fetched from the AI service through extensions. To achieve this, the administrator must create an extension and specify the extension action name here. The extension needs to be uploaded to the site via Navigation -> Extension Manager, and the required permissions must be granted. This extension will be executed on the AI service’s response before it is displayed to the support agent in the Proofread Agent Suggestions panel.
-
-
Save your changes.
Now, you can thoroughly test the Proofread Agent feature for Chat within the Browser UI.