Introduction
This is the second in a series of blogs that detail how to setup and use a LAMP Stack that makes use of MySQL HeatWave in the Oracle Cloud.
-
Part 1 sets the scene by detailing what a LAMP stack is and what deployment options are available in the Oracle Cloud. It will also set out the architectural vision for the LAMP stack this series of blogs will build.
-
Part 2 (this part) will build the infrastructure (network, application server, database server) in the Oracle Cloud.
-
Part 3 will install and configure the remaining LAMP stack software.
-
Part 4 will install additional software to assist in developing web applications.
-
Part 5 will consider how to make the stack more scalable, available and secure.
This blog will start to implement the architectural vision discussed in part 1 by detailing the steps necessary to build the infrastructure.
Using the Oracle Cloud
To build the infrastructure you will both need an account and a tenancy within Oracle Cloud Infrastructure (OCI) account. If you do not have these, then please click here. Note the Oracle very often offers a free trial period which provides more than enough credits to complete the architecture described in this blog.
Compartments
In order to create the LAMP stack we must provide an environment within our tenancy. By default a tenancy comes with a root compartment. Compartments are logical structures that allow us to better manage and secure cloud resources.
It is quite possible to work entirely out of the root compartment but this is not considered best practice because it produces an environment where errors can easily be made and also makes tracking costs difficult. Therefore we will create a compartment in which we will group all the resources we need for our LAMP stack.
The follow steps detail how to create a compartment.
Step 1: Navigate to the Compartments page
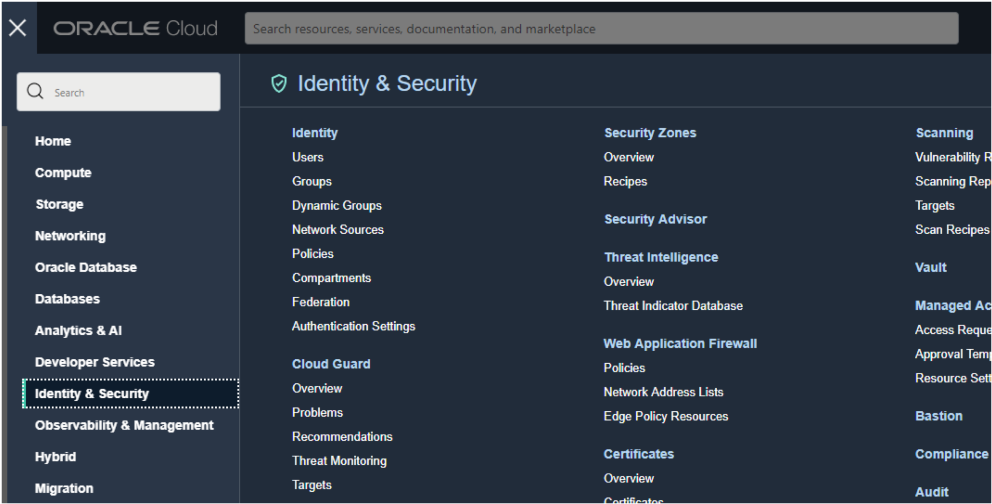
Log into OCI and then click on the main menu.

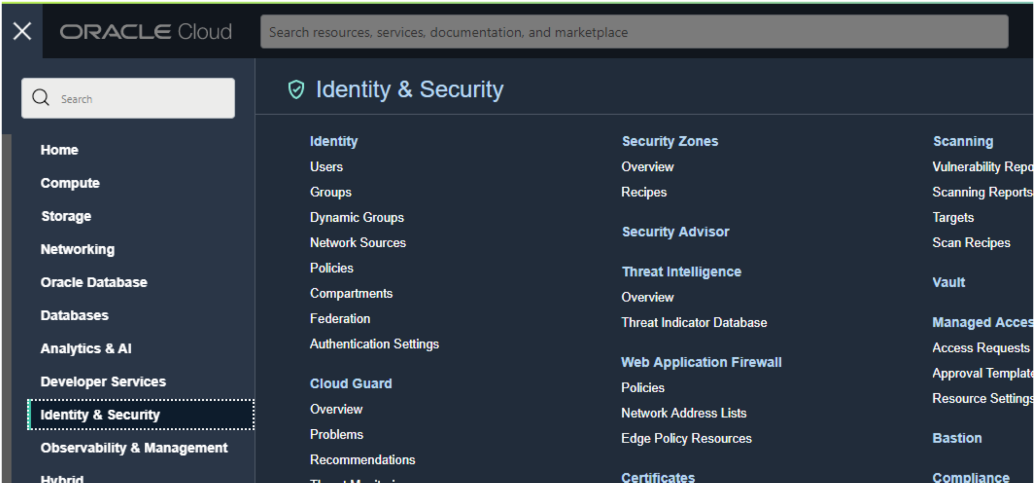
Select the Identity & Security menu item and then click on Compartments.
Step 2: Commence the creation of a compartment
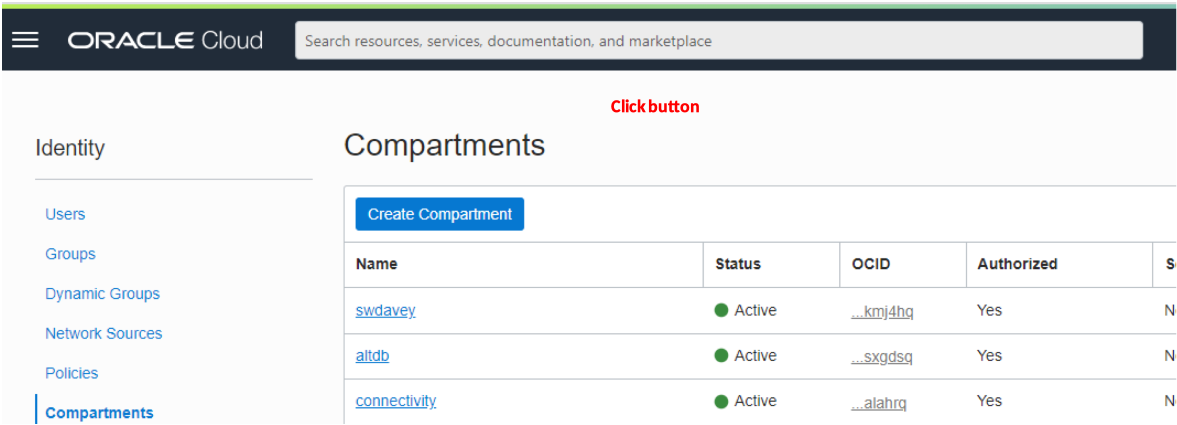
In the Compartments page click on the Create Compartment button.
Step 3: Complete the Create Compartment dialog
Give the compartment a name, e.g. lamp, and provide a description of what the compartment is to be used for.
Optionally provide a tag. It is not necessary to provide a tag for this project. However, tags can be useful, for example a compartment tag can be used to help track costs. For more details on tags please refer to https://docs.oracle.com/en-us/iaas/Content/Tagging/home.htm .
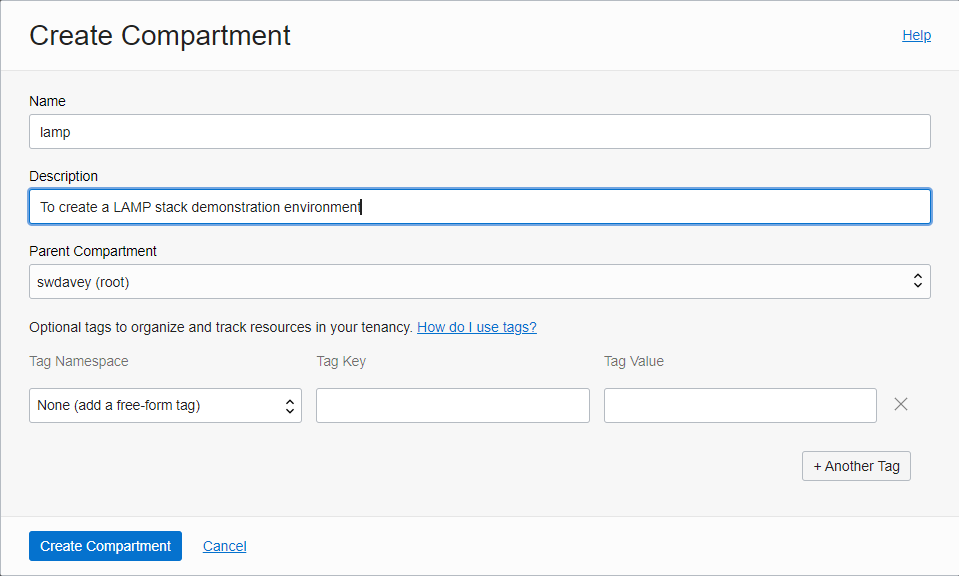
Click on the Create Compartment button. After a few seconds the Compartment should appear. If not, refresh the page until it does.
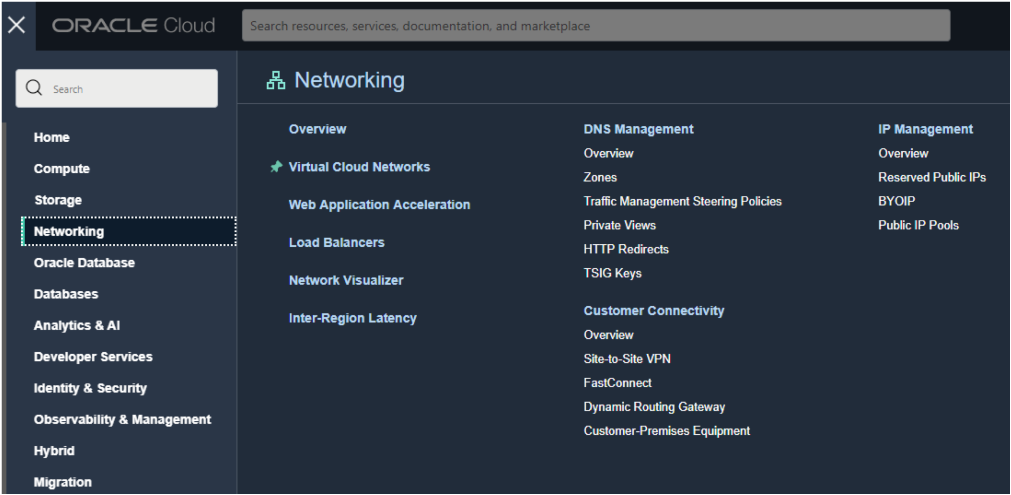
Networking
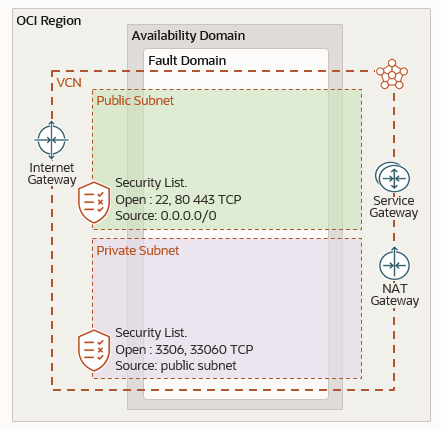
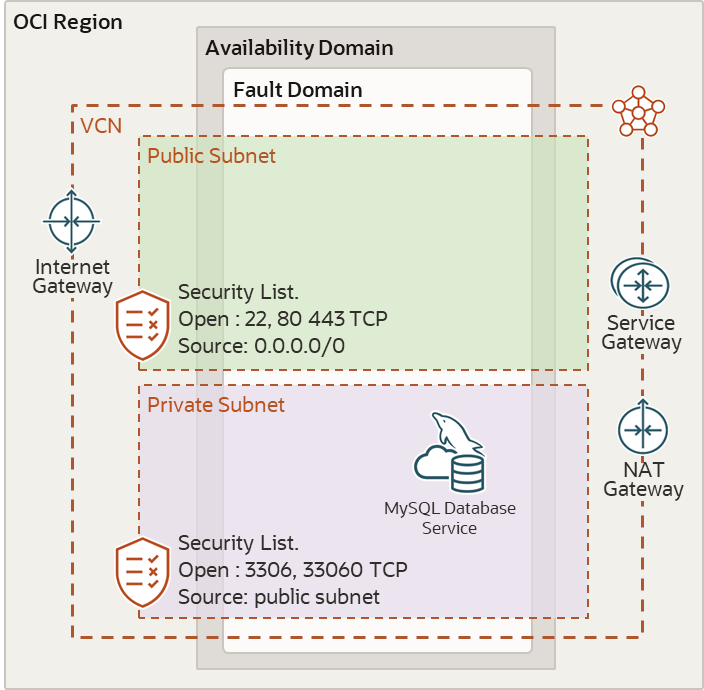
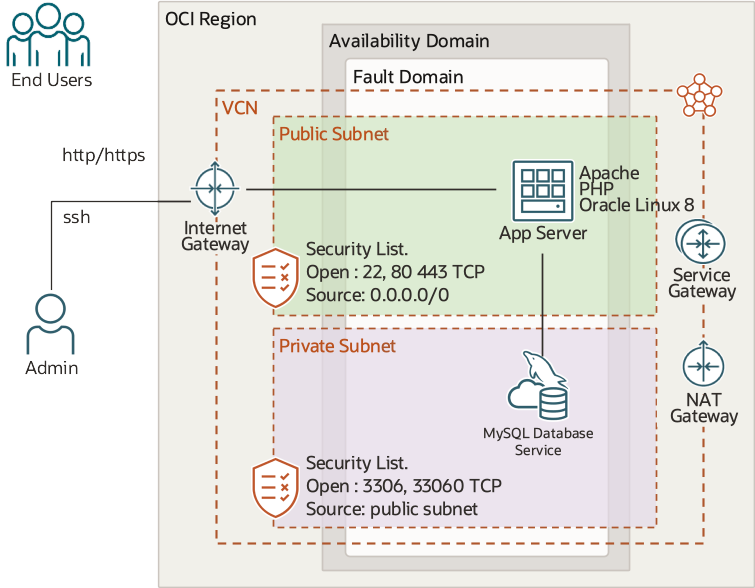
Now that we have created a compartment for our project’s resources we can start populating it by laying down our network infrastructure. The end state is shown in the drawing below. It may look complicated but it is very easy to reproduce given we will be using a wizard.
To create the network infrastructure, perform the following steps:
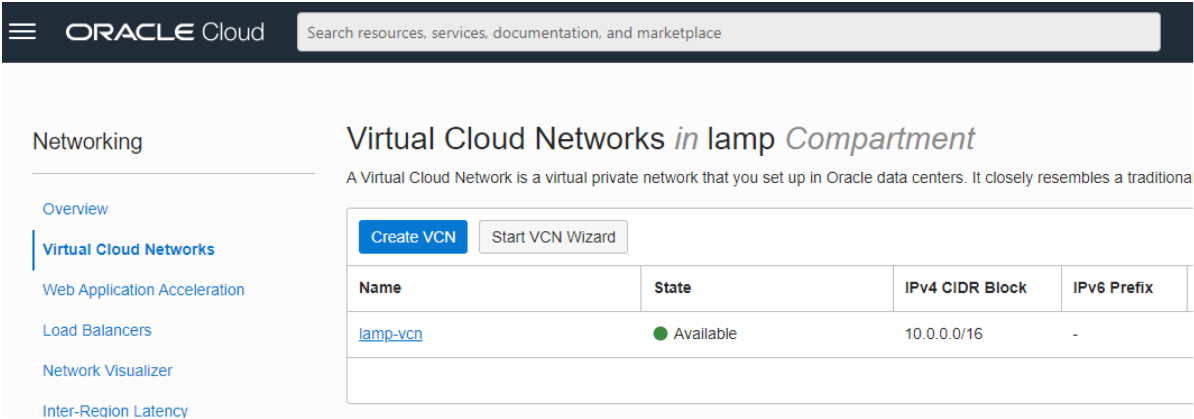
Step 1: In OCI navigate to the Virtual Cloud Networks page

Click on the main menu, then select the Networking menu item and then click on Virtual Cloud Networks.
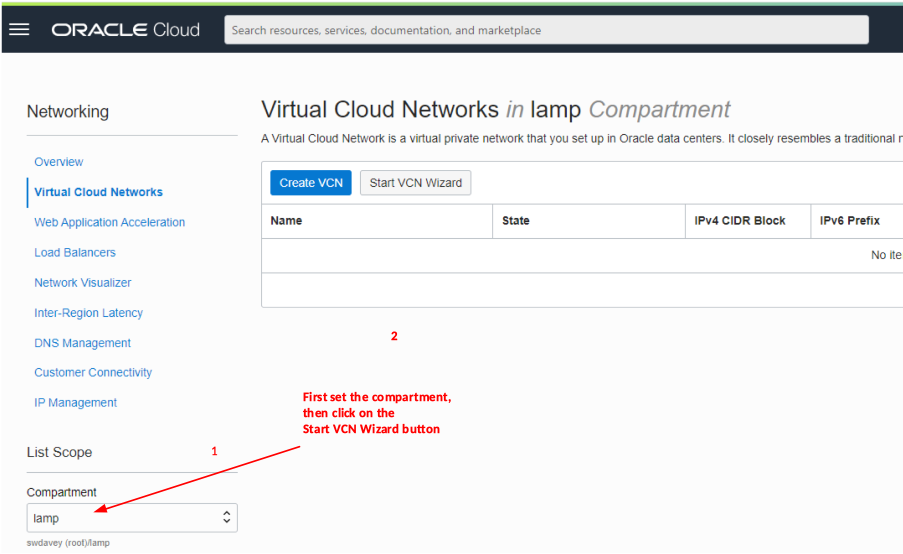
Step 2: Start the VCN Wizard
Firstly set the compartment to the lamp compartment (or whatever you called the compartment previously created. To do this use the Compartment drop down widget in the side bar (under List Scope). Once this has been set click on the Start VCN Wizard button.
Step 3: Create a VCN with the wizard

Make sure the Create VCN with Internet Connectivity radio button is selected, then click on the Start VCN Wizard button.
Step 4: Complete the VCN form
The following form should be displayed:
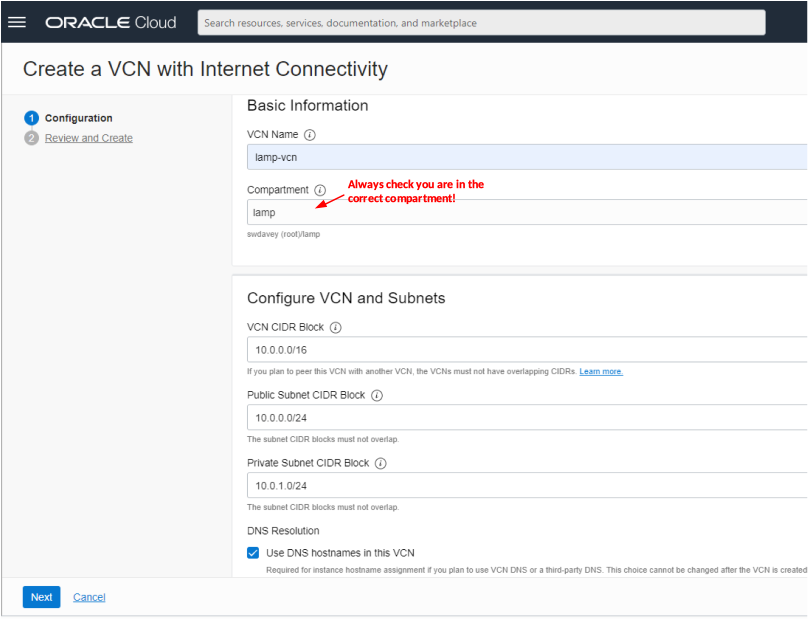
The only entry you need to make on this form is the name of the virtual cloud network to be created, e.g. lamp-vcn. You should also check that you are in the correct compartment (you should be if you set the compartment in step 2). All the other entries can be left at their defaults. If you do wish to change the network CIDR addresses from the “10” network shown then it is recommended that you use one of the other non-internet routable addresses 192.168.0.0/16 or 172.16.0.0 – remember to change the values for the public and private subnets accordingly. Click the Next button to bring up the next page of the form:
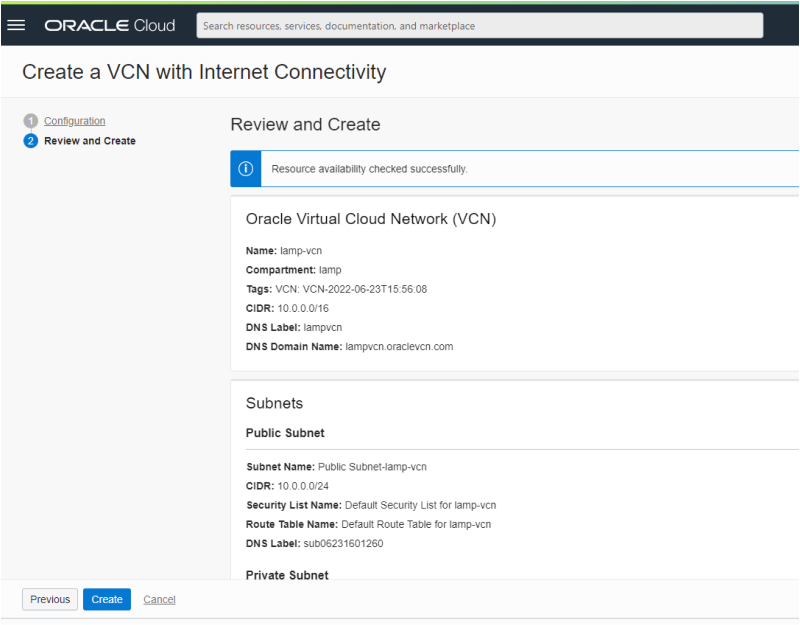
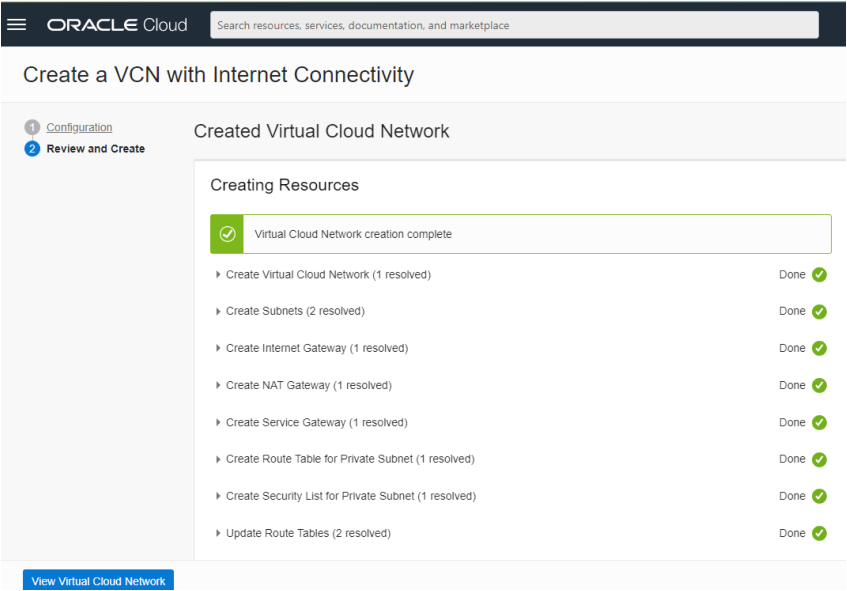
All you have to do on this form is scroll down and review its content. If everything is correct then click on the Create Button. OCI will now create your virtual cloud network. It takes about 10 seconds and you should see the following result:
The Virtual Cloud Network needs some further configuration:
-
update the public subnet’s security list to allow http and https traffic.
-
update the private subnet’s security list to allow MySQL database traffic over both the traditional MySQL protocol and the new X protocol.
Begin this work by clicking on the View Virtual Cloud Network button and then follow step 5.
Step 5: Open ports 80 (http) and 443 (https) on the public subnet’s security list
The page for the Virtual Cloud Network should now be displayed:

Click on the Public Subnet link in order to display the page detailing the Public Subnet. This page will detail the Security Lists that are associated with the Public Subnet :
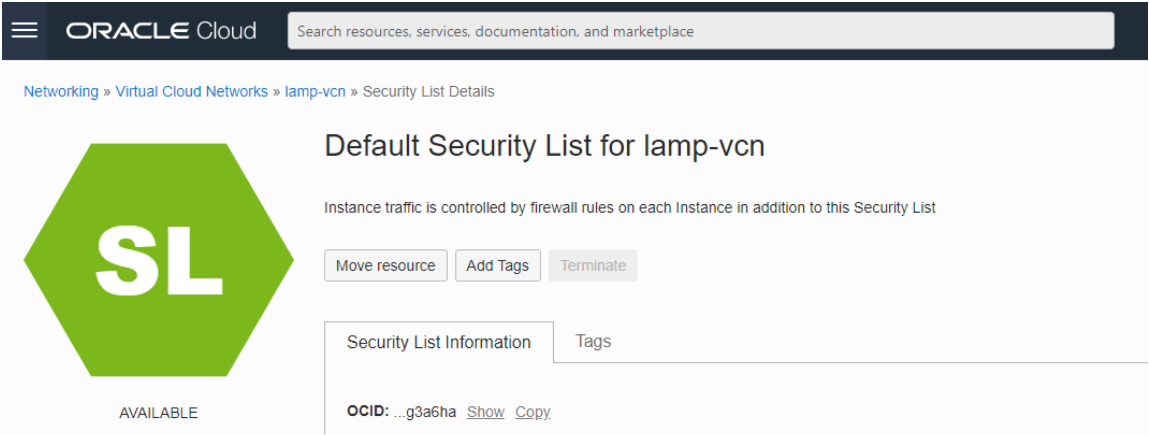
Given the Public Subnet was recently created by the VCN wizard it will only have one security list associated with it, the VCN’s default security list. The default security list is used by the public subnet because the VCN wizard did not create a security list specifically for it.
If our architecture demanded multiple public subnets within the VCN then it would probably make sense to create a bespoke security list for our subnet so that we could be more granular in applying or security decisions. However, our architecture only requires one public subnet and so we will continue to use it. To that end we will open up the security list to allow http and https traffic into it. Click on the Default Security List link in order to bring up the Security List’s page:
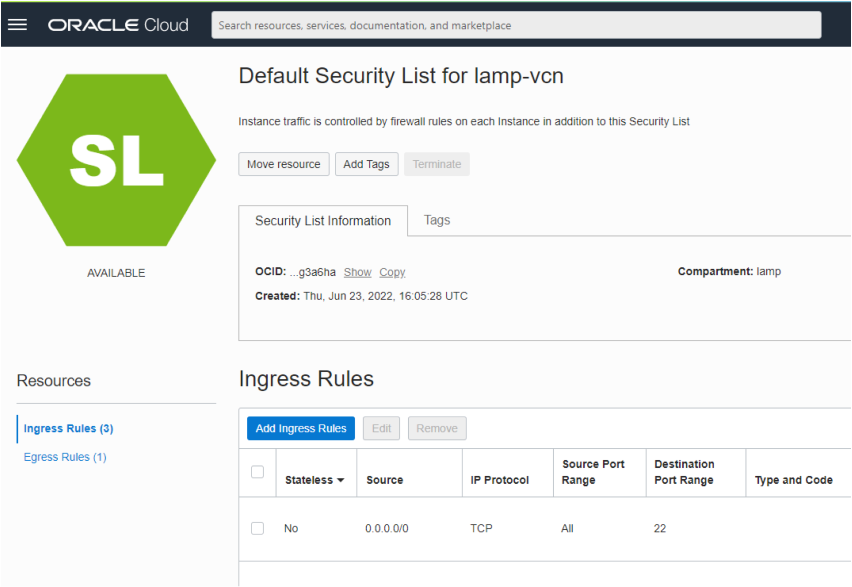
The first point to note is that a number of ingress rules for TCP and ICMP already exist. The figure above shows port 22 open to TCP traffic from anywhere on the internet (source is 0.0.0.0/0). This rule allows us to log into compute instances (virtual machines, bare metal hosts) using SSH. To add rules for http and https traffic click on the Add Ingress Rules button and complete the dialog as shown below:
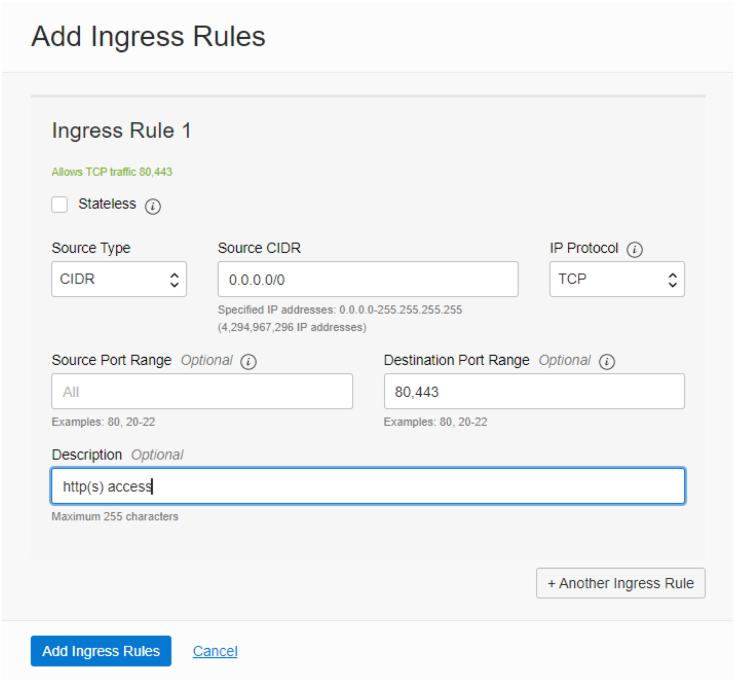
A source CIDR of 0.0.0.0/0 allows requests from anywhere on the internet. The http and https protocols are built on TCP so leave the IP Protocol at its default setting, then add ports 80 and 443 (defaults for http and https respectively) into the Destination Port Range. Note these port values must be separated by a comma and there must be no whitespace between them. Optionally provide a description and then click on the Add Ingress Rules button. The Security List page will be re-displayed and the rules for http and https will be apparent.
By default all types of outbound traffic (egress) are permitted and so there is no need to perform any further edits on the public subnet’s security list.
Step 6: Open ports 3306 (MySQL) and 33060 (MySQL X) on the private subnet’s security list
Navigate back to the VCN’s page. Either use the main menu or click on the link in the current page as shown below:
You should now be on the Virtual Cloud Networks page for your compartment:
Click on the link to your VCN:
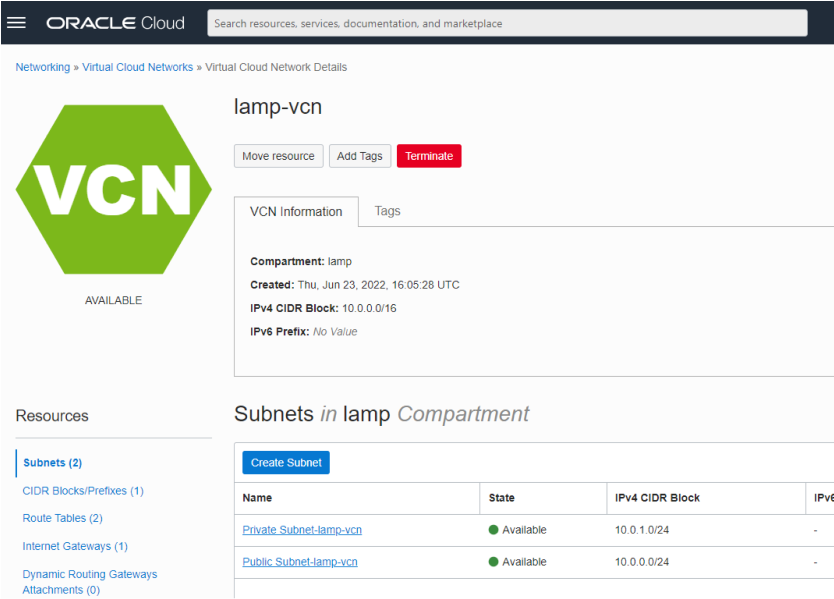
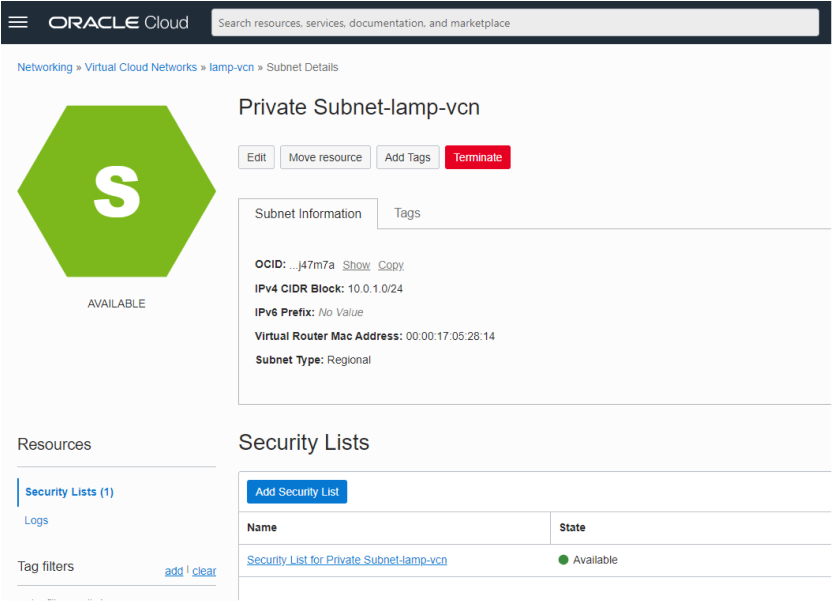
Now select the Private Subnet:
On your Private Subnet’s page select the Security List for your private subnet. Note that the VCN wizard created this and assigned it to the private subnet and in so doing disassociated it with the Default Security list. The Security List for the private subnet should be similar to that below:
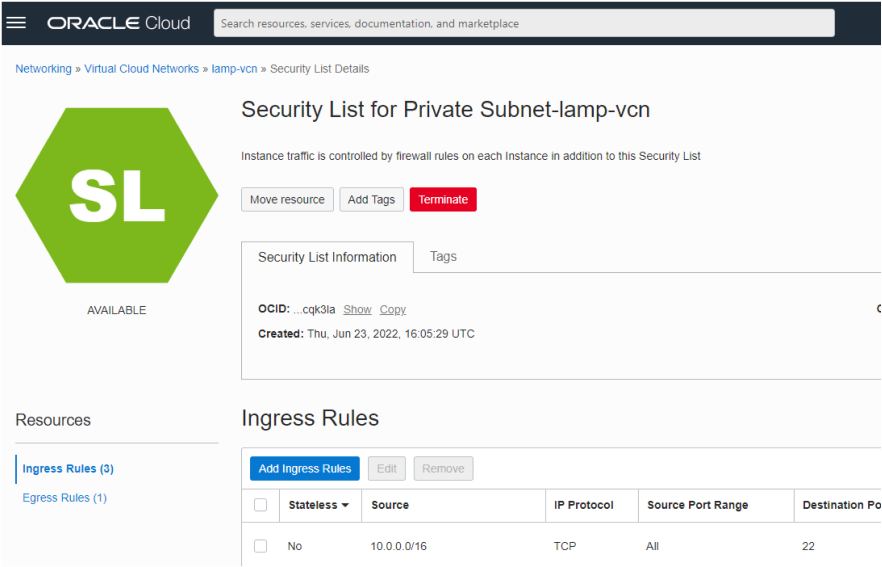
Note that the Security List has some open TCP and ICMP ports, but also note that the source network for SSH (port 22/TCP) is constrained to the VCN (10.0.0.0/16) and not wider (e.g. the internet, 0.0.0.0/0).
We need to allow MySQL traffic into the Private Subnet from the VCN’s Public Subnet, so click on the Add Ingress Rule button and create the rules using the dialog as shown below:
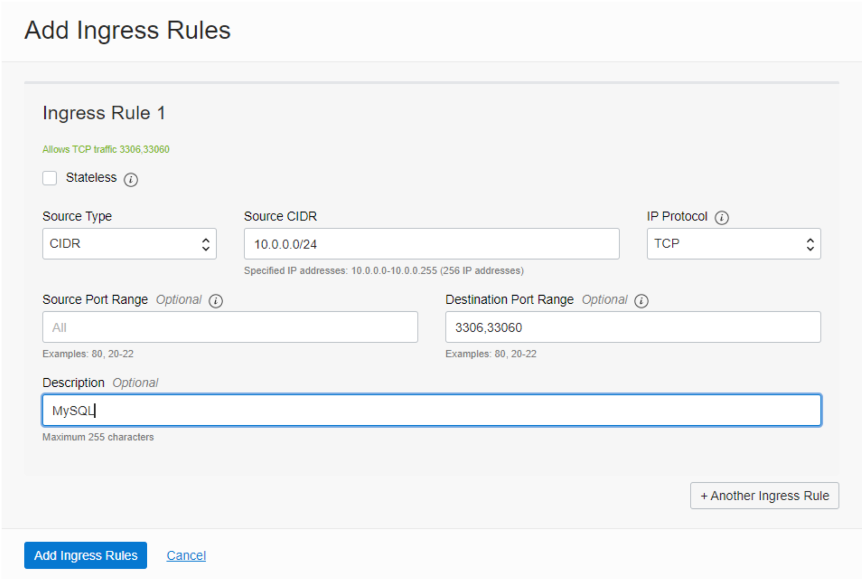
In the above dialog the Source CIDR is the same as the Public Subnet’s CIDR block, 10.0.0.0/24. The Destination Port range provides both the traditional MySQL protocol port (3306) and the new X protocol port (33060); a comma separates the two – there must be no whitespace.
Click on the Add Ingress Rules. The Security List page will update to show the new rules.
Networking is now complete.
MySQL Database Service
The next stage in building our LAMP stack is to create a MySQL Database Service endpoint in the Private Subnet, such that our architecture is the same as the diagram below.
To implement the MySQL Database Service complete the following steps:
Step 1: Navigate to the MySQL Database Service page:

Select the Databases menu item and then click on MySQL.
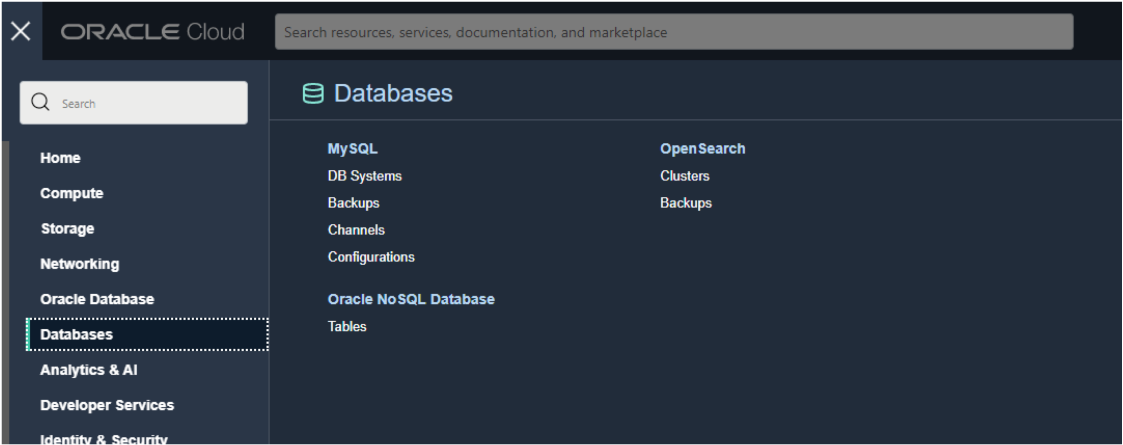
The following page should be displayed:

Assuming that you are in your new compartment, then you will be greeted with a prerequisite informational notice (as shown above). The message details three steps:
-
Create VCN/subnets
-
This we have already done in networking.
-
-
Create a Group
-
To use the MySQL Database Service a group of users (within your Oracle tenancy) must be authorized to perform tasks on the MySQL Database. For the purposes of this blog we will reuse the default Administrators group rather than creating a new group. If you own your tenancy then your user account should be assigned to the Administrators group. If you do not own the tenancy, then you will either need to work with your tenancy administrator to either add your account to this group or assign your account to a group that has the policies detailed in step 3.
-
-
Create Policies
-
The policies shown in the informational notice must be in place on either your compartment or a parent component (e.g. the tenancy’s root compartment). If you created a tenancy in order to complete this series of blogs then you will need to add these policies. If you are using a pre-existing tenancy then you should check whether any of your compartment’s parents have these in place. If they do not then you will need to implement them.
-
Step 2. Check or create MDS policies
The MDS Policy section details both how to create and check for the existence of an MDS policy.
If you have a new tenancy then you will need a MySQL Database Service policy in order to be able to use this service. Similarly, if you have an existing tenancy but have never deployed a MySQL Database Service, then you will also need this policy. In the following example the policy is located in the root compartment. By placing it in the root compartment all child compartments will inherit the policy. If you are neither a tenancy owner nor a member of the Administrators group then you may not be permitted to create this policy in the root compartment. In this case you will need to ask an administrator to perform this work for you.
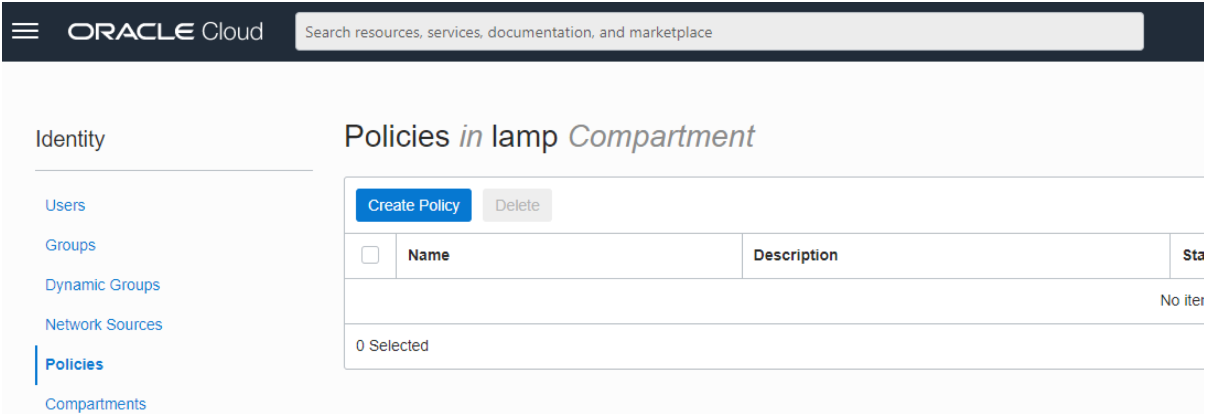
Step 2a: Navigate to Policies

From the main menu click on the Identity & Security menu item and then click on Policies.
Step 2b: Create the policy
Assuming you have been working through the stages in this blog you should be in the compartment where you are building the LAMP stack. This does not matter because you can change to the root compartment in the next slide.
Click on the Create Policy button. This will bring up the Create Policy form:
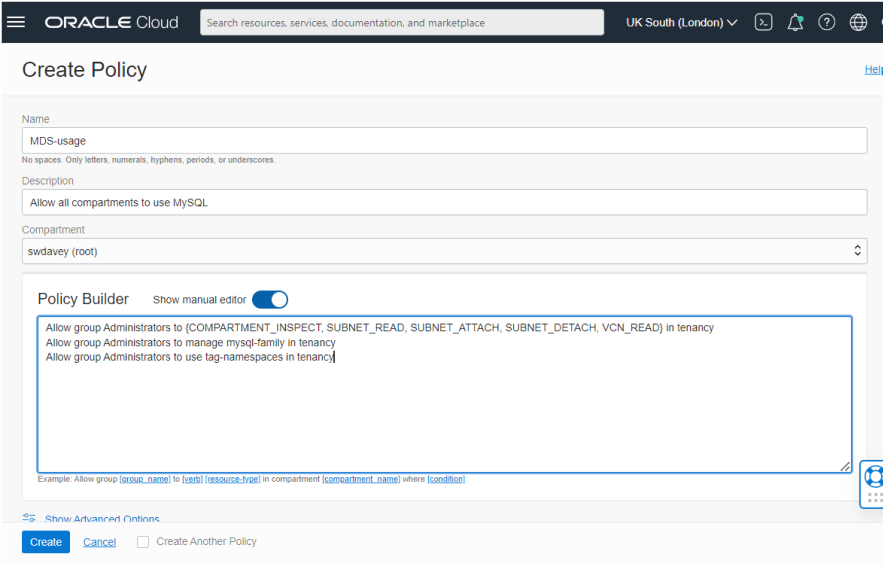
Complete the form as follows:
-
You must give the policy a name
-
You must give the policy a description
-
You need to change the compartment to the root compartment in order for your compartment to inherit the policy.
-
You need to set the Policy Builder to use the Manual Editor
Write these three policy lines into the editor:
Allow group Administrators to {SUBNET_READ, SUBNET_ATTACH, SUBNET_DETACH, VCN_READ, COMPARTMENT_INSPECT} in tenancy
Allow group Administrators to manage mysql-family in tenancy
Allow group Administrators to use tag-namespaces in tenancy
Click on the Create button.
Step 3. Create a MySQL Database Service instance
If necessary navigate back to the MySQL Database Service page as detailed in Step 1. It is likely that you will see the same informational notice regarding policies because you still have not populated the compartment with any MySQL Database instances.
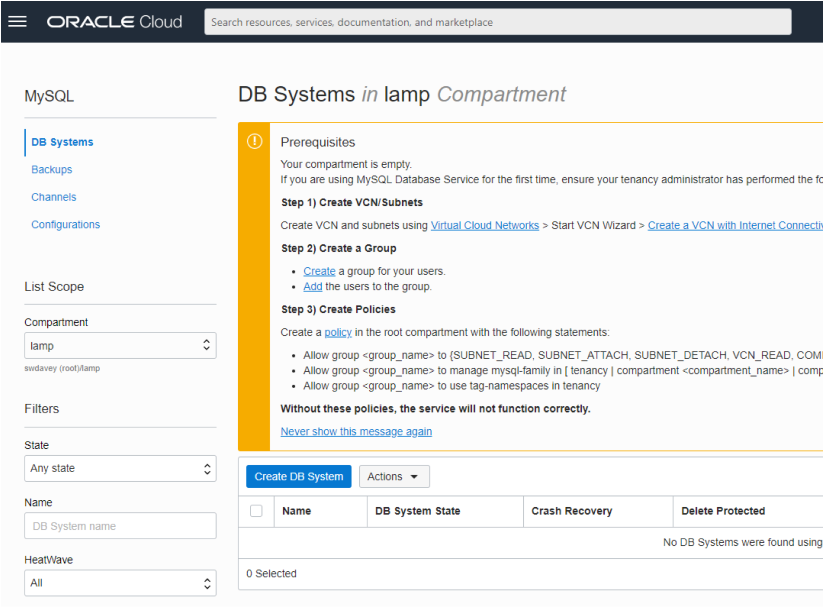
Make sure you are in the correct compartment (you may have changed compartment whilst either checking or creating your MDS policies). If you are not in the correct compartment then change by using the Drop Down list in the side bar (under List Scope).
Click on the Create DB System button.
Step 4. Complete the Create DB System form
The following page should now be apparent:
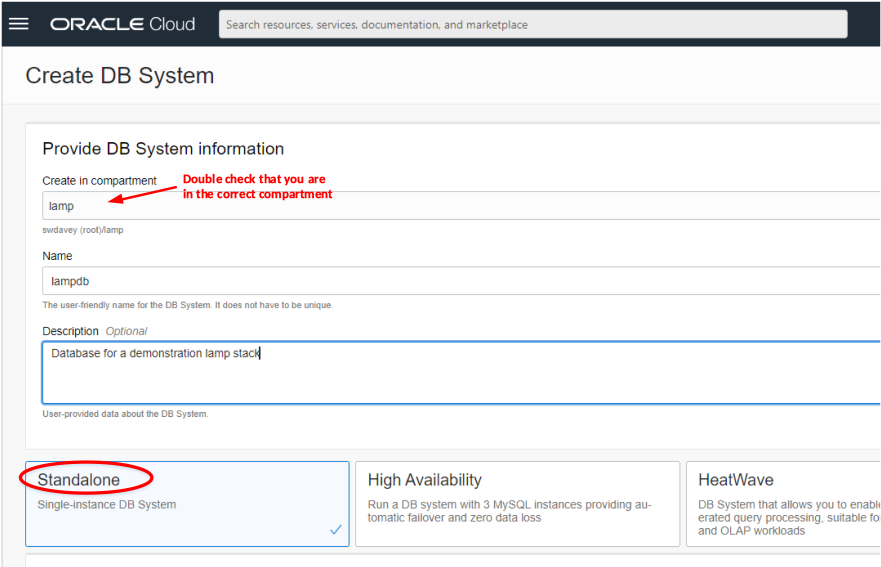
Make sure you are in the correct compartment, then give the MySQL Database Service instance a name. Optionally provide a description. By default the Standalone version will be selected, and this will be sufficient for our purposes. The next part of the form deals with the database administrator’s credentials:
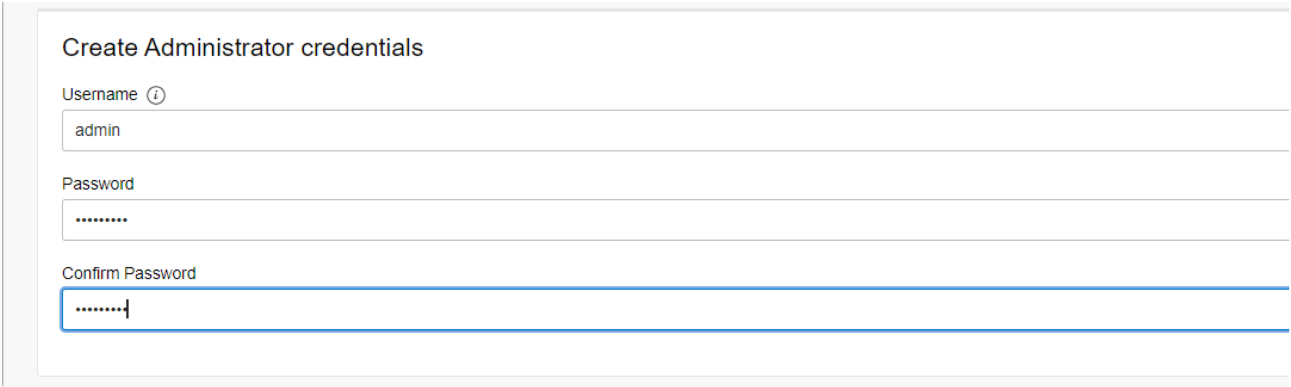
Provide a name and password – do not forget the password because it is not recoverable. The next section deals with networking and where the database will logically be installed:
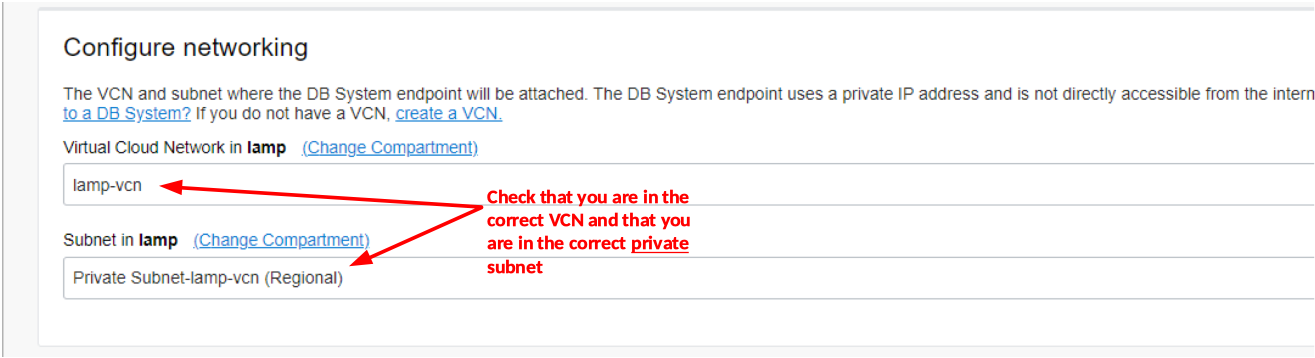
So long as you are using the correct compartment it is very likely that OCI will provide you with the correct VCN and private subnet. Check these items. If the VCN is not correct then recheck the compartment you are using.
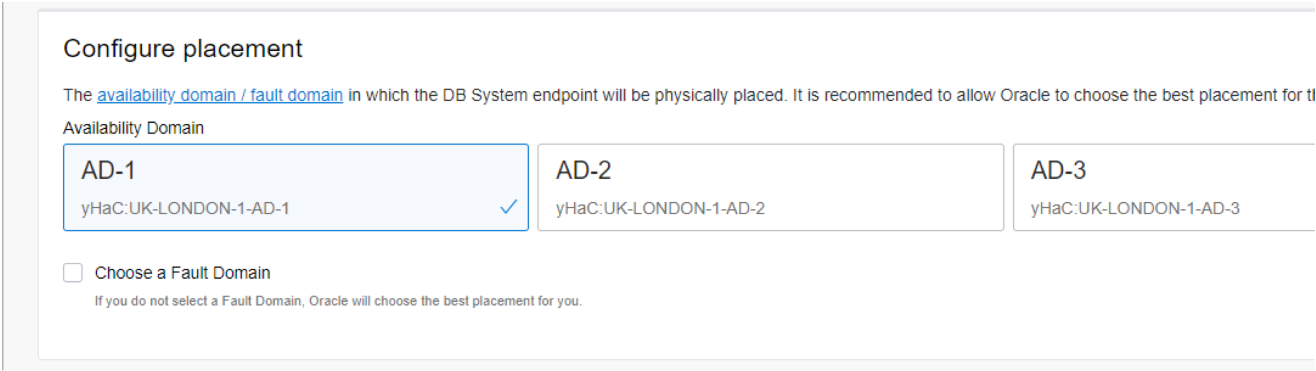
OCI will also select where the database service will be physically located. There should be no need or reason to change this. Note that for smaller regions only one availability domain will be available.
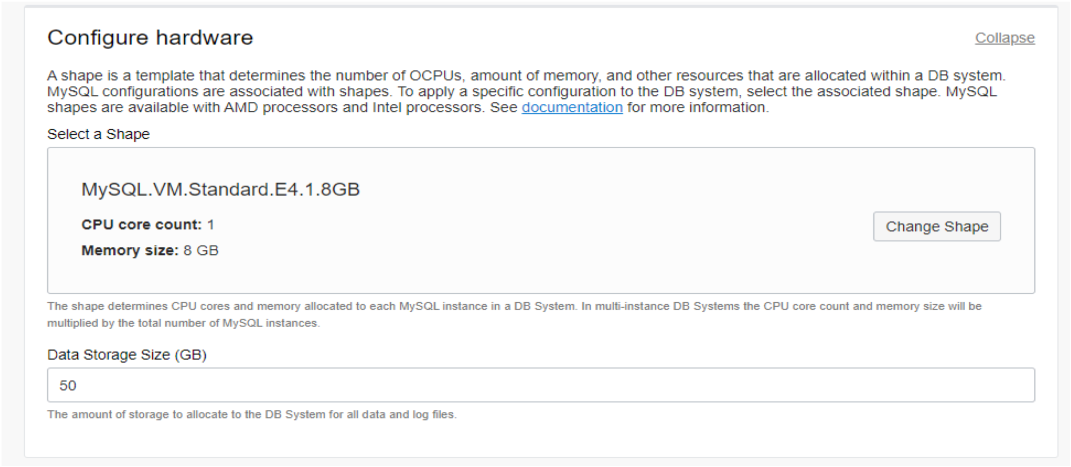
The default shape and storage size are sufficient for our purposes. However, if you wish to change them then edit by clicking the Change Shape button and resetting the storage size (50GB is the smallest size available).
The final part of the form provides advanced options. Click on the link to display them:

As the name suggests these are all optional. An overview:
-
Deletion – creating a deletion plan is recommended.
-
Configuration – no changes recommended. This allows you to set earlier versions of MySQL and is typically used for compatibility purposes. In our case there is no need or reason to use an earlier version of MySQL.
-
Crash recovery – changing from the default enabled state is not recommended. Disabling crash recovery should only be used as a temporary measure in order to more quickly load large volumes of data. We do not have such a use case, so do not change this option.
-
Management – specifying the maintenance period. If one is not specified then maintenance will be conducted outside of office hours.
-
Networking – potentially you could give the database service a name (e.g. lampdb – the remaining parts of the DNS FQDN will be made from your VCN and subnet names). There is no reason to provide an IP address – this is typically only used when recreating an existing database. There is no need to change the ports – if you do then you will have to update the rules in the private security list.
-
Data Import – no need to do anything because we have no data to import.
-
Tags – add tags if you wish.
Once you have decided which options (if any) to set, then click on the Create button.
The database service will take approximately 10 minutes to create: either grab a coffee and wait or continue with creating a compute instance.
Compute Instance (Application Server)
Our final piece of infrastructure. When this is in place our architecture will look like the diagram below:
To implement the infrastructure for the application server complete the following steps:
Step 1: Navigate to the Compute Instance page:

Select the Compute menu item and then click on Instances.

Step 2: Create a Compute Instance
You should now be on the Compute page for your compartment (assuming you have made no changes to the compartment you were in when you created the database). Your page should be similar to that shown below.
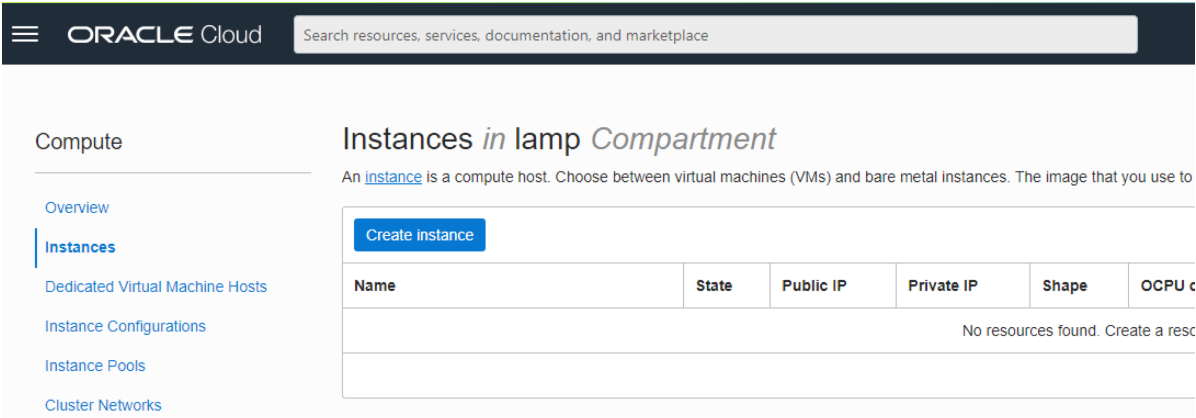
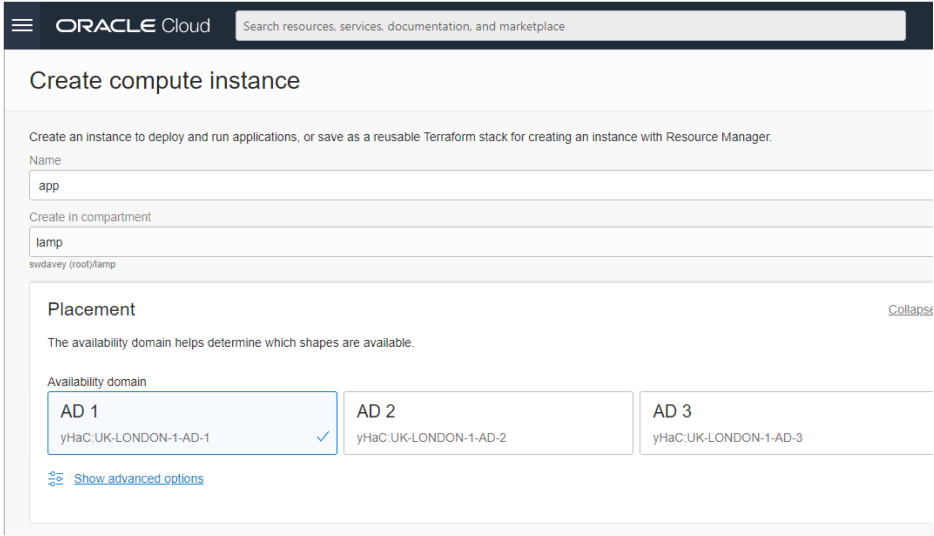
Click on the Create Instance button, then begin to fill in the form by giving your compute instance a name, (e.g. app), and making sure that you are creating the compute instance in the correct compartment. There is no need to worry about placement and so leave the selection to OCI.
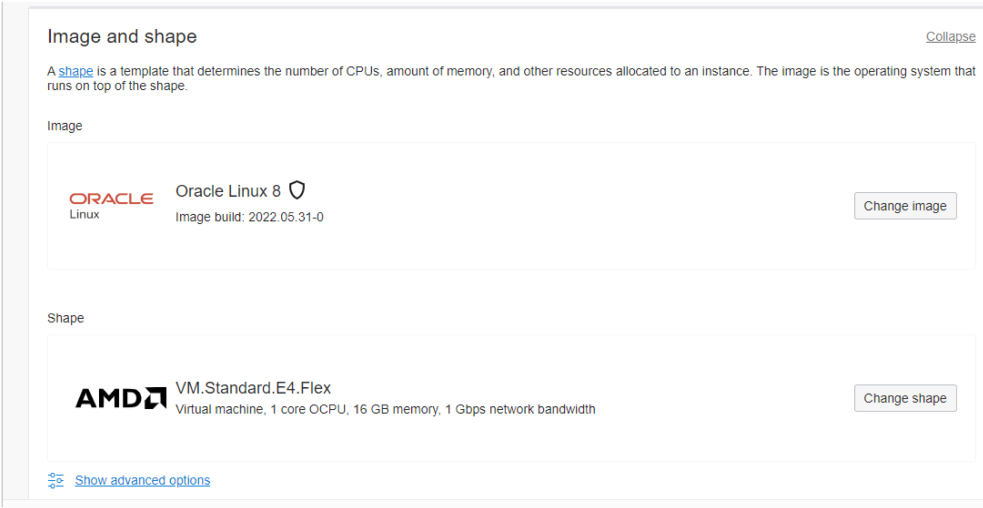
The next part of the form considers the operating system image and shape your compute instance will use. For the purposes of this series of blogs I shall be using the default Oracle Linux 8 operating systems and standard flex shape. It is suggested that you use these too – which means you don’t have to do anything.
If you change the operating system type then you will have to adapt the later blog on LAMP stack software installs because the installation commands will almost certainly be different. If you change to an ARM chip (rather than Intel or AMD) you may also run into trouble because (at the time of writing) there are PHP 8.1 packages for this chip architecture.
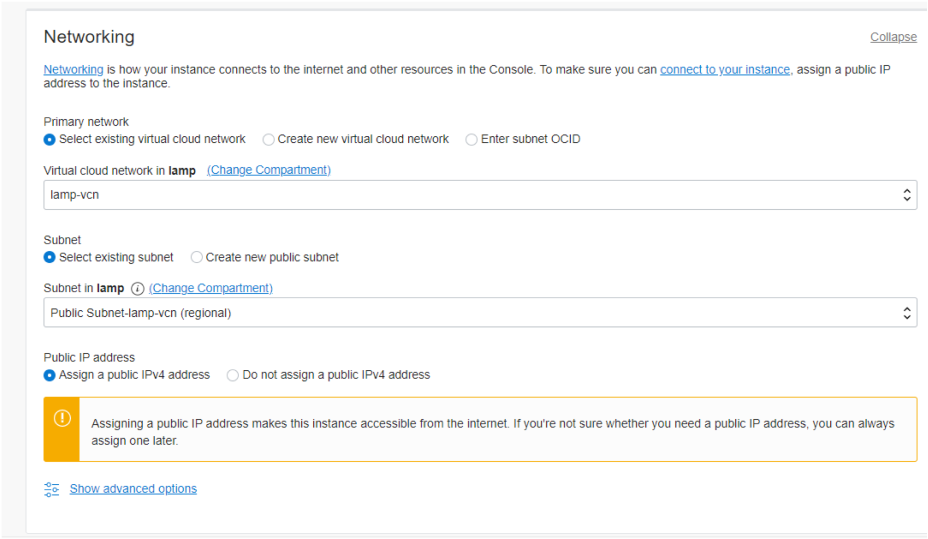
The next consideration is networking. There should be nothing to do other than check you are using the correct VCN and public subnet as well as the Assign a public IPv4 address radio button is selected.
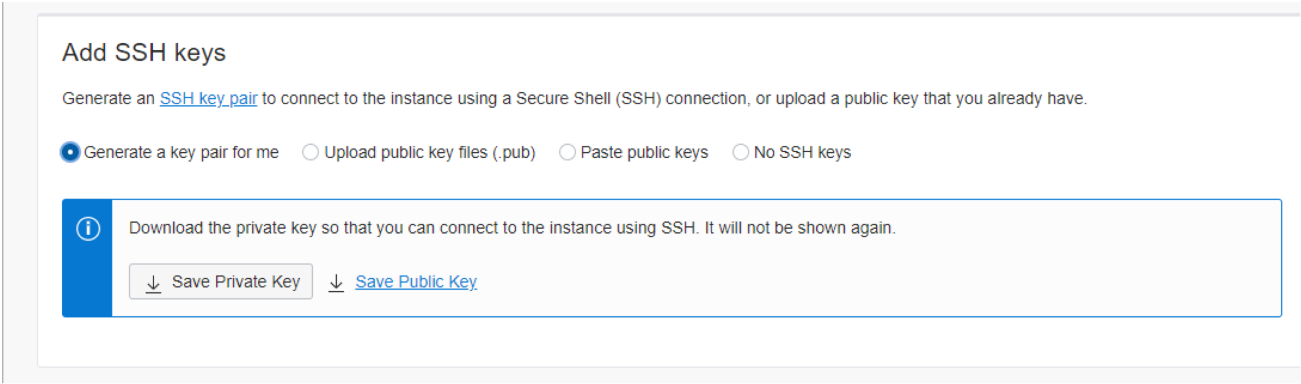
A public-private key pair is required to remotely log into the compute instance. This pairing can be provisioned in a number of ways and for the purposes of this blog I shall let OCI create a pair and then download the private key. If you use this method, then do not forget to download the private key now, because once you click the create button you will no longer be able to retrieve it.
The boot volume should be left as is (Use in-transit encryption) unless you have a burning desire to encrypt your boot volume with your own key. For the purposes of this blog the 50GB of storage provided for the OS should be more than enough for the software that is going to be installed.

The final part of the form provides advanced options. Click on the link to display them:

As the name suggests these are all optional. An overview of these options:
-
Management – has three features:
-
Allows you to use an authorization header
-
Allows you to include an initialization script to install software. For the purposes of the blog we will be installing software manually, however, it may be something you want to consider for the future.
-
Allows you to add tags.
-
-
Availability Configuration – allows you choose alternate migration and maintenance policies. Unless you have good reason to change, it is suggested that you keep with the defaults.
-
Oracle Cloud Agent – covers monitoring, vulnerability scanning and logging. The default selections are sufficient for this blog.
Once you have decided which options (if any) to set, then click on the Create button. The compute instance will build within a minute.
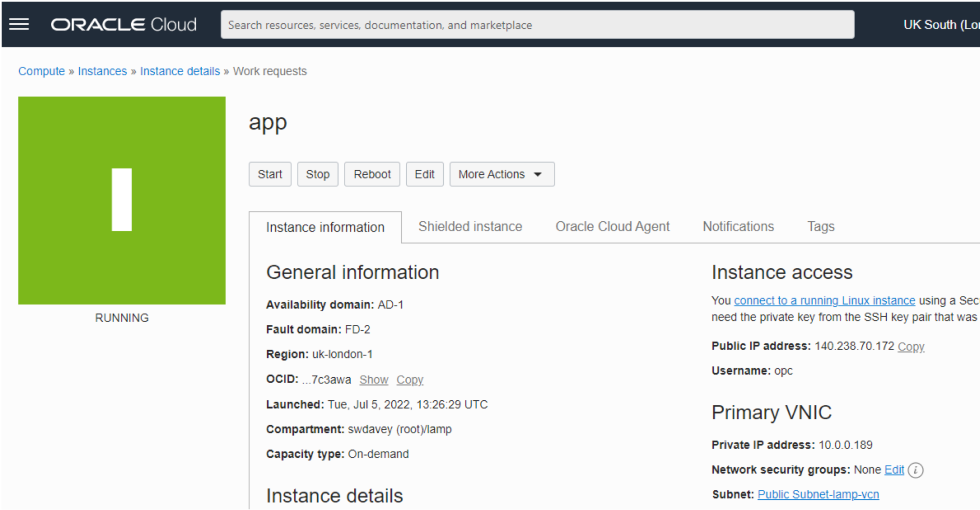
When the build completes take a note of the public IP address that has been assigned to the compute instance:
Step 3a Connecting to the compute instance from a Windows machine
Jump to Step 3b if you are connecting from a Linux machine.
Working assumptions:
-
your machine uses Windows 10 or later and it has both PowerShell and OpenSSL installed
-
your private key was downloaded to the Downloads folder and has a name similar to ssh-key-2022-07-05.key
In the following code excerpt we make a new folder called .ssh under our users folder, and then move the file to it, renaming it to app.key for ease of use. Finally, we make the key read-only.
PS C:\Users\swdavey> Move-Item -Path C:\Users\swdavey\Downloads\ssh-key-2022-07-05.key -Destination C:\Users\swdavey\.ssh\app.key
PS C:\Users\swdavey> attrib +r C:\Users\swdavey\.ssh\app.key
To log in you will need to know the public IP address of the compute instance – you should have retrieved this in the last part of step 2 (see above). You will also need a Linux user name. The user name for an Oracle Linux 8 compute instance is by default, opc. With this information you can log into the compute instance using an ssh command similar to the one shown in the example below. Note the –i key argument is using a relative path. Depending upon the folder you are in, you may have to use an absolute path (e.g. C:\Users\swdavey\.ssh\app.key).
The authenticity of host ‘140.238.70.172 (140.238.70.172)’ can’t be established.
ECDSA key fingerprint is SHA256:qDJGOoGT8gpWVZ2WWVVpIfxIHmkMIYk80wLbWp9aDYQ.
Are you sure you want to continue connecting (yes/no/[fingerprint])? yes
Warning: Permanently added ‘140.238.70.172’ (ECDSA) to the list of known hosts.
[opc@app ~]$ uname -a
Linux app 5.4.17-2136.307.3.1.el8uek.x86_64 #2 SMP Mon May 9 17:29:47 PDT 2022 x86_64 x86_64 x86_64 GNU/Linux
[opc@app ~]$ exit
PS C:\Users\swdavey>
If you are having trouble connecting, check that a VPN or some organizational firewall/proxy is not blocking your access.
Step 3b: Connecting to the compute instance from a Linux machine
Copy the private key that was downloaded in step 2 to your user’s .ssh directory. If your user does not have a .ssh directory then create it. Optionally rename the key so that it is easier to identify and use. Set the permissions to be read only for your user only.
/home/stuart% mv ssh-key-2022-07-05.key .ssh/app.key
/home/stuart% chmod 0400 .ssh/app.key
To log in you will need to know the public IP address of the compute instance – you should have retrieved this in the last part of step 2 (see above). You will also need a Linux user name. The user name for an Oracle Linux 8 compute instance is by default, opc. With this information you can log into the compute instance using an ssh command similar to the one shown in the example below.
The authenticity of host ‘140.238.70.172 (140.238.70.172)’ can’t be established.
ECDSA key fingerprint is SHA256:qDJGOoGT8gpWVZ2WWVVpIfxIHmkMIYk80wLbWp9aDYQ.
Are you sure you want to continue connecting (yes/no/[fingerprint])? yes
Warning: Permanently added ‘140.238.70.172’ (ECDSA) to the list of known hosts.
[opc@app ~]$ uname -a
Linux app 5.4.17-2136.307.3.1.el8uek.x86_64 #2 SMP Mon May 9 17:35:16 PDT 2022 x86_64 x86_64 x86_64 GNU/Linux
[opc@app ~]$ exit
/home/stuart%
If you are having trouble connecting, check that a VPN or some organizational firewall/proxy is not blocking your access.
Summary and Next Steps
The infrastructure build is now complete. The next blog in this series will install and test all the software necessary to complete the LAMP stack. Before you go it is worth collating all the information you will need for the remaining blogs in this series:
-
Public IP address of the application server
-
To find this information, log into OCI and navigate as follows:
-
Main-Menu (Compute) → (Compute) Instances
Check you are in the correct compartment – if necessary set the compartment using the Compartment drop down menu in the side bar (under List Scope)
Click on the link for your application server
On the instance’s page look for the Public IP Address under the Instance Access section.
-
Name of the Linux account you are using on the application server
-
Assuming you are using an Oracle Linux operating system this will be opc. Note that with this account you can raise its privileges to root using sudo.
-
-
Private IP address of the database server
-
To find this information, log into OCI and navigate as follows:
-
Main-Menu (Databases) → (MySQL) DB Systems
Check you are in the correct compartment – if necessary set the compartment using the Compartment drop down menu in the side bar (under List Scope)
Click on the link for your database
On the database’s page look for the Private IP Address under the Endpoint section.
-
Database administrative username and password
-
Hopefully you made a note of these credentials when you were creating the MySQL Database Service. If you have forgotten them, they will not be retrievable…
-
Now you are ready to continue to Part 3. You can also watch the recording below.