Introduction
This is the fourth in a series of blogs that detail how to setup and use a LAMP Stack that makes use of MySQL HeatWave in the Oracle Cloud.
-
Part 1 will set the scene by detailing what a LAMP stack is and what deployment options are available in the Oracle Cloud. It will also set out the architectural vision for the LAMP stack this series of blogs will build.
-
Part 2 will build the infrastructure (network, application server, database server) in the Oracle Cloud.
-
Part 3 will install and configure the remaining LAMP stack software.
-
Part 4 (this part) will install additional software to assist in developing and deploying web applications. It will then securely deploy a demonstration PHP application.
-
Part 5 will consider how to make the stack more scalable, available and secure.
Predicates for completing the tasks in this blog
You will need to have completed Parts 2 and 3 of this series of blogs. You will need the following information:
-
The public IP address of your application server
-
The Linux user account name (on the application server)
-
The private IP address of your MySQL Database Service instance
-
The name and password of the database’s administrative user
Ideally you will also have an internet domain name that you can use. It is not essential that you have one of these, but if you do not it will prevent you from completing the SSL certificate part of this blog. Nowadays, internet domain names can be purchased for just a few dollars a year, and so if you don’t have a domain name you might consider buying one so that you can.
Git for Source Control
For anything but the most trivial software projects source control is highly recommended. Where multiple developers contribute to a project then it is essential to have proper source control so that changes to code can be properly managed/merged.
GitHub, is a provider of Internet hosting for software development and version control using Git. It offers the distributed version control and source code management (SCM) functionality of Git, plus its own features. It provides access control and several collaboration features such as bug tracking, feature requests, task management, continuous integration, and wikis for every project.
For the purposes of this blog it is only necessary to install a Git client, but if you are serious about developing applications then you should consider getting a Github account in order to take advantage of the features previously described. Github has two forms: a free-to-use community-like form, and a subscribed-to enterprise form.
Step 1: Install git
Log onto your application server as the opc user, and then run the following commands
[opc@app ~]$ git –version
git version 2.31.1
[opc@app ~]$
Build and test the phpdemo application
The phpdemo application extracts data from the MySQL Database Service instance.
Step 1: Clone the phpdemo application
Firstly create a staging directory then using git, clone the application from https://github.com/swdavey/phpdemo.git :
[opc@app stage]$ cd ~/stage
[opc@app stage]$ git clone https://github.com/swdavey/phpdemo.git
[opc@app stage]$ ls -R
.:
phpdemo
./phpdemo:
README.md scripts src
./phpdemo/scripts:
createdb.sql getComposer.sh
./phpdemo/src:
names.php
[opc@app stage]$
A phpdemo directory will be created under the staging directory. In phpdemo there will a README.md file and two further directories, scripts and src.
The scripts directory will contain two files:
-
creatdb.sql which will be used to create the application’s schema;
-
getComposer.sh which is a script that will set up a PHP utility which will allow the easy download and install of PHP libraries the phpdemo application depends on.
The src directory contains one file, names.php. which is the application’s source code:
Step 2. Review the source code, names.php
The source code, names.php, is detailed below.
<html>
<head>
<meta name=”viewport” content=”width=device-width, initial-scale=1″>
</head>
<body>
<h1>Names List</h1>
<?php
require_once ‘vendor/autoload.php’;
$dotenv = Dotenv\Dotenv::createImmutable(__DIR__.”/../config”);
$dotenv->load();
$conn = new mysqli($_ENV[“DB_HOST”], $_ENV[“DB_USER”], $_ENV[“DB_PASS”], $_ENV[“DB_NAME”]);
if ($conn->connect_error) {
echo “Connection to DB could not be established.”;
} else {
$result = $conn->query(“SELECT * FROM t1”);
while ($row = $result->fetch_assoc()) {
echo $row[‘name’] . “<br>”;
}
$conn->close();
}
?>
</body>
</html>
The Apache webserver will receive an http request for this file (names.php). It will recognise that the request is for a PHP file and forward it to the PHP engine. The PHP engine will create a dynamic html document by assembling the static html parts and the (dynamic) output from the PHP code.
The PHP code is found between the php open (<php?) and close (?>) tags. The code starts by loading the dotenv library and creating a $dotenv object. This object reads the database credentials from a file called, ../config/.env into the application’s environment. Note that the .env filename is implicit. A mysqli object is created and assigned to the variable $conn. This provides connectivity to the database. $conn runs a simple query and the results of the query are fetched and written out to the html document being created. The connection is then closed. The dynamically created html file is returned to Apache, which then wraps it in an http response and sends it back to the caller.
Step 3: Install the database schema
Before the application code can be run, the database schema needs to be in place.
Using MySQL Shell connect to the database and run the createdb.sql script. In the example below the user is called admin and the private IP address of the database is 10.0.1.66. Change these values for your own.
/home/opc/stage
[opc@app stage]$ cd phpdemo/scripts
[opc@app scripts]$ mysqlsh –uri admin@10.0.1.66 –sql -f createdb.sql
Please provide the password for ‘admin@10.0.1.66’: *********
Records: 4 Duplicates: 0 Warnings: 0
[opc@app scripts]$
The script creates a schema, db1, that has a single table, t1, and populates that table with 4 rows, with each row having an id and a name column. Additionally it creates a user called, appuser, and assigns it select, insert, update, delete permissions on objects (i.e. the table t1) in the db1 schema. The script provides the appuser with a password. Given this password is publicly available it should be changed. The code below details this. Note that the new password must be at least 8 characters long and contain at least one uppercase letter, one number and a special character.
Please provide the password for ‘admin@10.0.1.66’: *********
SQL > SELECT user, host FROM mysql.user WHERE user = ‘appuser’;
+———+——+
| user | host |
+———+——+
| appuser | % |
+———+——+
1 row in set (0.0007 sec)
SQL > ALTER USER ‘appuser’@’%’ IDENTIFIED BY ‘NewPa55w0rd!’;
Query OK, 0 rows affected (0.0053 sec)
SQL > \q
Bye!
[opc@app scripts]$
Test the appuser and its password by logging into the database and optionally investigate the structure of the db1 schema:
Please provide the password for ‘appuser@10.0.1.66’: *********
SQL > USE db1;
db1 SQL > SHOW TABLES;
+—————+
| Tables_in_db1 |
+—————+
| t1 |
+—————+
1 row in set (0.0017 sec)
db1 SQL > DESC t1;
+——-+————-+——+—–+———+—————-+
| Field | Type | Null | Key | Default | Extra |
+——-+————-+——+—–+———+—————-+
| id | int | NO | PRI | NULL | auto_increment |
| name | varchar(40) | NO | | NULL | |
+——-+————-+——+—–+———+—————-+
2 rows in set (0.0017 sec)
db1 SQL > SELECT * FROM t1;
+—-+——–+
| id | name |
+—-+——–+
| 1 | Fred |
| 2 | Barney |
| 3 | Wilma |
| 4 | Betty |
+—-+——–+
4 rows in set (0.0007 sec)
db1 SQL > \q
Bye!
[opc@app scripts]$
Step 4. Securely handling database credentials
Embedding database credentials in code represents a security risk and also makes code harder to maintain. Therefore, credentials and other sensitive data should always be stored externally to the code in a file. In the case of web applications this also means not storing credentials under the document root.
Storing credentials externally requires application code to read them from their file and make them accessible to the parts of the code that will use them (e.g. for creating a database connection). Given this is such a common use case, software libraries have been created so that developers can reuse rather than rewrite what is effectively boilerplate code.
The phpdemo application will use the PHP library package, vlucas/phpdotenv. This package is commonly used by PHP developers and is even embedded in PHP frameworks, for example, Laravel.
Step 4a: Install composer
Composer is an application-level dependency manager for the PHP programming language that provides a standard format for managing dependencies of PHP software and required libraries such as vlucas/phpdotenv.
For convenience a script has been included that will securely download composer. Once composer is downloaded it should be relocated to /usr/local/bin (which is included in the opc user’s PATH variable) so that it is readily accessible and available to install vlucas/phpdotenv.
/home/opc/stage/phpdemo/scripts
[opc@app scripts]$ ls -l
total 8
-rw-rw-r–. 1 opc opc 366 Jul 7 13:06 createdb.sql
-rw-rw-r–. 1 opc opc 483 Jul 7 10:38 getComposer.sh
[opc@app scripts]$ chmod 0744 getComposer.sh
[opc@app scripts]$ ls -l
total 8
-rw-rw-r–. 1 opc opc 366 Jul 7 13:06 createdb.sql
-rwxr–r–. 1 opc opc 483 Jul 7 10:38 getComposer.sh
[opc@app scripts]$ ./getComposer.sh
[opc@app scripts]$ ls -l
total 2668
-rwxr-xr-x. 1 opc opc 2720967 Jul 8 08:43 composer.phar
-rw-rw-r–. 1 opc opc 366 Jul 7 13:06 createdb.sql
-rwxr–r–. 1 opc opc 483 Jul 7 10:38 getComposer.sh
[opc@app scripts]$ sudo mv composer.phar /usr/local/bin/composer
[opc@app scripts]$ ls -l /usr/local/bin/composer
-rwxr-xr-x. 1 opc opc 2720967 Jul 8 08:43 /usr/local/bin/composer
[opc@app scripts]$
Step 4b: Download and install the vlucas/phpdotenv package
Navigate to where the source is and then run the composer require command:
/home/opc/stage/phpdemo/scripts
[opc@app scripts]$ cd ../src
[opc@app src]$ ls
names.php
[opc@app src]$ composer require vlucas/phpdotenv
[opc@app src]$ ls -l
total 28
-rw-rw-r–. 1 opc opc 62 Jul 11 13:53 composer.json
-rw-rw-r–. 1 opc opc 16790 Jul 11 13:53 composer.lock
-rw-rw-r–. 1 opc opc 752 Jul 7 10:38 names.php
drwxrwxr-x. 7 opc opc 111 Jul 11 13:53 vendor
[opc@app src]$
Step 5: Create a dotenv configuration file
The configuration file will be hosted in a directory outside of the document root. The source code, names.php, details a relative path to accomplish this, ./../config , meaning the dotenv file, .env, will be located in a directory called config which is one directory up from where the source file is located. Create this directory structure, then create and populate .env as shown below. Substitute in your own values for DB_HOST and DB_PASS (i.e. the private IP address of your MySQL Database Service instance and appuser’s password respectively).
/home/opc/stage/phpdemo/src
[opc@app src]$ mkdir -p ./../config
[opc@app src]$ cd ./../config
[opc@app config]$ cat << EOF >> .env
DB_HOST=”10.0.1.66″
DB_USER=”appuser”
DB_PASS=”Welcome1!”
DB_NAME=”db1″
EOF
[opc@app config]$
Step 6: Test the application (using php)
Change to the src directory then invoke the application using php:
/home/opc/stage/phpdemo/config
[opc@app config]$ cd ../src
[opc@app src]$ php -f names.php
<!DOCTYPE html>
<html>
<head>
<meta name=”viewport” content=”width=device-width, initial-scale=1″>
</head>
<body>
<h1>Names List</h1>
Fred<br>Barney<br>Wilma<br>Betty<br></body>
</html>
[opc@app src]$
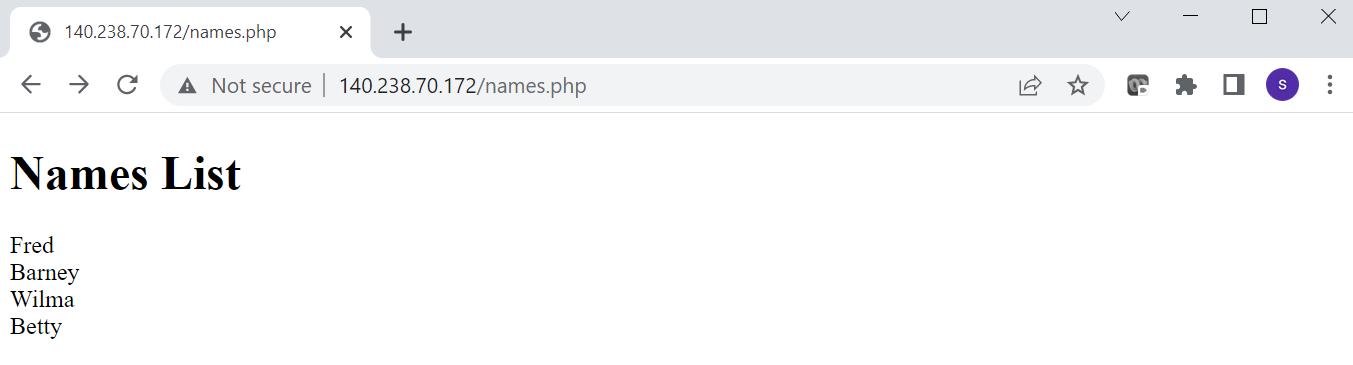
The output should be the text of an html file that contains the names in the t1 table of the db1 schema. If you see the above output then the code works.
Step 7. Deploying the application
The most basic form of deployment will be used: manually copying the code and its dependencies to the webserver’s document root. If this blog inspires you to develop further web applications using the LAMP stack then it is suggested that you use a framework (e.g. Lavarel, Symfony, etc.) and/or CI/CD software (e.g. Jenkins) as these both accelerate development and automate deployment.
The files that need to be copied to the document root (/var/www/html) from the src directory include names.php and the directory, vendor, and its contents. Additionally the ../config directory and its contents (i.e. the dotenv file, .env) also need to be copied but critically be deployed outside of the document root (i.e. /var/www/config):
/home/opc/stage/phpdemo/src
[opc@app src]$ ls -l
total 28
-rw-rw-r–. 1 opc opc 62 Jul 8 09:34 composer.json
-rw-rw-r–. 1 opc opc 16790 Jul 8 09:34 composer.lock
-rw-rw-r–. 1 opc opc 752 Jul 7 10:38 names.php
drwxrwxr-x. 7 opc opc 111 Jul 8 09:34 vendor
[opc@app src]$ sudo cp names.php /var/www/html
[opc@app src]$ sudo cp -R vendor /var/www/html
[opc@app src]$ cd ..
[opc@app phpdemo]$ sudo cp -R config /var/www
[opc@app phpdemo]$
Step 7: Configure selinux
Selinux is enabled by default on Oracle Linux. One of the selinux default rules is to prevent Apache from making remote calls to a database. Therefore, before the database can be accessed from the application server an exception to this rule must be made:
[opc@app src]$ sudo systemctl restart httpd
[opc@app src]$
Note that Apache must be restarted to pick up the change. Less secure alternatives to configuring selinux include making it permissive or disabling it altogether.
Step 8. Test the application (using a browser)
In a web browser enter the, http://<public-ip>/names.php. You should see a page that is similar to that below:
Providing an SSL Capability with Let’s Encrypt
So far Apache has only served content over http. Http transmits in the clear: it does not encrypt the data and so it can easily be stolen. Https remedies this issue by using a secure socket layer (SSL) certificate which is used to create a secure encrypted connection between the server and client program (e.g. browser). Https is also secured by the Transport Layer Security (TLS) protocol. TLS helps provide data integrity. It both helps prevent the transfer of data from being modified or corrupted, and provides authentication – proving to users they are communicating with the intended website.
Apache has been installed with the capability of using TLS/SSL (see Part 2). However, for it to make use of this capability a certificate is required. Potentially, a self-signed certificate could be created and used. However, the issue with self-signed certificates is that browsers cannot authenticate them. This results in a warning notice being issued the first time a user attempts to access a web page from the web server. This may not be a problem for development but in production any potential users/customers are likely to heed the warning and not proceed to the site. There is only really one solution to this problem and that is to use a certificate issued by a trusted Certificate Authority (CA). For individuals and start-ups this may be problematic: firstly there is the cost aspect, and secondly it may be difficult to trade with these organization given they may impose demands regarding both identity and trading status. If you own a domain, then potentially your Domain provider may be able to provide a CA certificate for your website free of charge. However, some providers may stipulate that it cannot be used for commercial purposes unless you pay them some money. To overcome issues such as these, an organization called, Let’s Encrypt, was formed. Let’s Encrypt is a free, automated, and open certificate authority provided by the non-profit Internet Security Research Group (ISRG). All you need to have in order to take advantage of Let’s Encrypt is have a valid domain name and email address. Ideally, your website should run as a virtual host.
The following steps describe how to change from serving pages in the clear to using TLS/SSL with Let’s Encrypt certificates.
Step 1: Assign the application server’s public IP address to your domain
This involves logging into the account you have with a domain provider and editing the DNS record for your domain. Your Domain provider should be able to tell you how to do this, but typically all it involves is editing the (IPv4) DNS A record for web traffic (www) for your domain such that it maps to your application server’s IP address.
Step 2: Create a virtual host
In order to properly manage Let’s Encrypt certificates, a Certbot client will later be installed. For Certbot requires that an Apache Virtual Host be used.
A Virtual Host is an Apache configuration directive that allows you to run more than one website on a single server. With Virtual Hosts, you can specify the site document root (the directory containing the website files), create a separate security policy for each site, use different SSL certificates, and much more.
To create the virtual host perform the commands detailed below. Some points to note
-
The example assumes a domain called, www.mydomain.com. Edit the example with your own domain name.
-
The domain name is used to form the directory structure. It is not essential to do this but if you intend to host multiple websites (each with their own domain or sub-domain name) then this creates a self-documenting structure.
-
Port 80 is used because Certbot/Let’s Encrypt needs to use this port to verify that the domain name being used is valid. When Certbot installs the Let’s Encrypt certificate it will append some URL rewriting code to this configuration file which will redirect URLs to a virtual host on port 443 (Certbot will automatically create this virtual host file).
[opc@app src]$ sudo mkdir /var/www/mydomain.com/html
[opc@app src]$ sudo mkdir /var/www/mydomain.com/log
[opc@app src]$ sudo mkdir /var/www/mydomain.com/config
[opc@app src]$ sudo -s
[opc@app src]# cat << EOF >> /etc/httpd/conf.d/mydomain.com.conf
<VirtualHost *:80>
ServerName www.mydomain.com
ServerAlias www.mydomain.com
DocumentRoot /var/www/mydomain.com/html
ErrorLog /var/www/mydomain.com/log/error.log
CustomLog /var/www/mydomain.com/log/requests.log combined
</VirtualHost>
EOF
[opc@app src]# exit
[opc@app src]$
Step 3: Configure selinux
By default selinux policies only allow Apache to use its default directories, for example: /var/www/html (the main server’s document root) and /var/log/httpd for logging. With virtual hosts other directories will almost certainly be used and so selinux policies for Apache will need to be changed.
There are many policies for Apache (see man httpd_selinux) but the policies most commonly used are:
-
httpd_sys_content_t
-
Read-only directories and files used by Apache
-
-
httpd_sys_rw_content_t
-
Readable and writable directories and files used by Apache. Assign this to directories where files can be created or modified by your application, or assign it to files directory to allow your application to modify them.
-
-
httpd_log_t
-
Used by Apache to generate and append to web application log files.
-
-
htppd_cache_t
-
Assign to a directory used by Apache for caching, if you are using mod_cache.
-
The intention is to move the phpdemo application to the virtual host. Given it is such a simple application only the policies httpd_sys_content_t and httpd_log_t need to be considered:
[opc@app src]$ sudo semanage fcontext -a -t httpd_log_t “/var/www/mydomain.com/log(/.*)?”
[opc@app src]$ sudo restorecon -R -v /var/www/mydomain.com
Relabeled /var/www/mydomain.com/log from unconfined_u:object_r:httpd_sys_content_t:s0 to unconfined_u:object_r:httpd_log_t:s0
[opc@app src]$
The first semanage fcontext command sets a policy that will allow Apache (httpd) to write content to the document root and any directories below it. The second command sets a policy that will allow Apache (httpd) to log to the non-default log directory. The restorecon command applies the changes made by semanage fcontext.
Step 4: Install a Let’s Encrypt Certificate
Certbot is a free, open source software tool for automatically using Let’s Encrypt certificates on manually-administrated websites to enable HTTPS. Certbot is installed using snap. Snap is not part of the Oracle Linux distribution and therefore needs to be installed first. Snap also has a dependency on Linux epel package:
[opc@app src]$ sudo dnf -y install snapd
[opc@app src]$ sudo systemctl enable –now snapd.socket
[opc@app src]$ sudo ln -s /var/lib/snapd/snap /snap
[opc@app src]$ sudo snap install core
[opc@app src]$
When installing core you may get an error that is similar to this:
If you do, then wait a few seconds before re-running the command.
Certbot can now be installed :
[opc@app src]$ sudo ln -s /snap/bin/certbot /usr/bin/certbot
[opc@app src]$
Install the certificate (all entries must be valid – no made up email addresses, etc.)
Saving debug log to /var/log/letsencrypt/letsencrypt.log
Enter email address (used for urgent renewal and security notices)
(Enter ‘c’ to cancel): john.doe@xyz.com
– – – – – – – – – – – – – – – – – – – – – – – – – – – – – – – – – – – – – – – –
Please read the Terms of Service at
https://letsencrypt.org/documents/LE-SA-v1.2-November-15-2017.pdf. You must
agree in order to register with the ACME server. Do you agree?
– – – – – – – – – – – – – – – – – – – – – – – – – – – – – – – – – – – – – – – –
(Y)es/(N)o: Y
– – – – – – – – – – – – – – – – – – – – – – – – – – – – – – – – – – – – – – – –
Would you be willing, once your first certificate is successfully issued, to
share your email address with the Electronic Frontier Foundation, a founding
partner of the Let’s Encrypt project and the non-profit organization that
develops Certbot? We’d like to send you email about our work encrypting the web,
EFF news, campaigns, and ways to support digital freedom.
– – – – – – – – – – – – – – – – – – – – – – – – – – – – – – – – – – – – – – – –
(Y)es/(N)o: N
Account registered.
Which names would you like to activate HTTPS for?
– – – – – – – – – – – – – – – – – – – – – – – – – – – – – – – – – – – – – – – –
1: www.mydomain.com
– – – – – – – – – – – – – – – – – – – – – – – – – – – – – – – – – – – – – – – –
Select the appropriate numbers separated by commas and/or spaces, or leave input
blank to select all options shown (Enter ‘c’ to cancel): 1
Requesting a certificate for www.mydomain.com
Successfully received certificate.
Certificate is saved at: /etc/letsencrypt/live/www.mydomain.com/fullchain.pem
Key is saved at: /etc/letsencrypt/live/www.mydomain.com/privkey.pem
This certificate expires on 2022-10-13.
These files will be updated when the certificate renews.
Certbot has set up a scheduled task to automatically renew this certificate in the background.
Deploying certificate
Successfully deployed certificate for www.mydomain.com to /etc/httpd/conf.d/mydomain.com-le-ssl.conf
Congratulations! You have successfully enabled HTTPS on https://www.mydomain.com
– – – – – – – – – – – – – – – – – – – – – – – – – – – – – – – – – – – – – – – –
If you like Certbot, please consider supporting our work by:
* Donating to ISRG / Let’s Encrypt: https://letsencrypt.org/donate
* Donating to EFF: https://eff.org/donate-le
– – – – – – – – – – – – – – – – – – – – – – – – – – – – – – – – – – – – – – – –
[opc@app src]$
Apache must be restarted:
[opc@app src]$
Step 5: Test TLS/SSL usage
Currently no files have been deployed to the virtual host’s document root and so there is nothing for the webserver to serve. To remedy this move the original index.html file from the main server’s document root to the virtual host’s and then test using a browser:
[opc@app src]$
Now test in a browser:
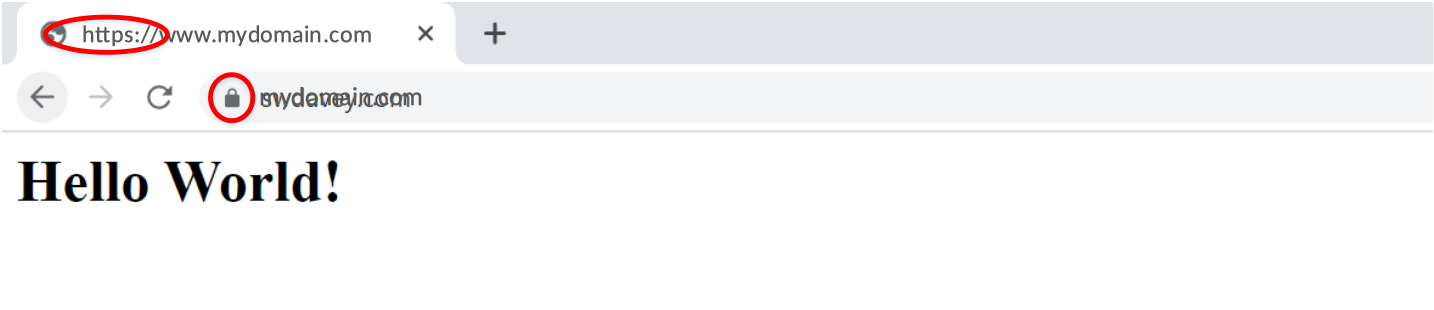
In the picture above the chrome browser indicates that TLS/SSL is being using by displaying the URL in the tab (i.e. the protocol is https) and by displaying the secure symbol (a padlock) in the search bar (previously the protocol was http and in the search bar there was a warning triangle with the words, Not Secure).
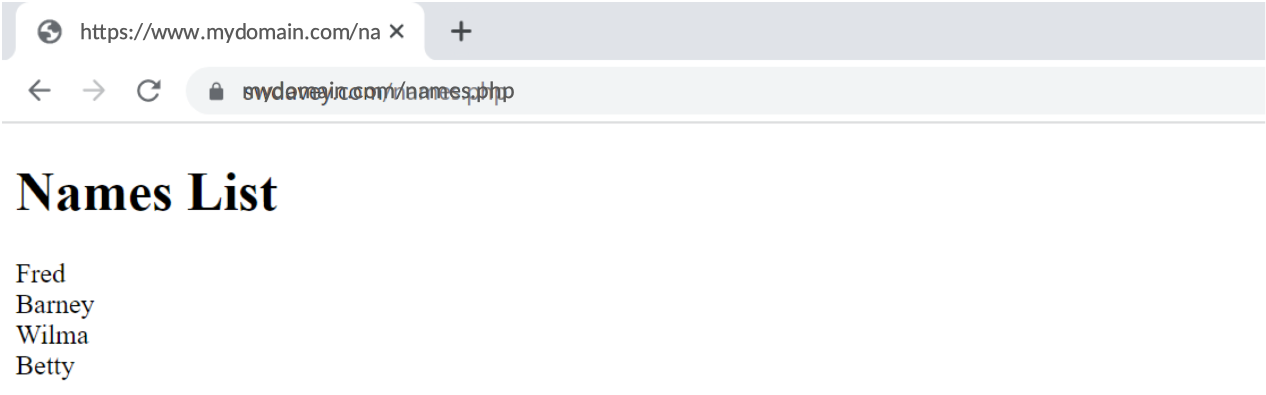
Now move the phpdemo application to the virtual host and test in a browser:
[opc@app src]$ sudo mv /var/www/html/vendor /var/www/mydomain.com/html
[opc@app src]$ sudo mv /var/www/config /var/www/mydomain.com
[opc@app src]$
Step 6: Testing certificate renewal
Certbot will automatically renew the certificate. However, it is worth performing a dry run just to make sure nothing is blocking this process:
Saving debug log to /var/log/letsencrypt/letsencrypt.log
– – – – – – – – – – – – – – – – – – – – – – – – – – – – – – – – – – – – – – – –
Processing /etc/letsencrypt/renewal/www.mydomain.com.conf
– – – – – – – – – – – – – – – – – – – – – – – – – – – – – – – – – – – – – – – –
Account registered.
Simulating renewal of an existing certificate for www.mydomain.com
– – – – – – – – – – – – – – – – – – – – – – – – – – – – – – – – – – – – – – – –
Congratulations, all simulated renewals succeeded:
/etc/letsencrypt/live/www.mydomain.com/fullchain.pem (success)
– – – – – – – – – – – – – – – – – – – – – – – – – – – – – – – – – – – – – – – –
[opc@app src]$
Summary and Next Steps
If you have followed all the steps in this blog and the preceding ones then you have a working LAMP stack that is securely serving webpages and PHP content over SSL/TLS. The stack that has been developed over this series can be considered a development stack. The next blog in this series will discuss how to move into production and scale the stack as demand grows.
Continue to part 5. You can also watch the recording below.