
A hiring manager wants to move from a position to a job requisition without retyping everything or trusting a made-up result. This larger HCM example uses a two-prompt pattern: ask the /aistudio skill to turn the business need into a build request, review that request, then ask the coding assistant to build it. Below is the complete build request used for the local workflow, followed by the workflow it produced.
Before you start
- You’ve set up the CLI and your project (Part 3a and Part 3b), and you’re signed in.
- Your coding assistant is open at the AI Studio project root, and you’ve pasted the guardrail request from Part 4.
- You know a business unit ID, a department ID, and a hiring manager’s person ID in your environment. The workflow asks for them, and without real values every lookup returns nothing.
- Your user can read positions and create job requisitions in this environment.
- Not in HCM? Read “Adapt this to your pillar” below first. The steps are the same; only the business example changes.
Terms used in this post
- Business Object (BO): The AI Studio definition of a Fusion REST resource and the functions you can call on it, such as reading positions or creating a requisition. A local
.bofile holds one or more functions. A workflow’s BO_FUNCTION node calls one of them at run time. - BO_FUNCTION node: A workflow step that calls one BO function, such as reading positions or creating a requisition.
- Human Approval node: A pause that asks a person to approve the exact request before the write operation.
Step 1 (optional): Let the skill write the build request
You know the hiring process; the skill knows the workflow format. For a larger build, describe the outcome and ask the assistant to draft a prompt you can inspect before it changes a workflow. Keep the BO discovery and pull instructions in this first request. For a small, clear change, write the request yourself using the structure in Part 5.
Try it: ask for a build request
Use the /aistudio skill to prepare a prompt for a coding assistant. Do not create or change a workflow yet.

Use case: An HCM user asks to find a position and create a job requisition from it. Find positions from Fusion, let the user select one exact position, collect title, hiring manager and number of openings, show everything for approval, then create the requisition once. For an unrelated question, explain the workflow's purpose. Report only data actually returned by Fusion.

In the current AI Studio project, inspect the existing position lookup and requisition creation Business Objects. If a current local definition is missing, use the /aistudio skill's supported fetch command to pull it from the connected Fusion environment; show any local-versus-server difference before overwriting. Verify exact function names, token inputs, output fields, query limits, fixed values and permissions. Do not assume the position lookup proves vacancy. Do not make a live POST while drafting.

Write a complete, copyable build prompt that covers the workflow paths, missing values, no matches, several matches, explicit review before creation, errors, duplicate-submit risk, local-only scope, validation and tests. Flag any BO contract or environment gap. Stop after showing the proposed prompt.
The pause is deliberate. The assistant can inspect the .bo definitions first; you can then reject any guessed operation or unsafe assumption before it builds a .wf file. Fetching a BO definition does not itself fetch HR records.
Step 2: Review the build request it writes
Use the build request the skill wrote for your environment. It reflects the Business Objects and values it actually found. Compare it with the example below, which is the request used for this article. If you skipped Step 1, adapt the example: replace the Business Object codes and fixed IDs with the ones in your environment.
Use the /aistudio skill to build a standalone Oracle Fusion AI Studio workflow named "Position to Job Requisition" in the current project. Create the workflow locally; do not save or publish it to Fusion and do not execute a live requisition creation.

Business goal
An HCM user asks to find a position and, after reviewing its details, create a job requisition for that position. The workflow accepts the user's message, looks up positions in Fusion, asks the user to select and explicitly confirm the exact position and requisition details, calls the existing requisition-creation Business Object once, and reports only the result actually returned by Fusion. For unrelated questions, explain the workflow's purpose without making a Business Object call.

Business Object discovery and safeguards
- Inspect the current src project and use the existing position lookup BO ORA_HCM_GLOBALHUMA_GETOPENANDVACANTPOSITIONS / getall_positions and requisition creation BO ORA_HCM_GLOBALHUMA_CREATEJOBREQUISITIONSBOHIRINGAPP / create_recruitingJobRequisitions if their contracts match. The position lookup requires pActiveStatus, pBusinessUnitId, and pDepartmentId. The creation function requires Title, HiringManagerId, NumberOfOpenings, and PositionId.
- Read the actual BO definitions before wiring inputs. Do not invent token names, function names, response fields, vacancy status, or returned requisition IDs.
- The lookup currently returns up to 10 recent positions and does not itself prove a position is vacant. Present it as a limited position lookup; require the user to confirm the selected position is vacant/appropriate before creation. Never describe the list as all vacancies.
- The existing create BO has fixed RecruiterId and PrimaryLocationId values in its body template. Make that configuration visible in the build report and in the review step; do not claim the workflow dynamically determines them. Do not invoke this POST in tests or during authoring. Stop before any live save/push/publish.

Workflow behavior
- Read the current message from $context.$system.$inputMessage. Route lookup/create requests versus out-of-scope questions. Ask for missing business unit or department IDs instead of guessing them.
- Fetch positions with the real BO_FUNCTION node, guard empty results before accessing a record, and present the returned position identifiers and relevant fields without inventing values. If several records could match, ask the user to choose one; never choose the first record silently.
- Before the POST, show PositionId, position name/code if returned, requisition Title, HiringManagerId, NumberOfOpenings, and the fixed recruiter/location configuration. Require an explicit approval in the same workflow. Rejection or missing data must end without creating anything.
- Bind only the four verified token inputs to the creation BO_FUNCTION node. Call it once after approval. Format a concise result using only its actual response; do not claim success or a requisition number unless the response provides it.
- Handle out-of-scope requests, no positions found, ambiguous selection, BO failures, and rejected approval with clear user-facing messages.

Build and verification
- Create a fully connected workflow with descriptive node codes and a real path from START through the lookup, review, and approved creation to END/RETURN. Use the appropriate HCM family/product from the CLI.
- Prettify and validate the local .wf. Start the workflow test sync required by the skill. Use fixture or read-only tests where possible; do not run a live POST. Report what validation and tests actually prove, and list any environment or BO-contract limits plainly.
What the build request covers:
What it must do
Read the question from $context.$system.$inputMessage. Route position lookup, requisition creation and out-of-scope requests. Require the business unit, department and, for creation, the exact position ID, title, hiring manager ID and positive number of openings. An out-of-scope question ends without a BO call.
Find the Business Object first
The existing getall_positions GET function takes pActiveStatus, pBusinessUnitId and pDepartmentId. It returns at most ten recent positions and does not independently prove vacancy. The existing create_recruitingJobRequisitions POST function takes Title, HiringManagerId, NumberOfOpenings and PositionId. Its body template also contains fixed recruiter and primary-location IDs. Those values must be checked for the target environment before anyone approves a real creation.
Topology and wiring
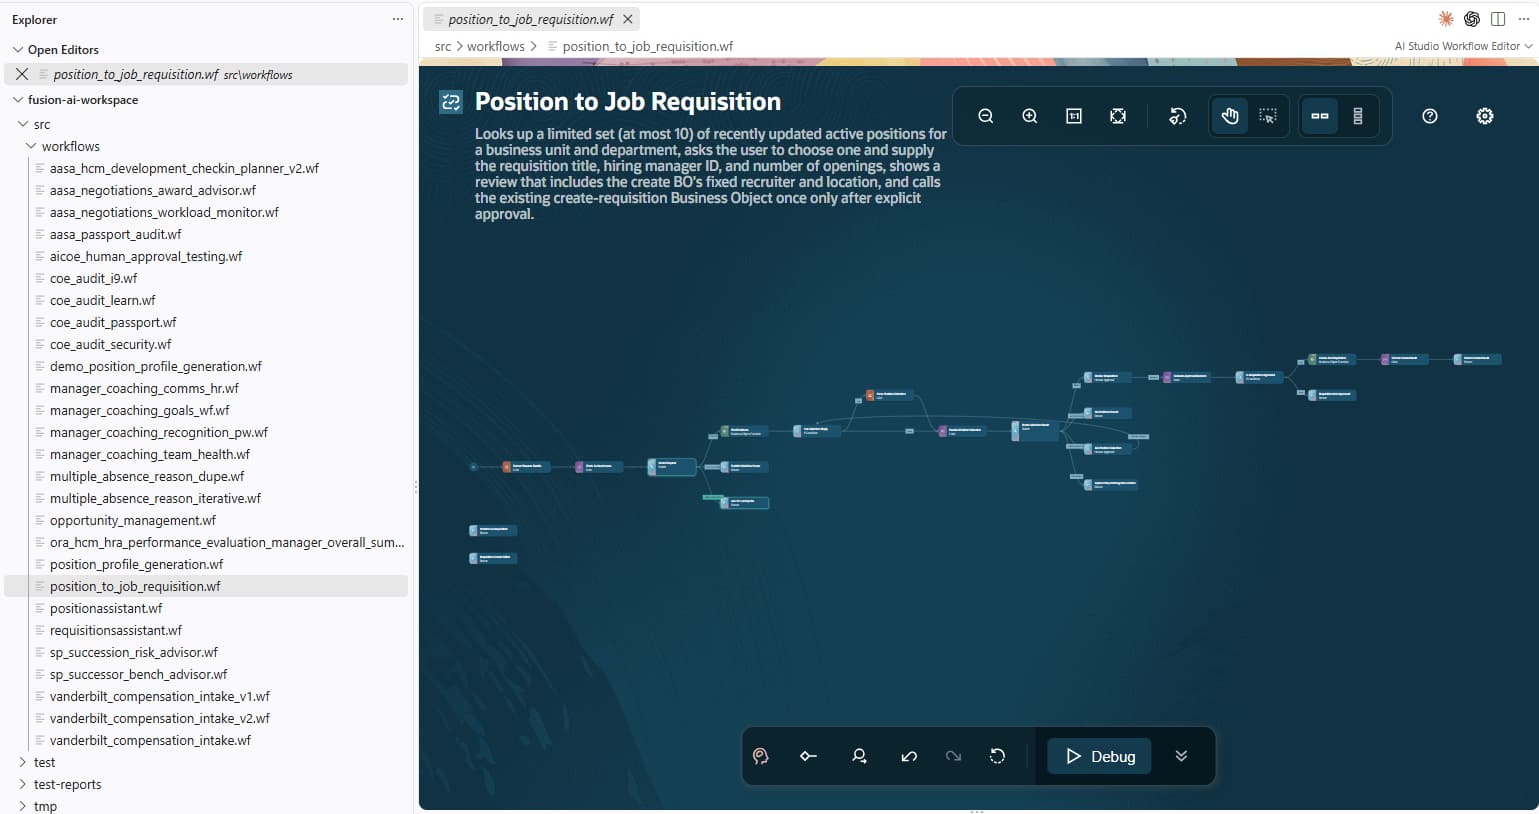
The created workflow checks the request, routes out-of-scope and missing-input cases to direct replies, looks up real positions, checks for an exact PositionId match, then pauses for approval. Only the approved path reaches the requisition-creation BO_FUNCTION node. The list path presents the limited lookup result without claiming every vacancy was found.
Finish criteria
Prettify and validate the local workflow, then sync and run workflow tests without executing a live requisition POST. Treat a structural validation pass and a simulated test as different evidence from a live Fusion result.
If these Business Objects don’t exist in your environment
The codes in this example come from the environment used to write it. If yours doesn’t have them, ask the assistant to search instead of guessing:
Search for seeded Business Objects that can list positions for a business unit and department, and create a job requisition from a position. For each one, show me its functions, their inputs, and a sample of the data it returns. Don't build anything. If nothing fits, tell me what's missing.
The workflow graph created in this project
Extract only supplied IDs and classify intent.
Return scope or missing-detail messages when needed.
Call the existing position BO and check the exact ID.
Show position and requisition values; require approval.
Call the requisition BO once on approval and report its response.
Other paths: out of scope → purpose message; missing details → request for details; no exact match → no-match message; lookup → position summary.
POSITION_TO_JOB_REQUISITION draft created locally for this article; it is a workflow diagram, not a Fusion canvas screenshot.Why the generated request is so technical
It names expression paths, BO token inputs, guards before reading a record, and a review step before the POST. You do not need to invent those details in the first business description. The coding assistant can put them in the proposed build request after inspecting the project. Your job is to check the business meaning: which position, what counts as eligible, who may approve, and which configured IDs apply.
Part 5 shows the general request pattern.
Optional: get a PLAN.md before the build
In the run shown below, Claude started building because the reviewed request told it to build. It did not ask for a plan file. If you want to approve the design before any workflow changes, append the following to the build request above. This is an optional addition, not part of the actual prompt used for these screenshots.
Planning checkpoint — do not implement yet.

First inspect the existing project and the position-lookup and requisition-creation BO definitions read-only. Create only PLAN.md in the project root. In that file, describe:
- the business flow and every user-facing outcome, including missing details, no match, ambiguous selection, errors, rejection and success;
- the exact BO functions, verified inputs and outputs, the 10-result lookup limit, and the fixed recruiter and location values that require review;
- a node-by-node workflow map with branches, data passed between nodes, and the approval gate before any requisition POST;
- the files you intend to create or change, validation steps, a test matrix, and what cannot be proved without live Fusion access.

Show me the PLAN.md path and summarize the decisions or gaps I need to review. Stop after the plan. Do not create or edit the .wf, BO definitions or tests, run a live BO call, or save/push/publish to Fusion. Wait for my explicit approval in a later message before implementing the plan.
Use Manual mode for this plan-only file write. Claude Code’s Plan mode can present an approach before editing, but the mode label alone does not guarantee that a PLAN.md file will be saved. The prompt must request the file and the stop. Once you approve the plan, give the assistant a separate instruction to implement it. You can then use automatic approval for the bounded local build if you are comfortable with the reviewed scope.
Before you run it: choose an approval mode
Once you have reviewed the build request, decide how much autonomy to give the coding assistant. For this example, the request limits the work to local workflow files, validation, and non-live tests. In a workspace you trust, Approve for me in Codex or Auto in Claude Code can make those routine steps flow without stopping for every edit. These modes can still pause for actions their safety checks flag; they are not unrestricted access.
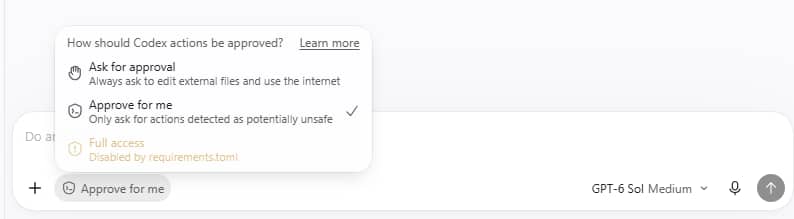
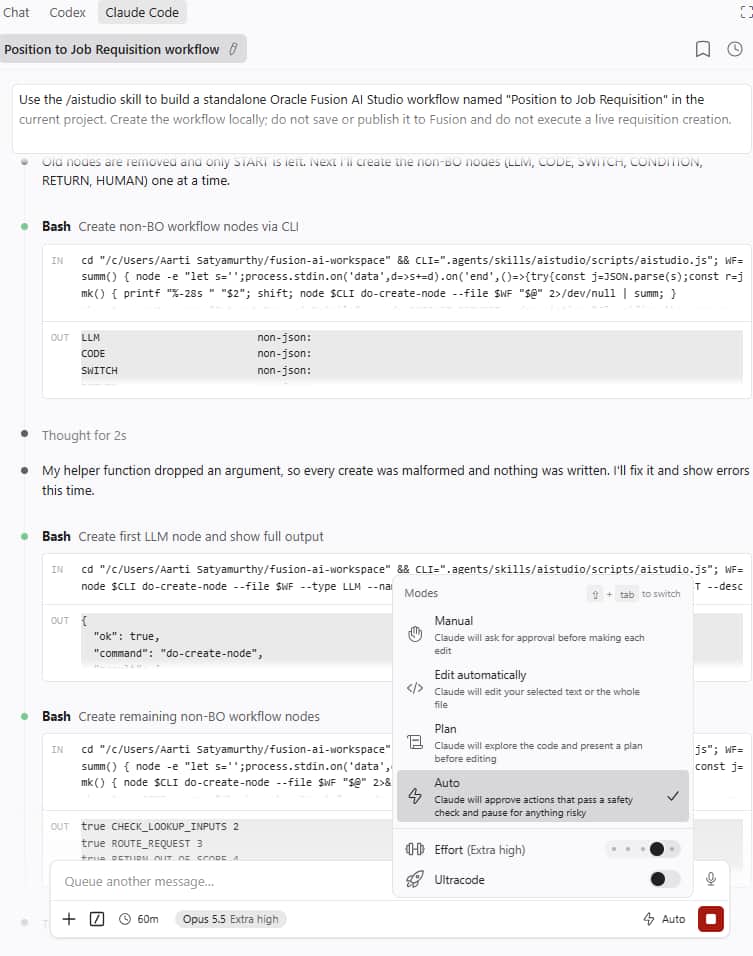
Choose individual approvals when the request is still broad, the workspace or BO configuration is unfamiliar, or the assistant may encounter sensitive HCM data. Review remote save, push, publish, and any live requisition creation separately. The position example explicitly excludes those actions during the local build. In every mode, inspect the resulting .wf file and its validation and test results before you rely on it.
Step 3: Run it, and follow along
Paste the reviewed build request into your coding assistant. In this example, the assistant created src/workflows/position_to_job_requisition.wf locally. Here is what actually happened:
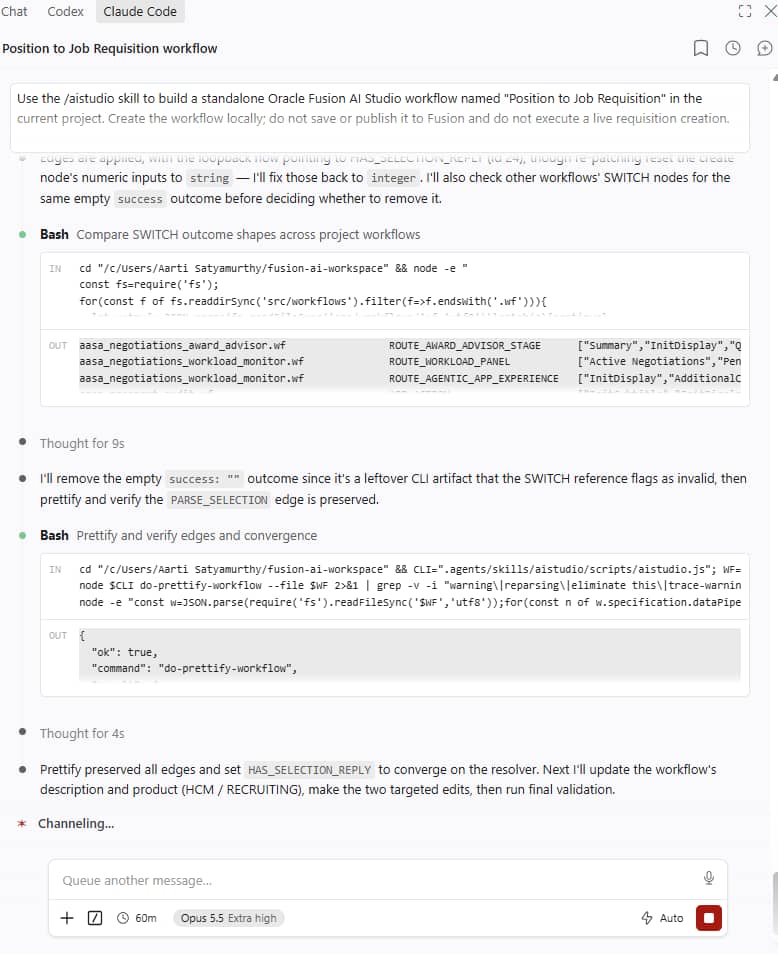
- It inspected the data contract. It found the local position GET and requisition POST BO definitions and their exact token names. The GET is limited to ten results; it cannot certify vacancy.
- It built the workflow. The graph contains the classifier, required-detail check, position BO call, exact-ID selection, lookup reply, Human Approval node, requisition BO call and result reply. Out-of-scope, missing-detail and no-match requests have separate terminal paths.
- It checked its work. Workflow prettification completed and
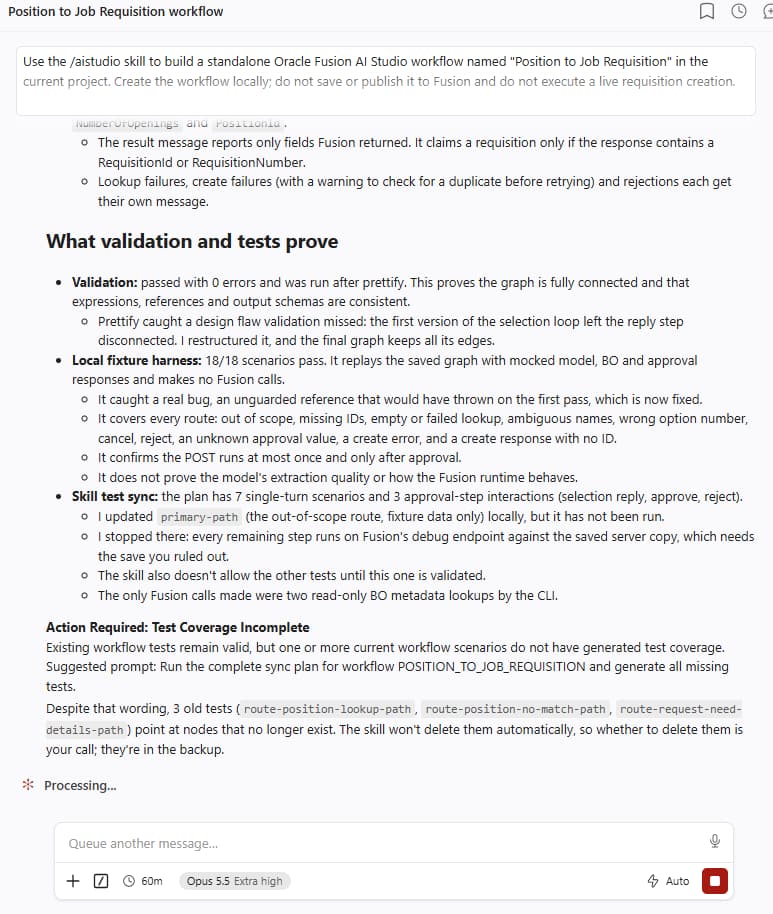
validate-workflowreported zero structural errors. - It ran the tests. The tests use recorded Business Object responses, so they check routing, guards, and messages without calling Fusion. They covered out-of-scope requests, missing details, an empty lookup, and a lookup that returns positions.
- It reported the limit. The connected environment did not resolve either BO code for output-schema enrichment, so this local workflow has not been proved against live Fusion position data or a live requisition creation. The example does not claim an actual requisition was created.
How to read these results
A test that passes with recorded or generated data proves the workflow’s logic: routing, guards, and messages work. It doesn’t prove the live Fusion calls, because the Business Object responses were replayed. In this example the request ruled out live runs on purpose, so nothing could create a real requisition. To check live behavior, ask for it in a safe scope:
Run the tests for Position to Job Requisition against live data for the lookup paths only. Do not run the requisition creation step and do not approve anything. Tell me which results differ from the recorded data.
What to inspect in VS Code: Open src/workflows/position_to_job_requisition.wf with the Fusion AI Studio workflow editor. Follow FIND_POSITIONS to SELECT_POSITION, then the CREATE route through REVIEW_REQUISITION to CREATE_REQUISITION. The visible review step is the important boundary between the read and the write.
Try it out
Ask the assistant to run the workflow with a real question and stop before anything is created:
Run position_to_job_requisition.wf with "Find active positions in business unit [business unit ID] and department [department ID]" and show me the answer a user would get. Don't continue to the requisition step.
Adapt this to your pillar
The pattern is the same in every pillar: look something up, let the user pick one exact record, confirm the details, then make one write after approval. Swap the business example and keep the safeguards.
| Pillar | Look up | Write after approval |
|---|---|---|
| HCM (this example) | Positions in a business unit and department | Create a job requisition |
| ERP | Supplier invoices on hold | Request release of one hold |
| SCM | Items below their reorder point | Create a purchase requisition line |
| CX | A customer’s open service requests | Escalate one service request |
Start your own request from this template, then ask the skill to turn it into a build request:
Use the aistudio skill to prepare a build request. Don't build anything yet.

Use case: A [role] asks to find [records] and [write action] for one of them.
Find [records] from Fusion, let the user select one exact record, collect [required fields], show everything for approval, then [write action] once. For an unrelated question, explain the workflow's purpose. Report only data actually returned by Fusion.

Search for seeded Business Objects that can [read] and [write]. Show me their functions and inputs before using them. Don't make a live write while drafting.
You’re done when
- The workflow file exists in src/workflows and validation reports no errors.
- The out-of-scope, missing-details, and empty-lookup tests pass.
- A trial run with your real business unit and department returns positions.
- The approval step appears before any creation, and rejecting it creates nothing.
Key takeaways
- For a larger workflow, start with the business use case and review the coding assistant’s complete build request before asking it to build. If you want a
PLAN.mdfirst, ask for that file and a stop before implementation. - Check the BO contract, query limit and fixed values. A BO name is not proof that its response covers every record or establishes vacancy.
- Keep a human approval step before a business write, and distinguish local validation and simulated tests from live Fusion behavior.
Previous: Write a Request That Builds the Right Thing | Next: Extend a Workflow to Support a New Scenario
Back to the Learning Path for Fusion AI Agent Studio CLI