

Oracle AI Agent Studio is designed to meet every builder where they work – from business users creating applications with natural language to developers building sophisticated agentic applications with code. While we’ll cover the no-code and guided builder experiences in a separate blog, this article focuses on the pro-code journey. We’ll show how developers can leverage the AI Agent Studio CLI, AI-native tooling, and enterprise APIs to build, extend, and deploy production-ready agentic applications with the flexibility and control expected by professional developers.
The pro-code experience brings Fusion AI Agent Studio development into a local workspace. Developers use Visual Studio Code to organize and review project files, the Fusion AI Studio VS Code extension to work with AI Studio artifacts, and Codex to accelerate development through natural-language collaboration.
A complete solution can combine an App, Workflows, Agents, Business Objects, Topics, Tools, connector instances, deeplinks, and supporting resources. Working with these assets as a connected local project gives teams the visibility, repeatability, and control expected in a professional development workflow.
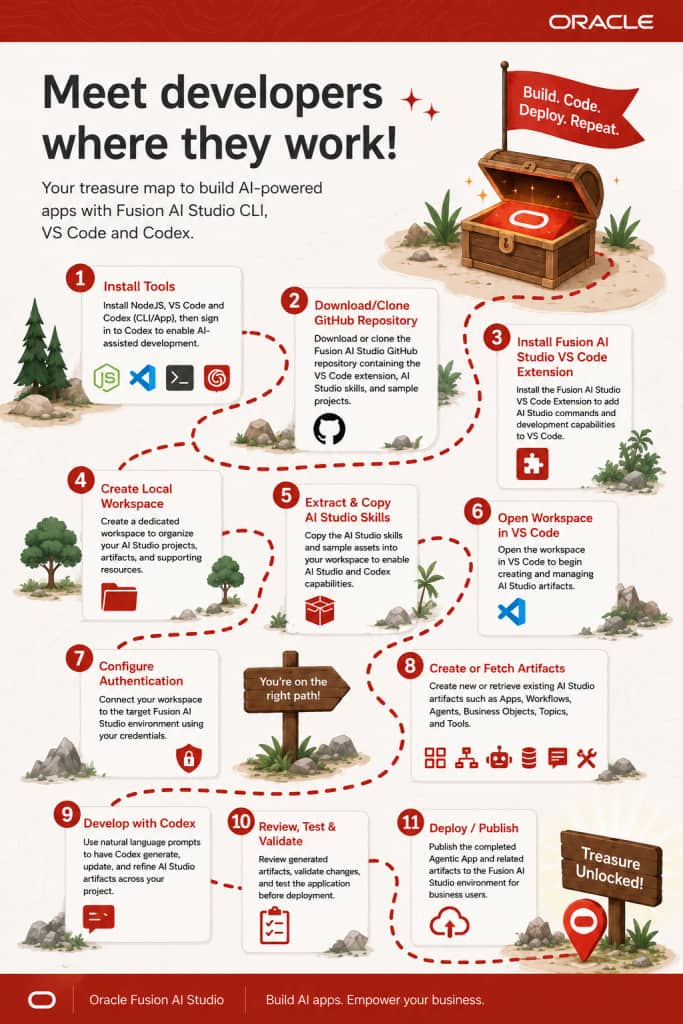
Choose your setup experience
Choose the setup approach that best fits your development style and team standards.
| Option | Best for | Summary |
|---|---|---|
| 1. Use Codex to set up your workspace | Developers who prefer AI-guided onboarding | Use a natural-language prompt to have Codex guide you through the local setup process. |
| 2. Use the sample setup script | Teams that want repeatable onboarding | Download and run the supplied script to create and prepare a standard local workspace. |
| 3. Complete the setup manually | Developers who prefer step-by-step control | Follow the official GitHub repository and installation guide. |
1. Use Codex to set up your workspace
Codex can guide you through the complete setup process, including installing prerequisites, downloading the Fusion AI Studio repository, preparing a workspace, extracting the required skills and samples, and opening the project in VS Code. The prompt does not include the steps to get node.js installed. Follow the steps on https://nodejs.org/en/download to install before running the prompt if you do not have node.js already.
Here is a sample Codex prompt you can use as a starting point .. feel free to customize it to match your environment and requirements.
# Oracle Fusion AI Studio CLI Setup
Read and follow the official installation guide from start to finish.

## References

Repository
https://github.com/oracle/fusion-ai-studio

Installation Guide
https://github.com/oracle/fusion-ai-studio/blob/main/release-26C/how-to/install-and-use-fusion-ai-studio-CLI_vscode-codex.md

## Objective

Set up Oracle Fusion AI Studio CLI completely using the official documentation. Clone the repository, create the workspace, install the VS Code extension, copy all required AI Studio skills and sample applications, configure the environment, and verify the installation.

## Source of Truth

The installation guide is the authoritative source for all prerequisites, installation steps, configuration, verification, and troubleshooting.

Follow the guide exactly. Do not invent or skip steps. When multiple options exist, use the recommended/default approach.

## Required Workspace Layout

Use this directory structure instead of the example paths in the documentation.

```text
~/Documents/my-fusion-agent-studio-cli/
├── fusion-ai-repo/
└── fusion-ai-workspace/
    ├── .agents/skills/
    ├── aiapps/
    ├── AiCoE-BootCamp/
    ├── XXXX-DEV1/
    └── XXXX-TEST/
```

Adapt all documented file locations to this workspace unless the guide explicitly requires otherwise.

## Execution

* Read the entire installation guide before making changes.
* Execute every documented step in order.
* Copy or extract all required skills, sample applications, templates, and supporting files into the appropriate workspace folders.
* Install and configure the Fusion AI Studio VS Code extension from the documented VSIX package.
* Complete every validation and verification step described in the guide.
* Resolve installation issues before continuing.

## Safety

* Do not overwrite, move, or delete existing files.
* Keep all new files within the required workspace unless the guide requires otherwise.
* Preserve existing content.

## Approval Policy

Ask for approval only if a step requires:

* software installation
* administrator privileges
* authentication or sign-in
* access outside the required workspace
* overwriting or deleting existing files

Otherwise, continue automatically.

## Final Report

Summarize:

* completed steps
* directories created
* files copied or extracted
* extensions installed
* verification results
* approvals requested
* remaining manual steps or recommendations
2. Use the sample setup script
If you prefer not to use Codex or another coding agent and want full control over the setup and configuration, download and run the attached sample setup script locally. It creates the workspace and copies the required Fusion AI Studio skills and sample assets into the expected locations. The script does not install the Fusion AI Studio VS Code extension, so you’ll need to install it manually after the script is done. The script does not include the steps to get node.js installed. Follow the steps on https://nodejs.org/en/download to install.
Disclaimer: The sample script and examples in this post were developed and tested on macOS/ Windows. Feel free to modify the script as needed to suit your own operating system or environment. This script is my personal work and is not an Oracle product, officially supported solution, or productized utility. It simply automates the manual setup steps that are already documented in the configuration guide with the goal of helping you complete the setup in less than five minutes.
Mac
Important! – This setup is for macOS. Update any local paths, release values, or organization-specific settings in the script before running it. Once updated you should move the file into the folder you want to run the steps in before running chmod +x setup-fusion-ai.sh in your Terminal.
Windows
Download and unzip the file below. Once unzipped, follow the steps in the .md file to complete the setup via the provided script.
After the script completes, your local environment will have a structure similar to the following:
~/Documents/my-fusion-agent-studio-cli/
├── fusion-ai-repo/                                  ← Git repository clone
└── fusion-ai-workspace/                             ← Your local workspace
    ├── .agents/
    │   └── skills/                                  ← Shared AI Studio skills
    │       ├── aistudio/
    │       ├── aistudio-apps-succession-management/
    │       ├── aistudio-apps-warehouse-operations-shortages/
    │       └── ...
    ├── aiapps/                                      ← Sample AI Apps
    │   └── ...
    ├── AiCoE-BootCamp/     ← Current project; open this folder in VS Code
    ├── Testing-release-26C/           <-- Example Future project folder
    └── AIW-Labs/                      <-- Example Future project folder
Start with the AiCoE-BootCamp project folder by opening it in VS Code. You can always additional folders for your projects – for e.g. Testing-release-26C or AIW-Labs.
3. Complete the setup manually
Follow the Fusion AI Studio GitHub repository and the Configuration guide for complete manual setup instructions. Note – The steps assume you have node.js installed. If you do not, follow the steps on https://nodejs.org/en/download to install.
Why doesn’t aistudio work everywhere?
Problem Statement: I keep my Git repo and AI Studio CLI in a regular folder like AI Studio Projects, AI Studio Bootcamp, VS Code Projects, CoELabs … and then create subfolders for different labs and workshops. aistudio –help is not working from every path.
Solution: Make life easier by creating an alias (MacOS) or function(Windows) for aistudio.
MacOS
One-time alias in ~/.zshrc. Run the lines below in order in your desktop terminal. (Note: the example below must be modified to match the file path for aistudio.js on your computer)
touch ~/.zshrc
echo 'alias aistudio='\''node "/Users/pborse/Documents/VS Code Projects/.agents/skills/aistudio/scripts/aistudio.js"'\''' >> ~/.zshrc
source ~/.zshrc
Now aistudio can behave like a proper shortcut instead of making you type the whole family tree every time.
WINDOWS
1. Open PowerShell
2. Open your PowerShell profile configuration by running:
powershell
notepad $PROFILE
3. If prompted to create a new file, click Yes.
4. Paste the following line at the bottom of the file: (Note: the example below must be modified to match the file path for aistudio.js on your computer)
powershell
function aistudio { node C:\Users\HariKMenon\.codex\skills\aistudio\scripts\aistudio.js” @args }
5. Save and close Notepad.
6. Restart PowerShell or run . $PROFILE to apply changes immediately
Build your first workflow: Hello World for AI agents
“Hello World” has long been the first step in learning a new development platform. Let’s use the same approach for Fusion AI Agent Studio – create a simple workflow, validate it locally, and establish the foundation for more sophisticated Agentic Apps.
1. Open the workspace in VS Code
Open the fusion-ai-workspace/AiCoE-BootCamp folder in Visual Studio Code. This is where you will create, view, and manage Fusion AI Studio artifacts for the AI CoE Bootcamp. You can create similar folders for your other projects.
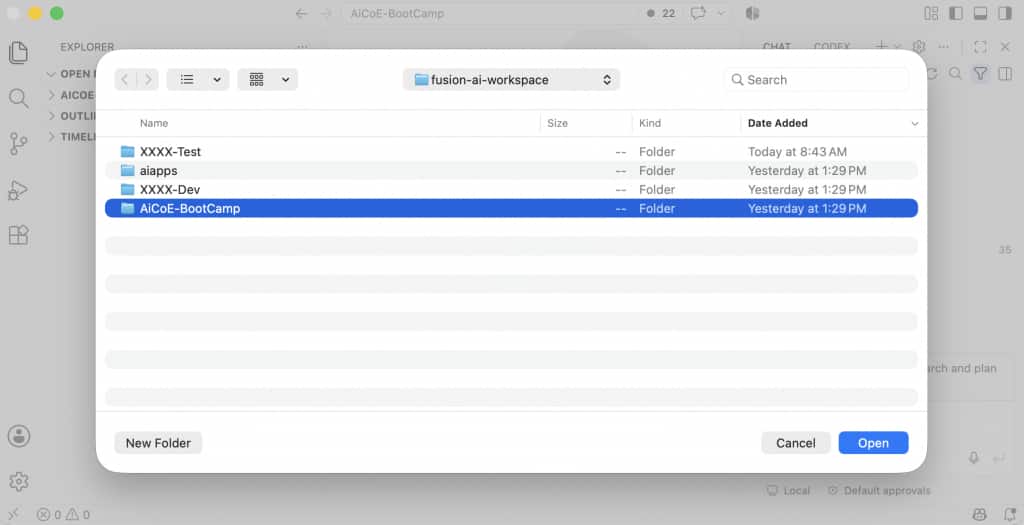
Confirm that the workspace is visible in the VS Code Explorer and that the Fusion AI Studio extension is installed.
2. Create the project scaffold
Open the VS Code terminal from the workspace root and run:
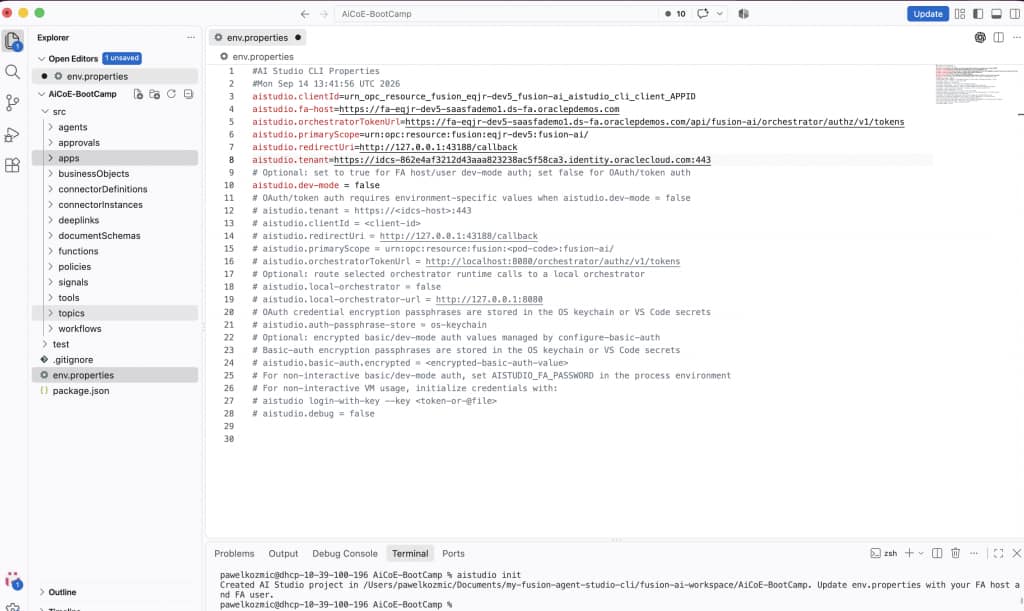
aistudio initThis command creates a new AI Studio project by generating the folders and files needed to get started. Think of it as a project template or starter kit: it creates the expected directory structure so you do not have to build it manually.
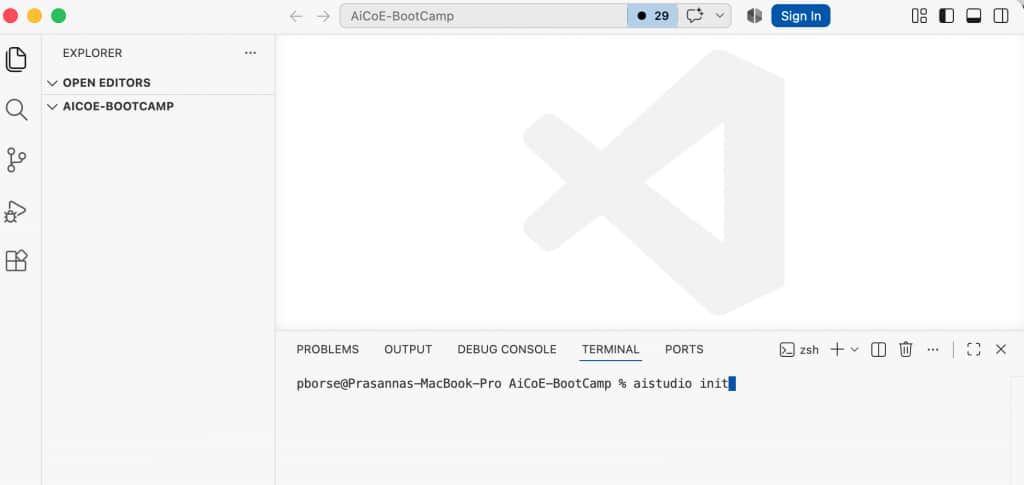
Review the generated files before continuing. They provide the local foundation for your workflow and other AI Studio artifacts.
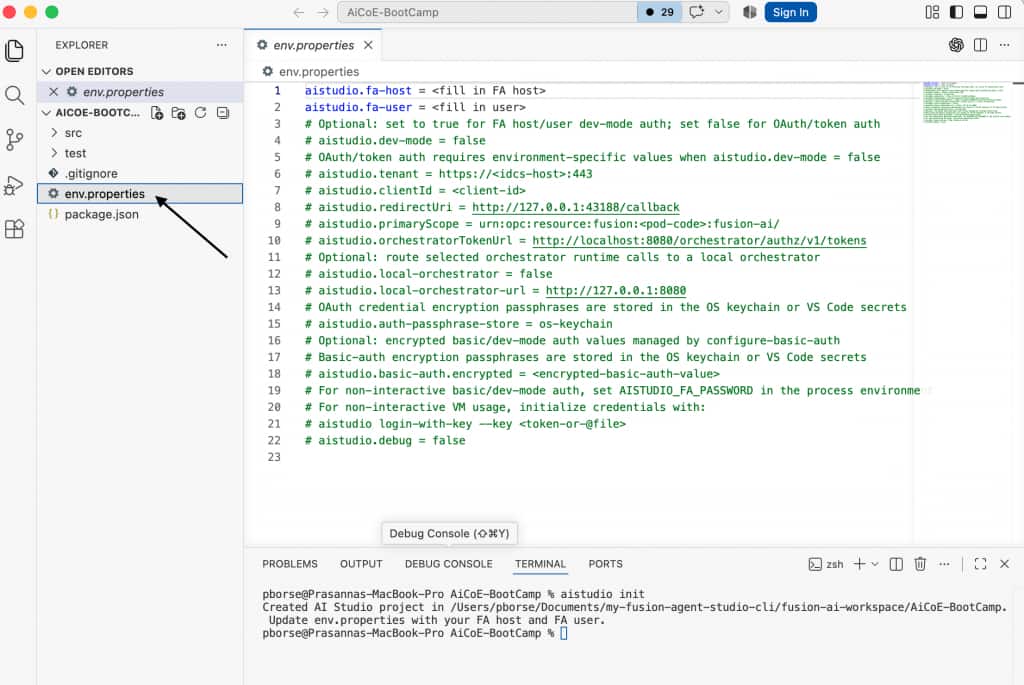
3. Configure authentication
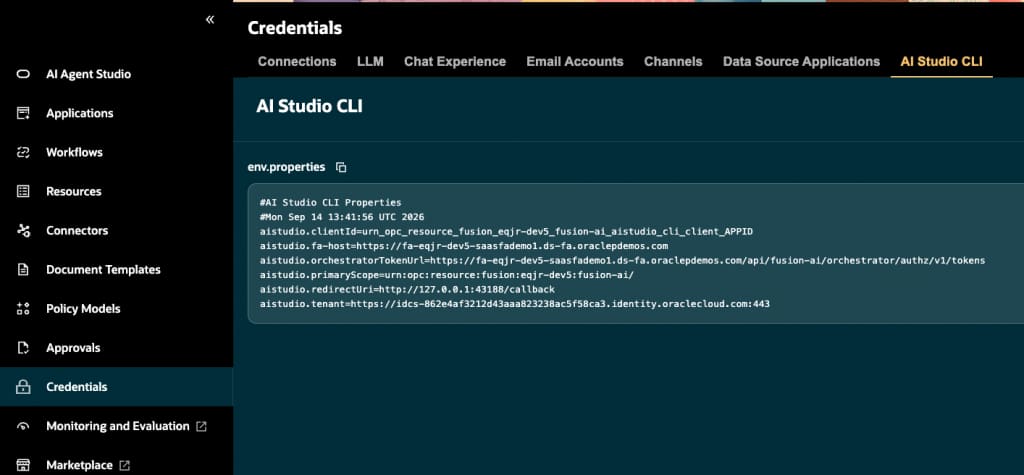
Connect your workspace to the target Fusion AI Studio environment. Run Fusion AI Studio: Configure Authentication from the VS Code Command Palette, then provide the server URL and CLI setup supplied by your Fusion AI Studio admin. (Found in Ai Agent Studio > Credentials > AI Studio CLI)
The configuration updates the env.properties file in the workspace. This file connects your local project to the appropriate Fusion AI Studio environment.
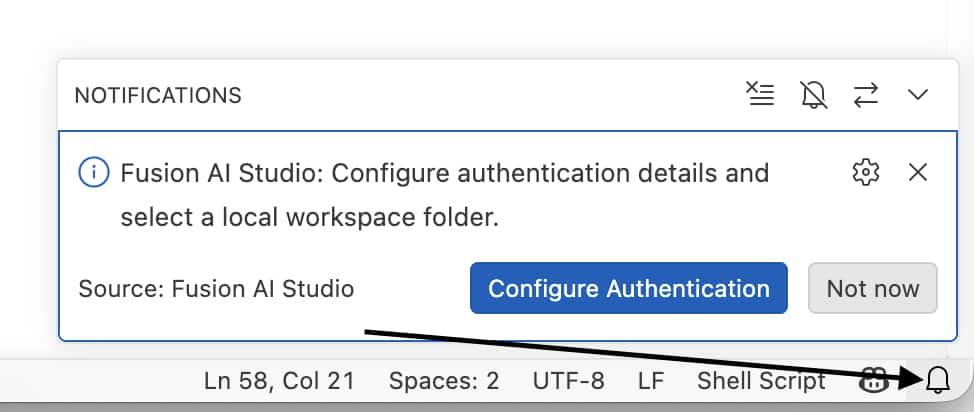
👀 Keep an eye on those sneaky notifications—they love hiding the authentication pop-up you actually need to click!
4. Choose Your Weapon ⚔️
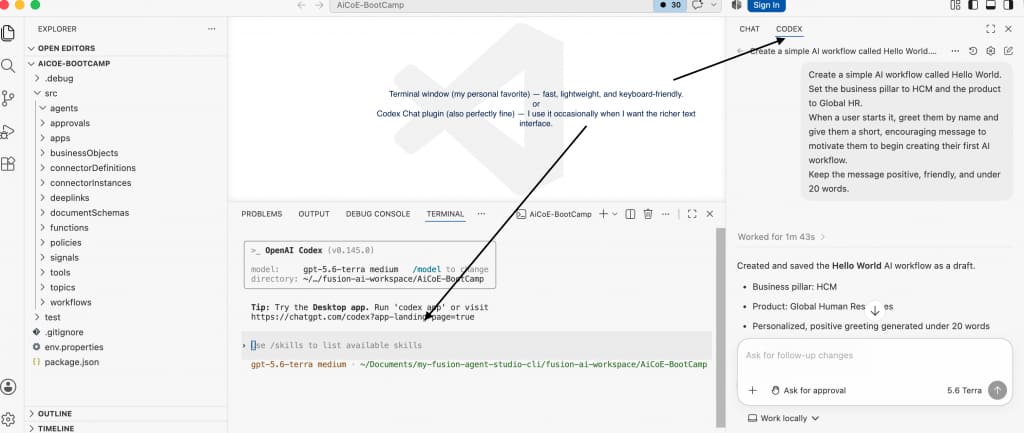
Choose how you want to work with Codex:
- Terminal window (my personal favorite) — fast, lightweight, and keyboard-friendly.
- Codex Chat plugin (also perfectly fine) — I use it occasionally when I want the richer text interface.
5. Create or fetch AI Studio artifacts
Use the Fusion AI Studio commands in VS Code to create a new workflow, or use Fetch from Server to retrieve an existing artifact. The extension supports Apps, Workflows, Agents, Business Objects, Topics, Tools, and other related artifacts.
For this example, create a new workflow named something like Hello World Workflow.
6. Develop the Hello World workflow with Codex
Open Codex in the same workspace and use this natural-language prompt:
Create a simple AI workflow called <Your Initials> Hello World. Set the business pillar to HCM and the product to Global HR.

When a user starts it, greet them by name and give them a short, encouraging message to motivate them to begin creating their first AI workflow.

Keep the message positive, friendly, and under 20 words.
Replace <Your Initials> with your initials before submitting the prompt. Codex can inspect the project, propose the required artifact changes, generate the workflow definition, and help refine it as your requirements evolve.
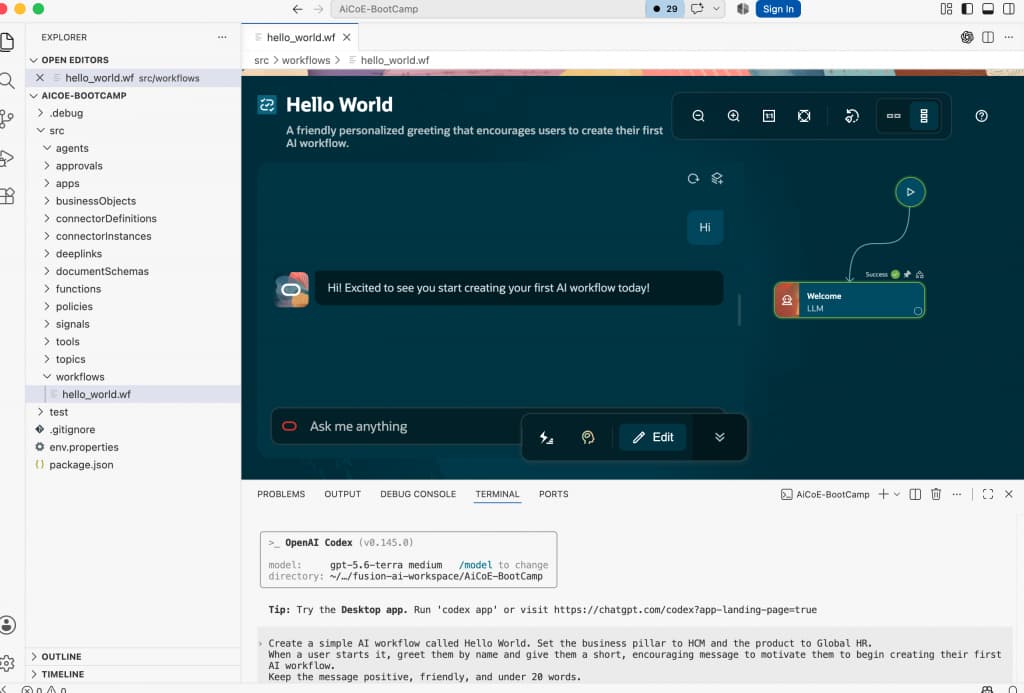
Review the plan and generated changes before accepting them.
7. Review, test, and validate
Before publishing, review the generated workflow and validate that it behaves as intended. The AI Studio CLI automatically runs the relevant test scripts!!
Once the workflow is validated, you have completed your first Fusion AI Agent Studio CLI development cycle and are ready to build richer workflows, agents, and business experiences.
Happy coding, and good luck!