After a successful functional test of the OCI tfurther requirements relating to security are considered. One part of this is identity and access management (IAM), i.e. how should the login to OCI take place and where do the user accounts come from. OCI itself contains a fully functional IAM. Users and accounts can be created, managed, and various login methods (password, one-time token, MFA, security token, etc.) can be selected. Another IAM is not necessary, nor a user repository.
Digression: Basically, OCI historically has three different IAM systems, OCI native, OCI Identity Cloud Service (IDCS) and OCI IAM-Domains. Newer tenants have OCI IAM-Domains only. Their configuration is like that of OCI IDCS. The configuration with IAM-Domains is shown below, followed by an appendix with IDCS desription.
If there is already another registration procedure, there is often a desire to use it because the users and accounts are already maintained there and the registration is also carried out there. The most common example is Azure/AD. With the IAM Services, OCI offers the possibility to connect third-party IAMs, both for the registration or SSO and for the provisioning of accounts. OCI IAM-Domains and OCI IDCS require an OCI IAM-Domain or OCI IDCS account for a successful SSO. It can be configured whether this account can only log in via the ‘non-OCI’ services or whether a local login is also possible.
Keycloak is a ‘non-OCI’ service that can be used for the OCI login process. The prerequisite is that the OCI IAM-Domain or OCI IDCS can reach the keycloak and keycloak including the SAML functionality is available. The blog is about federation via SAML2. OpenID would also be possible.
In the following the logical architecture with both variants, OCI IDCS and OCI IAM-Domain. The federations can be configured bothe in one keycloak realm.

Configuration in short:
- Open both consoles, IAM domains/IDCS and Keycloak, with an administrator account.
- Create a SAML application (=SP) in IDCS or IAM domains to download the metadata. The application is then no longer required and can be deleted. Name and store metadata meaningfully.
- Download the keycloak metadata. In keycloak, configure IDCS as SAML Service Provider.
- In IDCS, configure Keycloak as the SAML Identity Provider and adjust the IDP policy to allow keycloak login.
- Test SSO: You need a user that matches as you define, e.g. B. by email as here in the configuration.
Configuration step-by-step:
Step 1: Select the Domains menu item in OCI and select the appropriate domain there. The “default” domain is in every tenant. Additional domains can be created. The type of domain, here “Free”, describes the functions that are available under this license. It includes e.g. the integration of one SAML IDP. A detailed list can be found here: https://docs.oracle.com/en-us/iaas/Content/Identity/sku/overview.htm

Step 2: In the selected domain (here default) select the menu item “Application” in the “Security” menu. There click “Add Application” and select as type SAML.

Step 3: Give the application a name in order to get to the following screen with “Next”, download the two files offered there and name them so that they can be imported into keycloak without a doubt. The wizard can then be aborted with Cancel and the SAML application deleted.

Step 4: Select the correct realm in keycloak or create a new one. Similar to an IAM-Domain, a realm is an independent area in the IAM. In the realm, first download the SAML2 metadata file and name it meaningfully.

Step 5: The appropriate test user can also be created in the realm if one does not yet exist. The following configuration provides that the user from keycloak can be matched with the user from the IAM-Domain using the email address. Set a password here so that you can log in later. The rest can remain in the default setting.

Step 6: Select “Client” in the menu and there “Add Client”. Now select the metadata file of the IAM-Domain from your computer using the “Select File” button. This means that almost all the remaining entries are set automatically.

Step 7: Here is the same screen after the metadata has been imported. The client ID is automatically set to the issuer (the IAM-Domain – even if IDCS is included in the link, the IAM-Domains are just an integrated interface of IDCS). The protocol was automatically adjusted to SAML.

Step 8: Most of the settings were set by the import. All you have to do is give a name and a description, as well as the attribute that the SAML Federation uses to identify the user. In this example email. The rest of the settings can be adjusted as follows. Complete encryption was dispensed with here so that the information can be evaluated in the event of a debug. Transport encryption always takes place (https) and signing is activated. The SAML federation of the IAM domains uses the Post Profile, which can also be defined as mandatory.
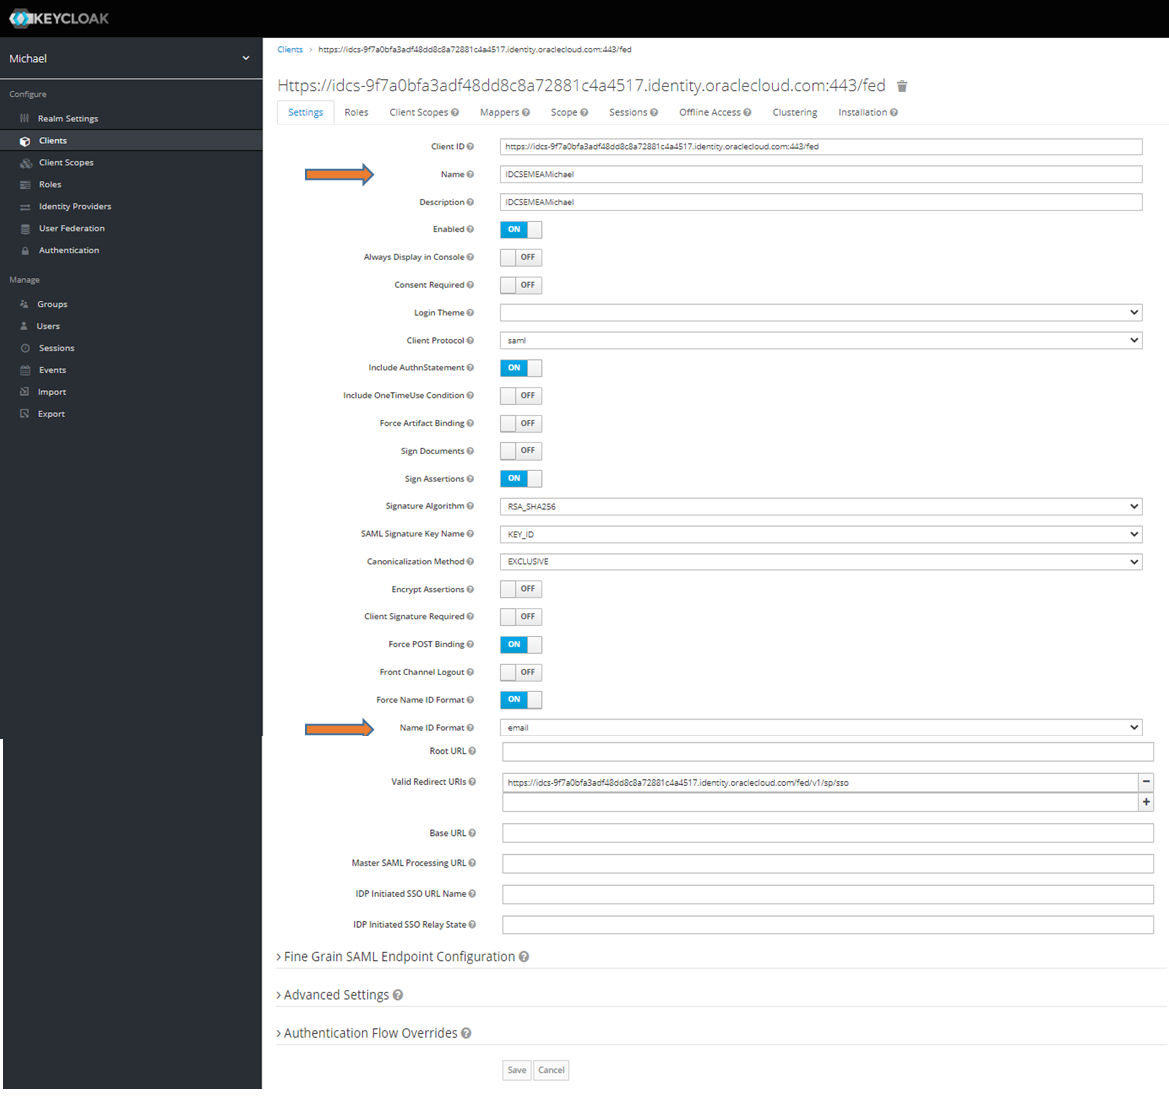
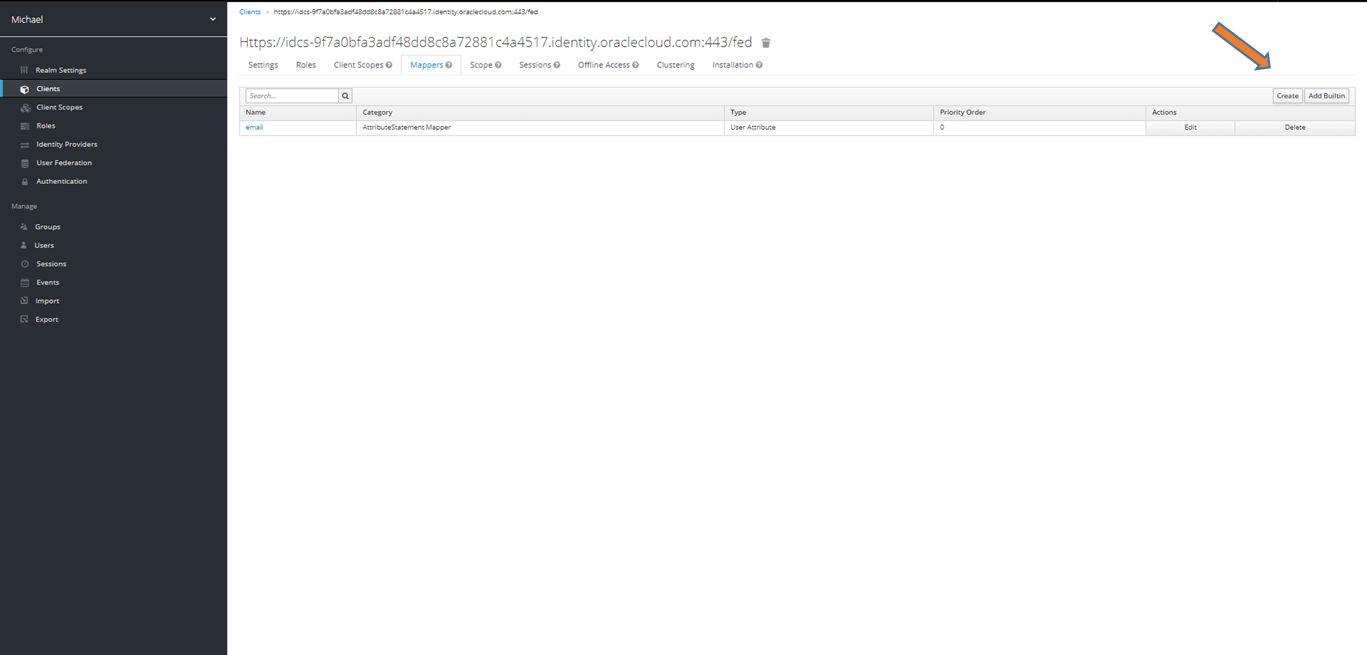
Step 9: Now switch to the Mapping area and add the SAML Response Email. Create a new mapping for this. Other attributes can be defined analogously. Since the IAM-Domain configuration is a pure SAML SSO, this configuration is sufficient. If SAML JIT (Just In Time Provisioning = the user is created during registration) should be used, further mappings must be created for the other attributes so that a valid IAM-Domain user can be created. A certain amount of caution is advised as IAM-Domains check the SAML response more strictly than keycloak issues it. With the IAM-Domains, it would also be possible to allow self-registration in the registration flow. This configuration is not outlined here.
Step 10: Within mapping, set the type to “User Attribute”. The input mask changes to this image:

Step 11: In the mapping, the values are entered as in the screen in order to be able to transfer the email. The field name must match the keycloak attribute name. The type is “Basic”. After a save, the configuration in keycloak is complete.

Step 12: In OCI in the selected IAM-Domain (see step 1) select the menu item “Security” and there the entry “Identity Providers”. Then select “Add IDP – Add SAML IDP” to set up the SAML federation.

Step 13: Enter a name and description in the wizard and click on “Next”.

Step 14: Now upload the keycloak metadata file here. Signature setting matches that of keycloak.

Step 15: The SAML mapping is defined here. NameID remains, this is the area in the SAML statement in which the user is specified. Since the email is transferred by the user, email must also be specified here (or primary mail adress, the field name in OCI IAM) and email as formatting. The IDP is created with “Create IDP”.

Step 16: The configuration of the IAM-Domain IDP SP is displayed here. Since we had already downloaded them in step 2, we do not need these files. The next screen with the test can also be skipped. The test is carried out after the configuration has been completed. Of course, it is important to activate it at the end of the wizard. If you forget to activate it, the IDP policy configuration will not be possible.

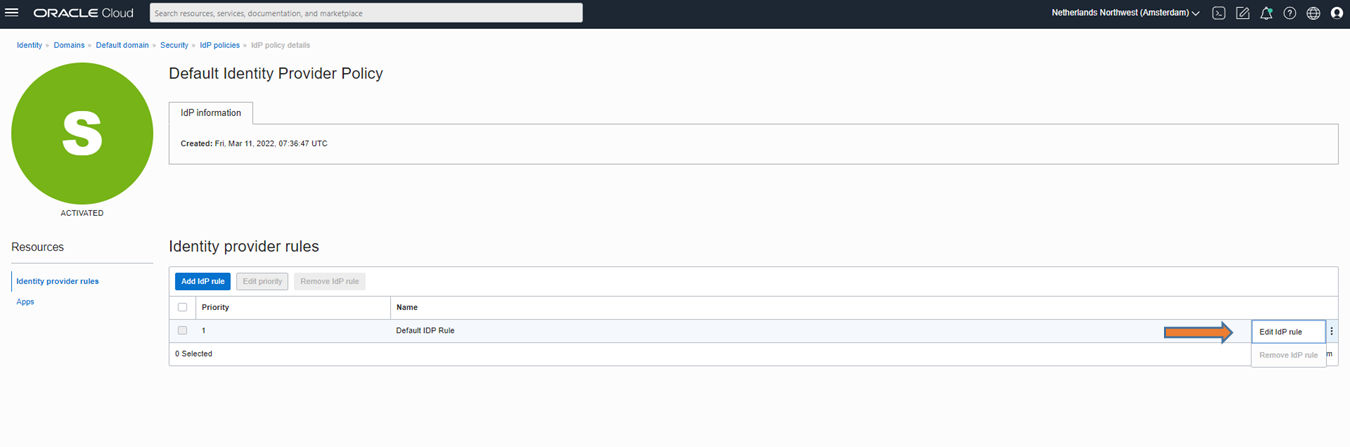
Step 17: In IAM-Domains, the IDP policy has to be adjusted so that a login with keycloak will be possible. To do this, select “IDP Policies” in the menu and select the default policy there. This means that the keycloak is globally approved as a login option. Restrictions, e.g. to only one application, are possible via IDP policies and rules.

Step 18: In the policy, select the preceding rule for editing.
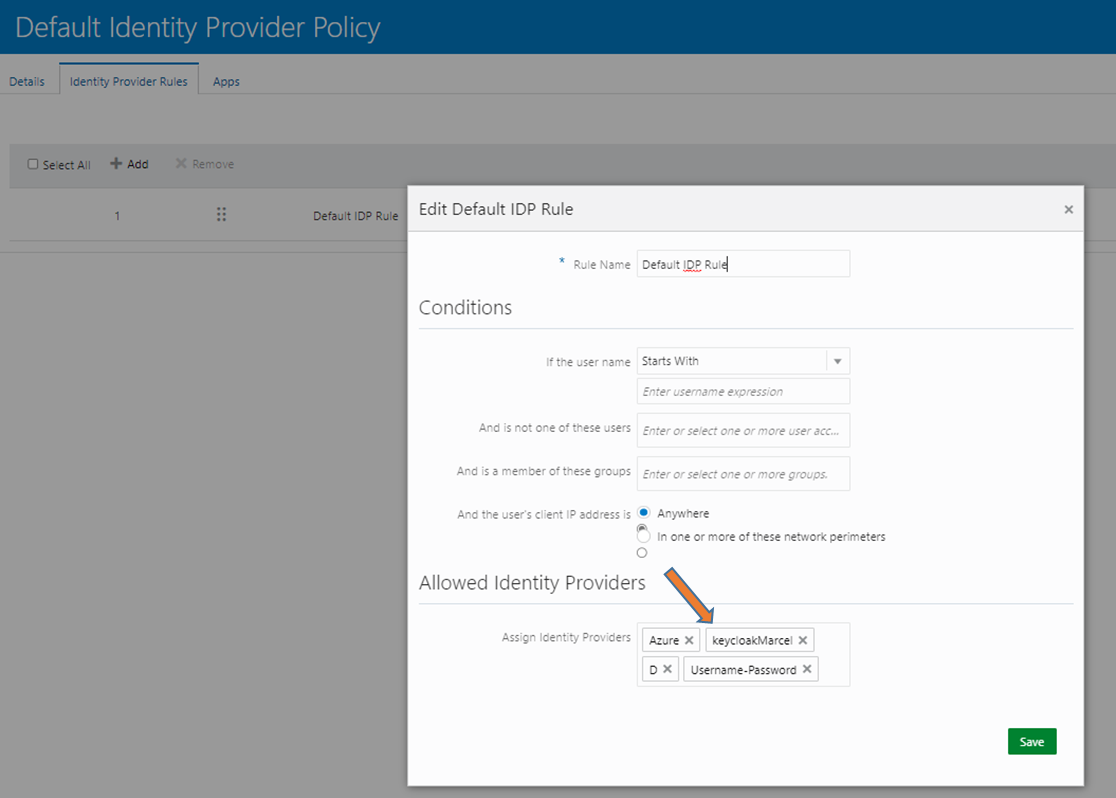
Step 19: Click in the rule in the provider field. This will display all available IDPs that are not yet included. With the addition and saving, the login option is already active. If keycloak is not in the selection, the IDP has not been activated (see step 14).

Step 20: The login screen for the IAM-Domain (in the example it was the default domain) now has the login button for keycloak. This screen would allow the user to choose as valid login methods Localuser, AzureMichael (Federation), Test and keycloak (Federation). The logn screen is customized thourgh the IDP polices (onyl valid options for login are shown) and customization of the screen at all which was not choosen for this screen.

If the login with the credentials in keycloak was successful (left part of the image) and the SAML response was without problems, then the user is also logged in to OCI (right part of the image).

This ends the step-by-step configuration.
Troubleshooting of error: “IAM could not authenticate User”
- Using the Browser Development Tool (Network) and decoding the SAML response (there is no other useful debug log for SAML)
- For the SAML response, NameID must be set (in our configuration): ok?
- The NameID value is matched to the “primary email” (in our configuration) in IAM domain/IDCS: ok?
- With this email there is only one user account in the IDCS/IAM domain: ok?
- User account is active in IDCS/IAM domain: ok?
- In SAML only the email is passed in the attributes section: ok?
If not, reduce the SAML response and try only email mapper in Keycloak (like in this configuration)
Appendix: Use of IDCS instead of IAM-Domains:
In the following, the configuration steps 1-3 and steps 12-20 with IDCS domains instead of IAM domains. The keycloak configuration (step 4-11) is the same as for OCI IAM domains, please switch to the top area.
Step 1: In IDCS select the menu item “Applications” and there “Add Application” and as type SAML.

Step 2: Give the application a name to get to the following screen with “Next”. The name doesn’t matter because the application can be deleted later.

Step 3: Download the two files offered here and name them so that they can be imported into keycloak without a doubt. Then complete the creation with Finsih and the SAML application can be deleted.

Step 4-11 is same as OCI IAM Domains, see previous section.
Step 12: In IDCS select the menu item “Security” and there the entry “Identity Providers”. Then select “Add SAML IDP” to set up the SAML Federation.

Step 13: Enter a name and description in the wizard and click on “Next”.

Step 14: Now upload the keycloak metadata file here. Signature setting matches that of keycloak.

Step 15: The mapping is defined here. NameID remains, this is the area in the SAML statement in which the user is specified. Since the email is transferred by the user, email must also be specified here (or primary email address) and email as formatting. Continue with “Next”.

Step 16: The configuration of the IDCS IDP SP is displayed here. Since we had already downloaded them in step 2, we do not need these files. The next screen with the test can also be skipped. The test is carried out after the configuration has been completed. Of course, it is important to activate it at the end of the wizard. If you forget to activate it, the IDP policy configuration is also not possible.

Step 17: In IDCS, the IDP policy still has to be adjusted so that a login with keycloak is even possible. To do this, click “IDP Policies” in the menu and select the default policy there.

Step 18: Select the default rule here. This means that the keycloak is globally approved as a login option. Restrictions, e.g. to only one application, are possible via IDP policies and rules.
Select the previous rule to edit.

Step 19: In the rule, click in the “Assign Identity Provider” field. This means that the IDPs that are not yet included are displayed and can be selected. With the addition and saving, the login option is already active. If keycloak is not in the selection, the IDP has not been activated (see step 16).
Step 20: The login screen for IDCS now has the login button for keycloak. All other permitted login methods are also shown, in this case Local User and Azure Federation.

If the login with the credentials in keycloak was successful (left part of the image) and the SAML response without problems, then the user is also logged in to IDCS (right part of the image) and in OCI if IDCS was used for the OCI login.

This ends the configuration description. For troubleshooting see the IAM Domains section.