A common pattern for integrating backends is to use an API gateway. The API GW ensures that the caller is authenticated so that the backends connected to the gateway cannot be called anonymously. In addition, it can also check the authorization. The gateway provides additional benefits, including throttling, to limit the maximum number of requests.
The following blog describes authentication and authorization with the OCI API Gateway. Two use cases are presented here that deal in particular with the interaction of the OCI IAM (IDCS or domains or their tokens) and the API Gateway. The integration here is based on JWT (more precisely Access Token) and could therefore be applied to other IAM systems. The OCI API Gateway is not hardwired to OCI IAM. The implementation of the use cases does not require any programming, only configuration via UI and rest calls. Basic knowledge of OAuth is helpful. For a short test, a rest client like Postman and a JWT decoder is sufficient.
The target scenario with the two use cases can be presented as follows:
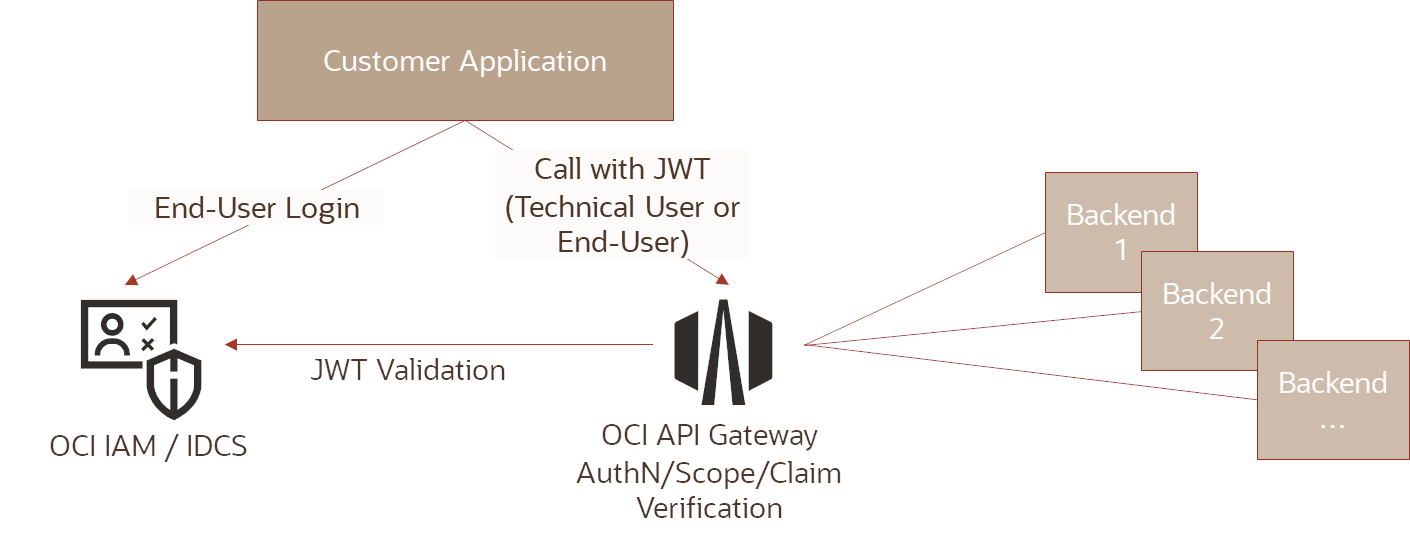
Overview if the Use Cases:
- Use case 1 – JWT of a technical user: The application gets an access token (client credential flow) from the IAM and sends it with every API call in the http header. Optionally, the token also contains scopes that have been specially defined for the resources. The API Gateway checks the token against the IAM for validity and optionally for the scopes.
- Use case 2 – JWT of the registered user: The application sends the user’s access token with every API call in the http header. The IAM issued the access token in such a way that it optionally contains the necessary claims. The API Gateway checks the token against the IAM for validity and optionally for the claims.
The prerequisite for both use cases is an environment in which the OCI IAM (IDCS or IAM domains as admin) and an API Gateway (or only a deployment on an API Gateway for configuration) can be used. The gateway must be reachable via the test client.
If these configurations are not powerful enough:
- the JWT can be created individually by the application as an “assertion”. An example of this can be found here: https://www.ateam-oracle.com/post/authentication-and-user-propagation-for-api-calls
- authentication and authorization can be coded completely individually. For this purpose, the API Gateway offers the “Function” authentication type. An example of this with node.js can be found here: https://www.ateam-oracle.com/post/how-to-implement-an-oci-api-gateway-authorization-fn-in-nodejs-that-accesses-oci-resources
Use Case 1 – JWT of a technical user
- Creation of a Confidential Application of the Type Resource Server with the desired audience and scopes
Steps 1 and 6 can be omitted if only the authentication is to be checked - Creation of a confidential application as a client which is assigned the desired scopes
- In the client or in the test Postman configuration of the Confidential Client, this access token is transferred to the API Gateway when called
- Creation of a token and control of the access token on scopes, issuer, audience
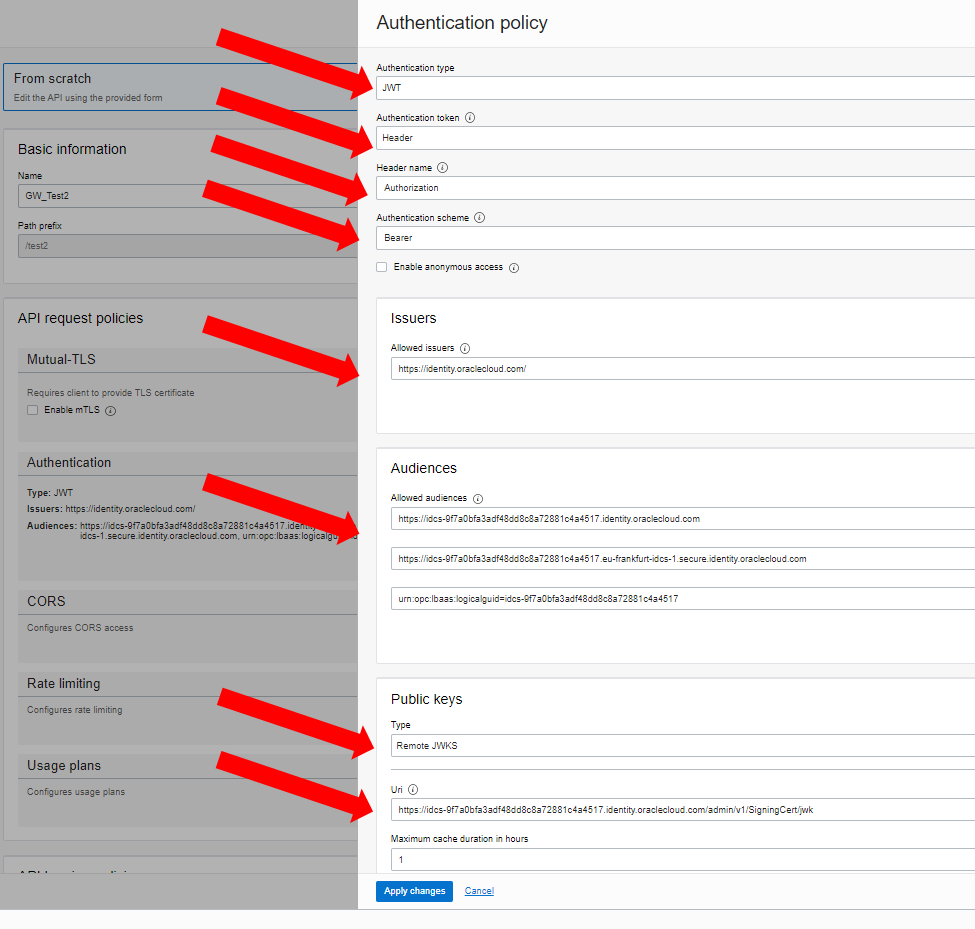
- Configuration of the deployment of the API gateway in the authentication area, type JWT/Header/Authorization/Bearer. All other information has the access token and can be copied out. The jwk link is <IDCS/IAM instance>.identity.oraclecloud.com/admin/v1/SigningCert/jwk
- Optionally enter “Scope” in the “Advanced” area for the claim and the necessary scope(s) as the value. Instead, the specification of the scopes can also be entered via API route, in which case the “Advanced” area remains empty.
- Test with the token created in step 4
Use Case 2 – JWT of an end user:
- Specify the user attribute that the permission should contain
An existing field can be used for this or new fields can be defined via a schema extension (in the UI).
Steps 1, 2, 3 and 8 can be omitted if only the authentication is to be checked - Define the field from step 1 as a custom claim for the access token (the IAM must be enabled via service request to use custom claims)
- Creating a confidential application as a client for the login flow
- Create a test user with a password and the appropriate entries in the field from step 1
- Define the “Password Flow” in the application or in Postman, this requires the client from step 3 and the credentials from step 4
- Creating a token and checking the access token for claims (claim name according to step 2), issuer, audience
- Configuration of the deployment of the API gateway in the authentication area, type JWT/Header/Authorization/Bearer. All other information has the access token and can be copied out. The jwk link is <IDCS/IAM instance>.identity.oraclecloud.com/admin/v1/SigningCert/jwk
- Optionally, in the “Advanced” area for Claim, enter the claim name according to step 2 and the value of the field as value.
- Test with the token created in step 6
Details for the steps of Use Case 1: JWT of a technical User
The following representations assume an IAM UI (IDCS or IAM domains, screens are similar to IDCS but in IAM domain) opened as admin and the API gateway with an existing deployment. The steps correspond to those of the Quick Start Guide,
Step 1: Create a Confidential Application of type Resource Server with the desired audience and scopes.
Select the “Applications” menu in IAM and create a new application there with “Add”. Click on Type “Confidential Application”.

Enter a name for the Resource Server (not shown), skip Client Config (not shown), and define the Resource Server. In the example audience application1 and a few scopes. Then save and activate. Further information is not necessary. The scope “ApplicationReadA” is used in the example.

Step 2: Creation of a Confidential Application as a client which is assigned the desired scopes
Create an application of type Confidential Client again and give it a name (not shown). Click on “Register Client” in the next screen (not shown).
Select at least Client Credentials for the grant types and select the Resource Server from step 1 in the Resources area via “Add Scope” and select the desired scopes. In the example only applicationReadA, further scopes would be possible. All other information can be left as it is. Continue through the wizard, save and activate. At the end the client credentials are displayed, please copy the client ID and secret.

Step 3: Configuration of the Confidential Client in the client or in the Postman test
Configuration of the client credential flow in Postman

Step 4: Create a token with the client from step 3 and check the access token for scopes, issuer, audience
Creation of a token to get a scope for the resource server from step 1. If several scopes are to be used, they are separated by a blank.
curl --location --request POST 'https://idcs-9fxxx.identity.oraclecloud.com//oauth2/v1/token' \
--header 'Authorization: Basic NDA3Yxxx' \
--header 'Content-Type: application/x-www-form-urlencoded' \
--data-urlencode 'grant_type=client_credentials' \
--data-urlencode 'scope=anwendung1AnwendungReadA'
The token looks like this in excerpts and contains the scope as well as the audience and the issuer. This means that the token fits and these values can be copied/pasted into the API gateway configuration to avoid typing errors:
{
...
  "iss": "https://identity.oraclecloud.com/",
  "tok_type": "AT",
  "aud": "anwendung1",
  "sub_type": "client",
  "scope": "AnwendungReadA",
  "client_name": "ResourceServerUse",
...
}
Step 5: Configuration of the deployment of the API Gateway in the Authentication area,
Call the API Gateway Deployment

Press in the Authentication section the edit button to configure authentication.

Inputs are of type JWT/Header/Authorization/Bearer. The access token from step 4 has all other information and can be copied out (issuer, audience). The jwks link is <IDCS/IAM instance>.identity.oraclecloud.com/admin/v1/SigningCert/jwk Save the changes and save the deployment.
For easier verification, authorization will only be added after a successful test.

Now pass the token from step 3 in the header as a test with the rest client. The call then looks something like this
curl --location --request GET 'https://cym2xxxx.apigateway.eu-frankfurt-1.oci.customer-oci.com/test/1' \
--header 'Authorization: Bearer eyJ4NXQjUzI1NiI6IllMOFhNxxxx'
If the test was successful, the scope can optionally be checked, see next step.
Step 6: Optionally store the desired authorization. There are two ways to do this, globally by deployment or by individual route.
Global: Expand the “Advanced Options” area and enter “scope” for Claim Key and the necessary scope as Value. The claim field is an exact string match, i.e. an enumeration as in the case of scopes is not resolved. In other words, in the case of scopes, this must be all scopes! If a selection is to be made, the next variant is to configure scopes for the route.

Save and wait for the renewed deployment, then continue with the final test.
Per route: The specification of the scopes can also be entered per API route instead of globally, then the “Advanced” area, the “global” example remains empty.
Go for Route Request Policies in the desired route and in the section Authorisation press the edit button.

Specifying “Any” allows one or more scopes to be specified.

Save and wait for the renewed deployment, then continue with the final test.
If neither “global” nor “per route” fits, there is the possibility of a function for an individual design.
Step 7: Test with the token created in Step 4
The call corresponds to that from step 5, except that now the scope is also evaluated.
curl --location --request GET 'https://cym2xxxx.apigateway.eu-frankfurt-1.oci.customer-oci.com/test/1' \
--header 'Authorization: Bearer eyJ4NXQjUzI1NiI6IllMOFhNxxxx'
This ends the description of use case 1.
Details to the steps Use Case 2: JWT of an end user
The following representations assume an IAM UI (IDCS or IAM domains, screens are similar to IDCS but in IAM domain) opened as admin and the API gateway with an existing deployment. The steps correspond to those of the Quick Start Guide,
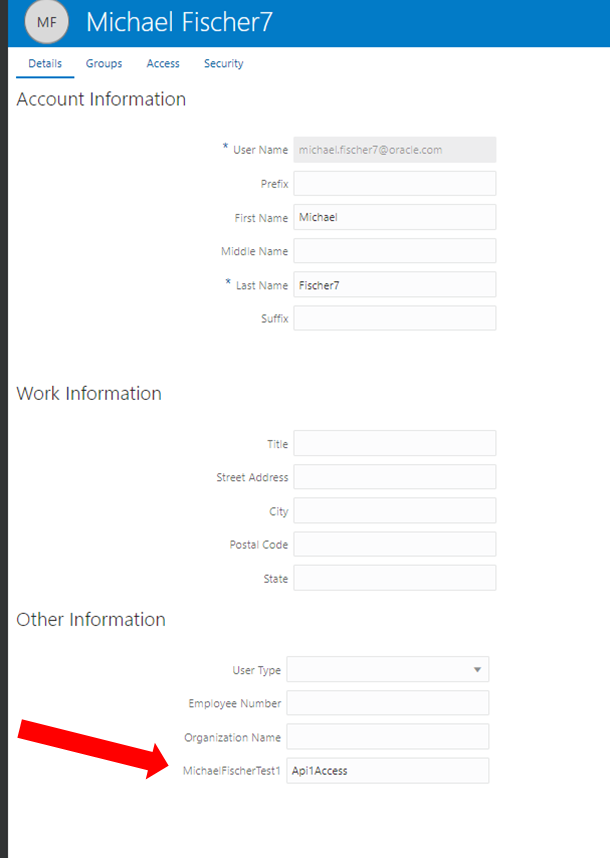
Step 1: Determine the user attribute that should contain the permission. Steps 1, 2, 3 and 8 can be omitted if only the authentication is to be checked.
An existing field can be used for authorization or new fields can be defined via a schema extension (via UI).
In the example, a schema extension was used and an attribute “MichaelFischerTest1” was added and a value was inserted there for the test user, which is later checked against (here Api1Access).
Step 2: Define the field from step 1 as a custom claim for the access token (the IAM must be enabled via service request to use custom claims)
A custom claim can only be created via REST API. If the feature itself is not activated, each call ends with an error. The confidential client that executes this call, or the token that is copied from the UI by a user, must have the IAM Domain Admin role.
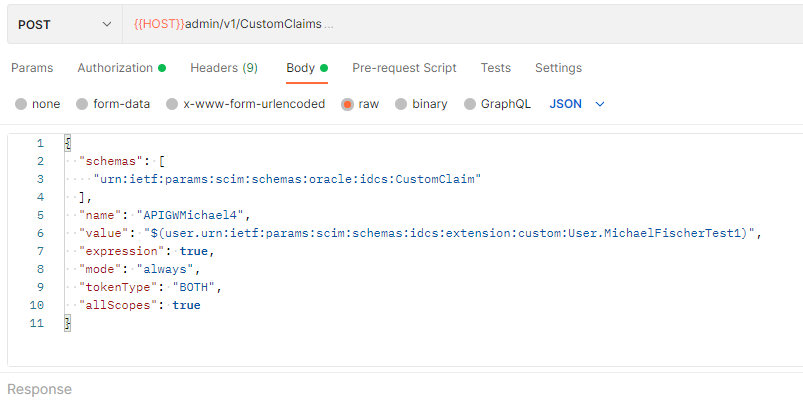
Documentation Claims: https://docs.oracle.com/en/cloud/paas/identity-cloud/rest-api/custom-claims-token.html
Step 3: Create a confidential application as a client for the login flow
This corresponds to step 2 from use case 1 or using the client from the previous step.
Only IAM app roles are necessary but no resources/scopes.
Step 4: Create a test user with a password and the appropriate entries in the field from step 1
A user can be created in IAM via the UI or REST. A password can also be set via REST, in the case of the UI via the password reset, which requires a valid email from the end user. For the test user used here, see step 1. Username and password are required in the next step. The appropriate authorization is set in the MichaelFischerTest1 field.
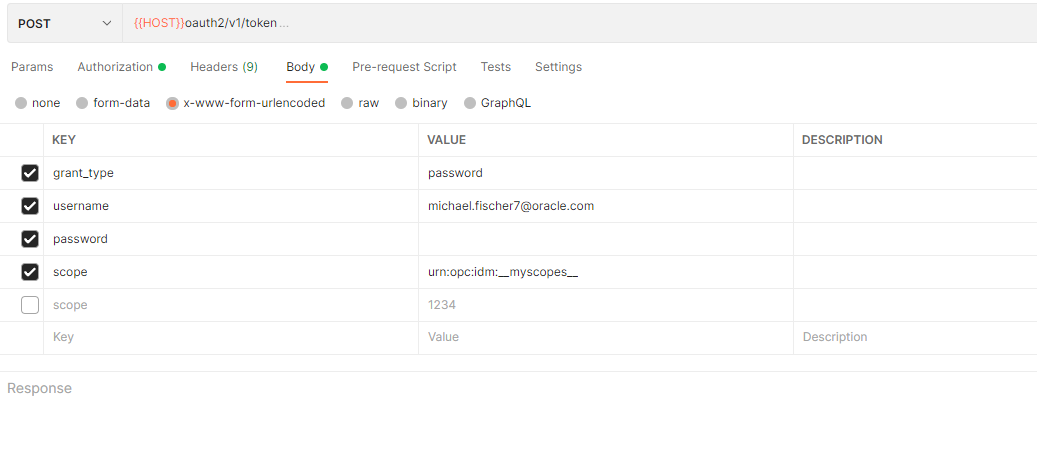
Step 5: Define the “Password Flow” in the application or in Postman, this requires the client from step 3 and the credentials from step 4
Since the custom claims are returned in all scopes, _myscopes_ is specified here in the scope.
Step 6: Creating a token and checking the access token for claims (claim name according to step 2), issuer, audience
The token should look something like this in excerpts:
{
...
"onBehalfOfUser": true,
"iss": "https://identity.oraclecloud.com/",
"user_displayname": "Michael Fischer7",
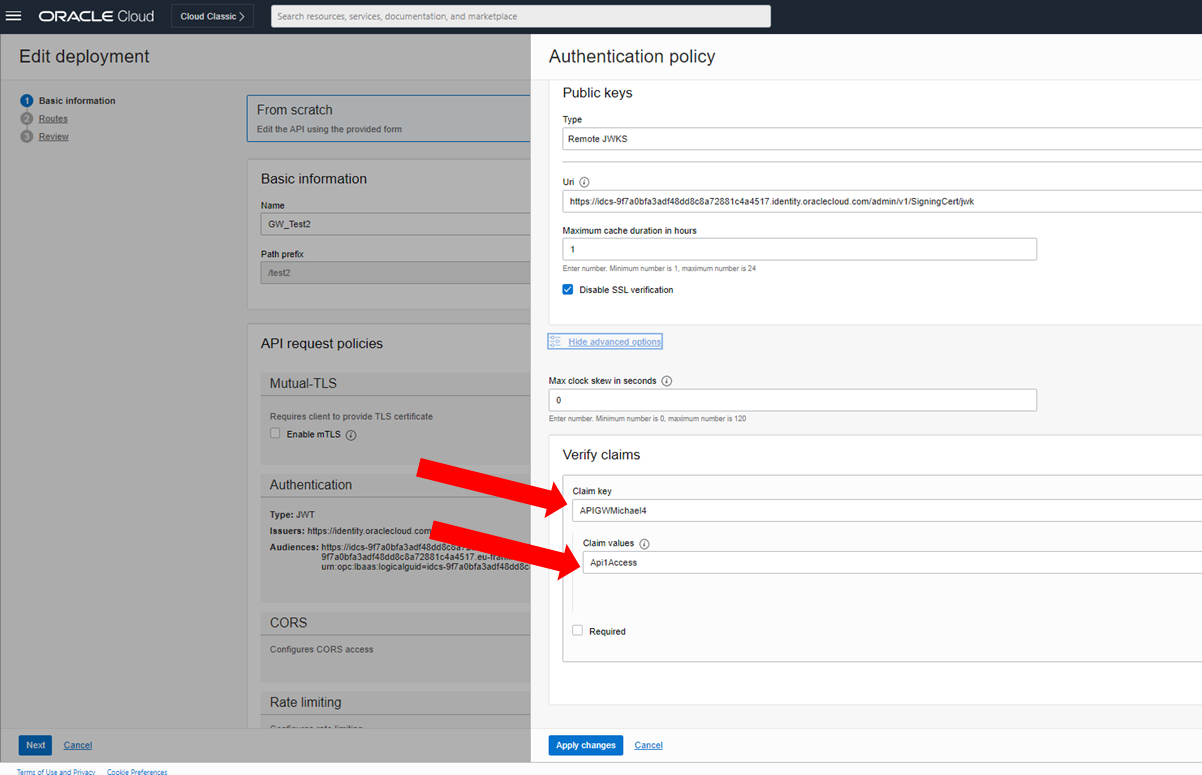
"APIGWMichael4": "Api1Access",
"tok_type": "AT",
"aud": [
"https://idcs-9f7xxx.eu-frankfurt-idcs-1.secure.identity.oraclecloud.com",
"https://idcs-9f7xxx.identity.oraclecloud.com",
"urn:opc:lbaas:logicalguid=idcs-9f7xxx"
],
...
}
Step 7: Configuration of the deployment of the API Gateway in the Authentication area
Inputs are of type JWT/Header/Authorization/Bearer. The access token from step 6 has all other information and can be copied out (issuer, audience). The jwks link is <IDCS/IAM instance>.identity.oraclecloud.com/admin/v1/SigningCert/jwk Save the changes and save the deployment.
For easier verification, authorization is only added after a successful test.
Now pass the token from step 6 in the header as a test with the rest client. The call then looks something like this
curl --location --request GET 'https://cym2xxxx.apigateway.eu-frankfurt-1.oci.customer-oci.com/test2/1' \
--header 'Authorization: Bearer eyJ4NXQjUzI1NiI6IllMOFhNxxxx'
If the test was successful, the claim can optionally be checked, see next step.
Step 8: Optionally define the authorization.
Expand the “Advanced option” area and enter the claim name under Claim Key (see step 2) and the necessary claim value as Value.
Attention, this is a string match, i.e. the full length of the claim must match that of the token.
Save and wait for the renewed deployment, then continue with the final test.
Step 9: Test with the token created in Step 6
The call corresponds to that in step 7 except that the claim is now also evaluated.
curl --location --request GET 'https://cym2xxxx.apigateway.eu-frankfurt-1.oci.customer-oci.com/test2/1' \
--header 'Authorization: Bearer eyJ4NXQjUzI1NiI6IllMOFhNxxxx'
This ends the description of Use Case 2.