To ensure that the backends connected to the gateway cannot be called anonymously, the API gateway ensures the authentication and authorization of the caller if required. The OCI API Gateway can use a function (FN) as an authorizer via custom authentication, but this must be programmed and provided. If no additional component is to be used for customer-specific authentication, the client’s JWT assertions can be used here. The benefit of this solution is that no separate code is used on the gateway and authorization can also be used via scopes in the routes.
The security is based on the fact that the client stores the certificate securely so that no third party can build a corresponding JWT to gain access to the APIs. In addition to the usual solutions, the private key could also be stored as a so-called secret in OCI Vault. Central maintenance and interchangeability or “rotation” of the keys would be possible at the same time.
The target scenario, without using secrets for additional security, can be represented as follows:
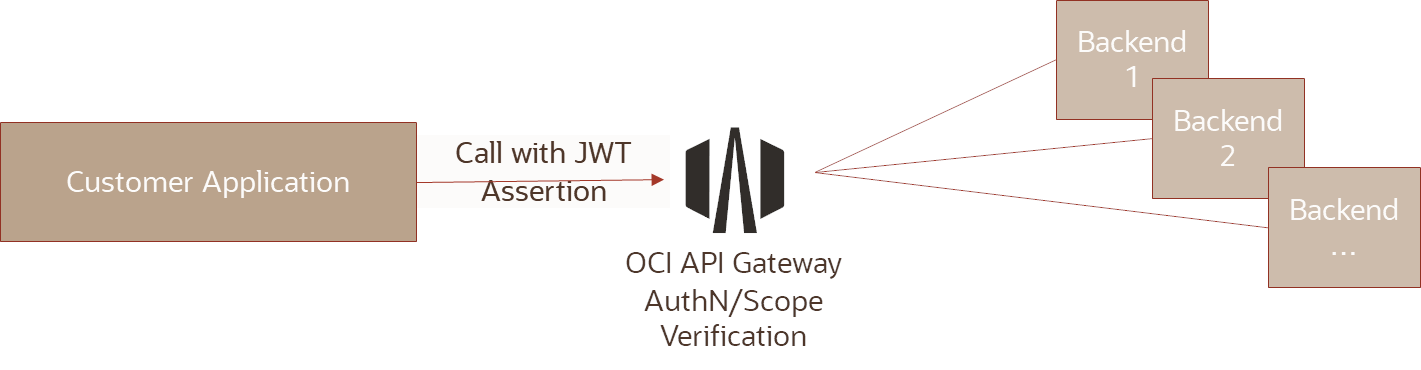
The function flow is in this constellation as follows: The client creates a JWT assertion that is signed with the private key of the client. This is checked by the API Gateway using the client’s public key. After a positive check, the API Gateway grants access. If scopes are also stored with the routes, these can be checked as authorization for the individual backend. The scopes must of course be contained in the JWT and have the advantage that they can be within a token from different resources or resource servers.
Necessary steps are:
- Creating a public/private key pair in PKCS8 format. From a technical point of view, this is possible via OpenSSL, for example
- Create a JWT assertion on the client signed with the private key from step 1. The minimum information to be entered is “kid”: “name”, “kty”: “RSA”, “alg”: “RS256”.
- Creating a JWK with “kty”: “RSA”, “n”: “public key…”, “e”: “according to public key…”, “alg”: “RS256”, “kid”: “name” , “use”: “sig”
- The client must send the JWT with every call, e.g. in the header. This configuration must match that of the API Gateway, which is carried out in the next step.
- Configure the authentication in the API Gateway during deployment: Type JWT, e.g. with transfer in the header, as authorization and bearer token. Issuer and audience must match those of the JWT and can be chosen “freely”. Specify static key and JWK, as KID copy that of the JWK from step 3/4 and the JWK
- Optionally specify the scopes that can be contained in the JWT for the routes.
- Now it can be tested
More information on the individual steps:
to step 1: creation of the key pair
Example of creating the key pair in PKCS8 with openssl
Generate key:
openssl genrsa -out keys.pem 2048
Extract public key:
openssl rsa -in keys.pem -pubout -out public_key.crt
Extract private key:
openssl pkcs8 -topk8 -inform PEM -outform PEM -nocrypt -in keys.pem -out private_key.key
to Step 2: Creating a JWT assertion on the client:
A program or tool of choice can be used for this purpose.
Structure of the JWT:
Header
{
    "kid": "suitable_name",
    "kty": "RSA",
    "alg": "RS256"
}

Payload
{
    "sub": "suitable_subject",
    "iss": "suitable_issuer",
    "aud": ["suitable_audience"],
    "scope": "Desired_scopes_separated_by_spaces",
    "iat": 1661933016,
    "exp": 1661936616
}
Suitable means that the respective value must correspond to the syntax and enable base64 encoding. The values (kid, iss, aud) must also be entered in the API Gateway in the configuration. The scopes can be used 1:1 for matching with API gateways routes. iat and exp are the validity period of the JWT.
After the token has been created as listed, it must be base64 URL Safe encoded, since the token is transmitted when it is called.
semi-code: token = base64_urlsafe_encoding(Header) +"."+ base64_urlsafe_encoding(Payload)
Then sign the token with the private key.
semi-code: signingstring = sign(token, private_key)
and append the signature to the token
semi-code: JWT = token +"."+ signingstring
A token has three parts with a dot as a delimiter and then looks something like this (xxxx for cut out characters). Part1 is the header, part2 is the payload and part3 is the base64 signing:
eyJraWQiOiJTSUdxxxx.eyJzdWIiOiJjZTk0NDEyMxxxx.gytkUMdDLrTUCva-UD8CQuM5Wl3k1bK_cEq1LOjyyxxxx
to Step 3: Create a JWK (key for verifying the signing of the JWT)
Build the corresponding JWK with a suitable tool, the public key is then copied into the structure. The correct format (PKCS8) can be recognized by the fact that it starts with “—–BEGIN PUBLIC KEY—–” and ends accordingly.
The JWK should have the following structure. “n” is the public key encoded.
{
  "kty": "RSA",
  "n": "s2mZMRqrDcV65Fxxxx",
  "e": "AQAB",
  "alg": "RS256",
  "kid": "name_from_step",
  "use": "sig"
}
to Step 4: Client Call with the JWT
As an example, a call with Postman assuming that the API Gateway is configured accordingly in step 5 (Header/Authorization/Bearer):
curl --location --request POST 'https://c5art3mxxxx.apigateway.eu-frankfurt-1.oci.customer-oci.com/test3/1' \
--header 'Authorization: Bearer eyJraWQiOiJTSUdxxxx.eyJzdWIiOiJjZTk0NDEyMxxxx.gytkUMdDLrTUCva-UD8CQuM5Wl3k1bK_cEq1LOjyyxxxx
to Step 5: API Gateway Configuration
Select “Authentication” during deployment and open with “Edit”.
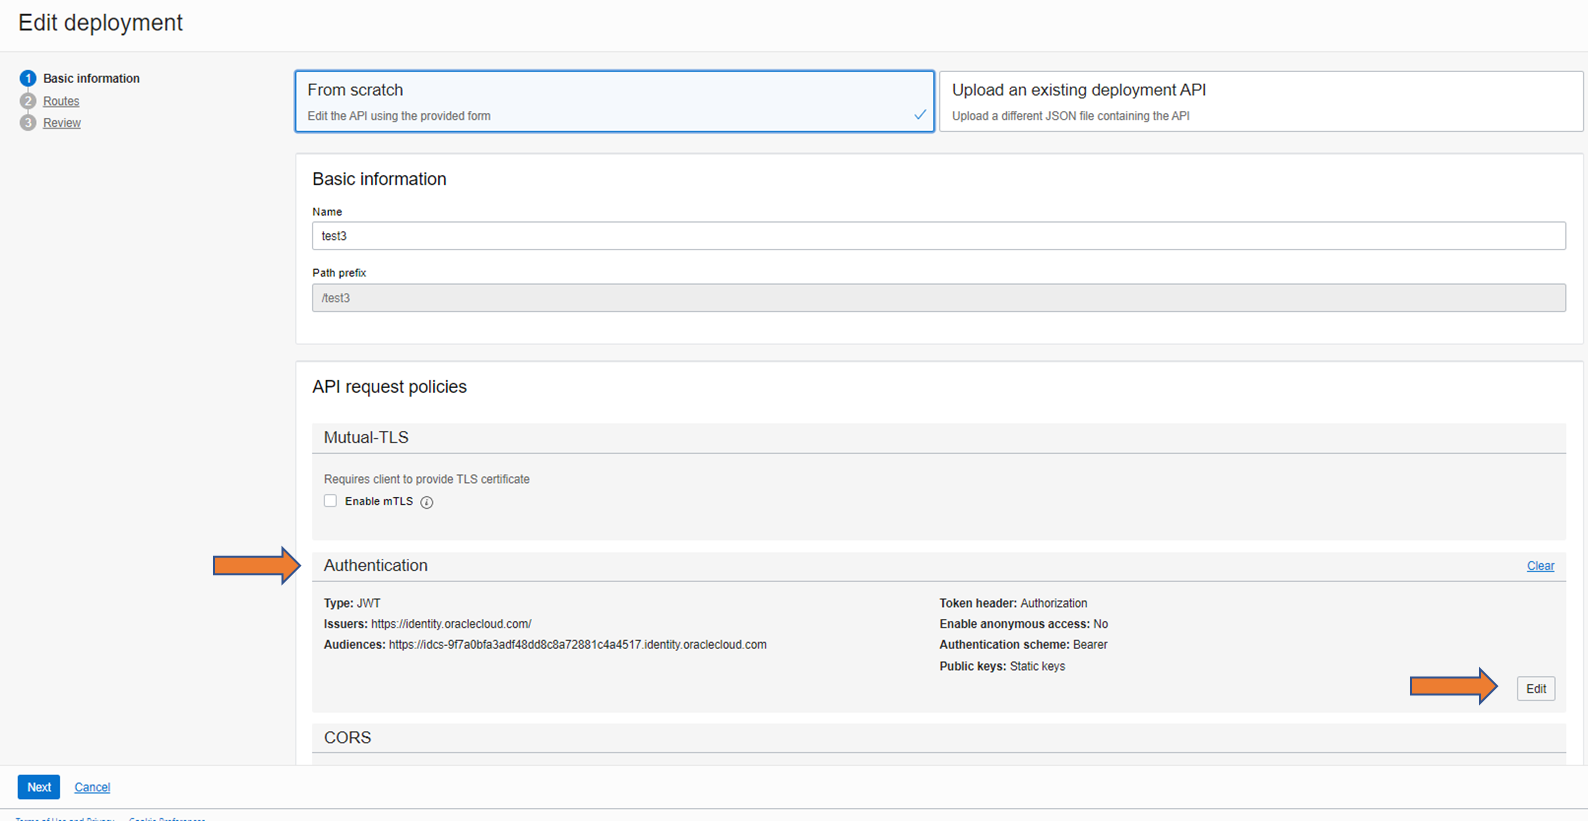
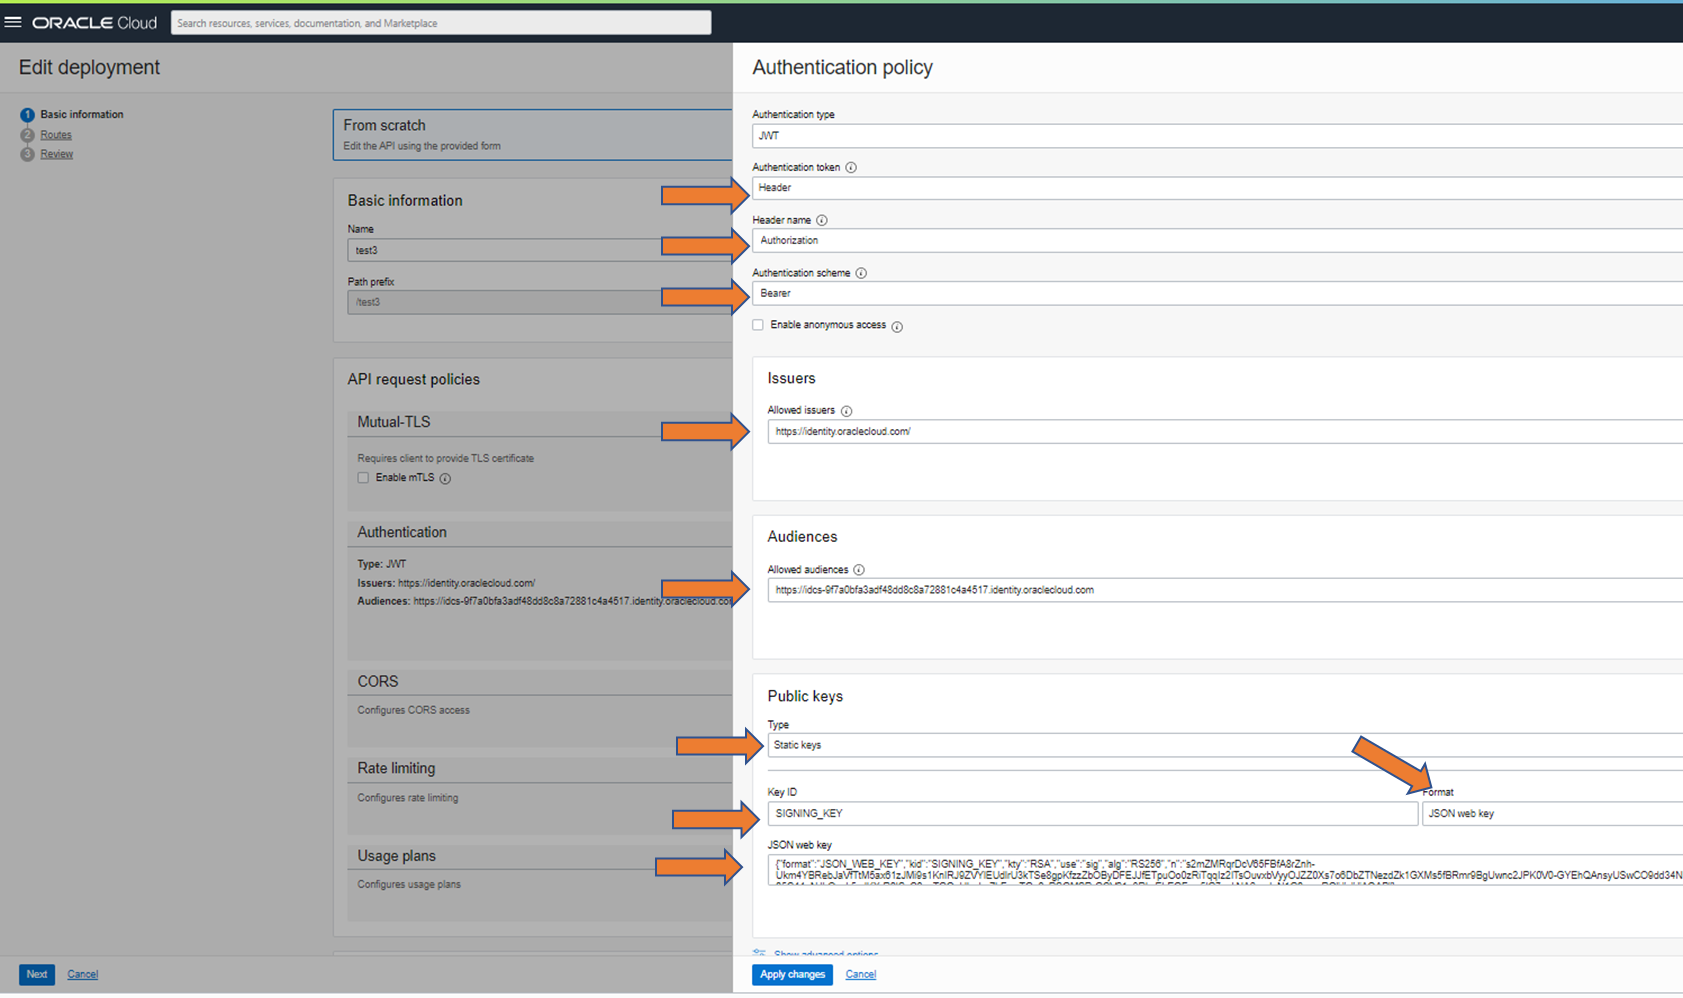
Select “JWT” as the type and then select the information that matches the caller. In the example, transfer via http header, via “Authorization” and “Bearer”; This corresponds to the example call from step 4.
The “Issuer” and the “Audience” must correspond to the JWT from step 2.
Select “Static keys” in the “Public keys” area, set the “Key ID” according to step 2 and select “JWK” as the format.
Copy in the JWK from step 3 and save everything with “Apply Changes”. Then save the complete deployment as well.
This means that a test with authentication is already possible.
to step 6: Optional authorization at the routes
If the individual routes are to be protected by an authorization, this can be specified in the “request policies” area. Expand this area and edit the “Authorization” area.
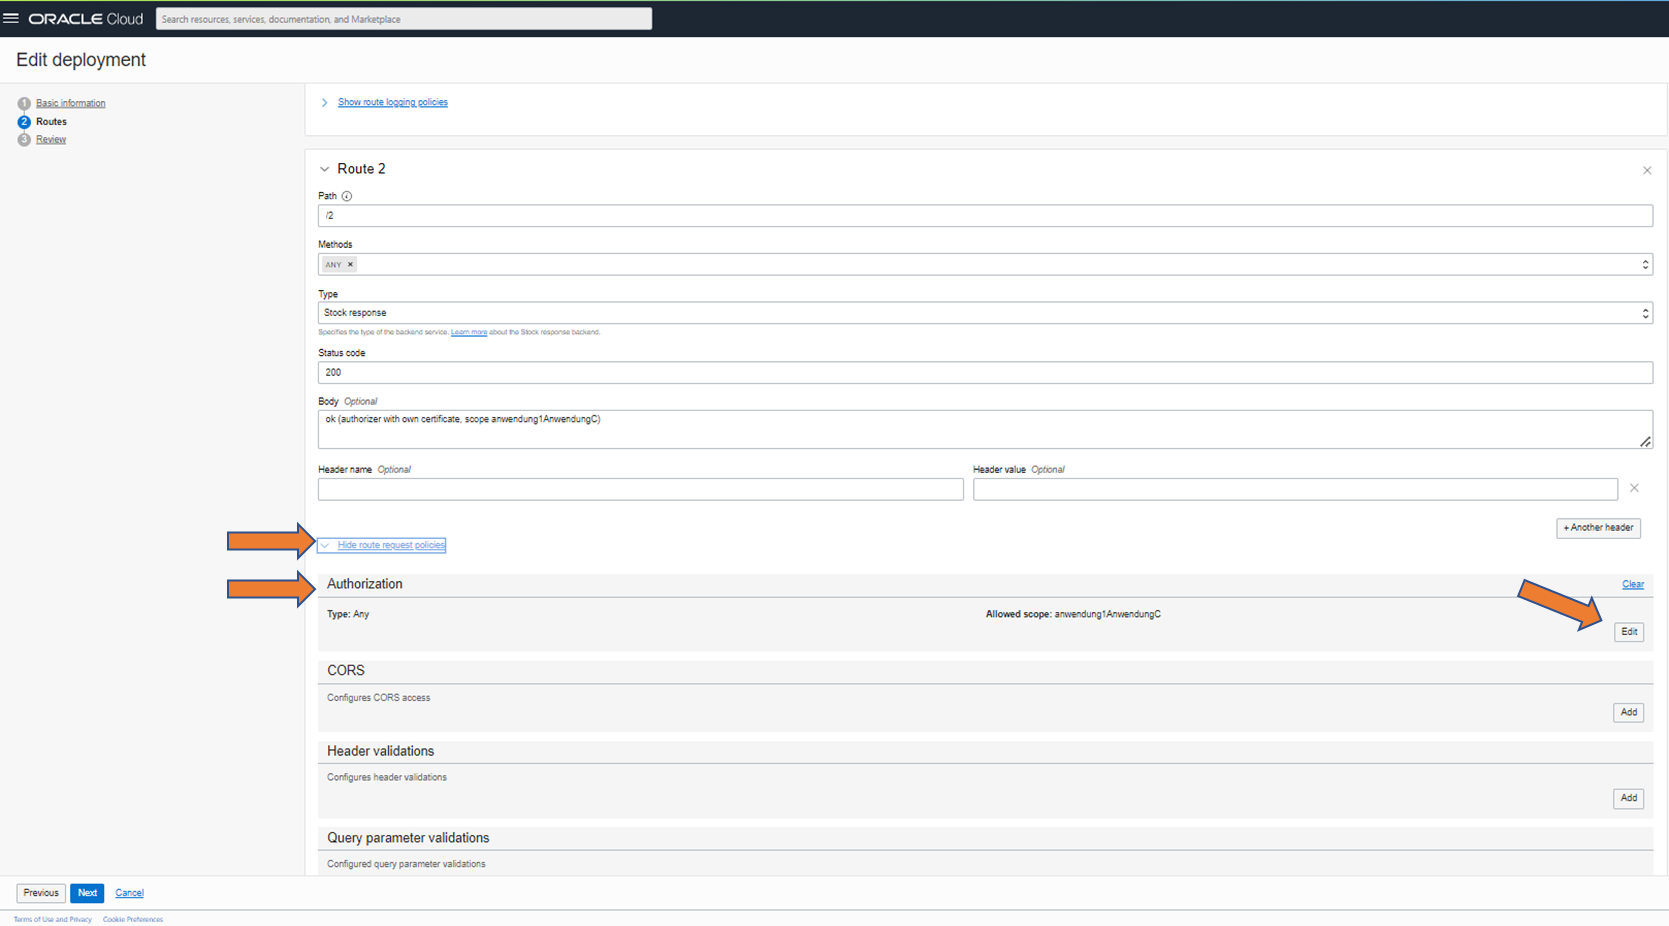
Select “Any” for Authorization so that all scopes specified below lead to successful authorization. These scopes must be included 1:1 in the JWT. A concatenation with audience is not required.
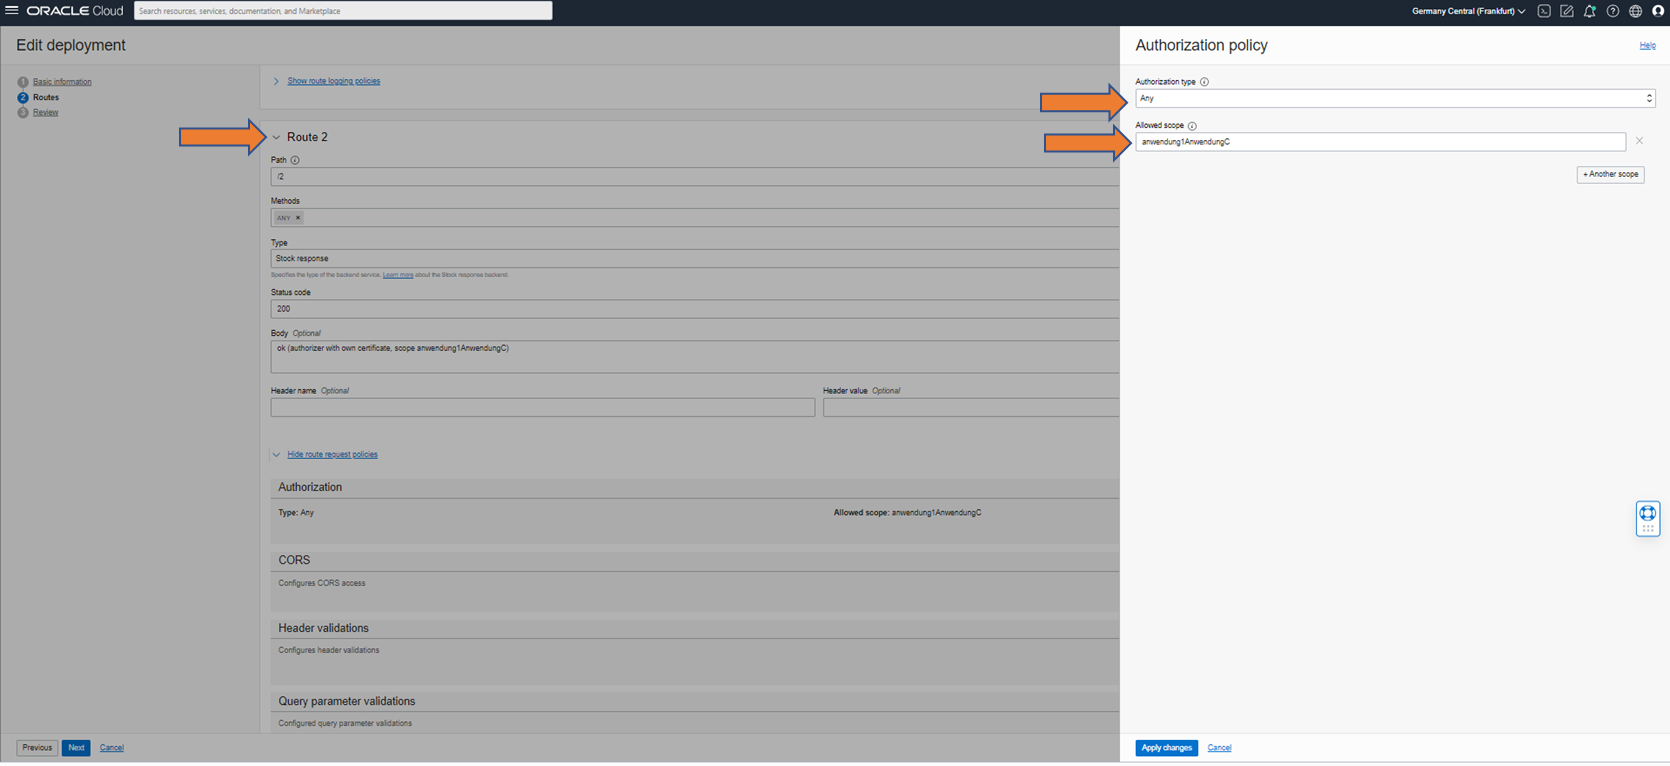
This enables a test with authentication and authorization.
to step 7: test
The rest call listed in step 4 can be used for testing in both cases, with or without authorization.
In the event of undesirable behavior, it makes sense to switch on the log on the API gateway. The execution log describes the errors such as key not found if the KID does not match or other information if issuer or audience does not match. There is a global message “invalid token” if the public key does not match the signature.
Documentation API Gateway and Static Keys as part of the JWT: https://docs.oracle.com/en-us/iaas/Content/APIGateway/Tasks/apigatewayusingjwttokens.htm