In this post, we’ll show how to combine OCI Service Operator for Kubernetes (OSOK) and Kube Resource Orchestrator (kro) to define and deploy a complete application stack through a single Kubernetes-native workflow.
Modern applications span both Kubernetes resources and cloud infrastructure services. Having to manage these layers separately can introduce complexity, inconsistency, and operational overhead.
What is OSOK?
OSOK is an open-source Kubernetes add-on from Oracle, that lets you create, manage, and connect to supported OCI service resources from a Kubernetes environment. Kubernetes users can simply install OSOK and perform actions on OCI resources using the Kubernetes API, removing the need to use the OCI CLI or other OCI developer tools to interact with a service API.
OSOK is based on the Operator Framework, an open-source toolkit used to manage Operators. It uses the controller-runtime library, which provides high-level APIs and abstractions to write operational logic and provides tools for scaffolding and code generation for Operators.
The OSOK project includes operators for several OCI resources. Below is a sample specification for an OCI MySQL DB system resource. On applying this spec, OSOK will create the resource in OCI, reconcile any changes to the spec and delete the instance when the Kubernetes resource is deleted
apiVersion: mysql.oracle.com/v1beta1
kind: DbSystem
metadata:
  name: mysql-dbsystem-sample
spec:
  compartmentId: ocid1.compartment.oc1..exampleuniqueID
  displayName: mysql-dbsystem-sample
  shapeName: MySQL.2
  subnetId: ocid1.subnet.oc1..exampleuniqueID
  availabilityDomain: qqZb:US-ASHBURN-AD-1
  isHighlyAvailable: false
  adminUsername:
    secret:
      secretName: admin-secret
  adminPassword:
    secret:
      secretName: admin-secret
  description: OSOK mysql DbSystem e2e sample
  dataStorageSizeInGBs: 50
What is kro?
kro is an open-source Kubernetes-native framework that lets you create reusable APIs to deploy multiple resources as a single unit. You can use it to encapsulate a Kubernetes deployment and its dependencies into a single custom API. You define the API by describing its schema and underlying resources in YAML using a custom resource introduced by kro called the ResourceGraphDefinition (RGD). Below is a high-level outline for an RGD
apiVersion: kro.run/v1alpha1
kind: ResourceGraphDefinition
metadata:
  name: demo-app
spec:
# The schema defines the inputs and outputs for the custom resource API
  schema:
    apiVersion: v1alpha1
    kind: DemoApp
    spec:
# Inputs
      inputAttribute1: string | required=true
      inputAttribute2: string | required=true
      inputAttribute3: integer | default=50
...
# Outputs
    status:
      appInfo1: ${resource1.status.attribute}
      appInfo2: ${resource2.status.attribute}
...

# The resources defines the actual resources which will be created in Kubernetes.
  resources:
    - id: resource1
      template:
        apiVersion: v1
        kind: Secret
        metadata:
name: ${schema.spec.inputAttribute1}
...
    - id: resource2
      template:
        apiVersion: mysql.oracle.com/v1beta1
        kind: DbSystem
        metadata:
name: ${schema.spec.inputAttribute2}
...
When you apply an RGD, kro generates a new custom resource definition (CRD) for your application and validates the dependency graph. You can then create an instance of this custom resource like below and apply it. kro applies the spec inputs as needed, applies each resource spec, reconciles each resource on spec changes and deletes them when the instance is deleted.
apiVersion: kro.run/v1alpha1
kind: DemoApp
metadata:
  name: my-demo
  namespace: demo
spec:
  inputAttribute1: ...
  inputAttribute2: ...
Through this approach, kro introduces a schema-driven model, built-in dependency management, and validation mechanisms that ensure resources are correctly configured before deployment.
Why OSOK + kro?
When used together, OSOK and kro provide a powerful unified workflow. You can provision OCI infrastructure, such as a MySQL DB System, deploy Kubernetes workloads and manage dependencies between all components seamlessly. The result is a streamlined, fully declarative approach where both infrastructure and application resources are defined and managed through a single Kubernetes resource.
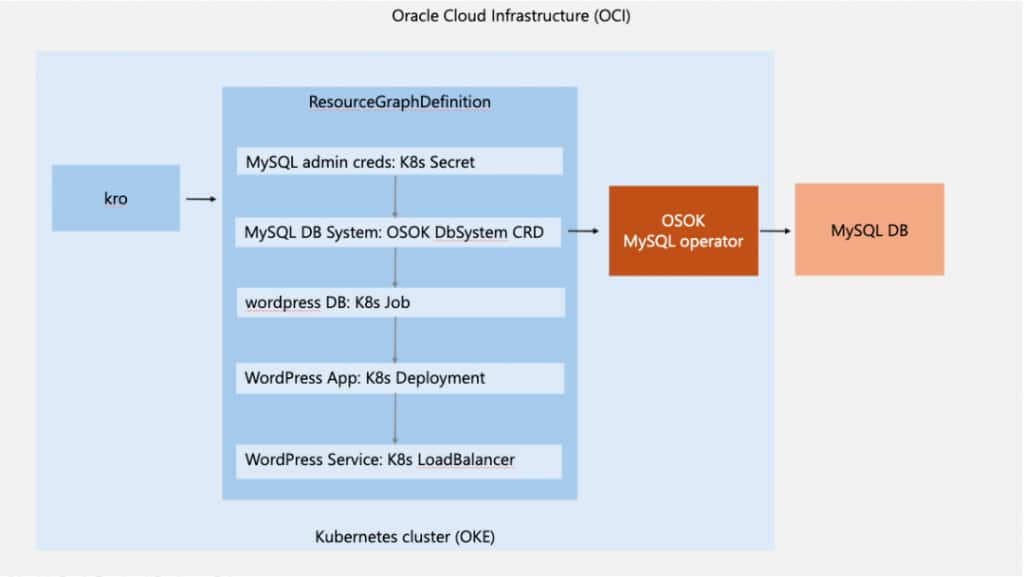
We will demonstrate this with a sample that deploys a WordPress application backed by an OCI MySQL Database Service instance. As shown in the diagram below, kro orchestrates the Kubernetes resources needed for the application based on the RGD. The RGD uses OSOK to provision the required OCI infrastructure, i.e. the MySQL DB System. The workflow ensures the following sequence
- Credentials are created first
- The MySQL DB System is provisioned
- A database is initialized
- WordPress is deployed and connected to the database
- The application is exposed via a LoadBalancer
Prerequisites
Before getting started, ensure you have:
- Access to an OCI tenancy and Identity Domain
- Permissions to create Dynamic Groups and IAM Policies
- An Oracle Kubernetes Engine (OKE) cluster
- A client machine with kubectl, helm and Docker
- Internet connectivity
Step 1: Set Up Your Kubernetes Cluster
Create an OKE cluster using the Quick Create workflow and configure access from your local machine. Ensure kubectl get nodes returns your cluster nodes successfully.
Step 2: Install OSOK
Install the required dependencies:
- Install the Operator SDK by using the installation instructions in the documentation
- Install the Operator Lifecycle Manager (OLM) using the command
operator-sdk olm installNow, deploy the OSOK package for MySQL by using the installation instructions in the documentation
Step 3: Install kro
Deploy Kube Resource Orchestrator (kro) in your cluster by using the installation instructions in the documentation.
Step 4: Configure OCI IAM
Create a dynamic group:
Any {instance.compartment.id = '<Kubernetes cluster compartment_ocid>'}Create policies:
IF the Kubernetes cluster is created in the root compartment
Allow dynamic-group <dynamic-group> to manage mysql-family in tenancy
Allow dynamic-group <dynamic-group> to use subnets in tenancy
Allow dynamic-group <dynamic-group> to {VCN_READ, COMPARTMENT_INSPECT} in tenancy
Allow dynamic-group <dynamic-group-name> to use tag-namespaces in tenancy
IF the Kubernetes cluster is created in a child compartment
Allow dynamic-group <dynamic-group> to manage mysql-family in compartment <compartment-name>
Allow dynamic-group <dynamic-group> to use subnets in compartment <compartment-name>
Allow dynamic-group <dynamic-group> to {VCN_READ, COMPARTMENT_INSPECT} in compartment <compartment-name>
Allow dynamic-group <dynamic-group-name> to use tag-namespaces in compartment <compartment-name>
Step 5: Prepare Required OCI Values
Collect the following:
- Kubernetes cluster Compartment OCID
- Kubernetes worker node subnet OCID
- Kubernetes cluster Availability Domain
- MySQL shape name (e.g., MySQL.Free) and Configuration OCID (see here)
Step 6: Define the Application Blueprint (RGD)
Now comes the most powerful part, defining your application as a ResourceGraphDefinition (RGD). This RGD will:
- Create a Kubernetes Secret for MySQL credentials
- Provision a MySQL DB System using OSOK
- OSOK creates a Kubernetes Secret containing connection details (e.g., Private IP), which is referenced by downstream resources.
- Initialize the WordPress database
- Deploy WordPress
- Expose it via a LoadBalancer
Key Concepts in the RGD
1. Dependency Management: Resources reference each other using expressions like ${mySqlSecret.metadata.name} which ensures proper execution order.
2. Readiness Gates: kro allows you to define readiness conditions using readyWhen which prevents premature execution of dependent resources.
apiVersion: kro.run/v1alpha1
kind: ResourceGraphDefinition
metadata:
  name: osok-kro-demo
spec:
  schema:
    apiVersion: v1alpha1
    kind: OsokKroDemoApp
    spec:
      compartmentId: string | required=true
      subnetId: string | required=true
      availabilityDomain: string | required=true
      configurationId: string | required=true
      mysqlShapeName: string | required=true
      mysqlAdminUsername: string | default="dbadmin"
      mysqlAdminPassword: string | required=true
      mysqlStorageSizeInGBs: integer | default=50
    status:
      wordpressSvcIP: ${wordpressSvc.status.loadBalancer.ingress[0].ip}
  resources:
# Kubernetes Secret to store the MySQL DB Admin credentials.
    - id: mysqlAdminSecret
      template:
        apiVersion: v1
        kind: Secret
        metadata:
          name: ${schema.metadata.name + "-mysql-admin"}
          namespace: ${schema.metadata.namespace}
        type: Opaque
        stringData:
          username: ${schema.spec.mysqlAdminUsername}
          password: ${schema.spec.mysqlAdminPassword}
# MySQL DB System in OCI managed by OSOK that is required for the WordPress application
    - id: mysqlDbSystem
      readyWhen:
        - ${mysqlDbSystem.status.?lifecycleState.orValue("") == "ACTIVE"}
      template:
        apiVersion: mysql.oracle.com/v1beta1
        kind: DbSystem
        metadata:
          name: ${schema.metadata.name + "-db"}
          namespace: ${schema.metadata.namespace}
        spec:
          compartmentId: ${schema.spec.compartmentId}
          displayName: ${schema.metadata.name + "-db"}
          shapeName: ${schema.spec.mysqlShapeName}
          subnetId: ${schema.spec.subnetId}
          configurationId: ${schema.spec.configurationId}
          availabilityDomain: ${schema.spec.availabilityDomain}
          adminUsername:
            secret:
              secretName: ${mysqlAdminSecret.metadata.name}
          adminPassword:
            secret:
              secretName: ${mysqlAdminSecret.metadata.name}
          dataStorageSizeInGBs: ${schema.spec.mysqlStorageSizeInGBs}
          port: 3306
          portX: 33060
# Create a database named “wordpress” in the MySQL DB System in OCI since it's required for the WordPress application
    - id: initWordpressDb
      readyWhen:
        - ${initWordpressDb.status.succeeded > 0}
      template:
        apiVersion: batch/v1
        kind: Job
        metadata:
          name: ${schema.metadata.name + "-init-wordpress-db"}
          namespace: ${schema.metadata.namespace}
        spec:
          template:
            spec:
              containers:
              - name: mysql-client
                image: docker.io/library/mysql:8.0
                env:
                  - name: DB_HOST
                    valueFrom:
                      secretKeyRef:
                        name: ${mysqlDbSystem.metadata.name}
                        key: PrivateIPAddress
                  - name: MYSQL_USER
                    valueFrom:
                      secretKeyRef:
                        name: ${mysqlAdminSecret.metadata.name}
                        key: username
                  - name: MYSQL_PWD
                    valueFrom:
                      secretKeyRef:
                        name: ${mysqlAdminSecret.metadata.name}
                        key: password
                command:
                  - "/bin/bash"
                  - "-c"
                  - |
                    until mysqladmin ping -h "$DB_HOST" -u "$MYSQL_USER" --password="$MYSQL_PWD" --silent; do
                      echo "Waiting for MySQL..."
                      sleep 10
                    done
                    mysql -h $DB_HOST -u $MYSQL_USER --password="$MYSQL_PWD" -P 3306 -e "CREATE DATABASE IF NOT EXISTS wordpress;"
              restartPolicy: OnFailure
# Deploy the WordPress application in the Kubernetes cluster passing in the MySQL DB System details
    - id: wordpressDeployment
      readyWhen:
        - ${wordpressDeployment.status.availableReplicas > 0}
      template:
        apiVersion: apps/v1
        kind: Deployment
        metadata:
          name: ${schema.metadata.name + "-wordpress-app"}
          namespace: ${schema.metadata.namespace}
          annotations:
            kro.run/after-db-init: ${string(initWordpressDb.status.succeeded)}
        spec:
          replicas: 1
          selector:
            matchLabels:
              app: ${schema.metadata.name + "-wordpress-app"}
          template:
            metadata:
              labels:
                app: ${schema.metadata.name + "-wordpress-app"}
            spec:
              containers:
              - name: wordpress
                image: docker.io/library/wordpress:6.4.2-php8.2-apache
                ports:
                  - containerPort: 80
                env:
                - name: WORDPRESS_DB_HOST
                  valueFrom:
                    secretKeyRef:
                      name: ${mysqlDbSystem.metadata.name}
                      key: PrivateIPAddress
                - name: WORDPRESS_DB_USER
                  valueFrom:
                    secretKeyRef:
                      name: ${mysqlAdminSecret.metadata.name}
                      key: username
                - name: WORDPRESS_DB_PASSWORD
                  valueFrom:
                    secretKeyRef:
                      name: ${mysqlAdminSecret.metadata.name}
                      key: password
# Expose the WordPress application using a simple LoadBalancer service
    - id: wordpressSvc
      readyWhen:
        - ${wordpressSvc.status.?loadBalancer.?ingress.orValue([]).size() > 0}
      template:
        apiVersion: v1
        kind: Service
        metadata:
          name: ${schema.metadata.name + "-wordpress-svc"}
          namespace: ${schema.metadata.namespace}
          annotations:
            kro.run/after-deployment-ready: ${string(wordpressDeployment.status.availableReplicas)}
        spec:
          type: LoadBalancer
          ports:
            - port: 80
          selector:
            app: ${schema.metadata.name + "-wordpress-app"}
Save the above RGD as osok_kro_demo_rgd.yaml. Apply it using
kubectl apply -f osok_kro_demo_rgd.yaml Verify that the RGD was successfully created using
kubectl get rgd osok-kro-demo

Expected output:
NAME             	STATE   	READY
osok-kro-demo    Active  	True
Step 7: Create an Instance of the Application
Create a namespace for the application called “demo” using
kubectl create namespace demoInstantiate the application by saving the following spec as osok_kro_demo.yaml.
apiVersion: kro.run/v1alpha1
kind: OsokKroDemoApp
metadata:
  name: osok-kro-demo
  namespace: demo
spec:
  compartmentId: <k8s cluster compartment OCID>
  subnetId: <k8s cluster worker node subnet OCID>
  availabilityDomain: <k8s cluster availability domain>
  configurationId: <mysql shape configuration OCID>
  mysqlShapeName: <mysql shape name> e.g. MySQL.Free
  mysqlAdminUsername: <username to use for DB admin e.g. admin>
  mysqlAdminPassword: <password to use for DB admin e.g. Pass@123>
  mysqlStorageSizeInGBs: 50
Apply it using
kubectl apply -f osok_kro_demo.yamlStep 8: Verify the Deployment
Check the status of the instance using
kubectl get OsokKroDemoAppIt can take up to 10 minutes to create the DB system. Once it’s ready, you retrieve the external IP of the WordPress application using the status field defined on the RGD
kubectl get OsokKroDemoApp osok-kro-demo -n demo -o jsonpath='{.status.wordpressSvcIP}{"\n"}'When you open the URL http://<external-ip>:80 in a browser, you should see the WordPress setup screen.
Cleanup
You can remove all the resources created by kro by deleting the RGD instance and the RGD spec
kubectl delete OsokKroDemoApp osok-kro-demo

kubectl delete rgd osok-kro-demo
Key Takeaways
OSOK enables Kubernetes-native management of OCI services, while kro provides a powerful abstraction for orchestrating multiple resources. Together, they allow you to define complete applications as a single, declarative resource. This unified approach simplifies deployment workflows, streamlines dependency management, and improves the integration of infrastructure and application components.
What’s Next?
Oracle continues to invest in enhancing OSOK and Kubernetes-native integrations for OCI. As a next step, you can explore all the services supported by OSOK, extend this example to more complex architectures, share your feedback on the OSOK GitHub project and stay updated on the latest changes by subscribing to the releases.
Resources