Premise: What this blog covers
The previous blogs on APEX Workflow have demonstrated how to design and implement complex business logic by converting them into workflow activities and linking the activities together in a sequence that could be based on conditions.
In the real world however there could be human steps in a workflow that might not be sequentially processed. For example, in a Content Management Process, when a new content is to be published, it involves
- a) Sending the content to the proof reading team to check for errors and approve
- b) Sending the content to the designer to create illustrations.
- c) Sending the design for approval to the Editorial Board
- d) Sending the text matter for approval to the Editorial Board
We can easily see that steps a) and b) can be done in parallel followed by steps c) and d) in parallel. Step b) does not require Step a) to complete and similarly Step d) does not require Step c) to complete. But Step c) must not commence until both a) and b) are complete.
If we need to use APEX workflow to design such a process where a few manual steps can be completed independent of each other, simply using the native activity types like Human Task – Create or Invoke API will not serve our purpose. This is where custom plugins can be useful.
The Employee Onboarding Usecase
Let us consider a very simplified version of the employee onboarding process
- a) The manager submits an Onboarding request for a new hire.
- b) An approval task is generated and assigned to the Badge Approver to grant access to Employee Badge
- c) An approval task is generated and assigned to the Purchase Approver to grant purchase of laptop and other resources.
- d) Employee is provided with new-hire training material. An action task is generated for the Employee to acknowledge completion of the training.
In this very simple scenario also, it is clear that Steps b) and c) are independent of each other, but step d) needs to happen after b) and c) have completed.
In the next steps we will create an application with a workflow that uses a custom process type plugin to model the above scenario.
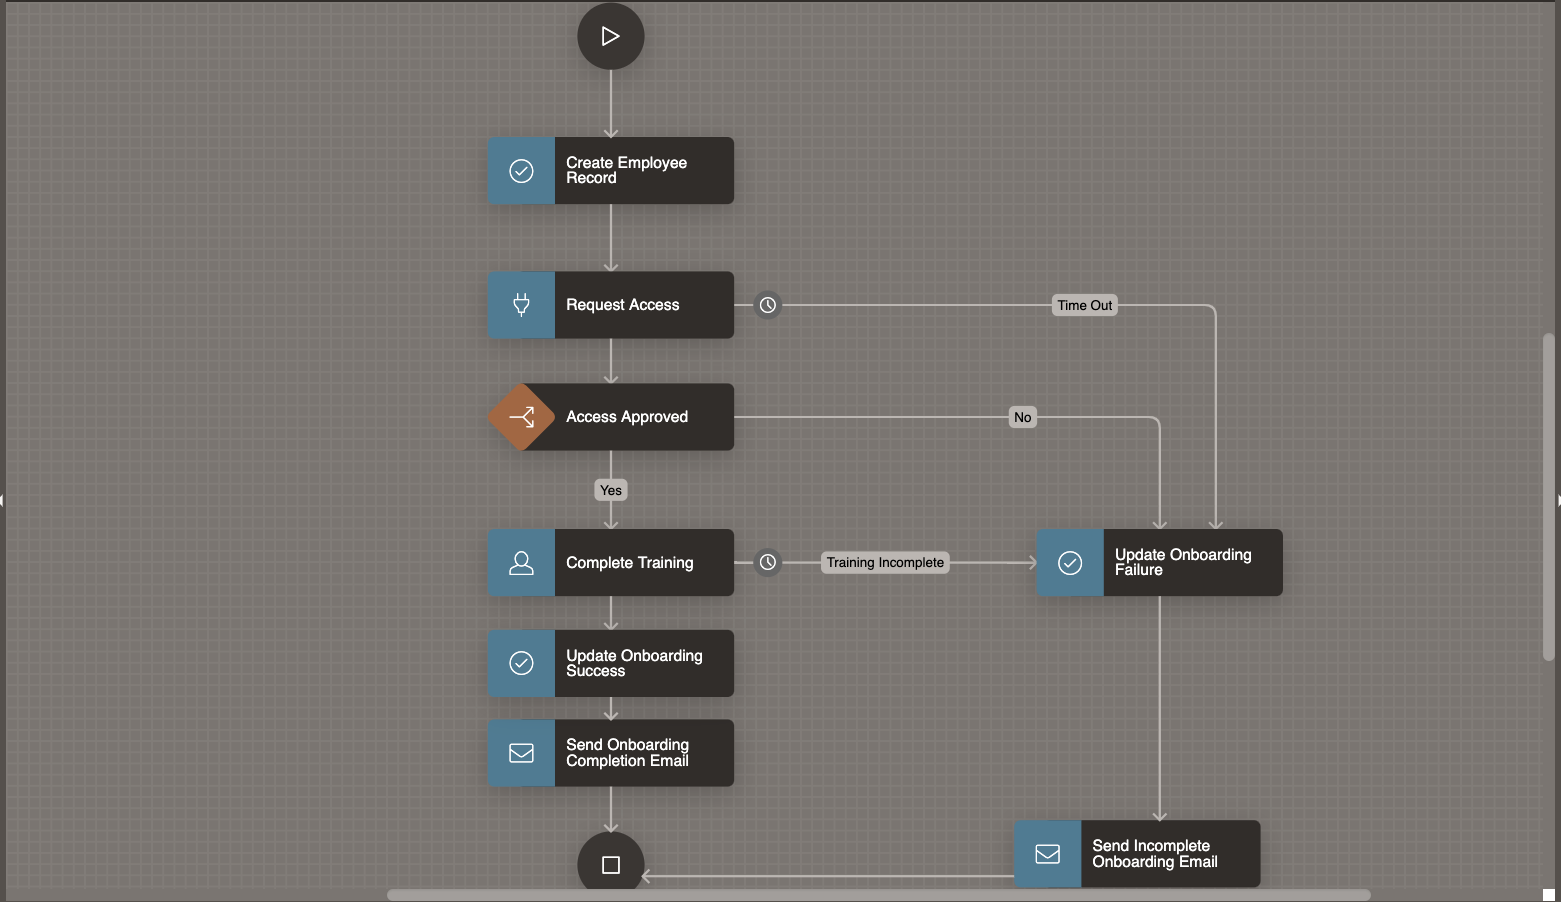
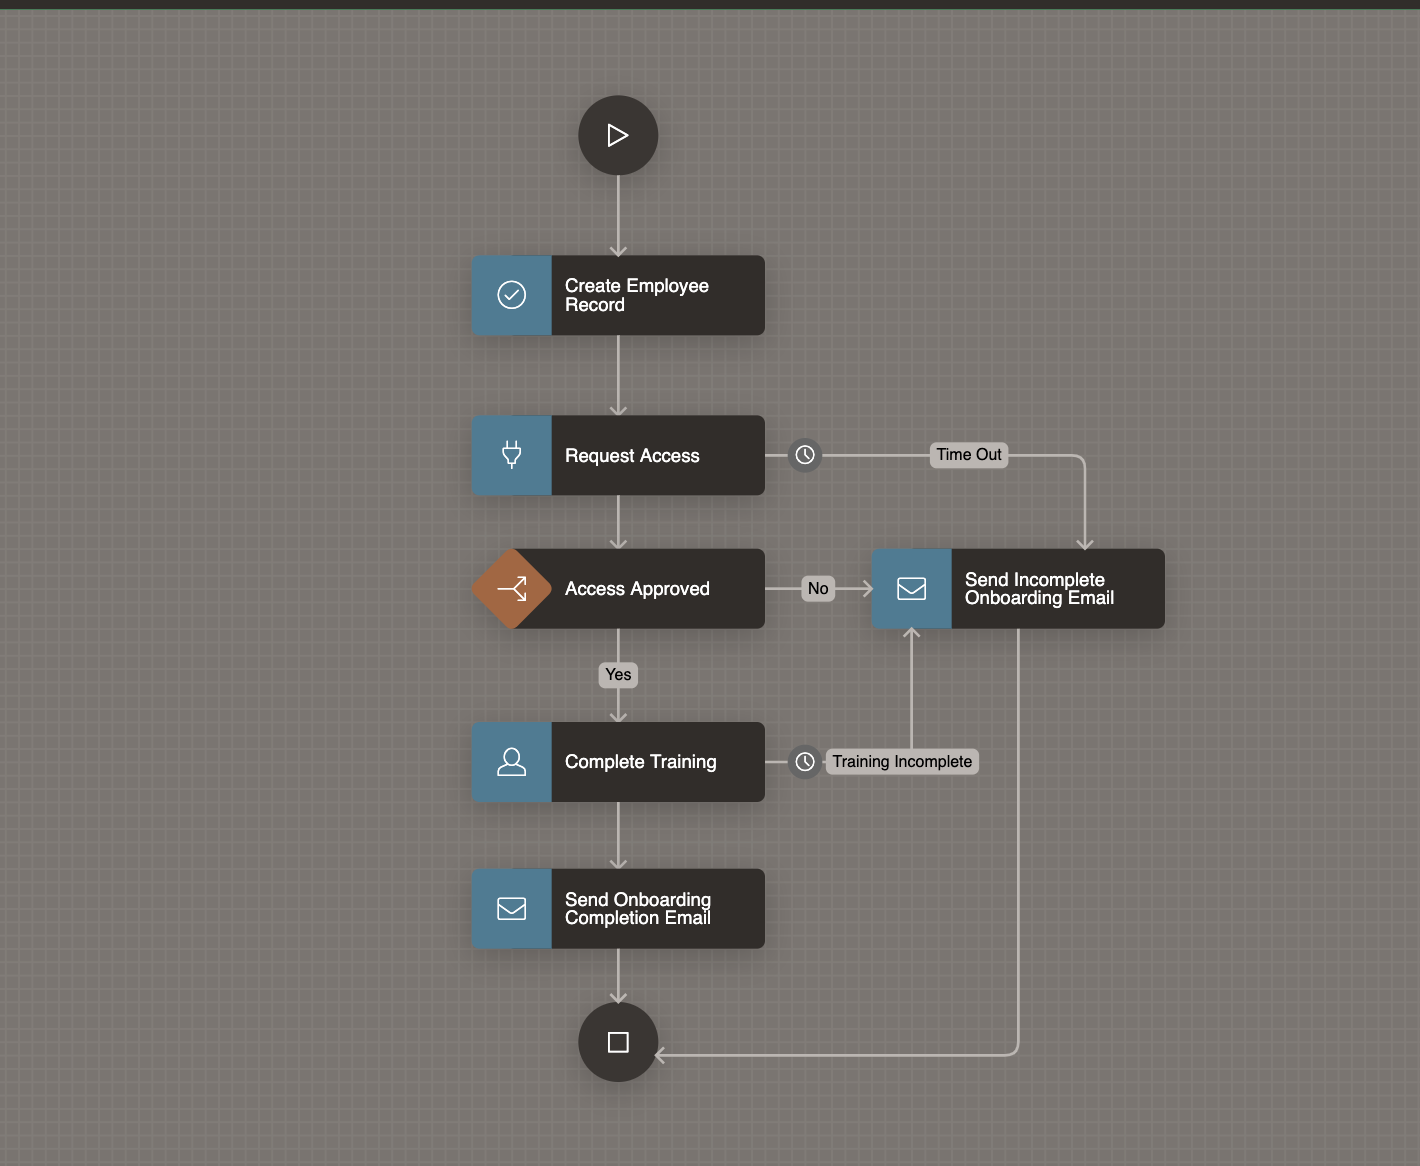
This is what the workflow will look like:
Designing the Onboarding Application
Prerequisite
It is assumed that the users logging in into the application at run time, have already been created beforehand. Create the following users using the Manage Users And Groups menu option under Workspace Administration: STEVE, JANE, JAY, SUSIE, RALMUELL.
Create the App
- Navigate to App Builder
- Click Create
- Click New Application
For Name – enter Onboarding
Sample Table and Sample Data
Install the Dataset
- Navigate to SQL Workshop and click SQL Scripts
- Click Create
- Copy and Paste the commands given below into the Script Editor to create two new tables EMP_STATS and EMP_ONBOARDING_STATUS.
- Click Run
- Click Run Now.
 CREATE TABLE "EMP_STATS"
   (    "EMPNO" NUMBER GENERATED BY DEFAULT ON NULL AS IDENTITY MINVALUE 1 MAXVALUE 9999999999999999999999999999 INCREMENT BY 1 START WITH 1 CACHE 20 NOORDER  NOCYCLE  NOKEEP  NOSCALE  NOT NULL ENABLE,
    "ENAME" VARCHAR2(255 CHAR),
    "JOINING_DATE" TIMESTAMP (6) WITH TIME ZONE,
    "DESIGNATION" VARCHAR2(255 CHAR),
    "DEPARTMENT" VARCHAR2(255 CHAR),
     CONSTRAINT "EMP_STATS_PK" PRIMARY KEY ("EMPNO")
  USING INDEX  ENABLE
   ) ;

  CREATE TABLE "EMP_ONBOARDING_STATUS"
   (    "EMPNO" NUMBER GENERATED BY DEFAULT ON NULL AS IDENTITY MINVALUE 1 MAXVALUE 9999999999999999999999999999 INCREMENT BY 1 START WITH 1 CACHE 20 NOORDER  NOCYCLE  NOKEEP  NOSCALE  NOT NULL ENABLE,
    "BADGE_ACCESS" VARCHAR2(50),
    "LAPTOP_ACCESS" VARCHAR2(50),
    "TRAINING_STATUS" VARCHAR2(50),
    "ONBOARDING_STATUS" VARCHAR2(50),
    "WORKFLOW_ID" NUMBER NOT NULL ENABLE,
     CONSTRAINT "EMP_ONBOARDING_STATUS_PK" PRIMARY KEY ("EMPNO")
  USING INDEX  ENABLE
   ) ;
Creating the Task Definitions for the Human Tasks
In this example we have 3 different Human Tasks
- Human Task for Badge Access approval
- Human Task for Laptop Purchase approval
- Human Task for New Hire to acknowledge training completion.
While 1) and 2) are Approval tasks, 3) can be represented as an Action Task in APEX.
In the empty Application, go to the Shared Components→ Workflows and Automations→ Task Definitions and hit Create . Fill in the Create Task Definition Wizard fields as shown below, and hit Create.
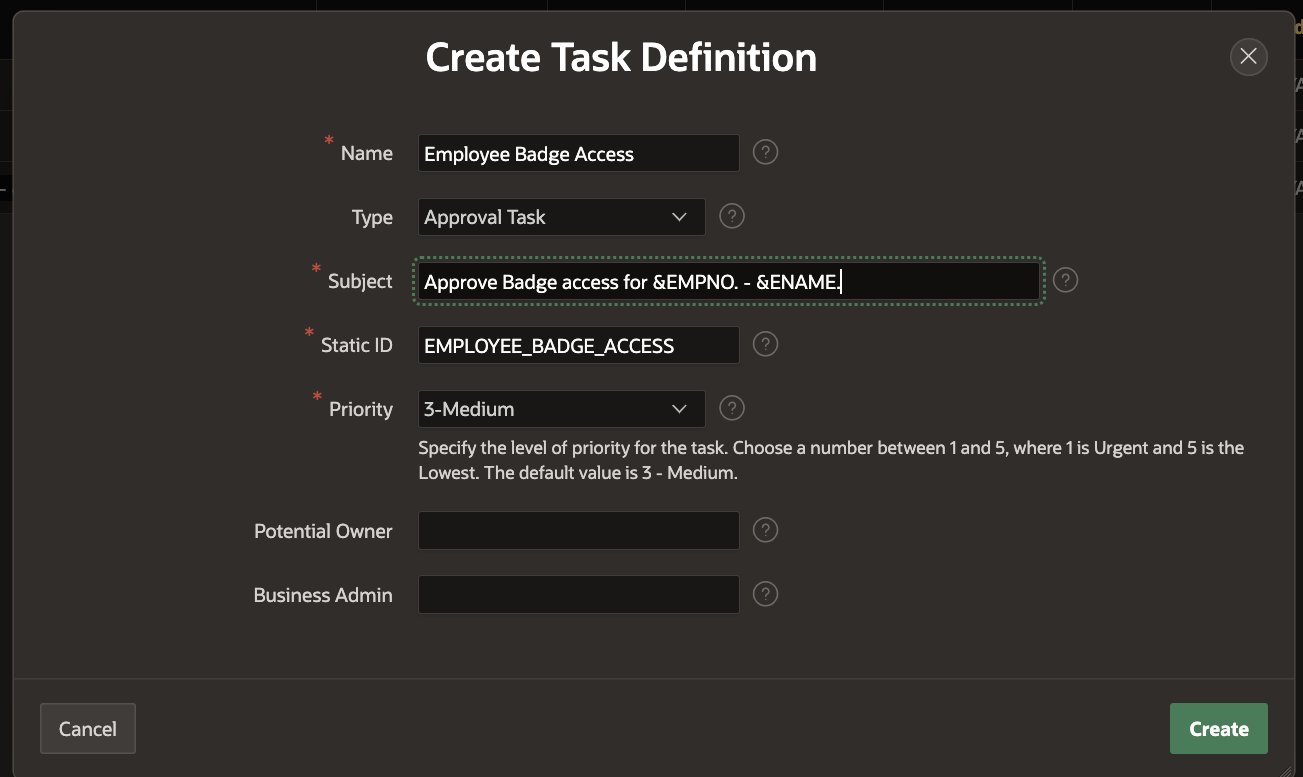
Leave the Potential Owner and Business Administrator fields empty for now. We will fill them up in the next section.
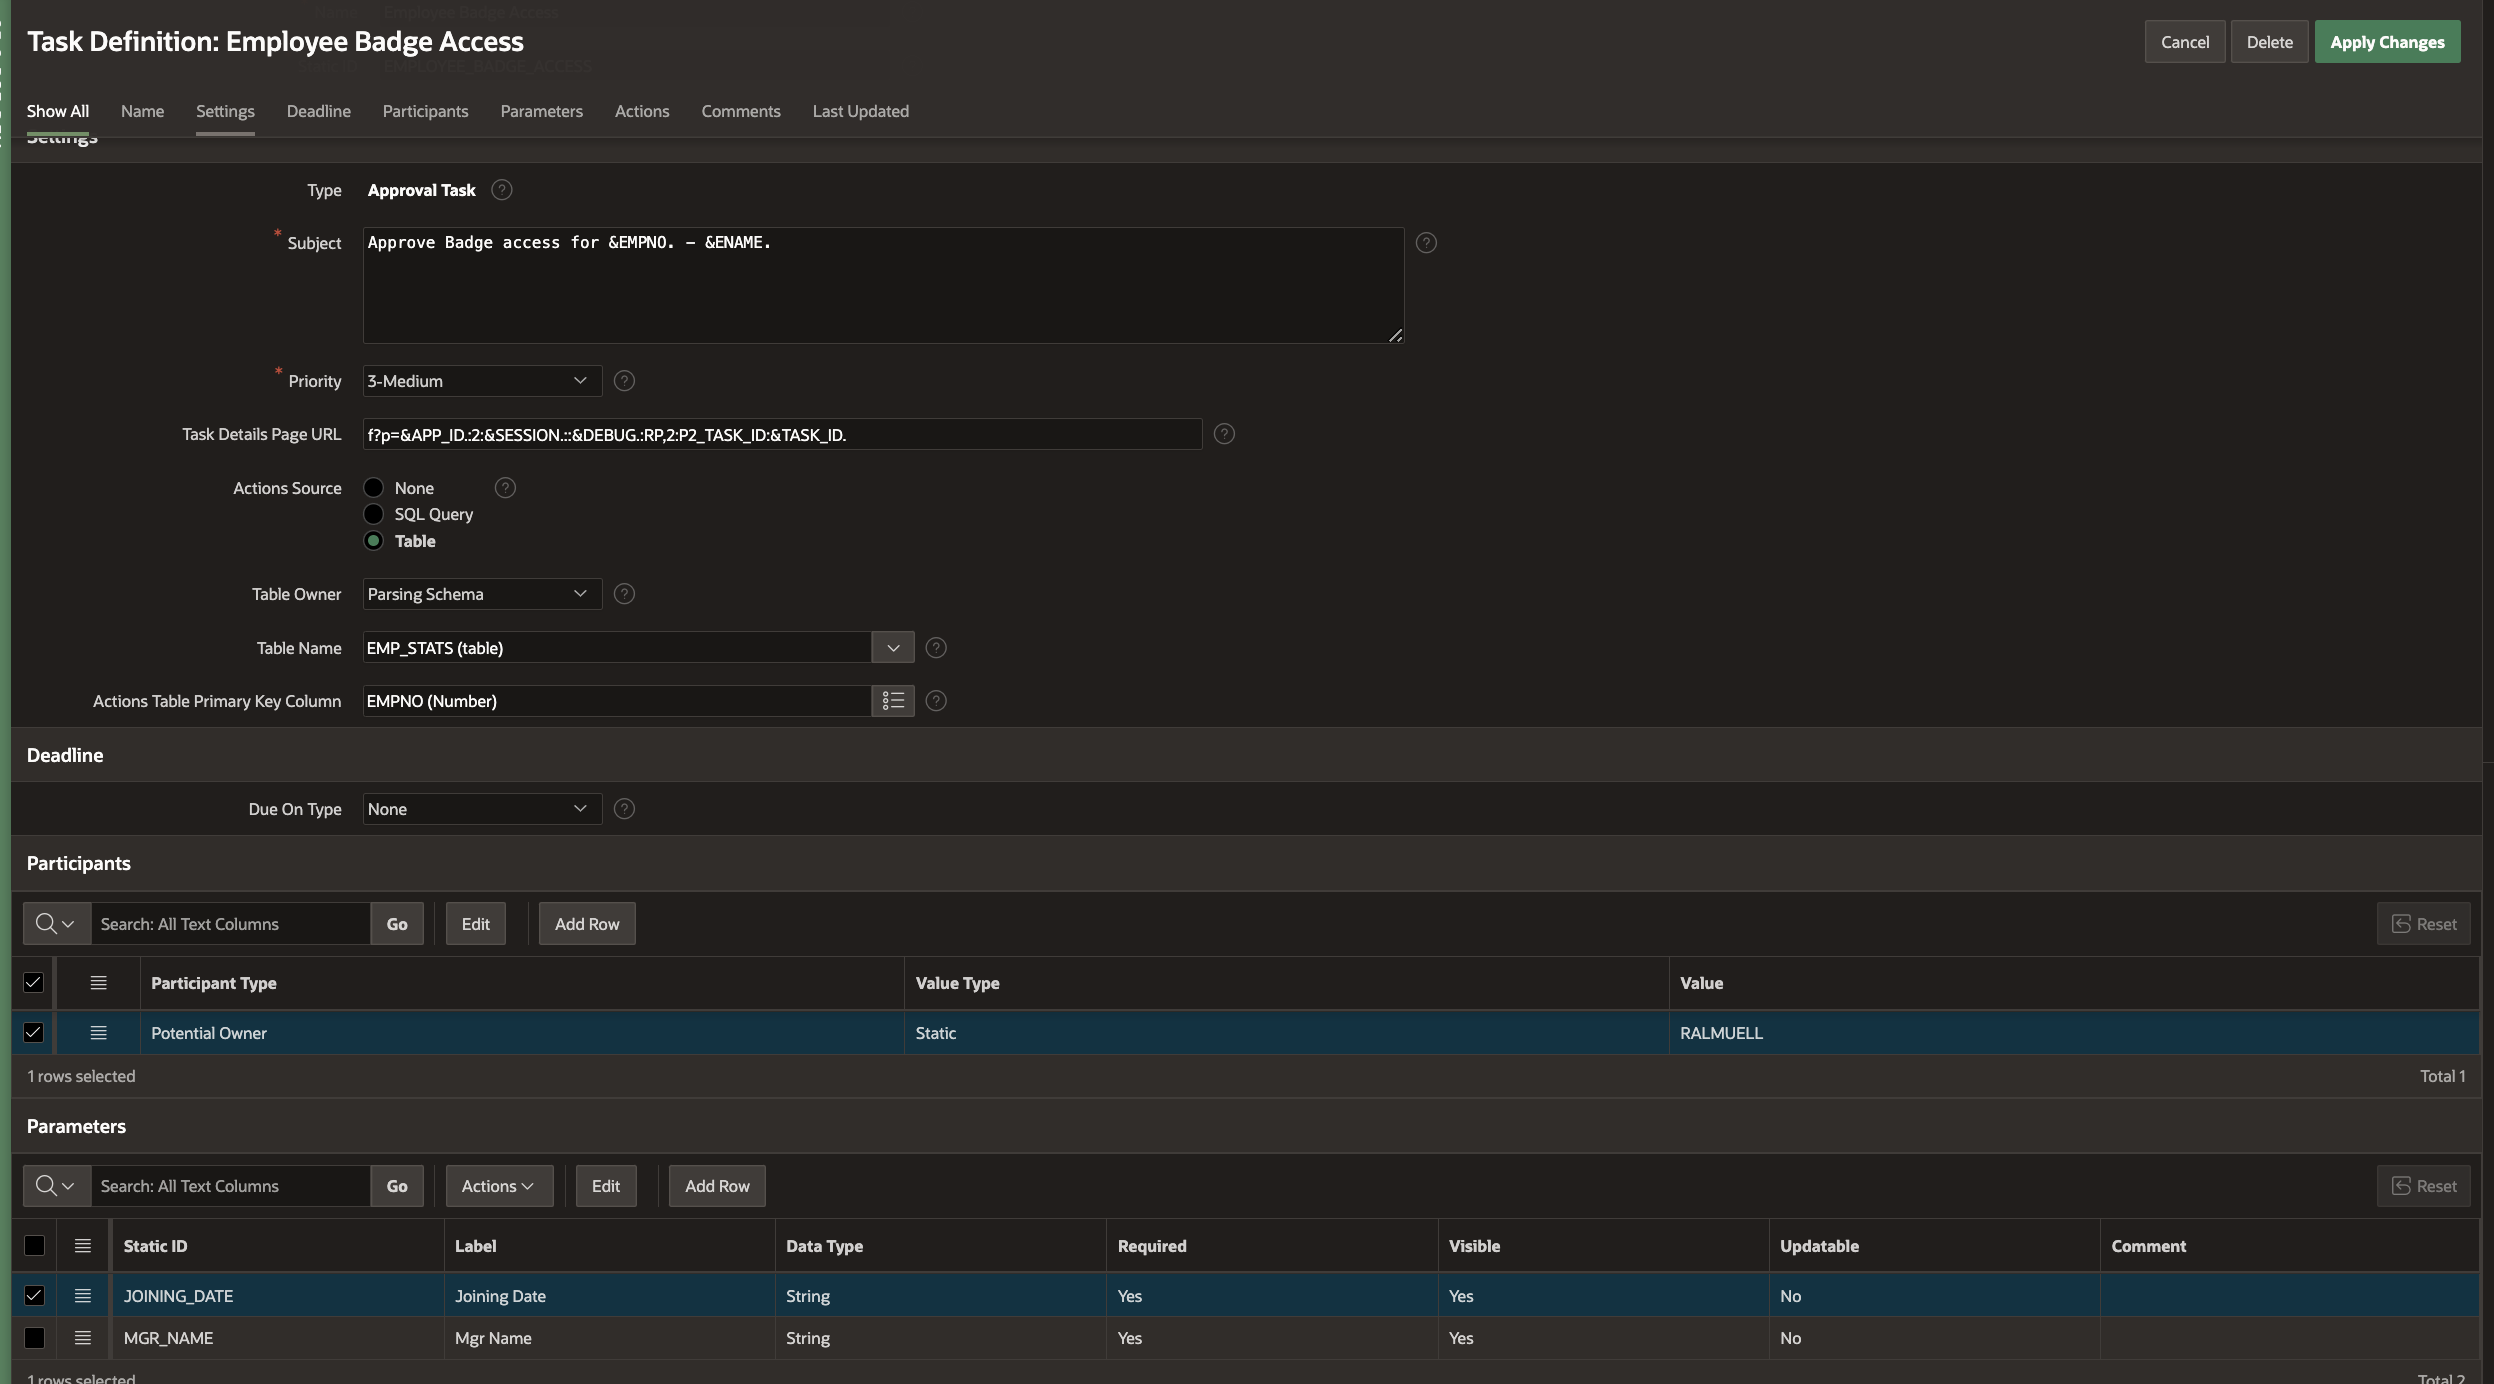
We can now further configure the Employee Badge Access Task Definition in the Edit Task Definition screen that opens once the Create is hit.
Note
- The Actions Source should be selected as Table, and specify the table as EMP_STATS with EMPNO as the Primary Key column.
- The Task Details Page URL is generated by clicking the Create Task Details Page button that appears initially. To learn more about generation of Task Details Page in a Task Definition, check out the Generating Task Details Page section in this blog.
Add Task Participants
In the Participants section, select Participant Type as Potential Owner and Value Type as Static and set the value as RALMUELL.
Add Task Parameters
Add the following entries to the Task Parameters section: JOINING_DATE, MGR_NAME.
Here is how the task definition looks now
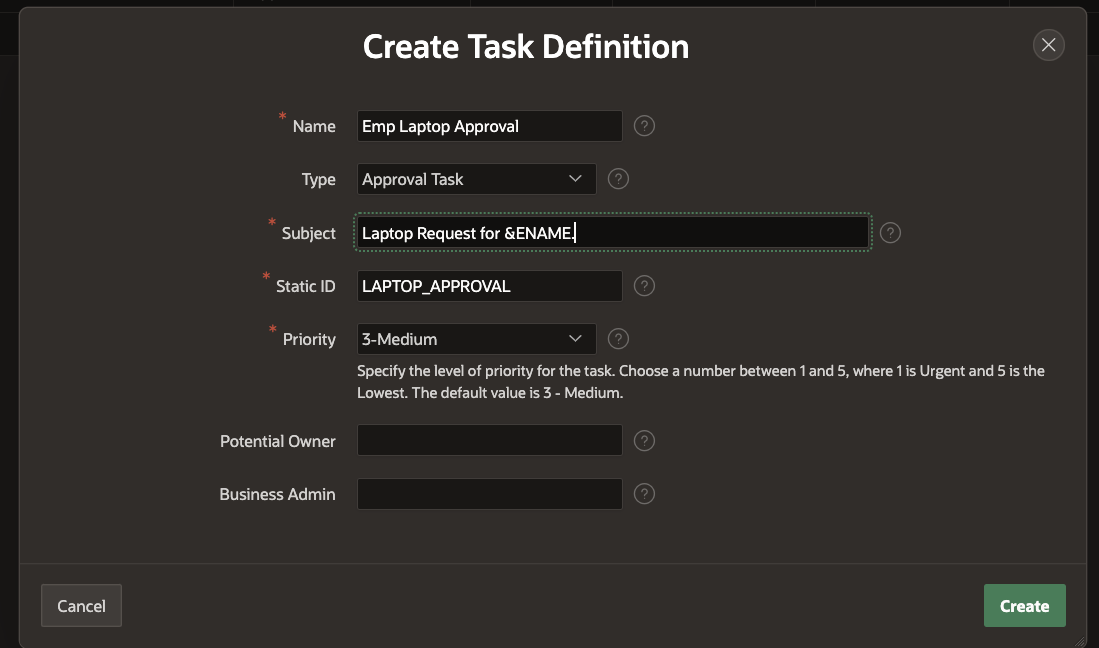
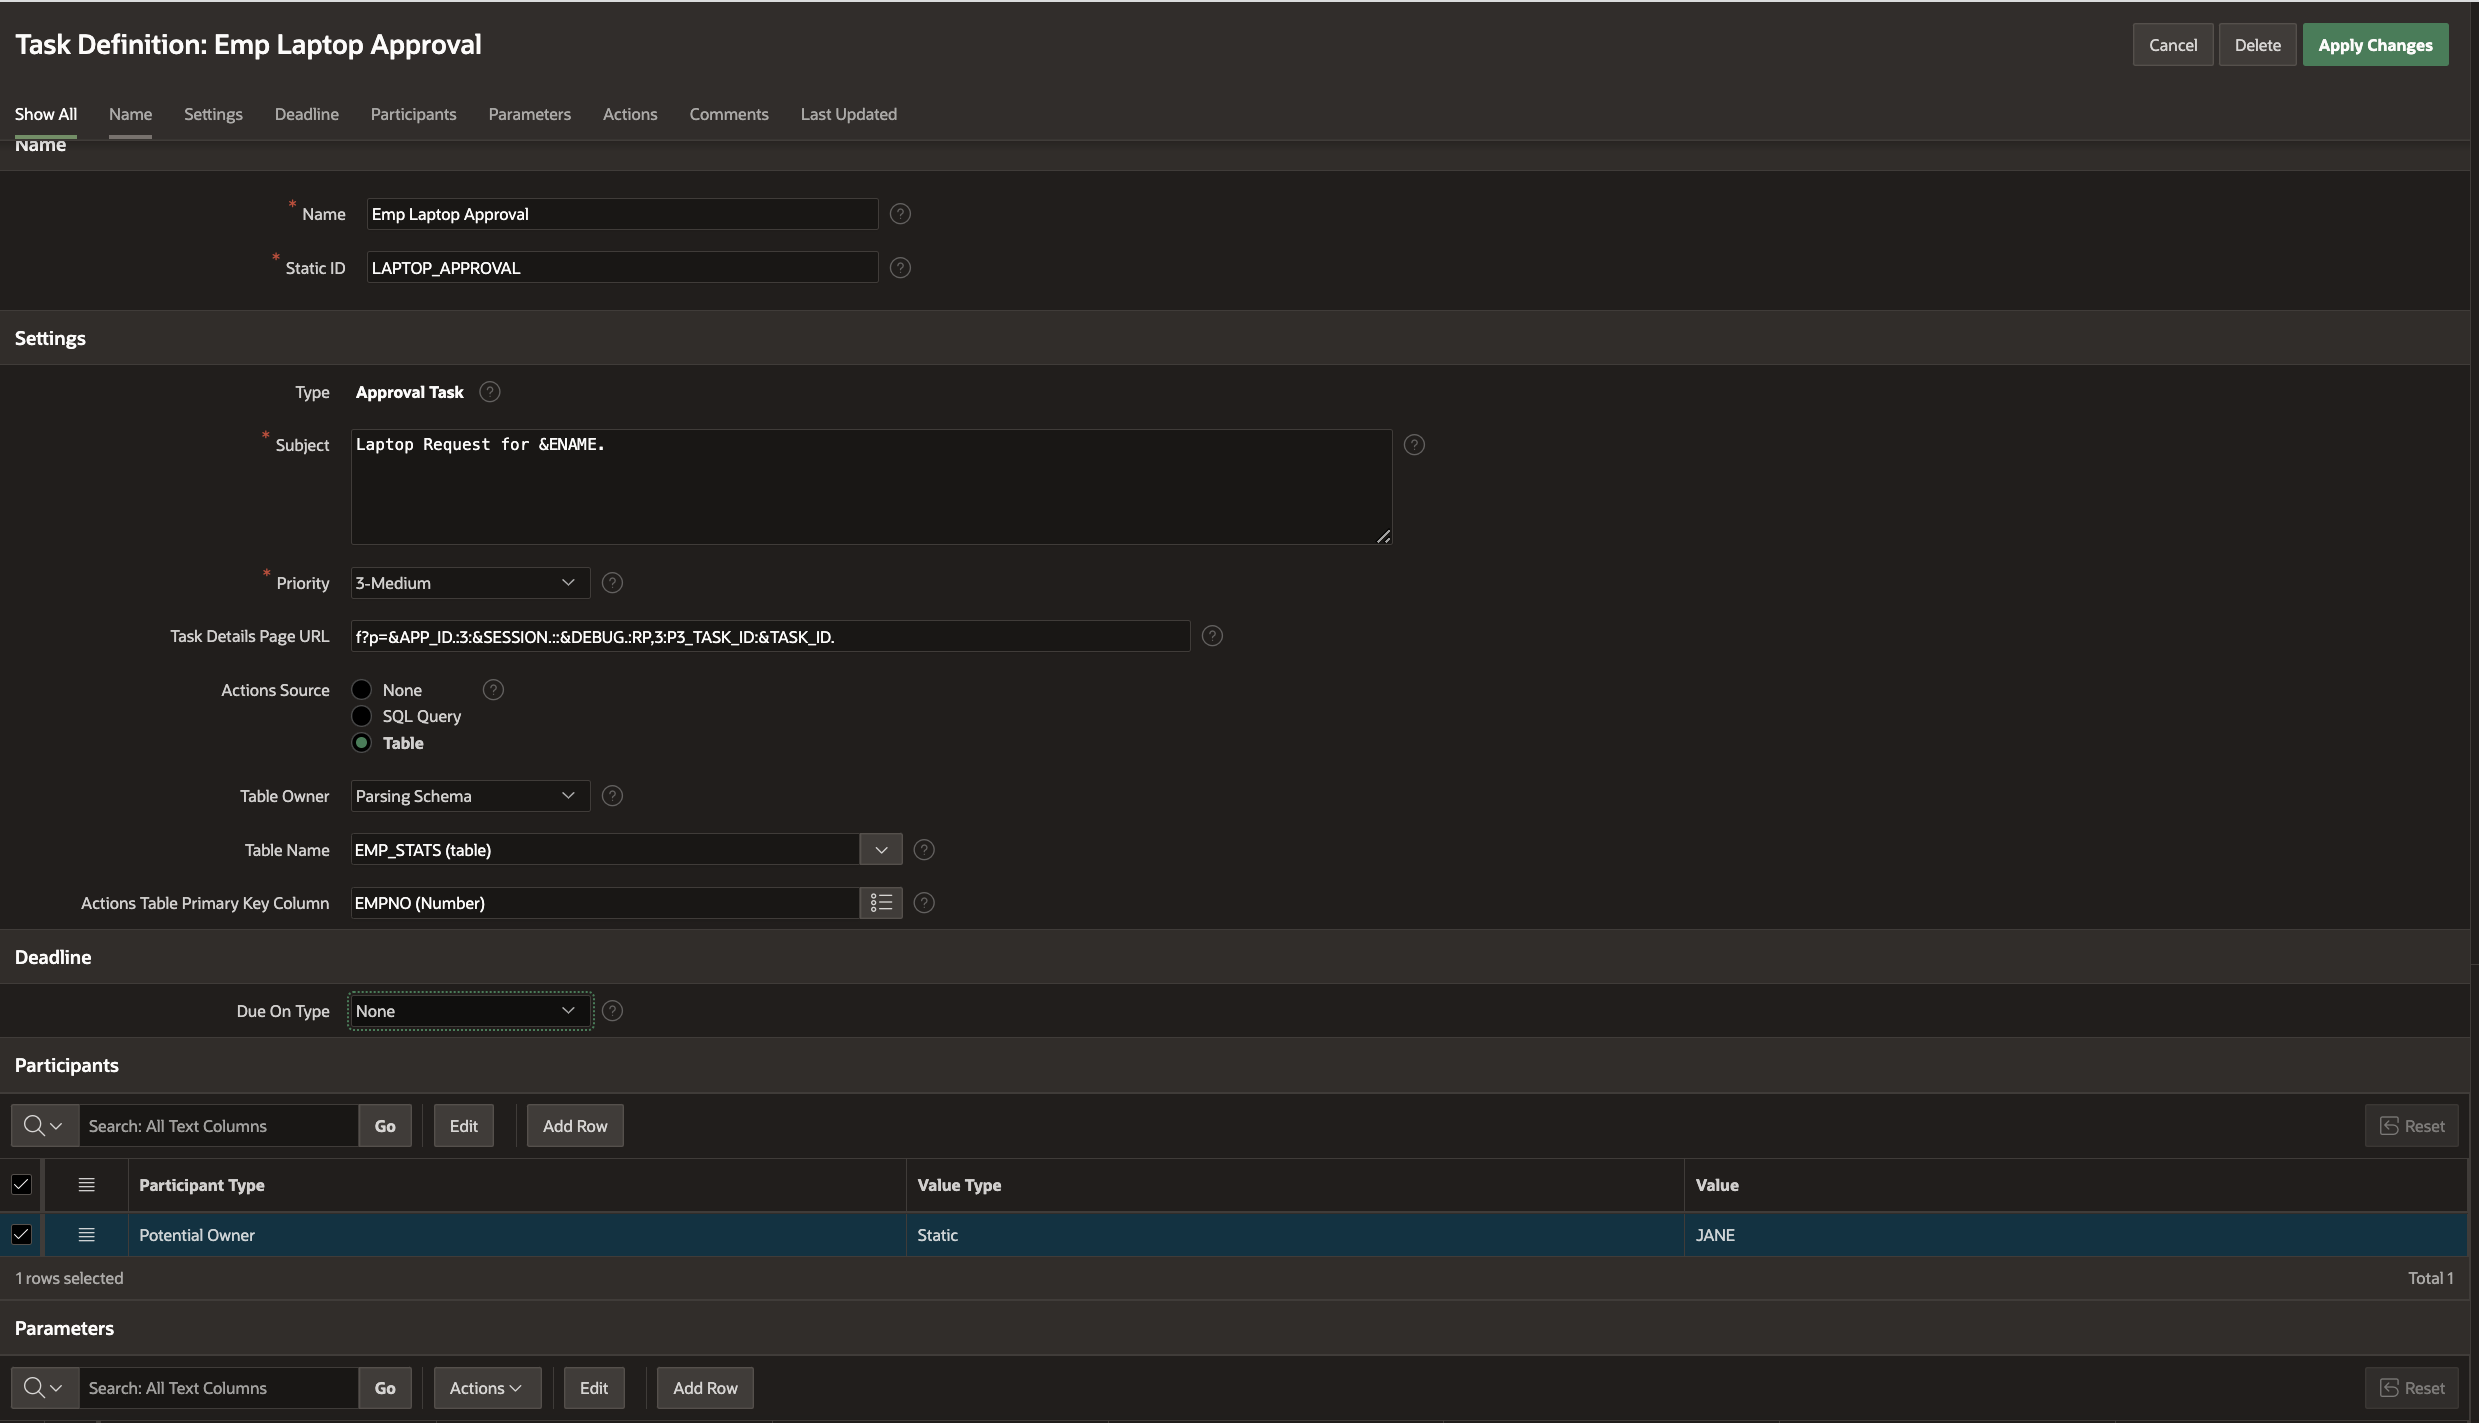
To create the Laptop Purchase Approval Task Definition, go to the Shared Components→ Workflows and Automations→ Task Definitions and hit Create . Fill in the Create Task Definition Wizard fields as shown below, and hit Create.
We can now further configure the Laptop Approval Task Definition in the Edit Task Definition screen that opens once the Create is hit.
Note
Add Task Participants
In the Participants section, select Participant Type as Potential Owner and Value Type as Static and set the value as JANE.
Note: We will revisit both the task definitions to define actions for them in a later section of this blog.
To create the Training Completion Task Definition, go to the Shared Components→ Workflows and Automations→ Task Definitions and hit Create . Fill in the Create Task Definition Wizard fields as shown below, and hit Create.
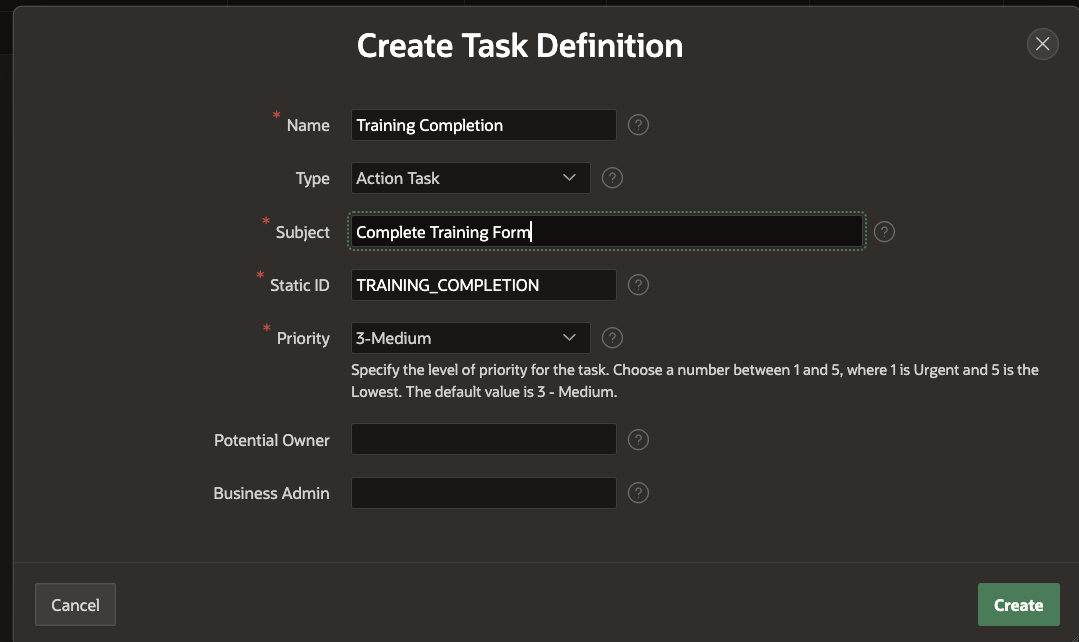
We can now further configure the Training Completion Task Definition in the Edit Task Definition screen that opens once the Create is hit.
Note
1) The Action Source will be left empty for this task definition.
2) The Task Details Page URL is generated by clicking the Create Task Details Page button that appears initially.
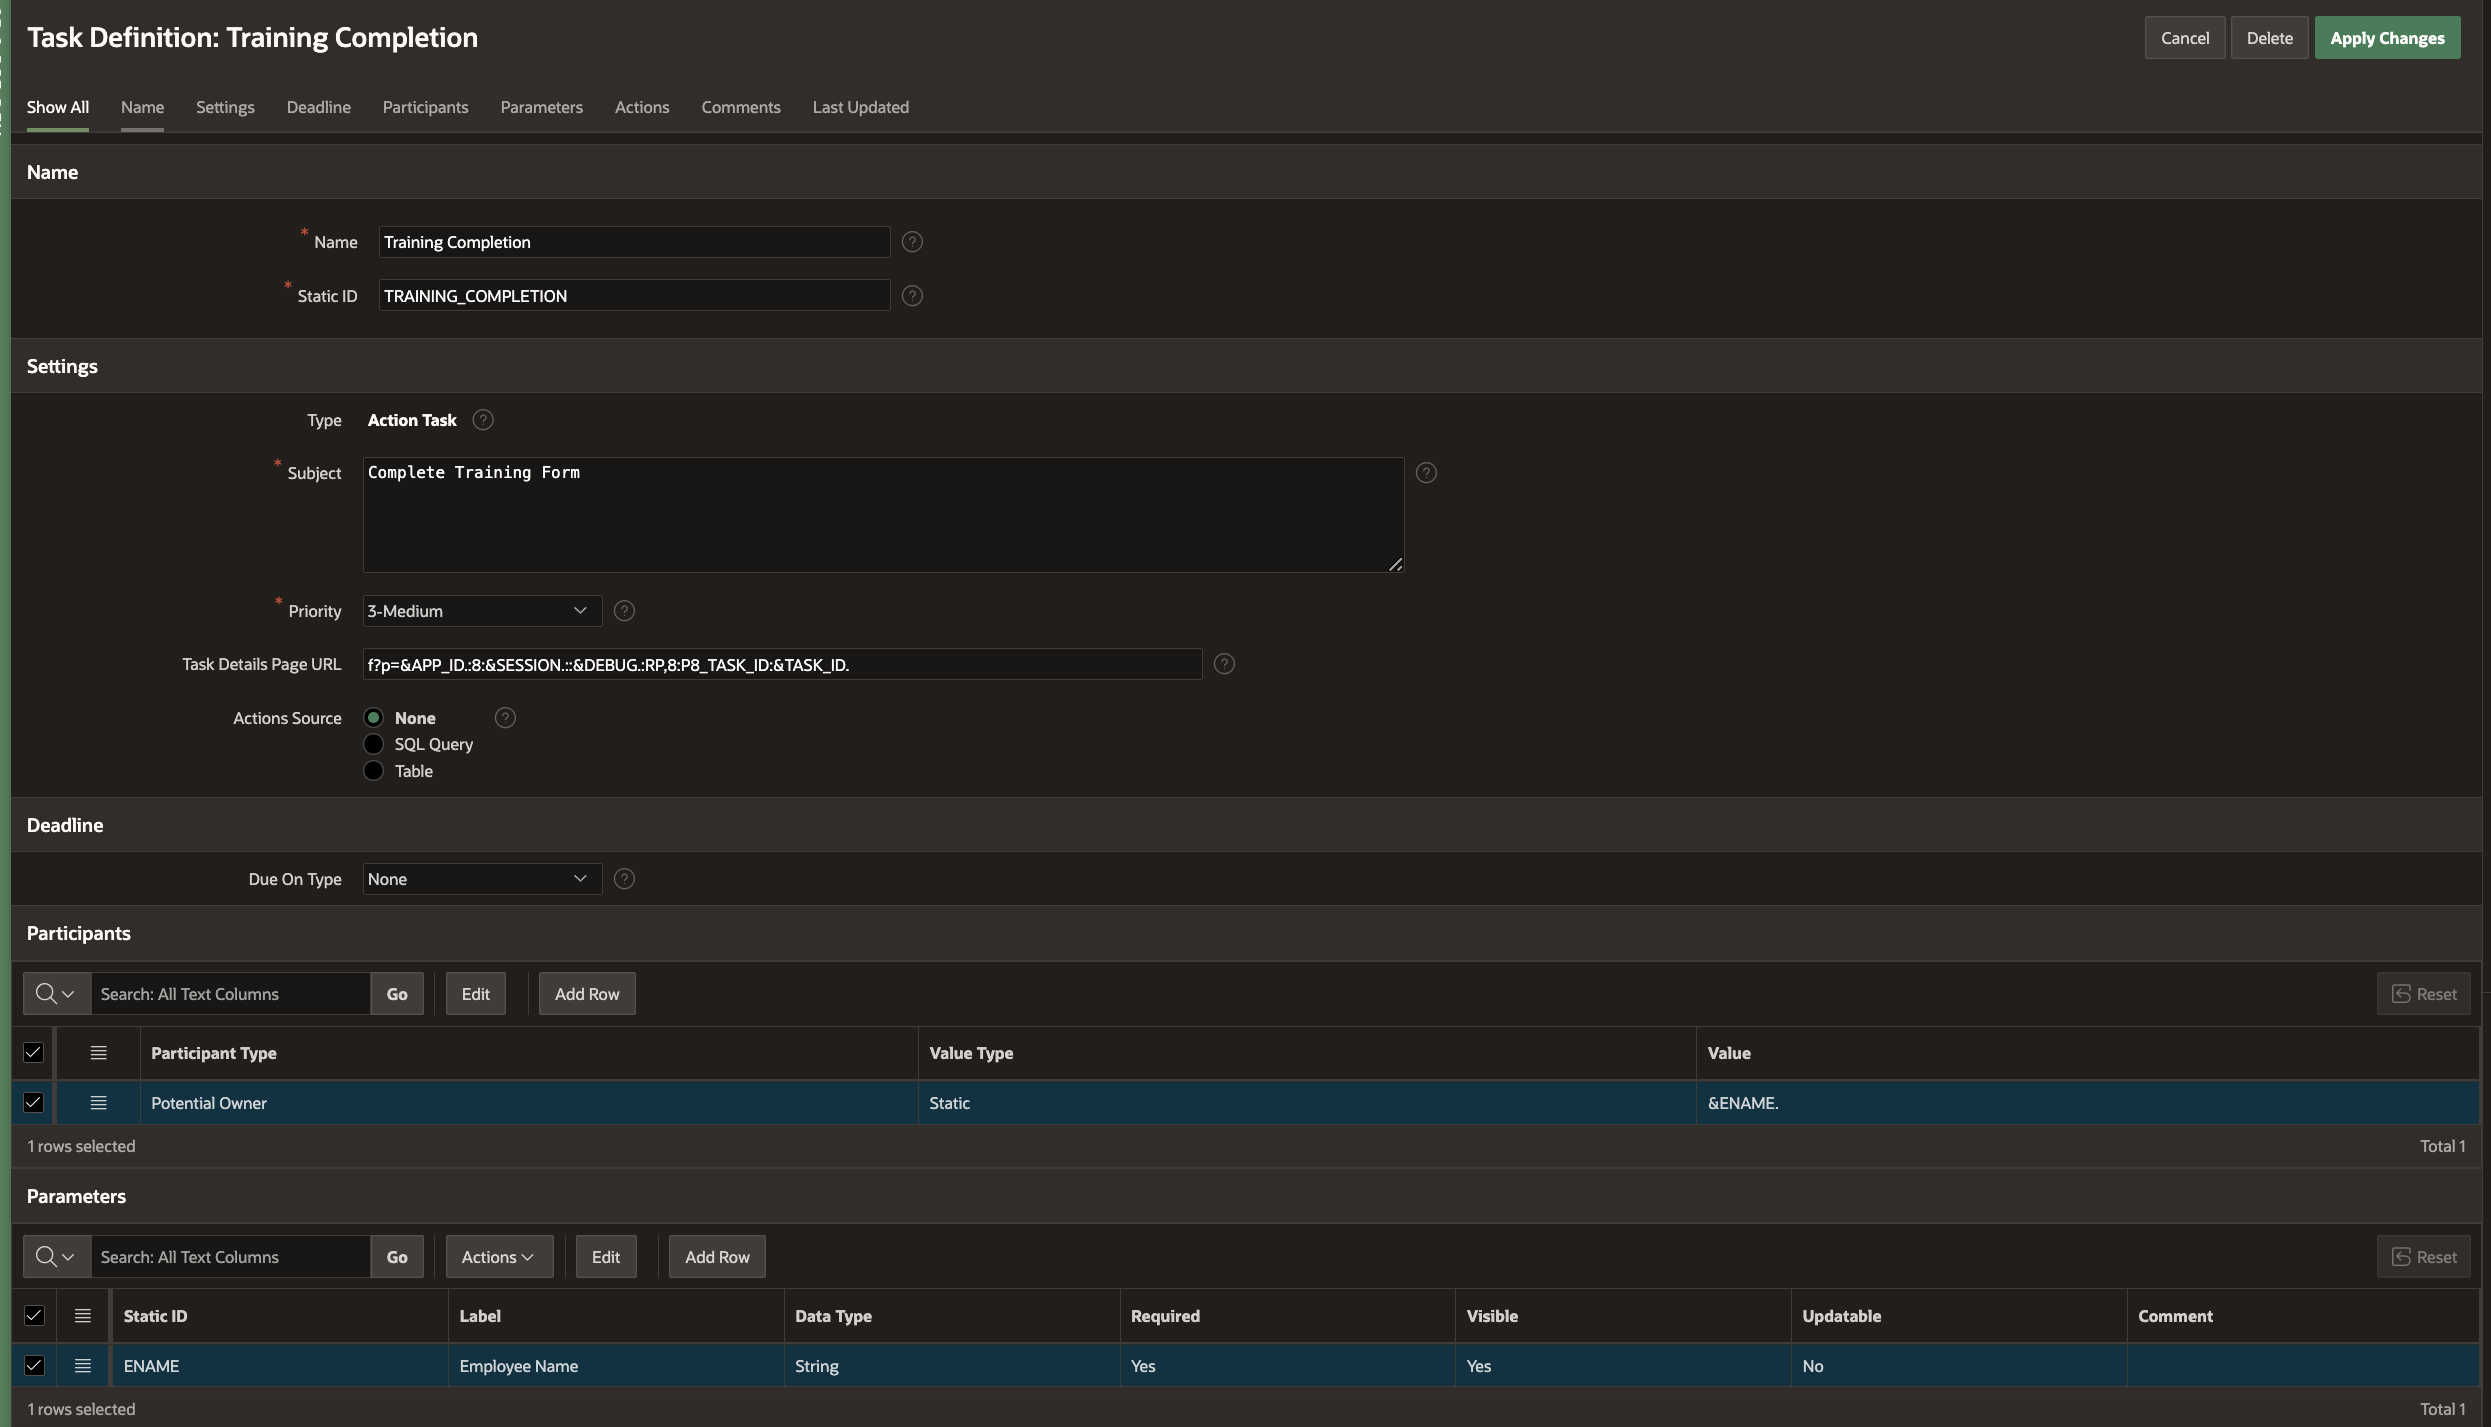
Add Task Participants
In the Participants section, select Participant Type as Potential Owner and Value Type as Static and set the value as &ENAME. .This is because this human task needs to be performed by the new hire employee.
Add Task Parameters
Add the following entry to the Task Parameters section: ENAME with label Employee Name
Here is how the task definition looks now
Defining the Custom Process Type Plugin
If you revisit the Onboarding scenario steps listed in the beginning, you will see that the first 2 tasks we defined, need to be performed in the workflow, independent of each other and the 3rd task follows only after the other 2 are completed. To achieve this, we will define a custom process type plugin which, when executed as a workflow activity, will create the first two tasks i.e, the Laptop and Badge access tasks.
To create a custom plugin, go to Shared Components -> Plugins and click on Create. In the following page, select Create From Scratch, as shown below.
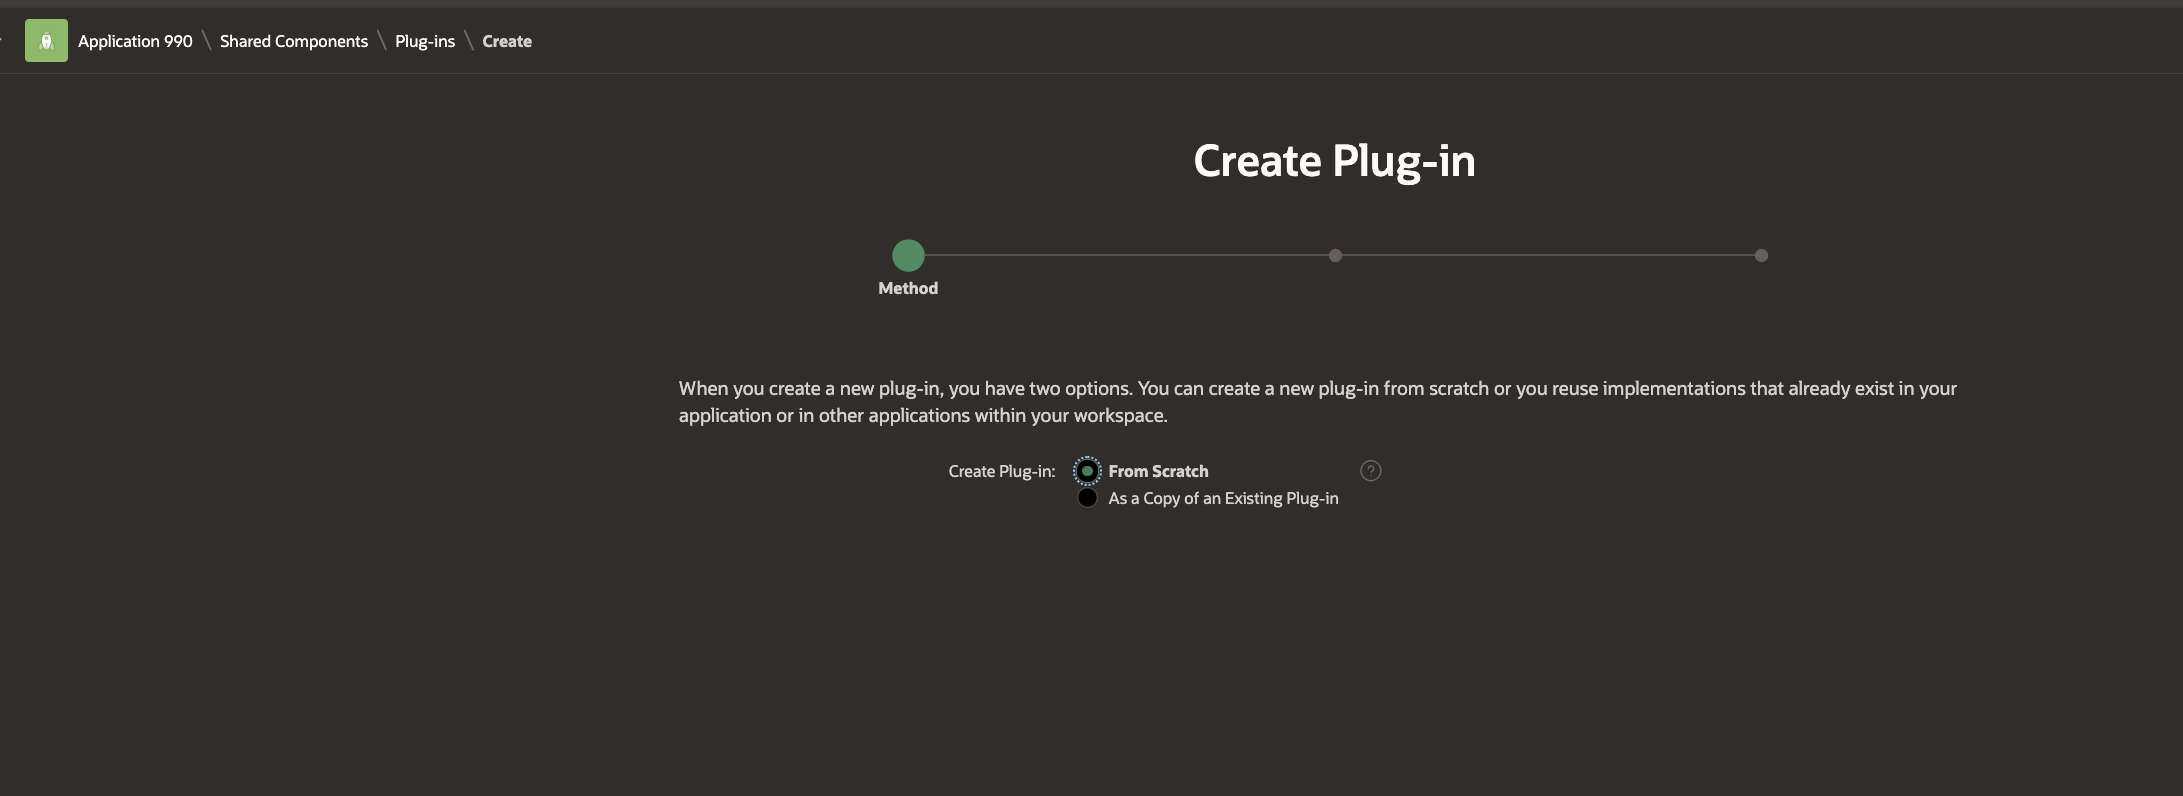
Click Next.
In the Plugin Definition Page, type in the name as Onboarding Tasks, and select the Type from the Drop Down as Process.

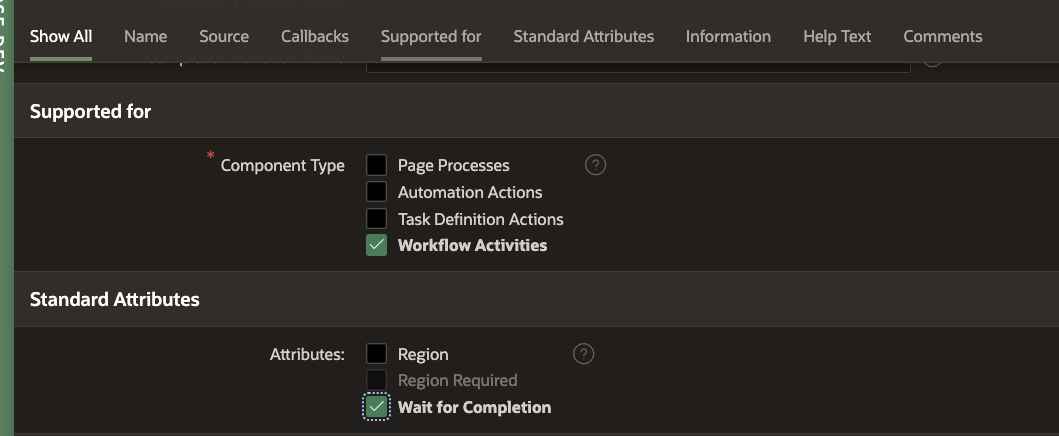
In the Supported for Section, keep the Workflow Activities option checked.
In the Standard Attributes section, keep the Wait For Completion option checked.
This will ensure that the workflow will wait until the completion of the tasks that the Onboarding Tasks will create, before progressing forward.
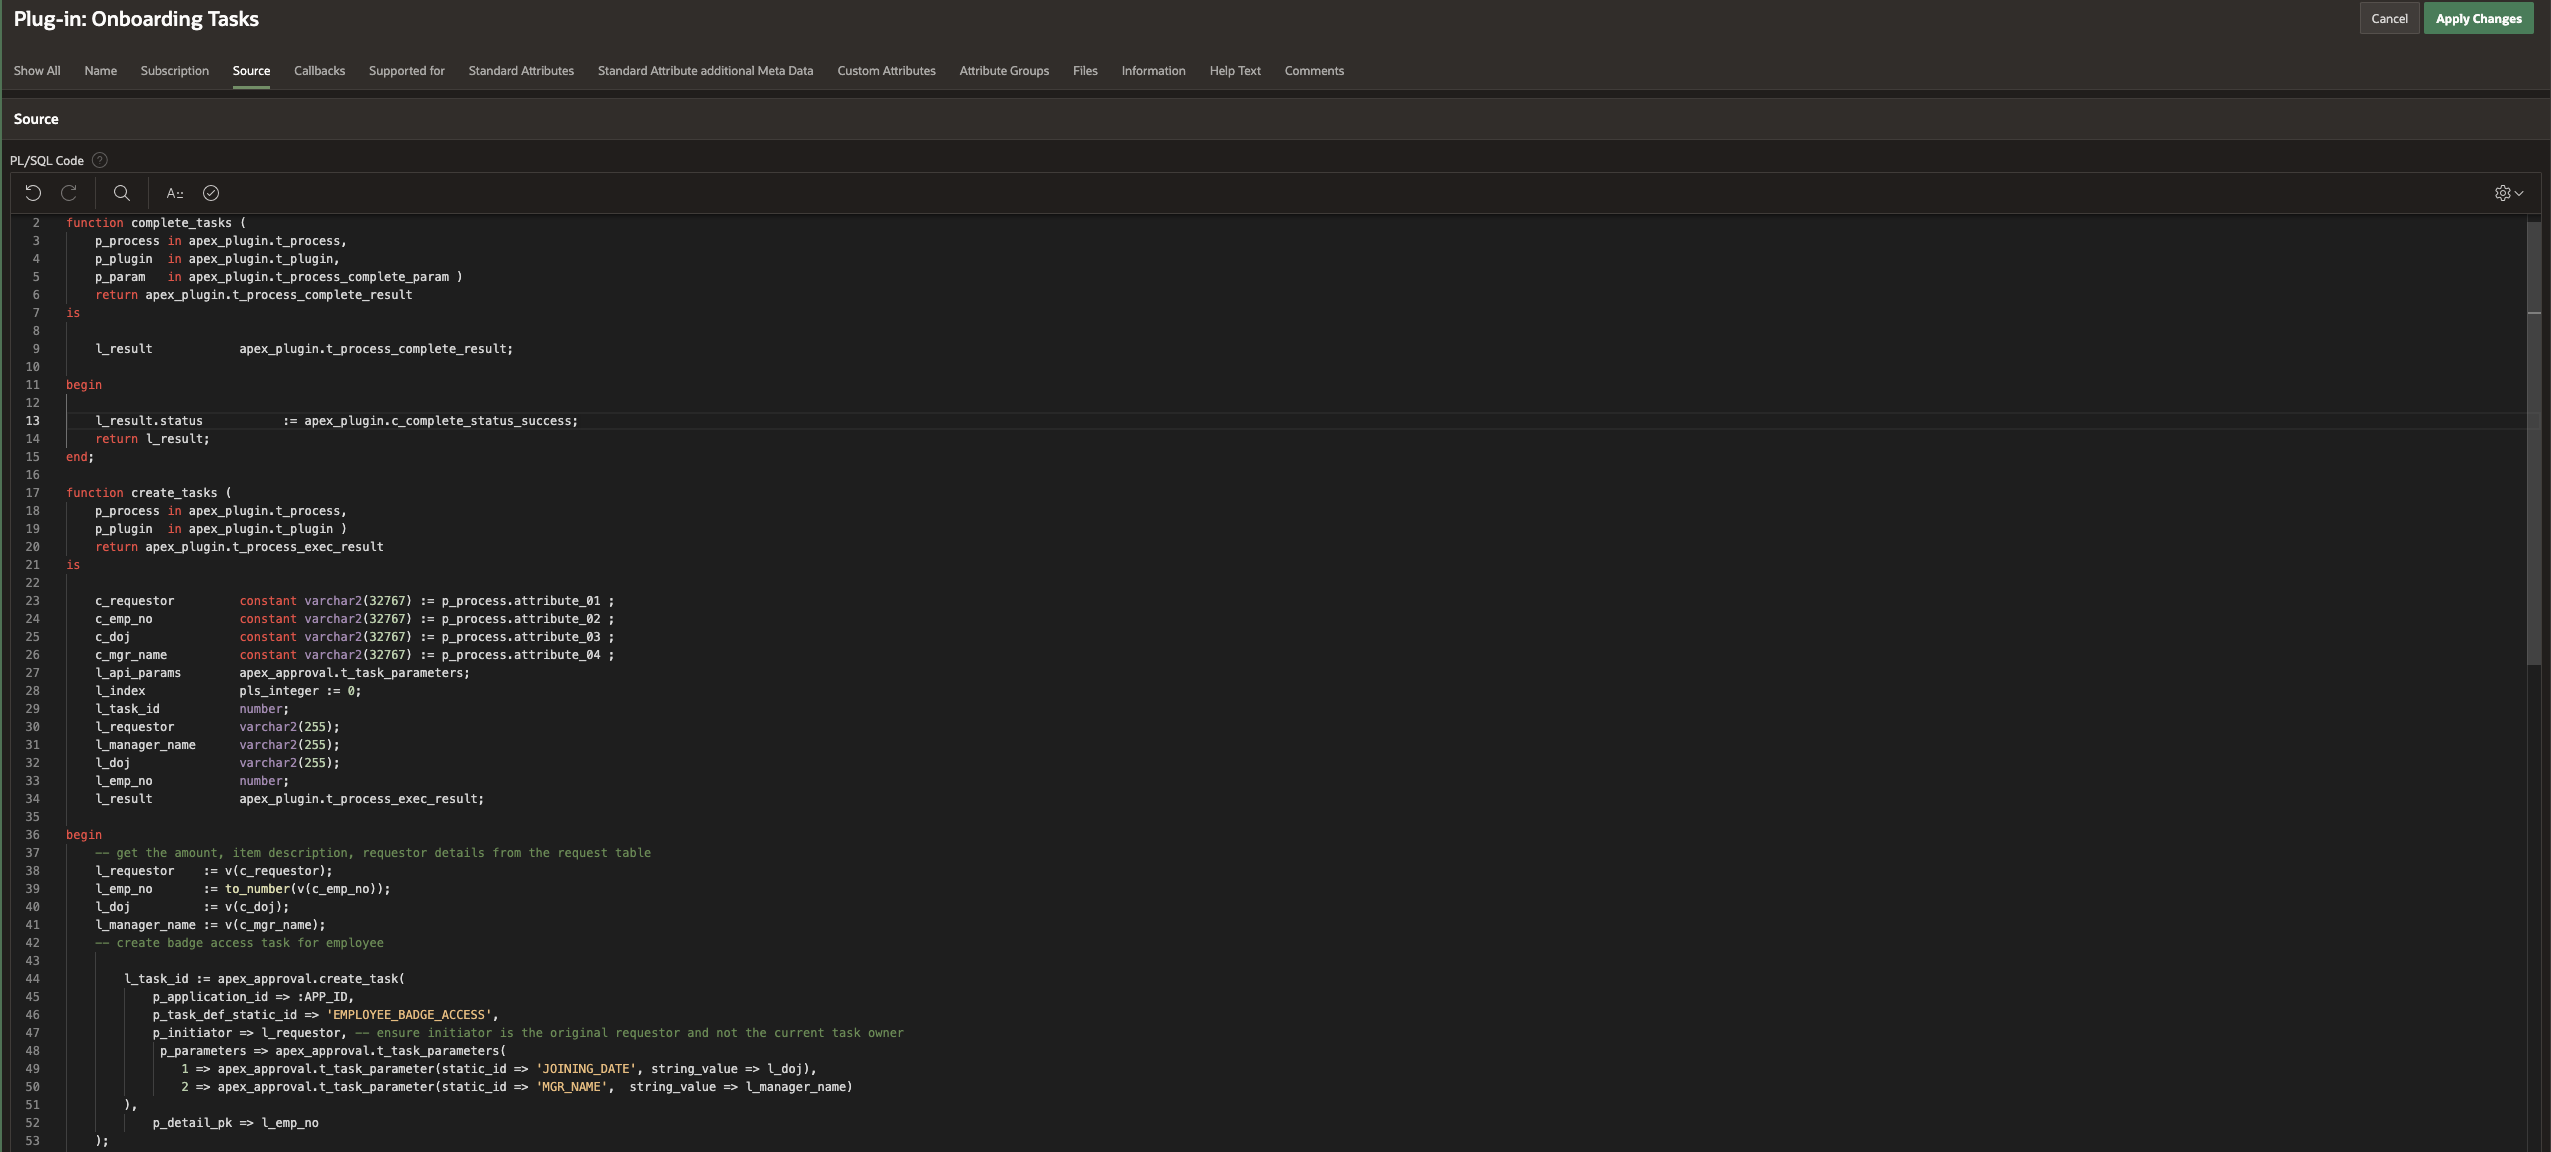
In the Source section copy and paste the following code block
function complete_tasks (
    p_process in apex_plugin.t_process,
    p_plugin  in apex_plugin.t_plugin,
    p_param   in apex_plugin.t_process_complete_param )
    return apex_plugin.t_process_complete_result
is
    l_result            apex_plugin.t_process_complete_result;
begin
    l_result.status           := apex_plugin.c_complete_status_success;
    return l_result;
end;

function create_tasks (
    p_process in apex_plugin.t_process,
    p_plugin  in apex_plugin.t_plugin )
    return apex_plugin.t_process_exec_result
is

    c_requestor         constant varchar2(32767) := p_process.attribute_01 ;
    c_emp_no            constant varchar2(32767) := p_process.attribute_02 ;
    c_doj               constant varchar2(32767) := p_process.attribute_03 ;
    c_mgr_name          constant varchar2(32767) := p_process.attribute_04 ;
    l_api_params        apex_approval.t_task_parameters;
    l_index             pls_integer := 0;
    l_task_id           number;
    l_requestor         varchar2(255);
    l_manager_name      varchar2(255);
    l_doj               varchar2(255);
    l_emp_no            number;
    l_result            apex_plugin.t_process_exec_result;

begin
    -- get the amount, item description, requestor details from the request table
    l_requestor    := v(c_requestor);
    l_emp_no       := to_number(v(c_emp_no));
    l_doj          := v(c_doj);
    l_manager_name := v(c_mgr_name);
    -- create badge access task for employee

        l_task_id := apex_approval.create_task(
            p_application_id => :APP_ID,
            p_task_def_static_id => 'EMPLOYEE_BADGE_ACCESS',
            p_initiator => l_requestor, -- ensure initiator is the original requestor and not the current task owner
             p_parameters => apex_approval.t_task_parameters(
                1 => apex_approval.t_task_parameter(static_id => 'JOINING_DATE', string_value => l_doj),
                2 => apex_approval.t_task_parameter(static_id => 'MGR_NAME',  string_value => l_manager_name)
        ),
            p_detail_pk => l_emp_no
    );
    -- create laptop access task for employee

        l_task_id := apex_approval.create_task(
            p_application_id => :APP_ID,
            p_task_def_static_id => 'LAPTOP_APPROVAL',
            p_initiator => l_requestor, -- ensure initiator is the original requestor and not the current task owner
            p_detail_pk => l_emp_no
    );
    return l_result;
end;
Fill in the Callbacks section as shown below. Then click on Create Plugin.

Edit the Plugin to add the following Custom Attributes

Note:
Click on Apply Changes to complete the plugin definition.
Revisiting the Approval Task Definitions
In the previous section we mentioned that the workflow will wait for the activity defined by the custom plugin to complete. This happens when the workflow receives a continue_activity call. So, at which point should this call be made?
Revisiting our business logic, the workflow should continue to the next step if
a) Both Laptop Approval and Badge Access Tasks are approved (happy path)
b) If either of the approval tasks are rejected. (unhappy path)
To implement this we will add Task Actions to both the Approval Task Definitions.
Go to Shared Components -> Workflows and Automations -> Task Definitions. Click on Employee Badge Access Task Definition.
Go to the Actions section and click on Add Action.
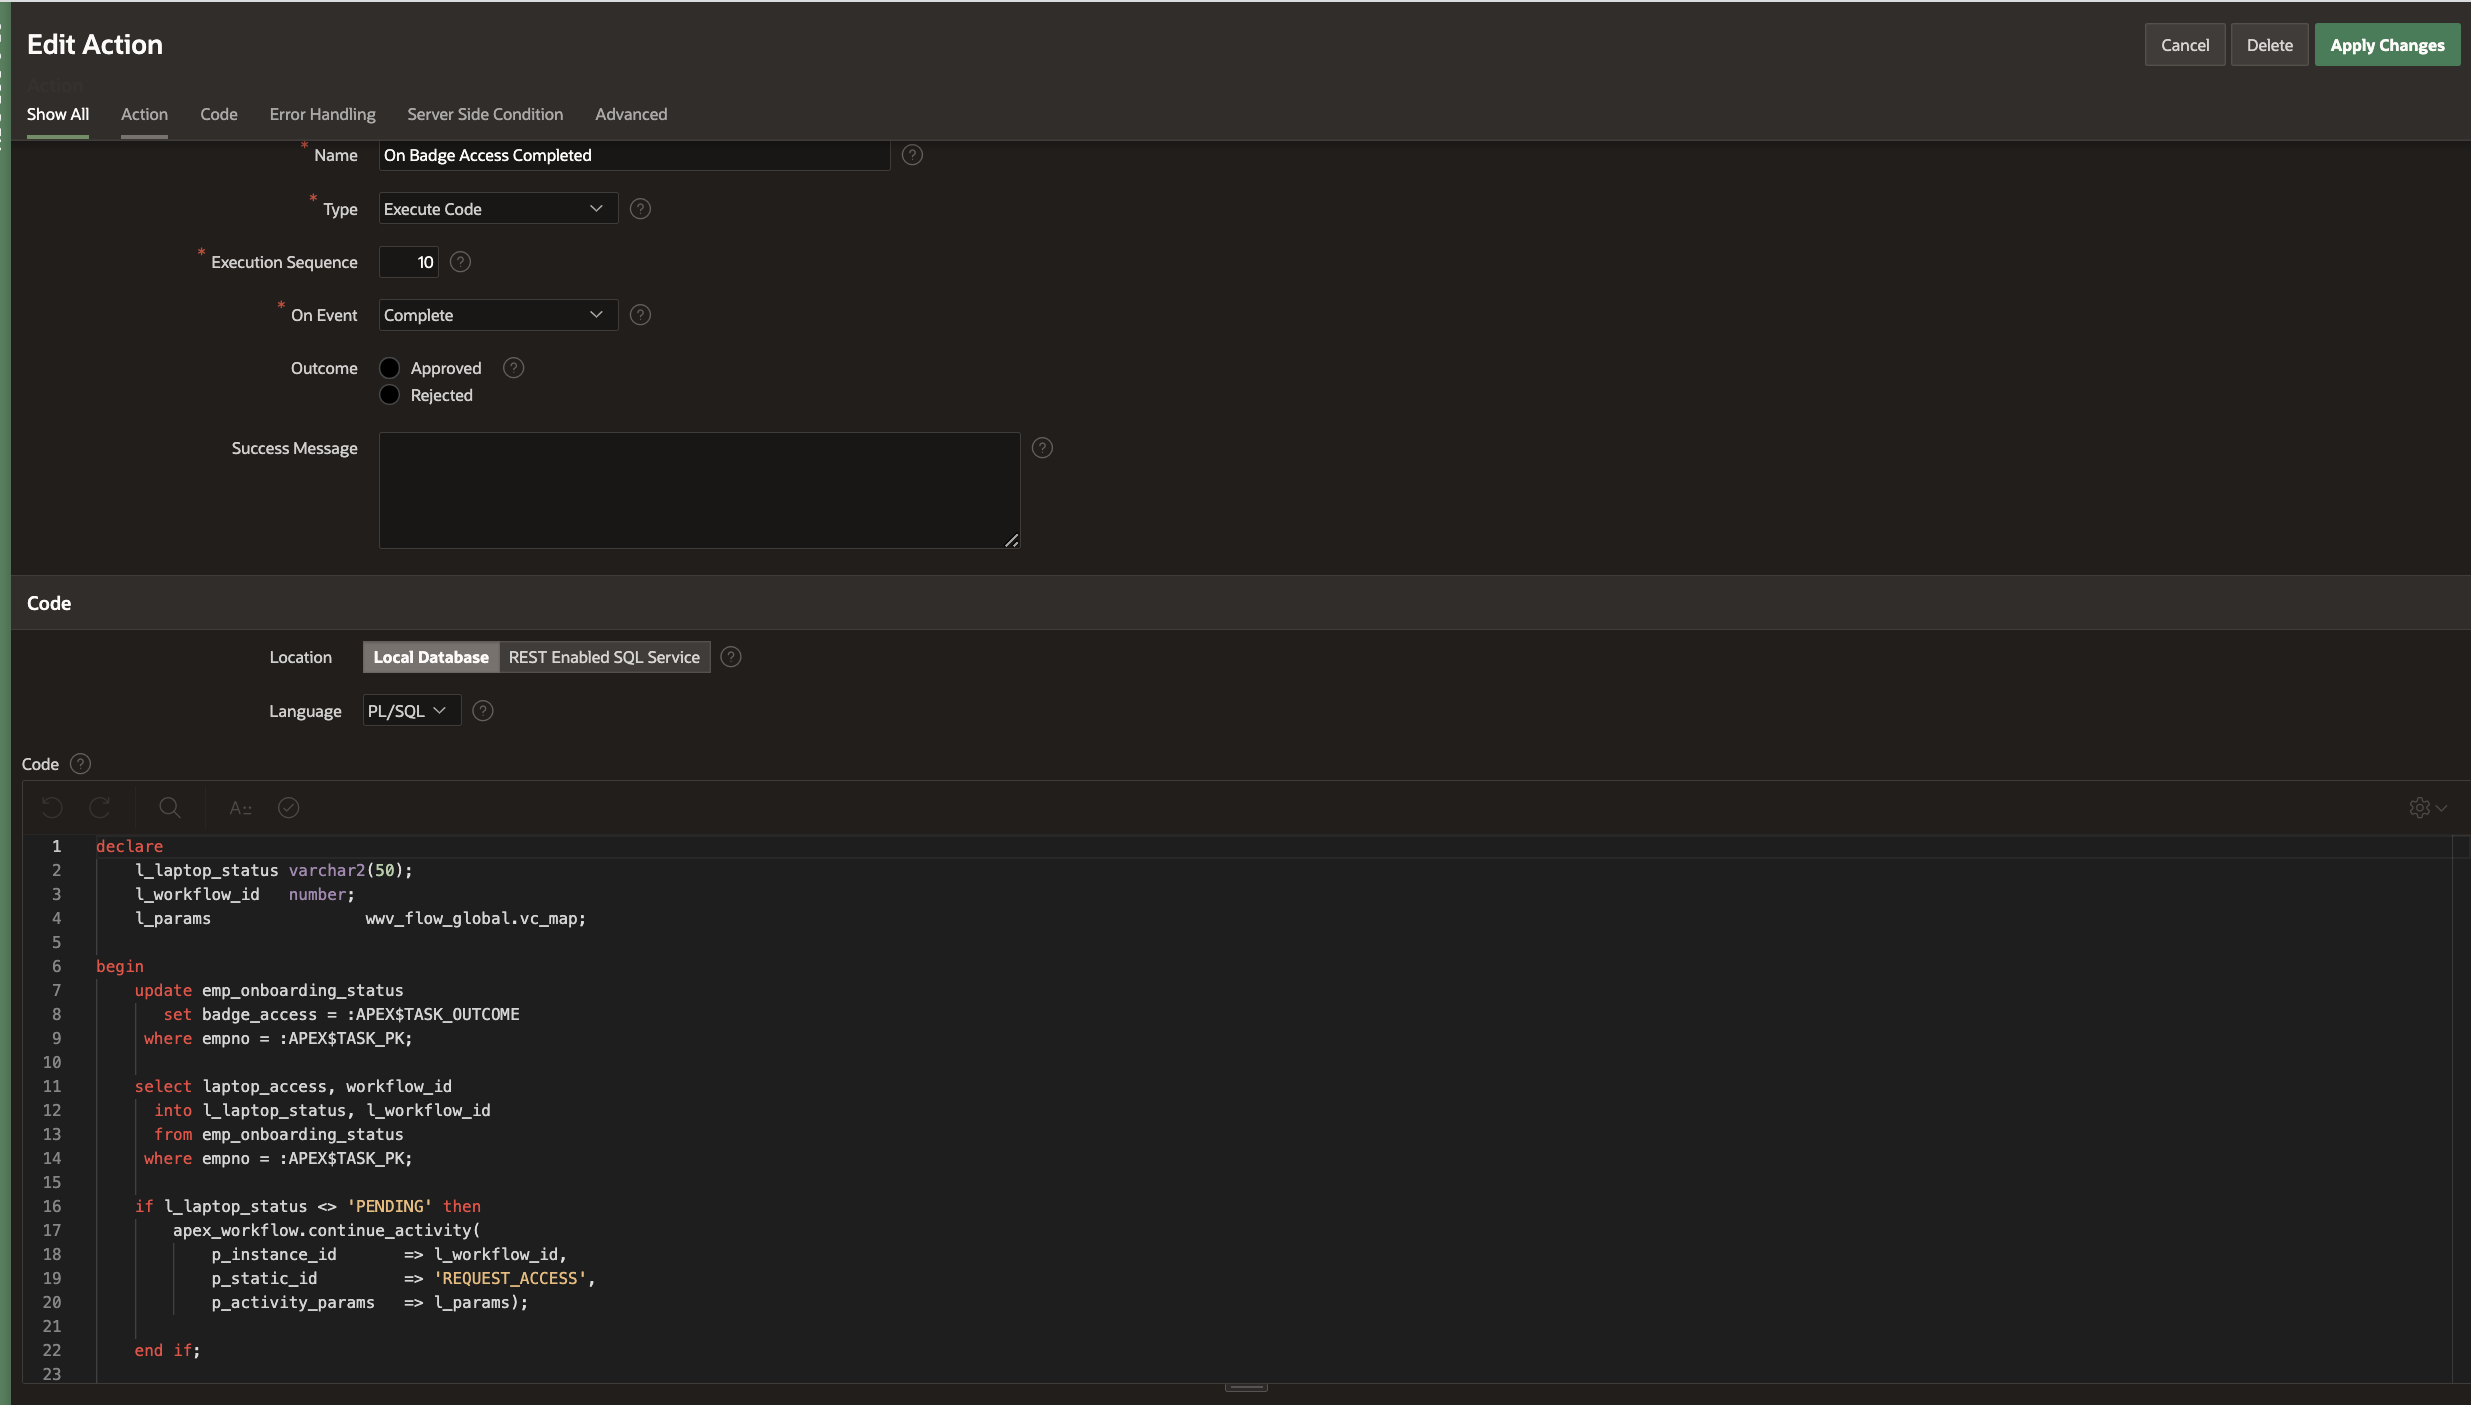
Add a new Action with name “On Badge Access Completed” . Select the Type as Execute Code and the Event as On Completed. Do Not click on either radio button Approve or Reject. This is because we want the action to fire on task completion irrespective of the task outcome.
In the Code section add the following code
declare
    l_laptop_status varchar2(50);
    l_workflow_id   number;
    l_params                wwv_flow_global.vc_map;

begin
    update emp_onboarding_status
       set badge_access = :APEX$TASK_OUTCOME
     where empno = :APEX$TASK_PK;

    select laptop_access, workflow_id
      into l_laptop_status, l_workflow_id
      from emp_onboarding_status
     where empno = :APEX$TASK_PK;

    if l_laptop_status <> 'PENDING' then
        apex_workflow.continue_activity(
            p_instance_id       => l_workflow_id,
            p_static_id         => 'REQUEST_ACCESS',
            p_activity_params   => l_params);

    end if;

end;
Note:
Click on Apply Changes to save the changes.
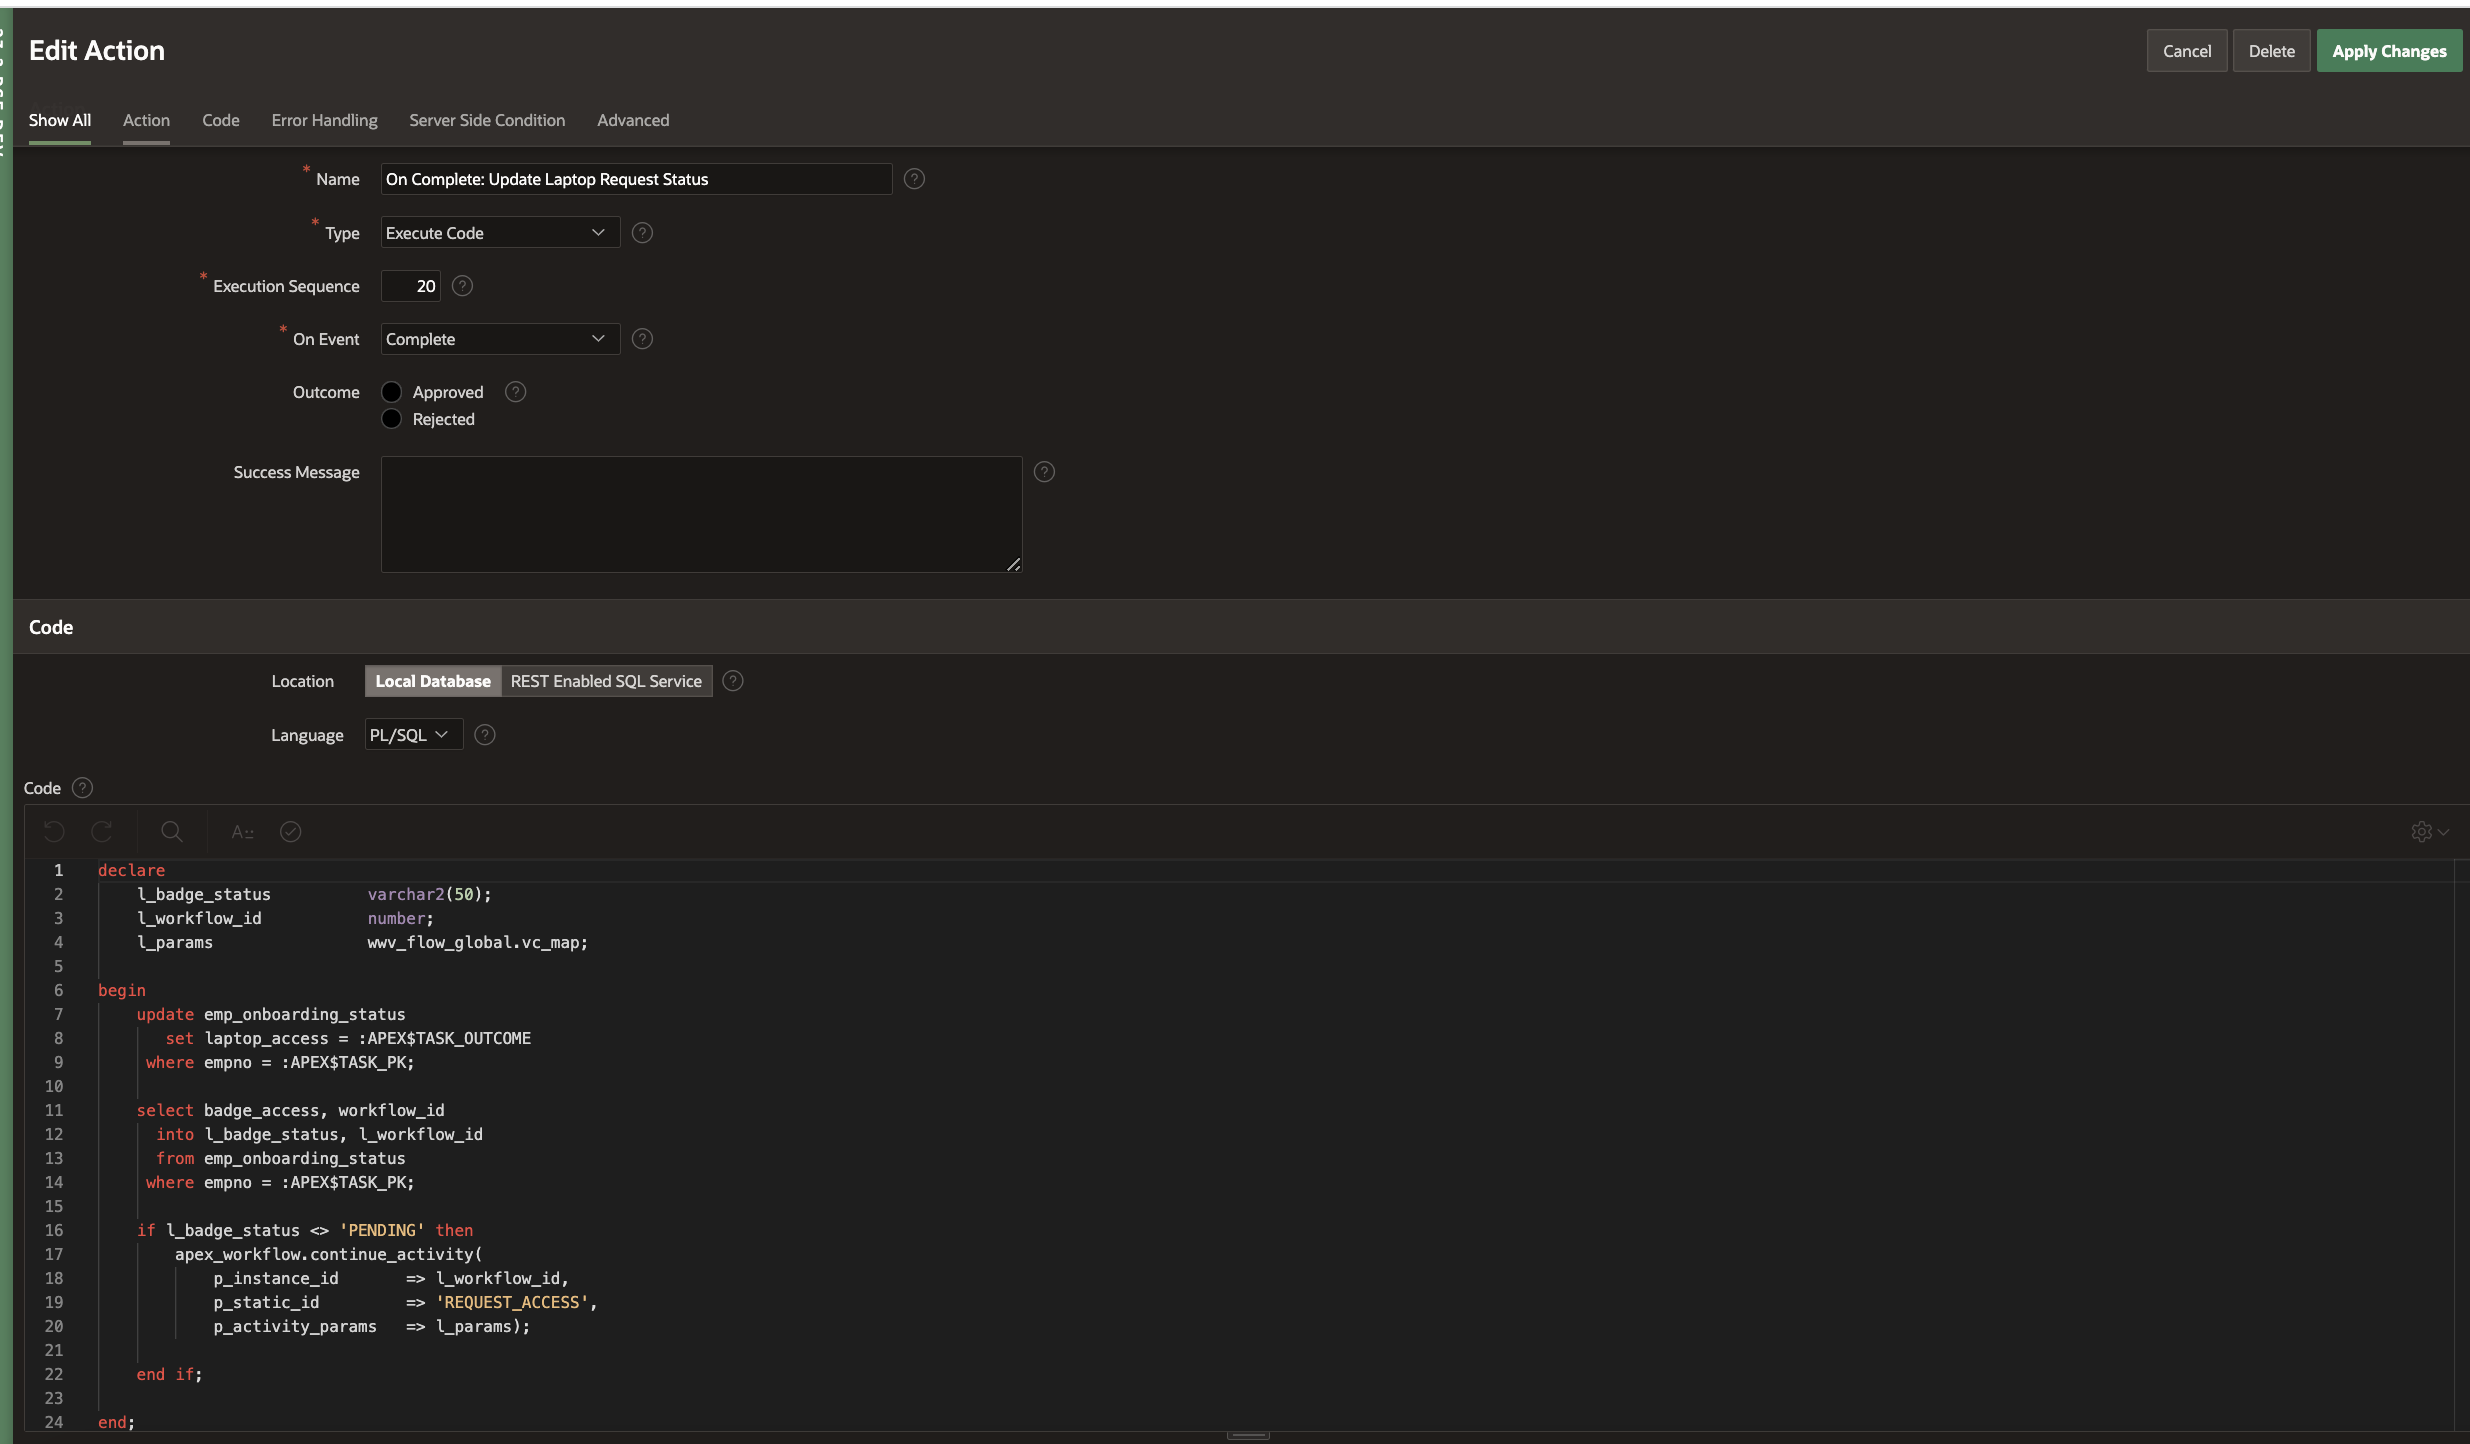
Go to the Laptop Approval Task Definition and add an On Completed Task Action in the same way.
Now that the Task Definitions and Custom Plugins are complete, let’s go and design the Workflow itself!
Creating the Onboarding Workflow
Brushing Up: The blog series Simplify Business Process Management Using APEX Workflow contains a detailed guide on how to create and use workflows for business process management. It also contains details of APEX Workflow Parameters, Variables, Activities and Connections.
To design the Onboarding Workflow, go to the Shared Components→ Workflows and Automations→ Workflows and hit Create.
This brings us to the Workflow Designer (Shared Components -> Workflows -> Workflow Definition) Page. You will find that a new workflow with a new version has been auto-created with a Start Activity, an Execute Code Activity and an End Activity. Remove the Execute Code Activity as shown in this blog.
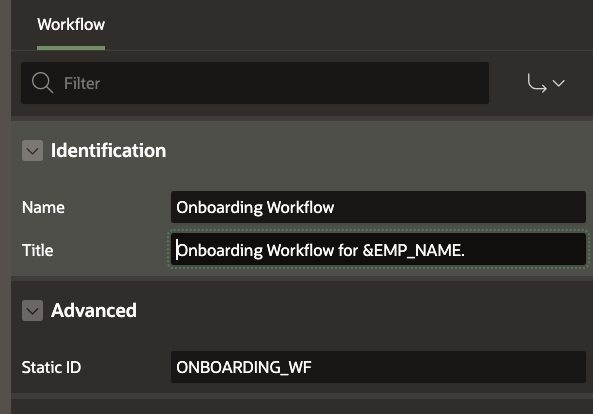
Modify the Workflow Name to Onboarding Workflow, Title to Onboarding Workflow for &EMP_NAME. and the Static ID to ONBOARDING_WF .
Modify the Workflow Version to 1.0
Parameters for the Workflow
We will define the following parameters for the Expense Reimbursement Workflow.
DEPARTMENT (Department), DESIGNATION (Designation) , EMP_EMAIL (Employee Email) , EMP_NAME (Employee Name), JOINING_DATE ( Joining Date ) , MGR_EMAIL (Manager Email ), REQUESTOR (Requestor)
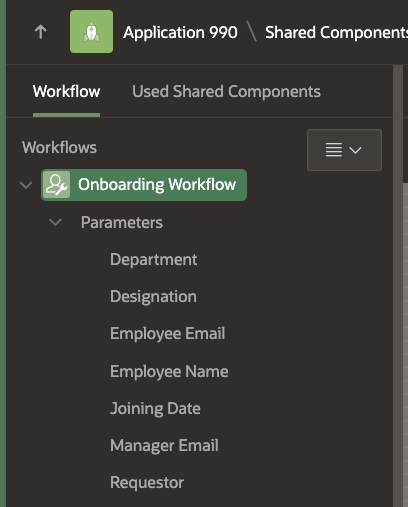
To create a new Parameter, right click on the Workflow in the Tree and select Create Parameter. This adds a Parameter with label “New” in the Workflow Tree. Go to the Property Editor and change the Labels and Static IDs to the values given above.
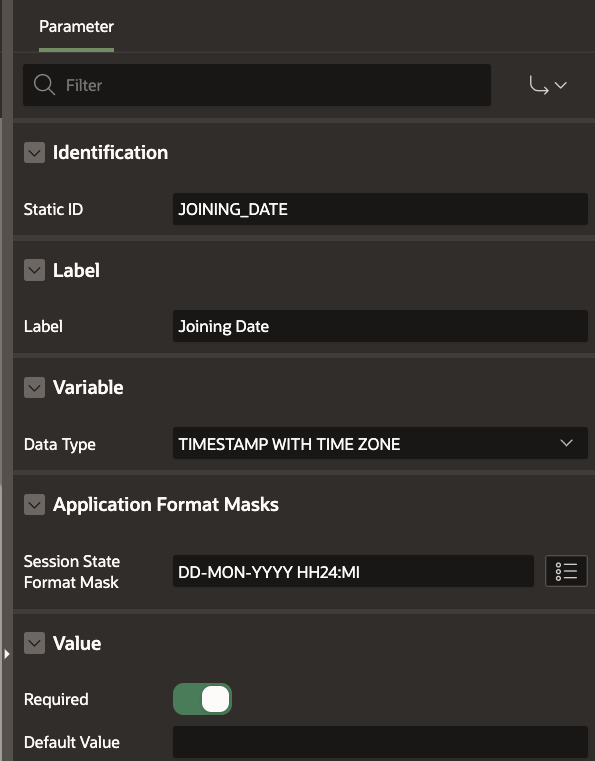
Shown below is an example of how you define the Joining Date parameter. All the other parameters are of Data Type VARCHAR2.
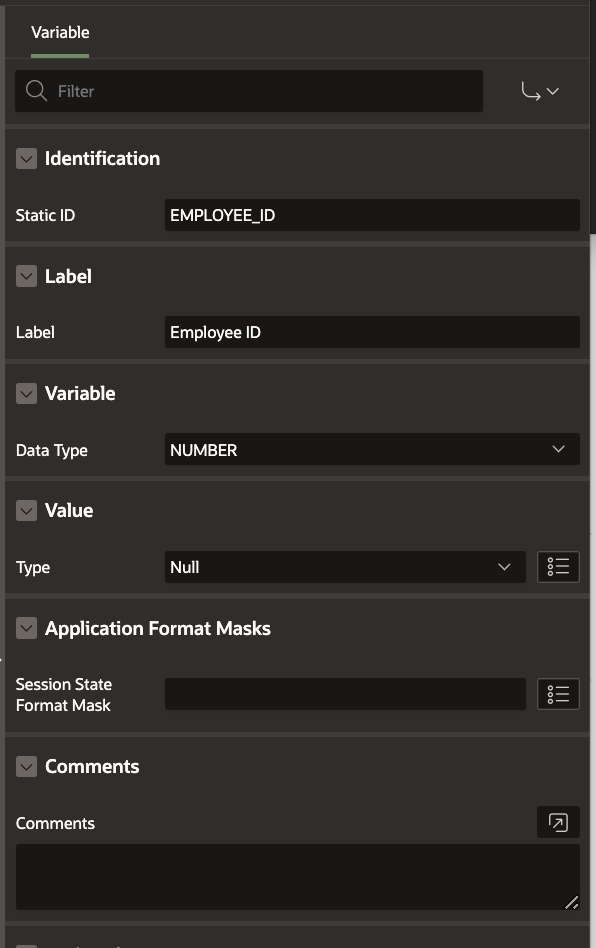
Variables in the Workflow
Define the following Workflow Variable:
EMPLOYEE_ID initialized to Null
Note: To learn about defining workflow variables, check Adding Workflow Variables section in this blog.
Activities in the Workflow
Follow the flowchart shown in the beginning of this blog (Figure 1) and define the following activities accordingly
Note: To get a detailed description of the different Workflow Activities visit this blog .
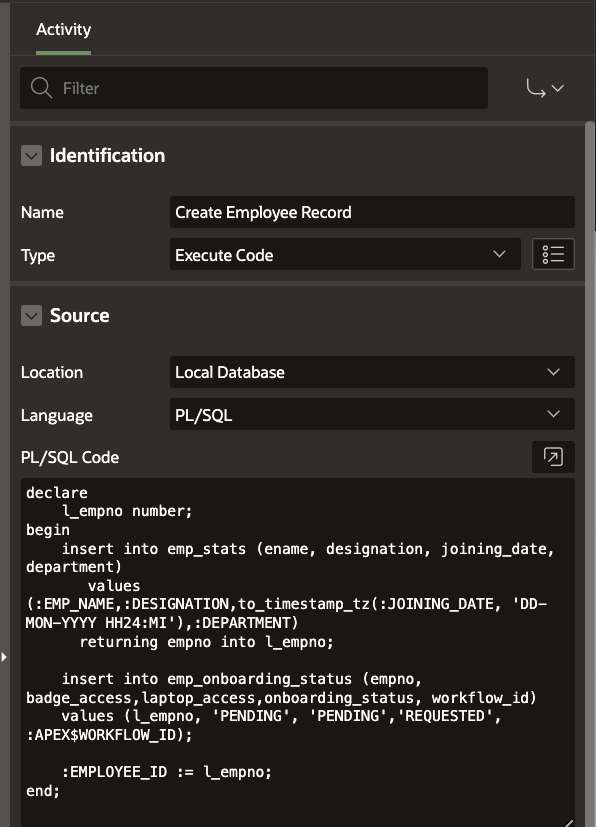
1) Create Employee Record
Activity Type : Execute Code
Code:
declare
    l_empno number;
begin
    insert into emp_stats (ename, designation, joining_date, department)
       values (:EMP_NAME,:DESIGNATION,to_timestamp_tz(:JOINING_DATE, 'DD-MON-YYYY HH24:MI'),:DEPARTMENT)
      returning empno into l_empno;

    insert into emp_onboarding_status (empno, badge_access,laptop_access,onboarding_status, workflow_id)
    values (l_empno, 'PENDING', 'PENDING','REQUESTED', :APEX$WORKFLOW_ID);

    :EMPLOYEE_ID := l_empno;
end;
2) Request Access
Activity Type : Onboarding Tasks (Custom Plugin)
You will find the custom plugin activity type available in the Activity Palette at the bottom of the Diagram Builder
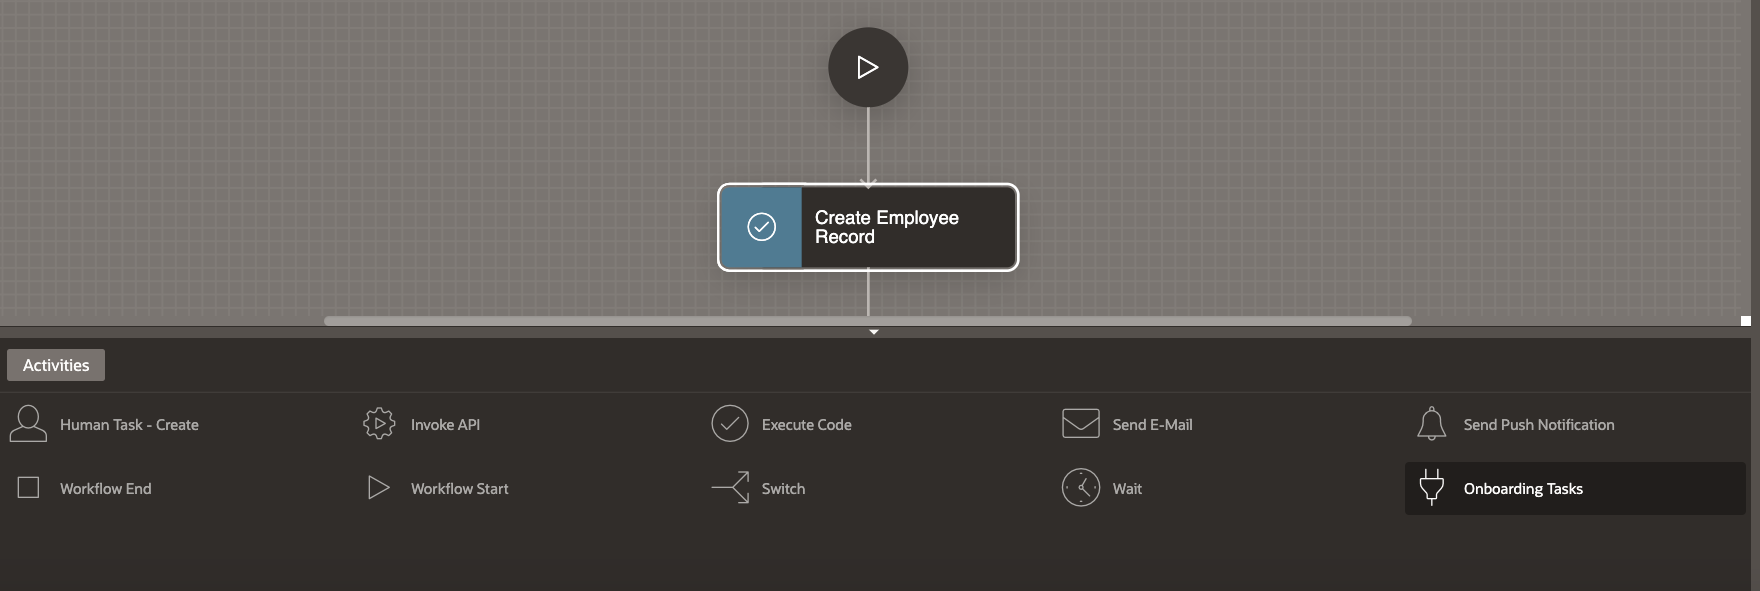
Drag and Drop this to the Diagram and connect it to Create Employee Record activity. Define the Properties of the activity as shown below.
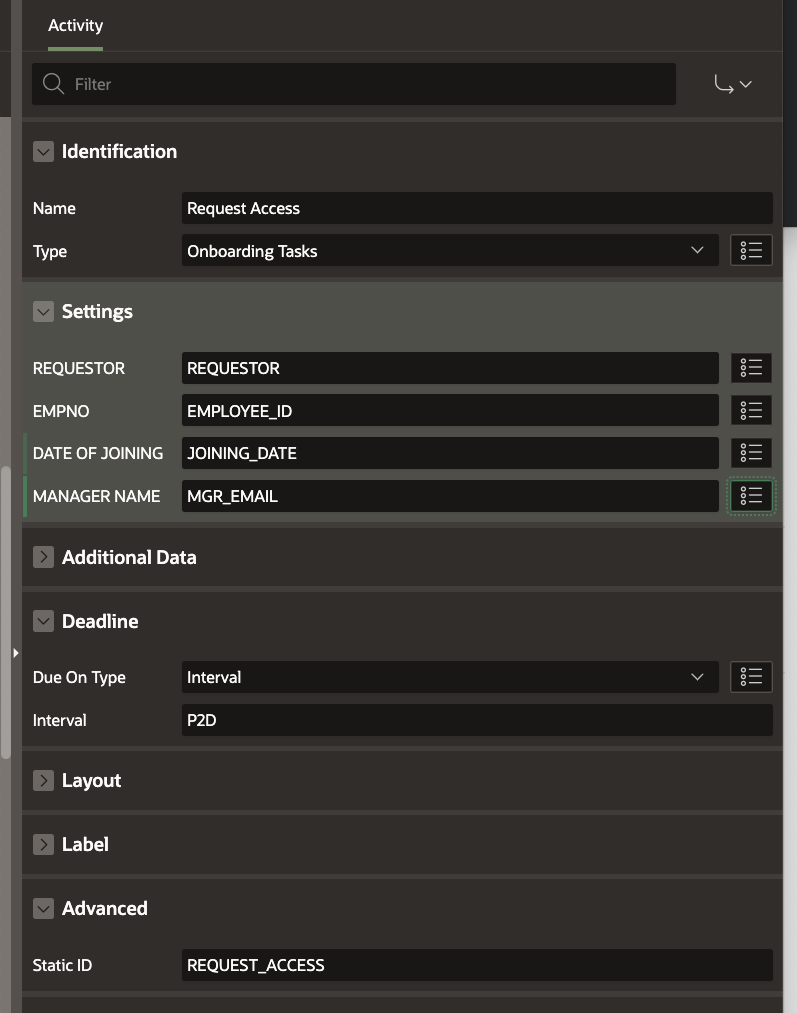
Note
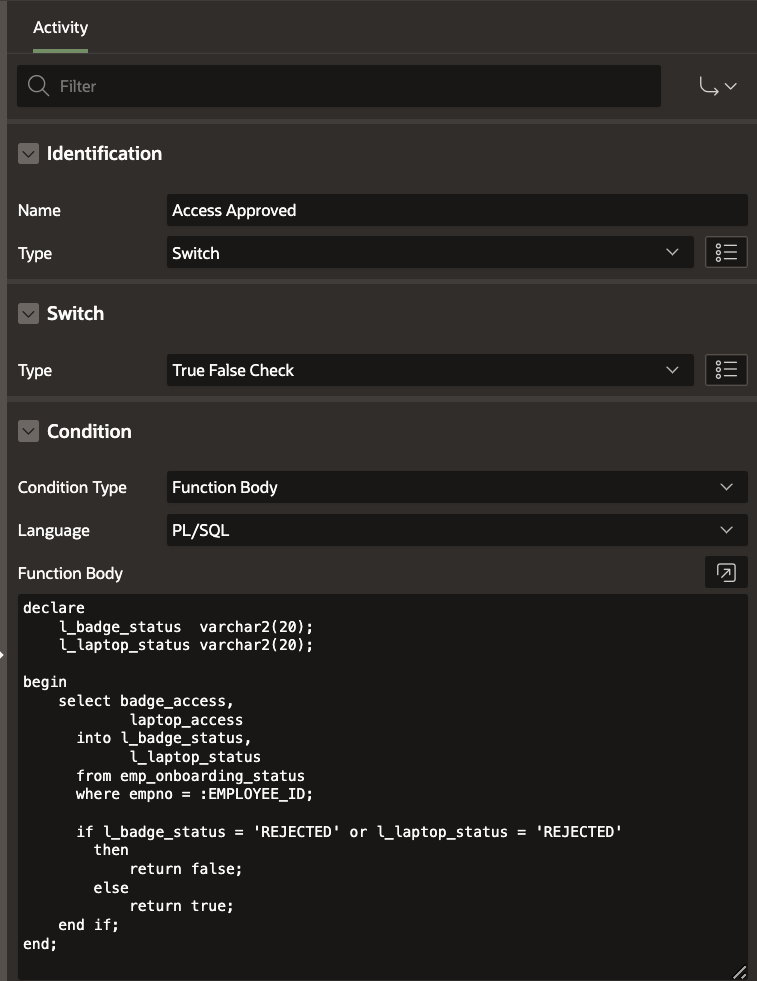
3) Access Approved
Activity Type: Switch ( True False Check)
Condition Type: Function Body
Function Body:
declare
    l_badge_status  varchar2(20);
    l_laptop_status varchar2(20);

begin
    select badge_access,
            laptop_access
      into l_badge_status,
            l_laptop_status
      from emp_onboarding_status
      where empno = :EMPLOYEE_ID;

      if l_badge_status = 'REJECTED' or l_laptop_status = 'REJECTED'
        then
            return false;
        else
            return true;
    end if;
end;
4) Complete Training
Activity Type : Human Task Create
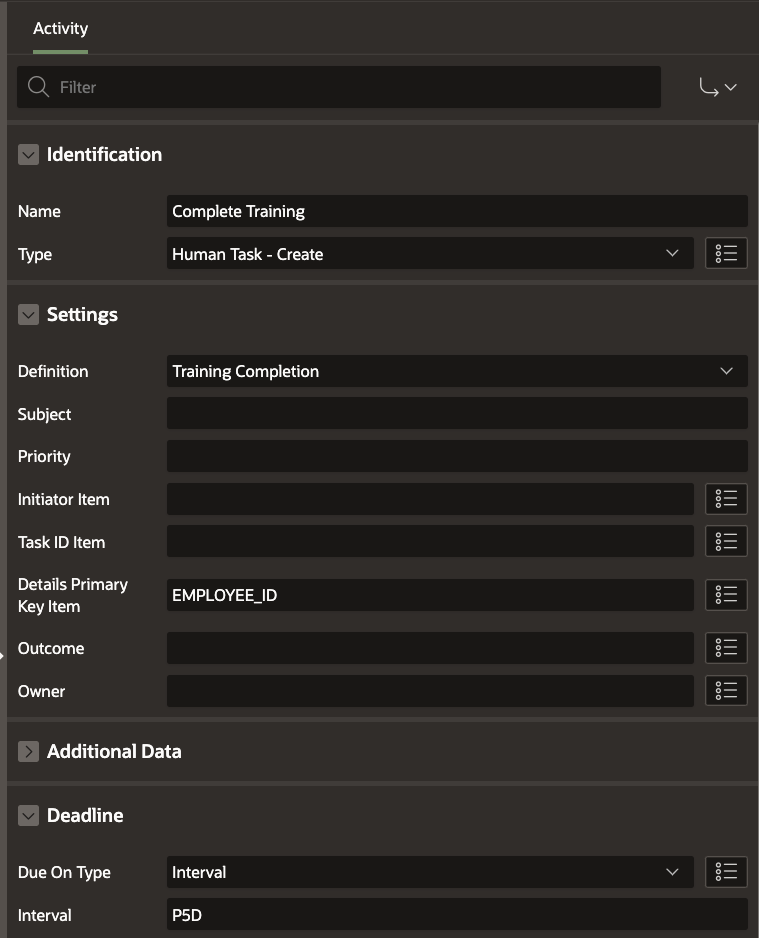
Note
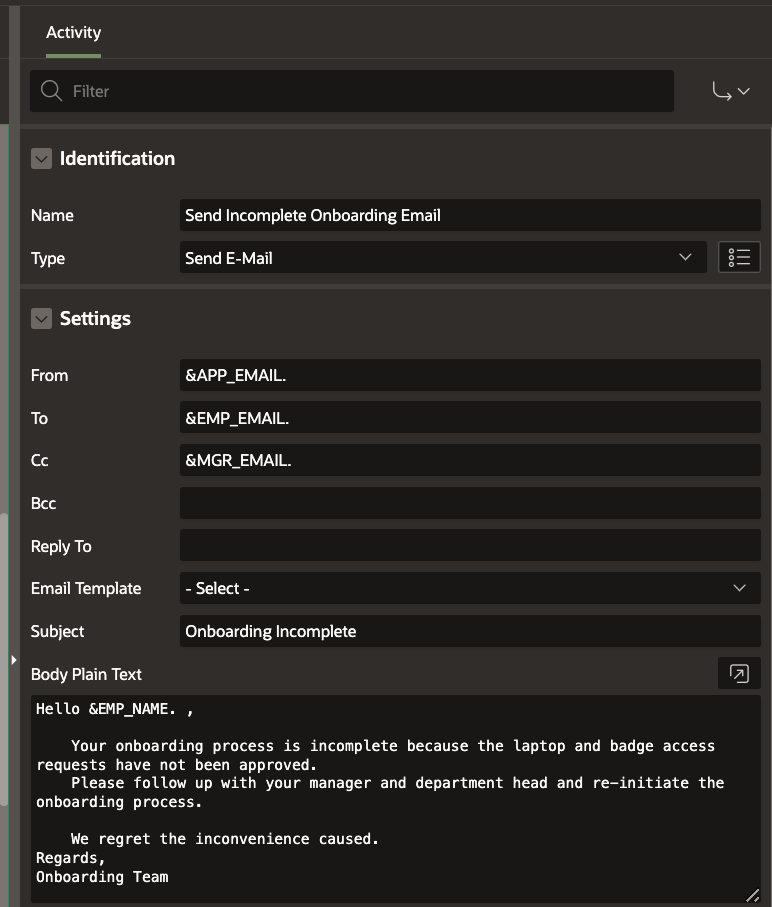
5) Send Incomplete Onboarding Email
Activity Type: Send Email
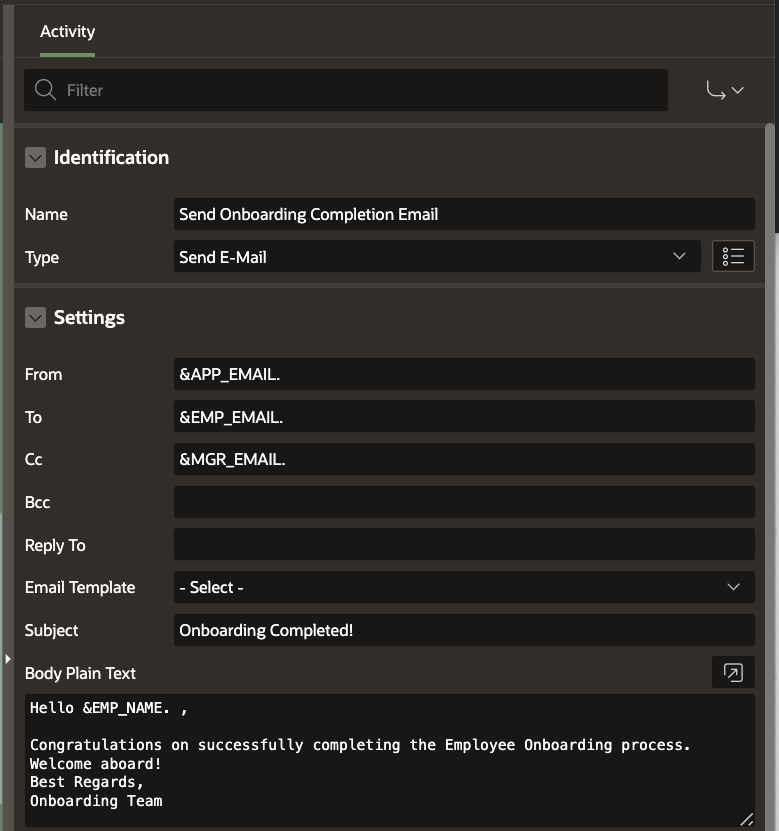
6) Send Onboarding Completed Email
Activity Type: Send Email
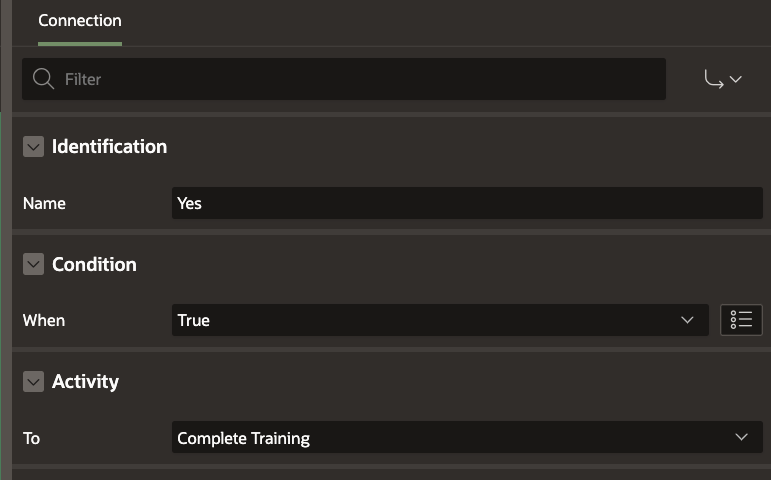
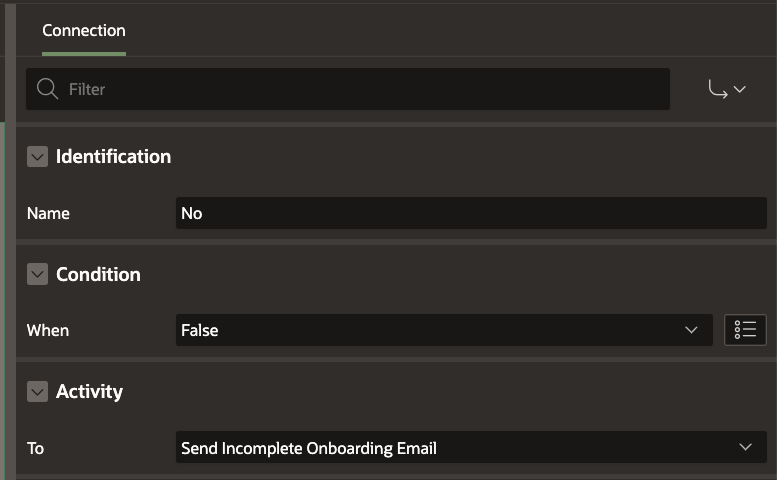
Adding the conditional connections for the Switch Activity
Define the True and False branches of Access Approved activity as shown below
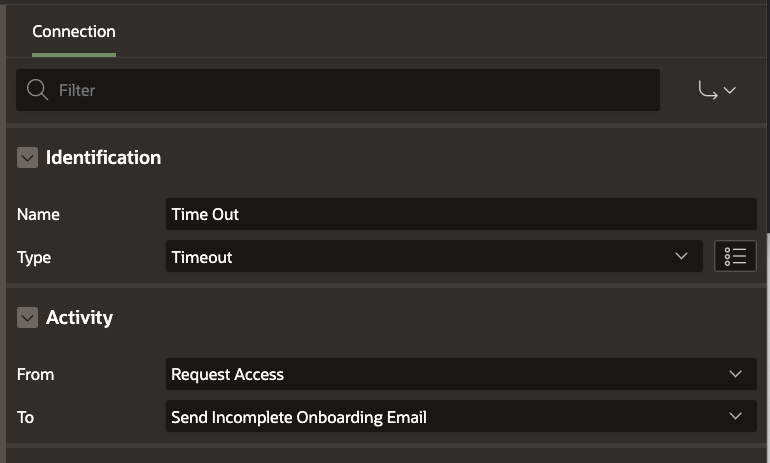
Adding the Timeout Connections
Define a Connection of type Timeout between Request Access and Send Incomplete Onboarding Email activities.
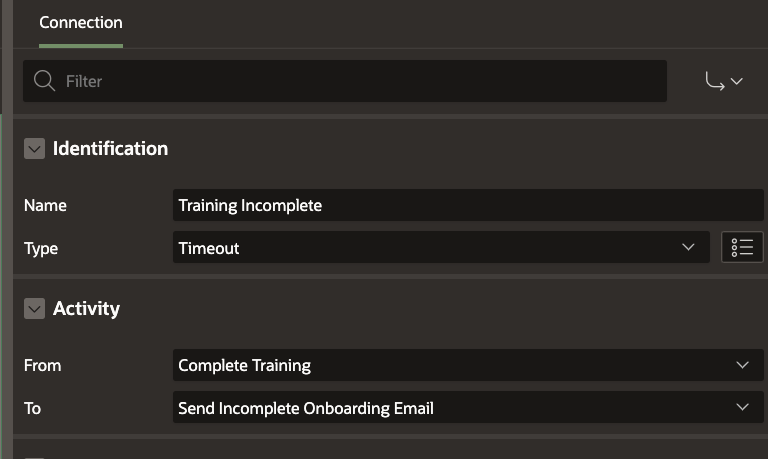
Define another Connection of type Timeout between Complete Training and Send Incomplete Onboarding Email activities.
Note:
These connections as well as the non-conditional connections between the different activities can be drawn in the Diagram Builder. To learn more about drawing connections between activities refer to this blog .
The Final Workflow Diagram
Link all the activities together so that the final workflow looks like this:
Creating the Request Onboarding page
Now that we have the task definition ,the plugin and the workflow created, we will create the page which will submit the onboarding request. Submitting this page will create an Onboarding workflow instance based on the workflow we have just configured.
Click on Create Page in your Onboarding application. Choose the Page type as Blank Page
Name this page “Request Onboarding” .
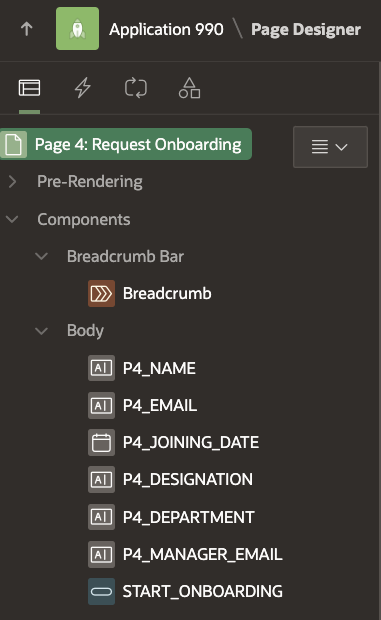
In the Page Designer, add the following Page Items to the Body : Name, Email, Joining Date, Designation, Department and Manager Email. Set the Joining Date type as Date Picker.
Add a button START_ONBOARDING to the Page.
Navigate to the Processing Tab and Create a new Page Process of type Workflow. Name the process “Submit Workflow“.
Under Settings, Click the Type and set it as Start. Set the Workflow Definition as Onboarding Workflow.
Set the Success Message as “Onboarding Started!”
Under Server-Side-Conditions set When Button Pressed to START_ONBOARDING

Set Parameters for the Workflow Page Process
Under Submit Expense -> Parameters in the Processing section:
- Click on Department and set it to Page Item P4_DEPARTMENT
- Click on Designation and set it to Page Item P4_DESIGNATION
- Click on Employee Email and set it to Page Item P4_EMAIL
- Click on Employee Name and set it to Page Item P4_NAME
- Click on Joining Date and set it to Page Item P4_JOINING_DATE
- Click on Manager Email and set it to Page Item P4_MGR_EMAIL
- Click on Requestor and set it to Static Value &APP_USER.
Save the changes.
Creating the My Tasks and Monitor Workflows pages
Create a Page of type Unified Task List with Report Context as My Tasks. This page will be used by the approvers of the Badge Access and Laptop Approval tasks, and also by the Employee to complete the Training Completion task.
Details of creating the Unified Task List page can be seen this blog.
Create a Page of type Workflow Console and name it Monitor Onboarding Workflows and choose the report context as Initiated By Me. Name the Forms page as Onboarding Details.
Details of creating Workflow Console page can be found in the View Appointment Workflows section of this blog.
Customizing the Task Details Page for the Complete Training Action Task
To customize the Task Details page for the Complete Training Action Task, open the details page and in the page designer, rename the COMPLETE button title to Acknowledge. Add a Read Only region with the following text
“Please click on the Acknowledge button to confirm the completion of your new-hire training” .
Note: You may delete other regions like History and Comments from the details page as they are not relevant to this Action Task.
Our Application is now Complete and Ready to Run!
Running the Application
Try the following steps:
a) Log In as STEVE and go to the Request Onboarding page to submit a new Onboarding request for JAY.
b) Click on Monitor Onboarding Workflows and check that the Workflow has started and is in ACTIVE state waiting at the Request Access activity.
c) Log out and log back in as RALMUELL and click on My Tasks. Approve the Badge Access Task that was generated by the Request Access activity.
d) Log out and log back in as JANE and click on My Tasks. Approve the Laptop Approval Task that was generated by the Request Access activity.
e) Log back in as STEVE and check the Monitor Onboarding Workflows. Check that the Workflow instance has now progressed to the Complete Training activity.
f) Log in as JAY and go to My Tasks. Click on the Complete Training Task and click on Acknowledge button in the Task Details page.
g) Verify that the Workflow is now complete and Onboarding Completion Email is received,
Try alternative steps like
1) Log in as either RALMUELL or JANE and Reject the approval task. Verify that the Workflow is completed and an Incomplete Onboarding Email is received.
2) Do not act on the Badge Access or Laptop Approval task for 2 days. Verify that the Workflow goes into the Timeout branch and an Incomplete Onboarding Email is received.
3) Check the flowchart in Figure 1 and add the two execute code activities (Update Onboarding Failure and Update Onboarding Success ) to update the EMP_ONBOARDING_STATUS table’s ONBOARDING_STATUS column to COMPLETED or FAILED depending on whether the Onboarding was successful or not.
Key Takeaways…
We saw how using a custom process type plugin as a workflow activity enables us to complete mutually independent non-sequential manual steps in the workflow. You can experiment with similar use-cases of your own and design your workflows in a highly customizable manner.