This blog post was originally published on May 10, 2022.
Approval Management made easy
The APEX Approvals Component enables Approvals within the APEX no-code/low-code eco system. In this introductory part of the multi-series blog I will explain the basic concepts of the Approval Management, and also provide a step by step guide to how a simple APEX Application can be set up to perform Approval Management.
Approval Management – Concepts and Terminology
To explain the concepts and terms associated with Approval Management in APEX, we will take the example of a simple Leave Request Application. To apply for leave, an employee logs into the application, submits a leave request filling in the From and To Dates, Leave type (Sick/Casual/Vacation/Maternity/Paternity/Adoption/Bereavement) and Justification. The manager of the employee typically approves or rejects this request.
Tasks
The smallest unit in the Approvals Component is a single Task (also known as Task Instance) one or more users might operate on. A Task instance gets created based on a pre-configured template, known as the Task Definition (explained in the following section), when an approval request is submitted by the user of the APEX Application. In the Leave Request Example, when the employee submits the Leave Request, a task instance gets created and assigned to the manager of the employee who will typically approve or reject this task. In the rest of this blog, we will use the terms task and task instance. interchangeably They mean the same.
Persona
Users can interact with the Approvals Management Tasks in the following avatars:
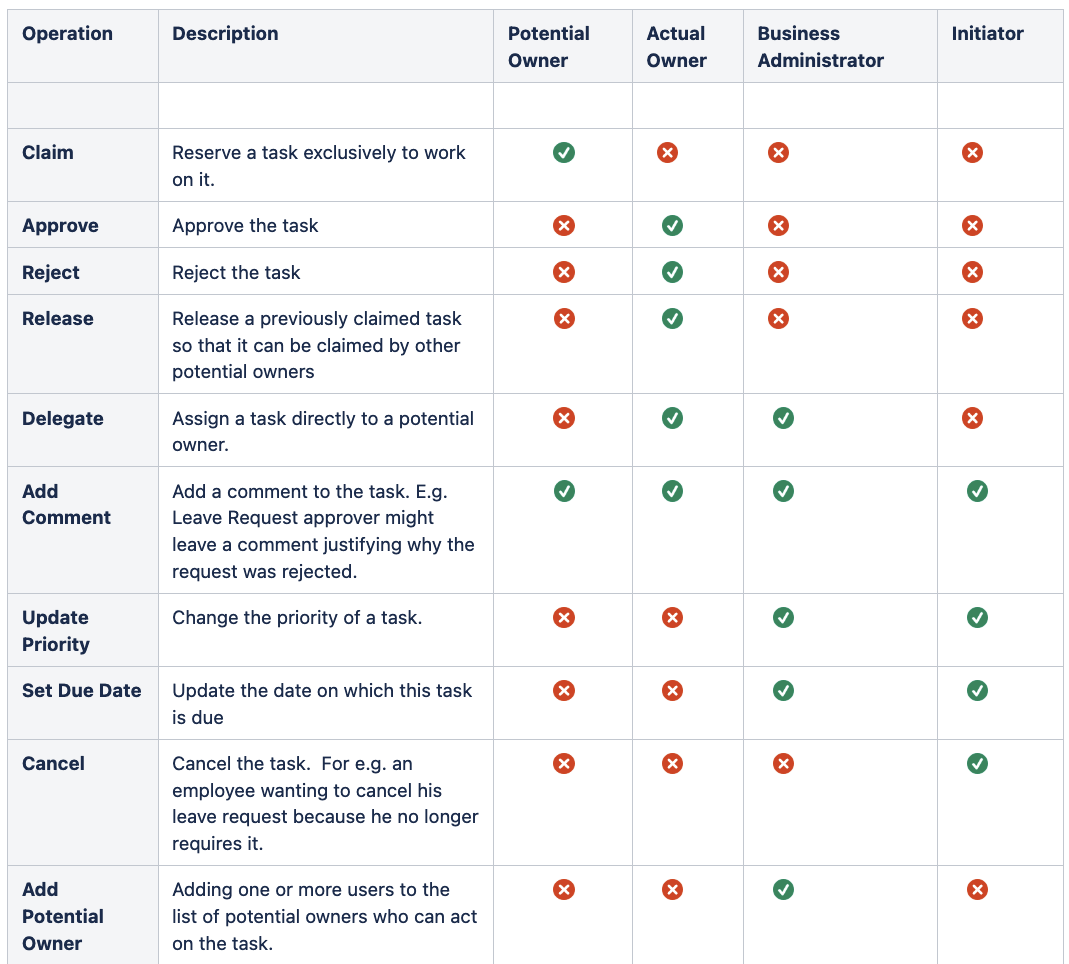
1) Initiator – The user who creates the task. Typically the requestor of the approval.
2) Potential Owner – User or users designated to work on the task, typically to approve or reject it. If a task has multiple potential owners, one of them has to first claim the task to work on it.
3) Actual Owner – User who has exclusive right to work on the task, typically to approve or reject it. If a task has just one potential owner, he or she automatically becomes the actual owner of the task once the task is created.
4) Business Administrator – User or users who have administrative rights over the task.
Note: Potential Owners and Business Administrators are configured for a task as part of the Task Definition. You will learn about this in the next section.
Task Definition
Every approval management scenario needs its own kind of task. For example the type of task that is apt for a Leave Approval will be very different from the type of task that is needed for a Purchase Requisition. The kind of information that the task should carry, the users who will be approving the task are unique to every type of task. These configuration elements of a task are contained in a template known as the Task Definition. The Task Definition for a Leave Approval will be different from the Task Definition for a Purchase Requisition. The Task Definition is created under the Application’s Shared Components→Workflows and Automations→ Task Definitions. So if your application manages both Employee Leaves as well as Employee Expense Reimbursement, then your application would have 2 Task Definitions- Leave Request Task Definition and Expense Request Task Definition, one for each kind of approval.
The Task Definition Shared Component is used to specify the following configurations of a task.
Subject – This is a heading for the task summarizing the task’s purpose. E.g. Leave Request for John Galt from 24.4.22 to 29.4.22.
Task Definition Static Id – The static id representing the task definition. This can be used when programmatically using the Approvals Public API to create a task based on a particular task definition. E.g. LEAVE_REQUEST
Due On Interval – The (optional) time duration in ISO or SQL duration format, denoting the time by which the task is due. For more information about this format, check the documentation.
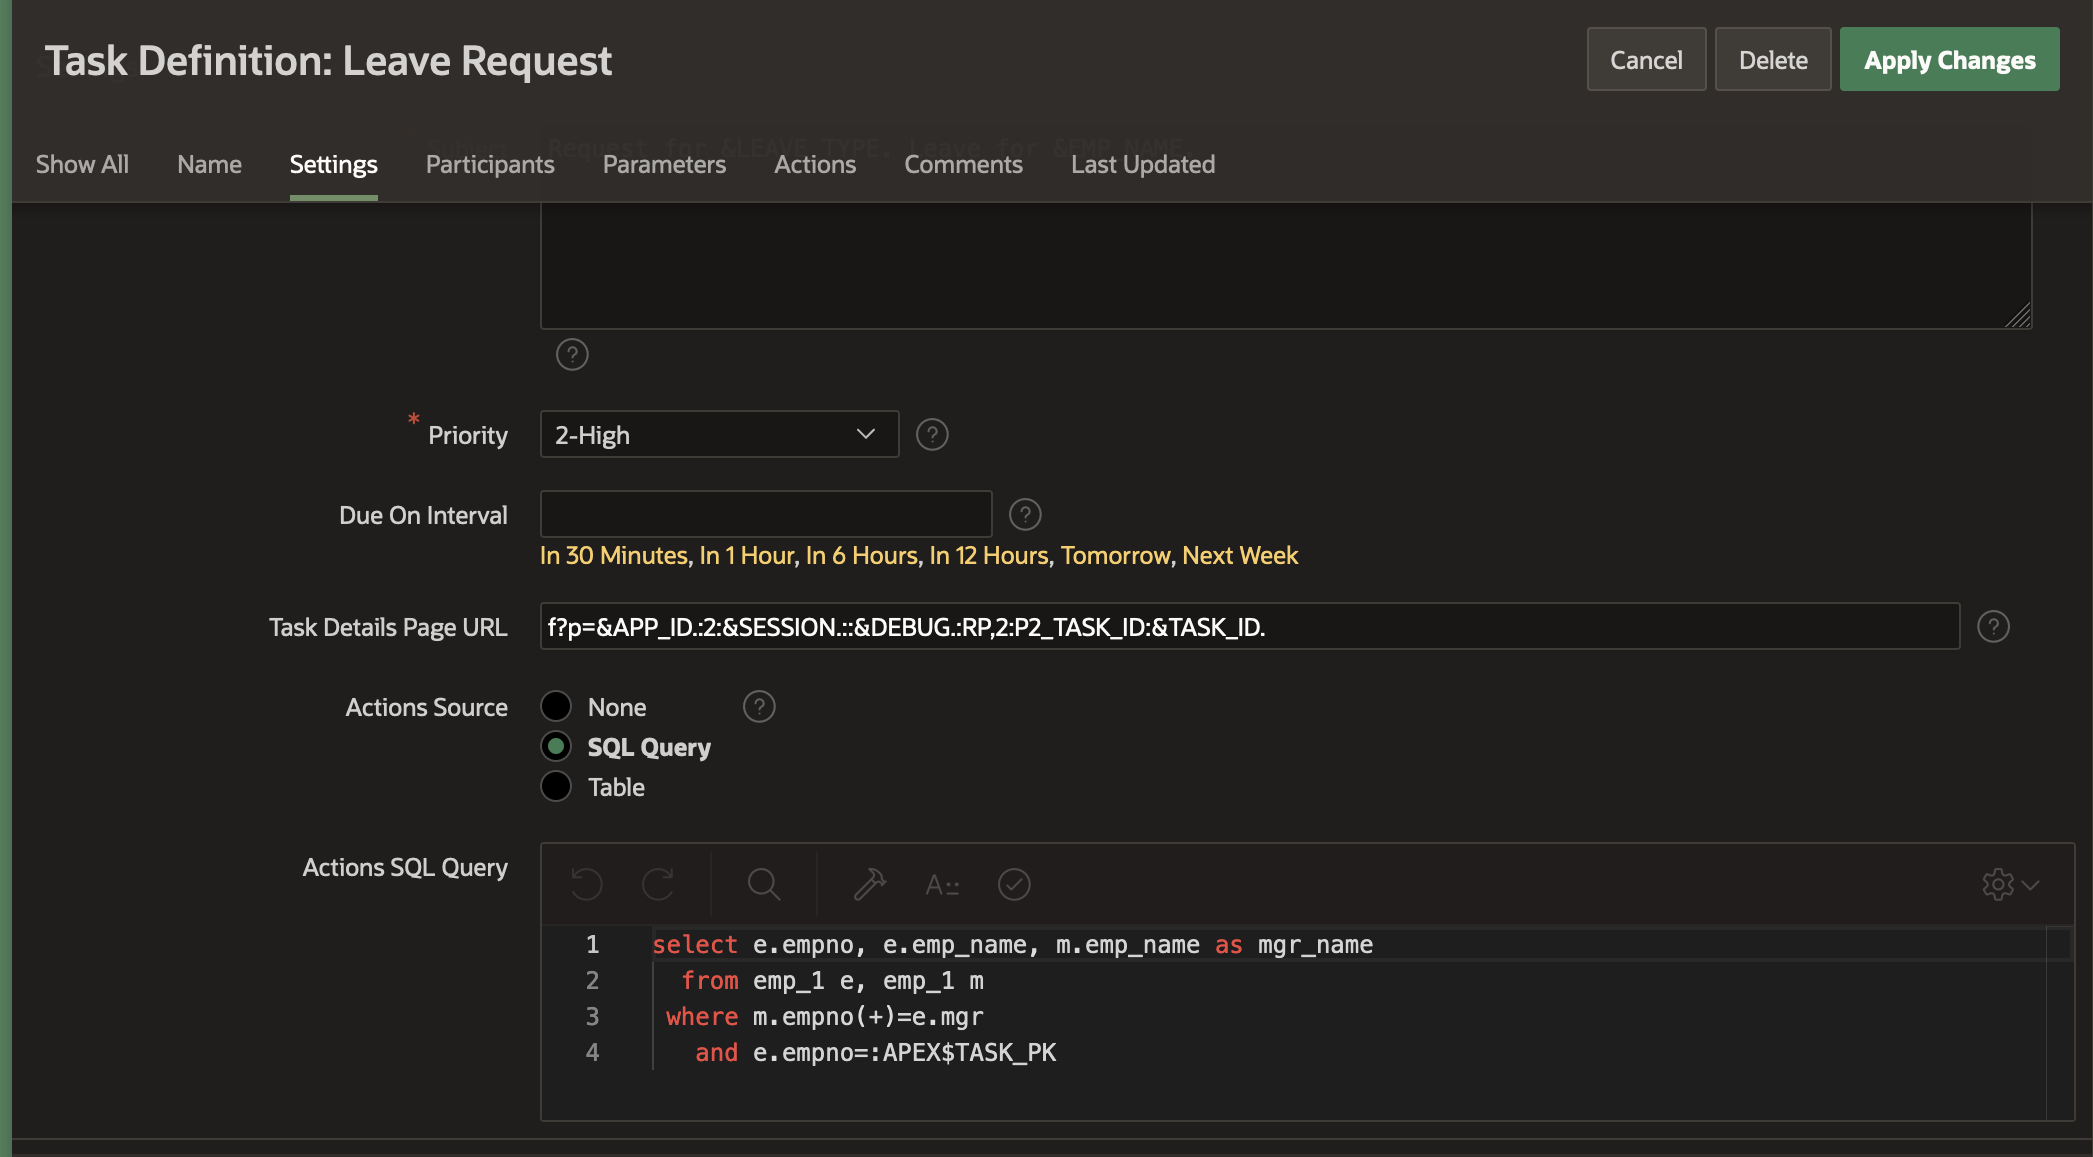
Priority – Tasks can be specified a priority – Lowest (5), Low (4), Medium (3), High (2) and Urgent (1).
Participants – There are 2 kinds of participants of a task a) Potential Owner – A user or users who can work on a task i.e Approve or Reject the task, and b) Business Administrator – A user or users who have administrative rights on a task. For E.g. In the Leave Request Application, the Potential Owner can be the manager of the employee, while the Business Administrator can be the Org Manager.
Parameters – These are attributes that show up by default on the task details page and contain information pertaining to the type of task. For example, in a Leave Request Application, the Employee ID, the No. Of Days and the Leave Type can be possible parameters. For a Purchase Requisition Application, the Item ID, Description, Quantity and Price can be possible parameters. We can also choose not have them displayed in the details page, by switching the Visible flag off when creating them.
Actions – A task is typically associated with a system of record for which the approvals is needed. For example, in the Leave Request Application, the approval task is associated with a database table or system of records that hold the employee leave accrual information. When such a task is approved or rejected, the corresponding record in the database needs to get updated to reflect the vacation days remaining for the employee. The application might also need to send out an email to the employee notifying him/her of the approval. These can be configured by defining actions on the task definition. Actions can not only be defined for Approve and Reject of a task, but also other Events occurring on the task, like Delegate, Claim, Cancel, Release etc. We will discuss the various Task Events in a later section of this blog.
Task Details Page URL – From the Task Definition Editor, the application developer can generate an out of the box details page containing the Task information and buttons to perform actions on the task. The generated page will contain
- Basic details of the task like the priority, task parameters , any comments made on the task , the history of the task as in what all operations the task went through and by who they were performed
- Buttons to manage the task i.e Approve, Reject , Claim, Delegate, Comment on the task etc depending on the user accessing the task. For e.g, a requestor of a Leave Approval will naturally not be able to approve or reject the task. Similarly, the person approving or rejecting the task will not be able to lower the priority of the task.
NOTE: The out of the box generated page is NOT set in stone. Application Developers can go in and customize the page(s) to add more details, graphs, charts, etc, or remove existing sections like the task history according to their specific use-case.
Check out this documentation for more details on Task Definitions.
Task Operations
These are the operations the application user can perform on a task, depending on his persona.
Task Events
Task Events signify the changes made to a task through one of the above operations. They are useful because as described earlier, specific Actions (Execute Code or Send Email) can be defined on any of these events.
Here is the operation-to-event mapping for a task.
| Operation | Event |
|---|---|
| Set Priority | Update Priority |
| Requestor initiates the task | Create |
| Release | Release |
| Reject | Complete |
| Delegate | Delegate |
| Claim | Claim |
| Cancel | Cancel |
| Approve | Complete |
| Add Comment | Update Comment |
Task States
Depict the various stages in the lifecycle of a task. Typically tasks move from one state to another based on the operations performed on them.
| State-Before | Operation | State-After |
|---|---|---|
| Unassigned | Claim | Assigned |
| Assigned | Release | Unassigned |
| Assigned/Unassigned | Delegate | Assigned |
| Assigned | Approve/Reject | Completed |
| Assigned /Unassigned | Cancel | Canceled |
NOTE: A Task could also move to the Errored state in case there is failure to complete an operation due to a business execution error.
We shall explore all the different states and operations in greater details in the forthcoming blogs of this series. You could also check this documentation for more details.
Unified Task List
The Unified Task List allows users to view, action, or edit task instances.Clicking on a task instance, opens the corresponding task details page which can be used to perform operations on the task depending on the logged in user’s persona. When you configure the Unified Task List, you have different Report Contexts to choose from:
- My Tasks, for users who are potential or actual owners of tasks.
- Shows all tasks that are Assigned to the user or Unassigned with the user as a potential owner. Tasks that have already been approved or rejected will not show in the list.
- Sorts by descending creation date or by due date, with newly created/due tasks at the top of the list.
- Admin Tasks, for users who are business administrators of tasks.
- Shows all tasks that list the user as a business administrator, including Errored, Completed, and Canceled tasks.
- Initiated by Me, for users who have initiated tasks.
- Shows all tasks that the user has initiated.
The primary details of the task e.g the Subject, Initiator, Due Date (if any), get displayed in the unified task list.
We will see how to create Unified Task Lists using the Create Page Wizard, in the next section where we design a Simple APEX Application that uses the Approvals component.
NOTE: The Unified Task List can be in the same application as one of the task definitions or a completely separate application in the same workspace. If the Unified Task List is in a separate application, session sharing will need to be configured so that the user can still open the task details. See this documentation to learn more about Unified Task List features and capabilities.
Designing a Simple Approvals Application
In this section, we will design a simple Leave Request Application where an Employee can make a request to apply for leave and the Manager of the Employee either approves or rejects the leave.
NOTE: It is assumed that the users logging in into the application at run time, have already been created beforehand. Create the following users using the Manage Users And Groups menu option under Workspace Administration: MATT, JANE, CLARA and JOHN.
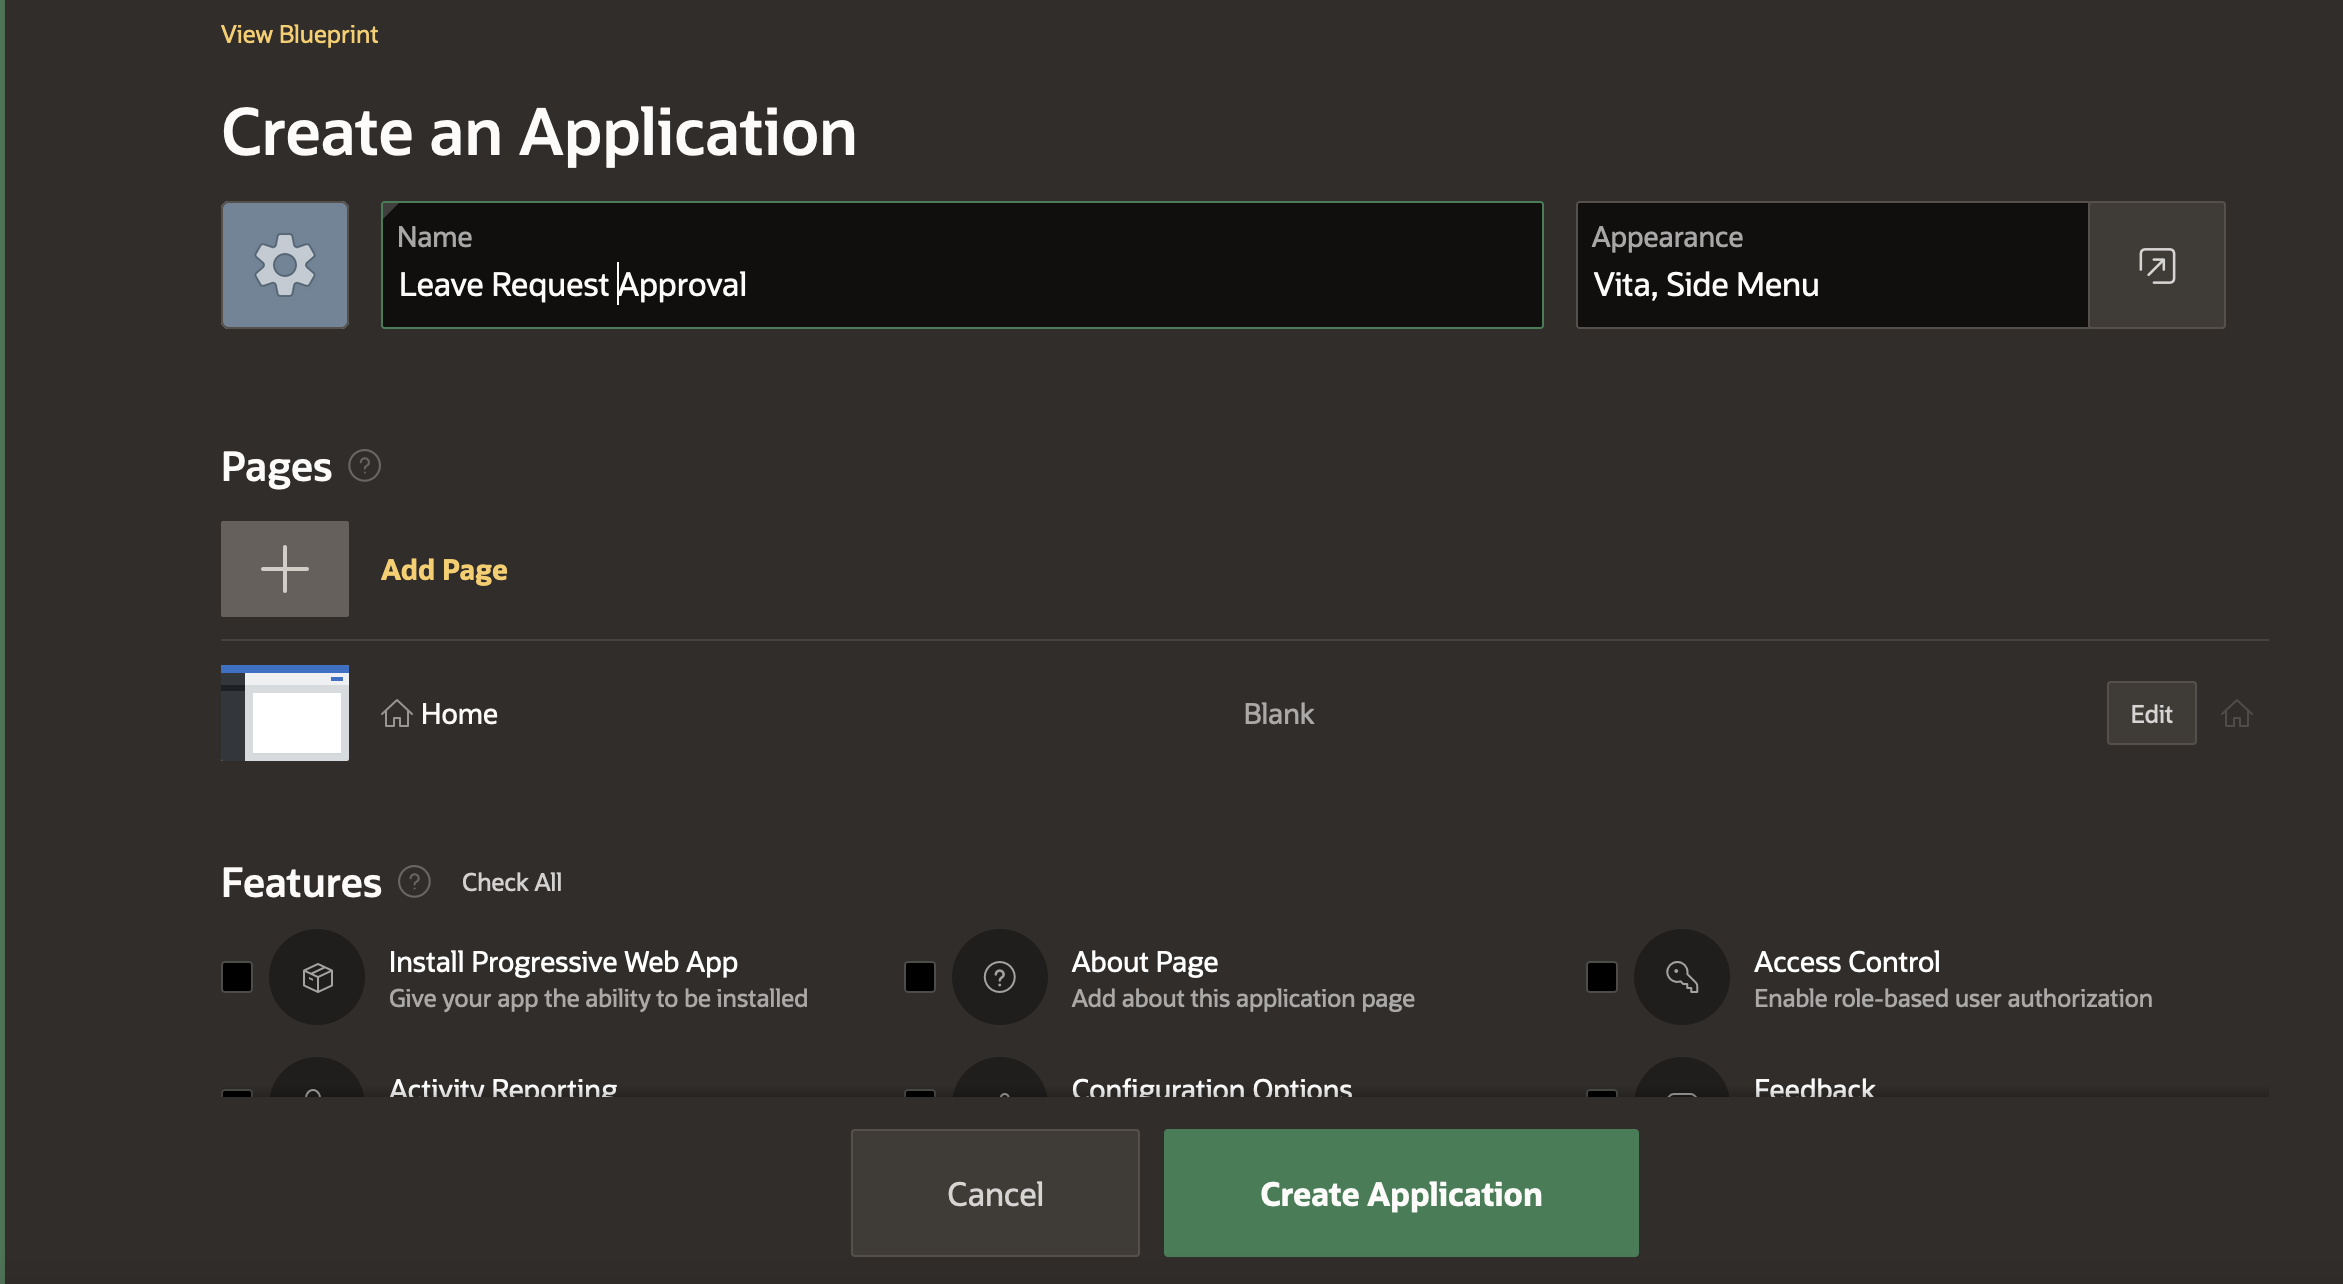
Create the App
- Navigate to App Builder
- Click Create
- Click New Application
For Name – enter Leave Request Approval
Sample Table and Sample Data
Install the Dataset
- Navigate to SQL Workshop and click SQL Scripts
- Click Create
- Copy and Paste the commands given below into the Script Editor to create a new Table EMP_1 and insert employee records into it.
- Click Run
- Click Run Now.
CREATE TABLE "EMP_1"
("EMPNO" NUMBER GENERATED BY DEFAULT ON NULL
 AS IDENTITY MINVALUE 1 MAXVALUE 9999999999999999999999999999
 INCREMENT BY 1 START WITH 8000 CACHE 20 NOORDER  NOCYCLE  NOKEEP  NOT NULL ENABLE,
 "EMP_NAME" VARCHAR2(10),
 "MGR" NUMBER(4,0),
 CONSTRAINT "EMP_1_PK" PRIMARY KEY ("EMPNO"));

insert into emp_1(empno, emp_name, mgr) values (10, 'JOHN', 30);
insert into emp_1(empno, emp_name, mgr) values (20, 'CLARA',30);
insert into emp_1(empno, emp_name, mgr) values (30, 'JANE', 40);
insert into emp_1(empno, emp_name, mgr) values (40, 'MATT', null);
commit;
Creating the Task Definition
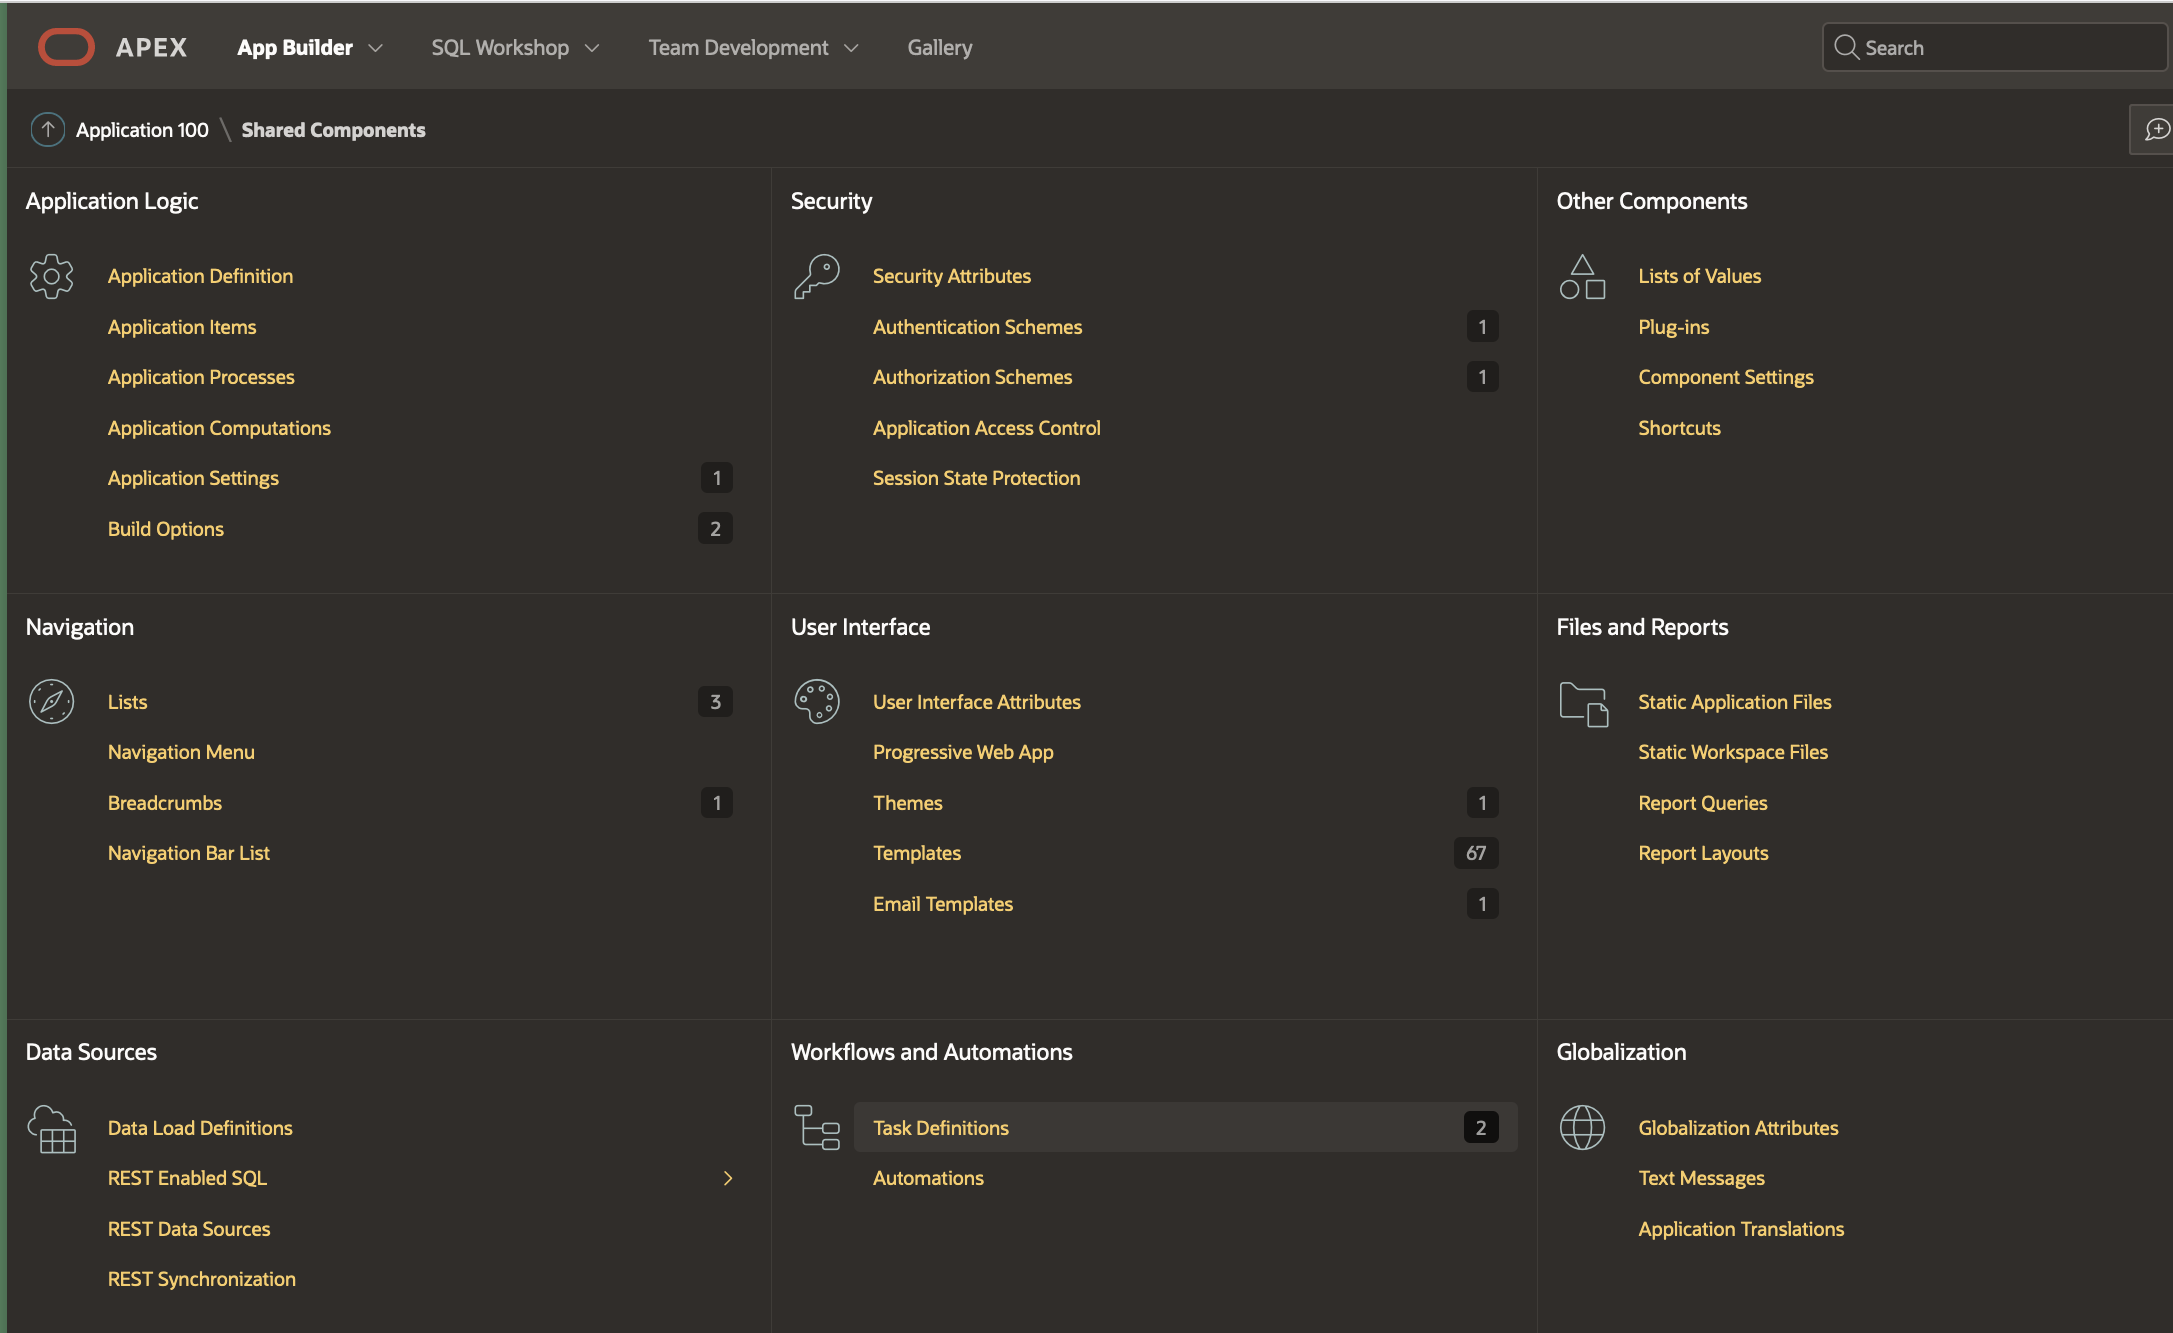
In the empty Application, we go to the Shared Components→ Workflows and Automations→ Task Definitions and hit Create.
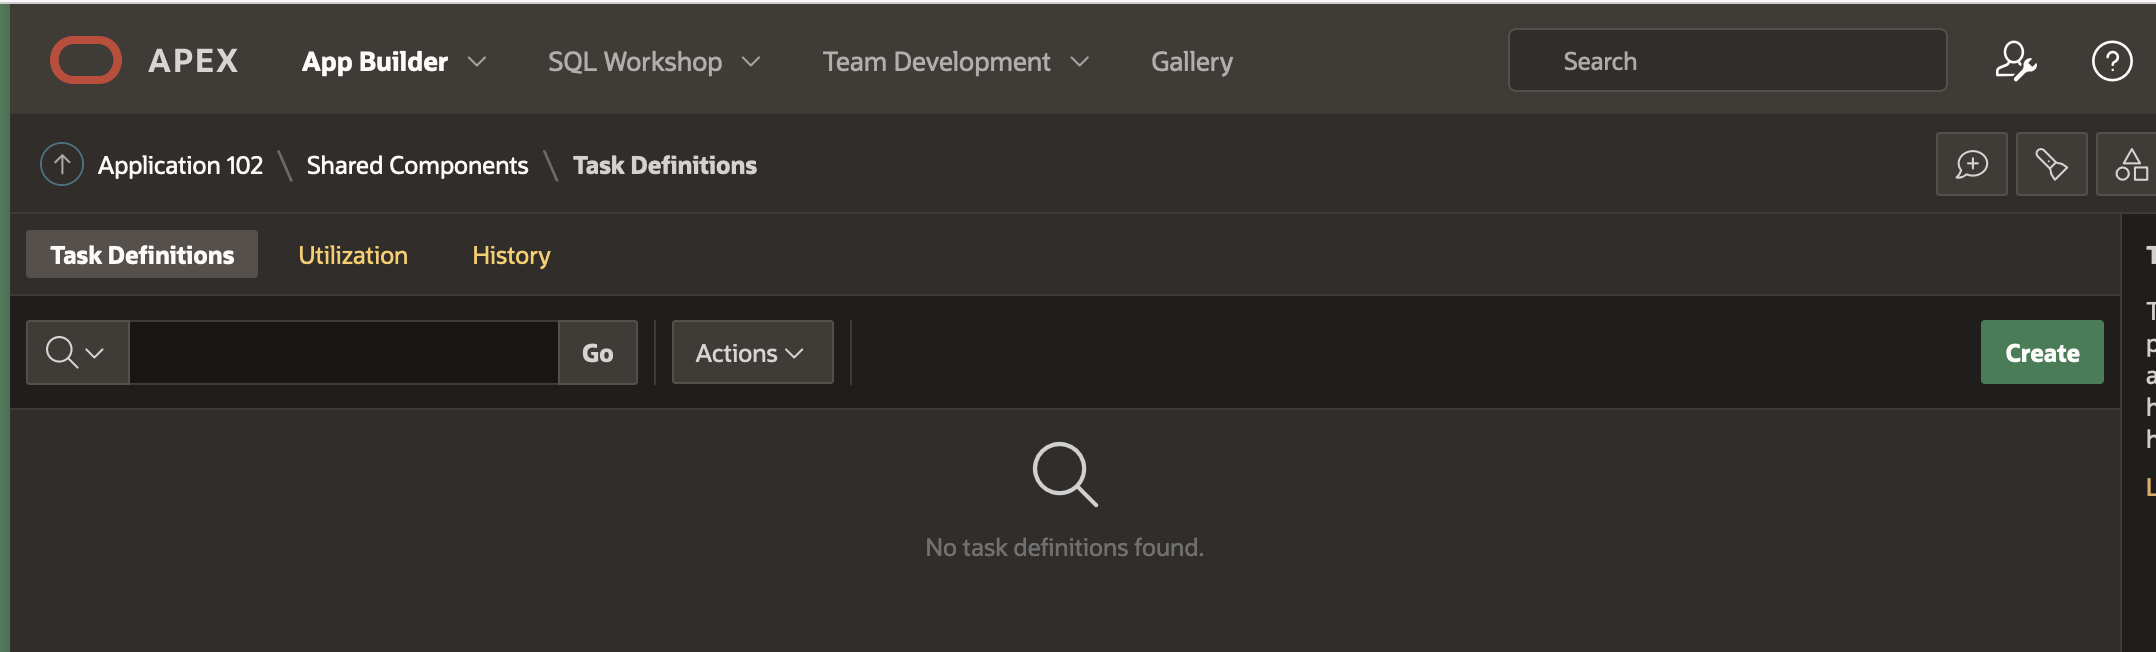
Fill in the Create Task Definition Wizard fields as shown below, and hit Create.
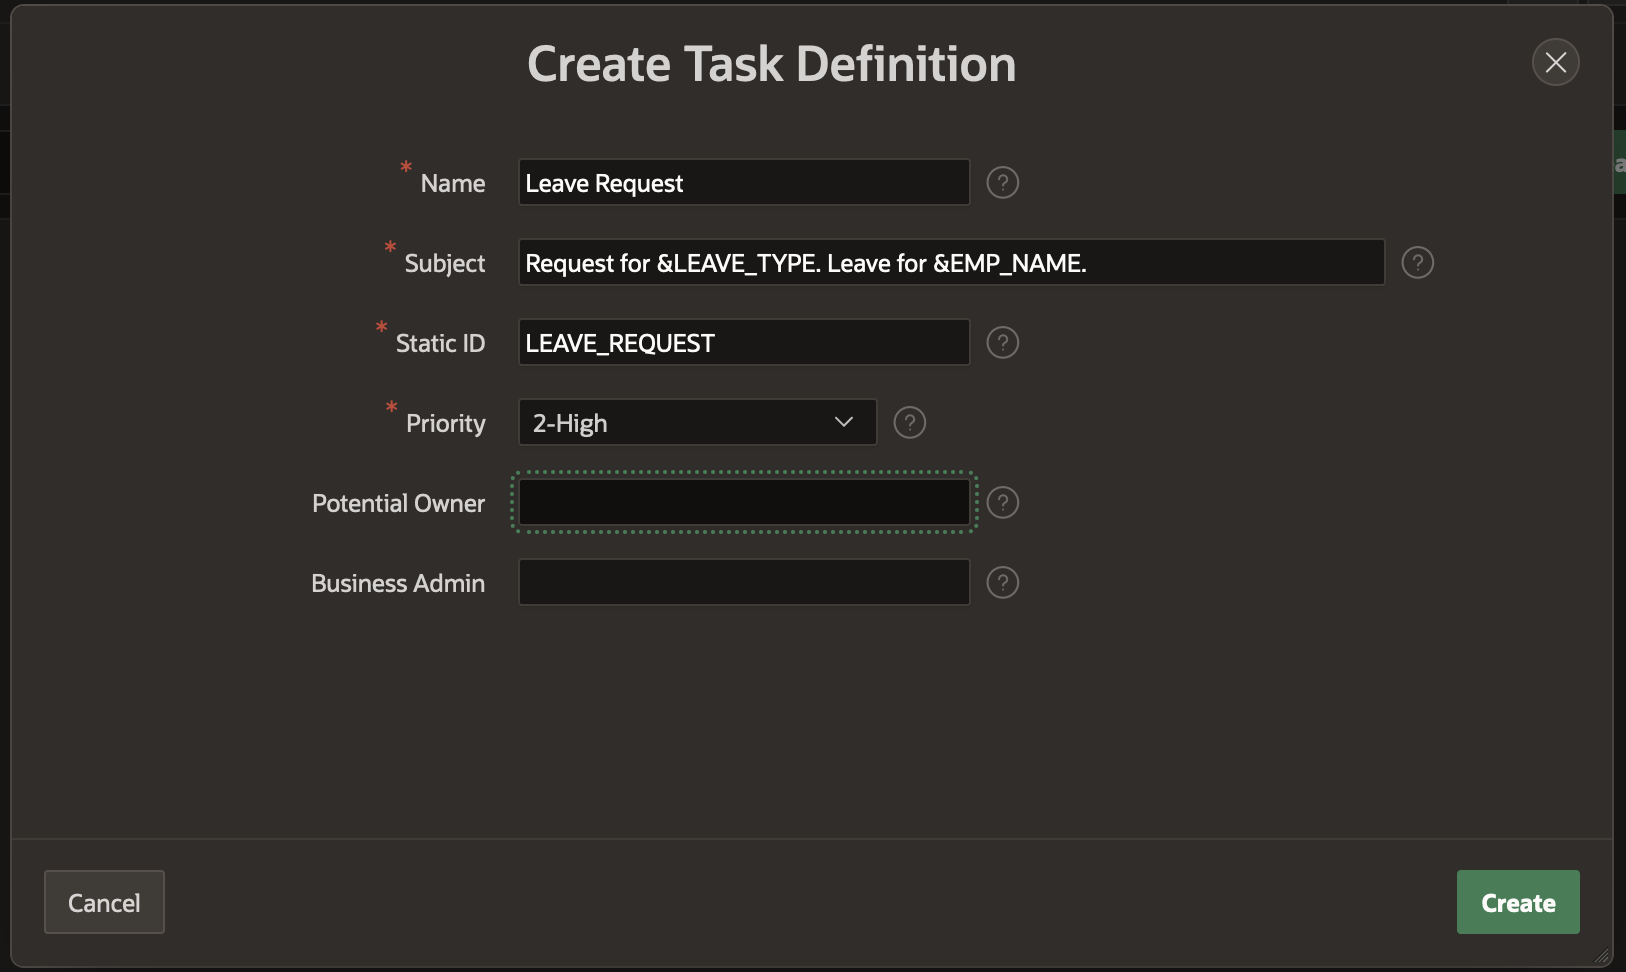
Leave the Potential Owner and Business Administrator fields empty for now. We will fill them up in the next section.
We can now further configure the Leave Request Task Definition in the Edit Task Definition screen that opens once the Create is hit.
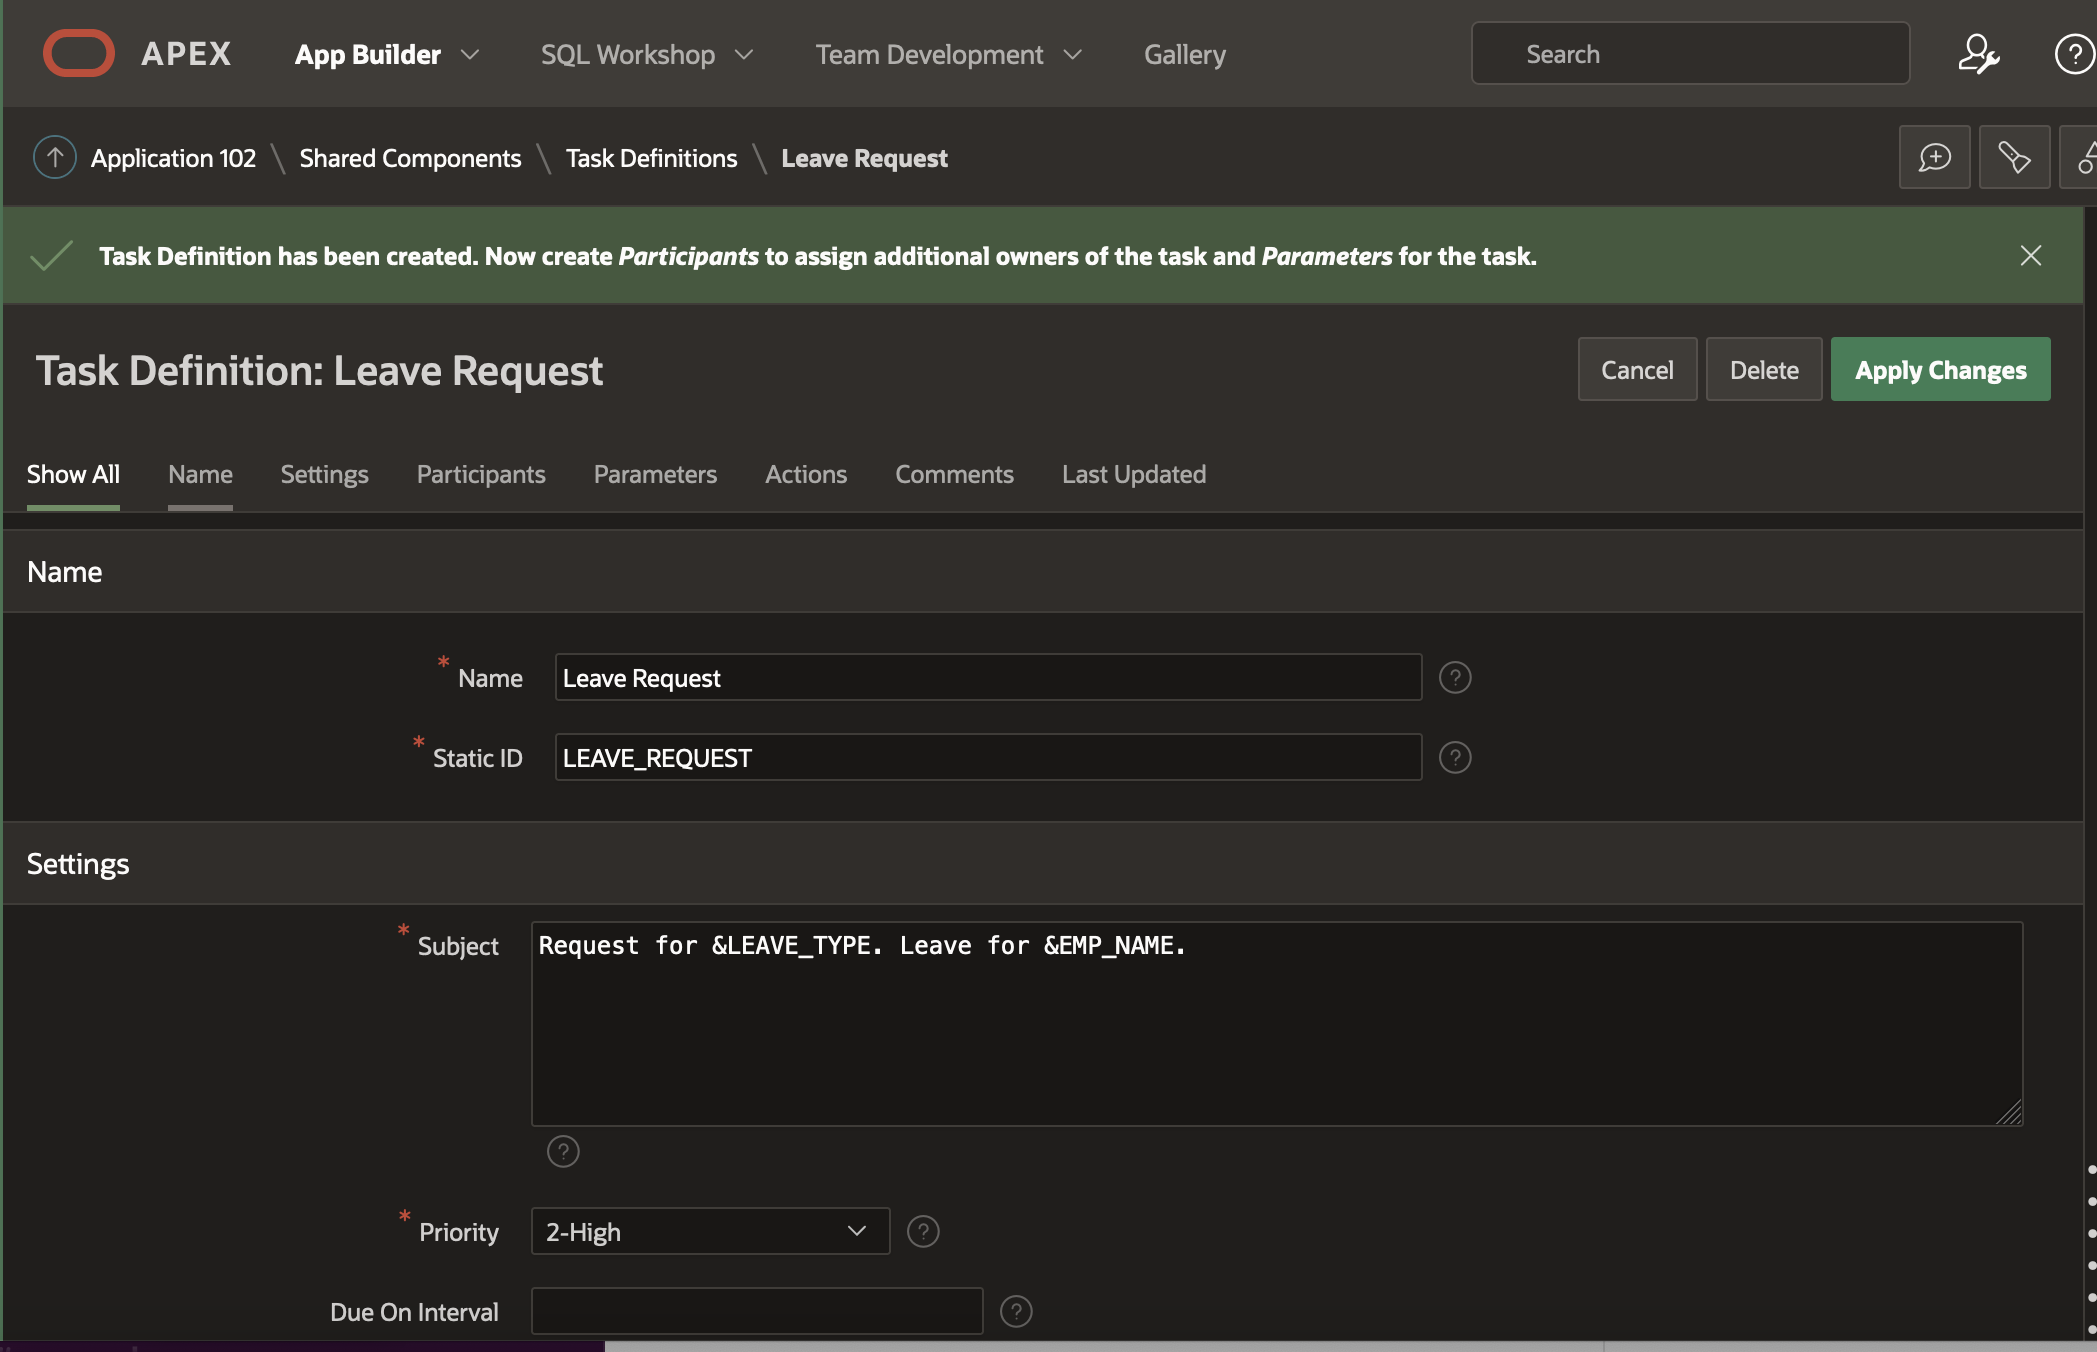
Adding the Action source – This step ties our task to the system of records, in this case, the employee records. Select SQL Query as the action source and add the following SQL statement in the Actions SQL Query editor.
select e.empno, e.emp_name, m.emp_name as mgr_name
  from emp_1 e, emp_1 m
 where m.empno(+)=e.mgr
   and e.empno=:APEX$TASK_PK
APEX$TASK_PK is a substitution string that holds the value of primary key of the system of records to which the task is tied. In this case, it will hold the employee number of the employee for whom this leave request task is being submitted. Note: Please check the documentation for a complete list of Substitution Strings available for Approvals Component.
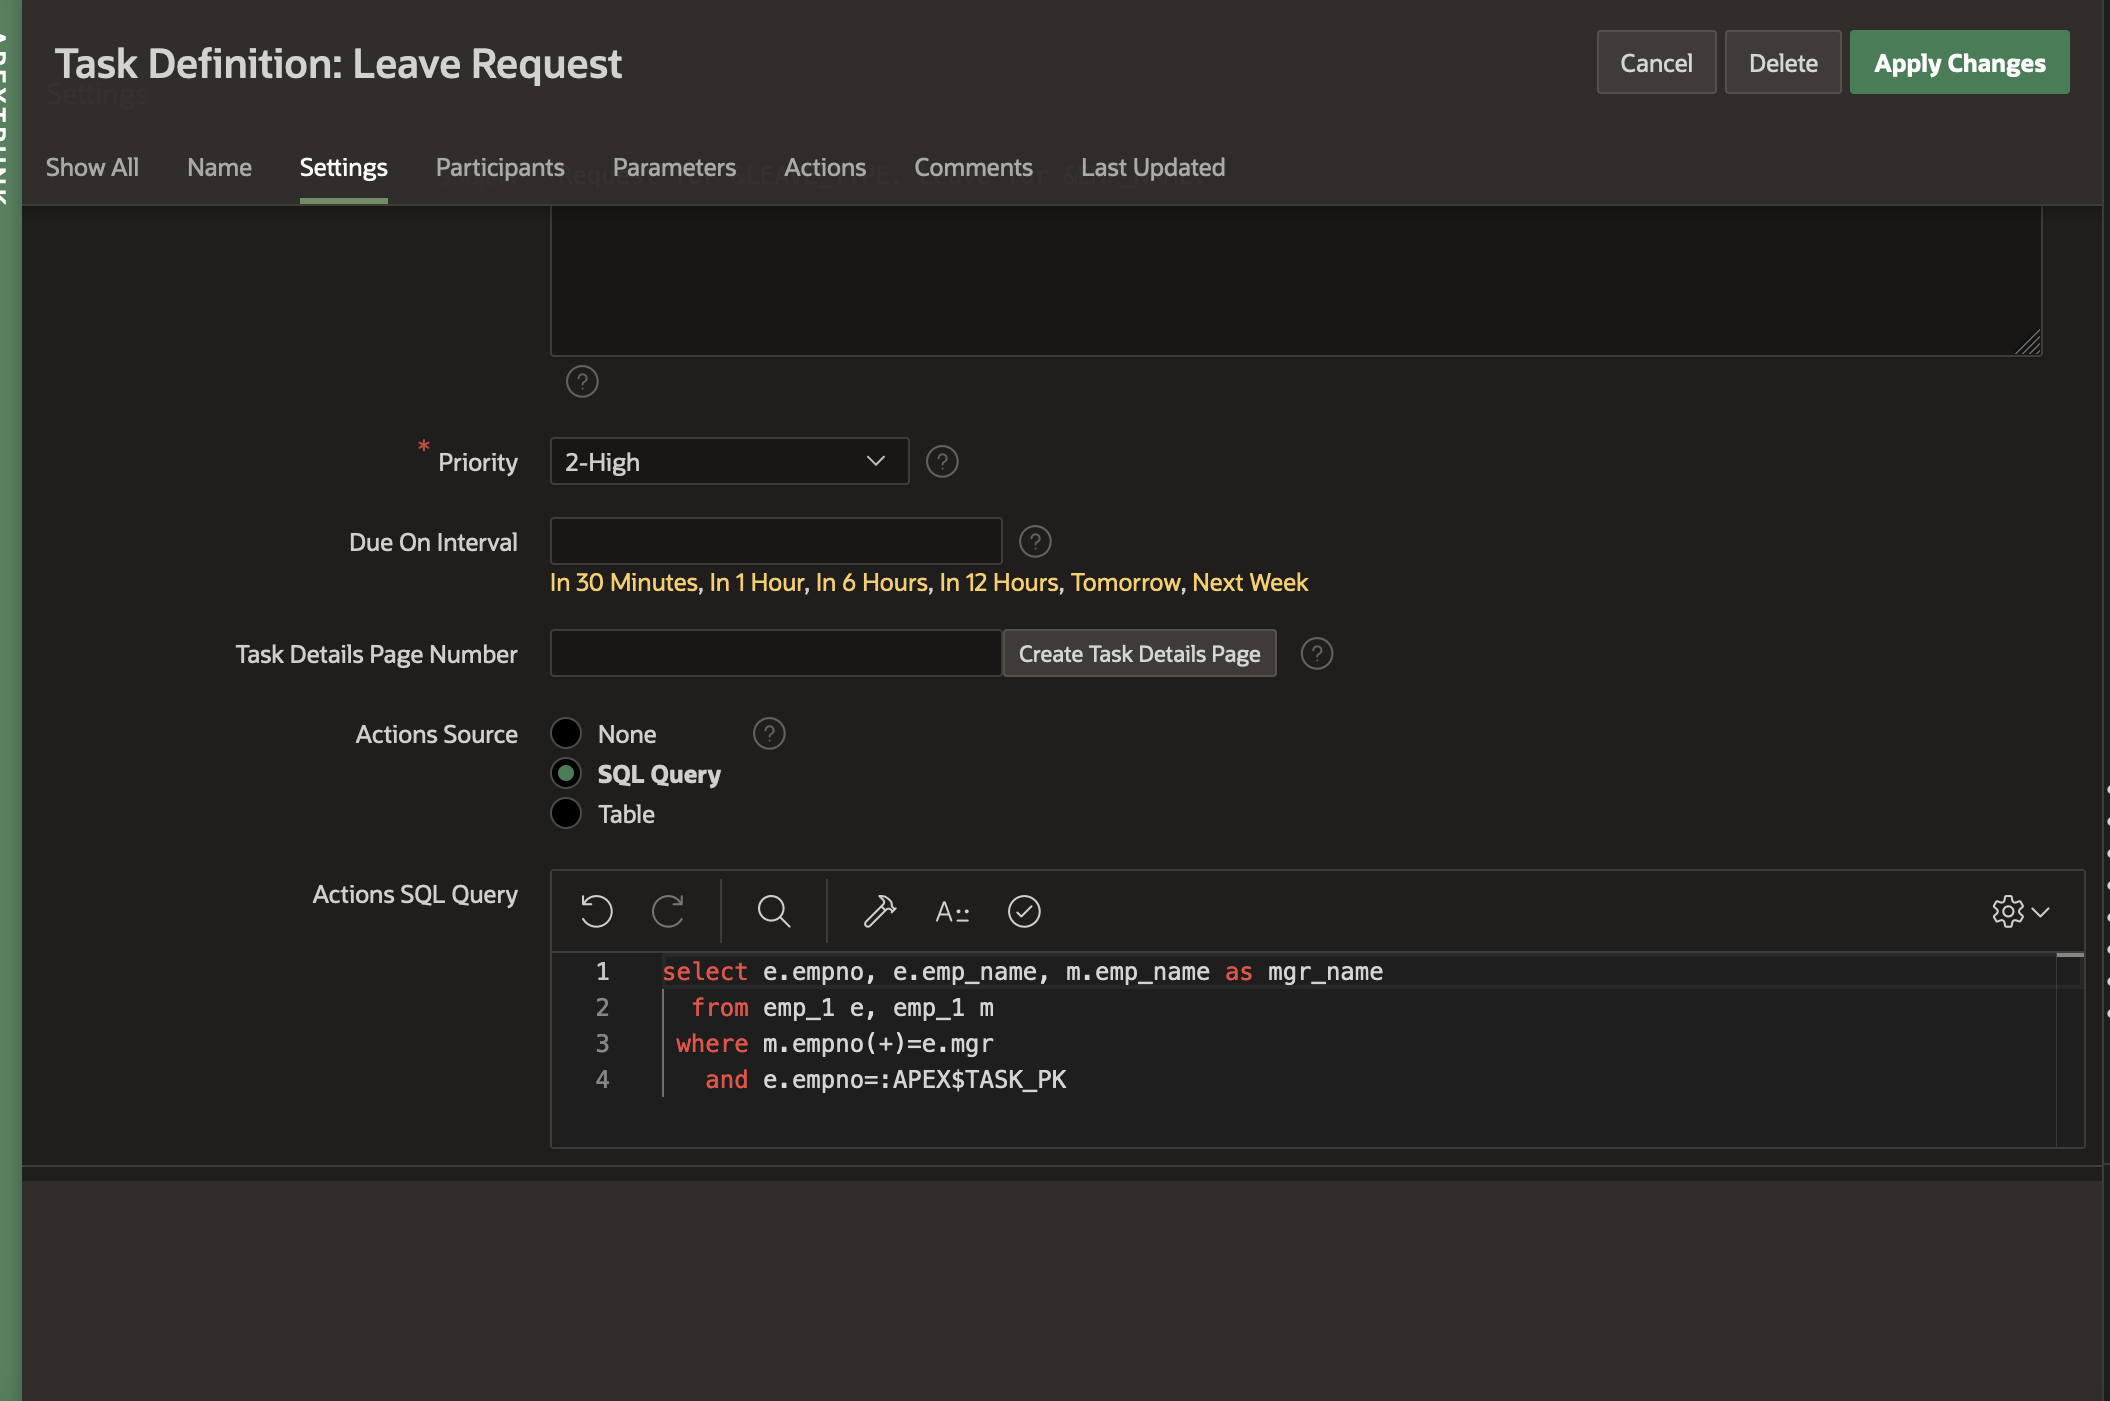
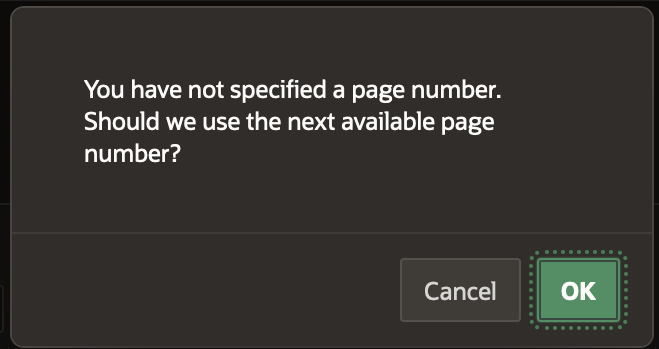
Generating Task Details Page – Notice that the Task Details Page Number is empty. Click on the Create Task Details Page button to generate the details page for this task. You will get a popup dialog asking if the next available page number should be used. Click OK.
We will find that the Task Details Page Number is replaced by the Task Details Page URL containing the link to the generated Details Page.
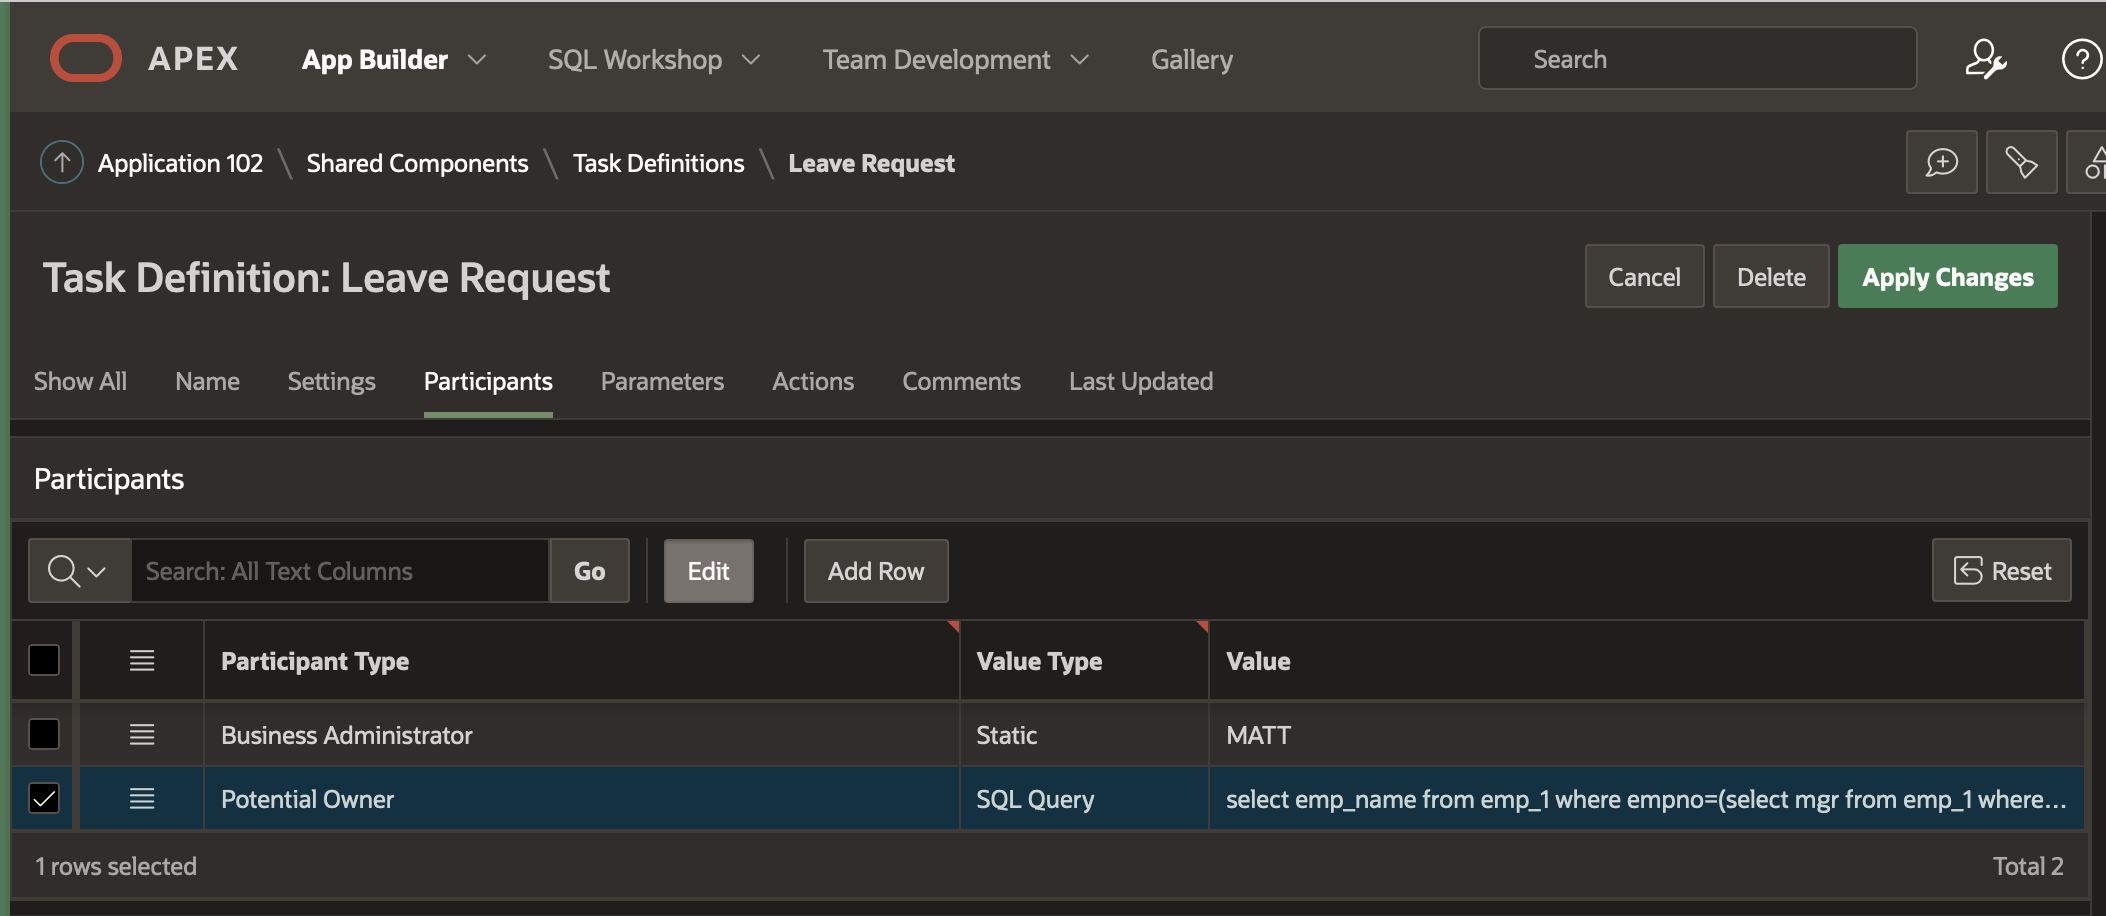
Add Task Participants
In the Participants section, select Participant Type as Potential Owner and Value Type as SQL Query. In the Value field, add the following SQL query
select emp_name from emp_1
 where empno=(select mgr from emp_1
 where empno=:APEX$TASK_PK)
NOTE: This query will fetch the manager of the employee for whom the request is being created.
Add another row to the Participants section . Select Participant Type as Business Administrator, Value Type as STATIC. In the Value field, type ‘MATT’.
Add Task Parameters
Add the following entries to the Task Parameters section.
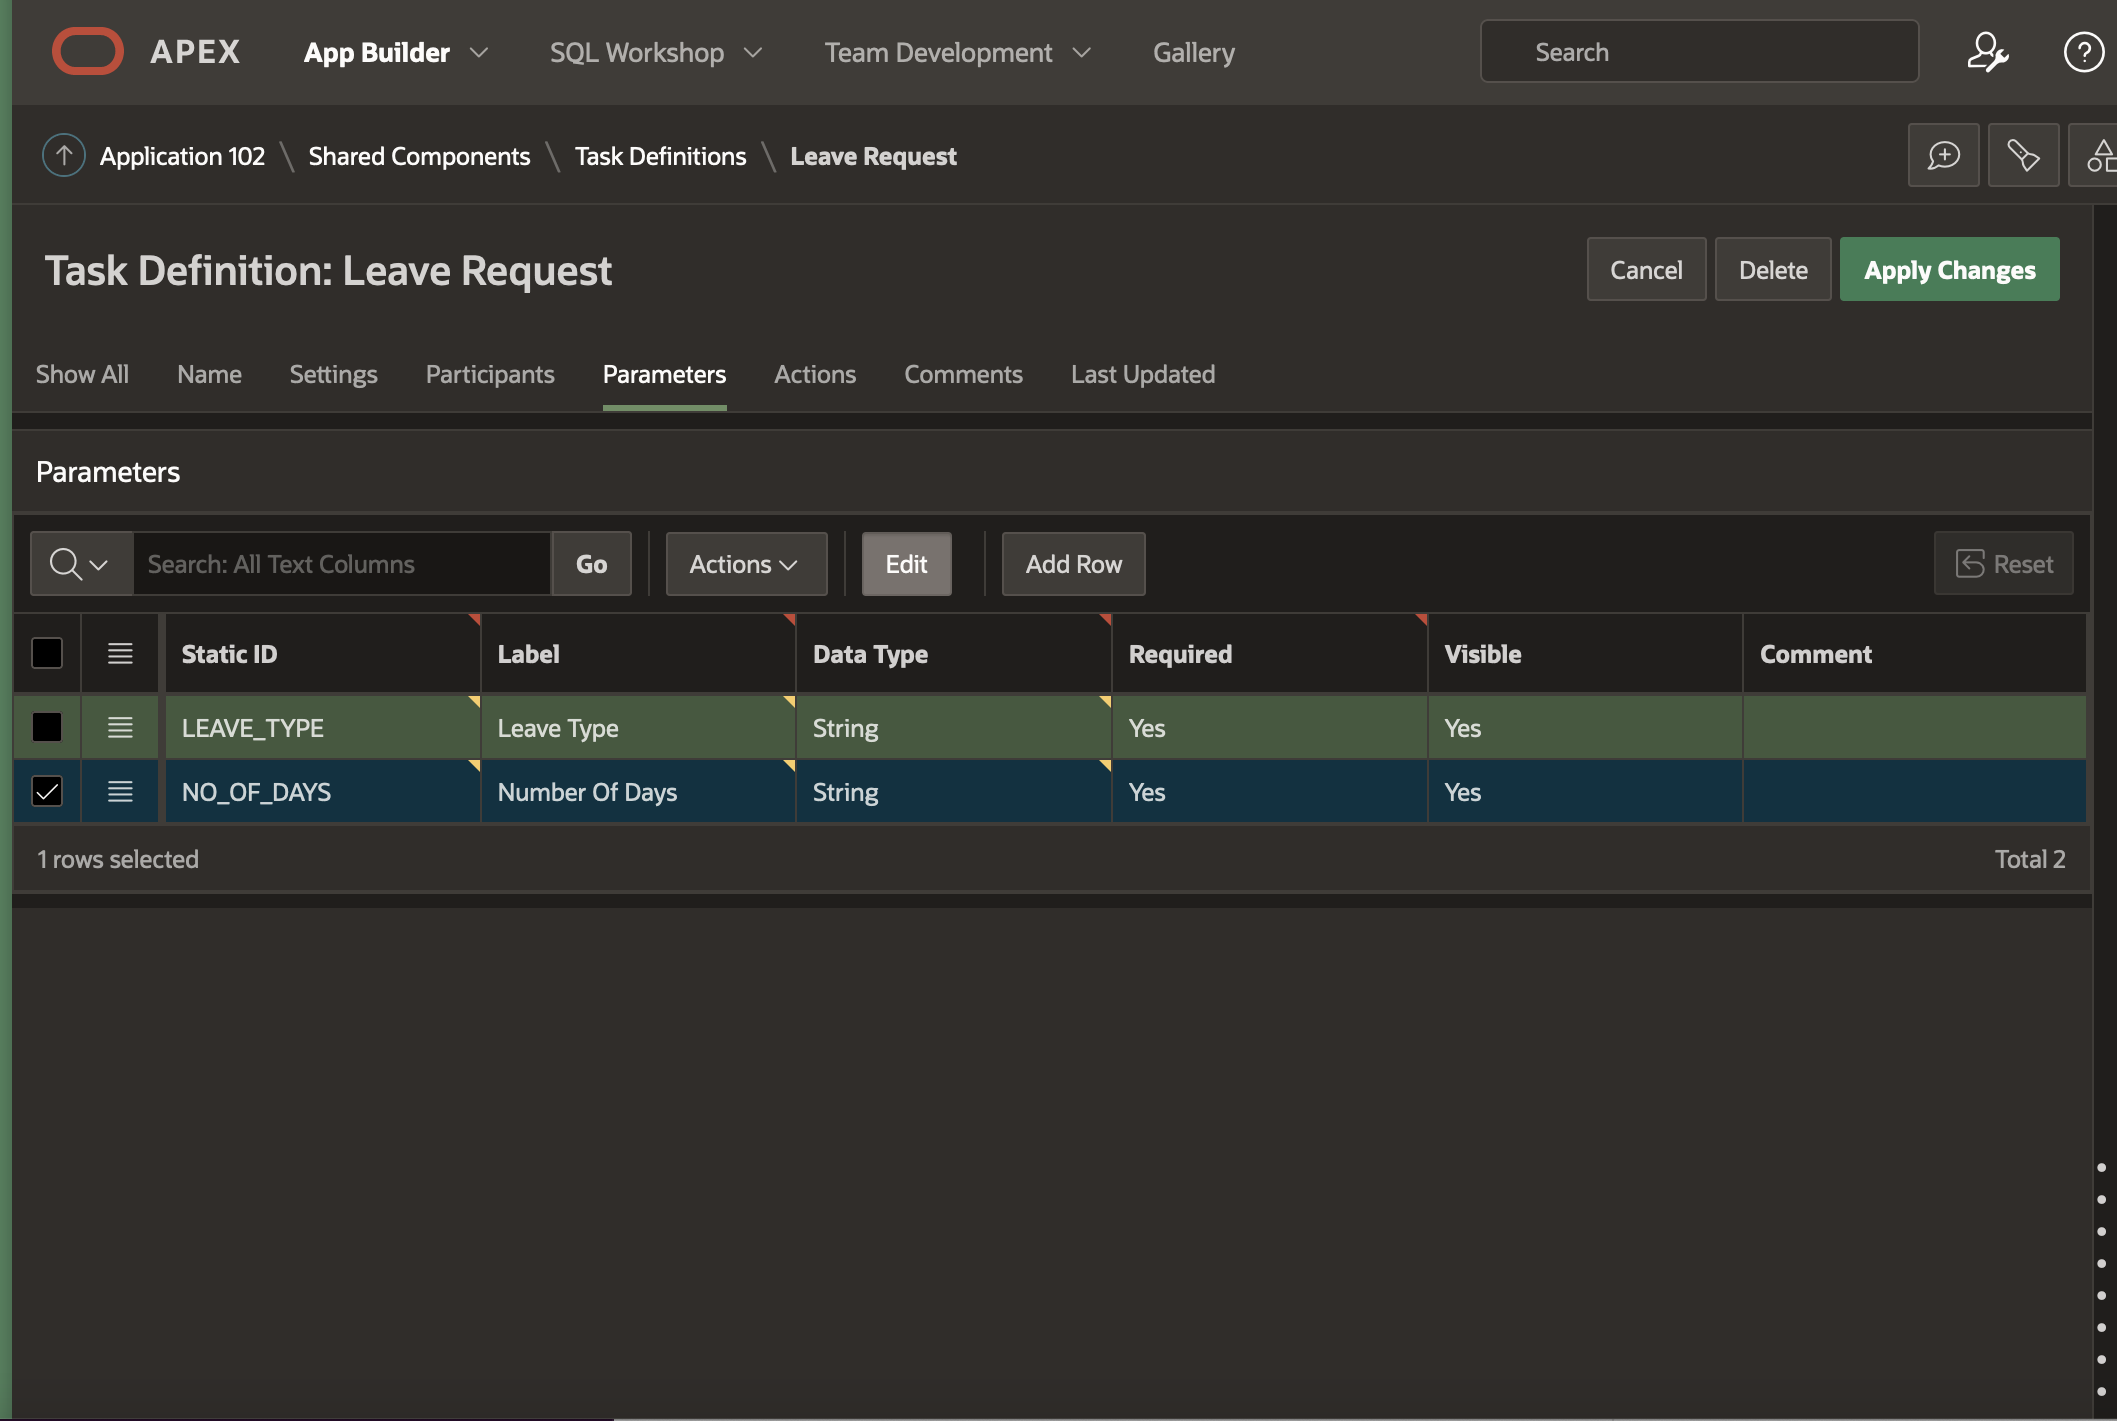
NOTE: Any parameter you add to the Task Parameters , can be used as bind variables in your participant or actions source SQL queries, as well as substitution strings in the task definition subject as shown in this example, where the subject contains a reference to the LEAVE_TYPE parameter.
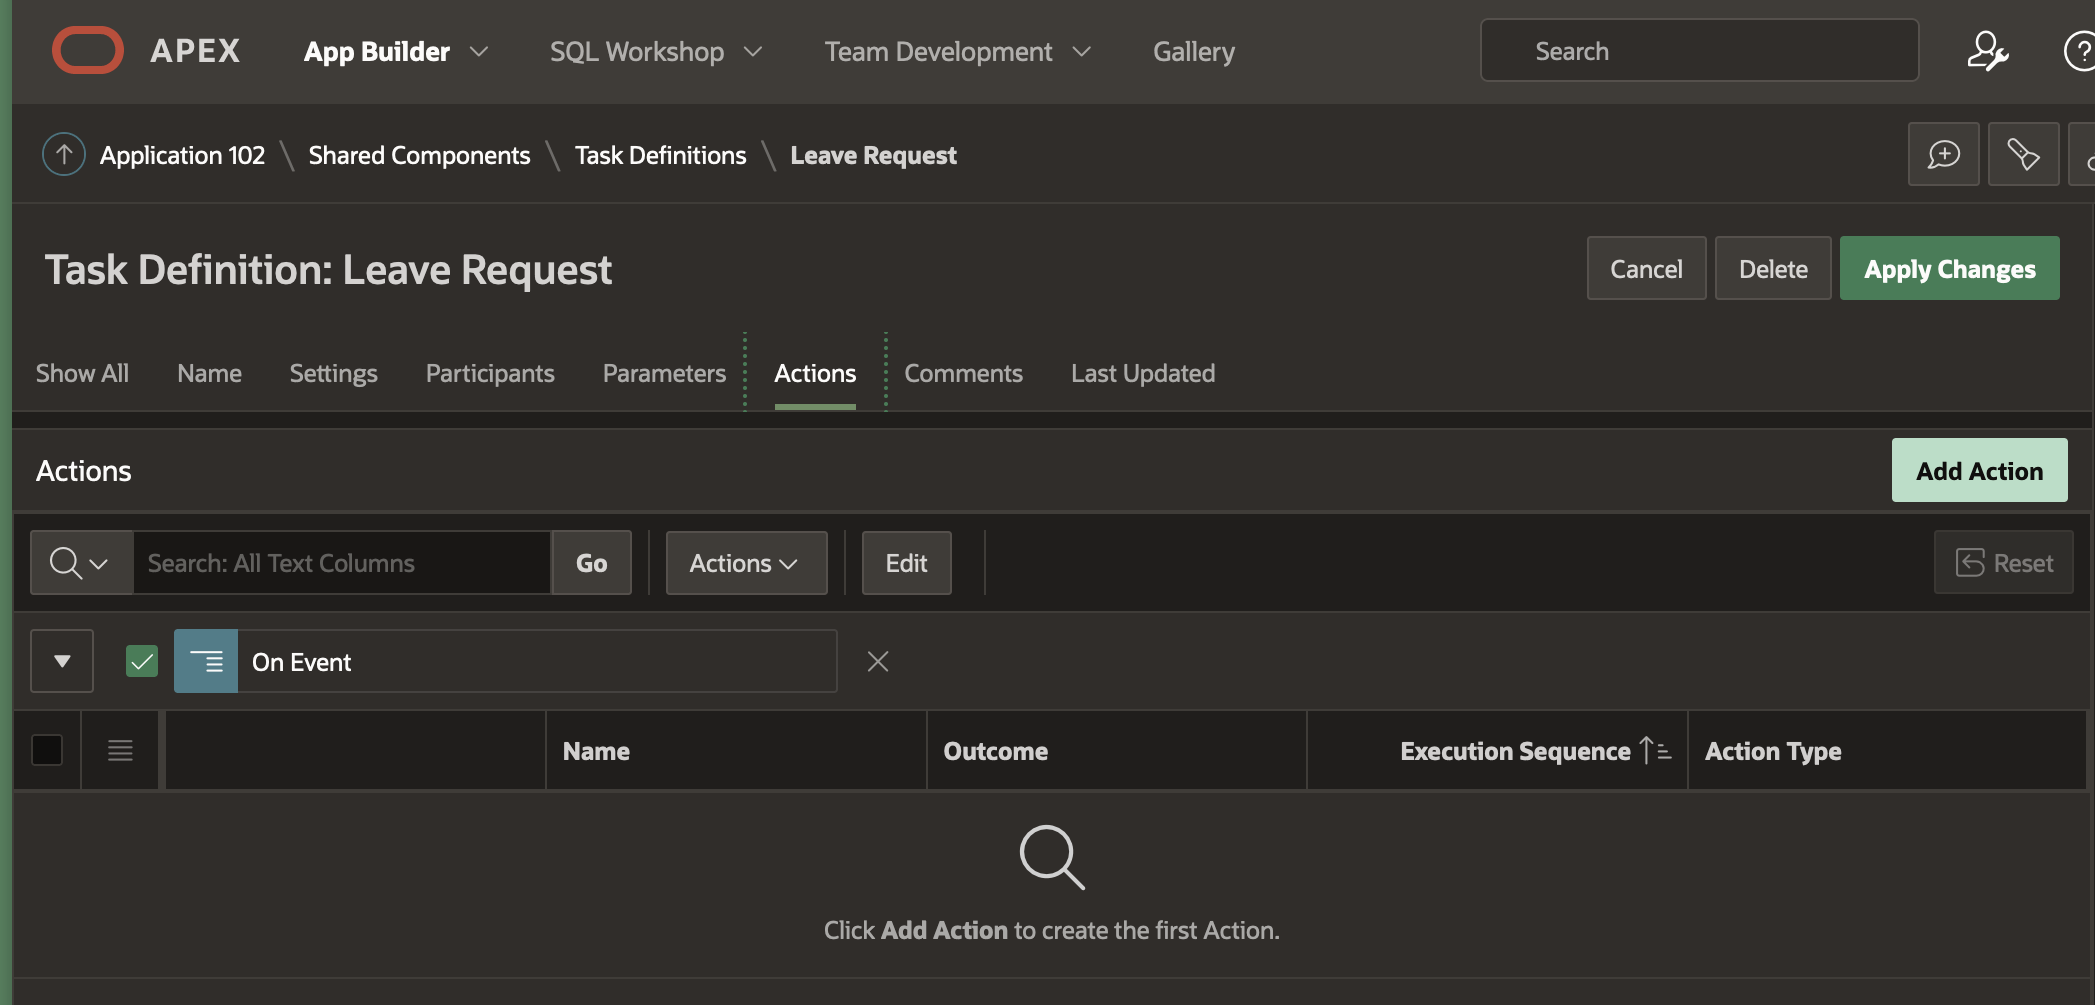
Add Actions
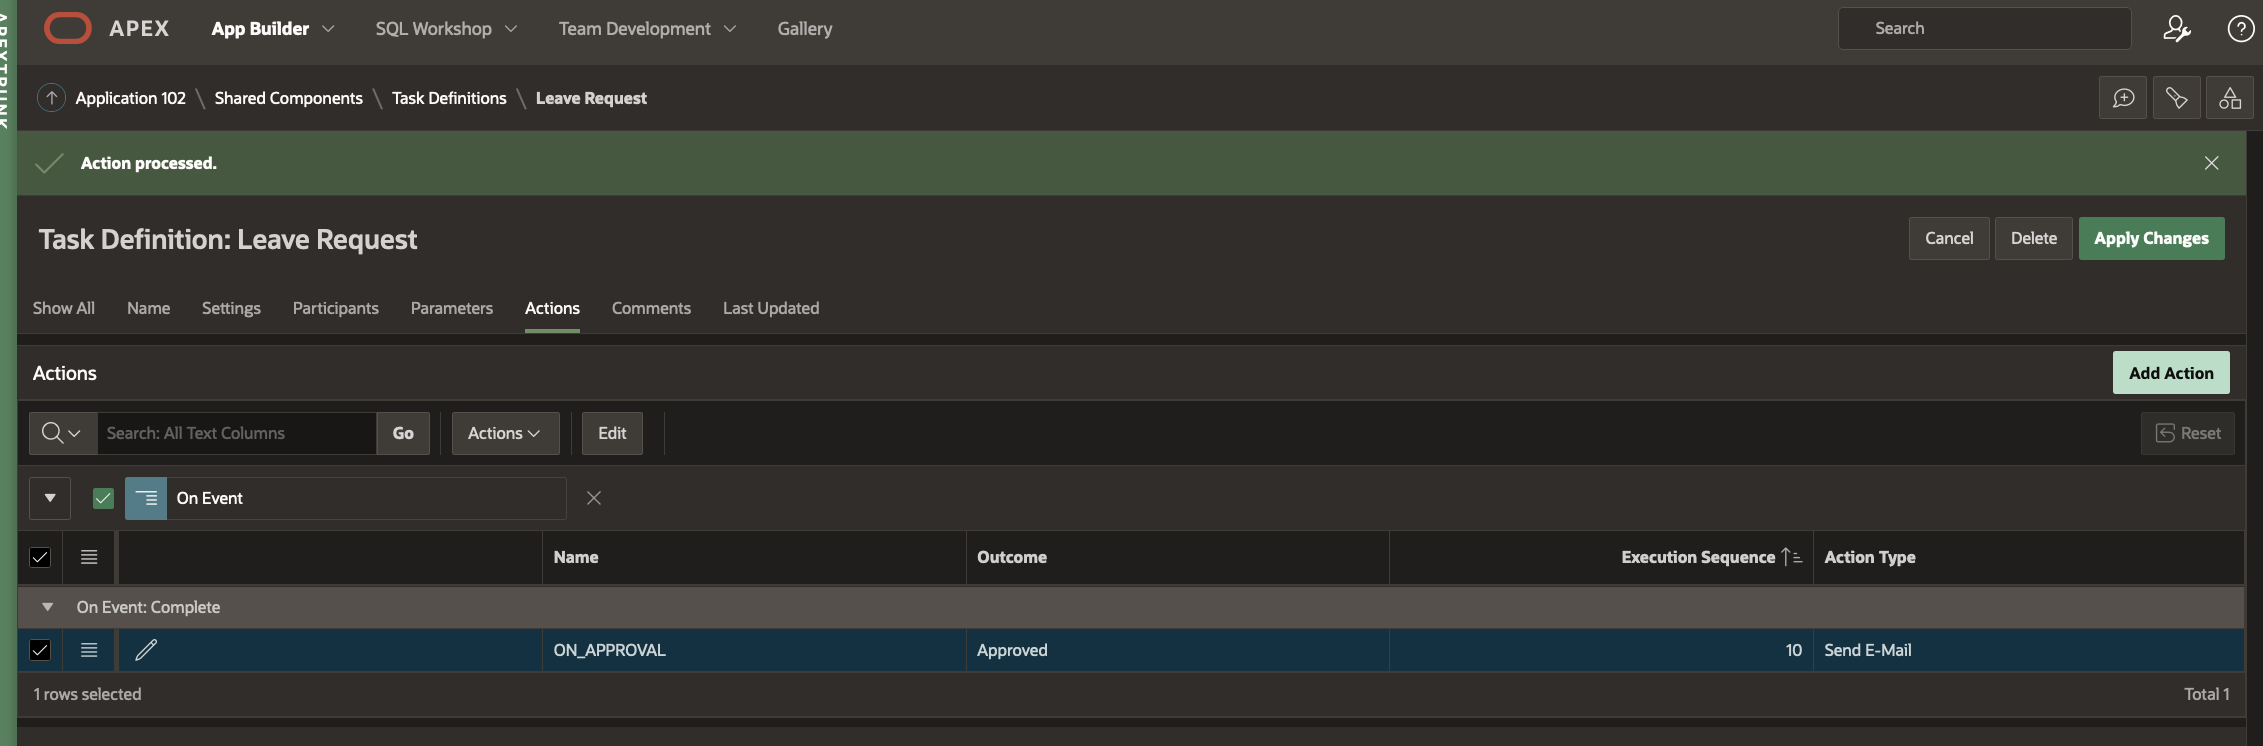
You could choose to perform additional actions when an event (defined in the Task Events section above) occurs on a task. Click on Add Action as shown below . This will take you to the Task Definition Actions Edit Page
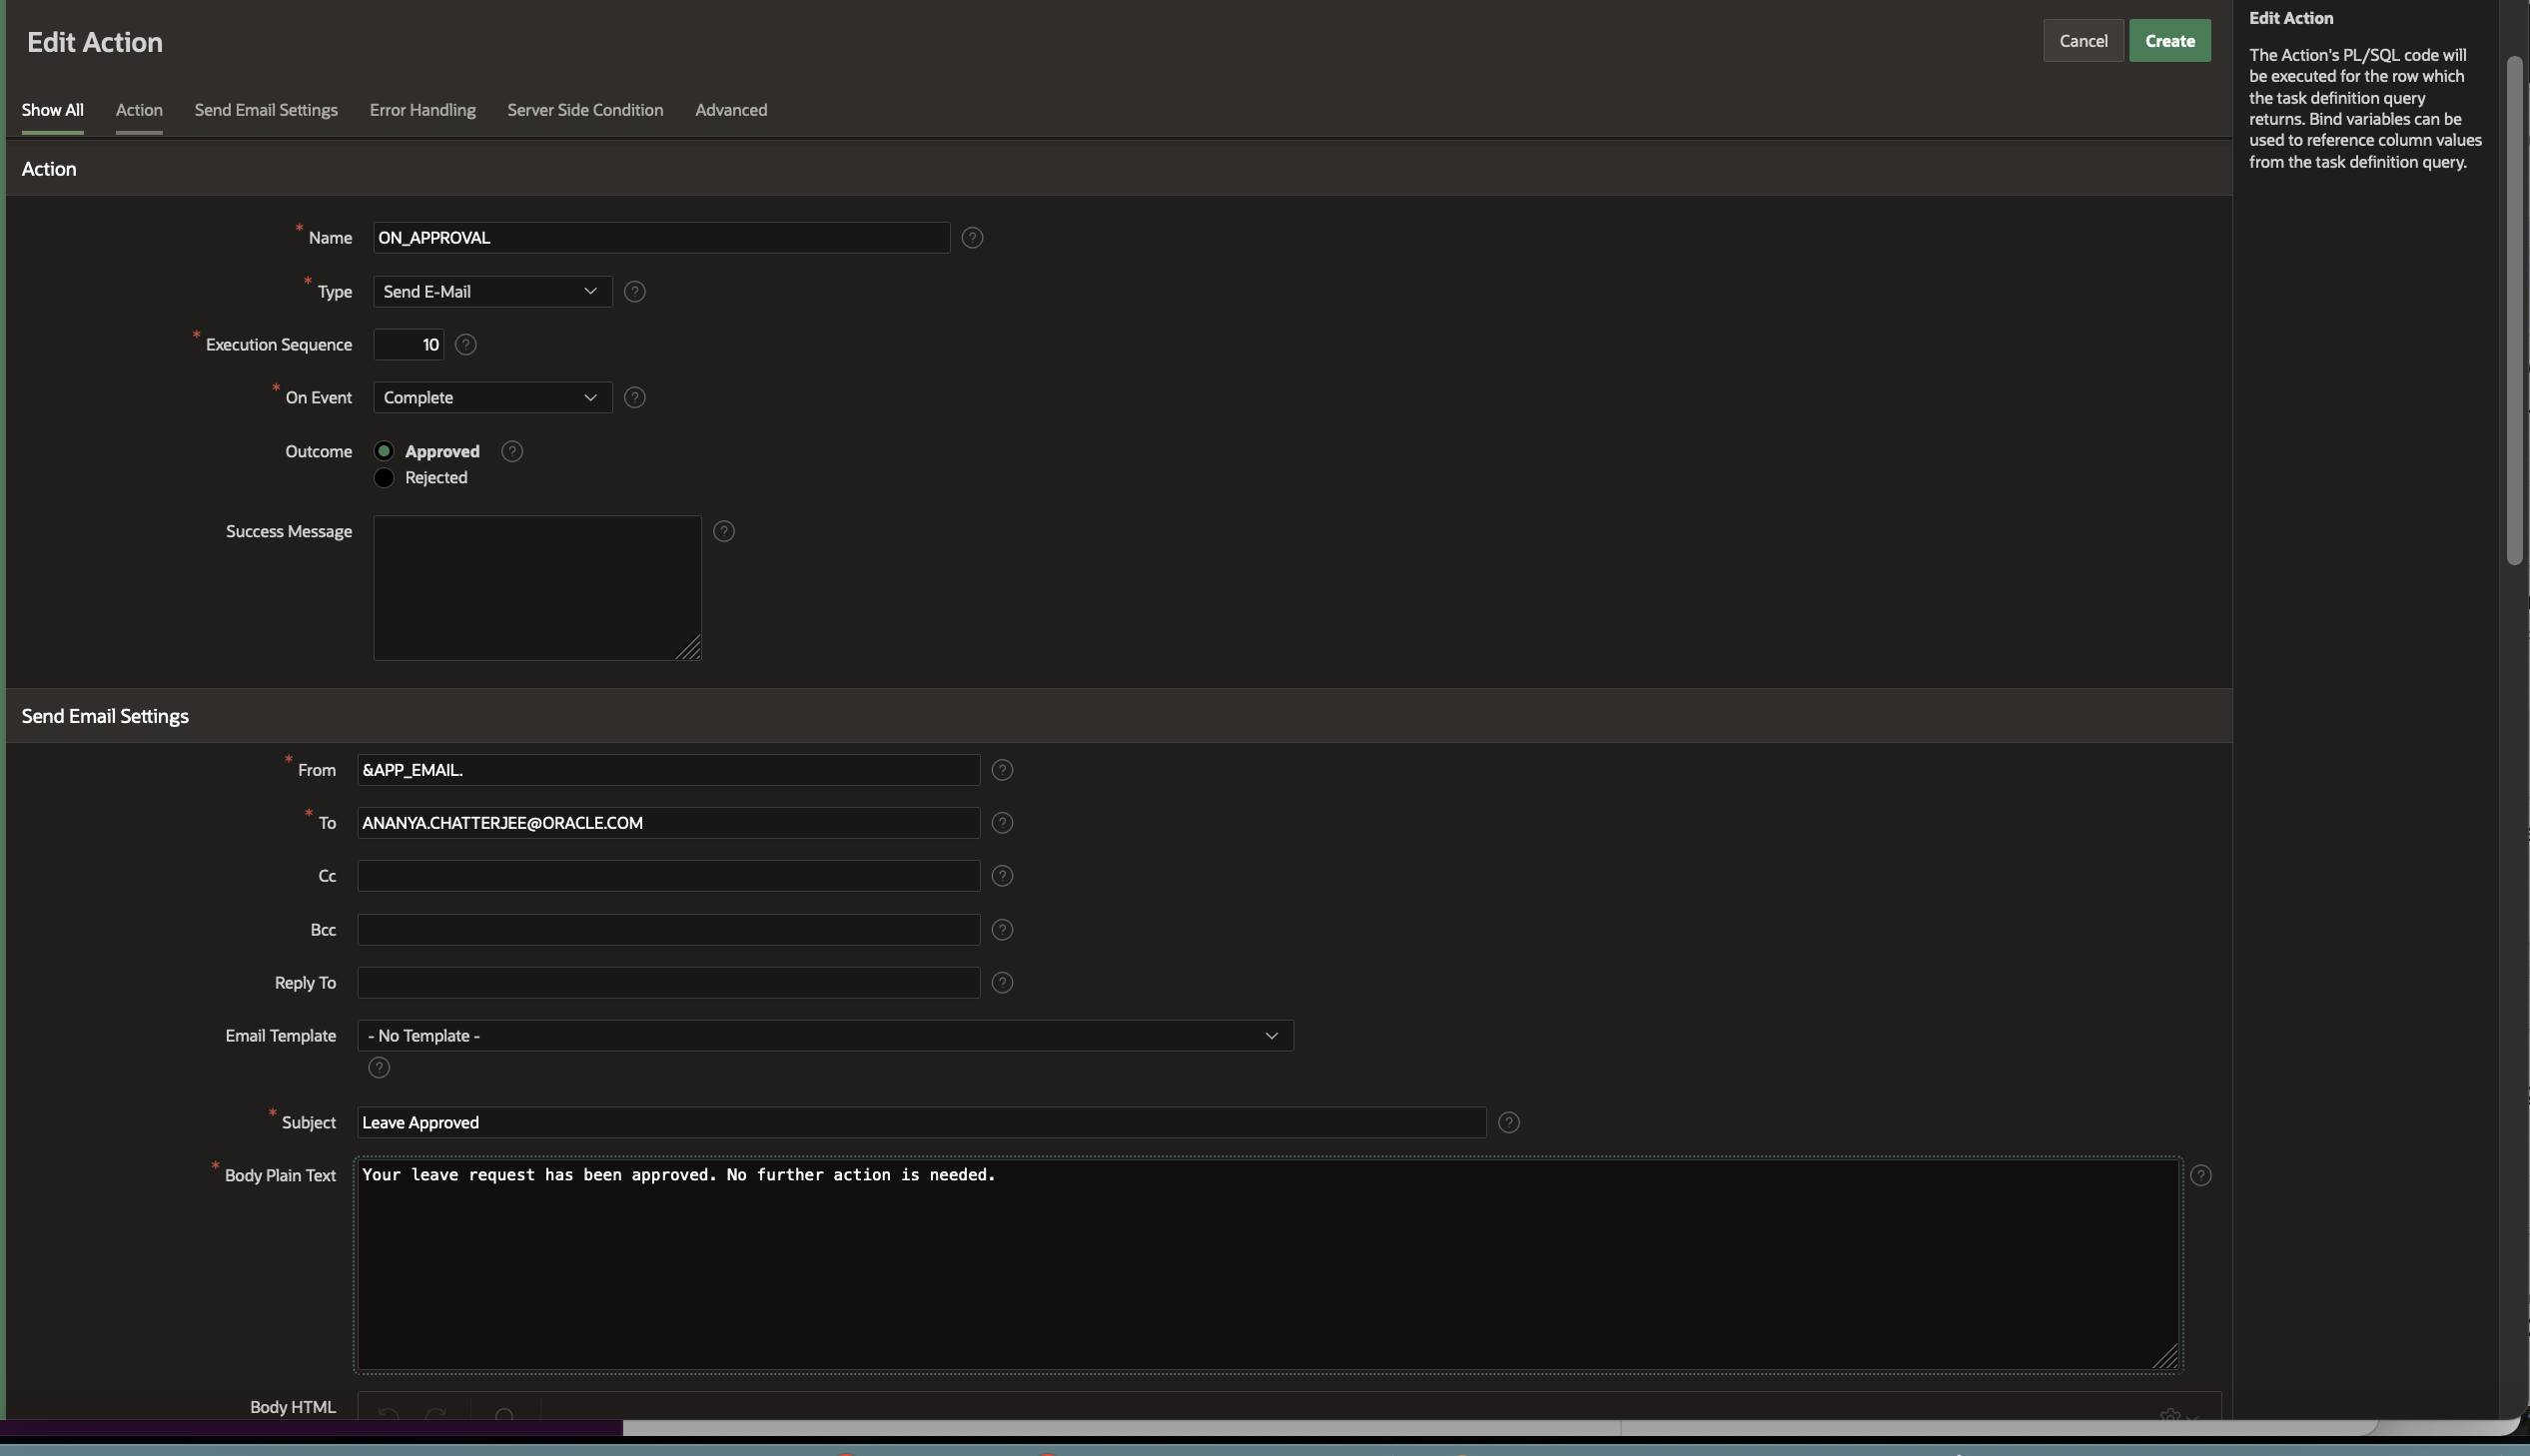
We will set up an action that sends an email to the applicant of the leave, when his/her Leave Request is approved. Fill out the Edit Action page as shown below and then hit Create:
You can do a lot more with Task Actions to update other tables, create additional tasks, and so on. We will explore this in a subsequent blog.
That’s all! Your task definition for Leave Request is complete. Apply Changes and come back to your application.
Creating the Apply for Leave page
Now that we have the task definition created, we will need to create the page which the employee will submit when requesting for leave. Submitting this page will create a Leave Request task based on the task definition we have just configured.
Click on Create Page in your Leave Request Approvals application.
Note that there is a new Task Details page in the list of pages for your application. This got generated when you had hit the Create Task Details Page while editing the task definition.
Name this page “Apply For Leave” and add it as a breadcrumb under the Home page

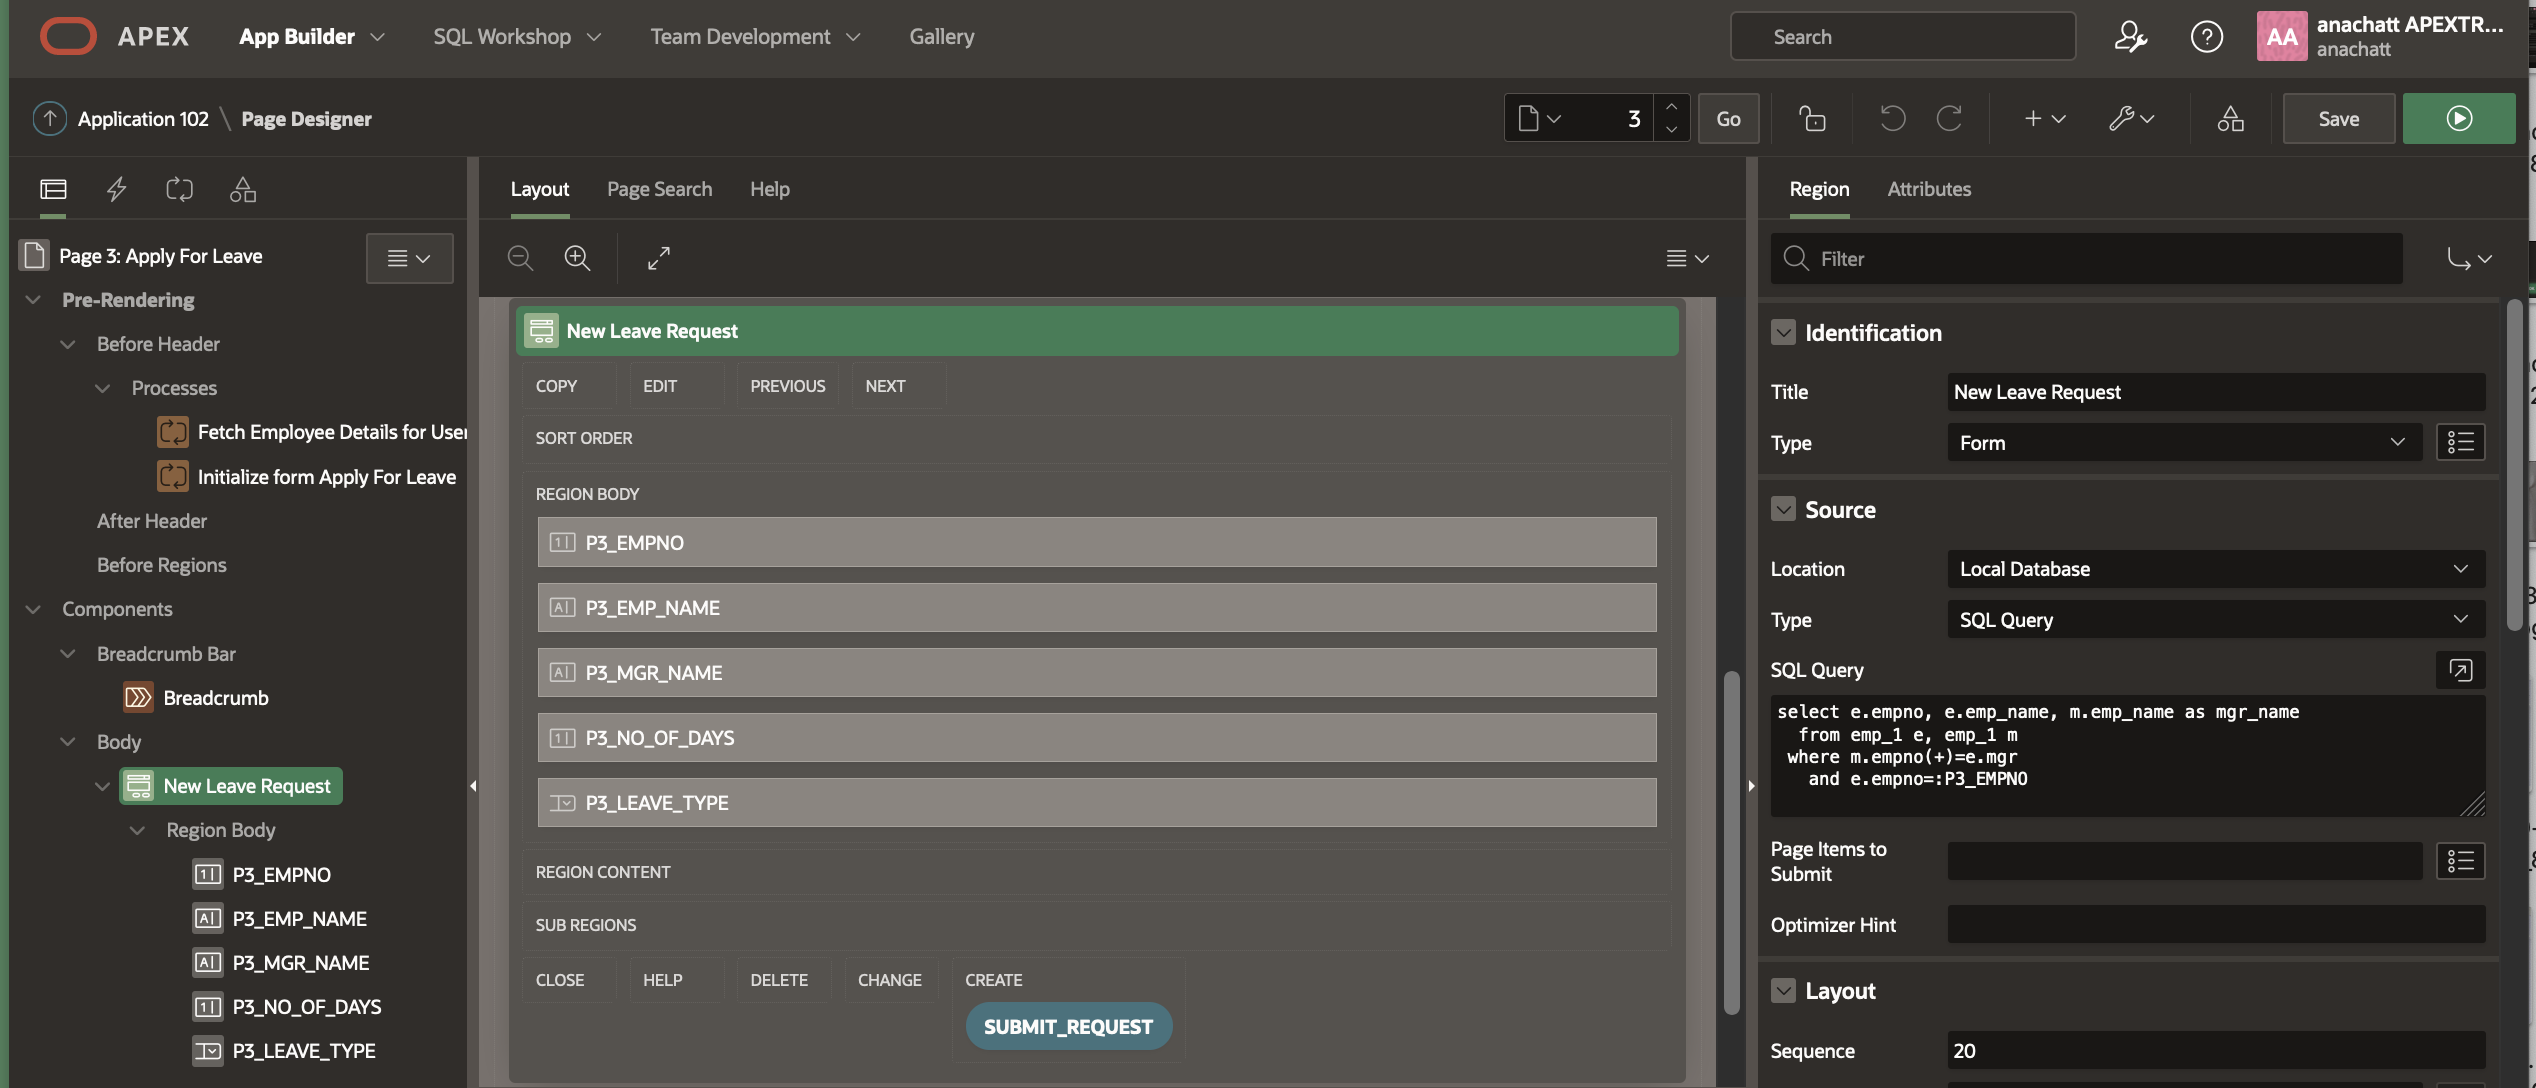
In the Page Designer, create a new Form and name it New Leave Request. Choose SQL Query as the source and enter the following in the query region:
select e.empno, e.emp_name, m.emp_name as mgr_name
  from emp_1 e, emp_1 m
 where m.empno(+)=e.mgr
   and e.empno=:P3_EMPNO
You will find the following page items already created: P3_EMPNO, P3_EMP_NAME and P3_MGR_NAME.
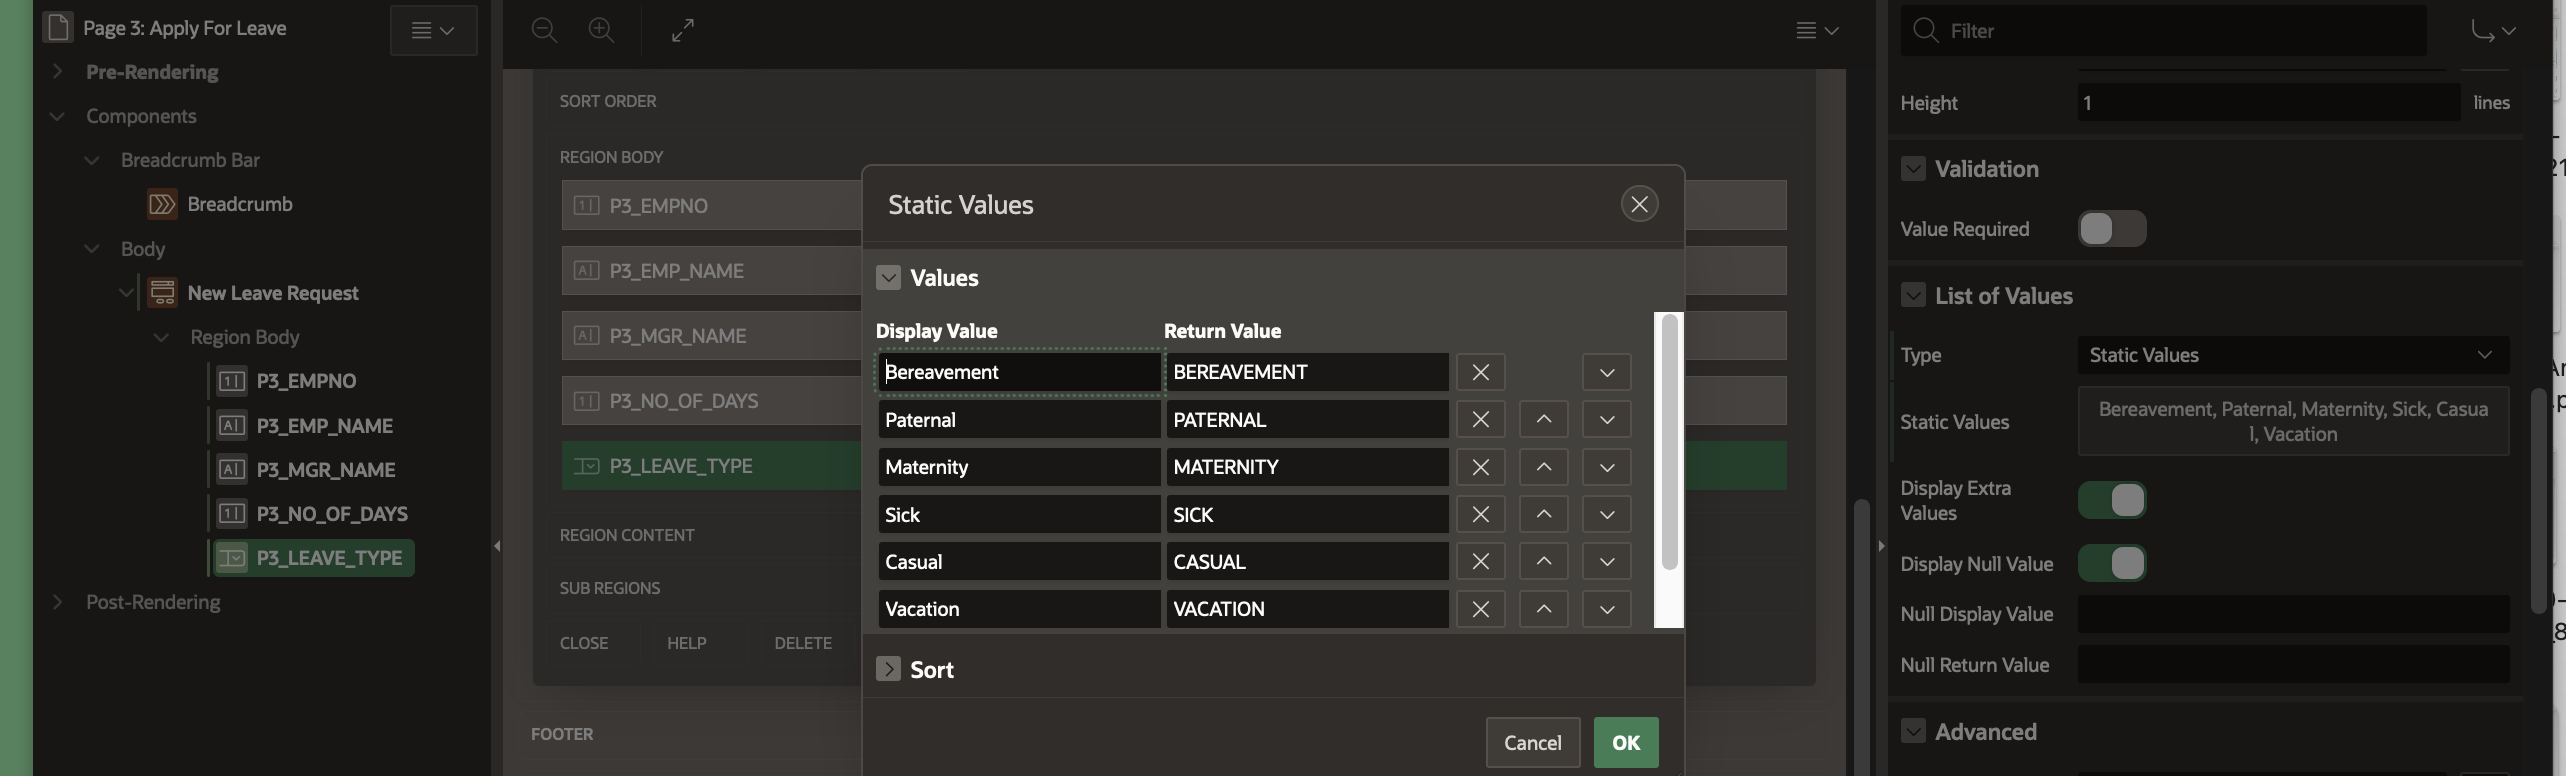
Add 2 new page items P3_NO_OF_DAYS and P3_LEAVE_TYPE.
Set the type for P3_LEAVE_TYPE to Select List and define a list of static values as following:
In the Pre-Rendering section add a New Process above the Initialize form Apply For Leave and name it “Fetch Employee Details for User”. Set the type to Execute Code and add the following in the PL/SQL Code editor
select empno into :P3_EMPNO
  from emp_1
 where emp_name=:APP_USER;
Navigate to the Processing Tab and Create a new Page Process of type Human Task – Create. Name the process “Submit Leave Request”.
Under the Settings, Click the Task Definition and select “Leave Request” from the drop down.
Set the Details Primary Key Item as P3_EMP_NO. This is how the task in your approvals component gets tied to the employee system of records.
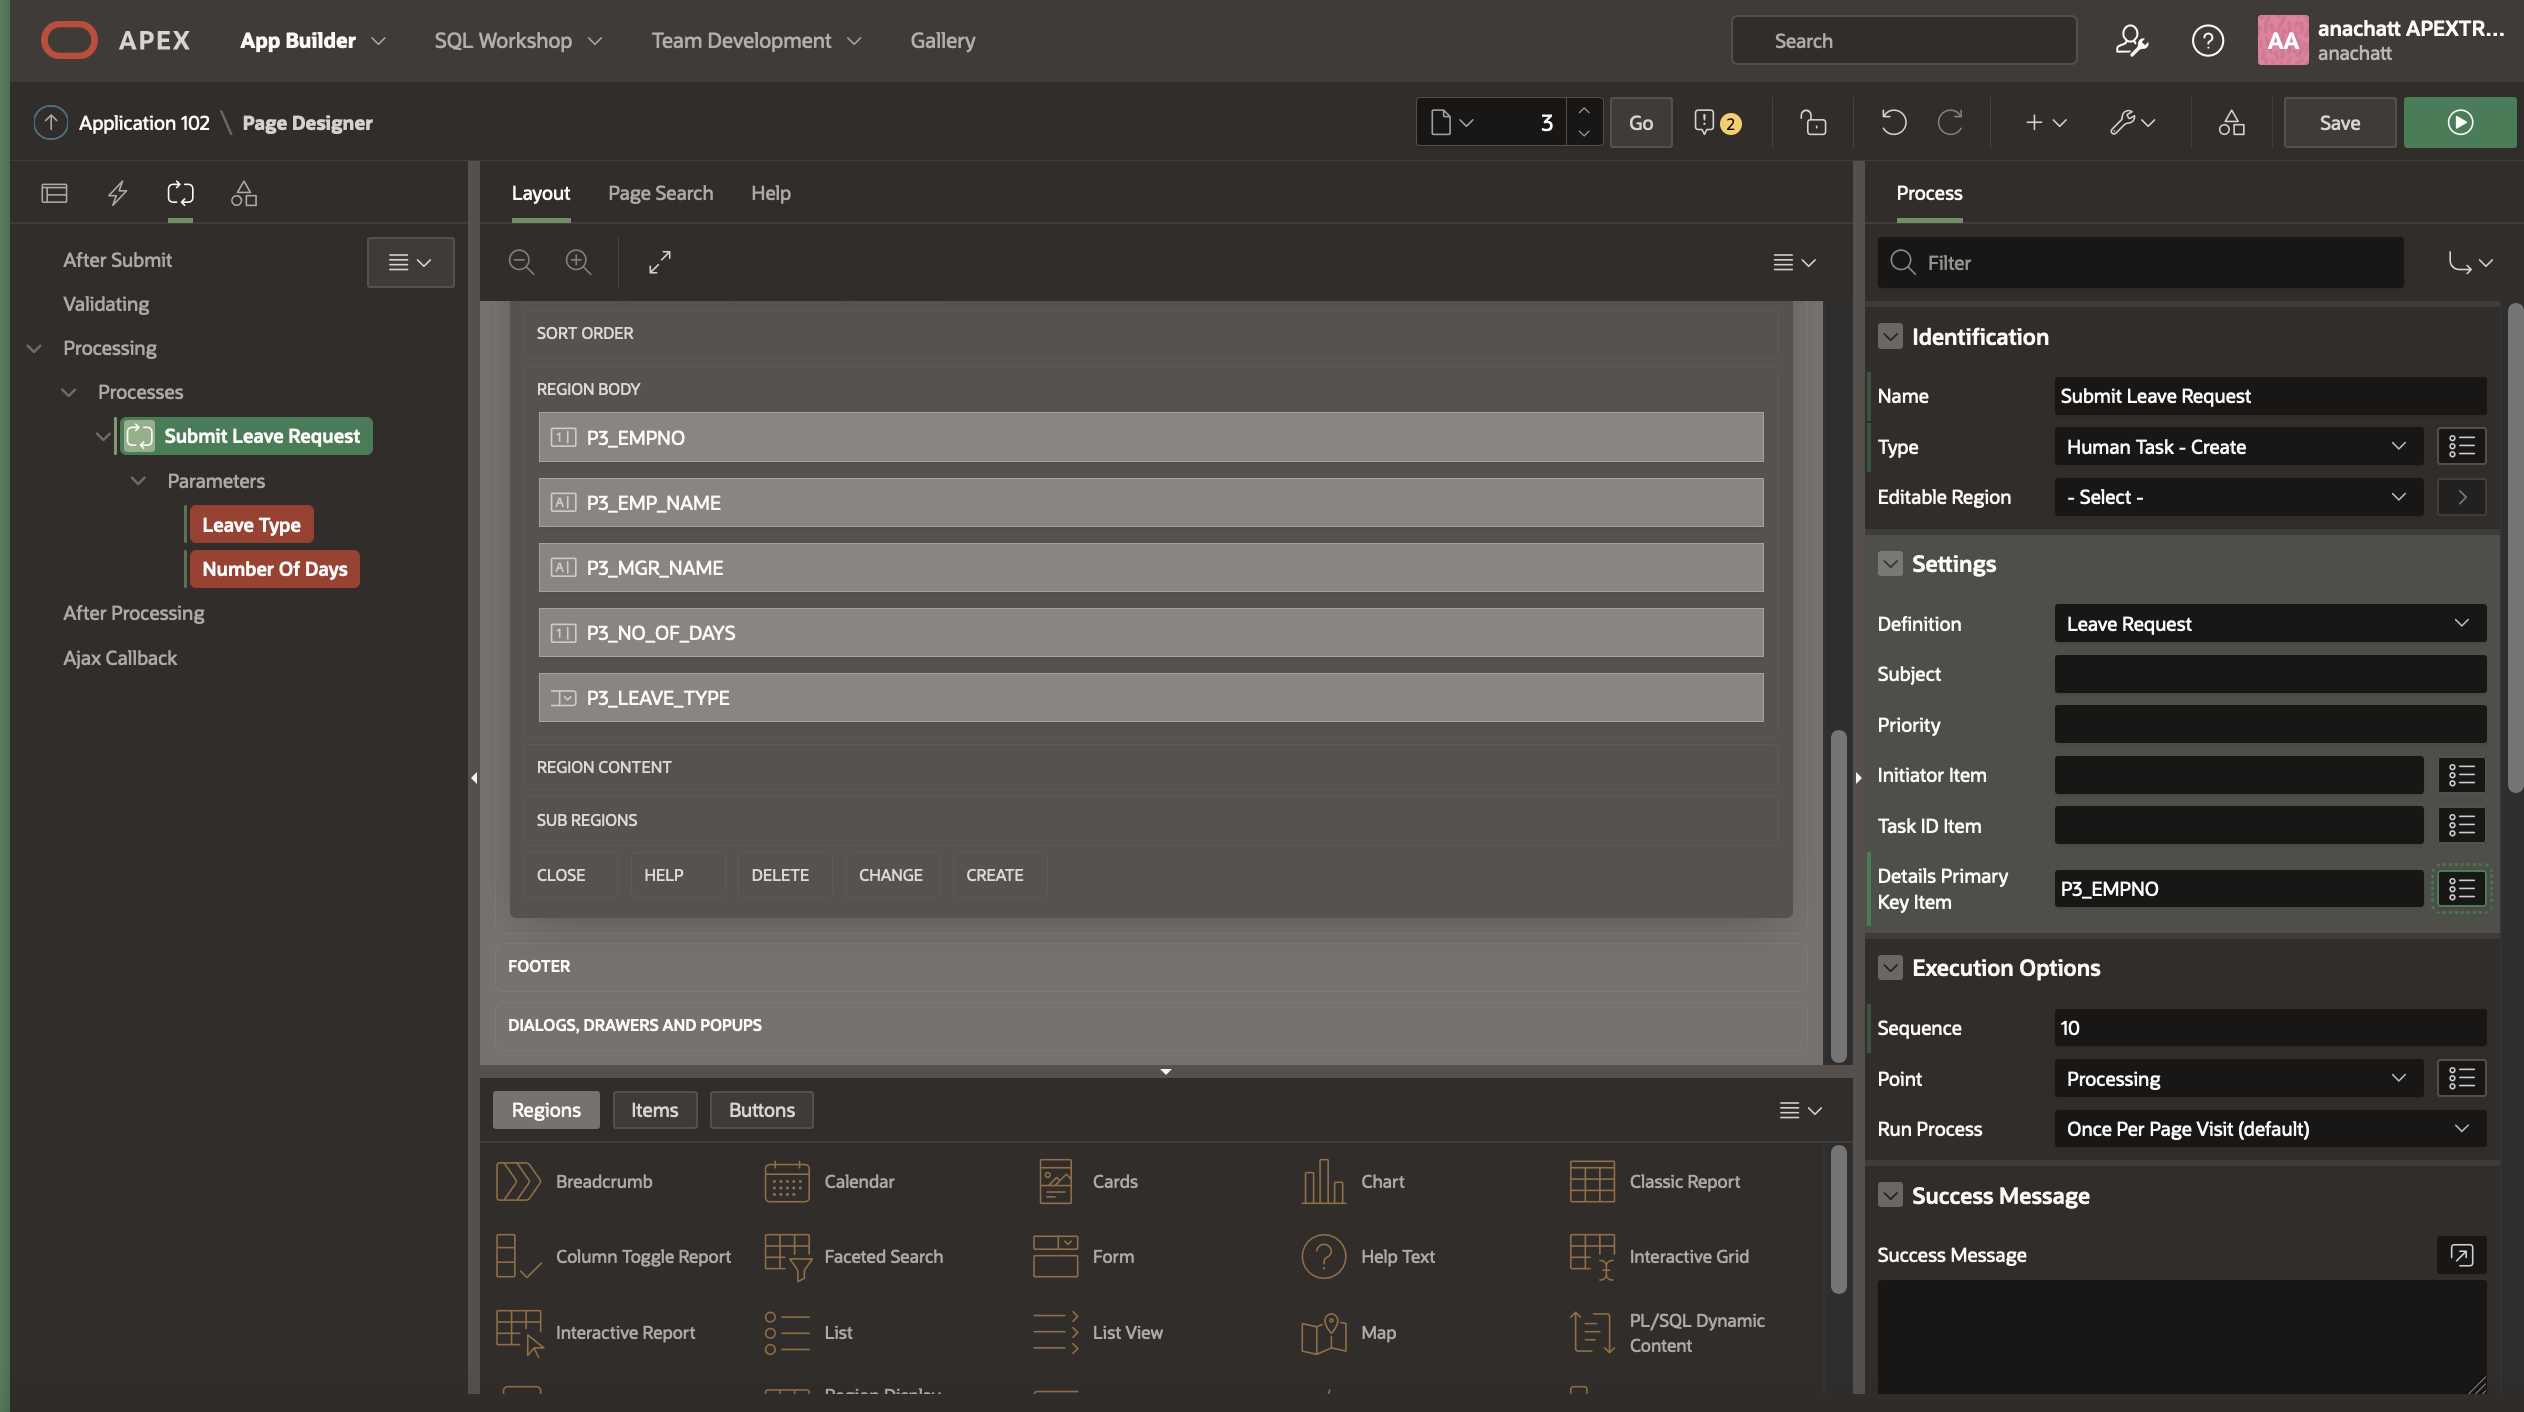
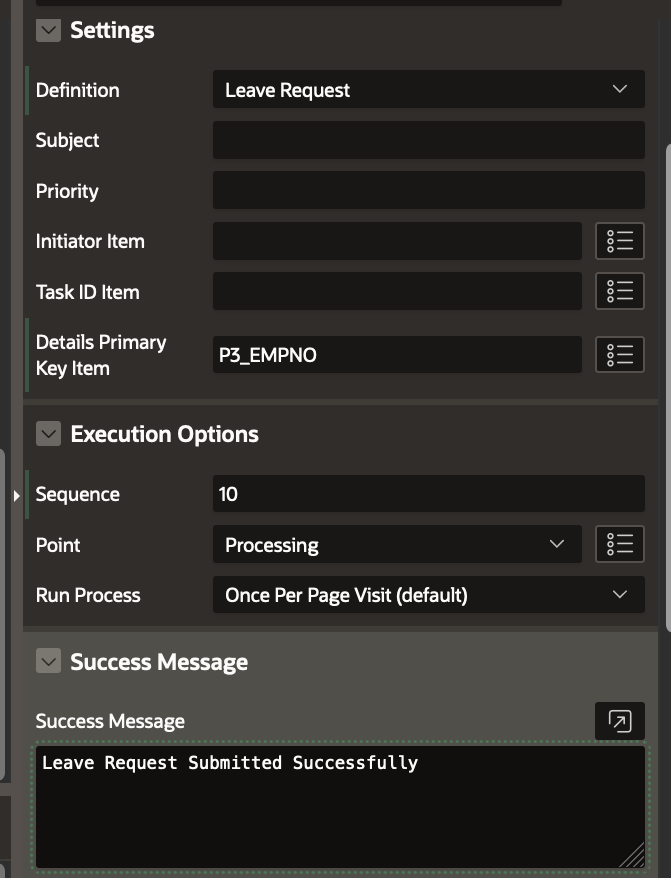
Add a Success Message which will show up once the Request is submitted.
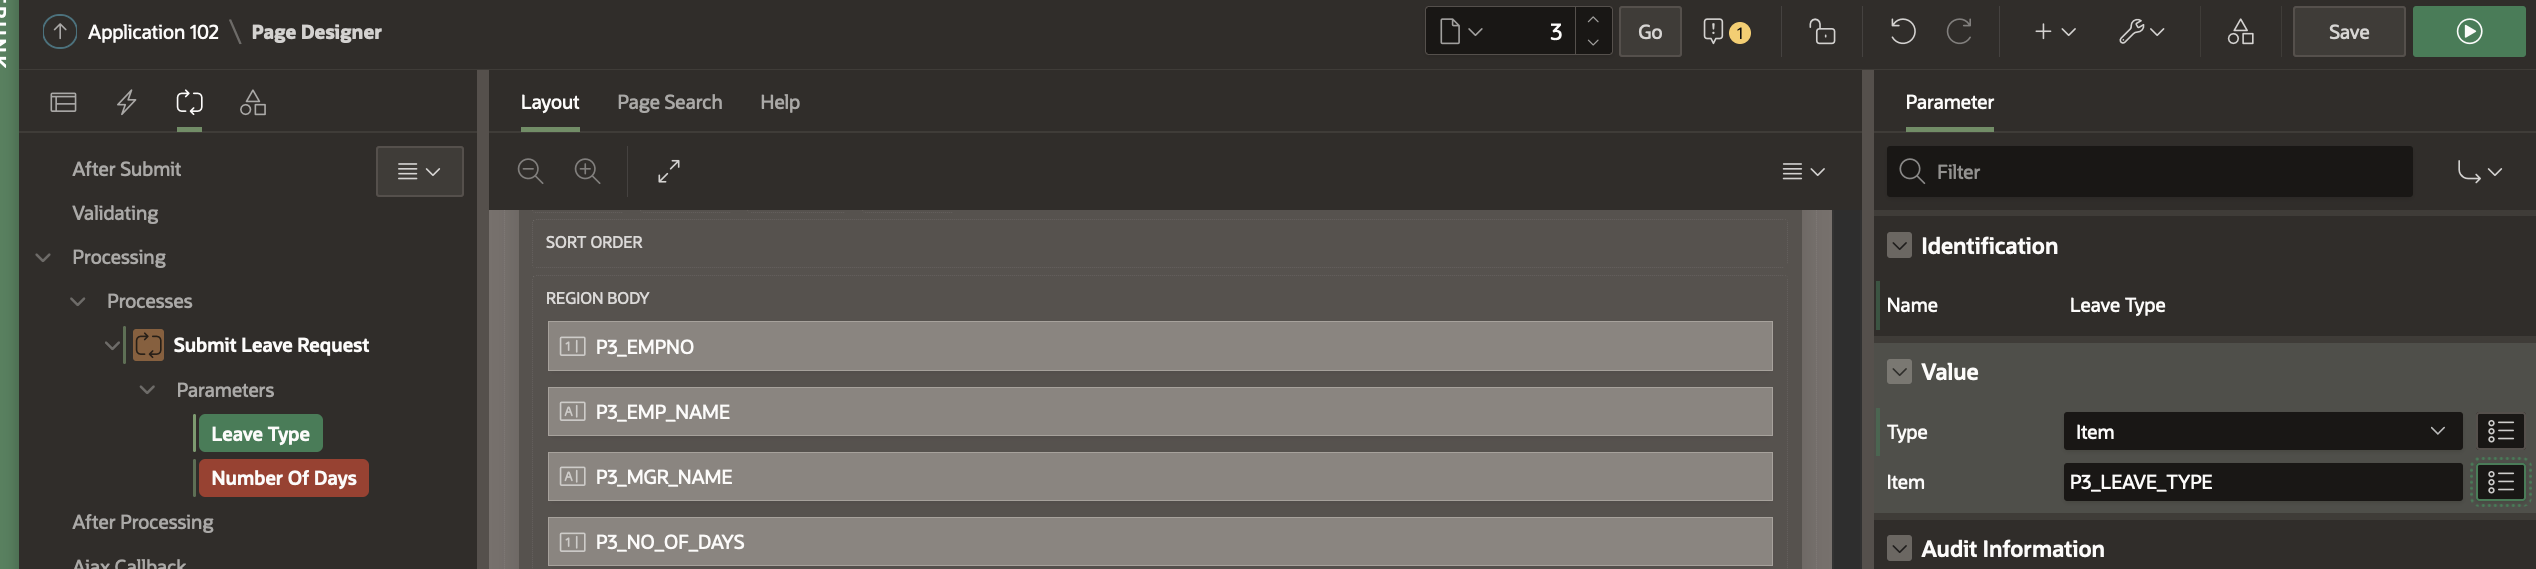
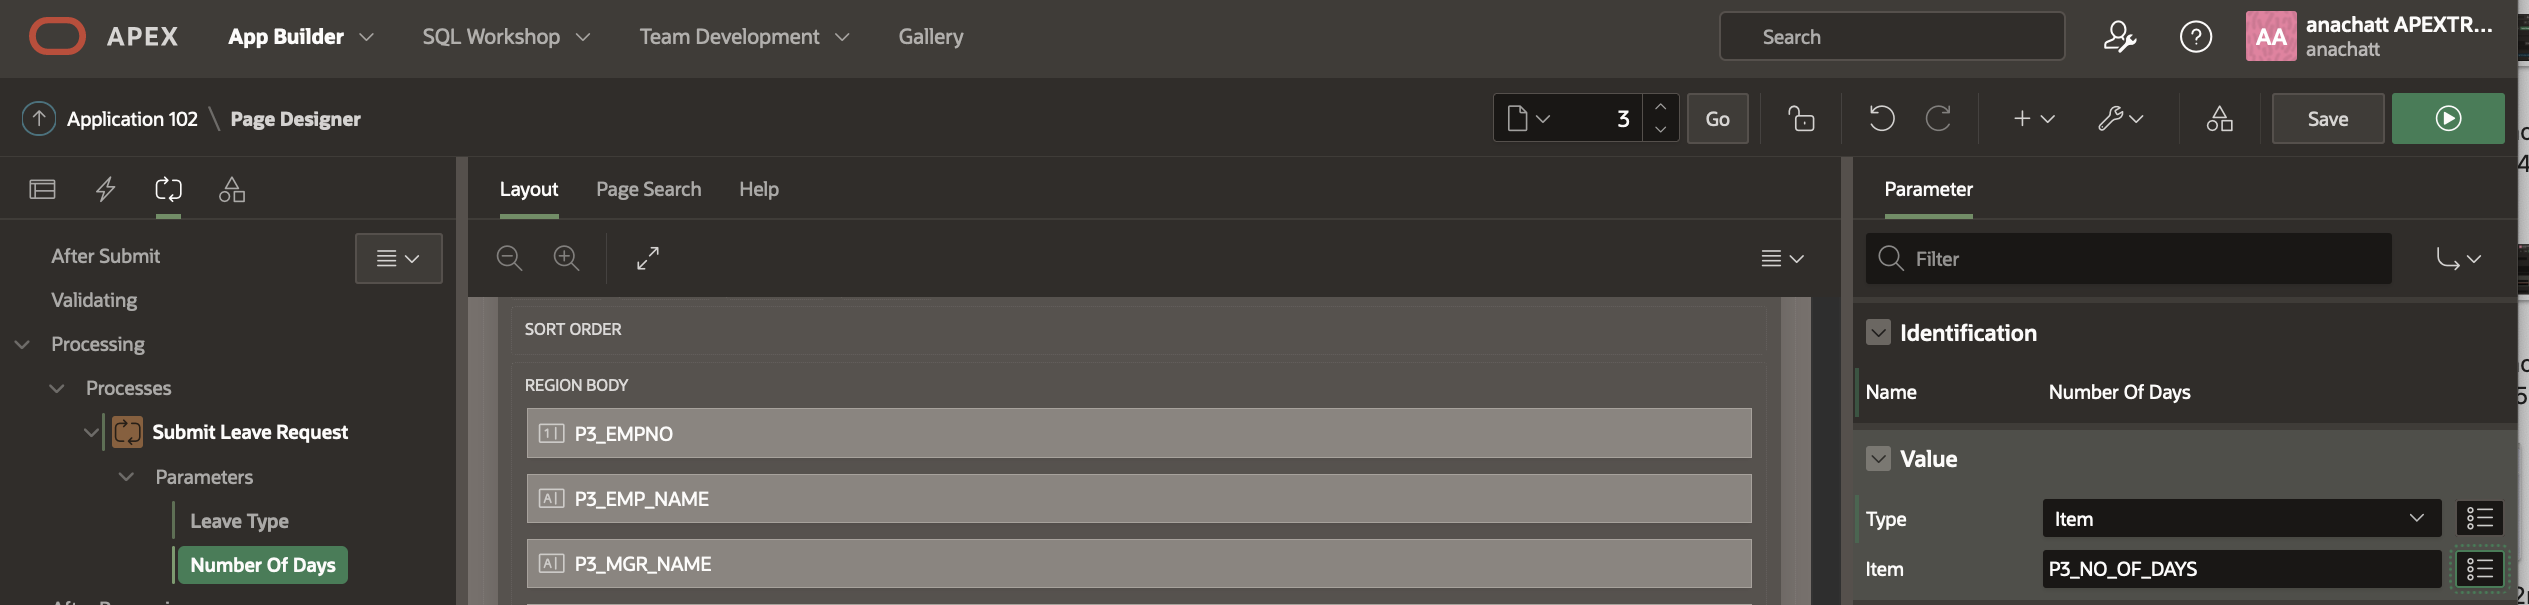
You will notice Leave Type and Number Of Days under the Parameters on the Left pane to be highlighted in RED. This is because, these were defined as required Parameters in the Leave Request Task Definition. Click on each parameter and set it to the corresponding page item (P3_NO_OF_DAYS and P3_LEAVE_TYPE) you had created earlier.
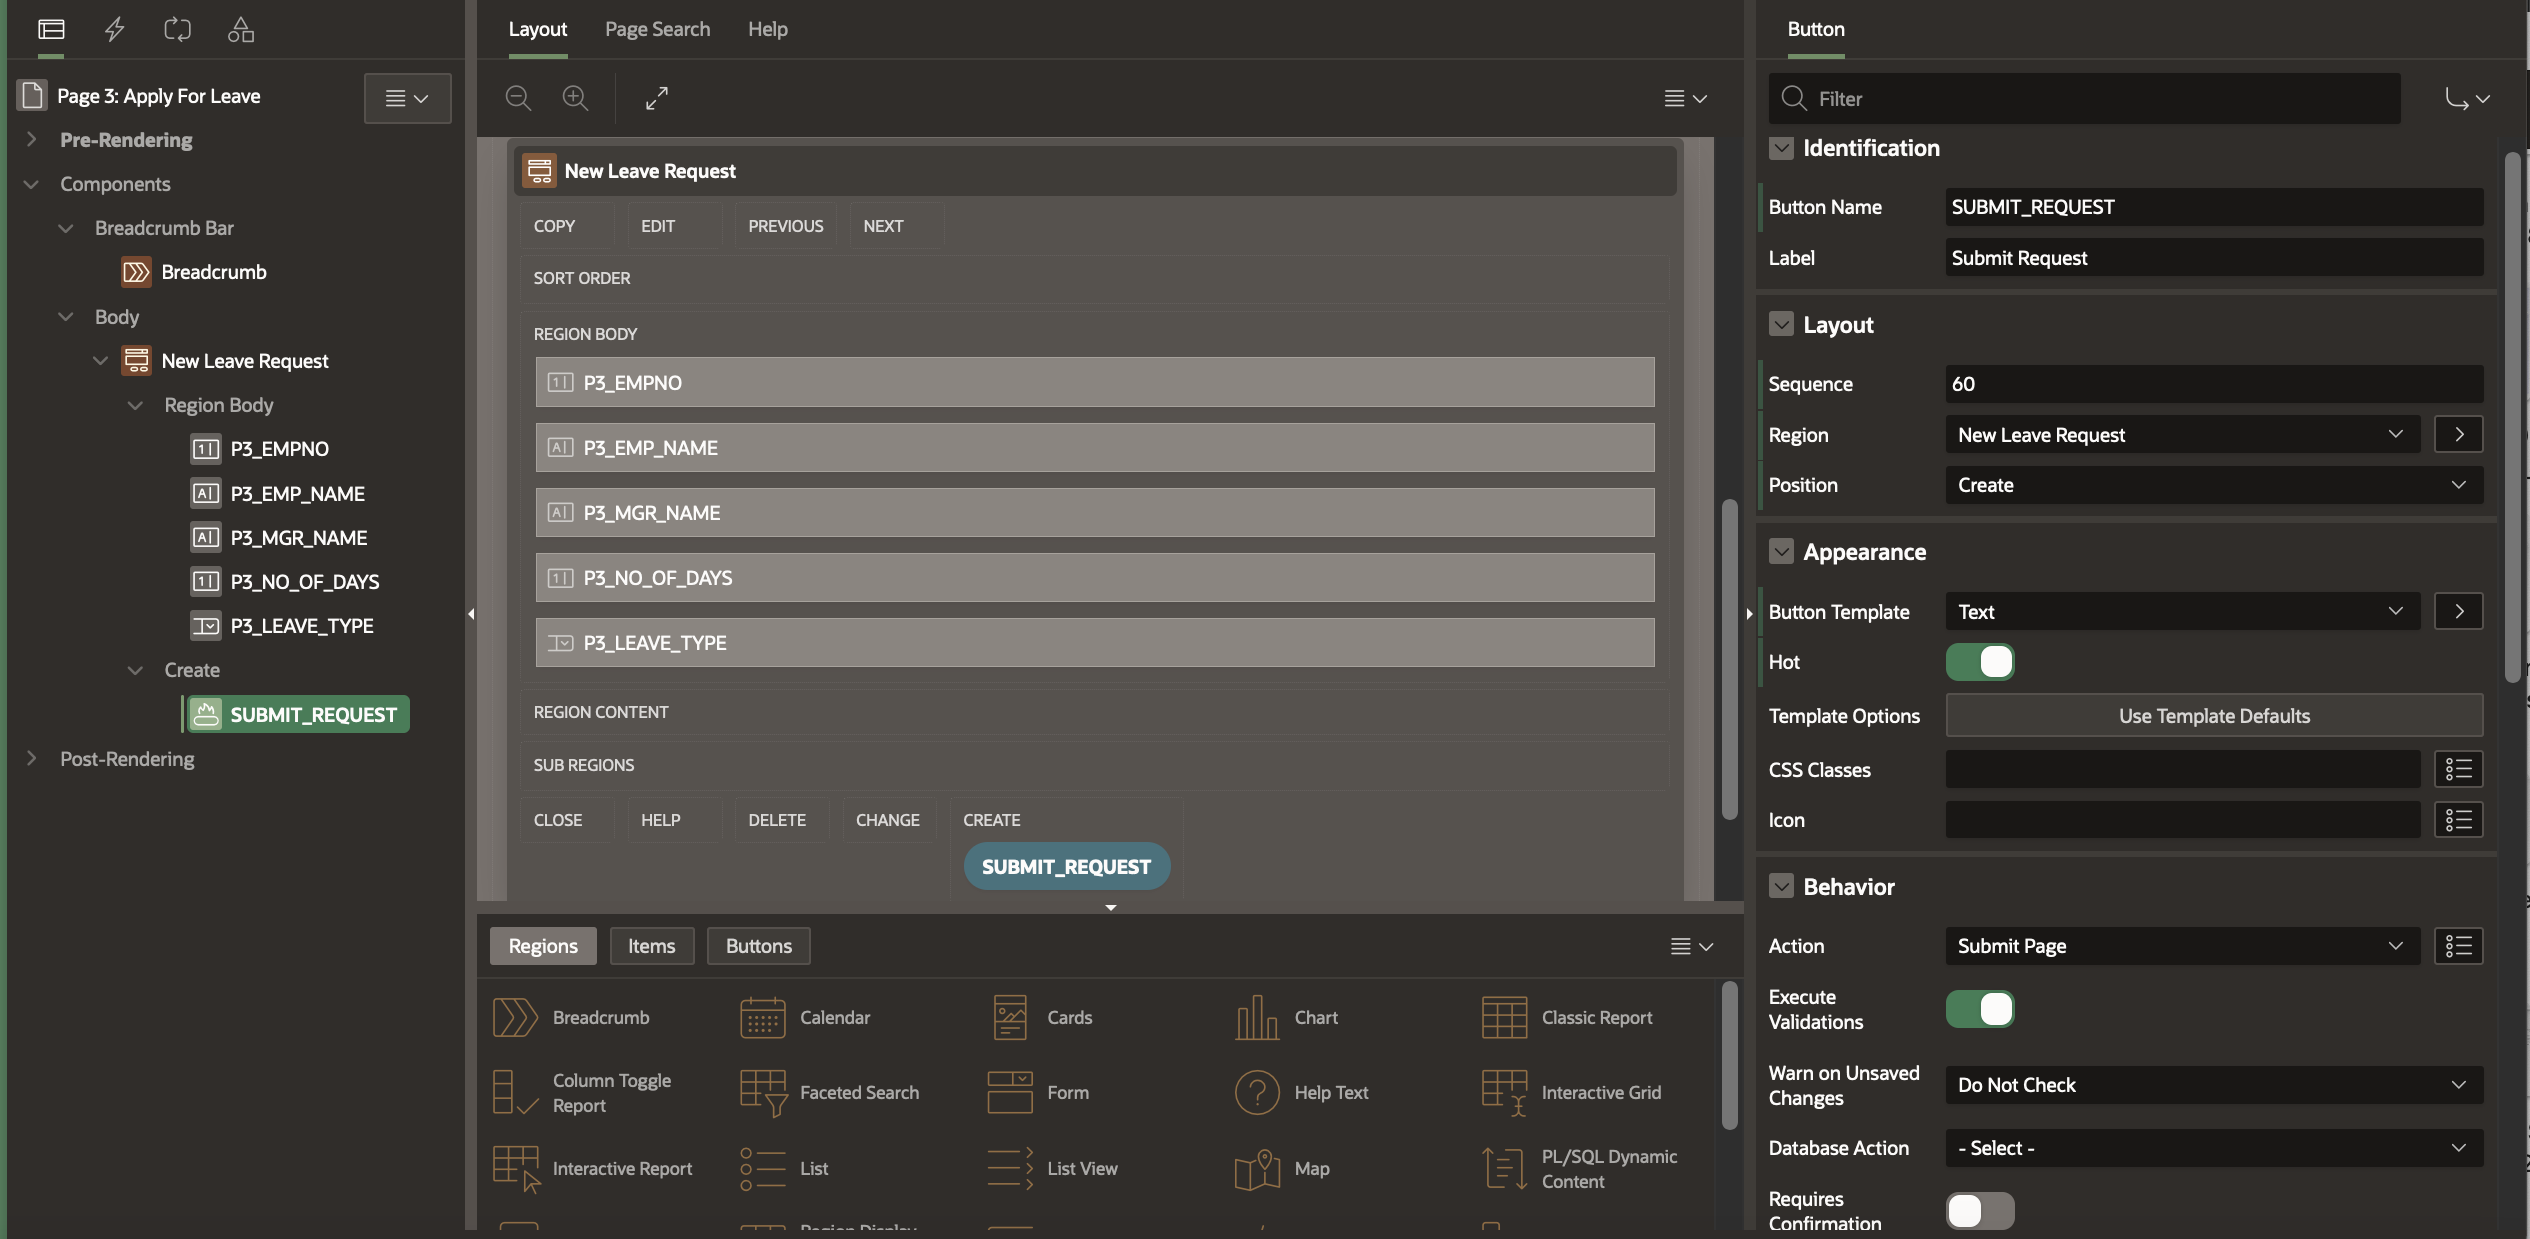
Click Save and navigate back to the Rendering Section. Create a new Button and name it Submit Request. Go back to the Submit Leave Request Process and under server side conditions, select “When Button Pressed” -Submit Request.
Your Apply For Leave Page is now complete!
Creating the My Approvals and My Requests Pages
We now create the pages where a) The manager of the employee can go to approve or reject a leave request and b) The employee can go and check the status of his request. For this we will create two Unified Task Lists.
Creating the My Approvals Page
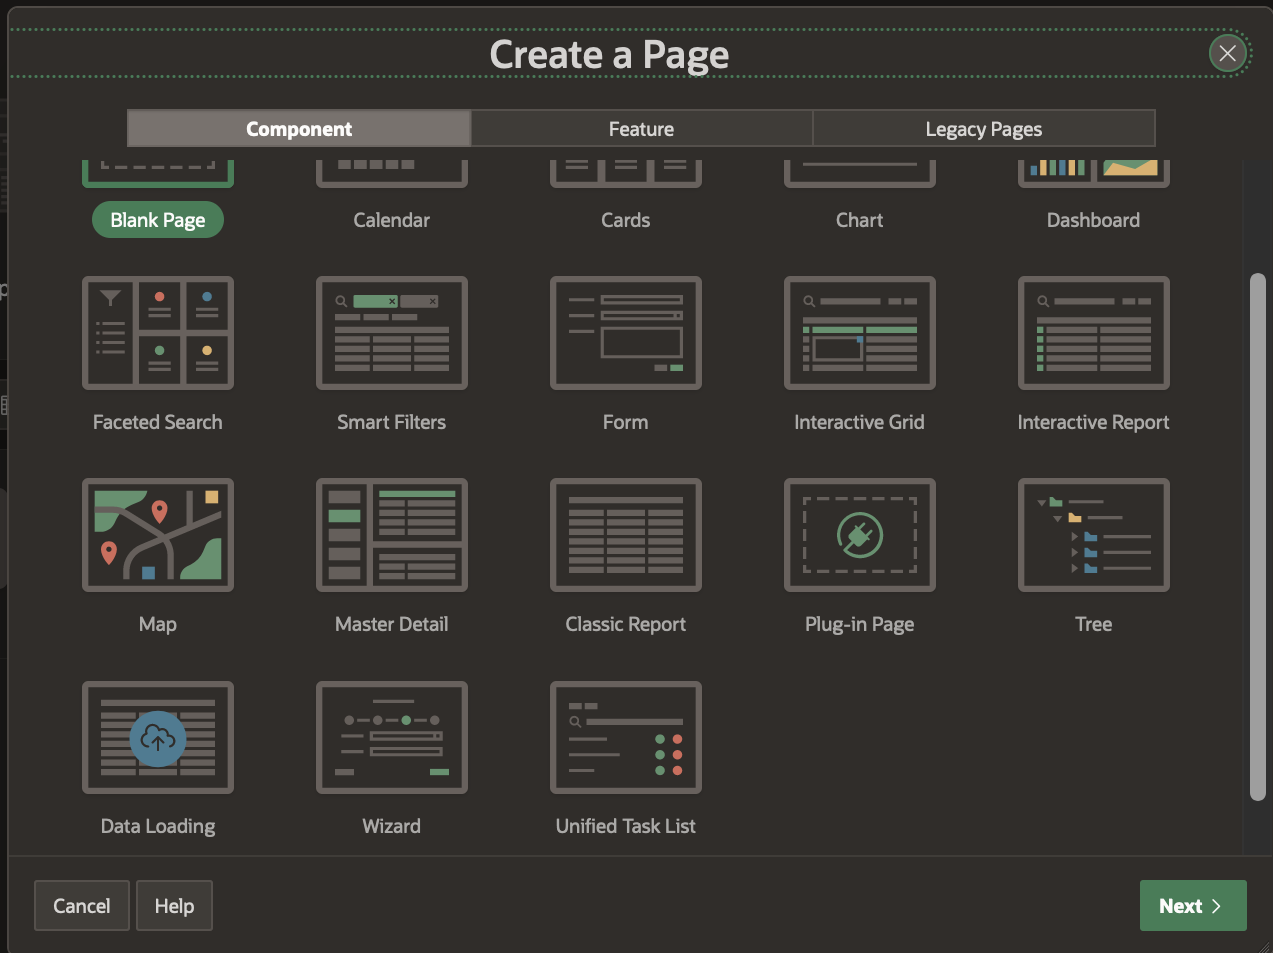
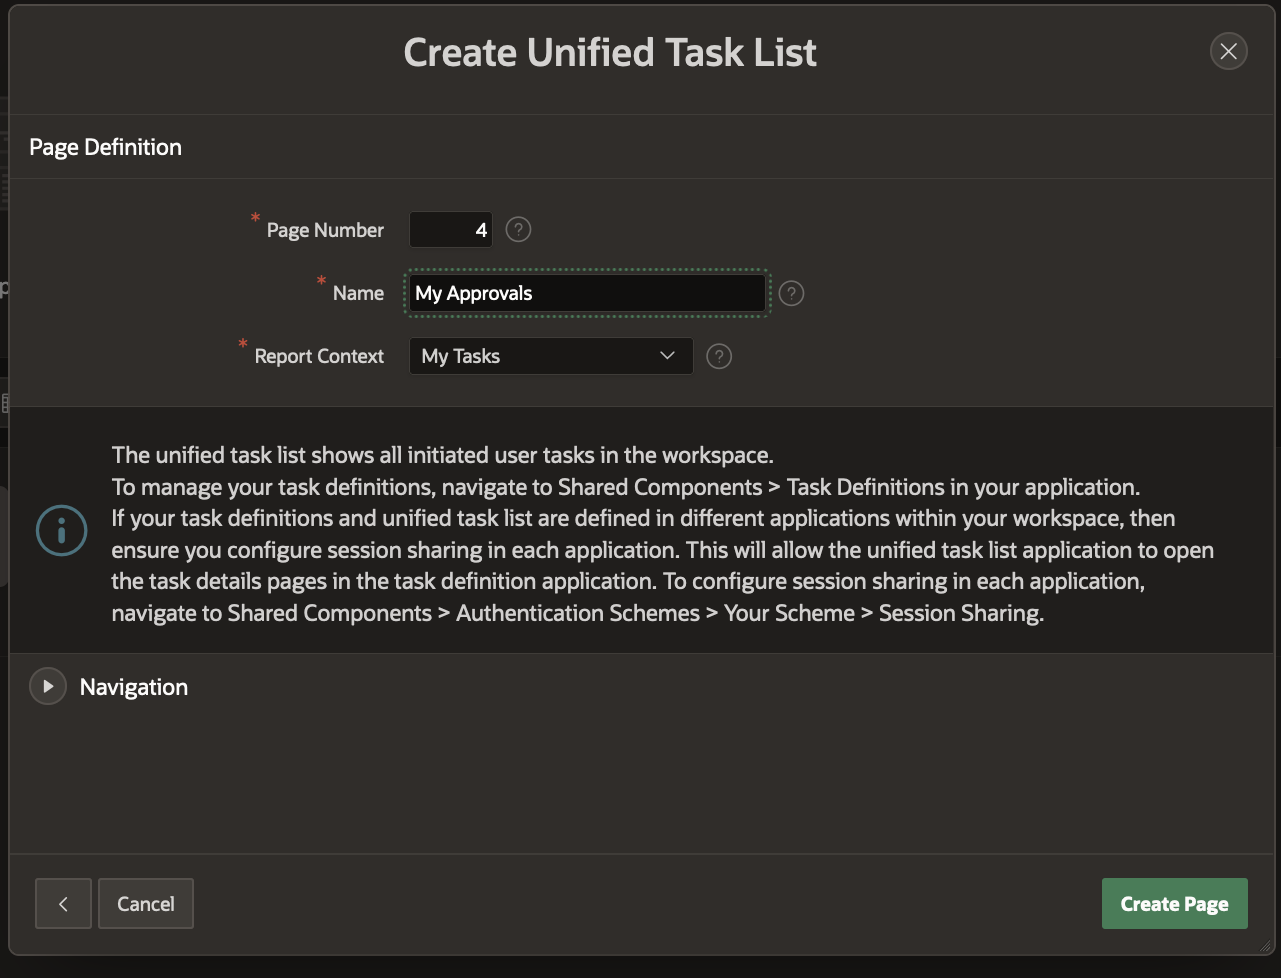
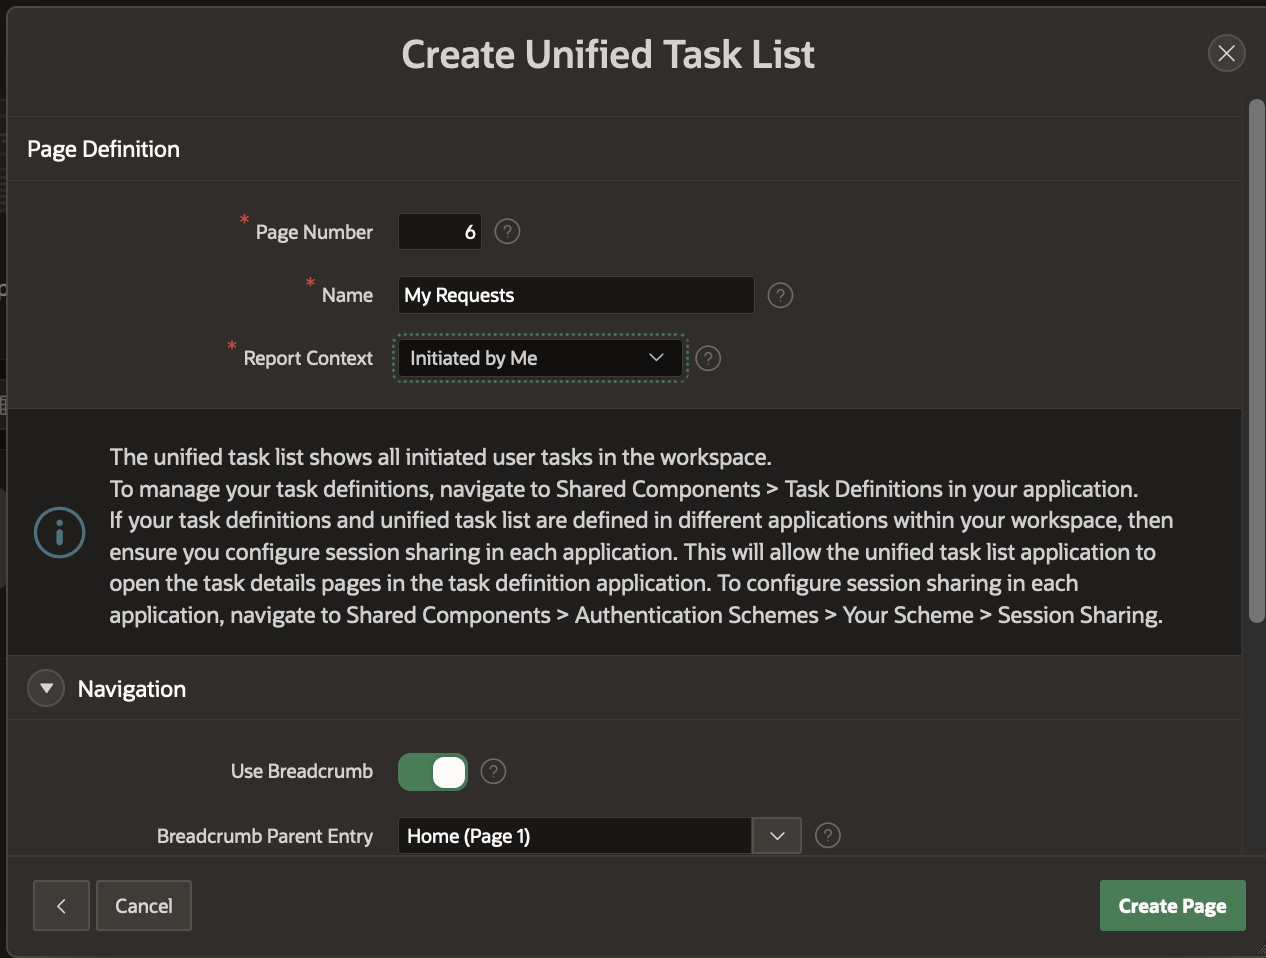
Click on the Create Page wizard and select Unified Task List from the Components section . Name the Page “My Approvals” and select Report Context as “My Tasks”. Similarly create another Unified Task List, name it “My Requests” and set the Report Context as “Initiated By Me”.
NOTE: Unified task list page can be customized in the Page Designer. But for this example we will use the one generated out of the box.
Running the Application
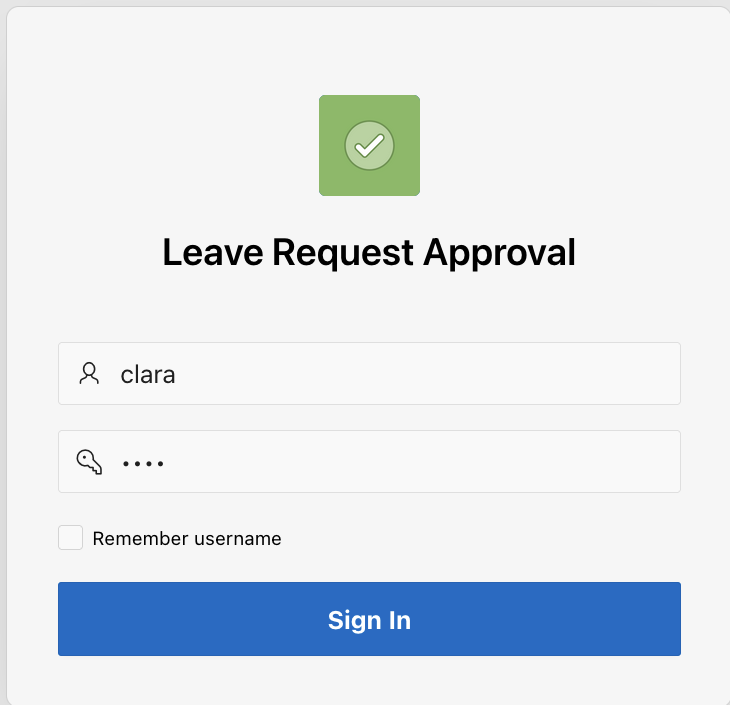
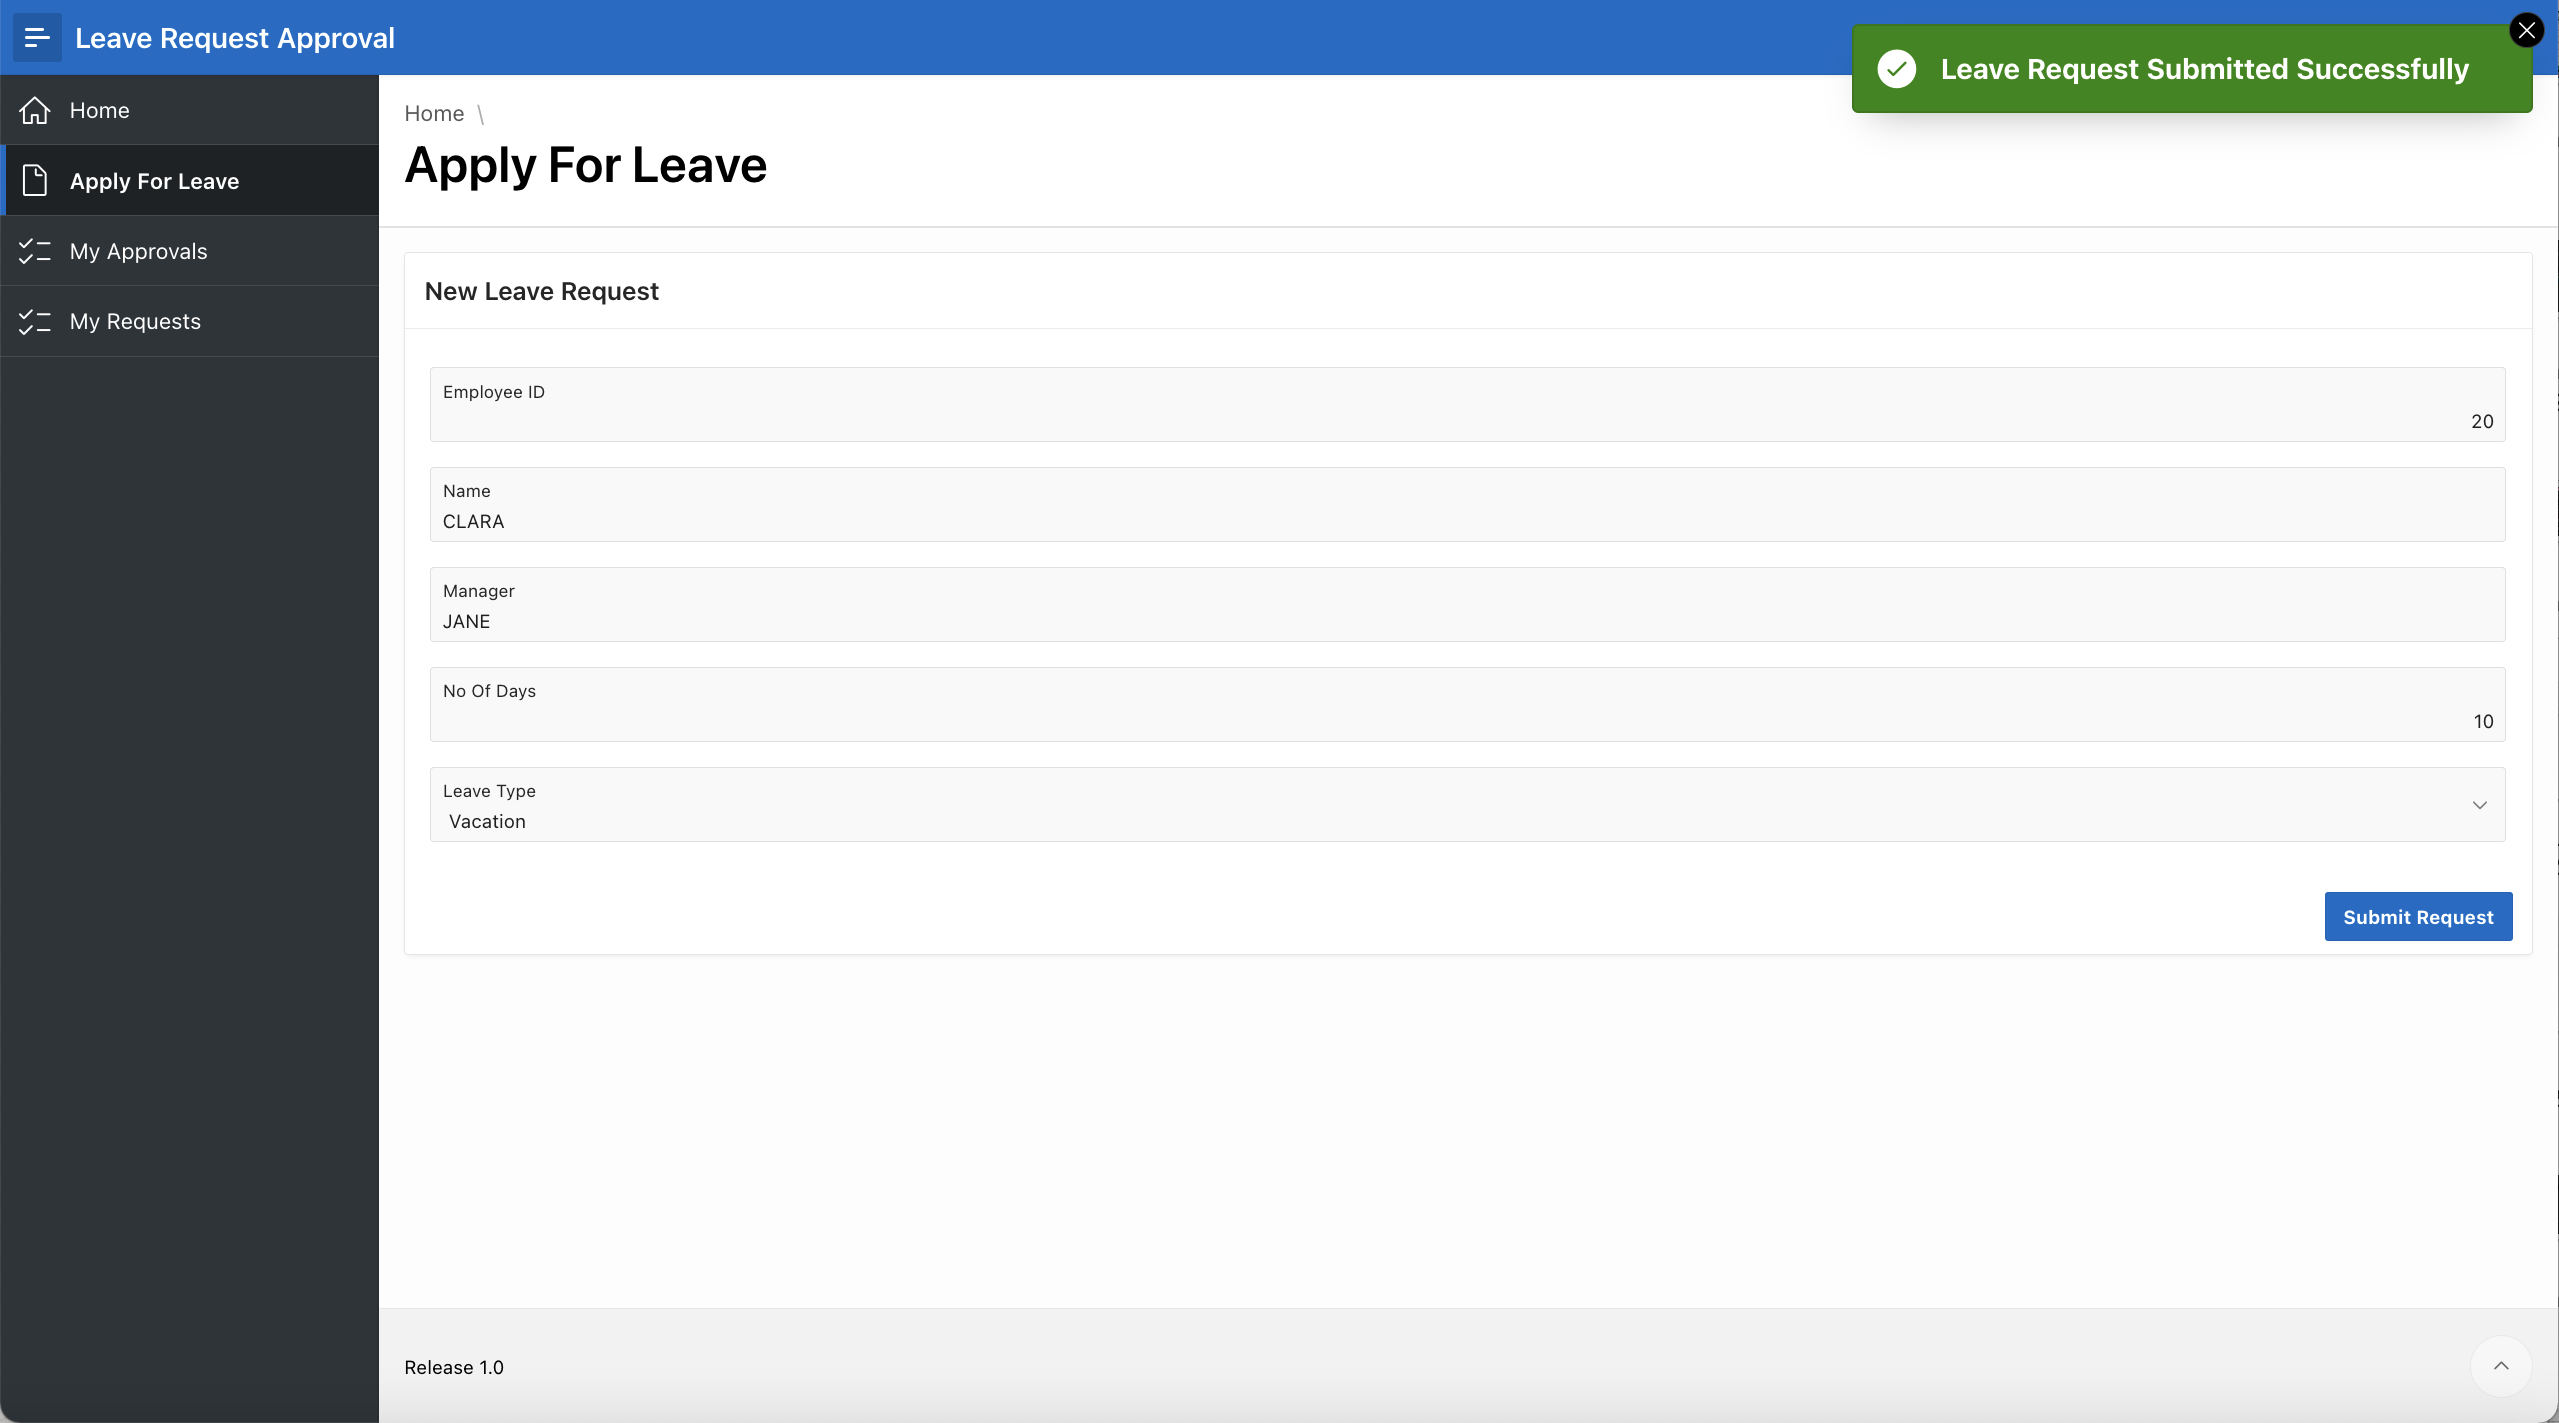
Select the Leave Request Approvals in the App Builder and click on Run Application. The Application is launched on a separate tab. Log in as CLARA and navigate to the Apply For Leave page. The Employee ID, Name and Manager fields will be pre-populated. Enter values for the No. Of Days and Leave Type as shown below. Hit “Submit Request” after that.
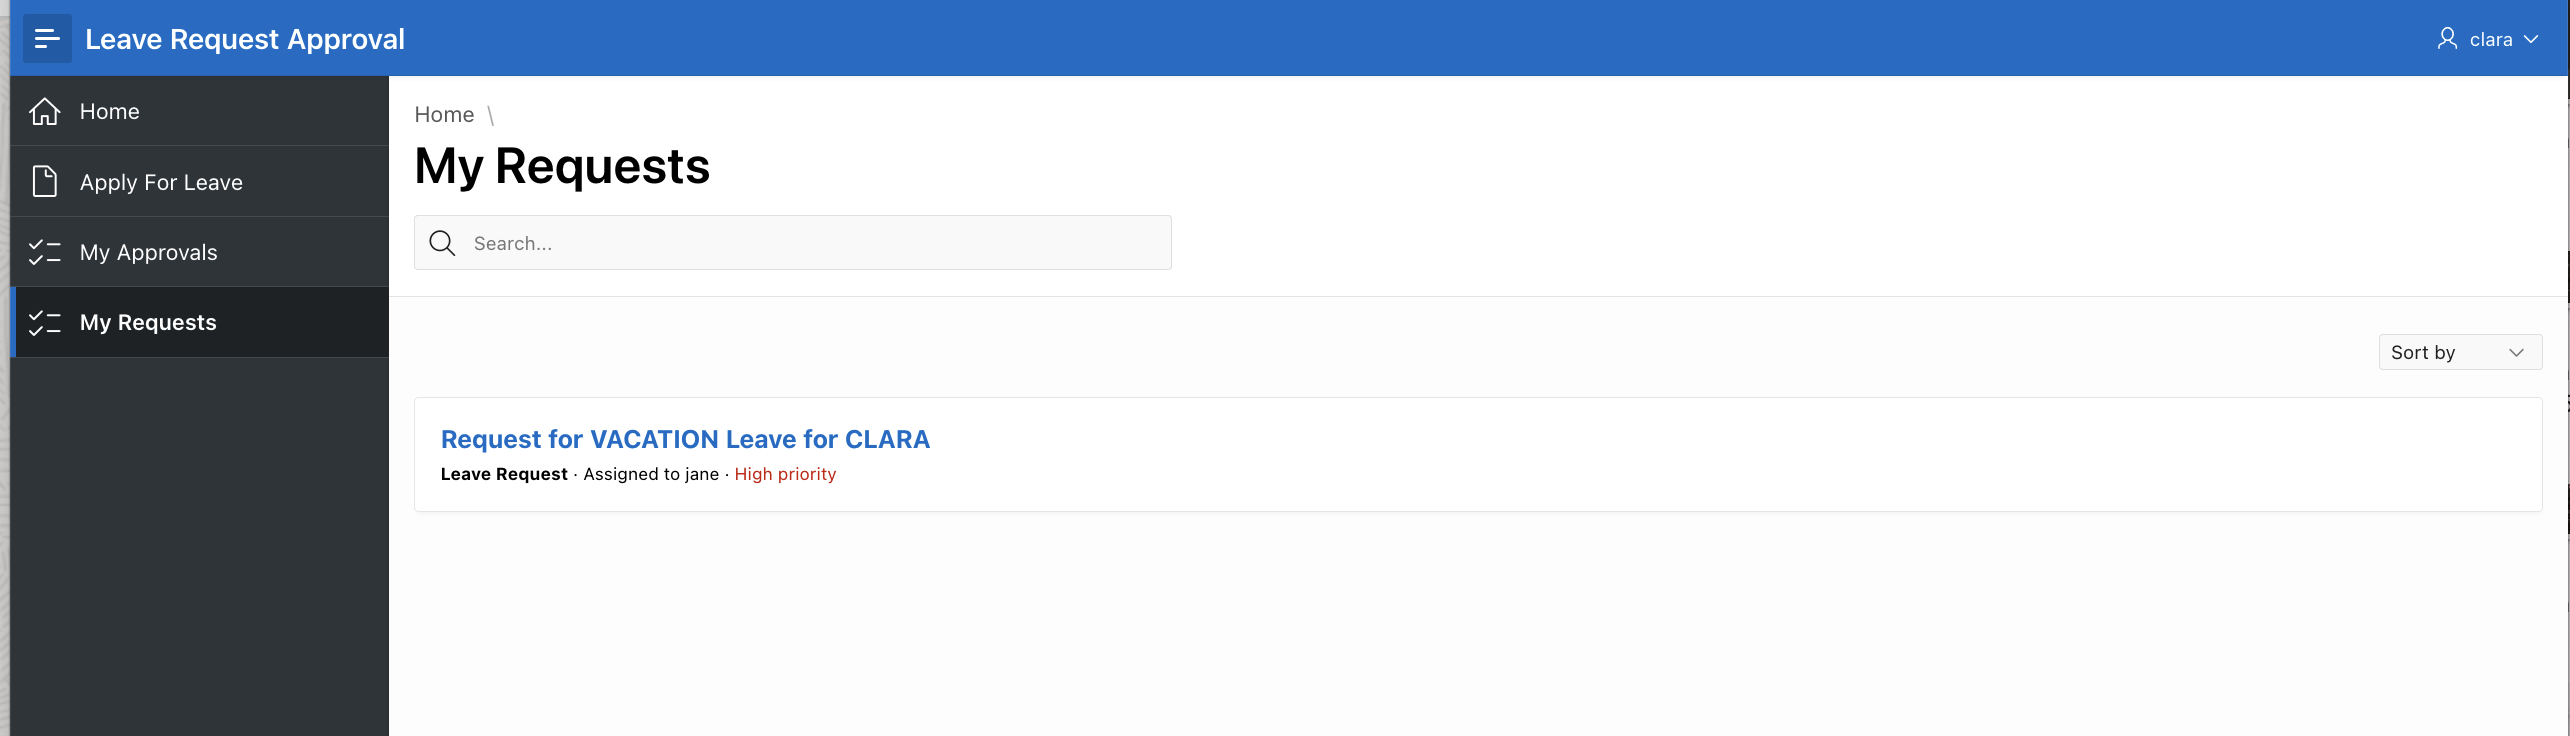
You can navigate to the My Requests Page to view the task that got created. Note how the substitution strings for LEAVE_TYPE and EMP_NAME have been replaced in the Task subject!
Log out and Log back in as Jane who is the manager of Clara. Navigate to the “My Approvals” page . You will find Clara’s request.
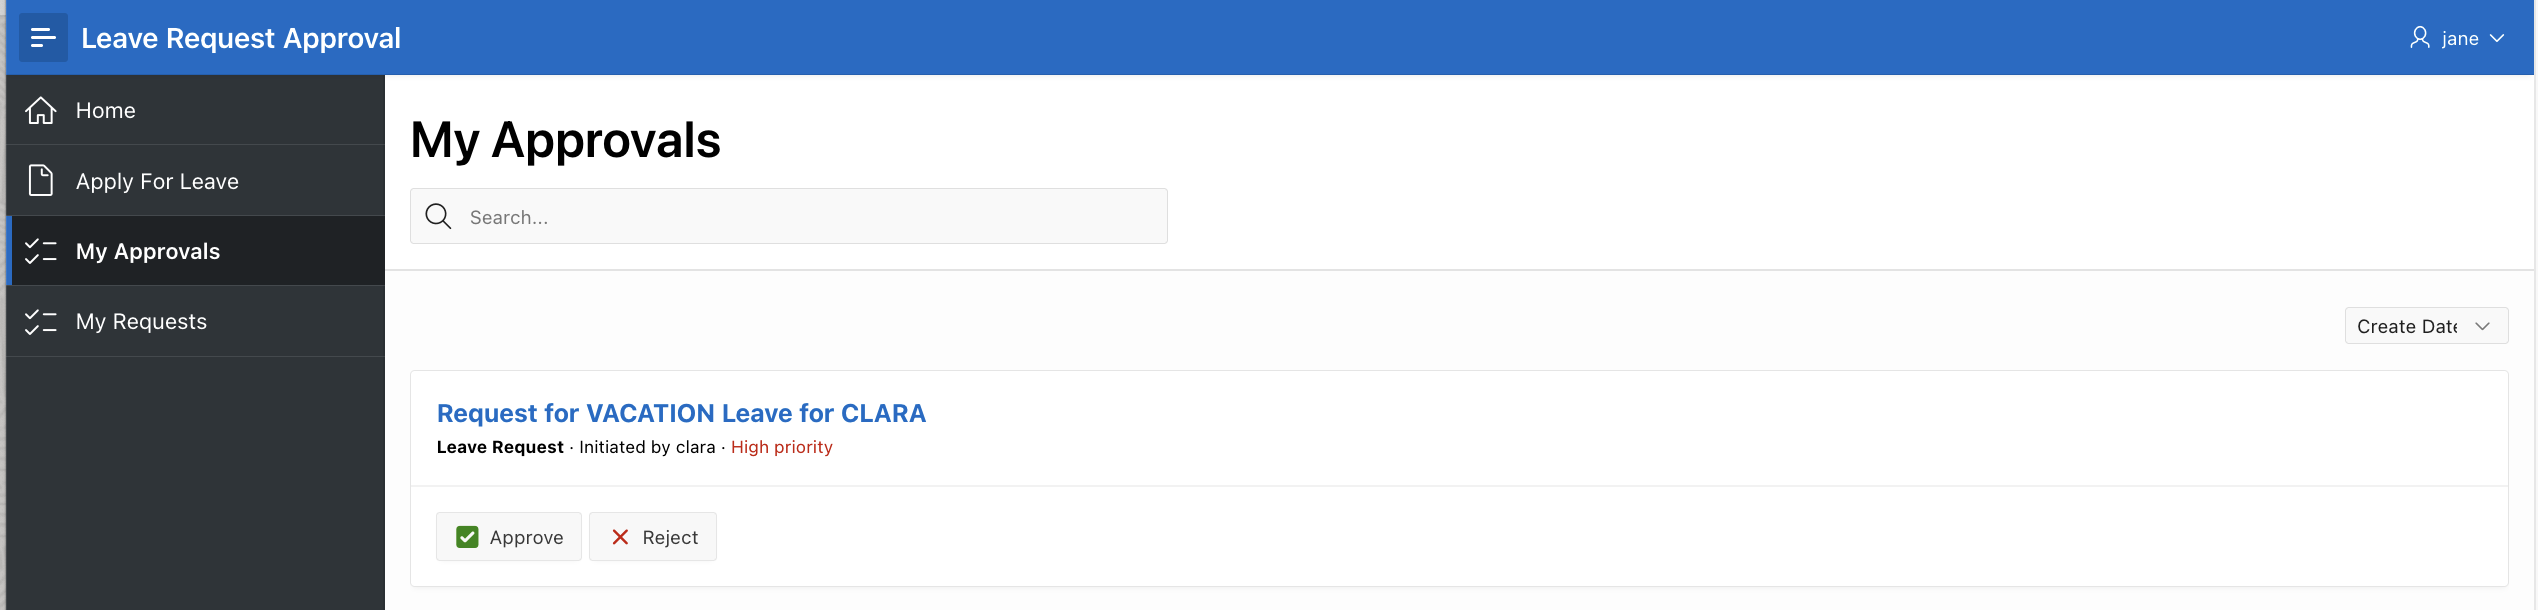
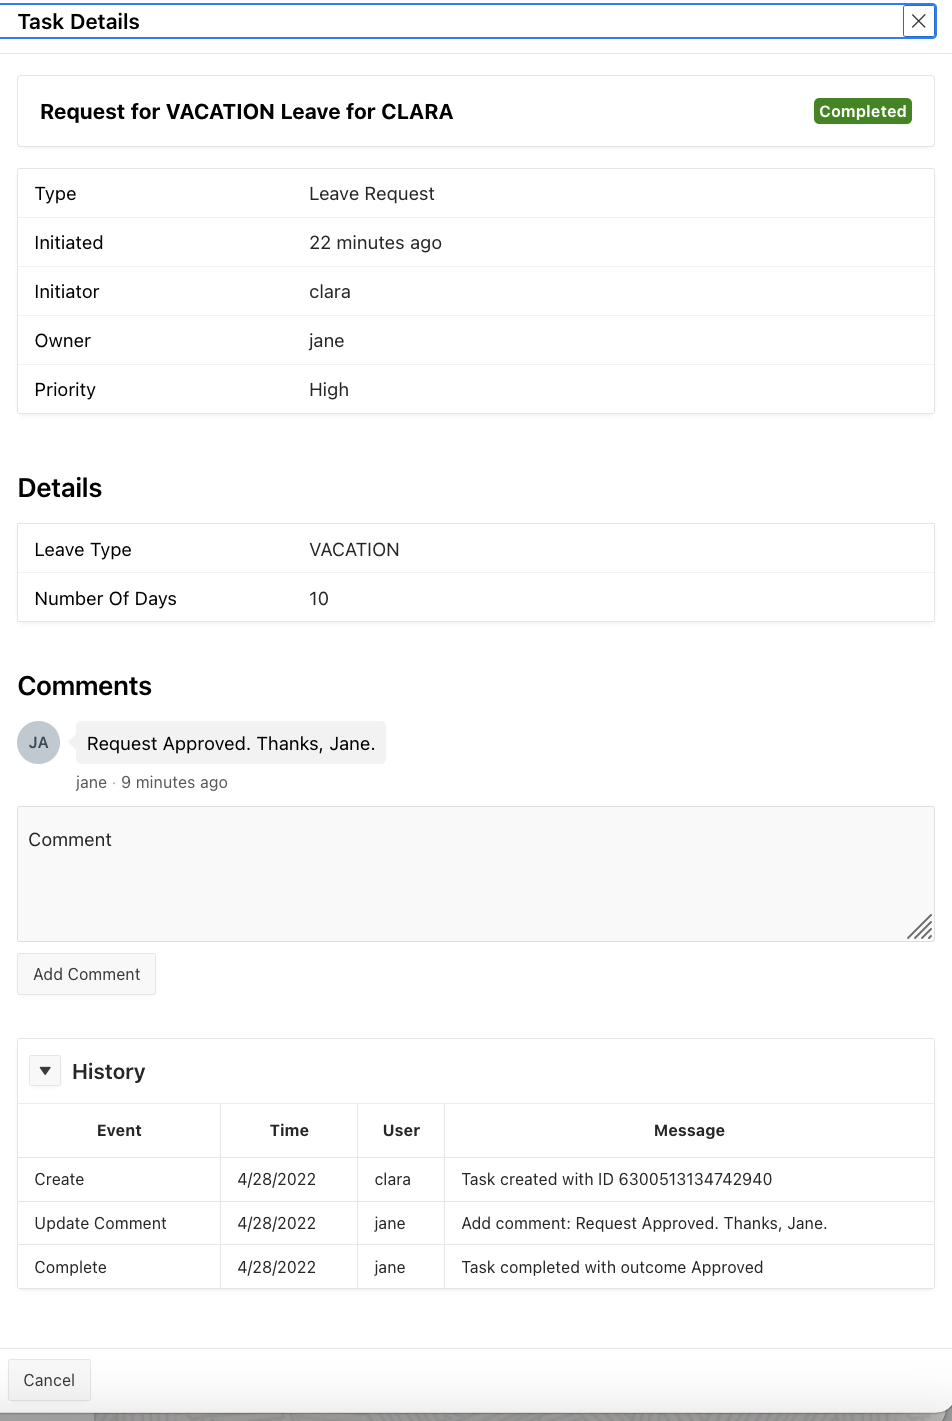
Jane can Approve or Reject the request using the buttons shown above. But, Jane can also choose the click on the task to view the details page which pops up.
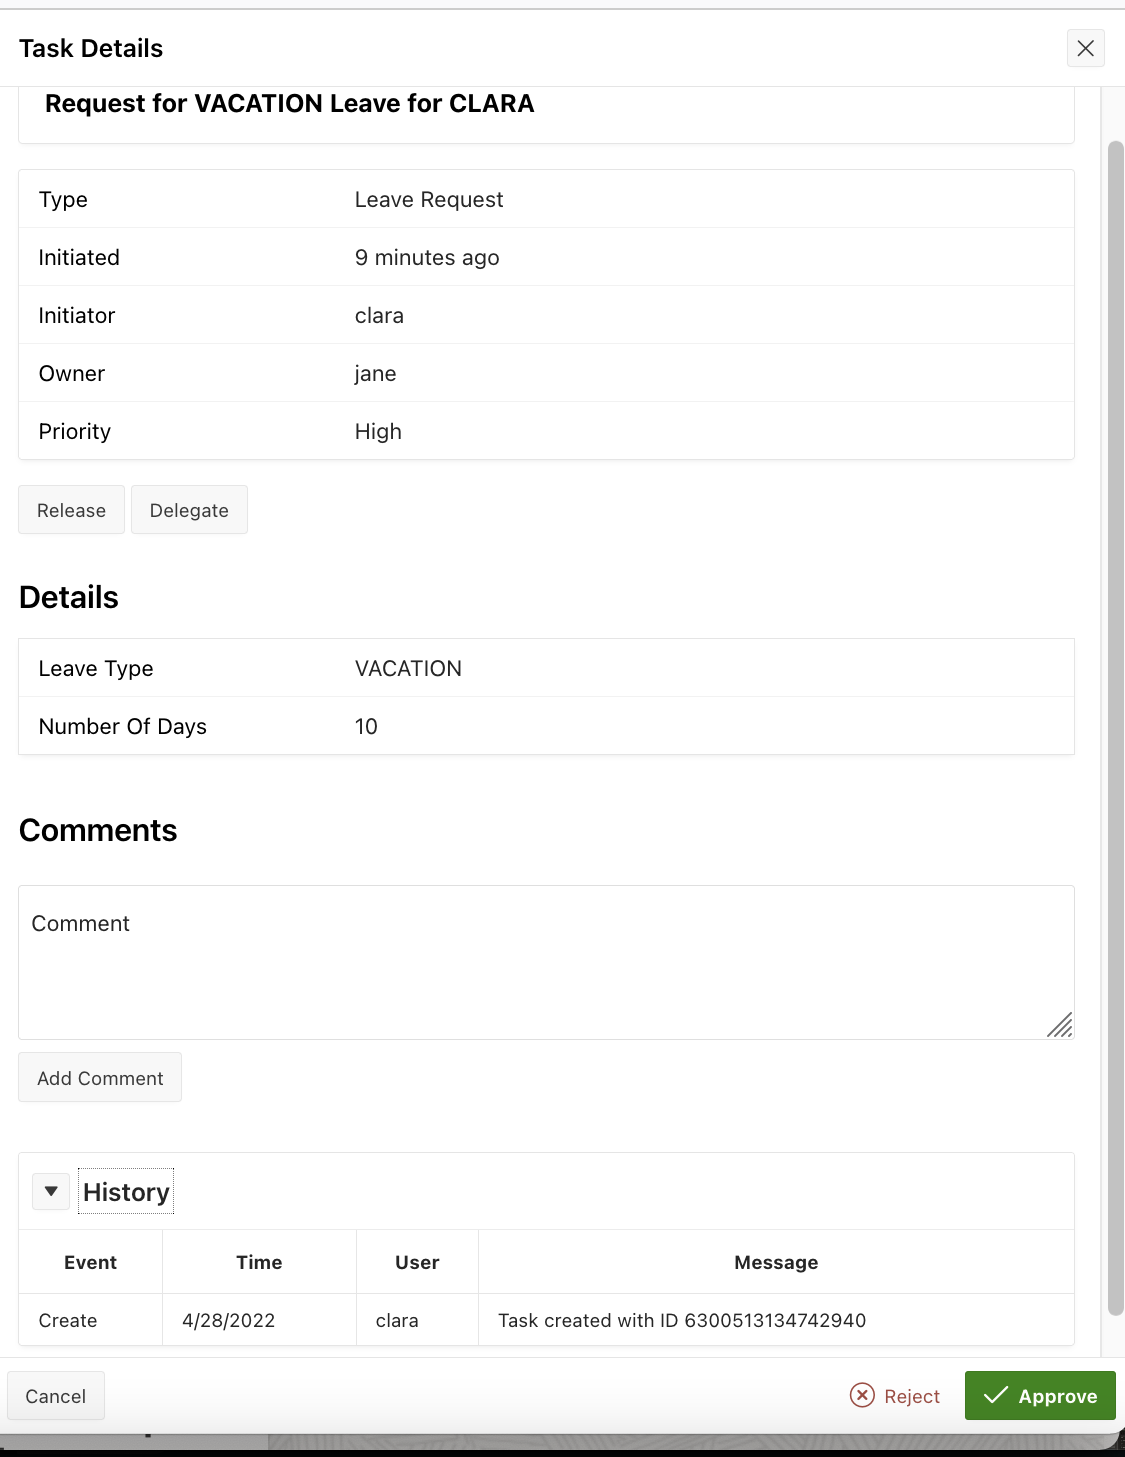
NOTE: The History section shows the progress of the task so far. The Details section shows the values of the task parameters that were configured in the Leave Request Task Definition
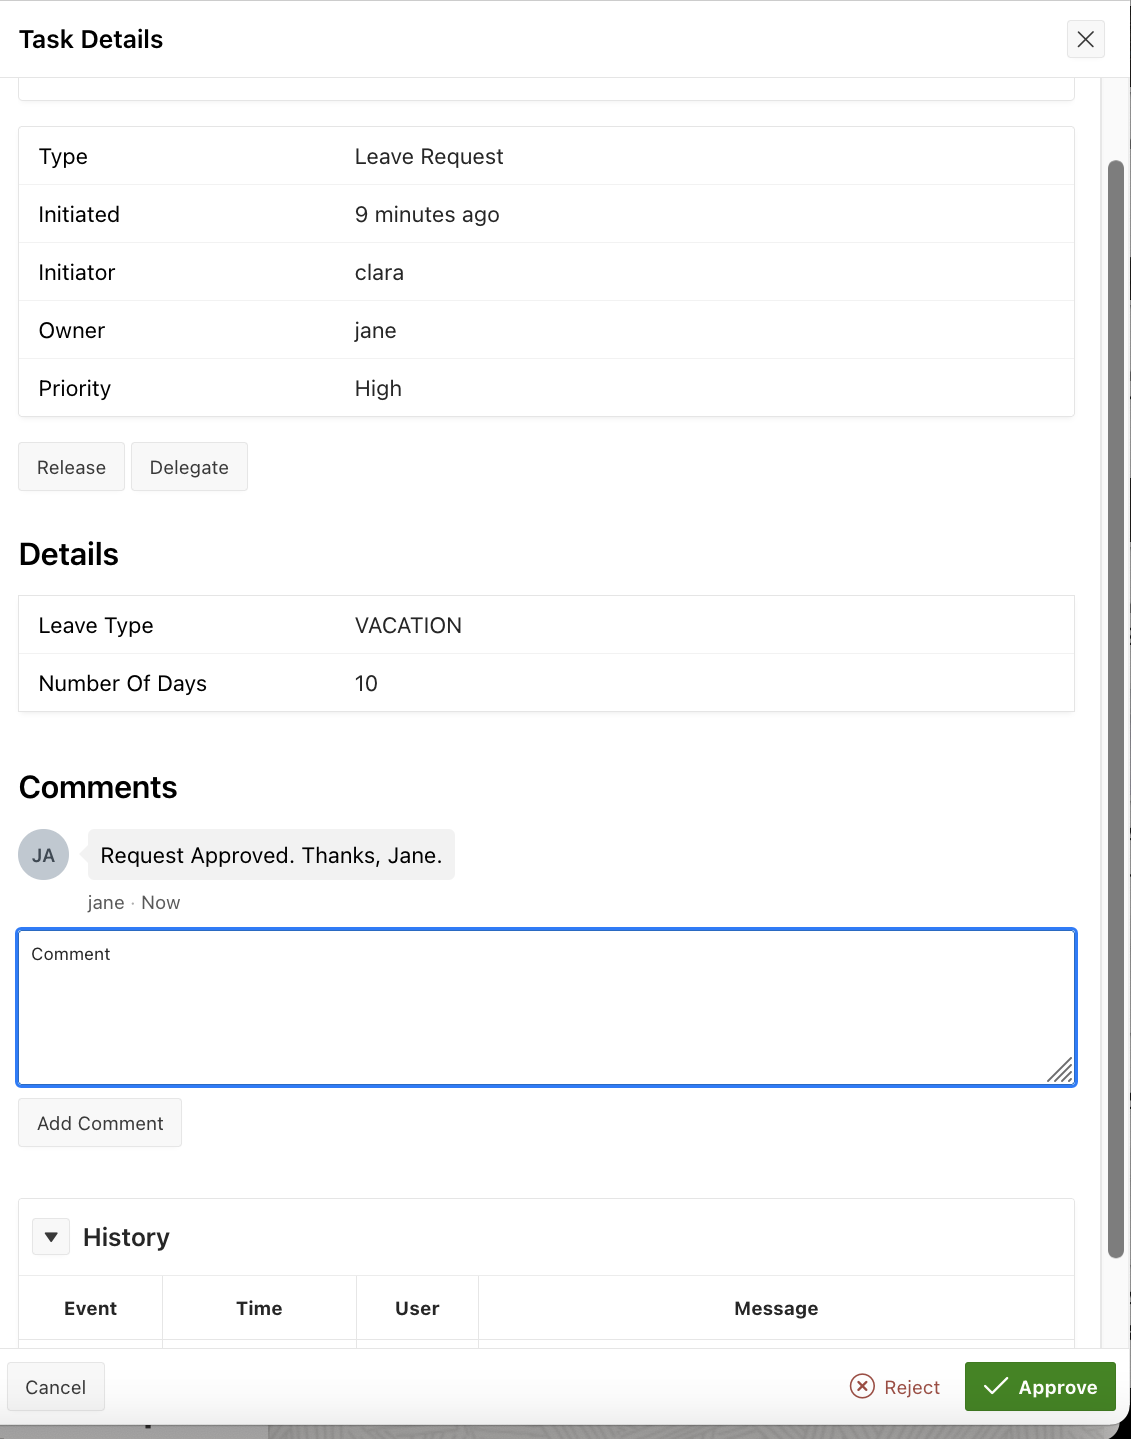
Let’s Add a Comment from Jane in the Comments section saying that the request is approved. And then click on Approve to approve the task.
Once the task is Approved, it disappears from Jane’s My Approvals page. Log out and Log back in as Clara and navigate to the My Requests page. The task is shown to be in Completed state.
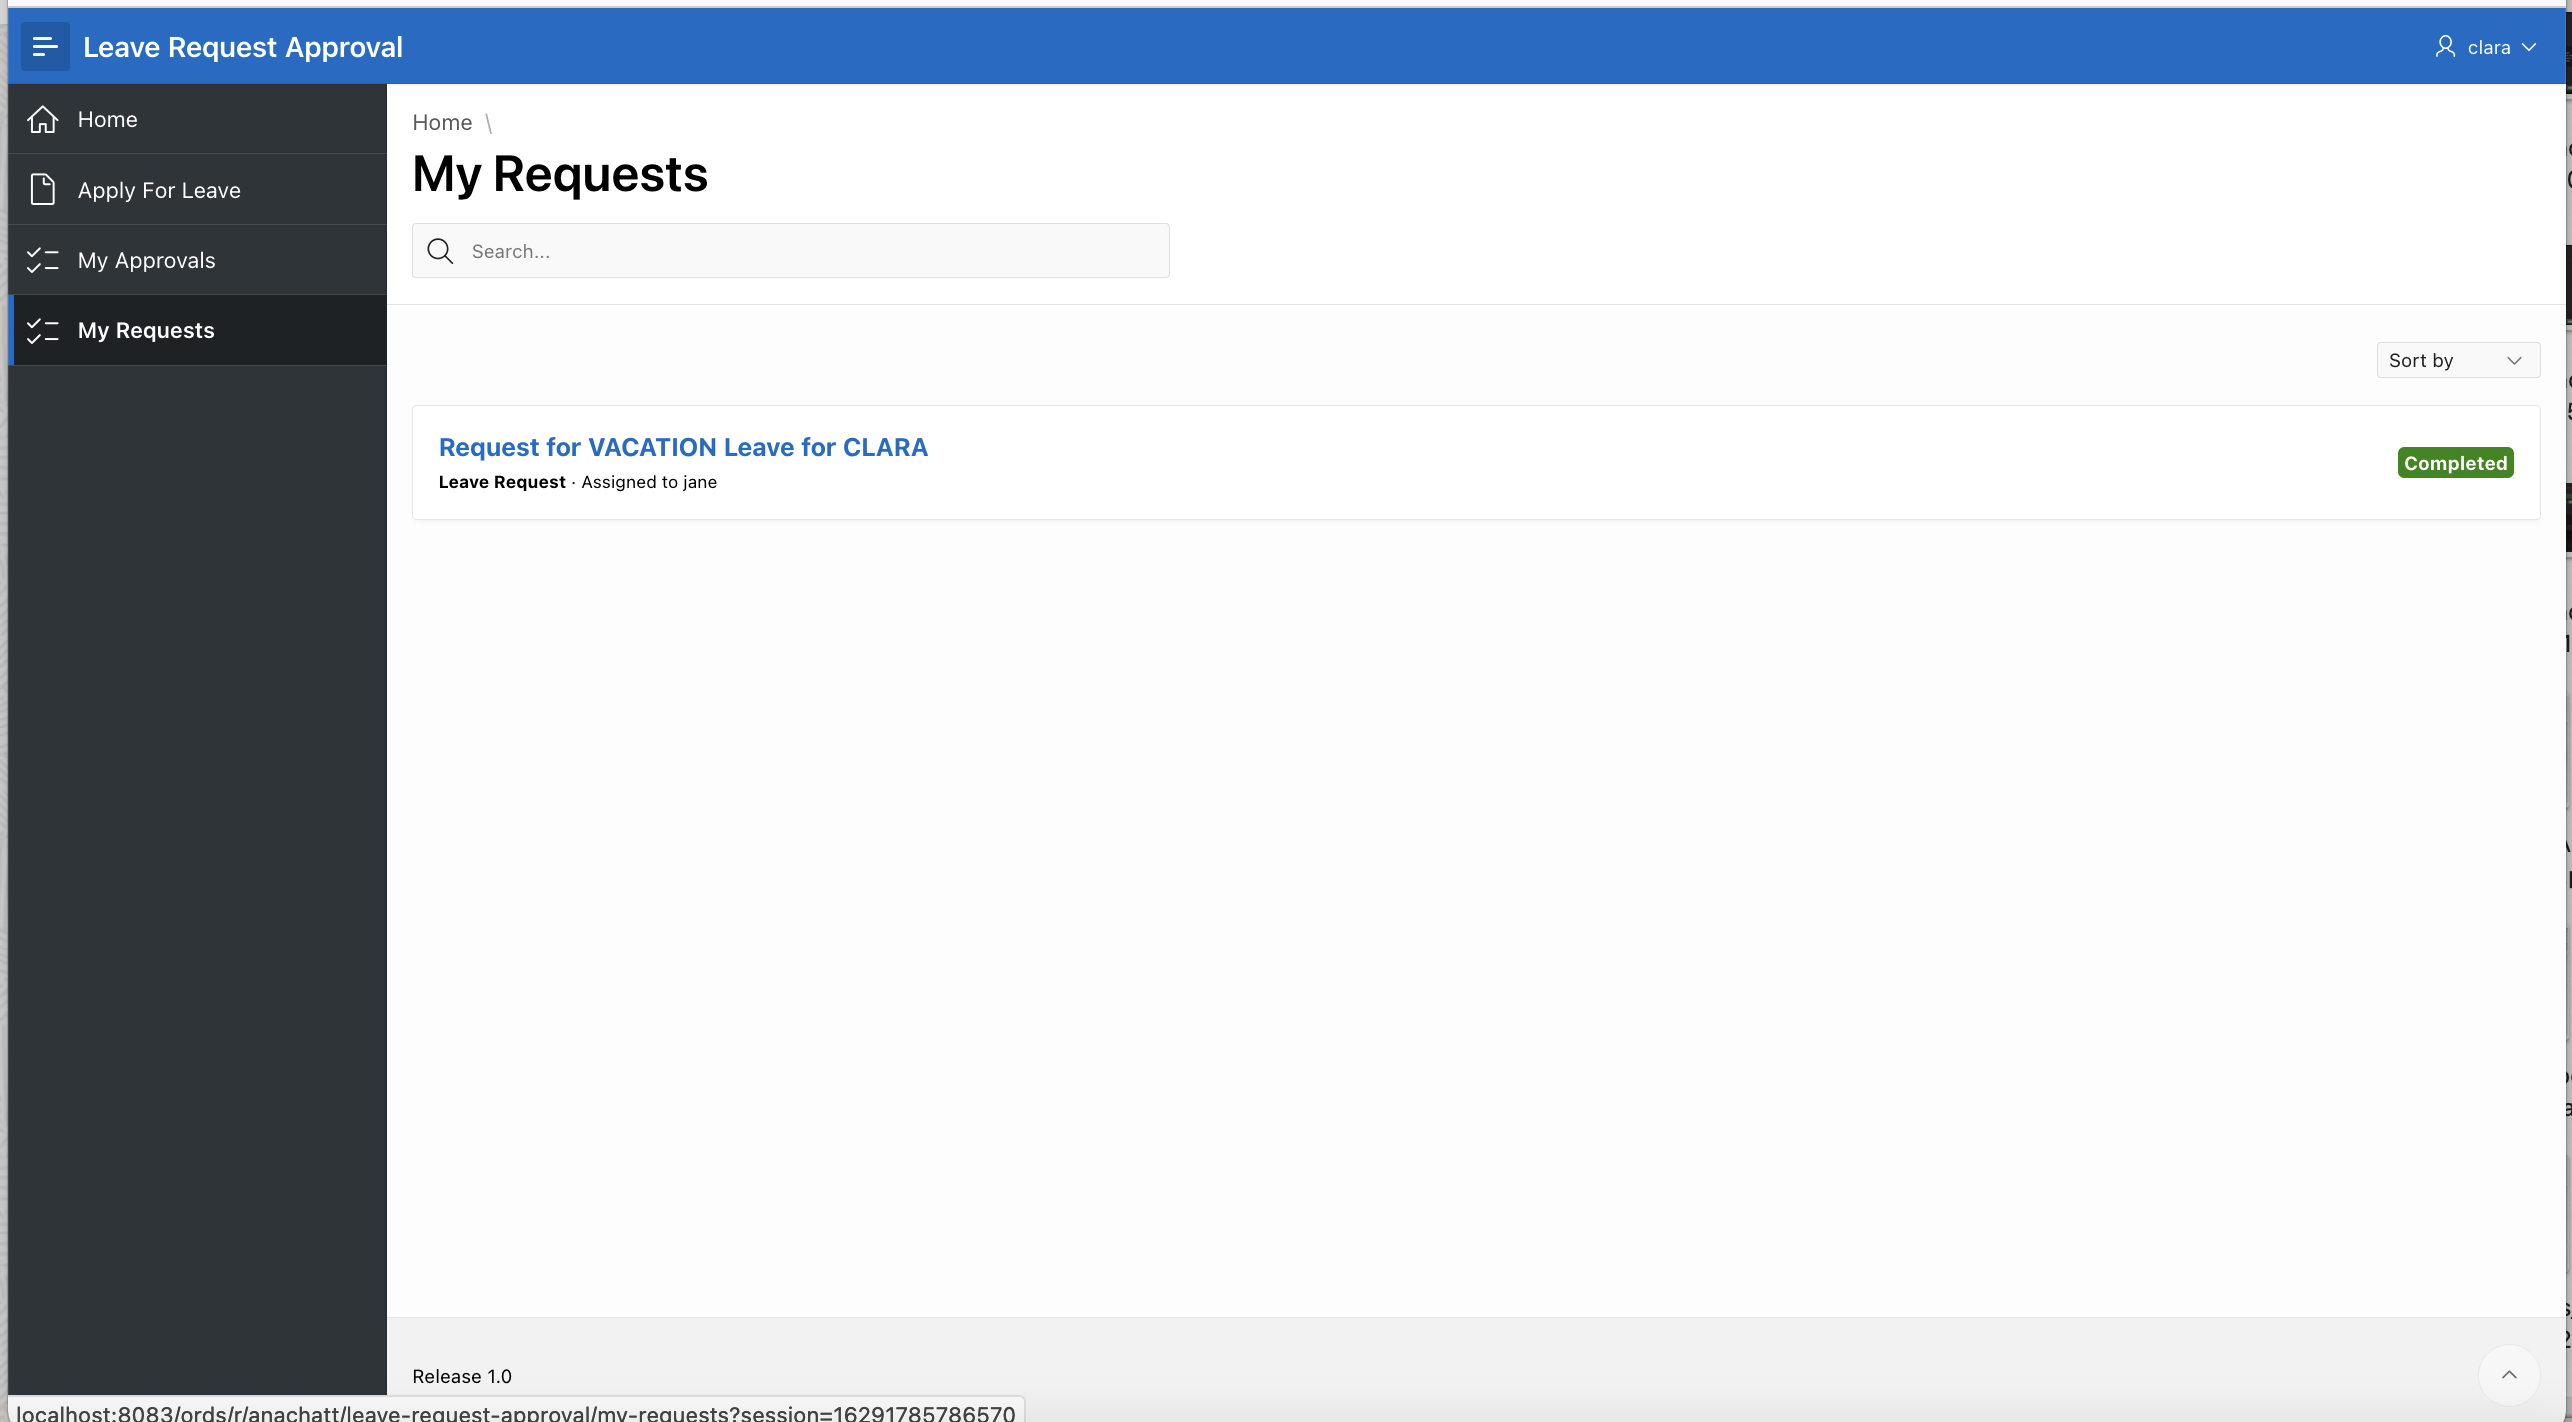
Clicking on the task, opens the Details Page which shows the comments and history with the outcome of the task i.e Approved.
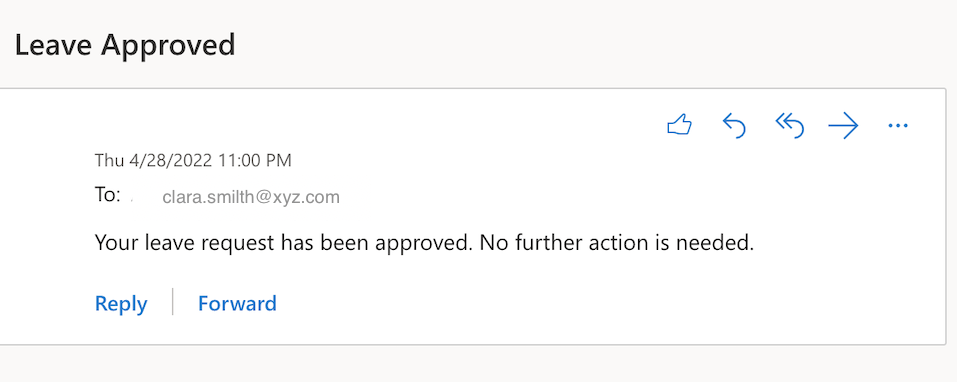
Clara also receives an email saying that her leave got approved.
This completes the introduction to the Approvals Component series.
Summary
What we have learnt
1) Approvals Component concepts and terminology.
2) How to create a Simple Approvals Application using task definition and unified task lists.
3) How to Approve or Reject requests using the Unified Task List and Task Details pages.
What’s Next?
In the following part of this series , we will further enhance this Application and learn how to
1) Claim, Delegate, Release and Update Priority of tasks.
2) How to work on Admin Only tasks.
3) How to add actions to update an Employee’s Leave Balance when the Leave is approved.
Stay Tuned….