Continuing with the Workflow
Now that we have defined the Approval and Action tasks, let us go back to the Doctor Appointment Workflow and resume from where we left.
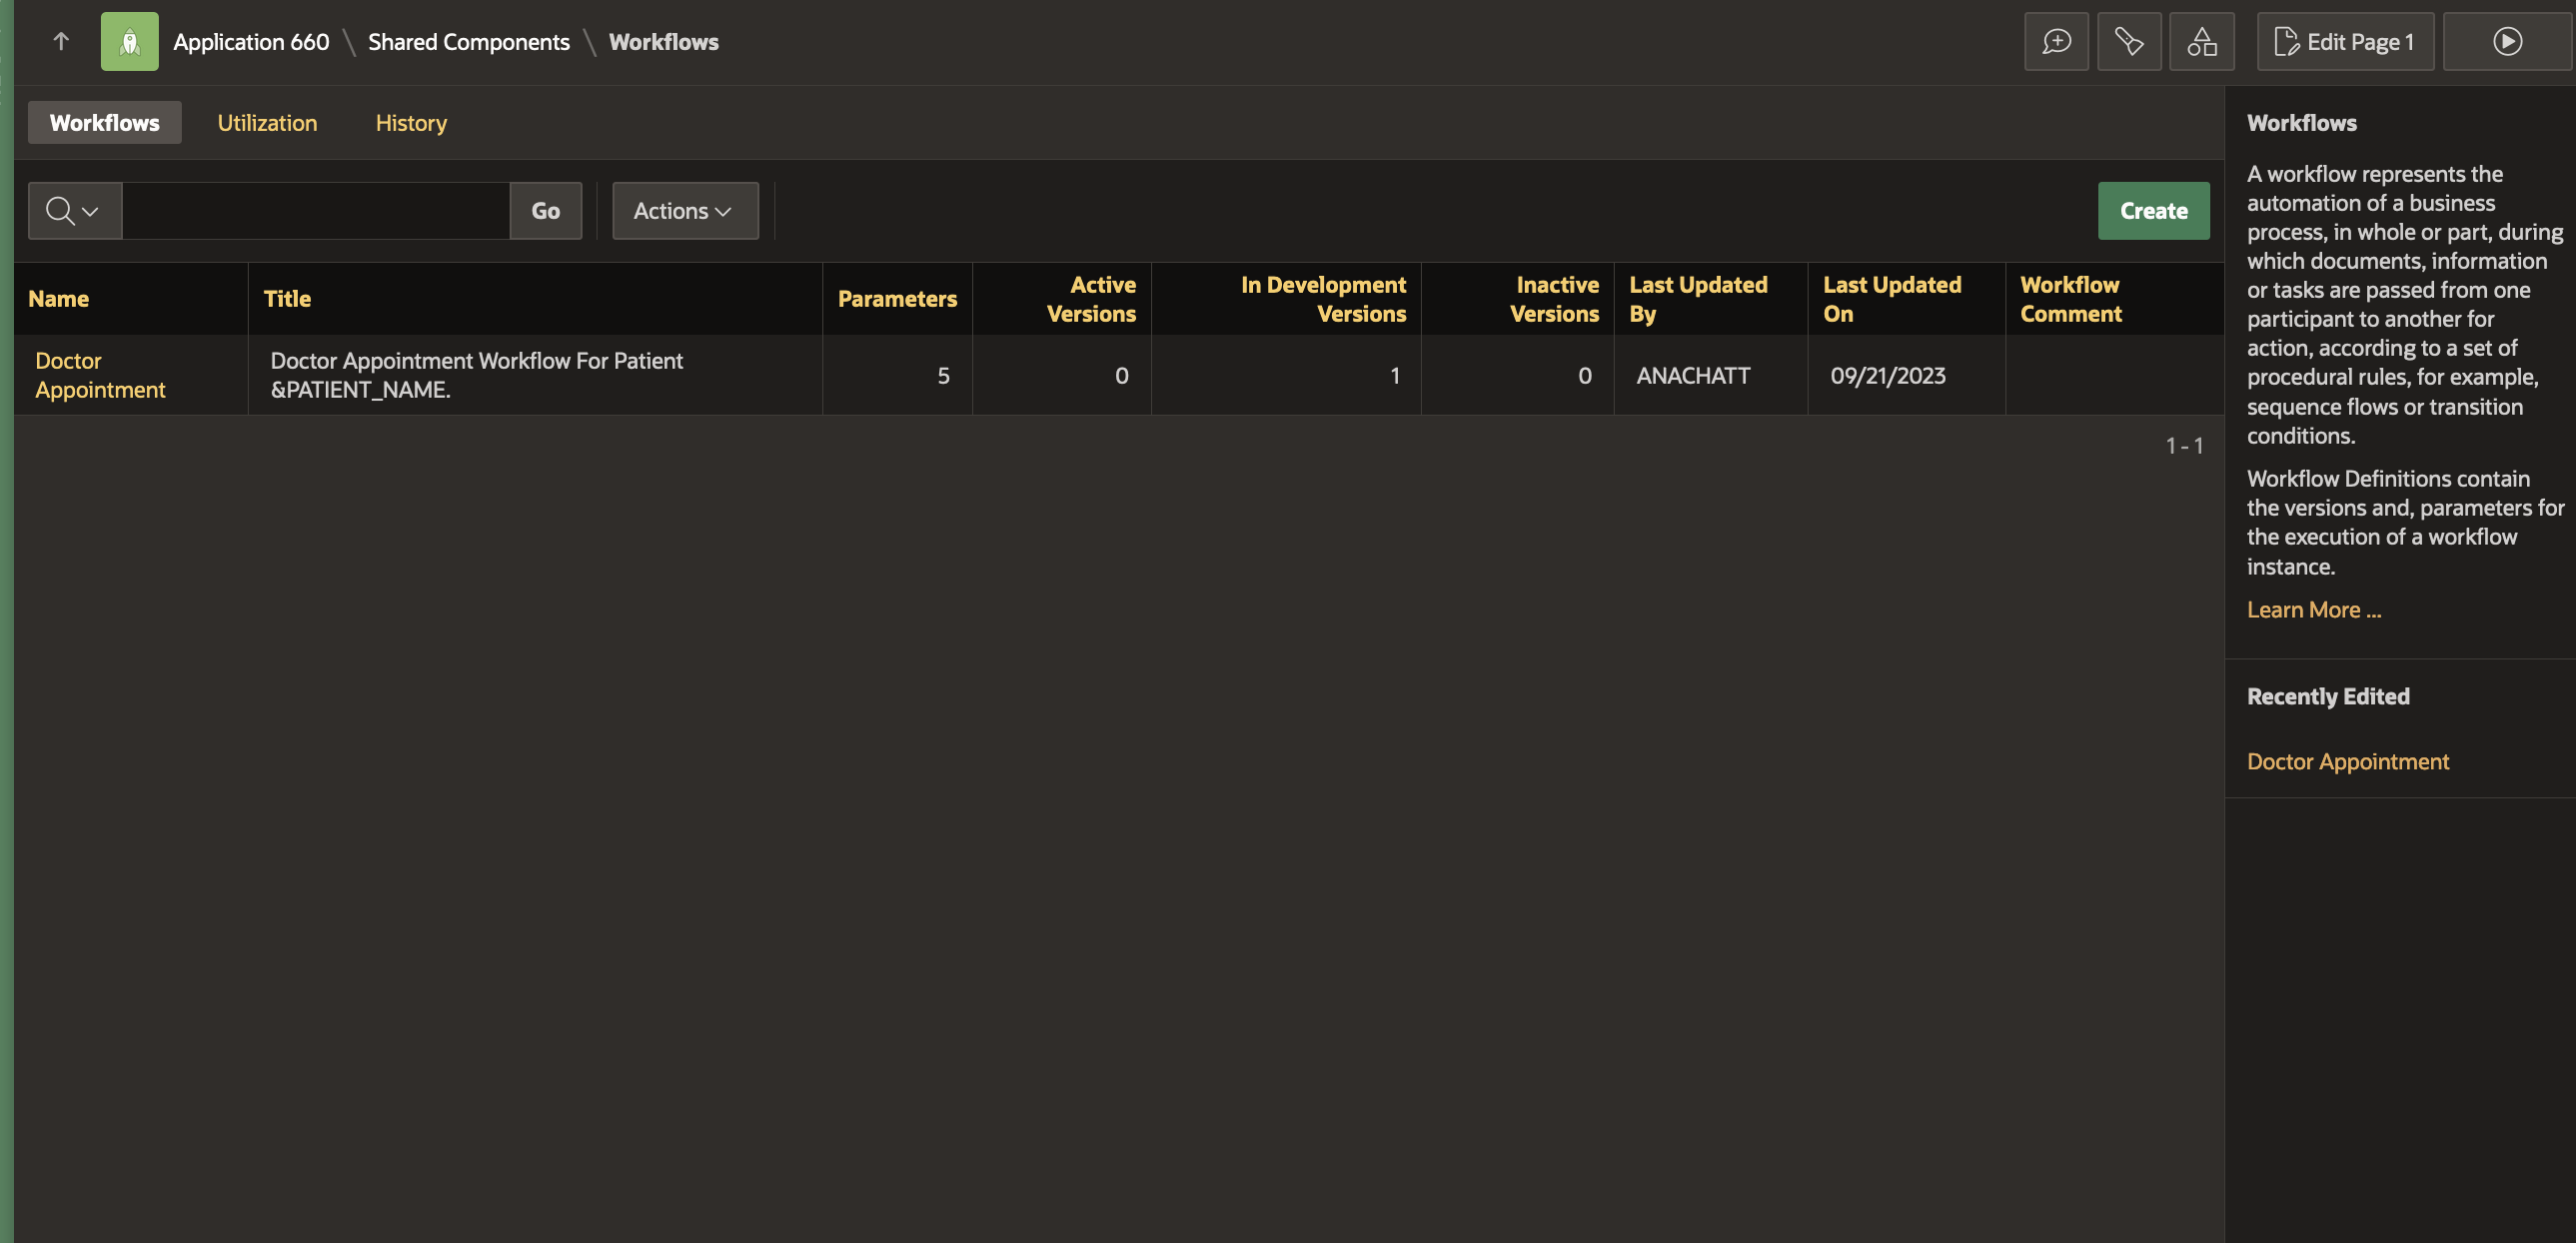
Go to Shared Components -> Workflows and Automations -> Workflows.
On the Workflows Page, click on the Doctor Appointment link. It will take you to the Workflow Designer.
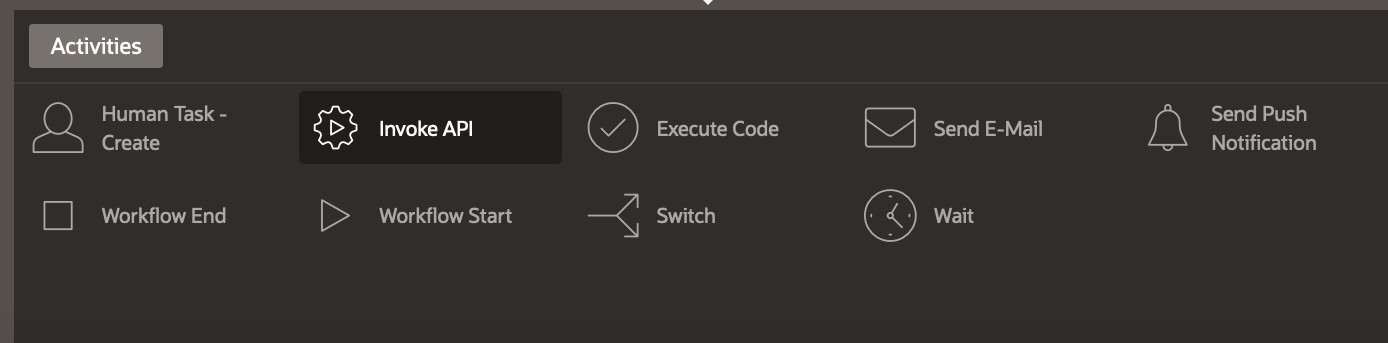
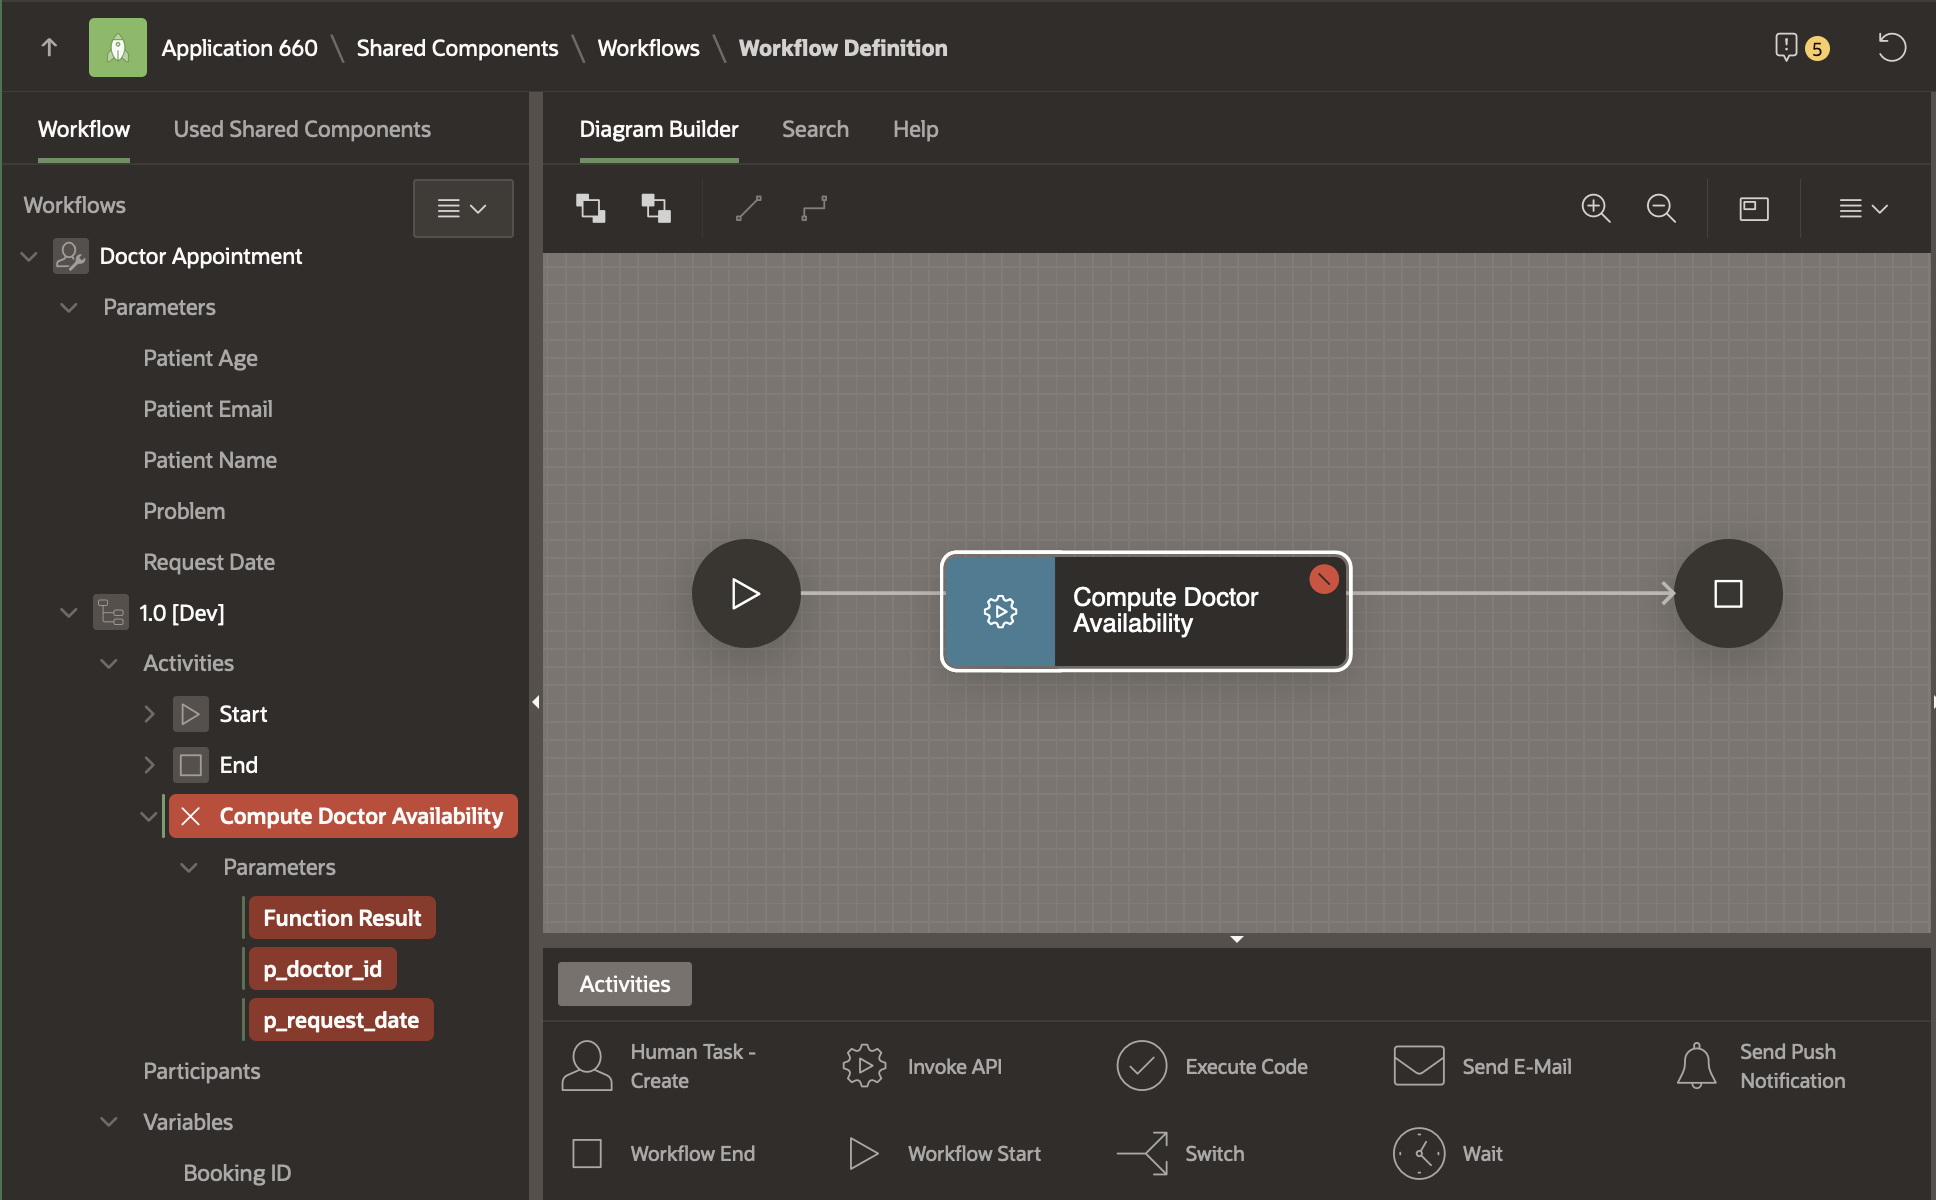
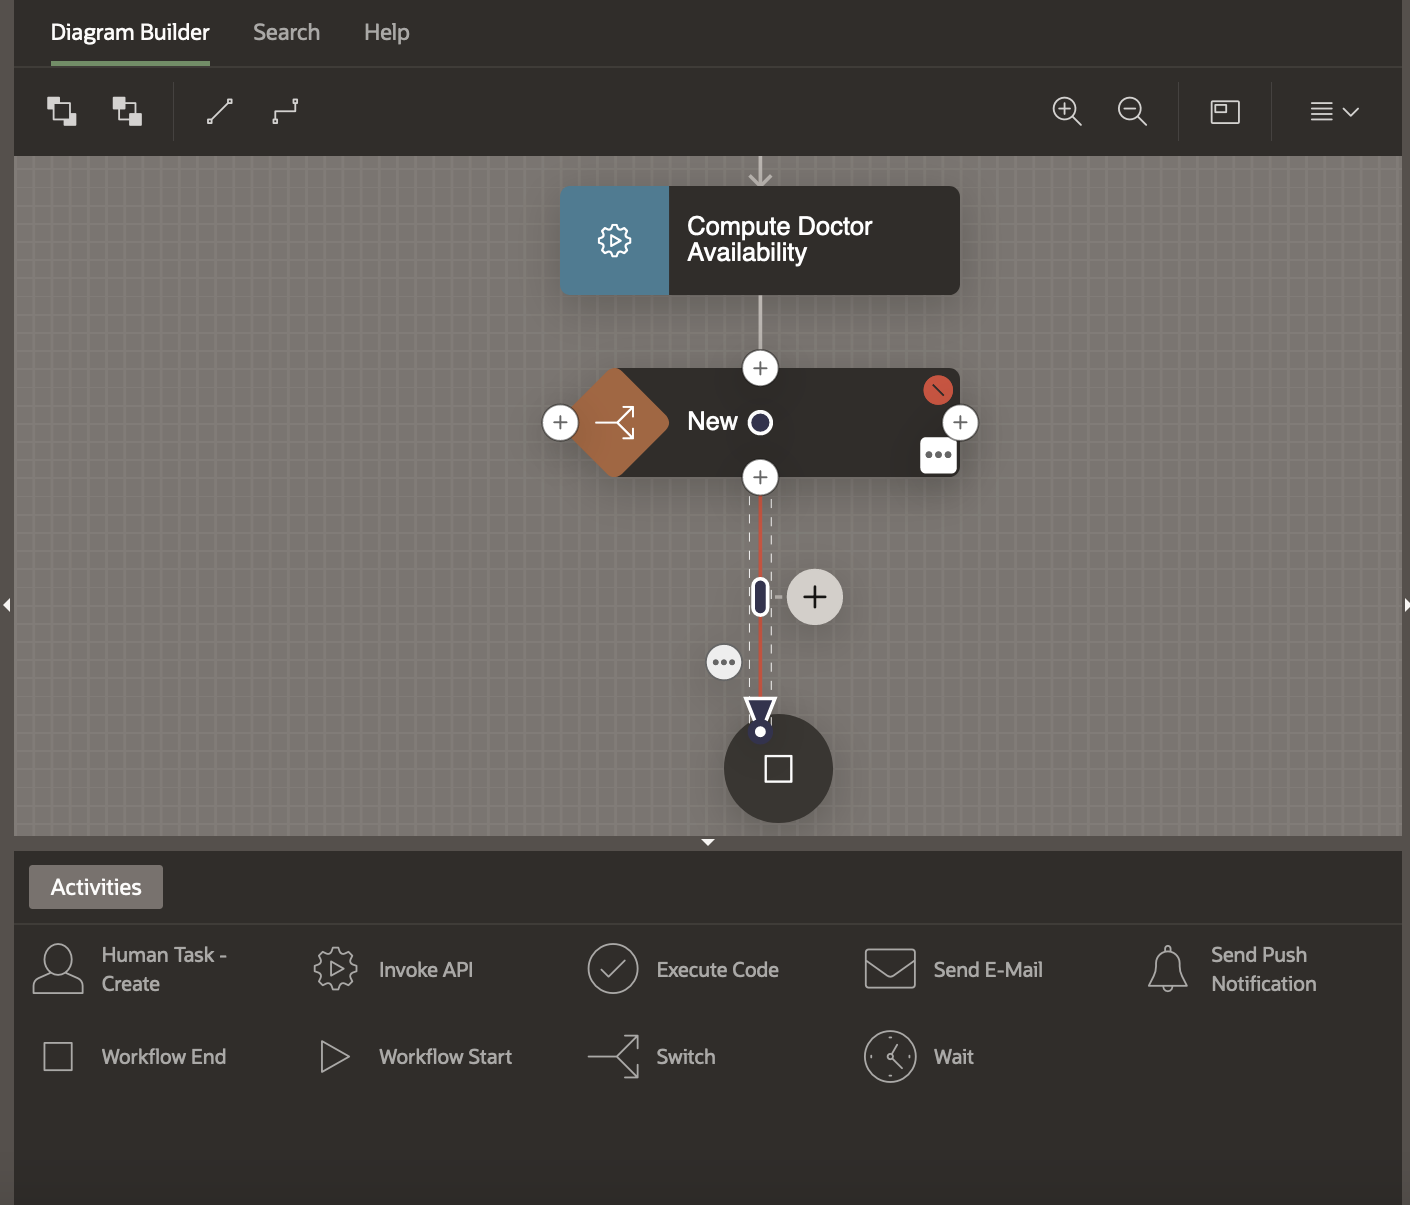
From the Activities Palette, Drag an Invoke API Activity into the Diagram Builder area and drop it on the connection joining the Start and End activities.
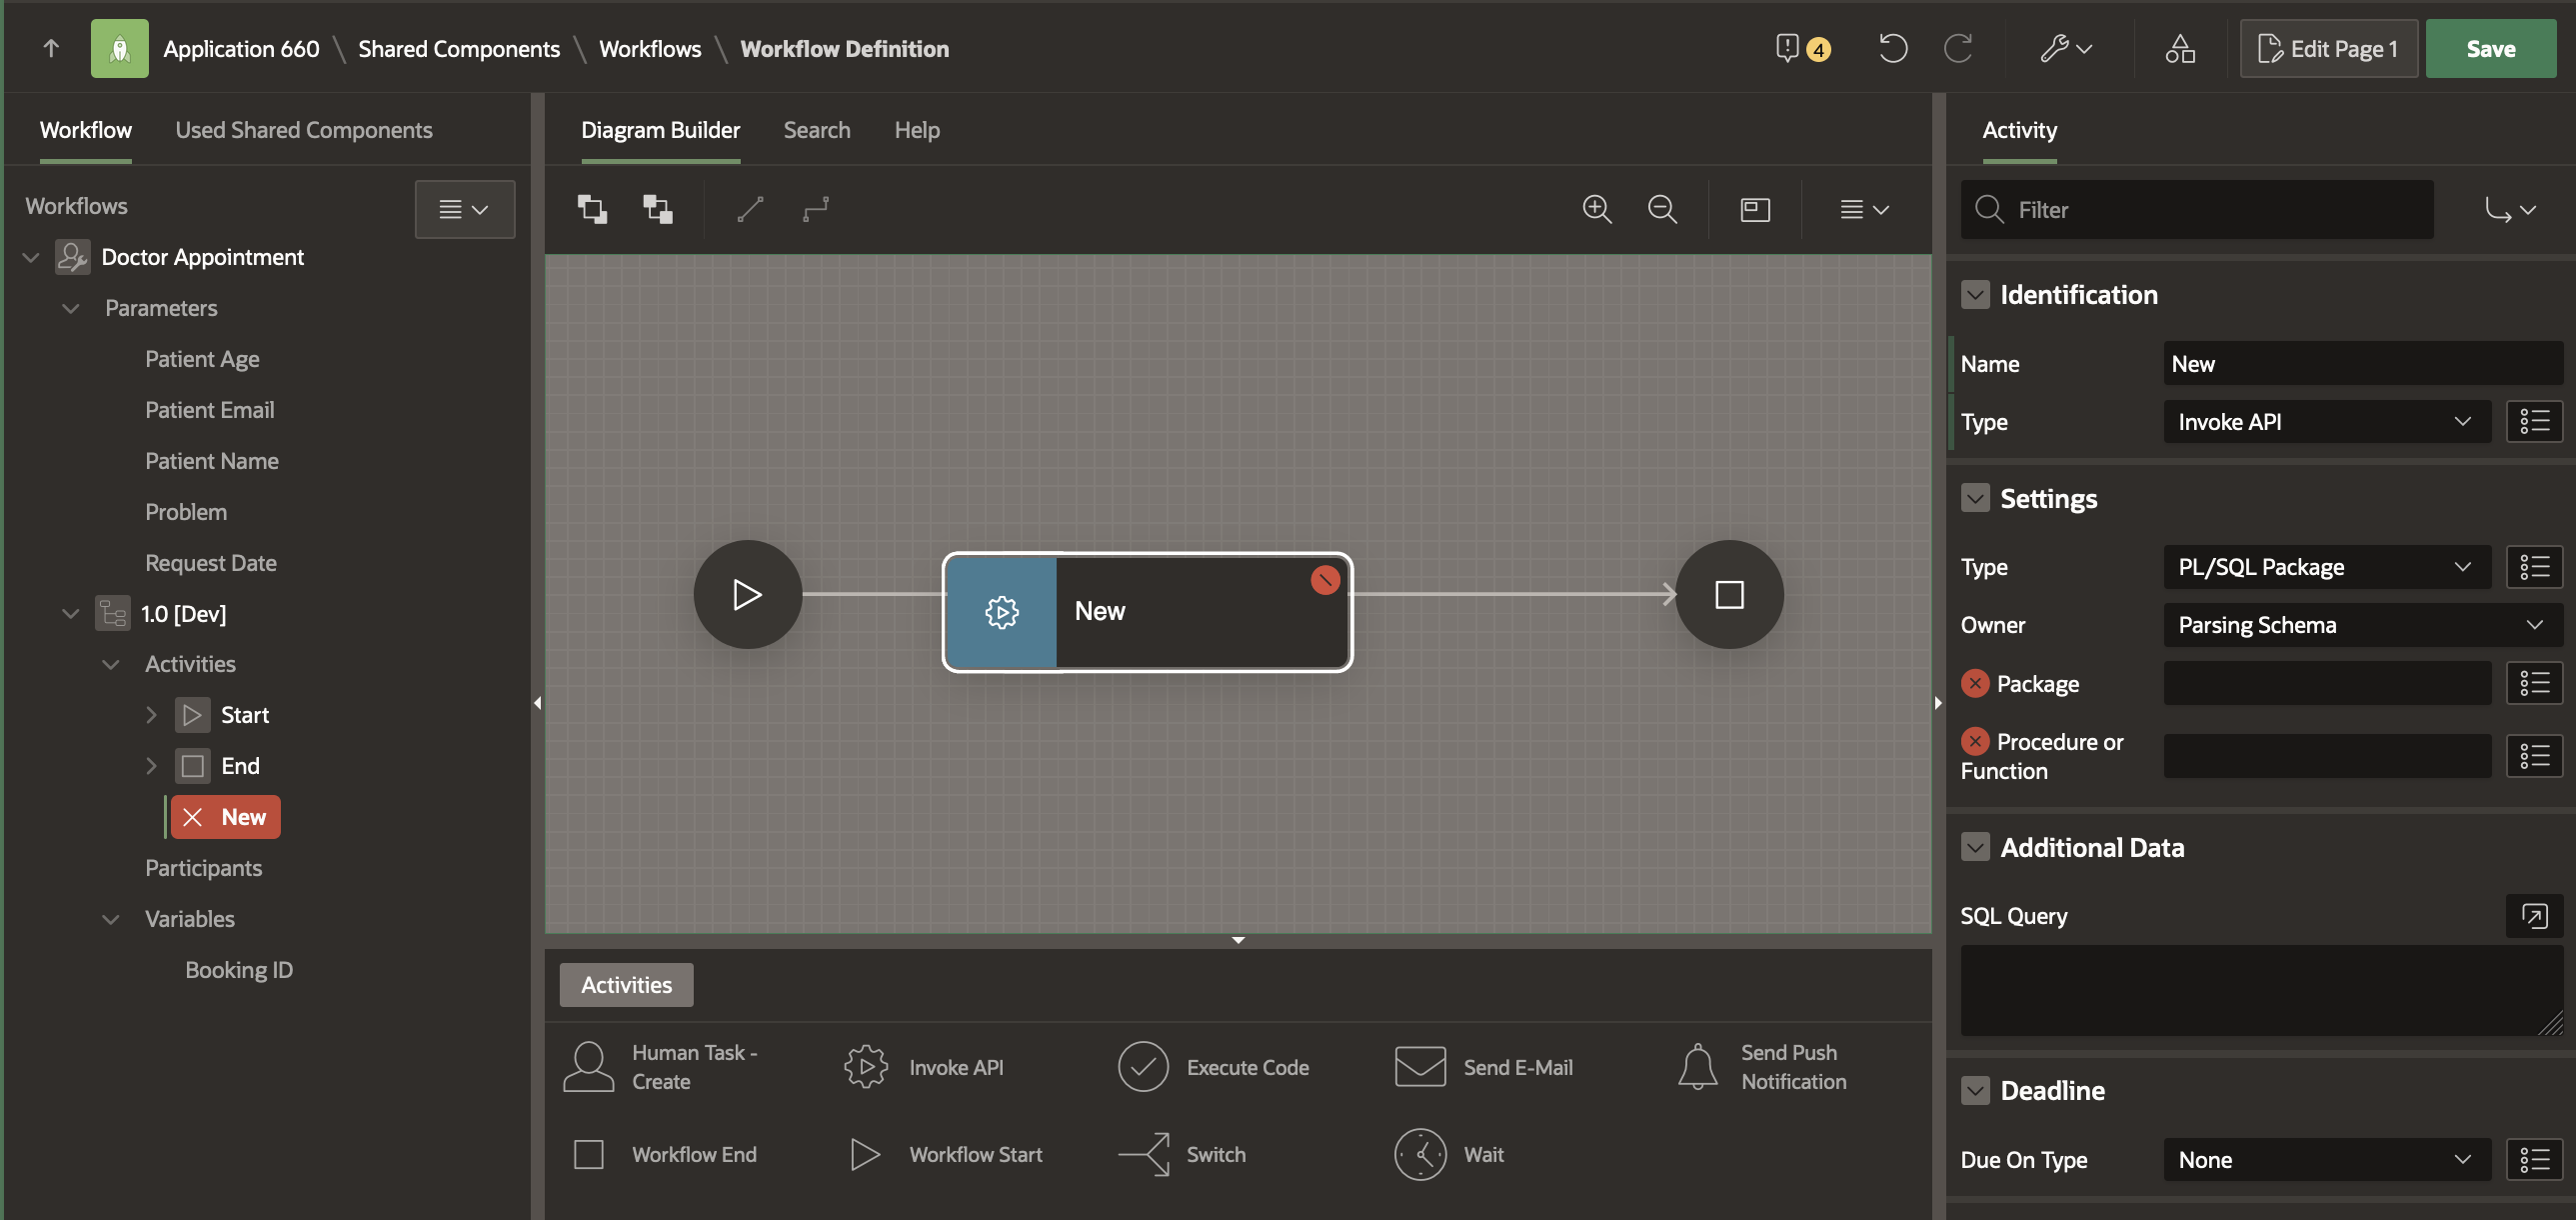
In the Property Editor change the Activity’s name to Compute Doctor Availability . In the Settings section select the Package and Function as shown below.
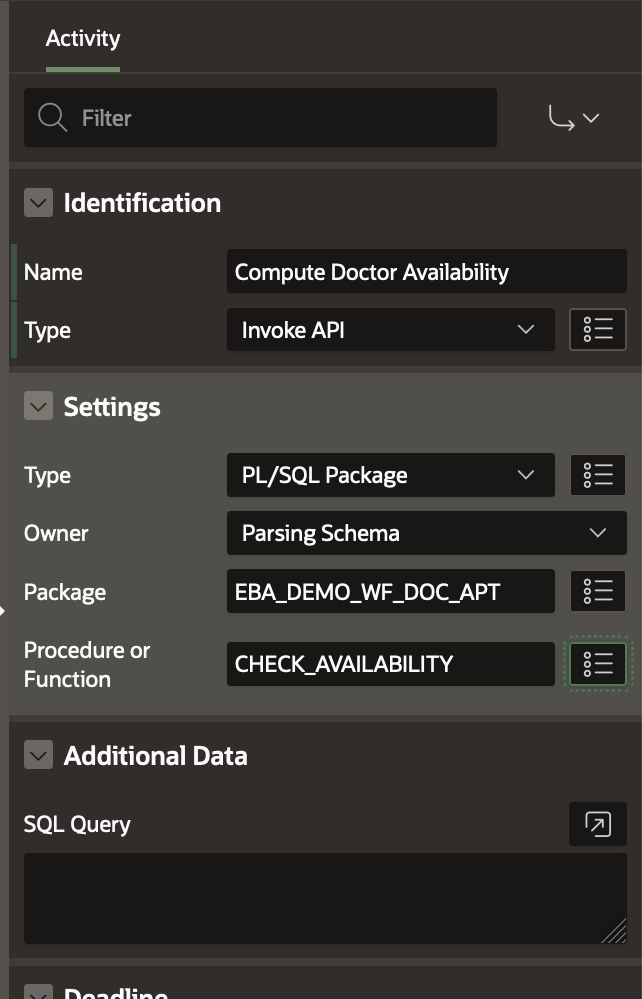
The CHECK_AVAILABILITY function has 3 Parameters, highlighted in RED to show that they are required.
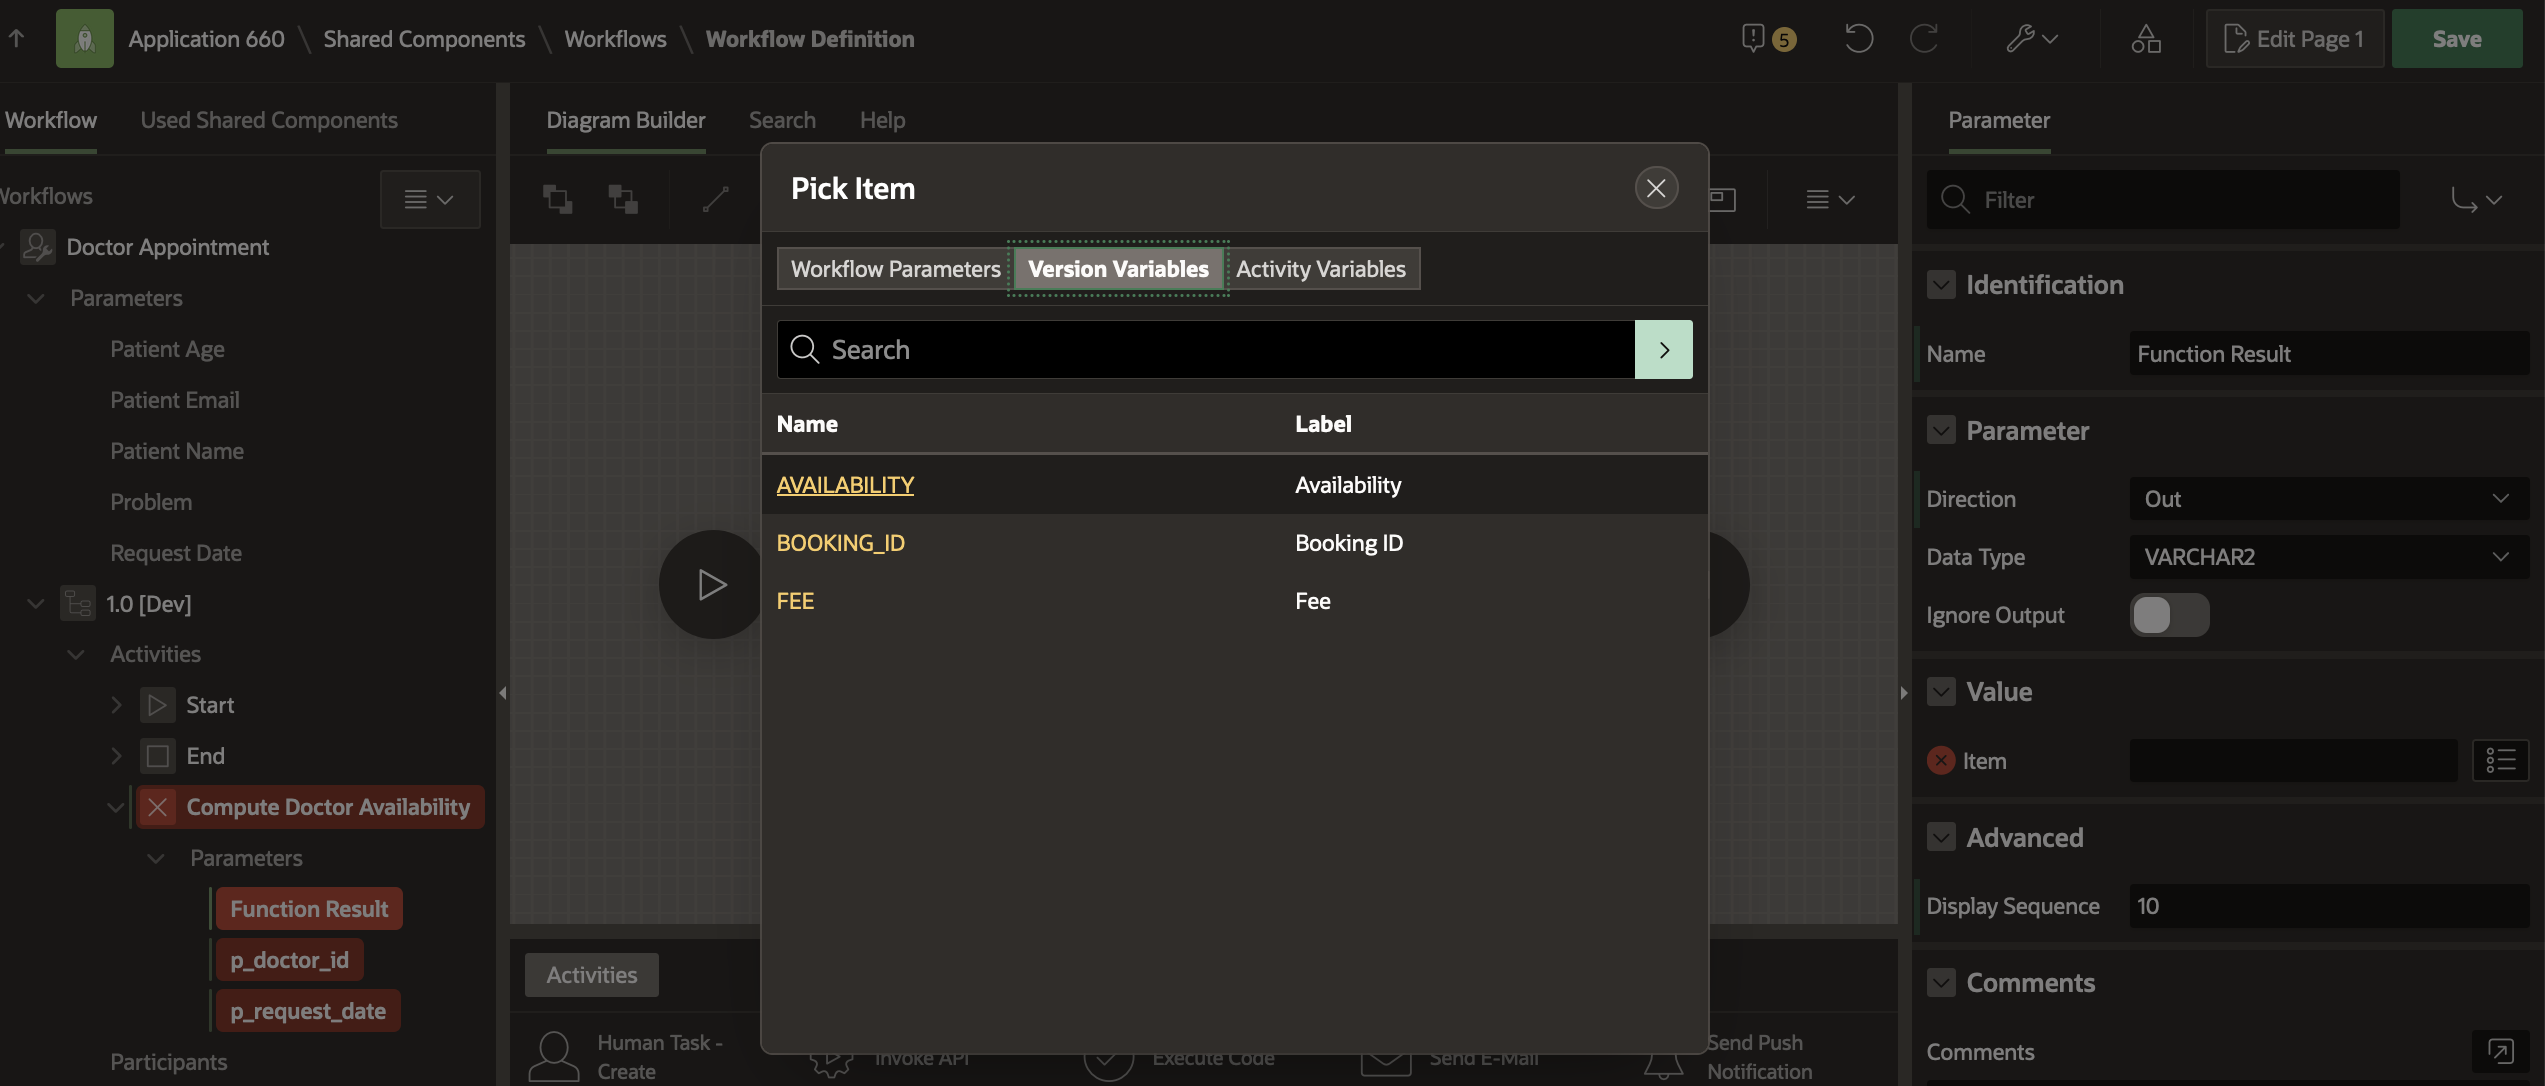
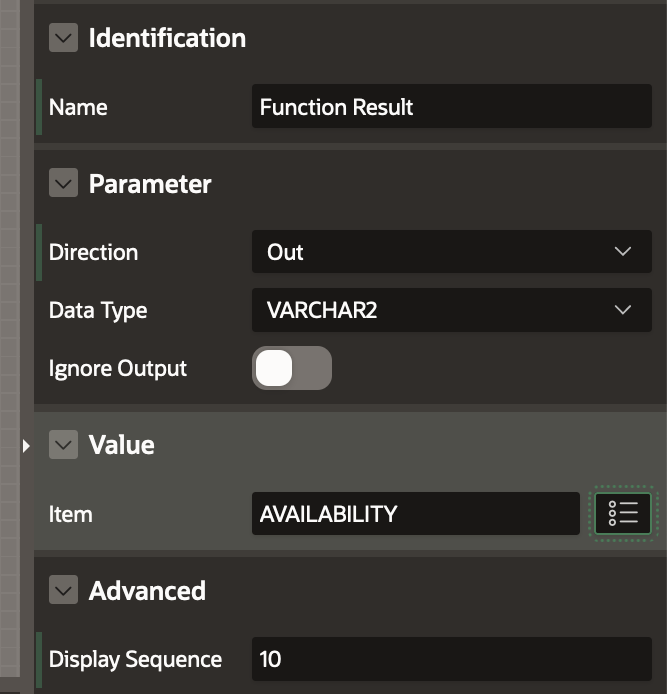
Click on Function Result OUT Parameter and set the Value attribute in the Property Editor to the Workflow Variable AVAILABILITY as shown below.
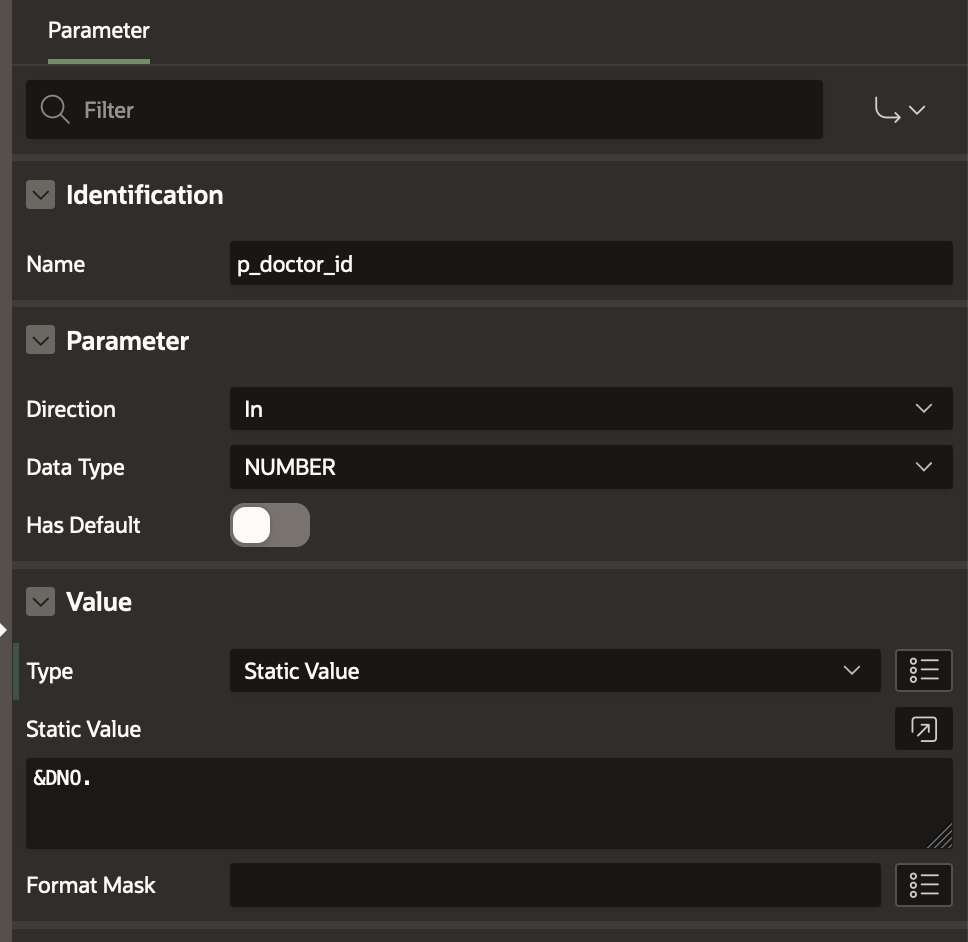
Click on p_doctor_id and set it as the value of the DNO column of the DOCTOR Table to &DNO. as shown below. Note that we had earlier defined DOCTOR table as Additional Data for this workflow version, which allows us to refer to its column values in this manner.
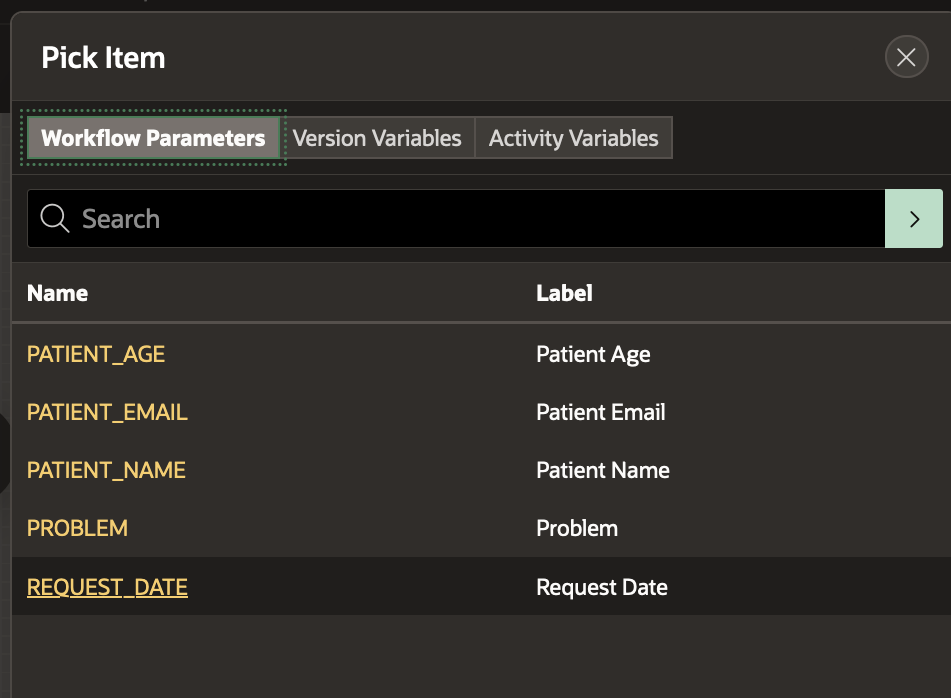
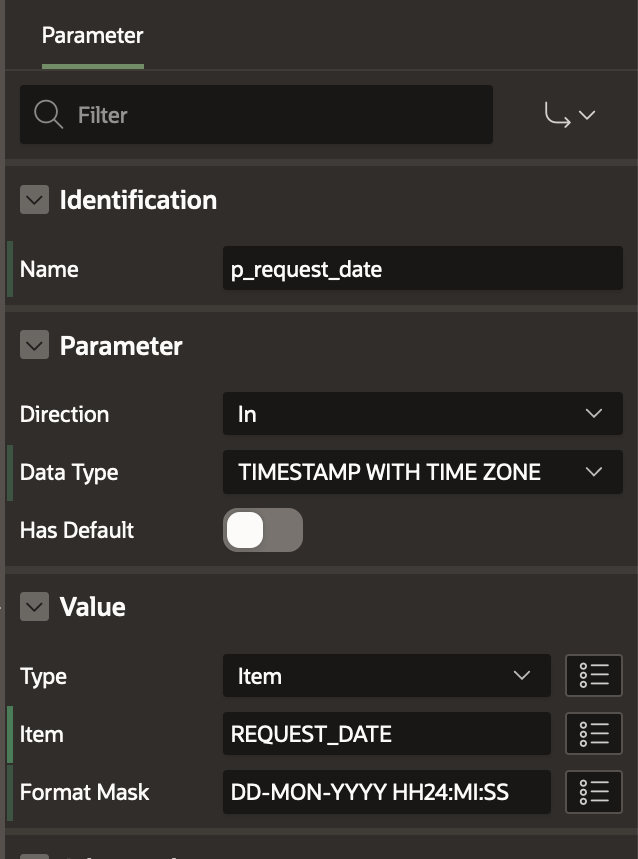
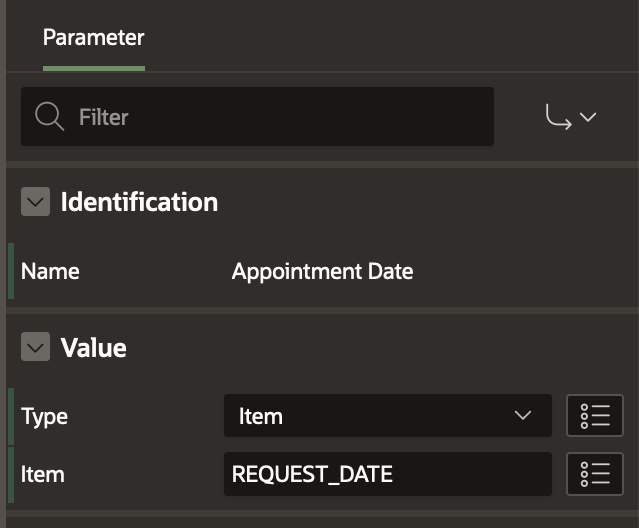
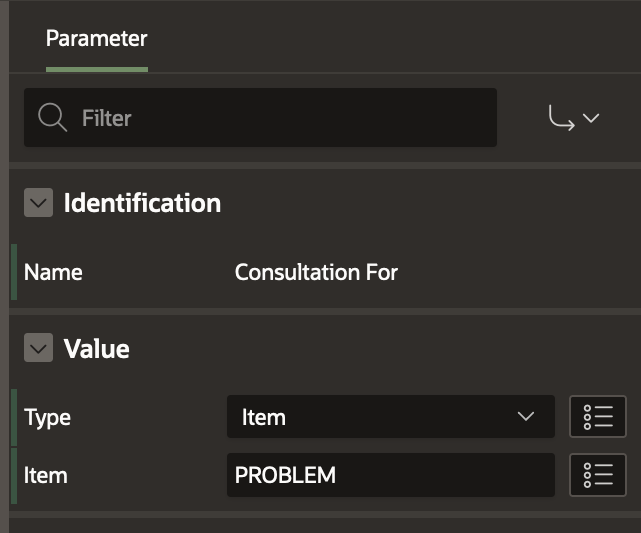
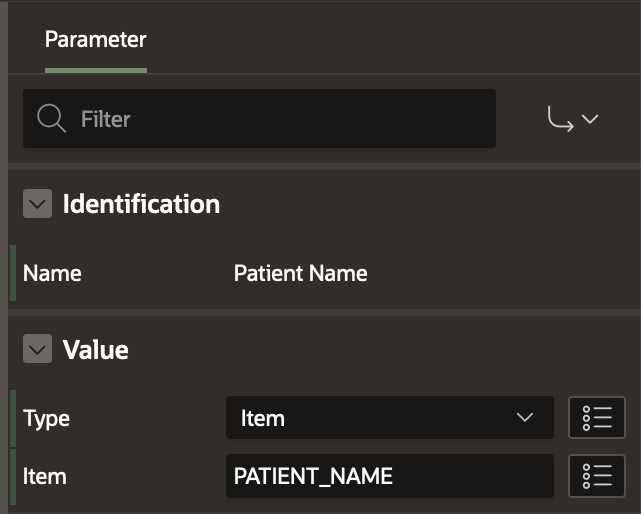
Click on p_request_date and set it to the Workflow Parameter- Request Date, using the Item Picker, as shown below. Also specify the Format Mask as shown.
Save the changes by clicking on the Save Button. The Activity upon execution will determine if the doctor is available or engaged at the requested date and time by consulting the Appointment schedule. Refer to check_availability function in Package EBA_DEMO_WF_DOC_APT .
Using the Workflow Switch Activity
Based on the Doctor’s availability, the workflow needs to branch conditionally.
Drag and Drop a Switch Activity on the connection between the Compute Doctor Availability and the End Activities.
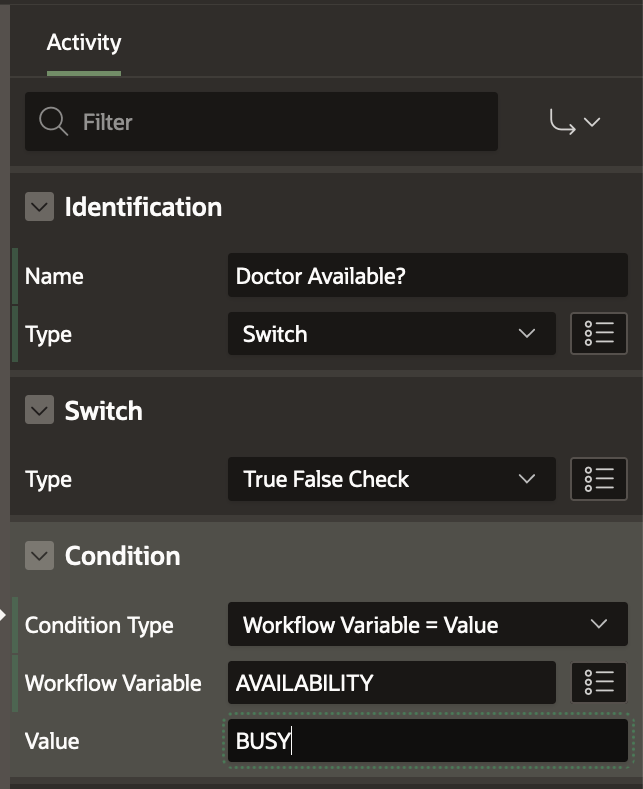
In the Property Editor, make the following changes
- Select the Condition Type as Workflow Variable = Value
- Select the Workflow Variable using the Item Picker. Set it to AVAILABILITY.
- Set the Value as BUSY
Next, we need to create the Conditional Connections (branches) for this Switch Activity. A True False Check Activity typically has a True Branch, False Branch and a Null Branch depending on the evaluation of the Condition.
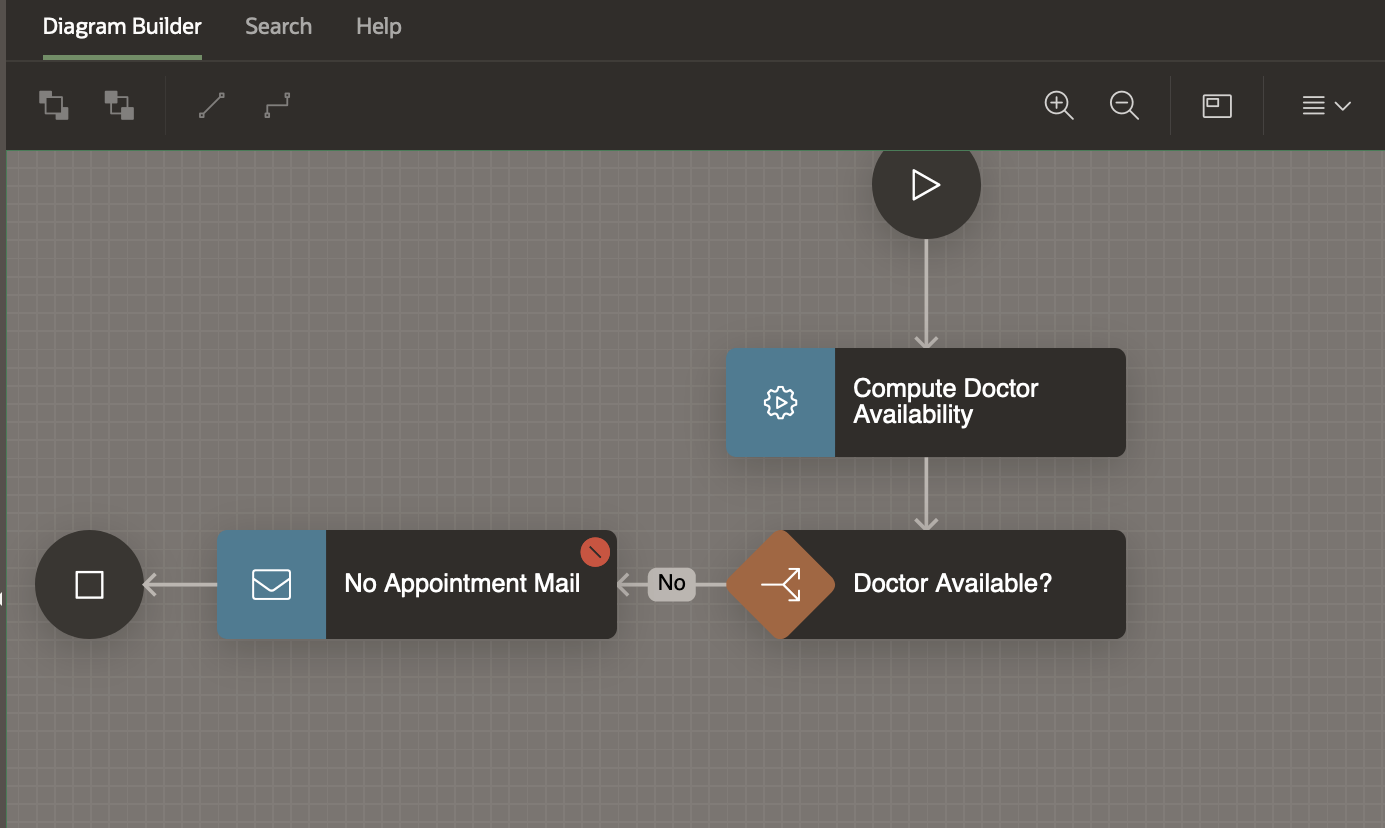
Going by the flowchart created earlier, if AVAILABILITY is set to BUSY, our Workflow sends a No Appointment Mail and terminates the business process. Otherwise it proceeds to Raise an Appointment Request for the Doctor to Approve or Reject.
Select the Connection (Arrow) leading out of the Switch Activity. In the Property Editor set the properties Name to No and When to True.
Drag and Drop a Send E-Mail Activity on the + (Plus) symbol in the middle of the arrow .
Select the Send E-Mail Activity and change its name to No Appointment Mail.
Re-adjust the arrow and the activity by dragging them to the left to make the diagram more aesthetic.
Select the True connection once again and verify that the To attribute in the Property Editor is correctly set to No Appointment Mail.

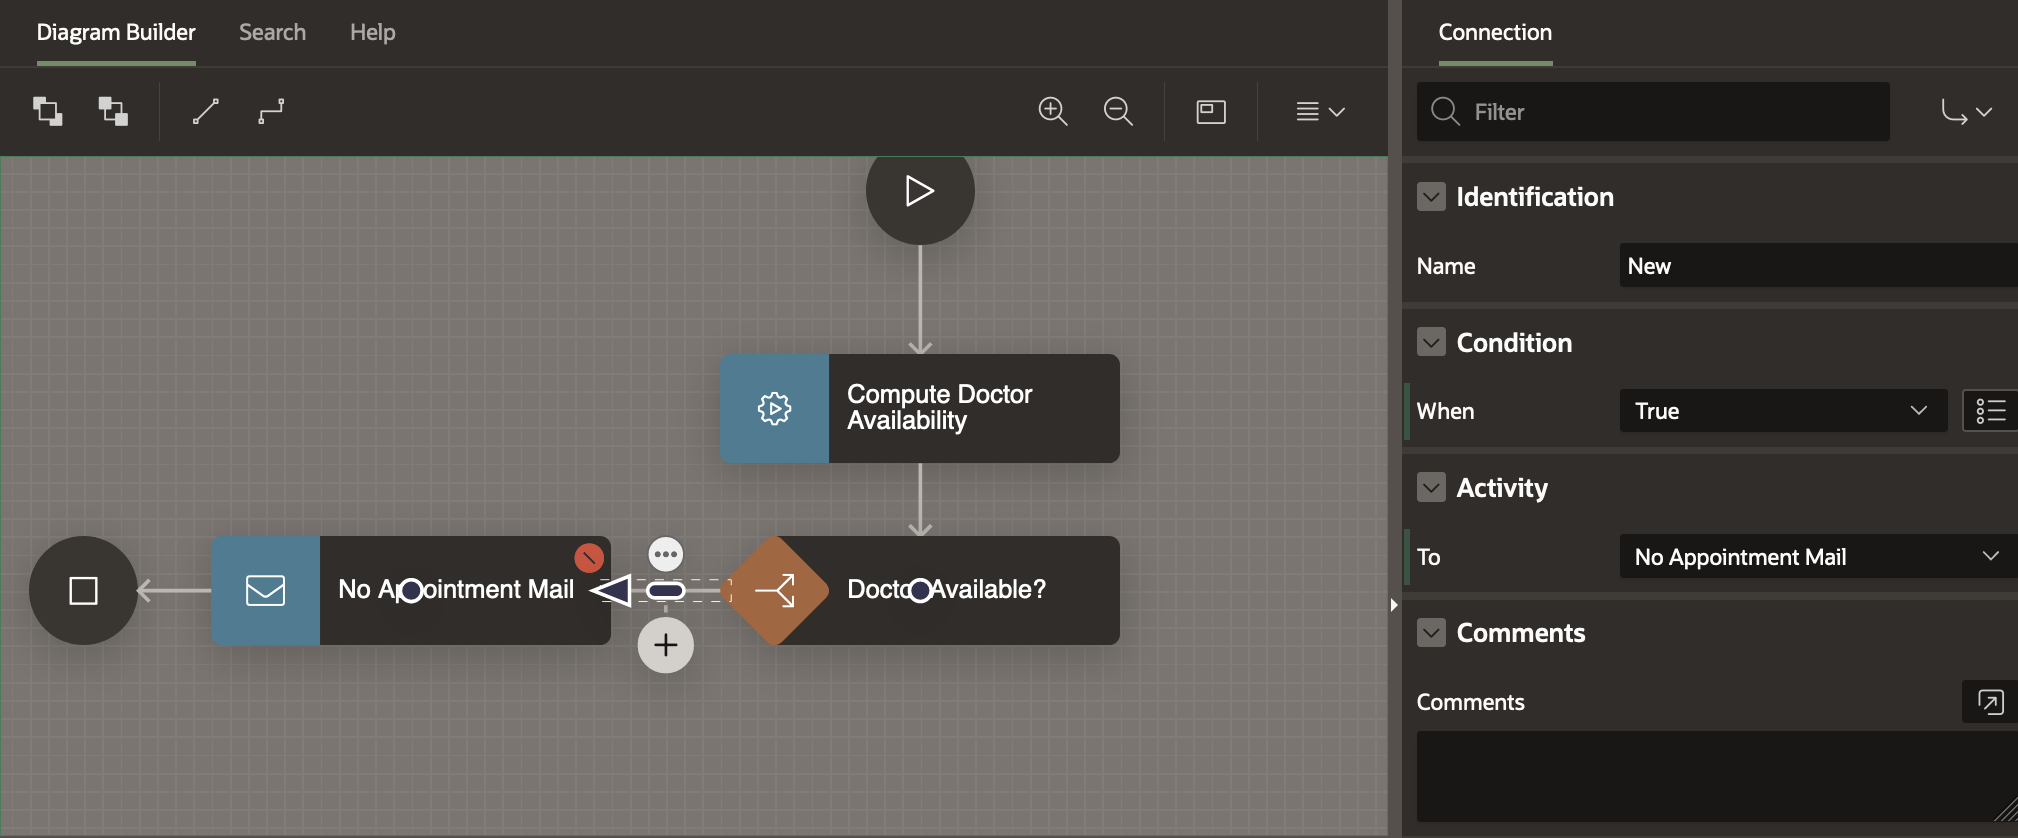
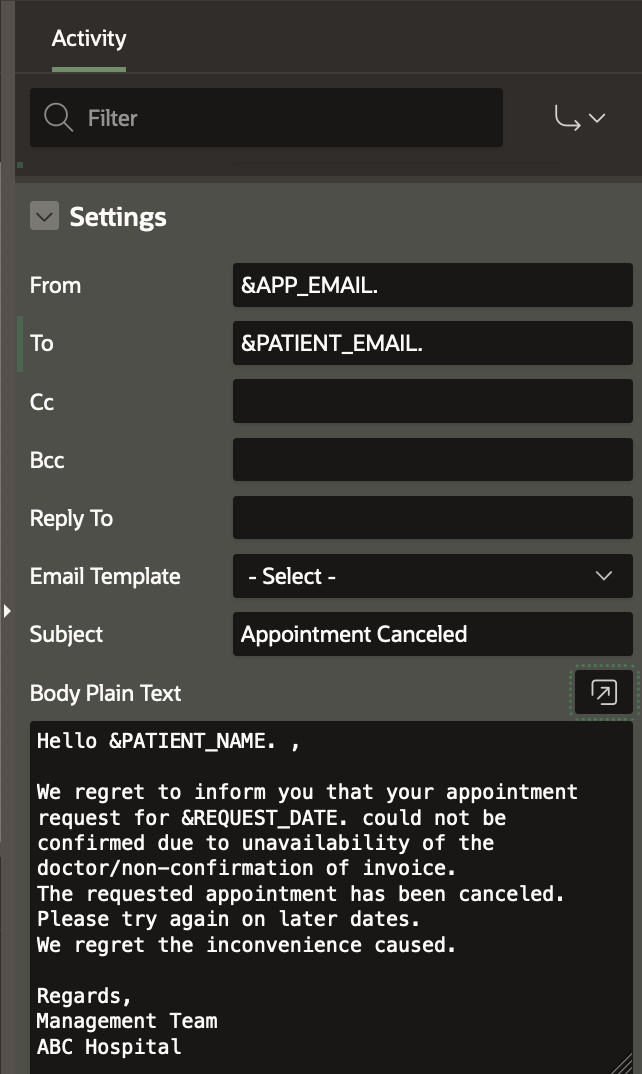
Click on the No Appointment Mail Activity to select it. In the Property Editor Settings Section
- Set To as &PATIENT_EMAIL.
- Set Subject as Appointment Canceled.
- Set the Body Plain Text as
Hello &PATIENT_NAME. ,
We regret to inform you that your appointment request for &REQUEST_DATE. could not be confirmed due to unavailability of the doctor/non-confirmation of invoice.
The requested appointment has been canceled.
Please try again on later dates.
We regret the inconvenience caused.
Regards,
Management Team
ABC Hospital
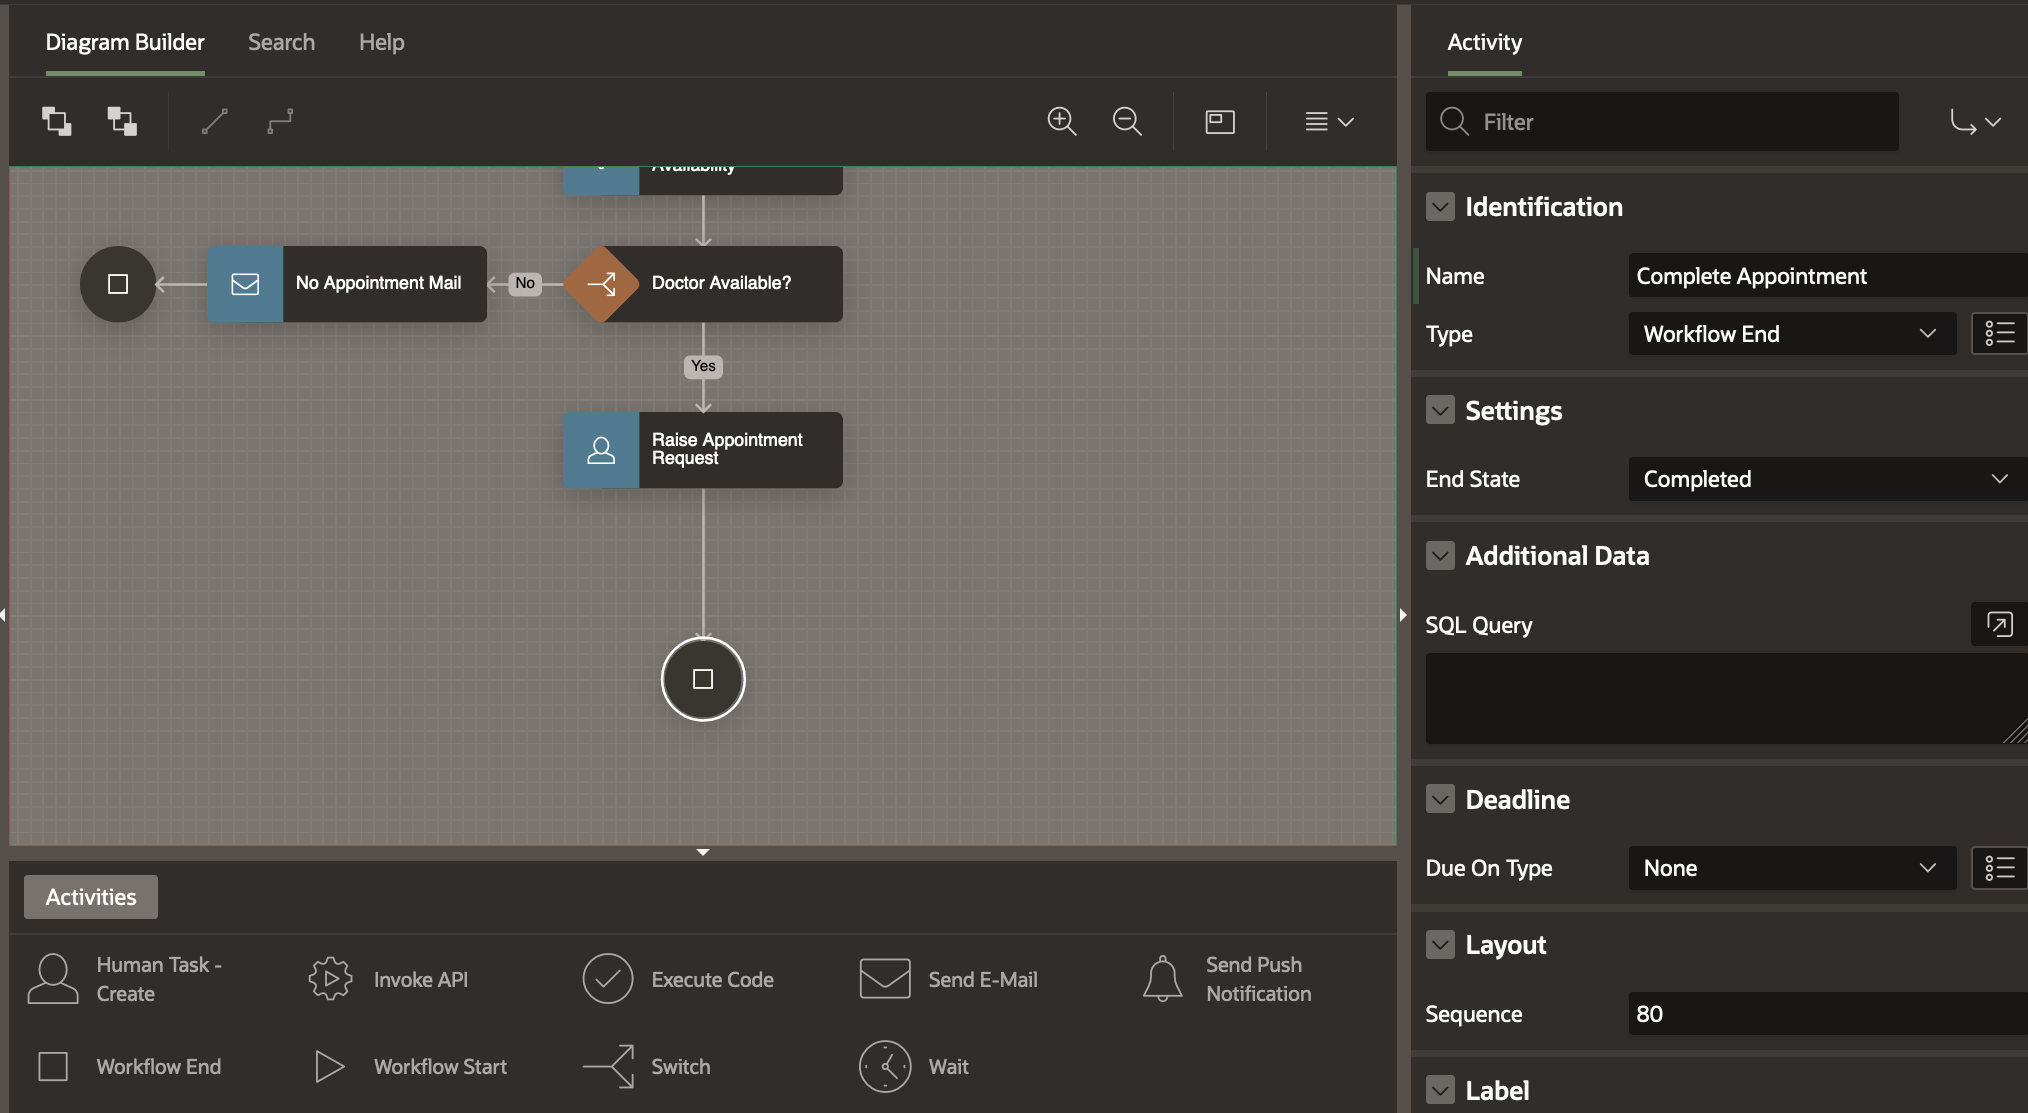
Click on the Workflow End Activity and change its name to Close Request. Also change the End State property to Terminated.
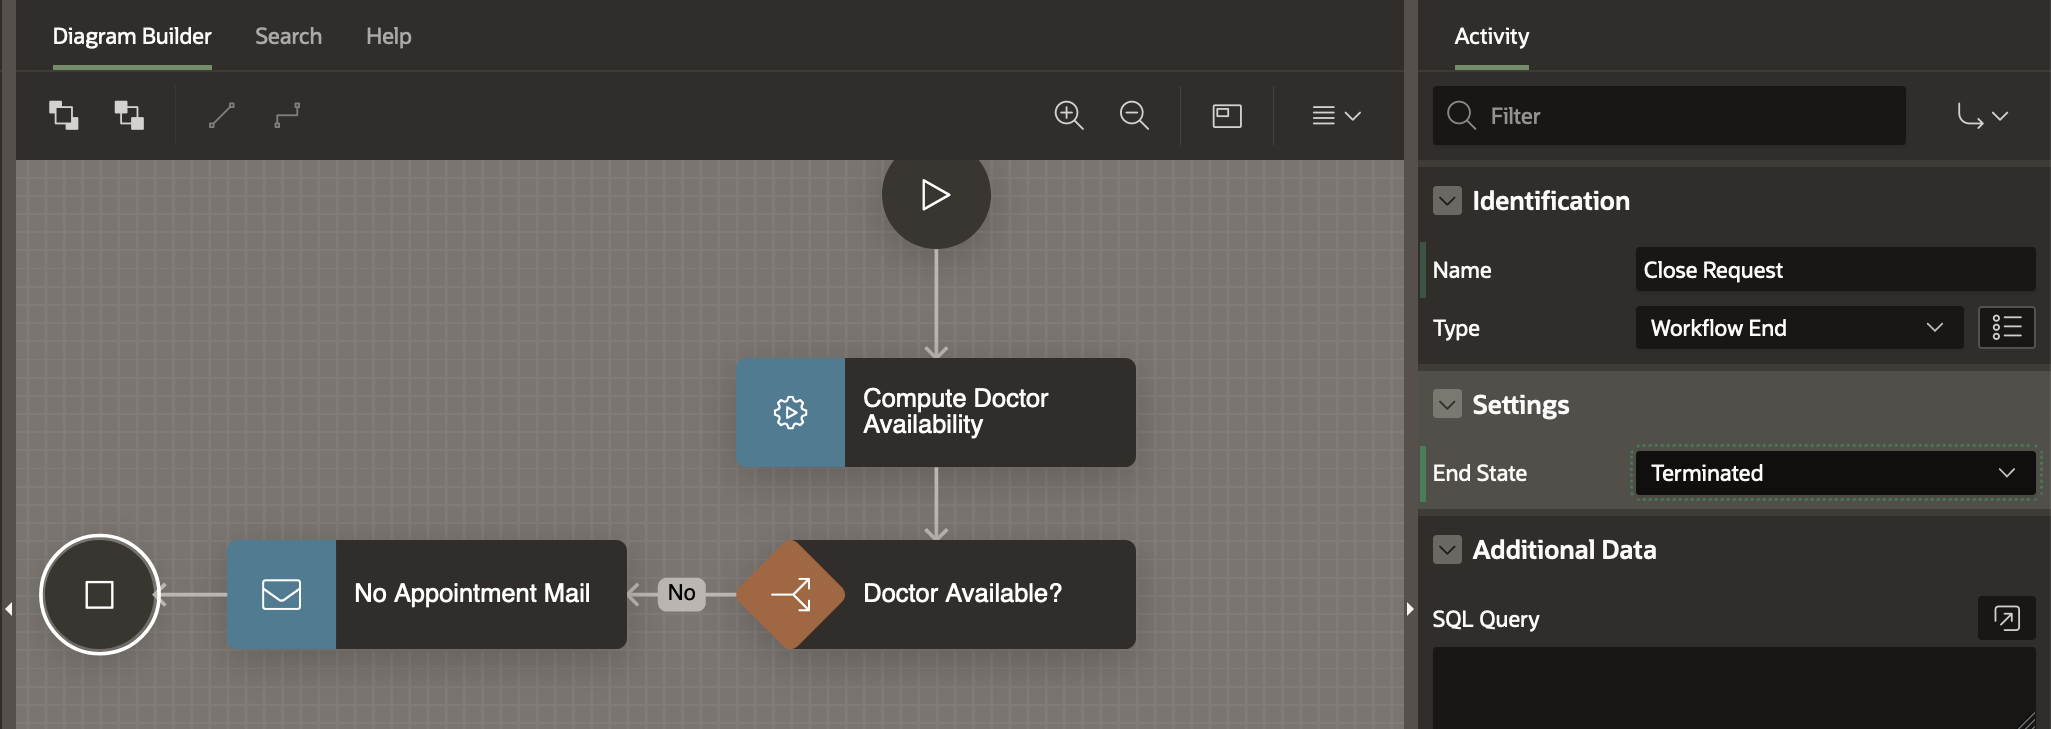
At this point there are no validation errors in the workflow model. So it can be saved. Click on the Save button to save your changes.
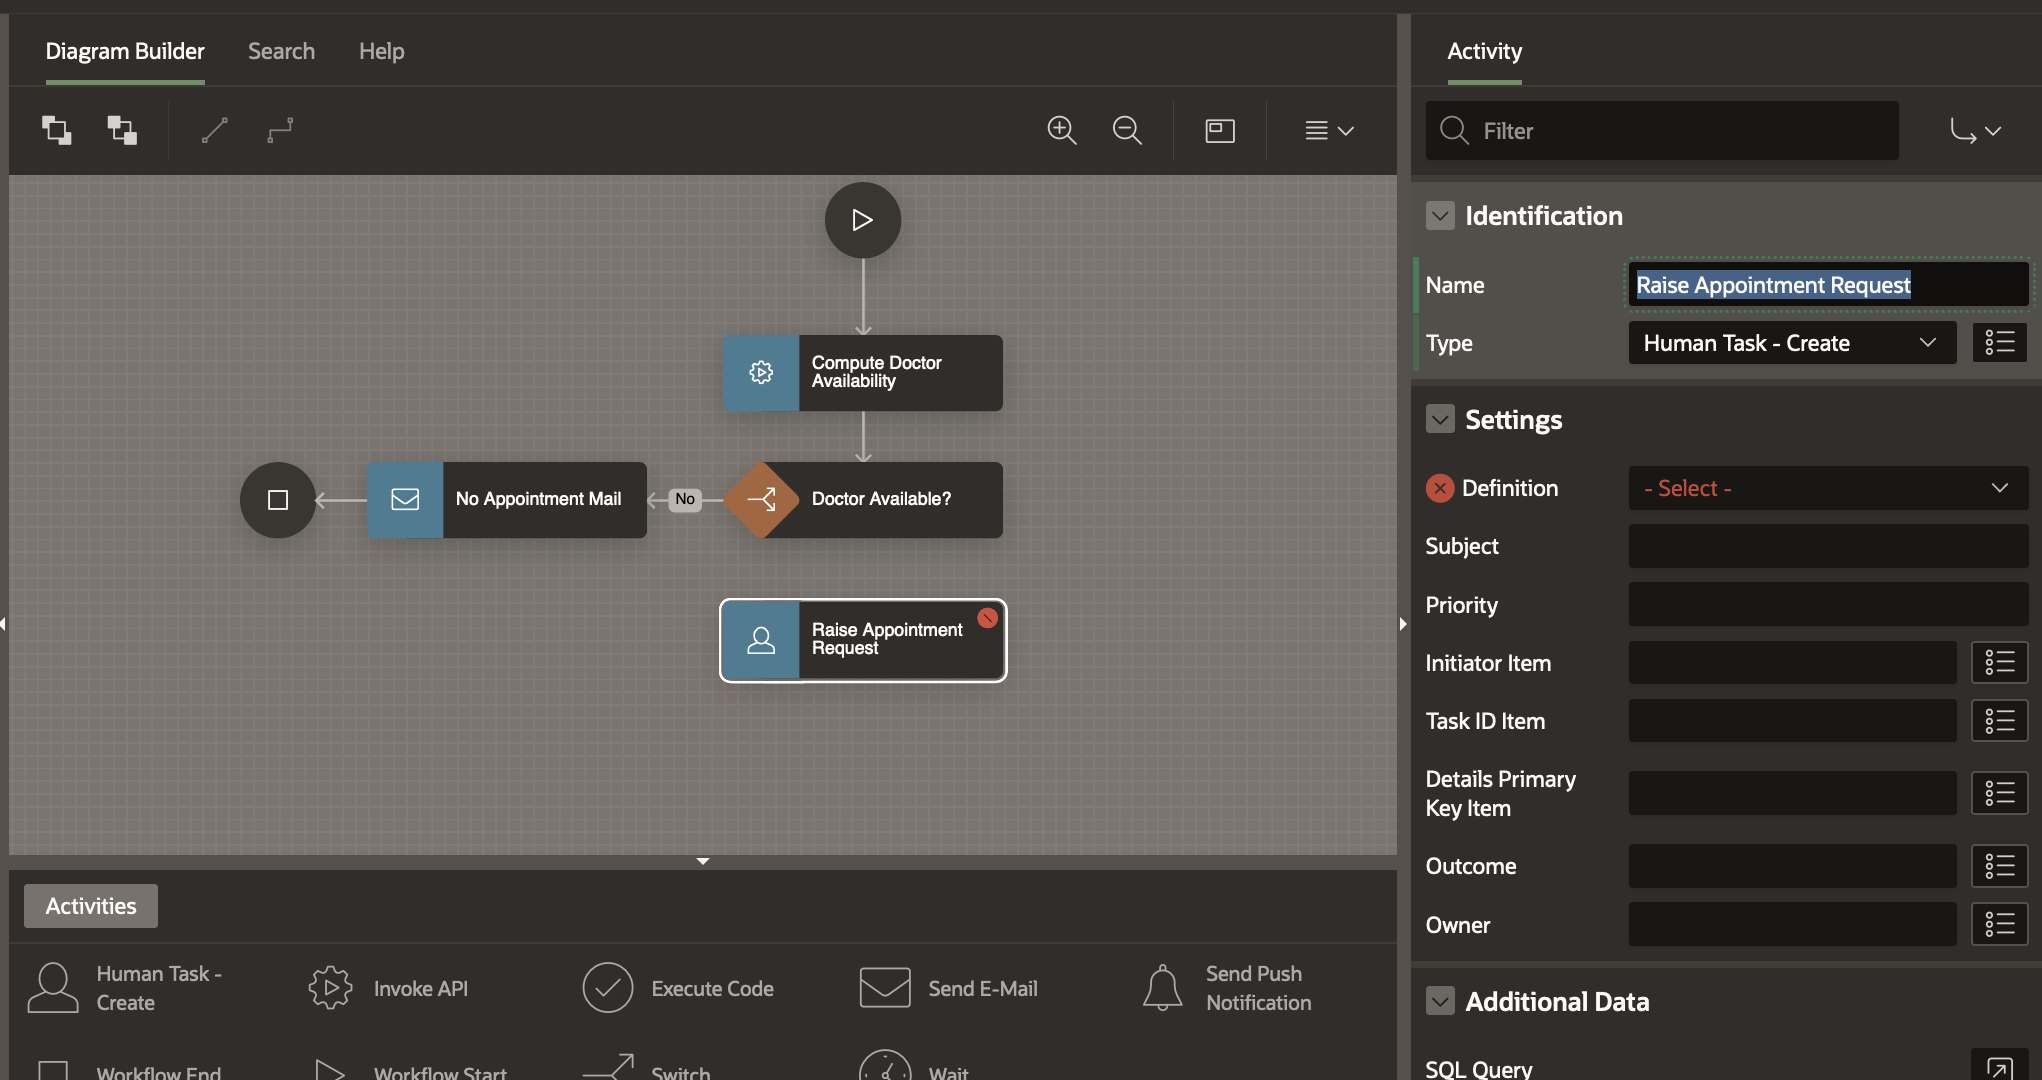
Creating the Raise Appointment Request Activity
From the Activities palette, drag and drop a Human Task – Create Activity and place it on the Diagram Area, in a position below the Doctor Available? Activity. In the Property Editor, change the Name of the activity to Raise Appointment Request.
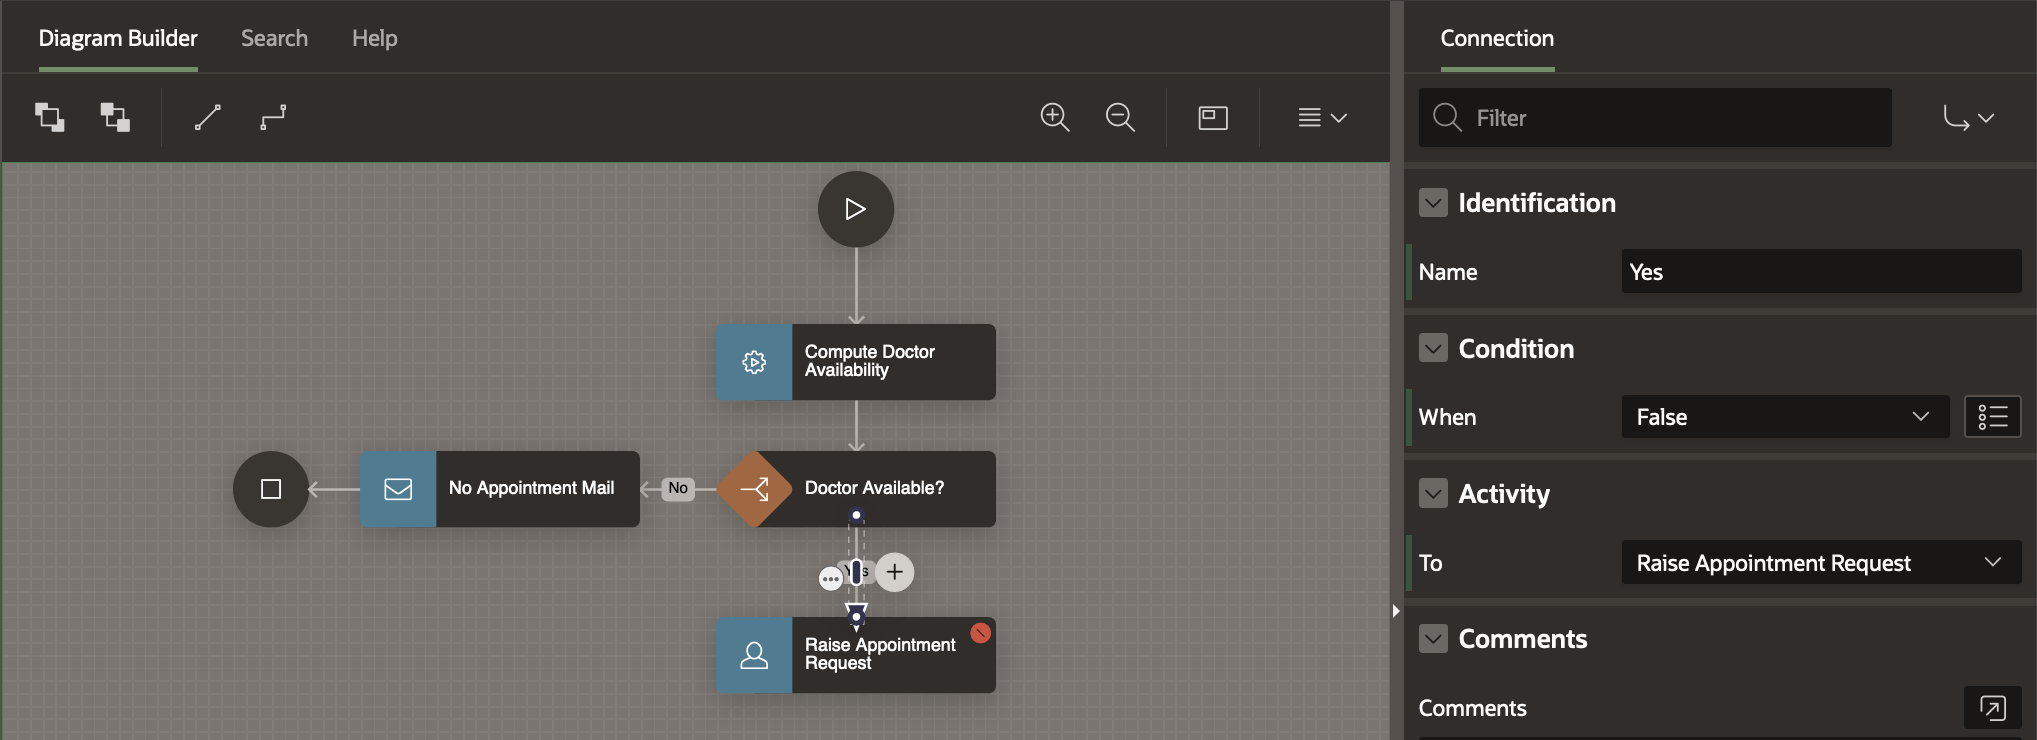
Creating the other branch for Switch Activity
Click on the Doctor Available? activity and draw a connection to the Raise Appointment Request activity. In the Property Editor for this connection, set the Name as Yes and When as False .
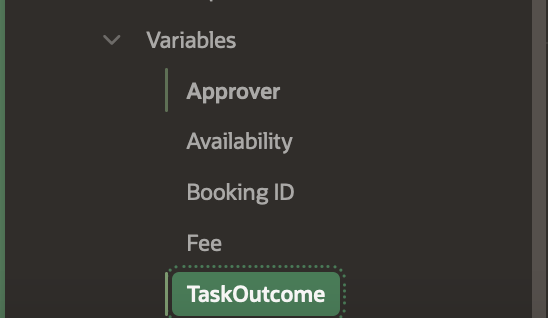
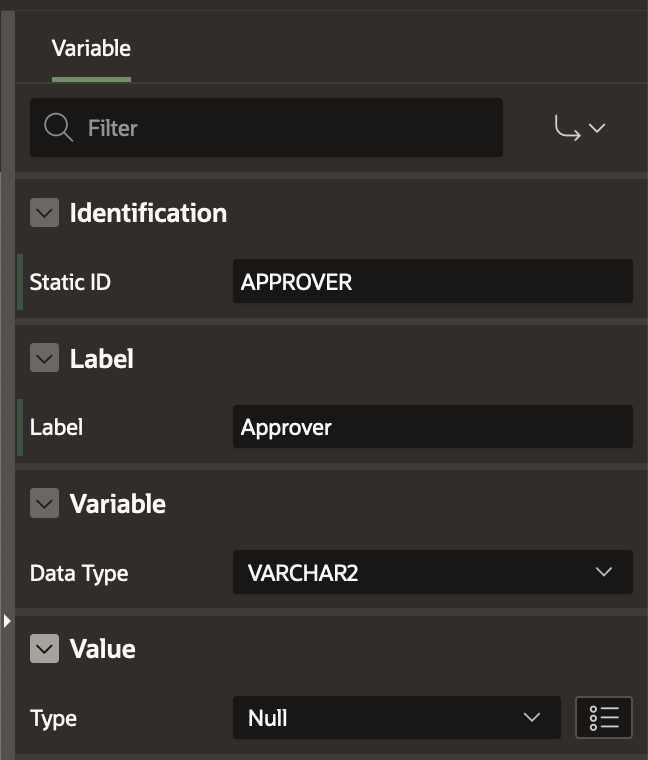
At this point, check the Variables in your Workflow Tree. You will notice there are 2 new workflow variables automatically created under Variables.
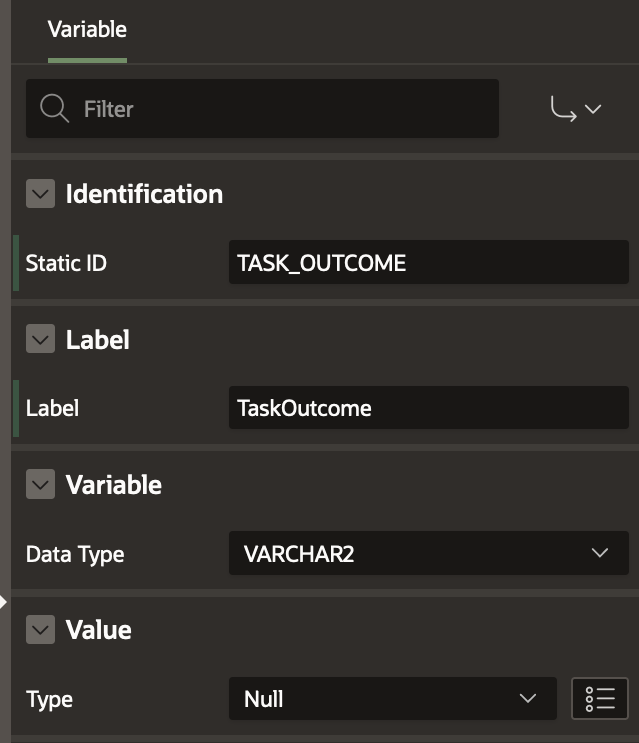
These are TaskOutcome (static Id TASK_OUTCOME) and Approver (Static ID APPROVER)
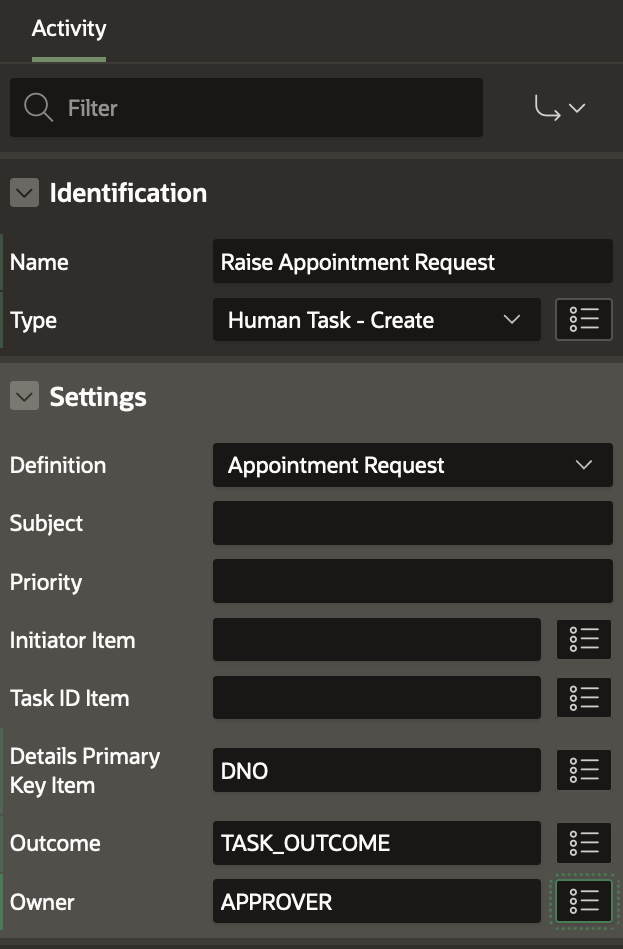
Select the Raise Appointment Request and, in the Property Editor-
- Choose the Task Definition as Raise Appointment Request.
- Set the Detail Primary Key Item as DNO (Doctor No. from the DOCTOR table)
- Set the TaskOutcome Item to TASK_OUTCOME workflow variable
- Set the Approver Item to APPROVER workflow variable
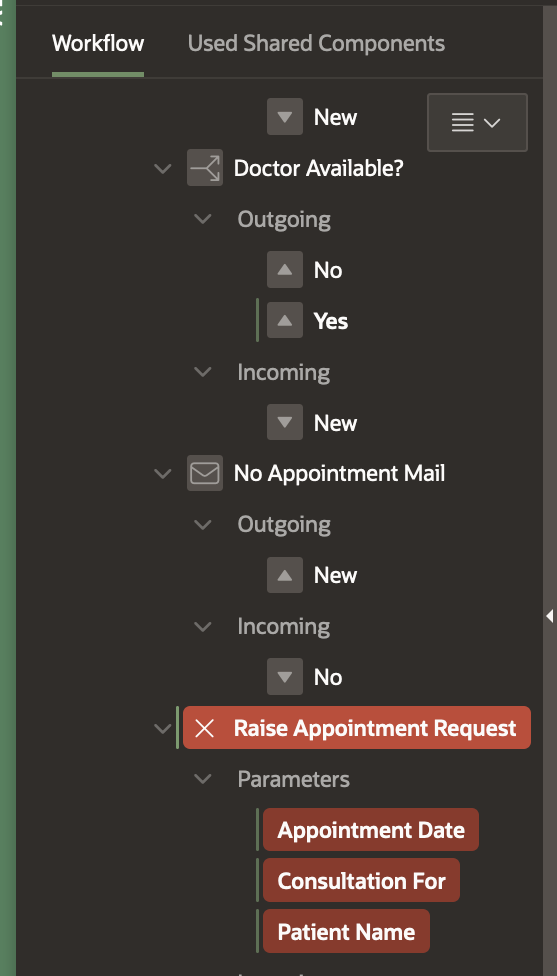
The Human Task Parameters show up in the tree in RED as they are required and need to be set, as shown below.
At this point we still have a validation error. Click on the Error to see it.
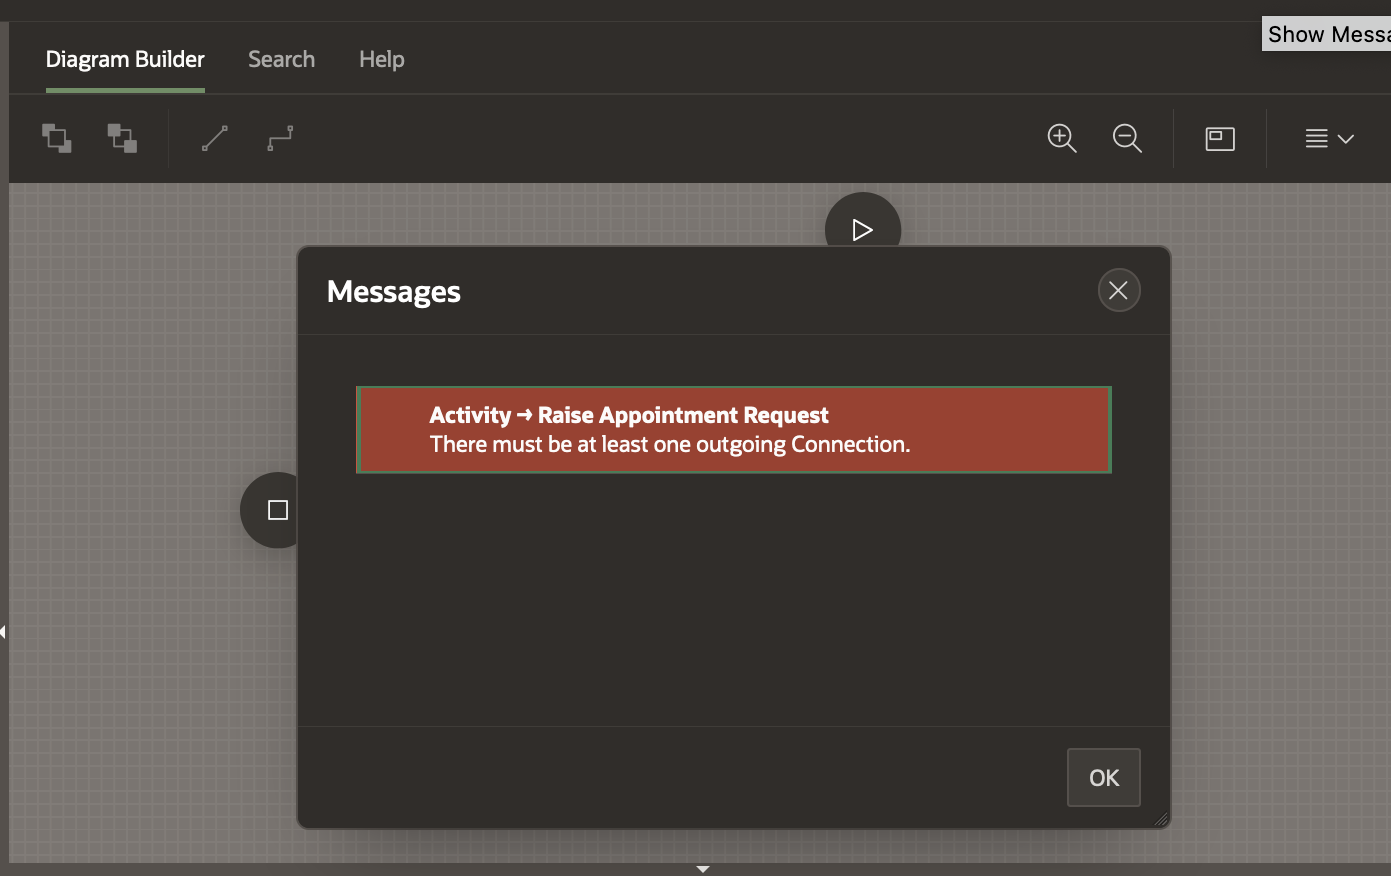
To resolve this error , drag and drop another Workflow End Activity and name it Complete Appointment. Create a connection from the Raise Appointment Request to Complete Appointment. Note that the validation error no longer shows up. Click on the Save button to save the workflow model.
Checking the Task Outcome
The Appointment Request Task can have two outcomes APPROVED or REJECTED.
At this point we add another Switch Activity to check the outcome.
In case it is APPROVED we create an entry in the APPOINTMENT table with details of the appointment and the status set to CONFIRMED.
In case it is REJECTED we send a No Appointment Mail to the patient.
Drag and Drop a Switch Activity on the Diagram area to the left of the Raise Appointment Request Activity. In the Property Editor
- Rename the activity to Appointment Approved?
- Change the Switch Type to Check Workflow Variable
- Select the Compare Variable as TASK_OUTCOME from the item picker.
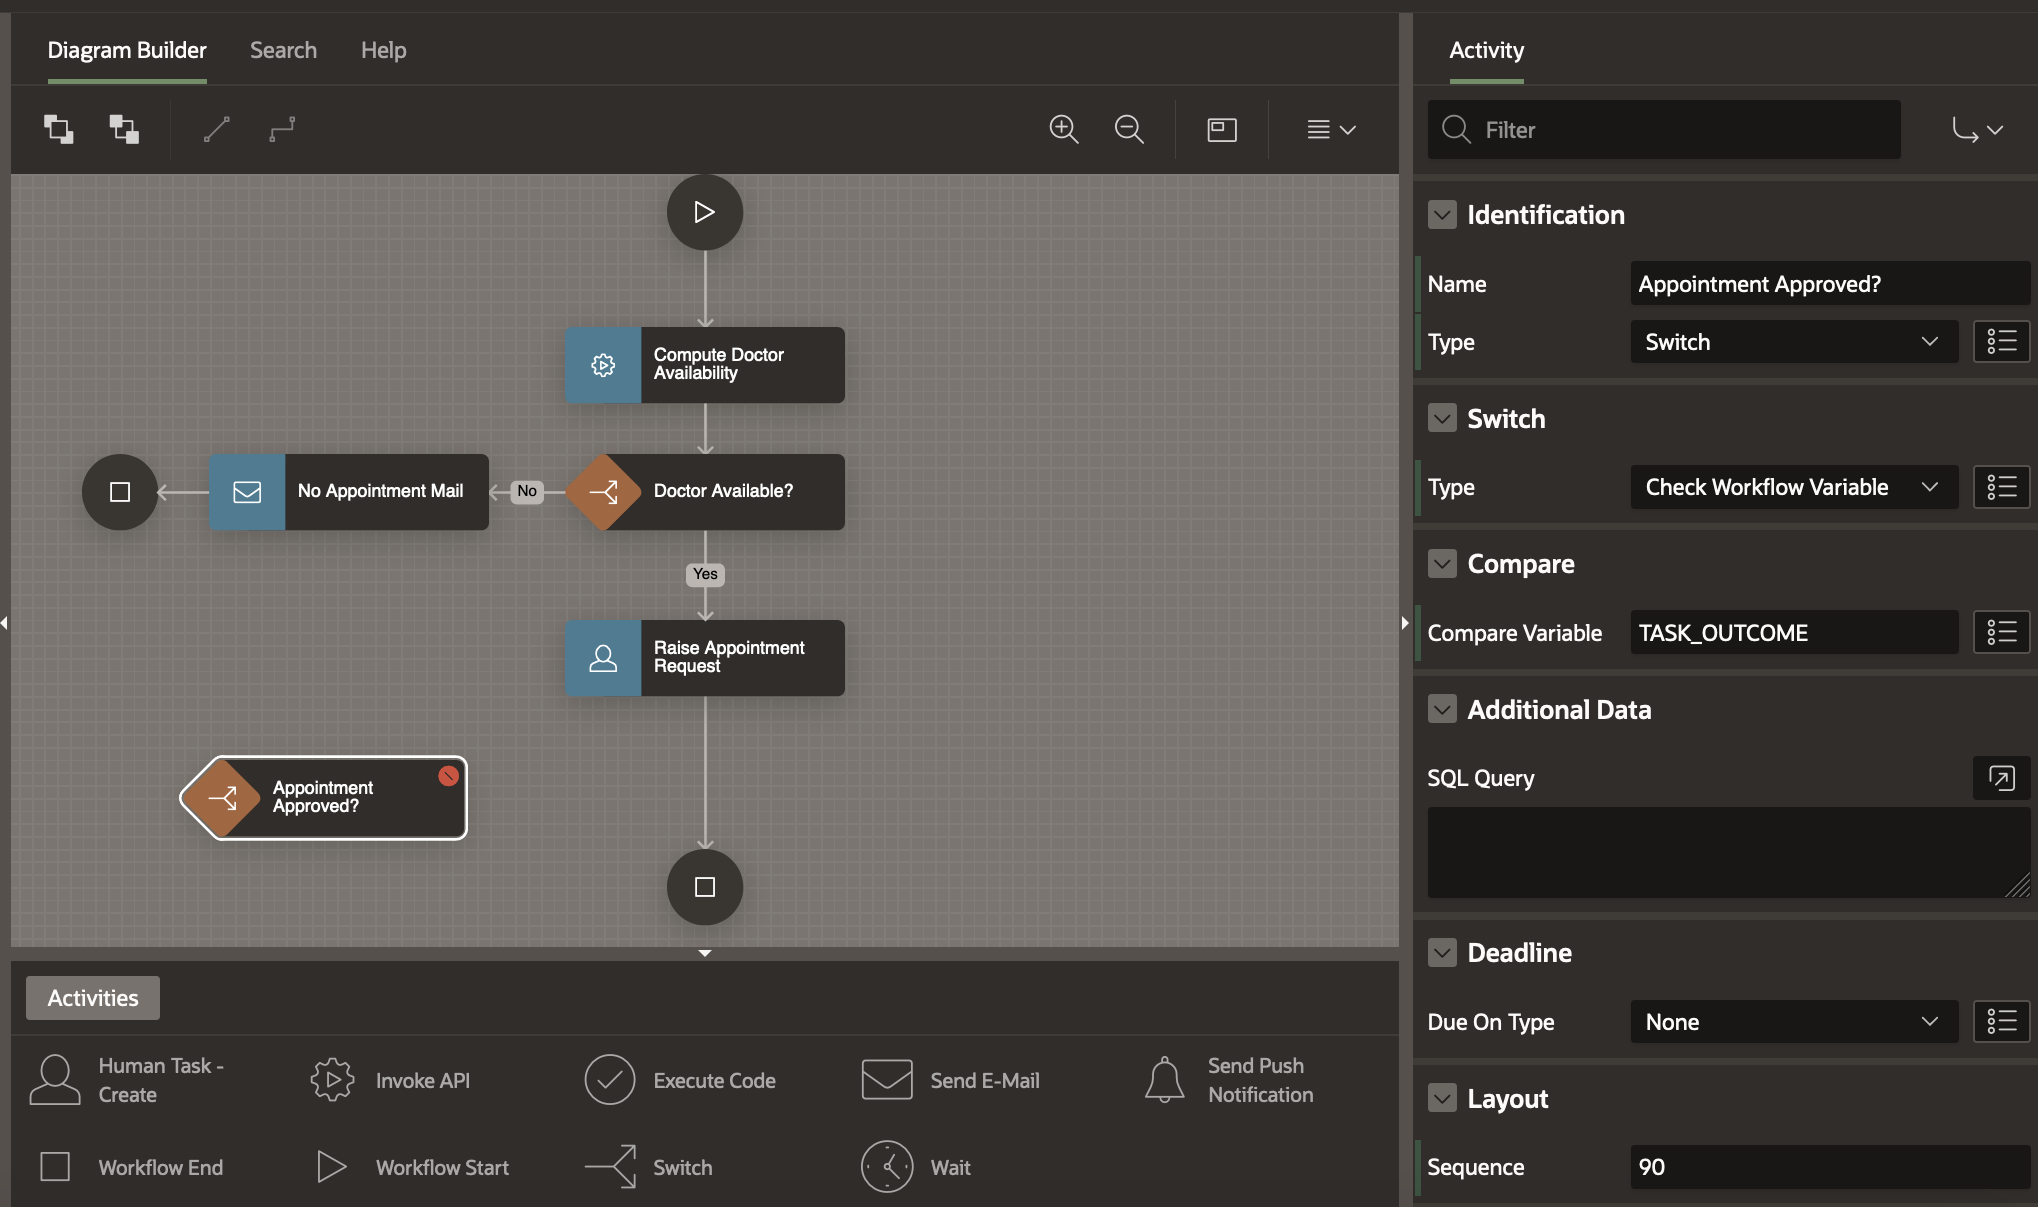
Detatch the end of the arrow connecting the Raise Appointment Request and the Complete Appointment activities and attach it to the Appointment Approved? activity.
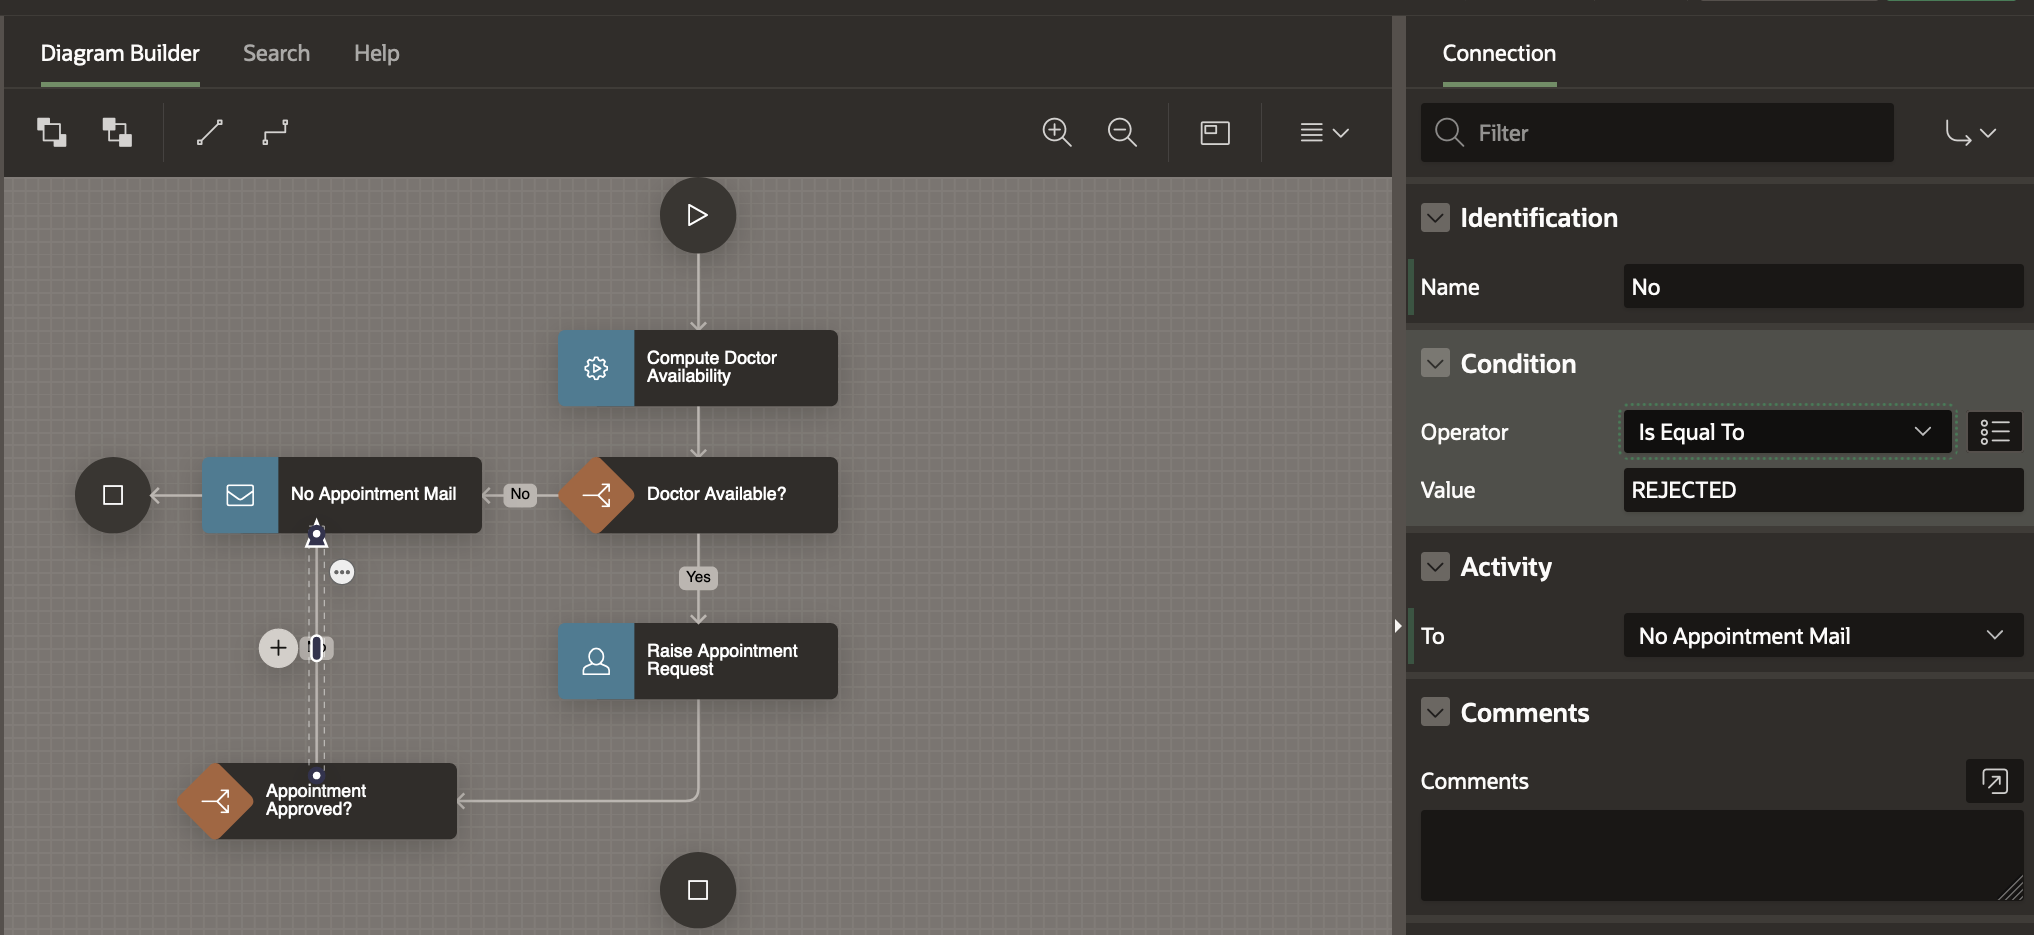
Click on the Appointment Approved? activity and draw an arrow to the No Appointment Mail activity. In the Property Editor,
- Change the Name of the Connection to No
- Set the Operator to Is Equal To
- Set the Value to REJECTED.
Drag and Drop an Invoke API Activity on the Diagram area, below the Appointment Approved? activity. Name this activity Confirm Appointment.
In the Property Editor for the Activity,
- Set the Package as EBA_DEMO_WF_DOC_APT
- Set the Function as CONFIRM_APPOINTMENT
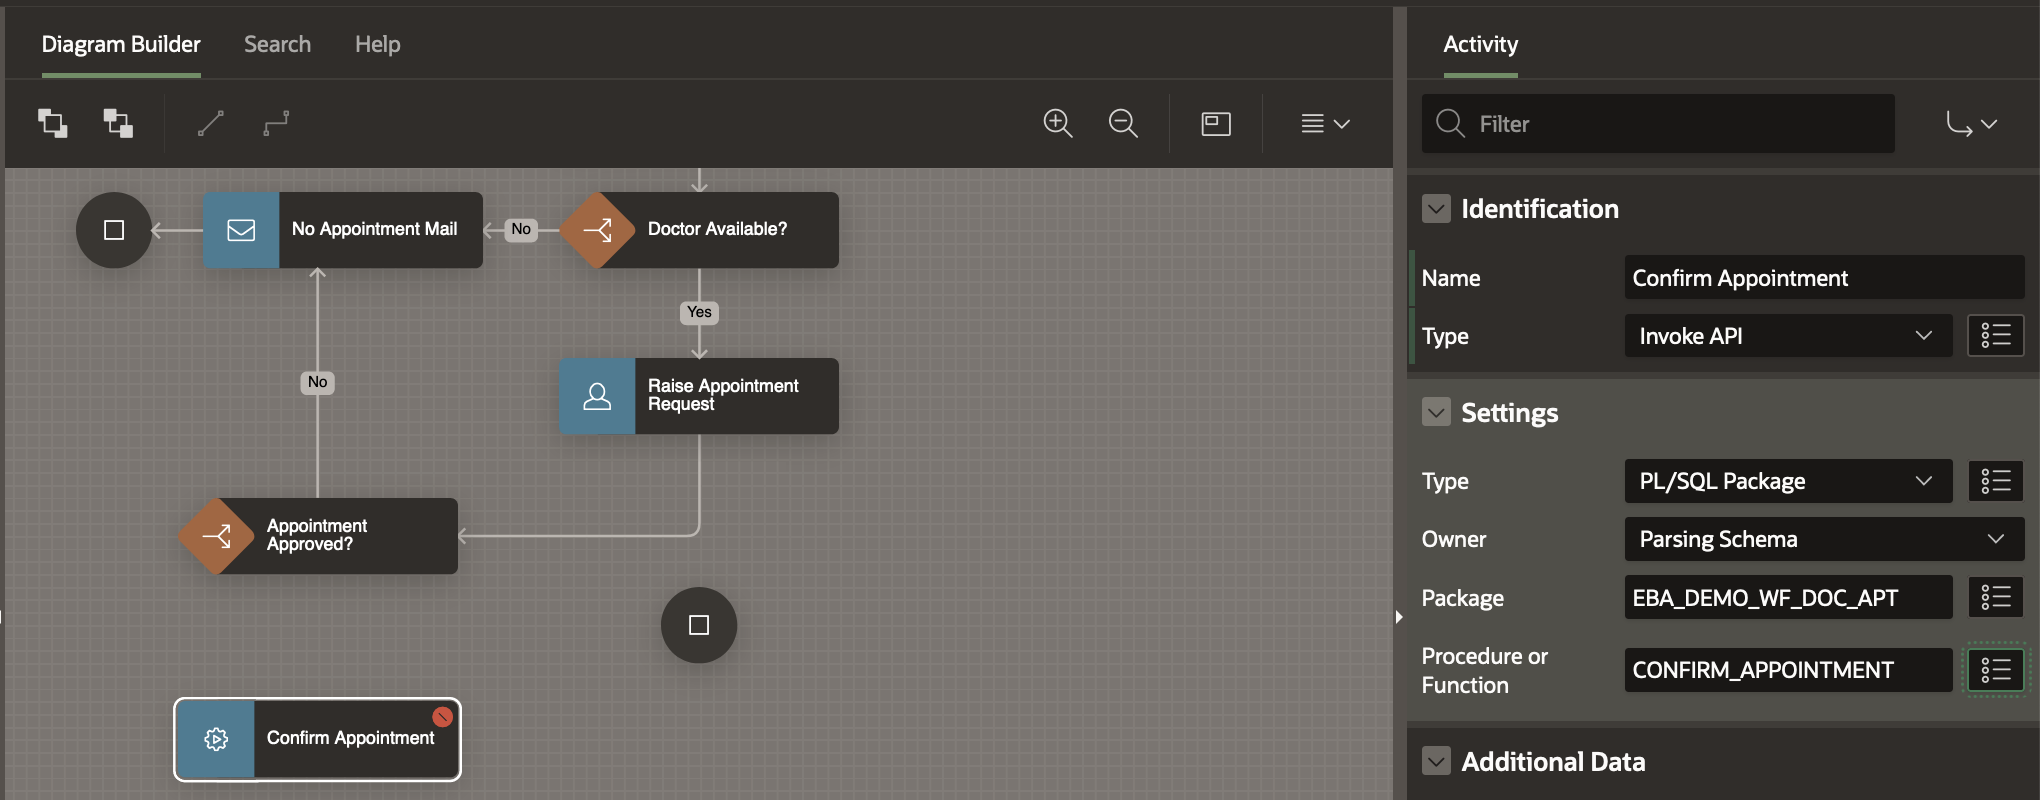
In the tree, the parameters for this activity appear in RED as these are required Invoke API parameters.
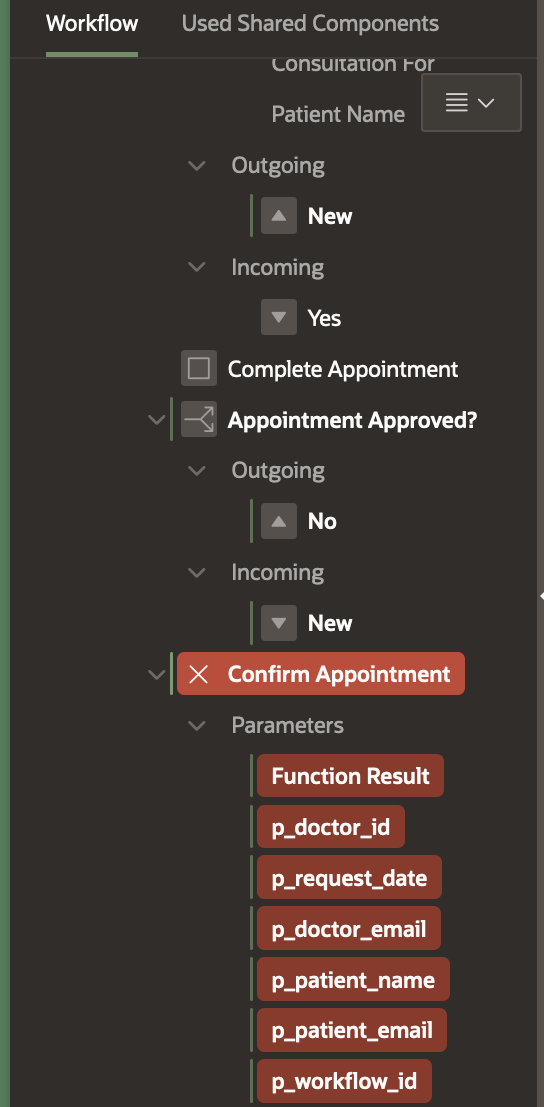
- Set Function Result to Item Picker -> Version Variable-> BOOKING_ID
- Set p_doctor_id as Static value &DNO.
- Set p_request_date as the REQUEST_DATE Workflow Parameter . Set the Format Mask to DD-MON-YYYY HH24:MI:SS
- Set p_doctor_email as Static value &DOC_EMAIL.
- Set p_patient_email as Item Picker -> Workflow Parameter -> PATIENT_EMAIL
- Set p_workflow_id as &APEX$WORKFLOW_ID.
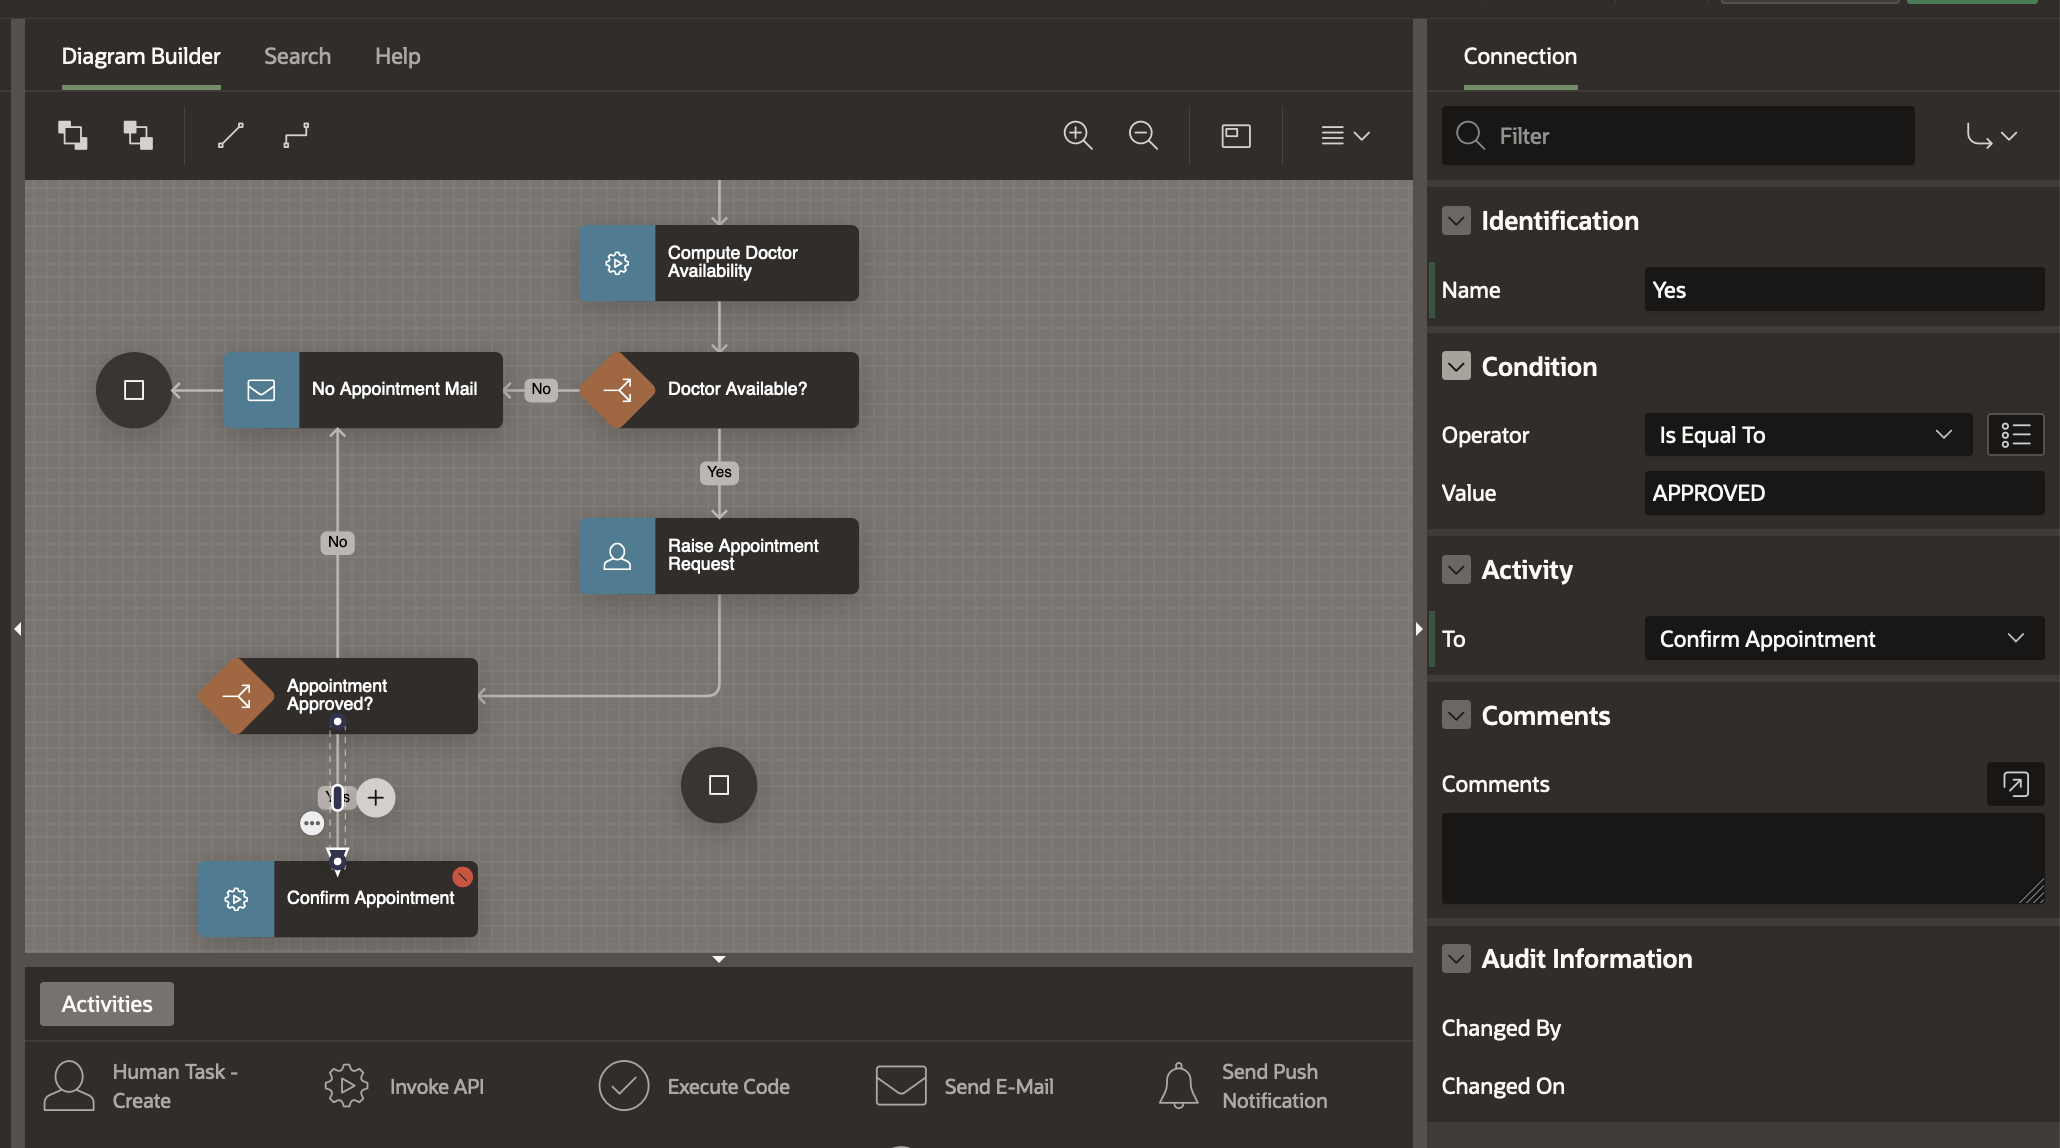
Click on the Appointment Approved? activity and draw an arrow to the Confirm Appointment activity. In the Property Editor,
- Change then Name of the Connection to Yes
- Set the Operator to Is Equal To
- Set the Value to APPROVED
To be able to save the model at this point, we need to get rid of validation errors. We create a connection from Confirm Appointment to Complete Appointment End activity.

The workflow model can be saved now by clicking the Save button.
The next step in the business logic is to check if this is a followup visit for the patient.
If this is patient returning in less than a week, the visit is considered to be a followup and is free of charge.
Otherwise a charge of 500 is levied.
Adding the Switch Activity for followup-check
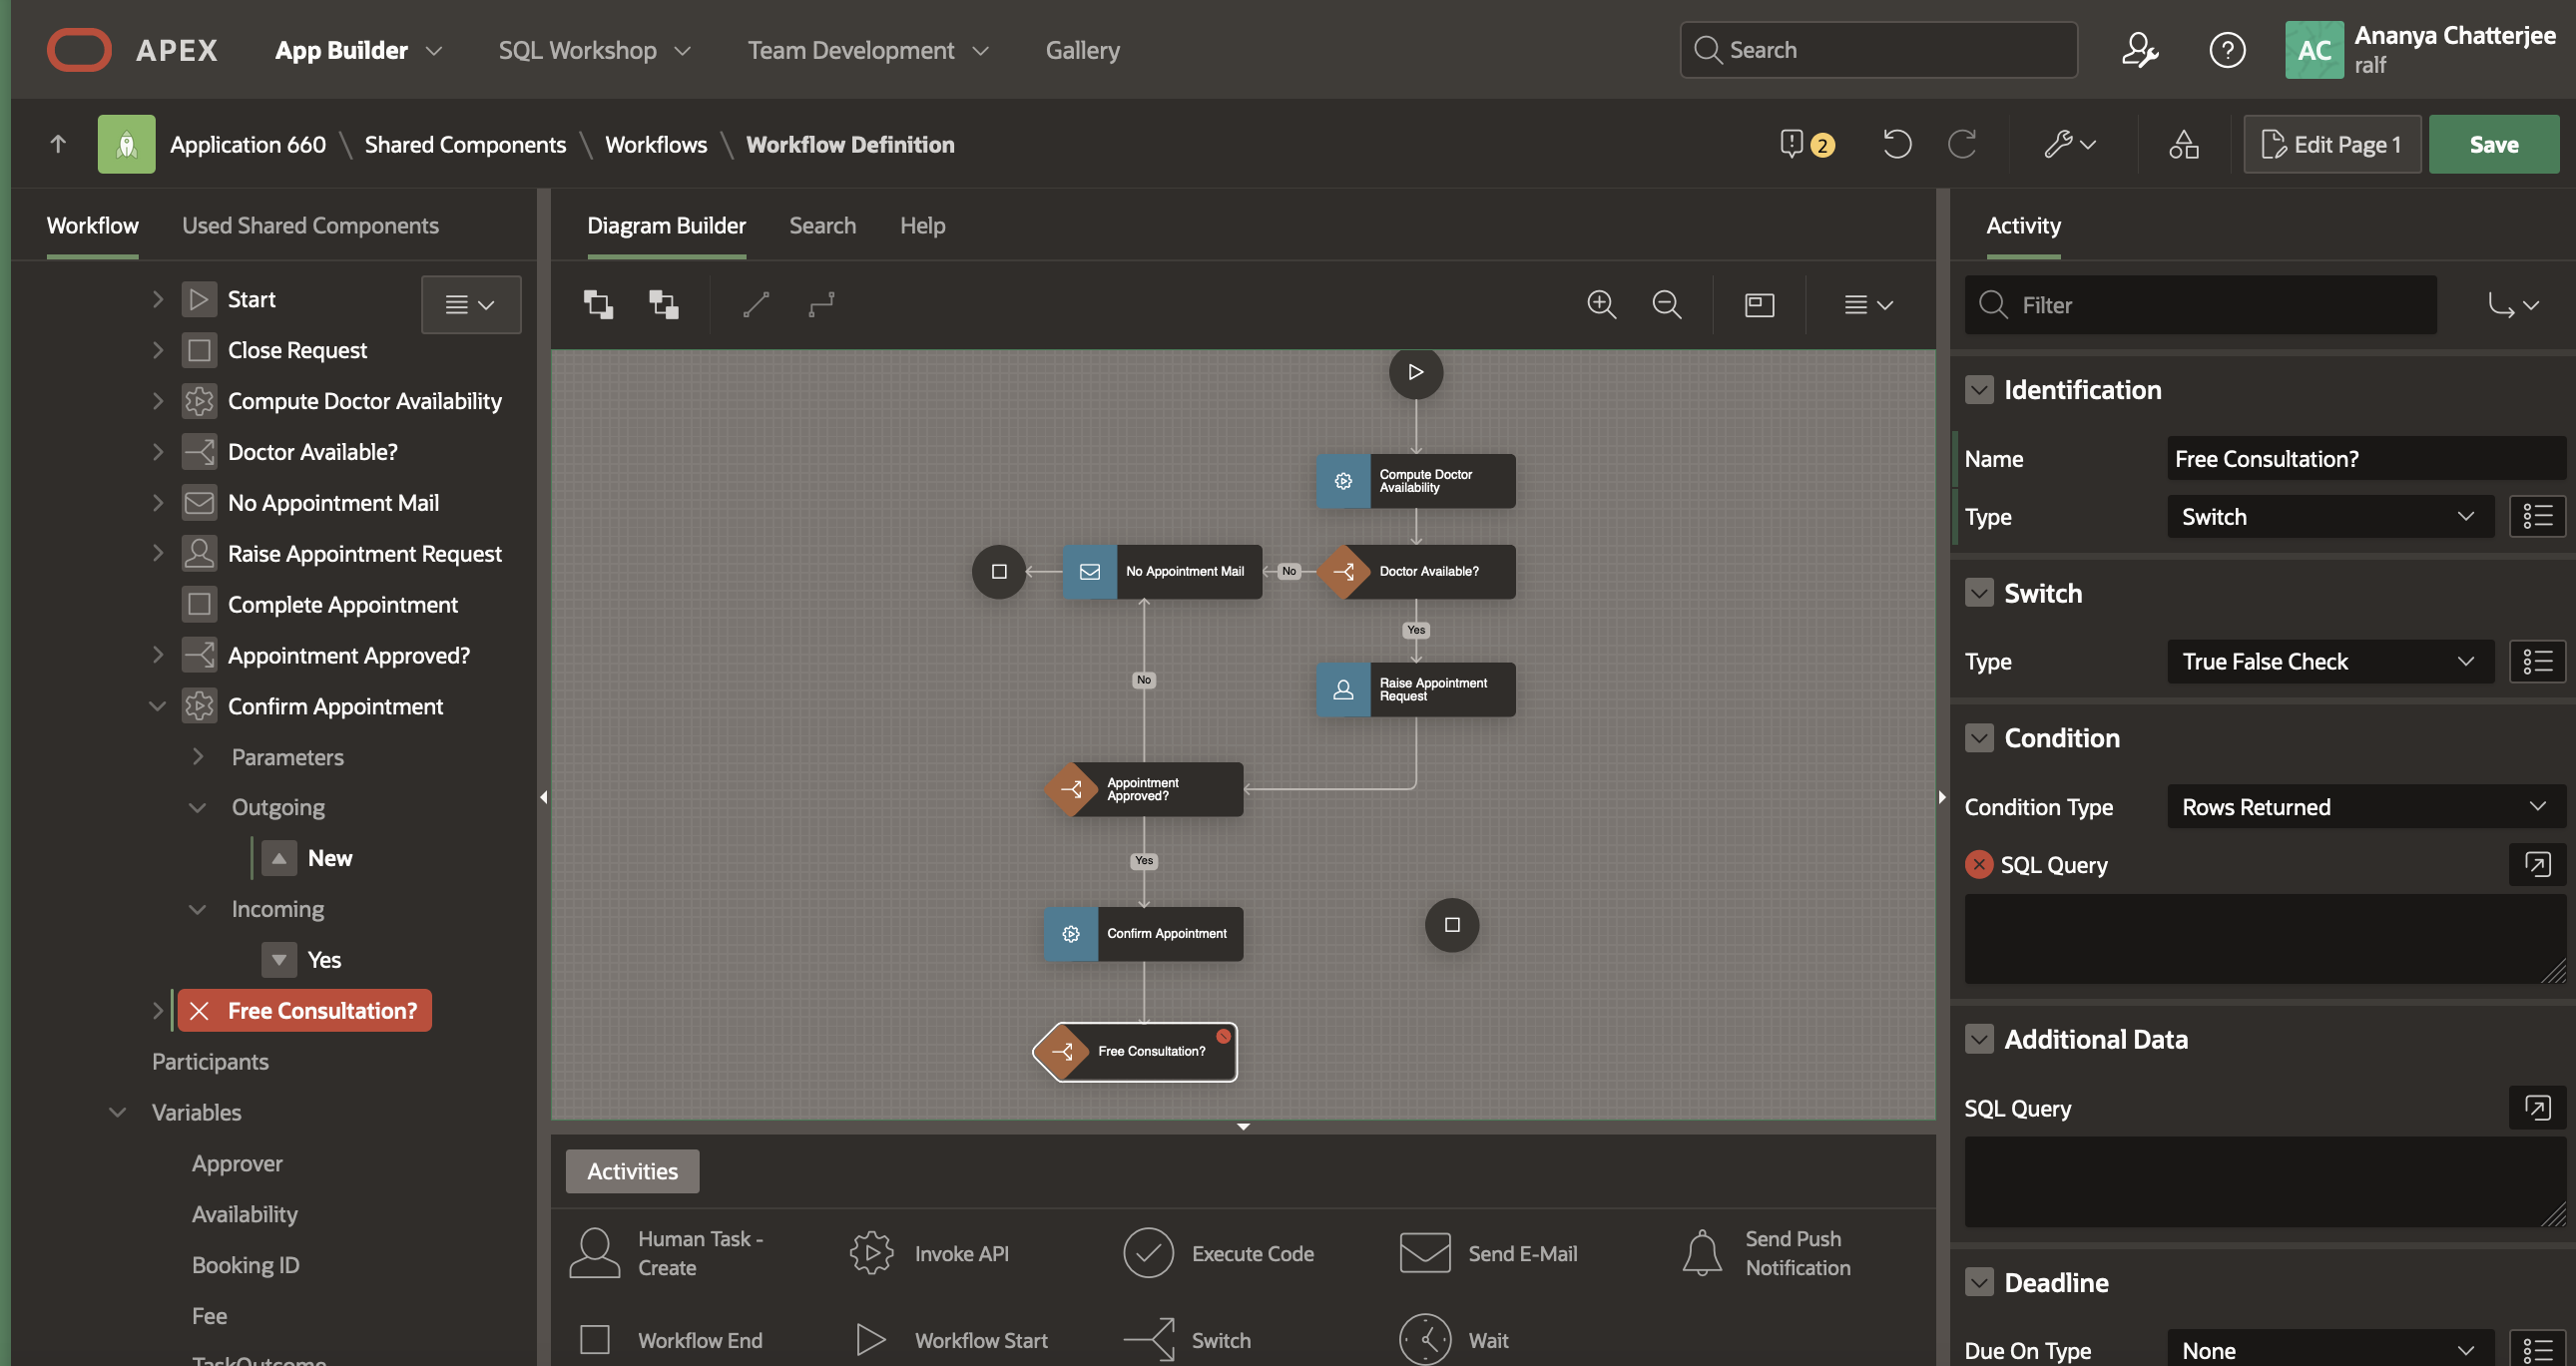
Drag and Drop a Switch Activity into the Diagram area, and place the activity below the Confirm Appointment Activity.
In the property editor, rename the Switch Activity to Free Consultation? .
Detach the connection from the Confirm Appointment Activity and re-attach it to this Switch Activity.
We need to base the Switch condition outcome on a calculation (the number of days since the patient’s last visit to the same doctor) . To store the calculation result we will create an Activity Variable for the Free Consultation? activity.
– During Activity execution
– During evaluation of a Switch condition
– During evaluation of any Timeout or Error-handling routes defined for the activity
Unlike Workflow Variables, they cannot be referenced by other activities of the workflow once the activity execution is completed
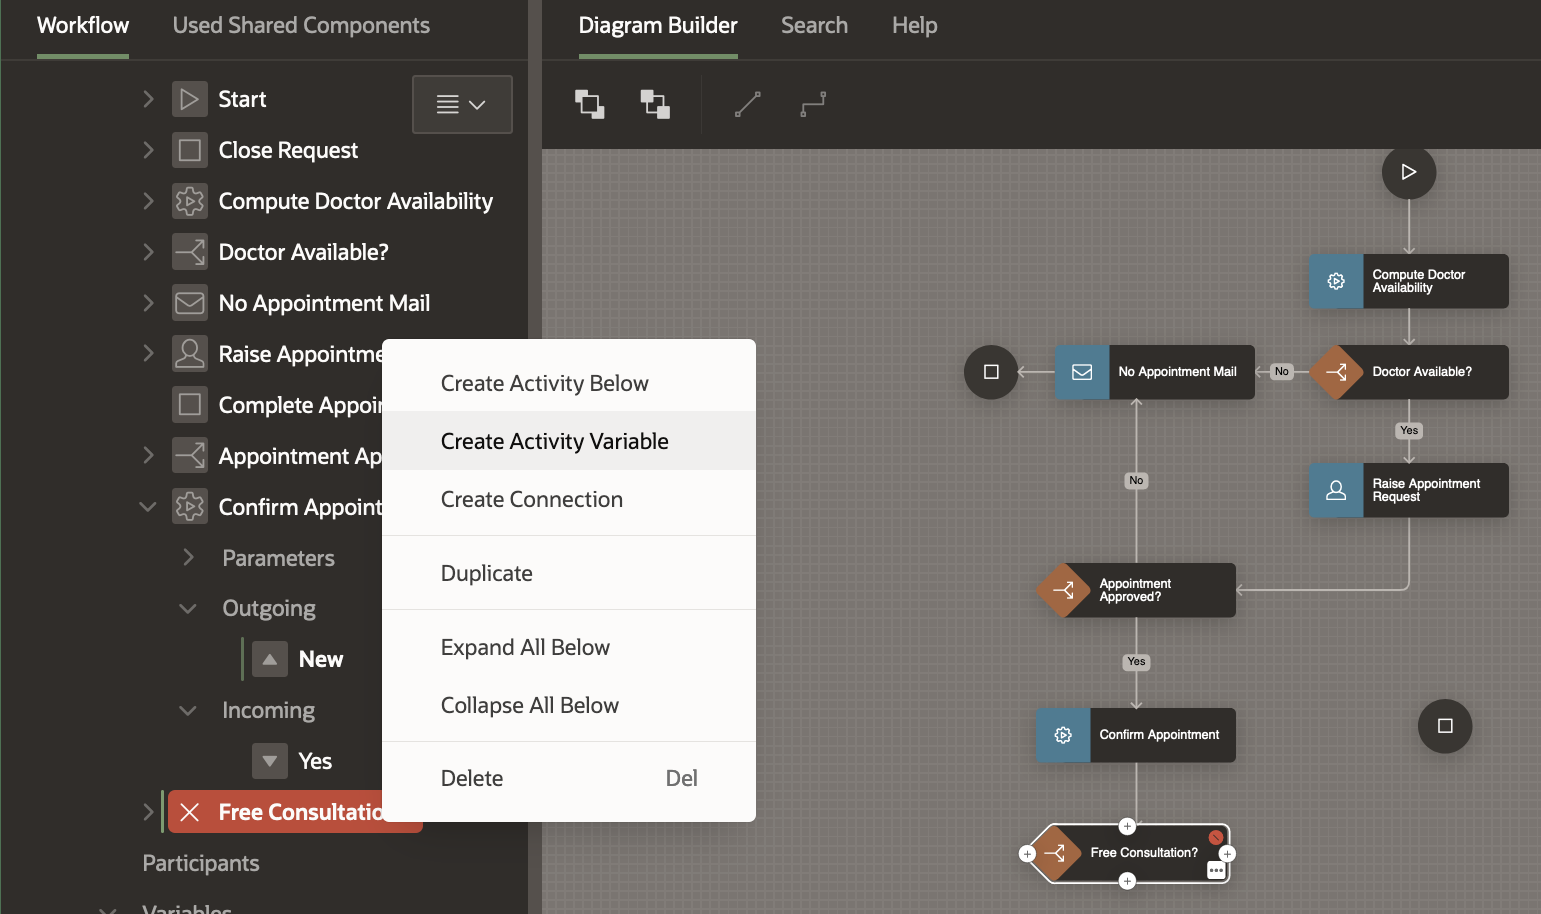
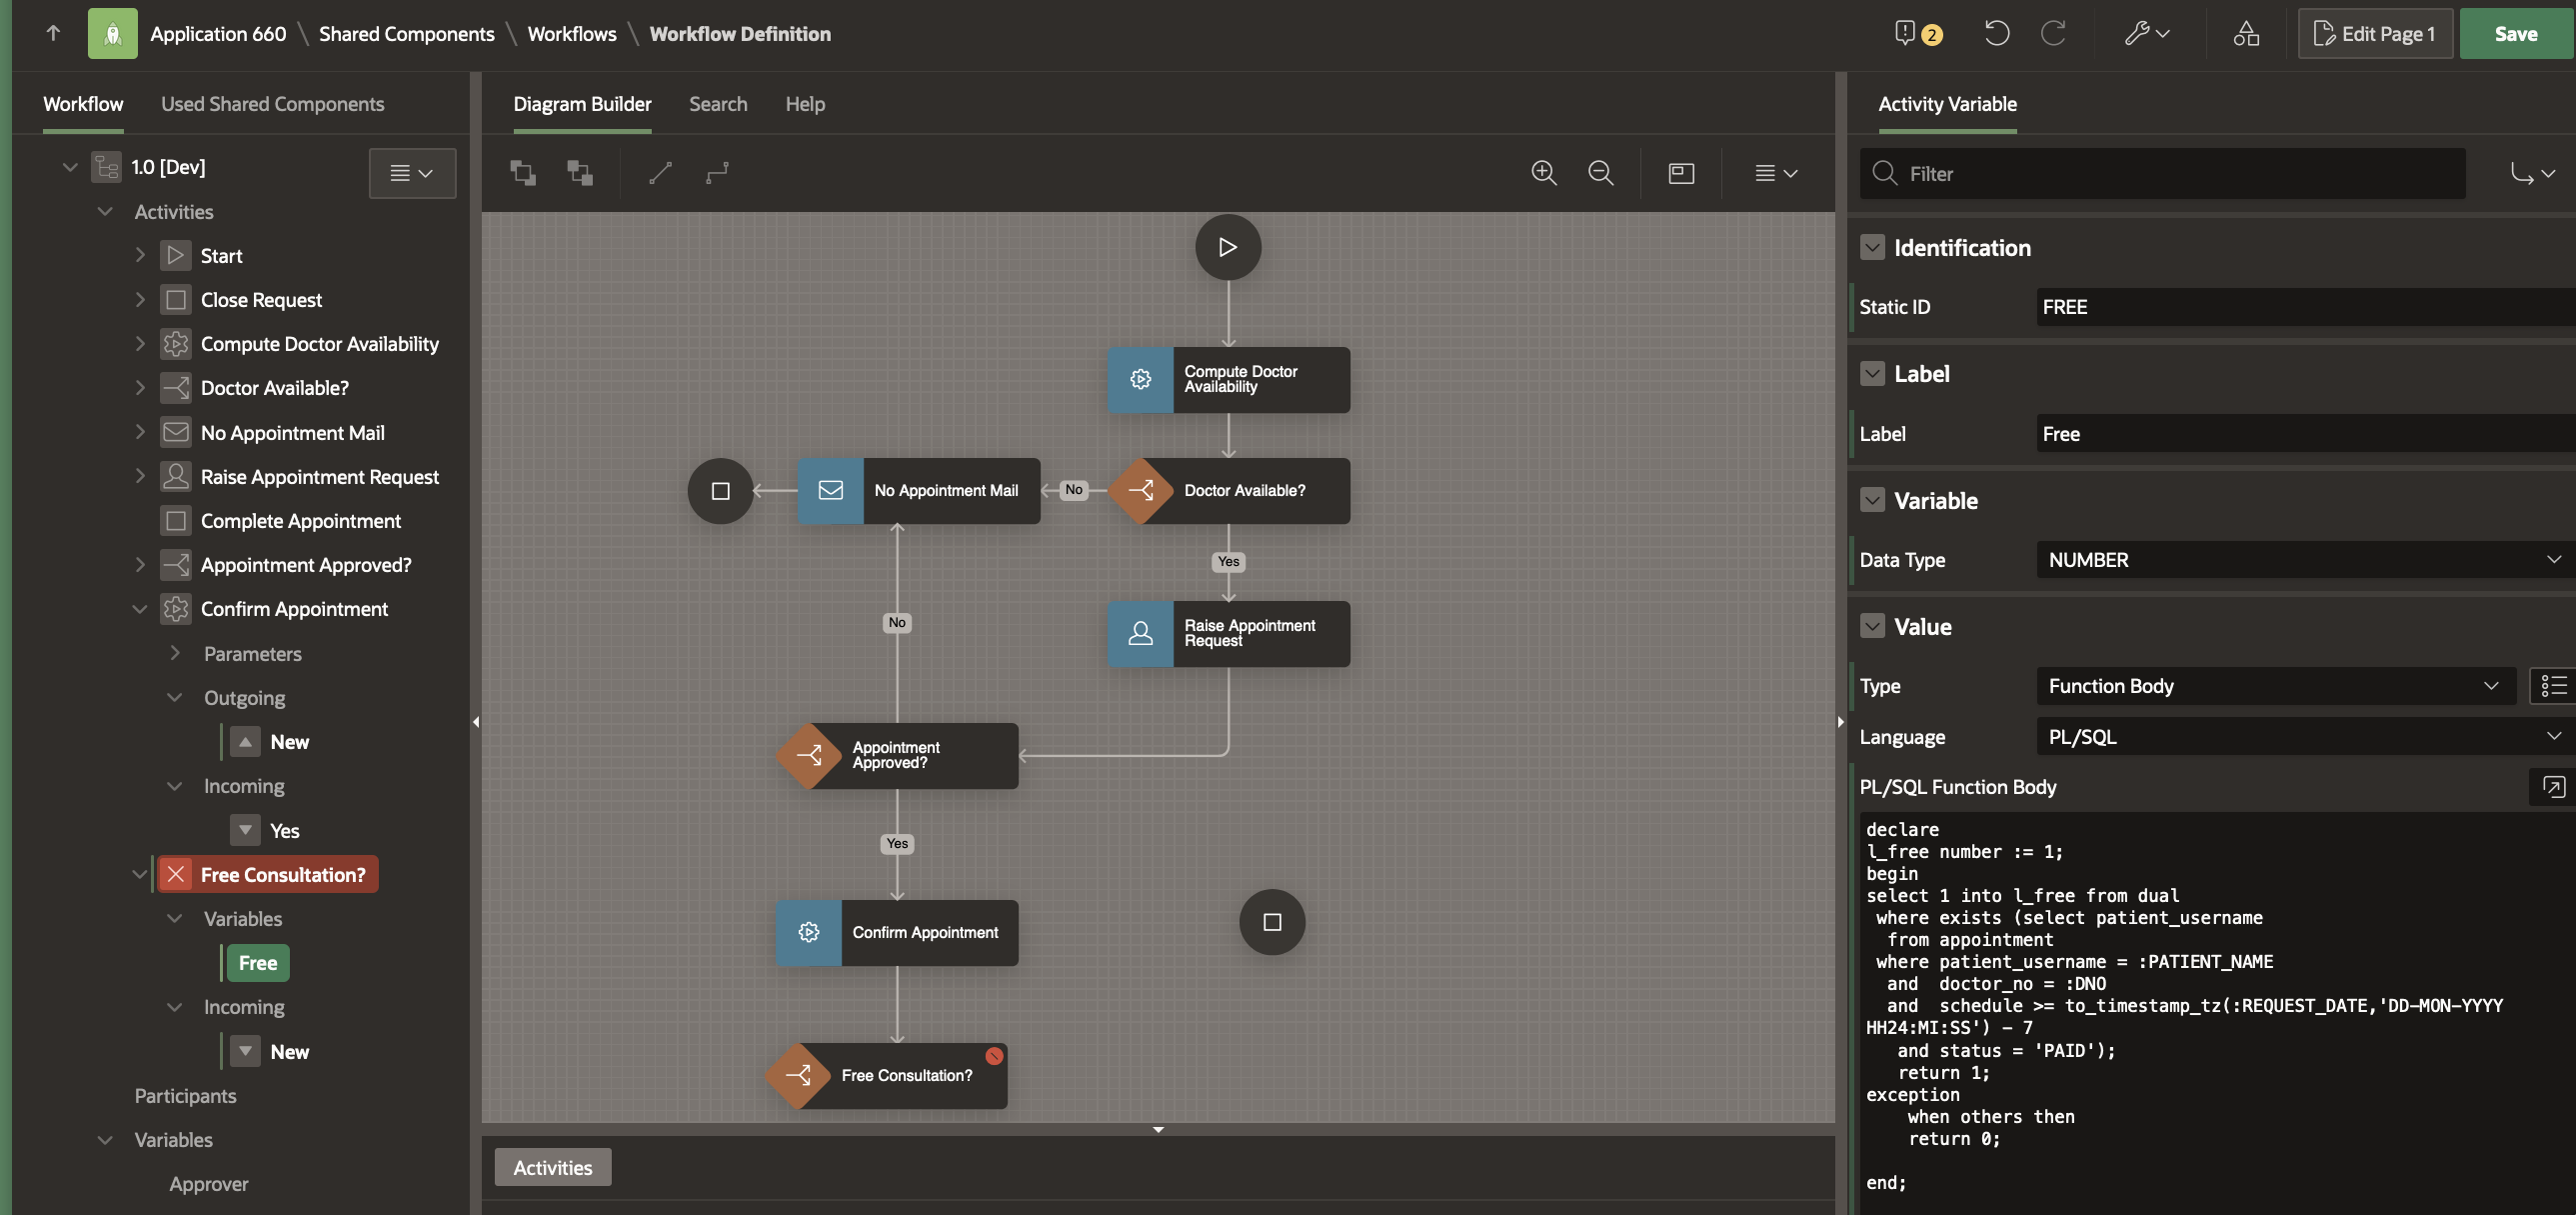
To create an Activity Variable, right-click on the Free Consultation? activity in the Workflow Tree and select Create Activity Variable.
Select the New activity variable and in the property editor
- Change the Static ID to FREE
- Change the Label to Free
- Set the Source as Function Body , and in the PL/SQL Code Editor enter the following code
declare
l_free number := 1;
begin
    select 1 into l_free from dual
     where exists (select patient_username
      from appointment
     where patient_username = :PATIENT_NAME
       and  doctor_no = :DNO
       and  schedule >= to_timestamp_tz(:REQUEST_DATE,'DD-MON-YYYY HH24:MI:SS') - 7
       and status = 'PAID');
   return 1;
exception
    when others then
    return 0;
end;
Select the Free Consultation? activity once more and in the Property Editor
- Set the Switch Type as True False Check
- Set the Condition as Workflow Variable = Value
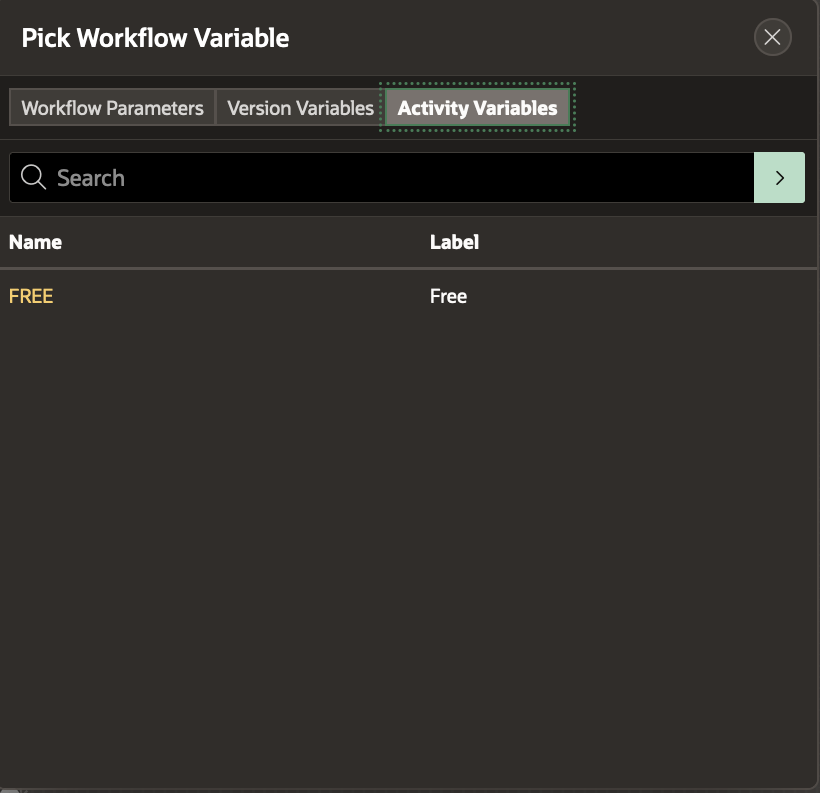
- Select the Variable as FREE from the Item Picker -> Activity Variables Tab
- Set the Value as 1

Creating the True and False Connections from the Switch Activity
We will first create the target activities for the Free Consultation? activity, and only then create the True and False connections.
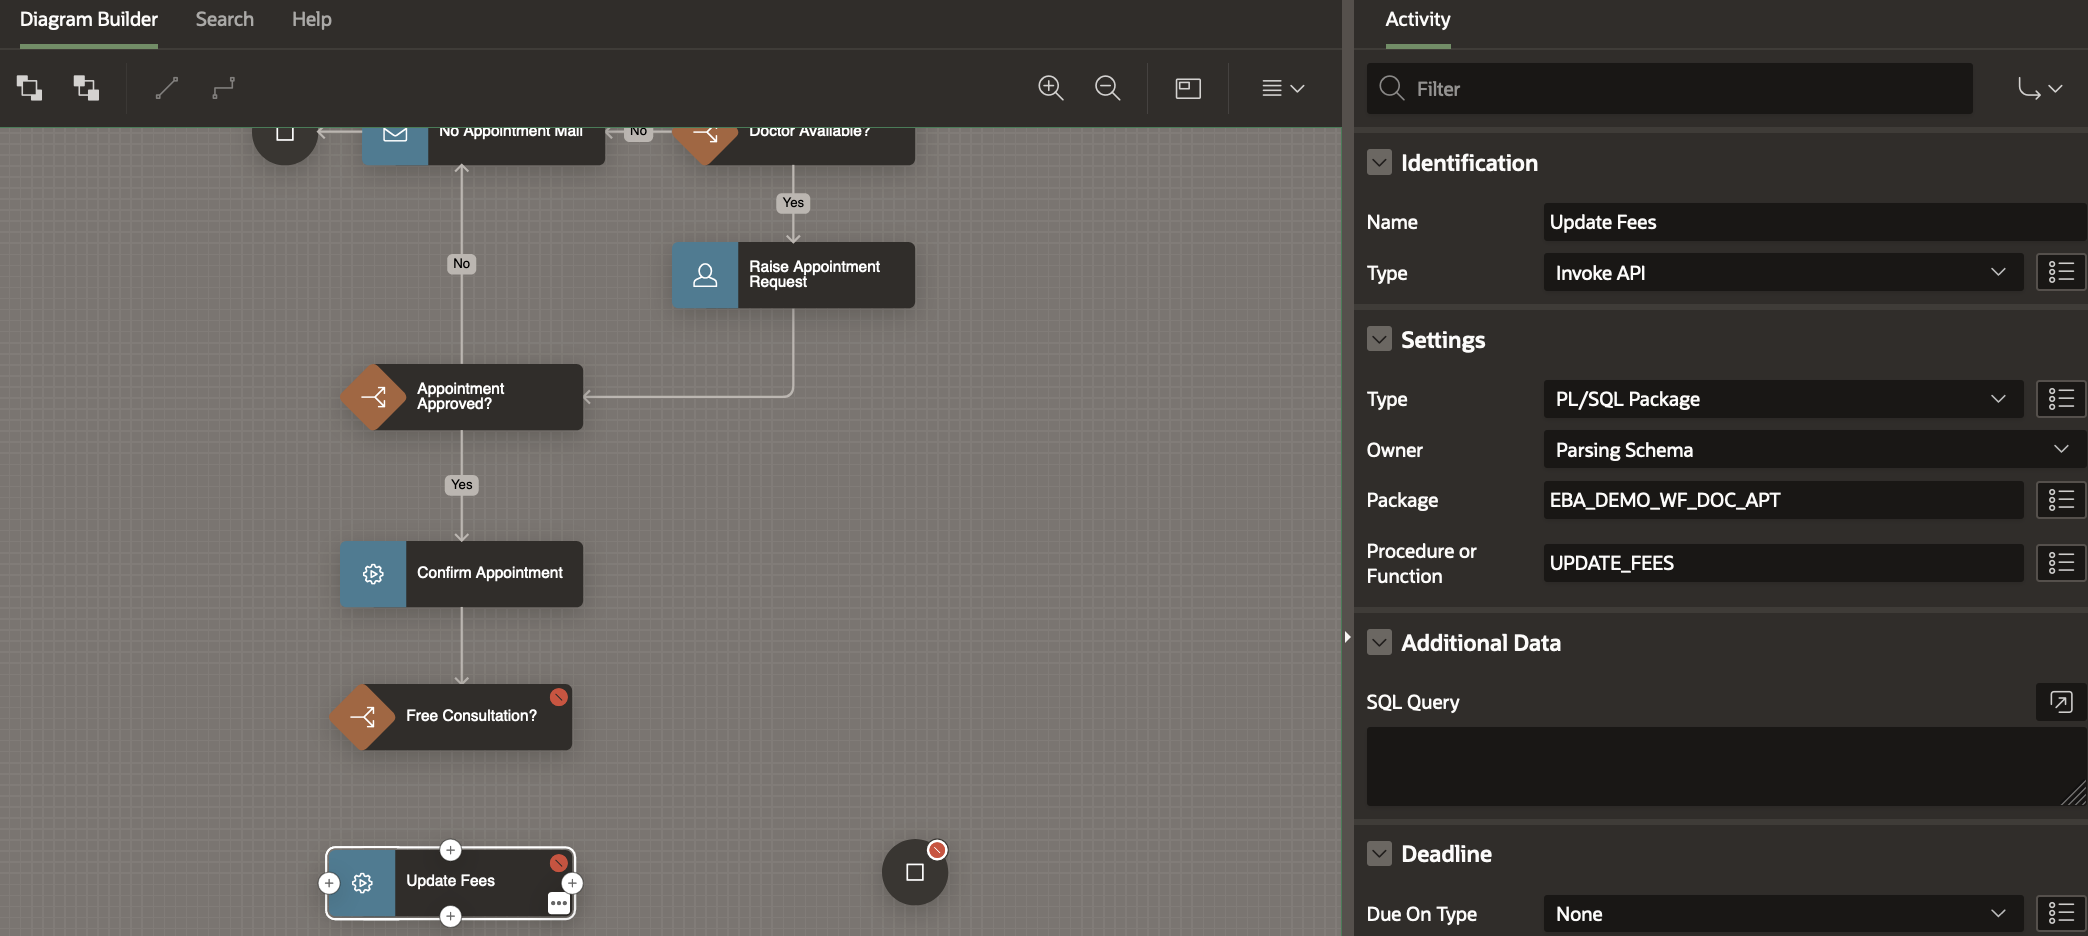
Creating the Update Fees Activity and the Send Invoice Email to Patient Activity
From the Activities Palette, drag and drop an Invoke API activity below the Free Consultation? activity.
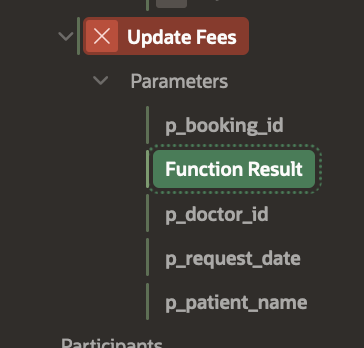
In the Property Editor rename it to Update Fees. Set the Package as EBA_DEMO_WF_DOC_APT and Procedure as UPDATE_FEES .
This procedure will update the Cosultation Fee (FEE) in the APPOINTMENT Table record and also populate the Workflow Variable FEE.
Set the Parameters for the Invoke API activity
- Set p_booking_id to Item-> Version Variable BOOKING_ID.
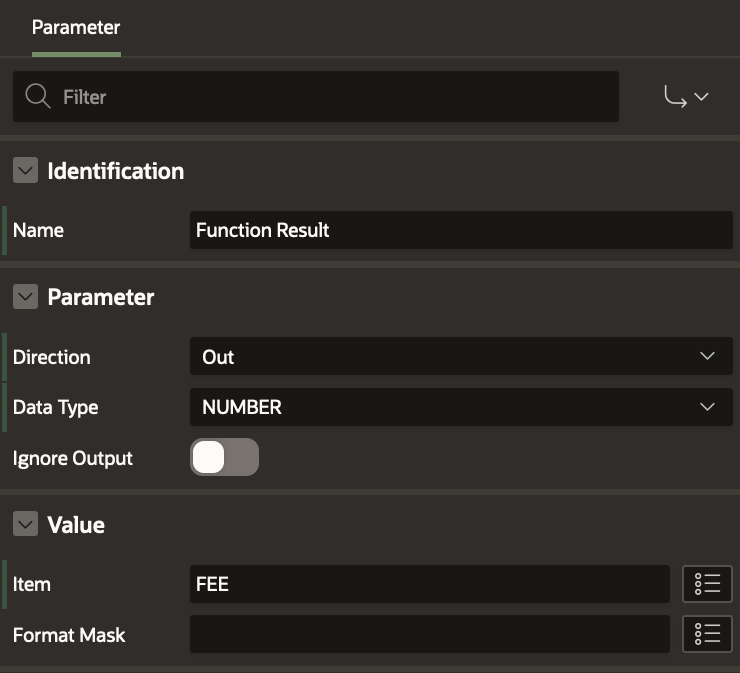
- Set Function Result to Item -> Version Variable FEE
- Set p_doctor_id to Static Value -> &DNO.
- Set p_request_date to Item -> Workflow Parameter REQUEST_DATE
- Set p_patient_name to Item -> Workflow Parameter PATIENT_NAME
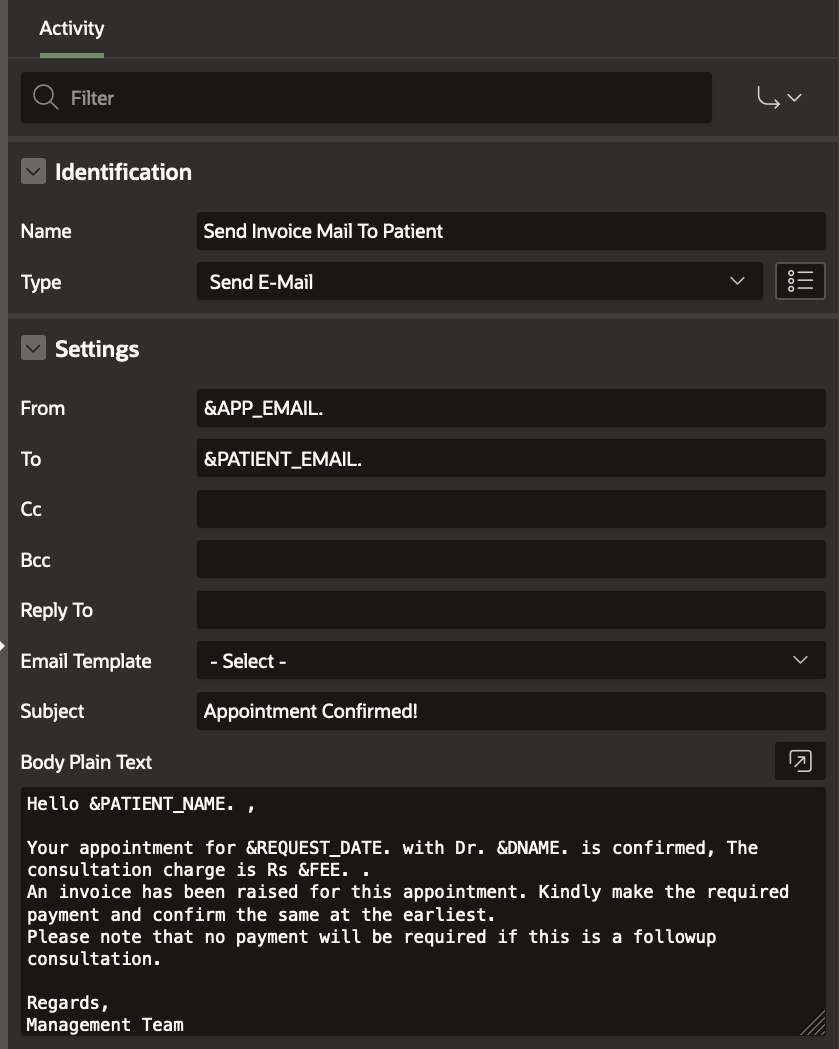
From the Activities Palette, drag and drop a Send E-Mail activity next to the Update Fees activity. In the Property Editor
- Set the Name as Send Invoice Email To Patient.
- Set the attribute To as &PATIENT_EMAIL.
- Set the attribute Subject as Appointment Confirmed!
- Set the Body Plain Text attribute as shown below
Hello &PATIENT_NAME. ,
Your appointment for &REQUEST_DATE. with Dr. &DNAME. is confirmed, The consultation charge is Rs &FEE. .
An invoice has been raised for this appointment. Kindly make the required payment and confirm the same at the earliest.
Please note that no payment will be required if this is a followup consultation.

Regards,
Management Team
ABC Hospital
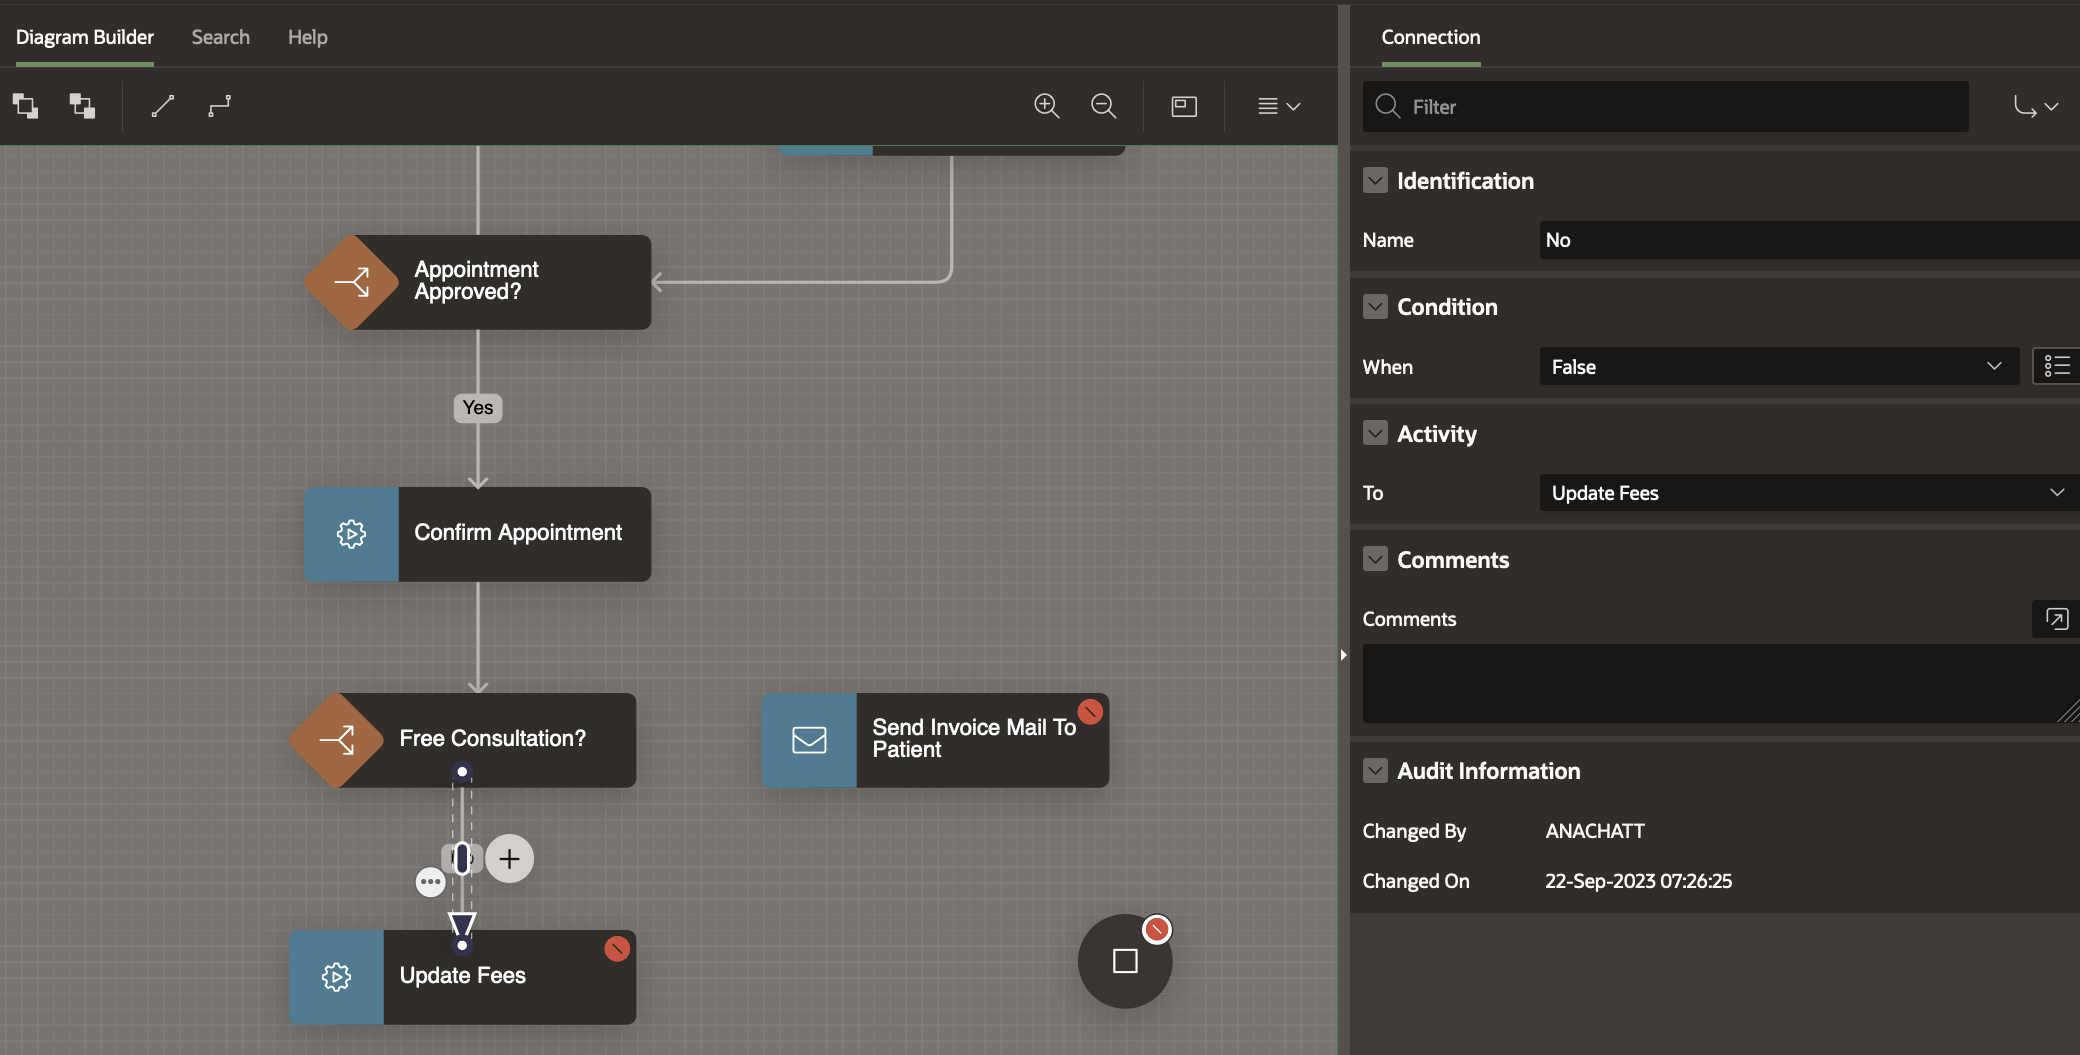
Draw a Connection from Free Consultation? activity to the Update Fees activity. In the Property Editor,
- Set Name to No
- Set When to False
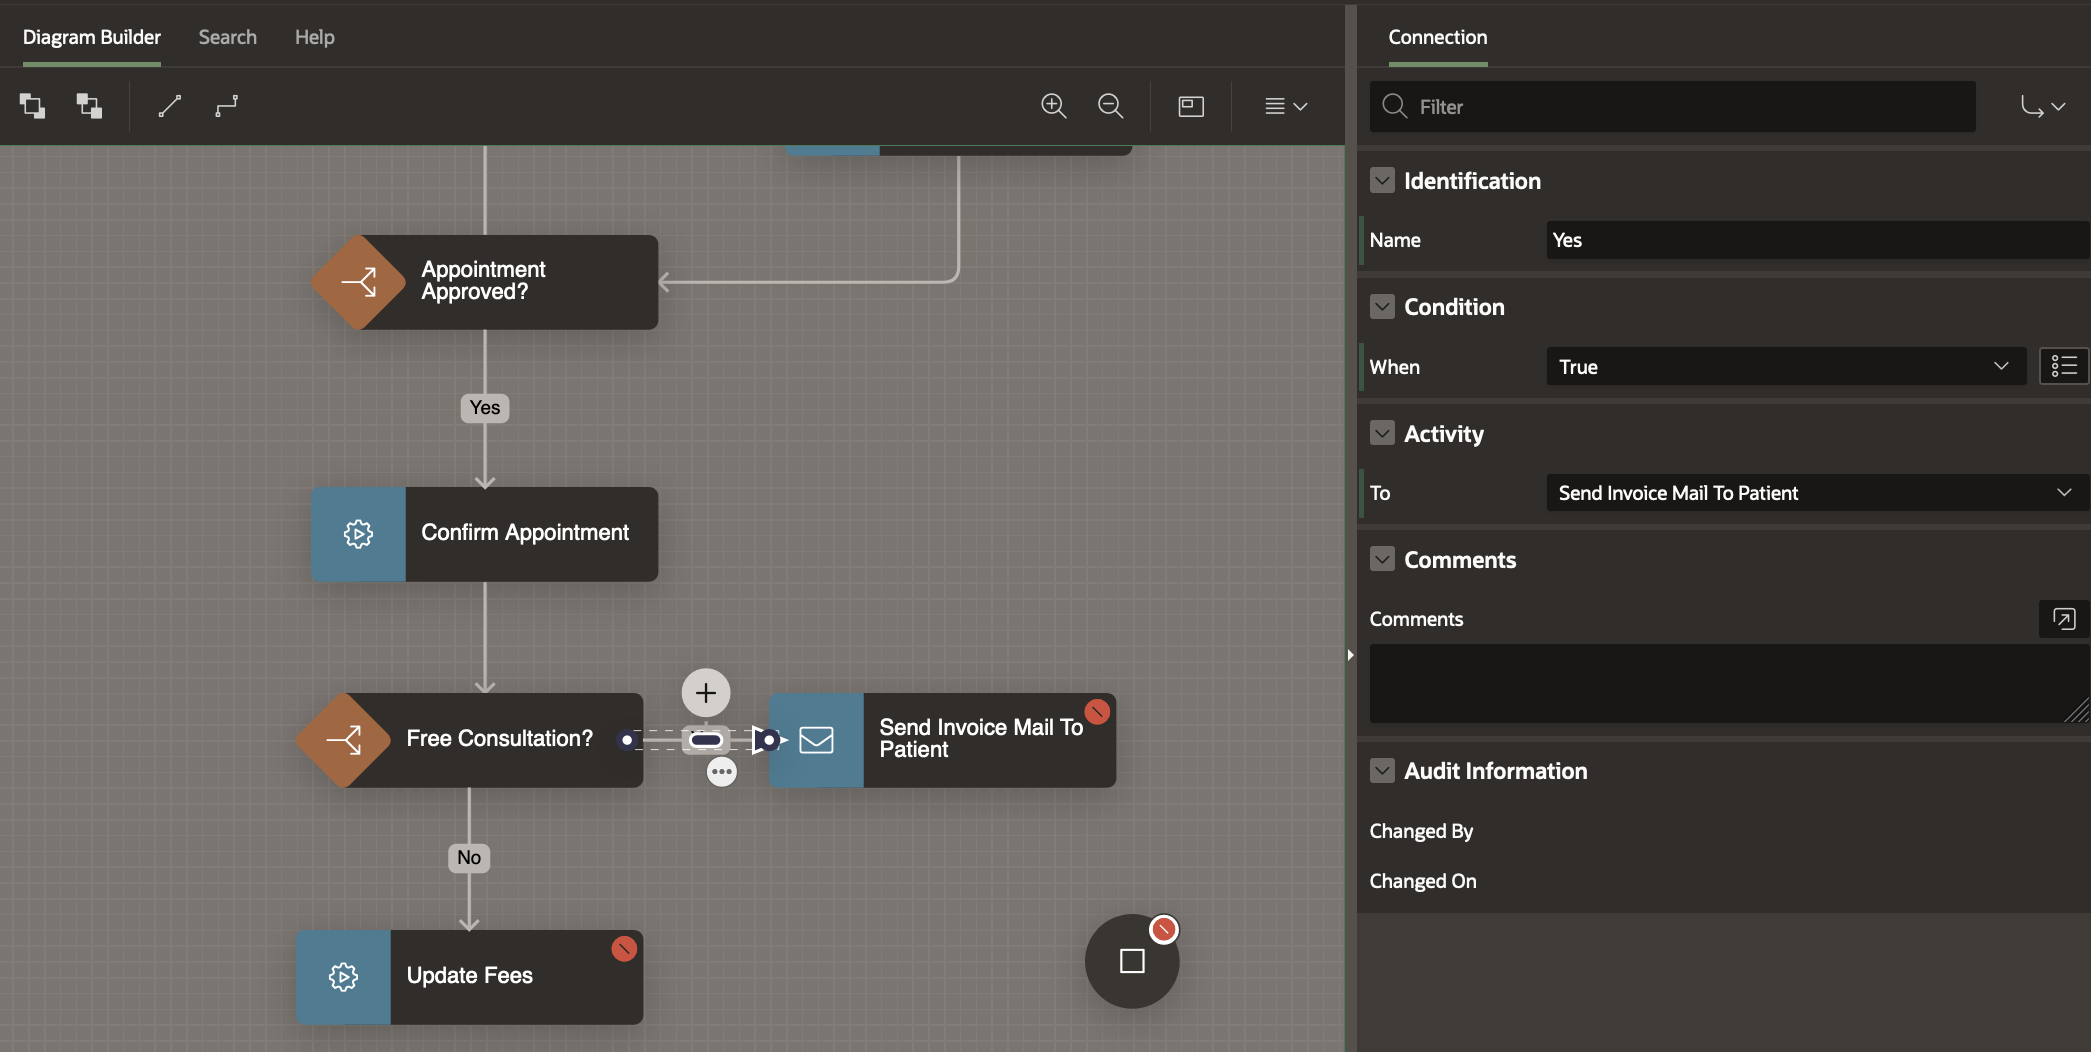
Draw a Connection from Free Consultation? activity to the Send Invoice Mail To Patient activity. In the Property Editor,
- Set Name to Yes
- Set When to True
Draw Connections from Send Invoice Mail To Patient and Update Fees to the Complete Appointment End Activity to get rid of the validation errors in the Workflow Model.
Click on the Save button to save the changes.
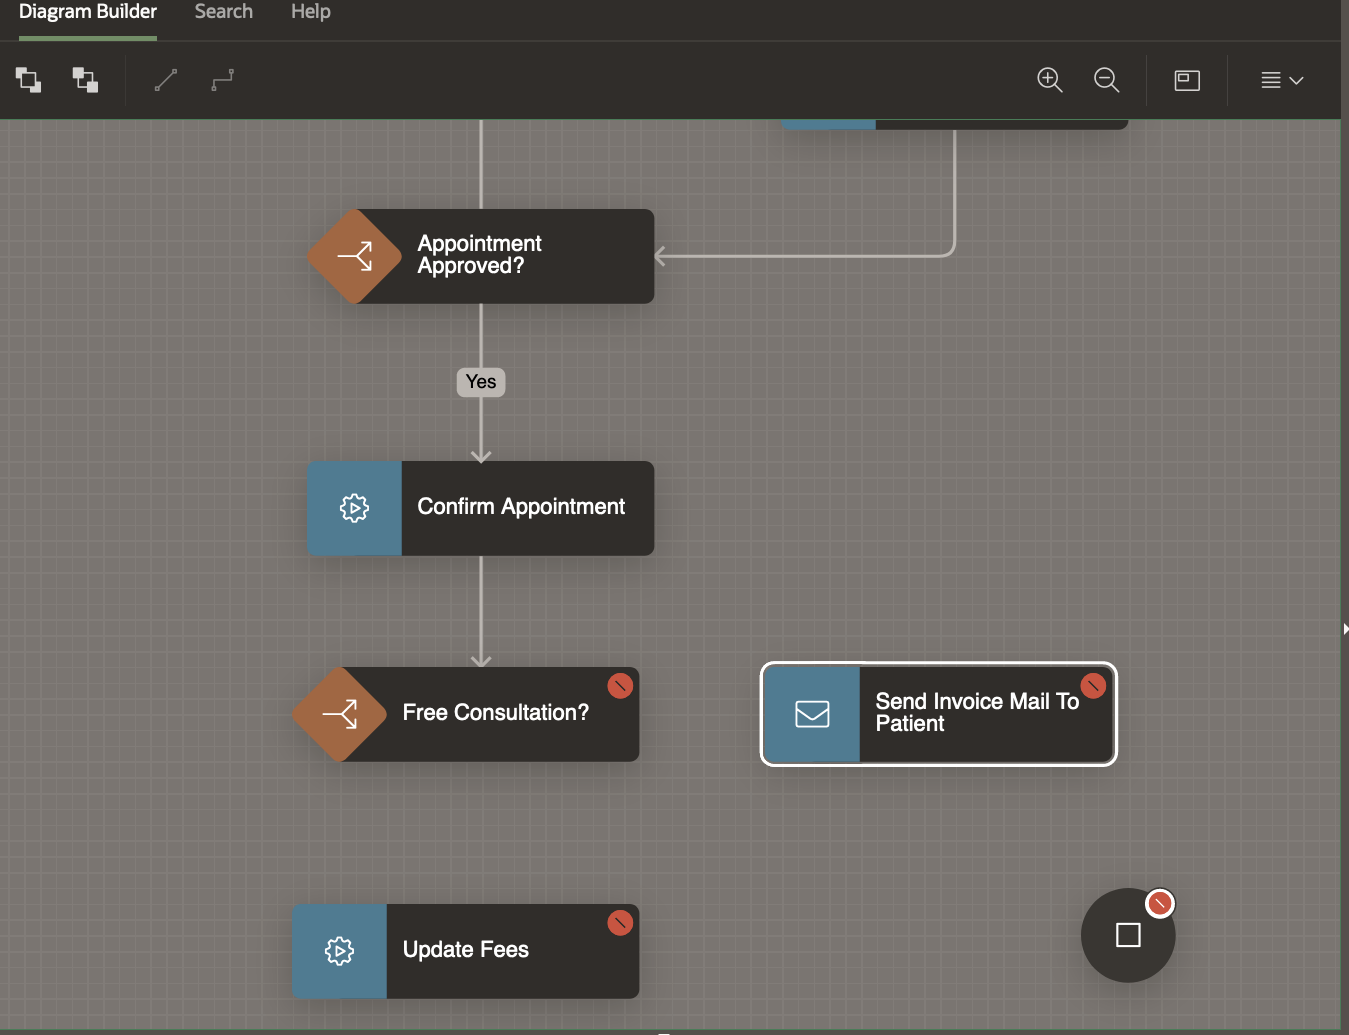
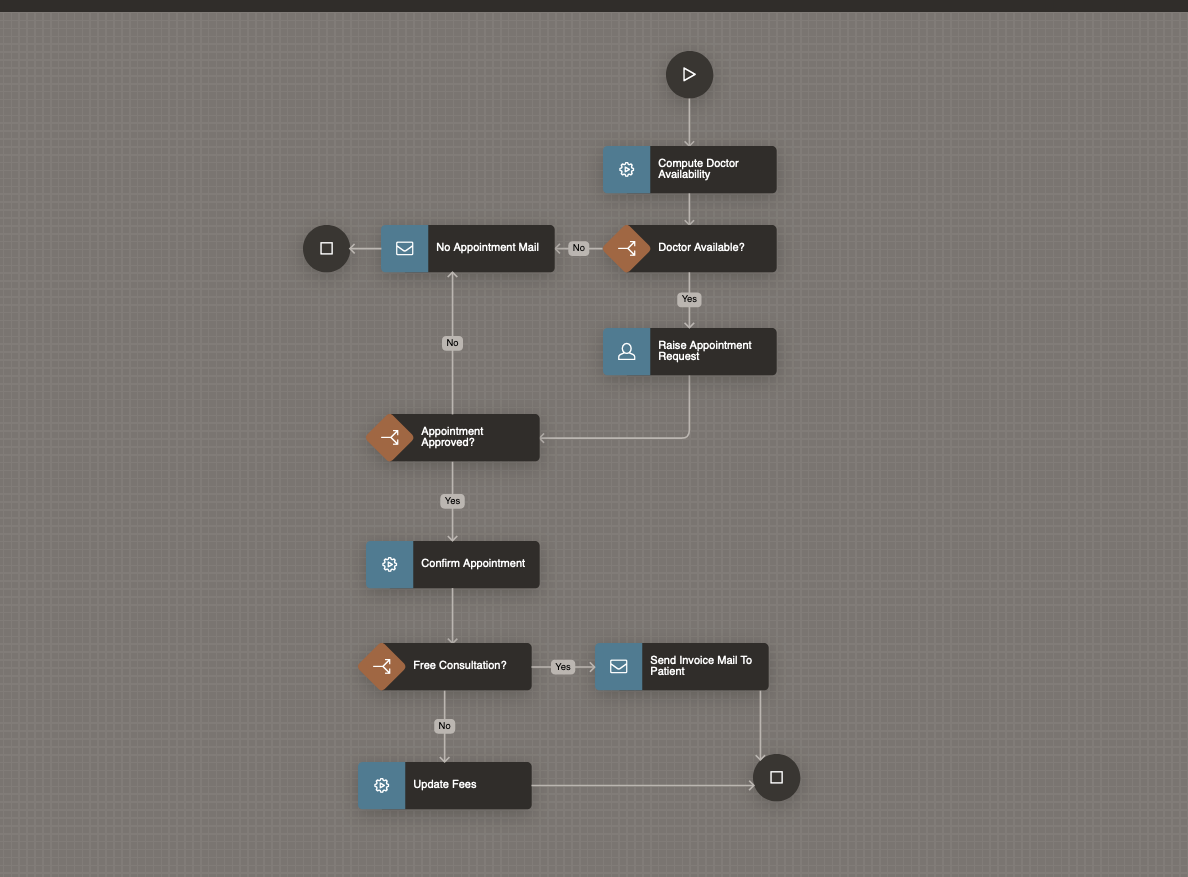
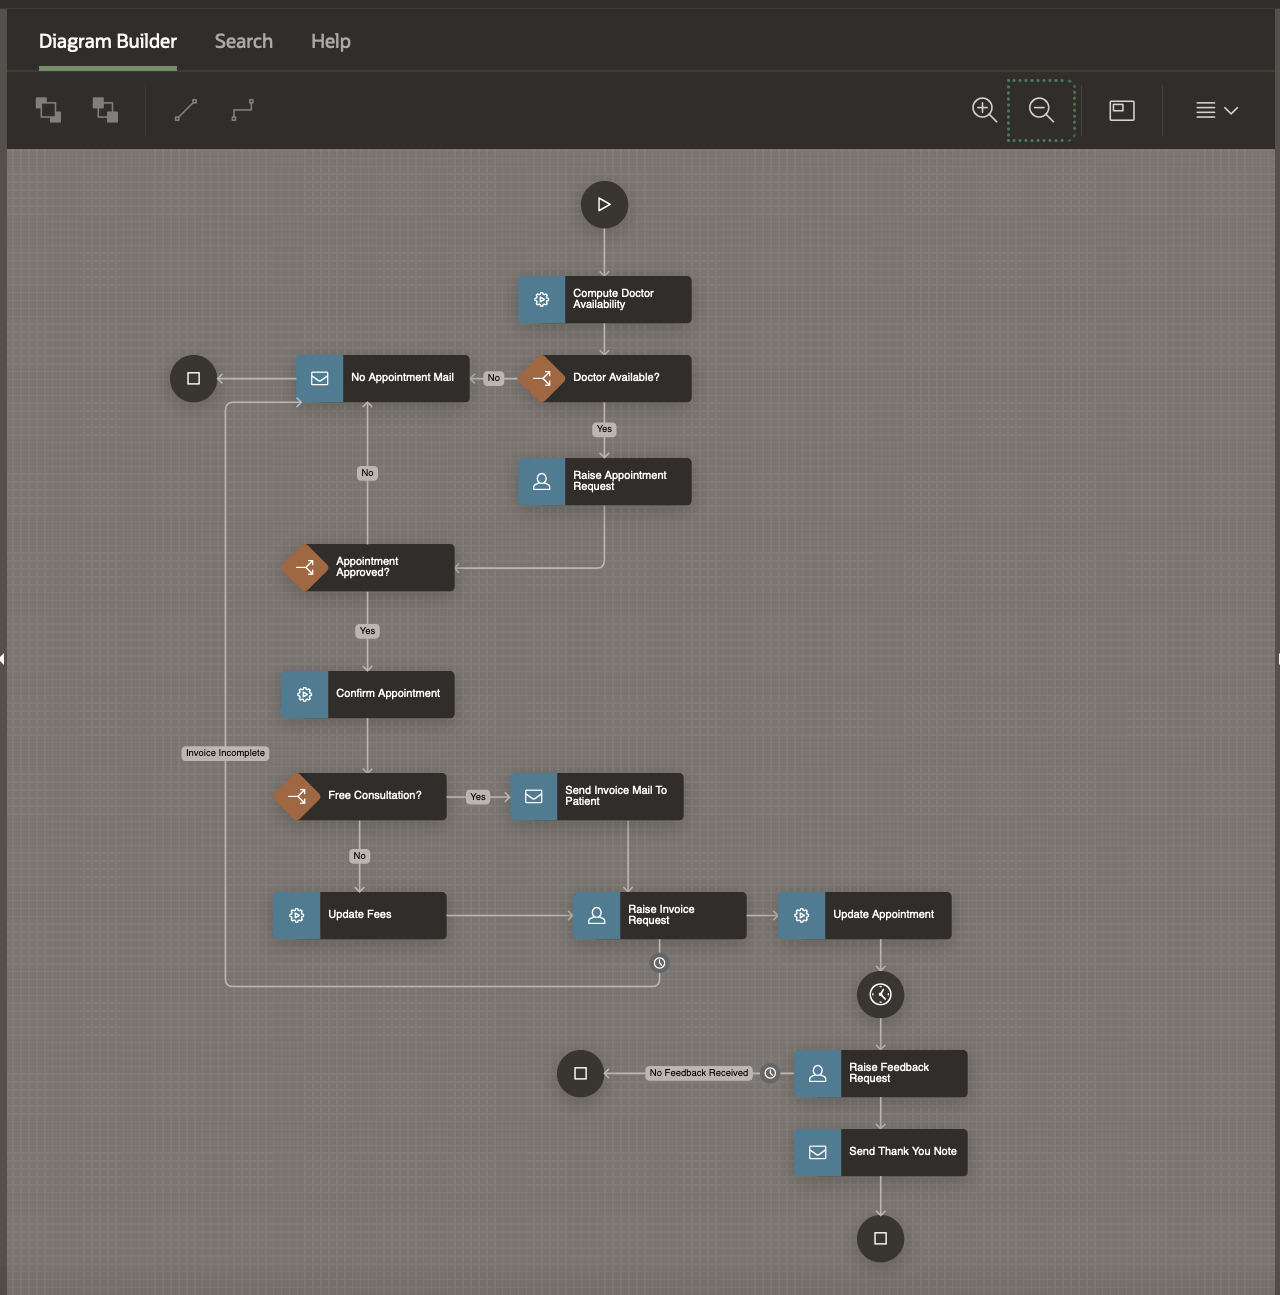
The Workflow Model should now look like the picture below.
Adding the Invoice Request Human Task Activity
At this point the workflow needs to raise an Invoice Request for the patient to confirm.
From the Activities Palette, drag and drop a Human Task – Create Activity and place it to the right of the Complete Appointment End Activity.
Detach the two connections from Update Fees and Send Invoice Mail To Patient activities and attach them to the Human Task activity.
In the property editor for the Human Task Activity,
- Set the Name as Raise Invoice Request
- Set the Task Definition as Invoice Request
- Set the Details Primary Key Item as BOOKING_ID
- Set the Due On Type to Interval and Interval to PT30M (this means that if the payment is not made and the invoice is not confirmed by the patient within 30 minutes then the Appointment request will be closed)
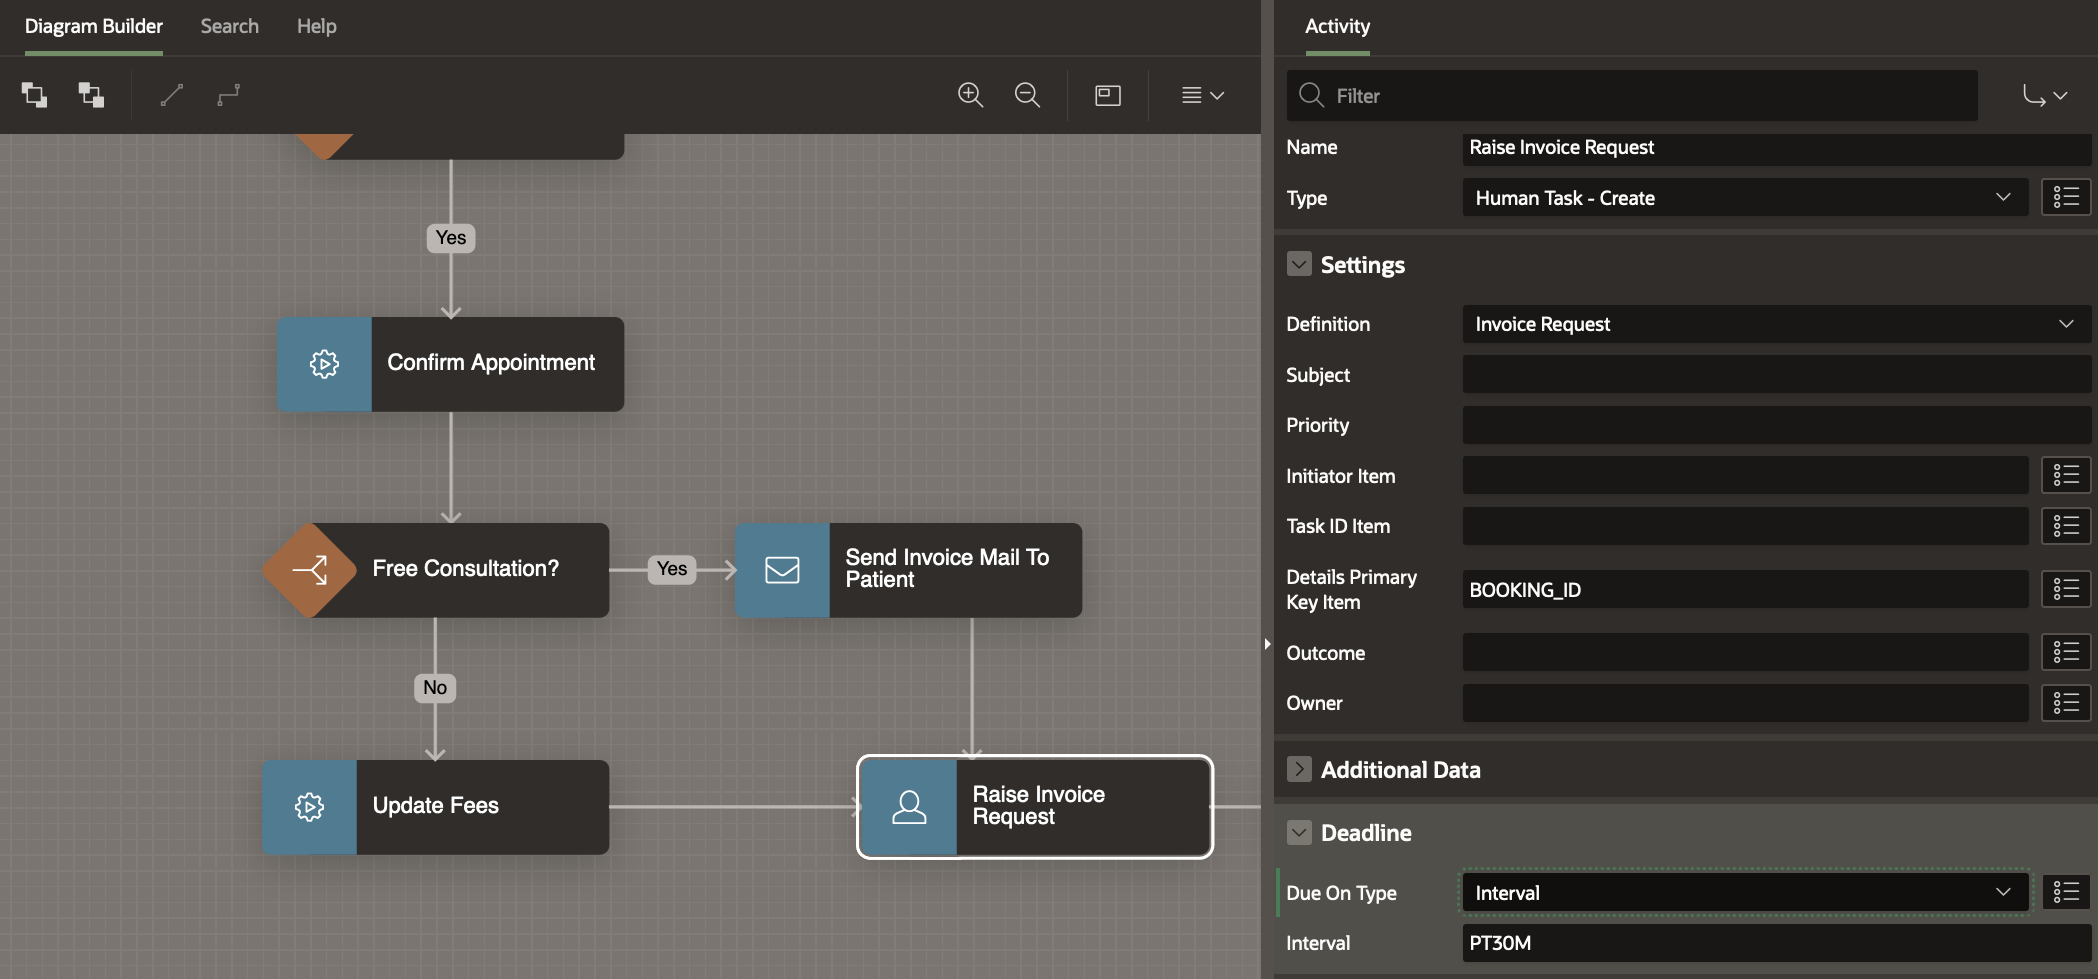
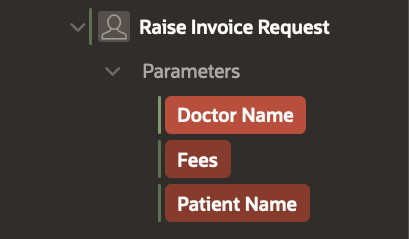
The Human Task Parameters show up in RED in the tree.
- Set Doctor Name as Static Value &DNAME.
- Set Fees as Item Picker -.> Version Variable -> FEE
- Set Patient Name as Item Picker -> Workflow Parameter -> PATIENT_NAME
Click on Save to save the changes.
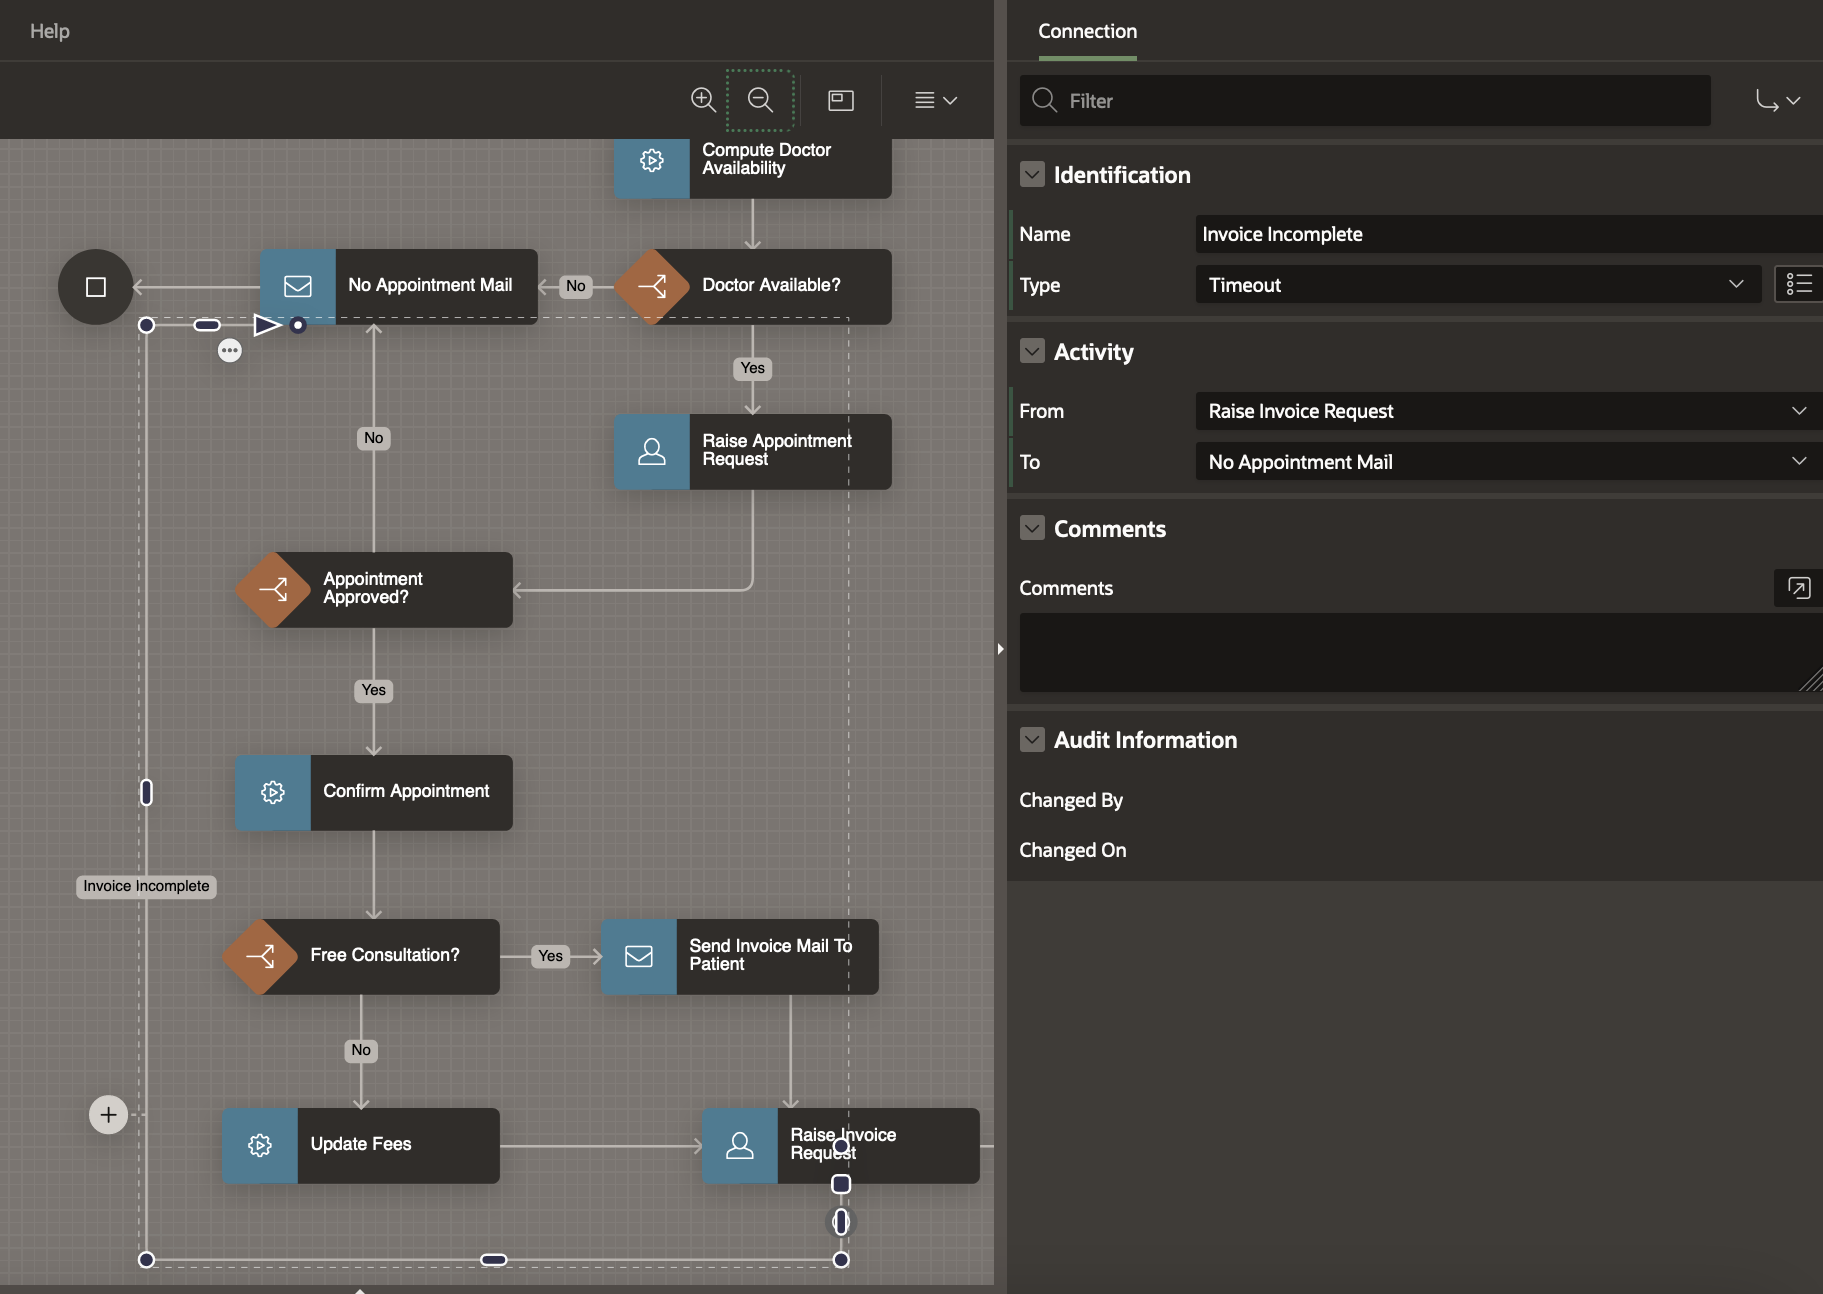
Adding a Time Check (Timeout Connection) for the Invoice Request completion.
Click on the 3 Dots at the top right corner of the Raise Invoice Request Activity to open the Context Menu and Select Create Connection.
Click on the new Connection and in the Property Editor
- Set the Name to Invoice Incomplete
- Set the Type to Timeout
- Set the Activity-> To attribute to No Appointment Mail
NEXT STEPS…
Once the Patient confirms the invoice / makes the payment , the Appointment record status needs to be updated to PAID .
Drag and Drop an Invoke API activity on the Connection between the Raise Invoice Request and Complete Appointment activities.
In the Property Editor rename it to Update Appointment.
Set the Package as EBA_DEMO_WF_DOC_APT and Procedure as UPDATE_APPOINTMENT .
This procedure will update the Status in the APPOINTMENT Table record to ‘PAID’.
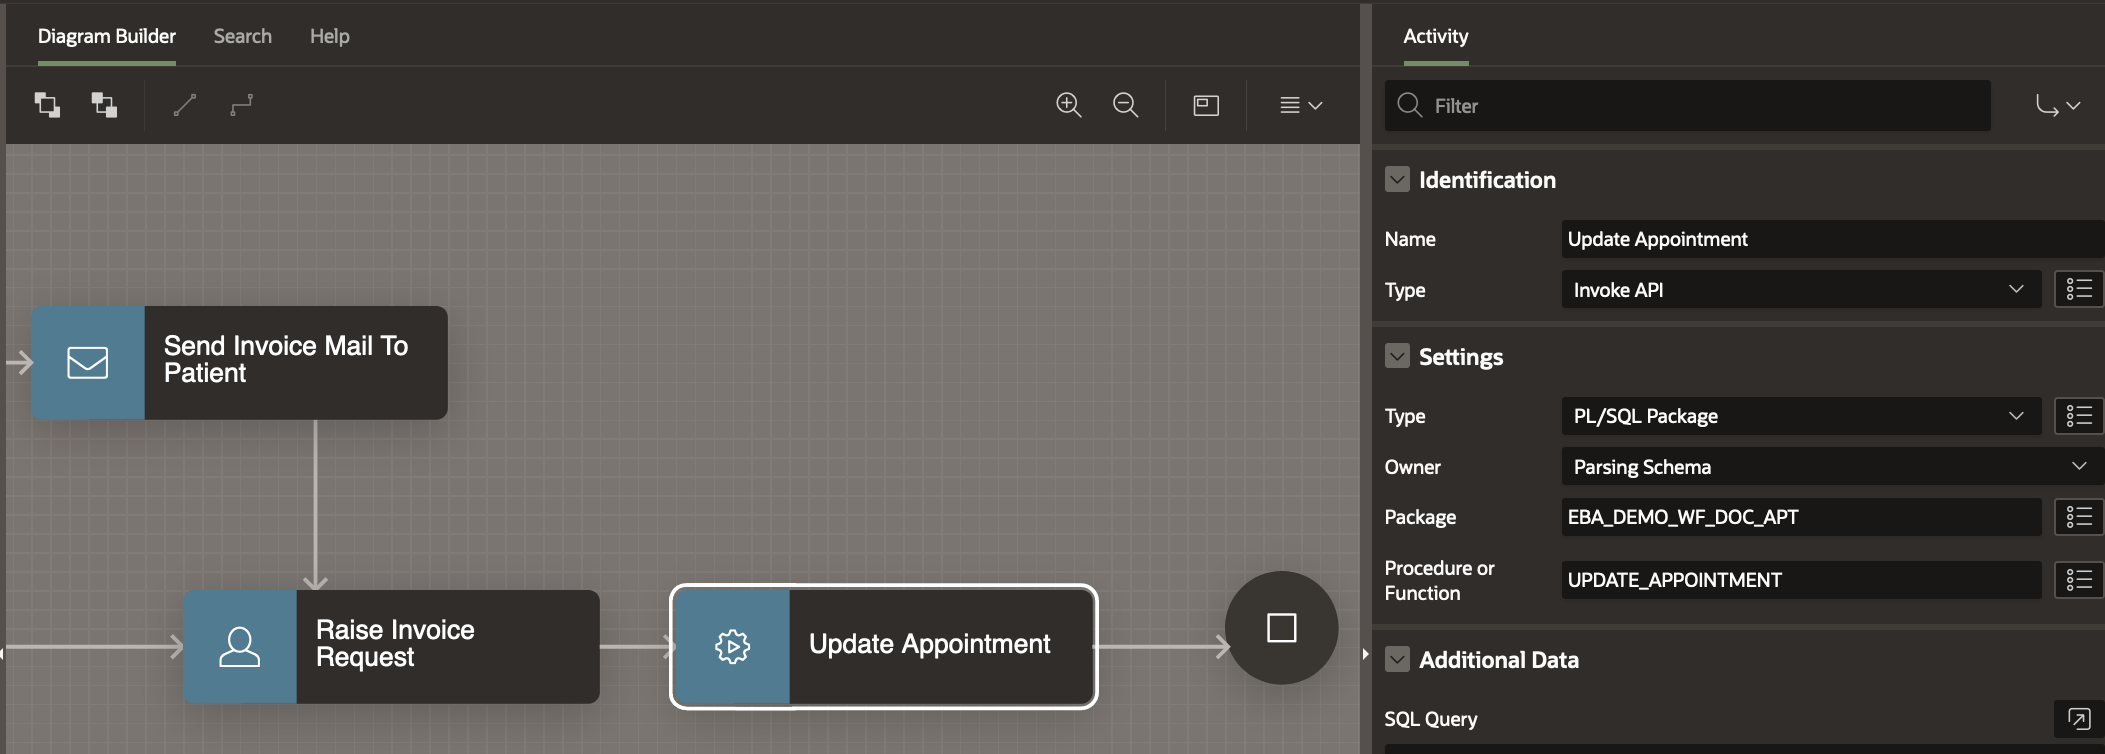
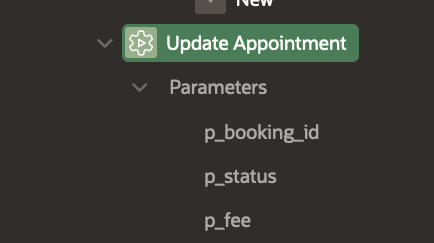
Set the Parameters for the Invoke API activity by clicking on them in the Workflow Tree
- Set p_booking_id to Item-> Version Variable BOOKING_ID.
- Set p_status to Static Value -> PAID
- Set p_fees to API Default
Final Steps in the Workflow…
Going back to our flowchart, at this point the Workflow waits for the appointment to happen and after that it raises a Feedback Request for the Patient. If the feedback is not received within a specific period, the Workflow is Completed without Feedback , else a Thank You Email is sent to the Patient.
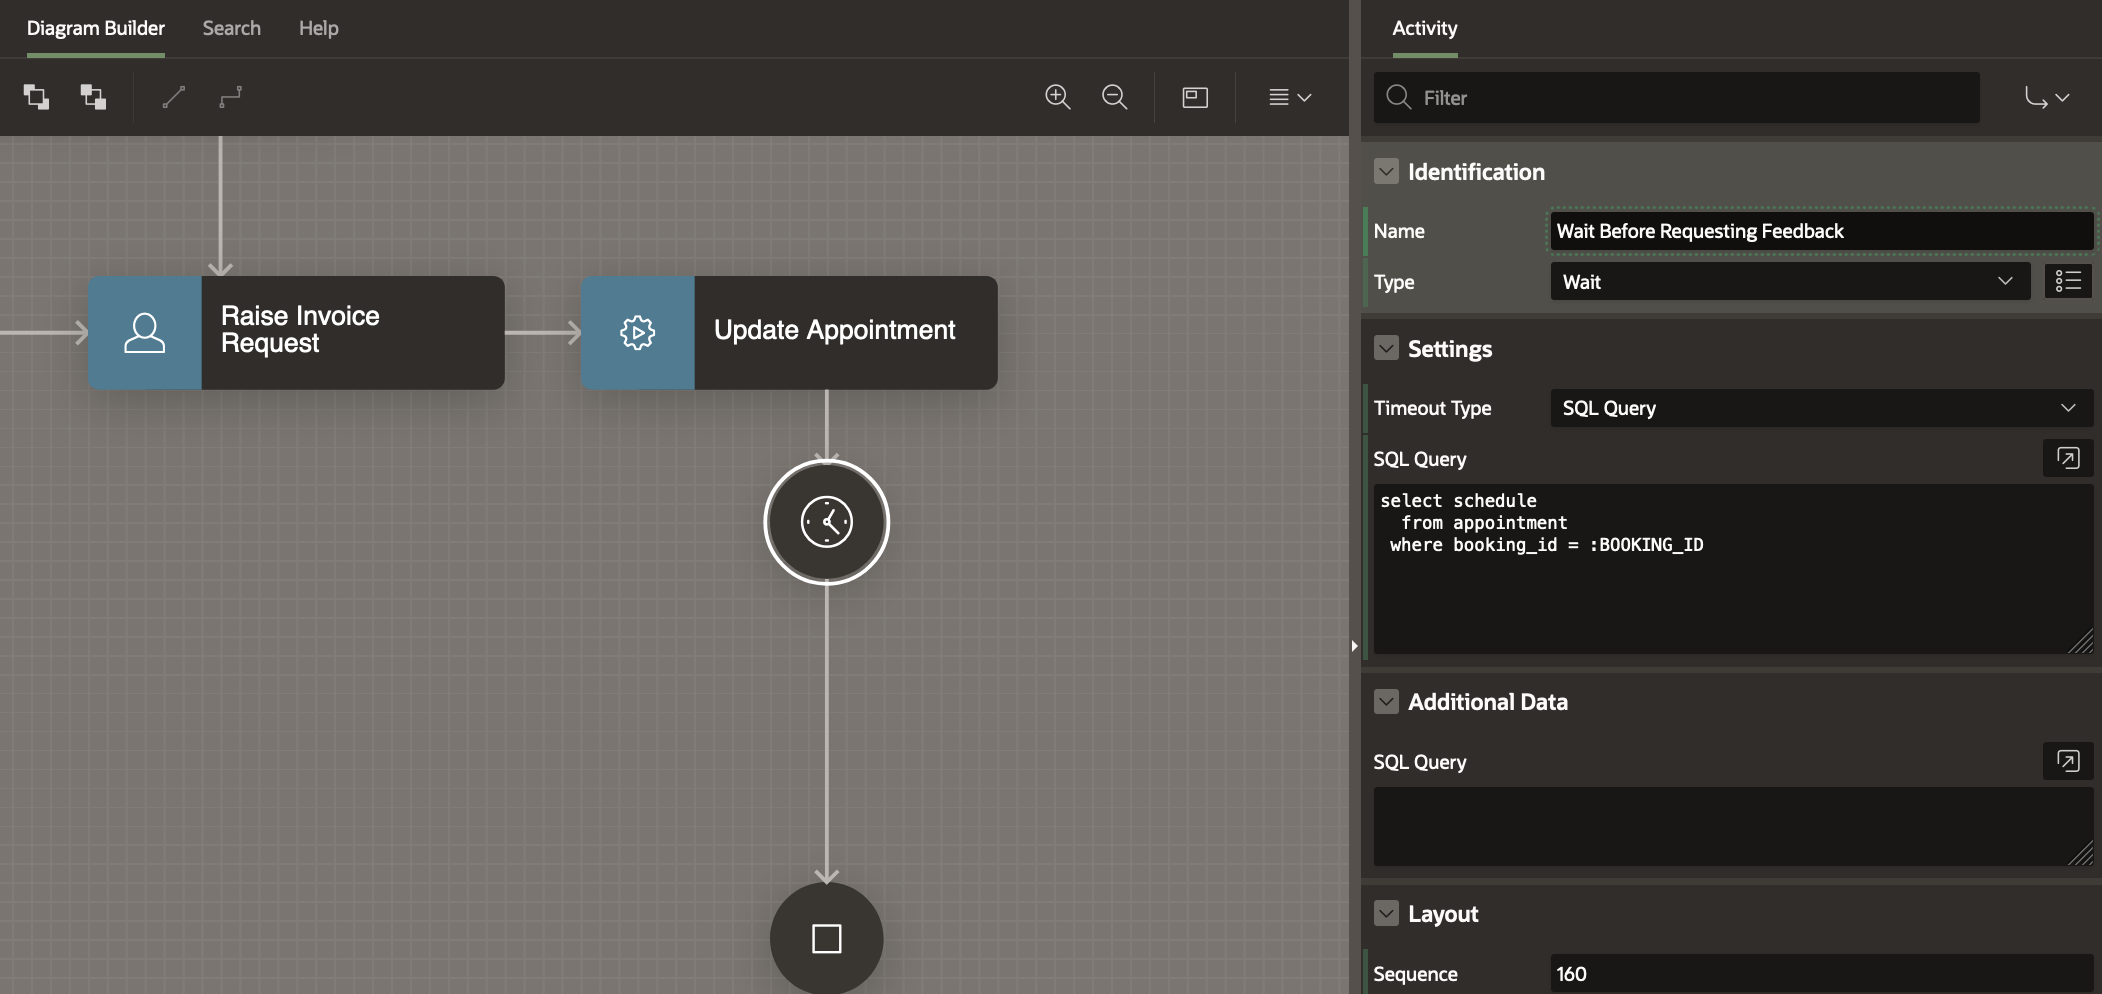
From the Activities Palette , drag a Wait Activity and drop it on the connection between the Update Appointment and the Complete Appointment activities. In the Property Editor
- Set Name to Wait Before Requesting Feedback
- Set Timeout Type as SQL Query
- In SQL Query enter the following SQL Code
select schedule
  from appointment
 where booking_id = :BOOKING_ID
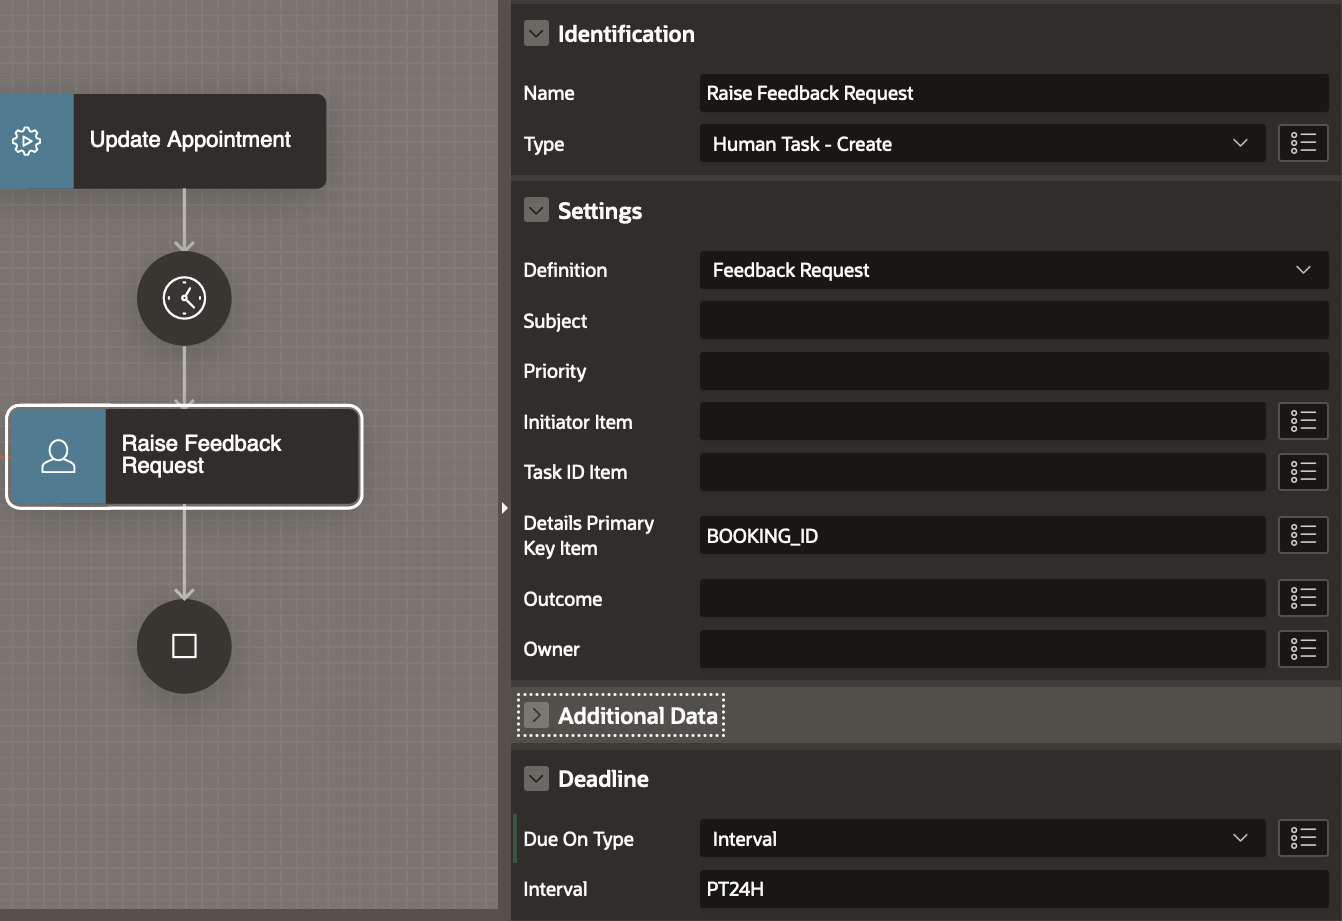
From the Activities Palette , drag a Human Task – Create Activity and drop it on the connection between the Wait Activity and the Complete Appointment activities.
In the Property Editor
- Set Name to Request For Feedback
- Set Task Definition to Feedback Request
- Set Detail Primary Key Item to BOOKING_ID
- Set Due On Type to Interval and Interval to PT24H (this implies that the Workflow will wait at most 24 hours for the feedback activity to be completed )
Set the Human Task Parameters
- Set Booking Id to Item Picker -> Version Variables -> BOOKING_ID
Drag a Workflow End Activity from the Activity Palette and drop it on the Diagram area to the right of the Raise Feedback Request activity.
In the Property Editor, set its Name to End Without Feedback.
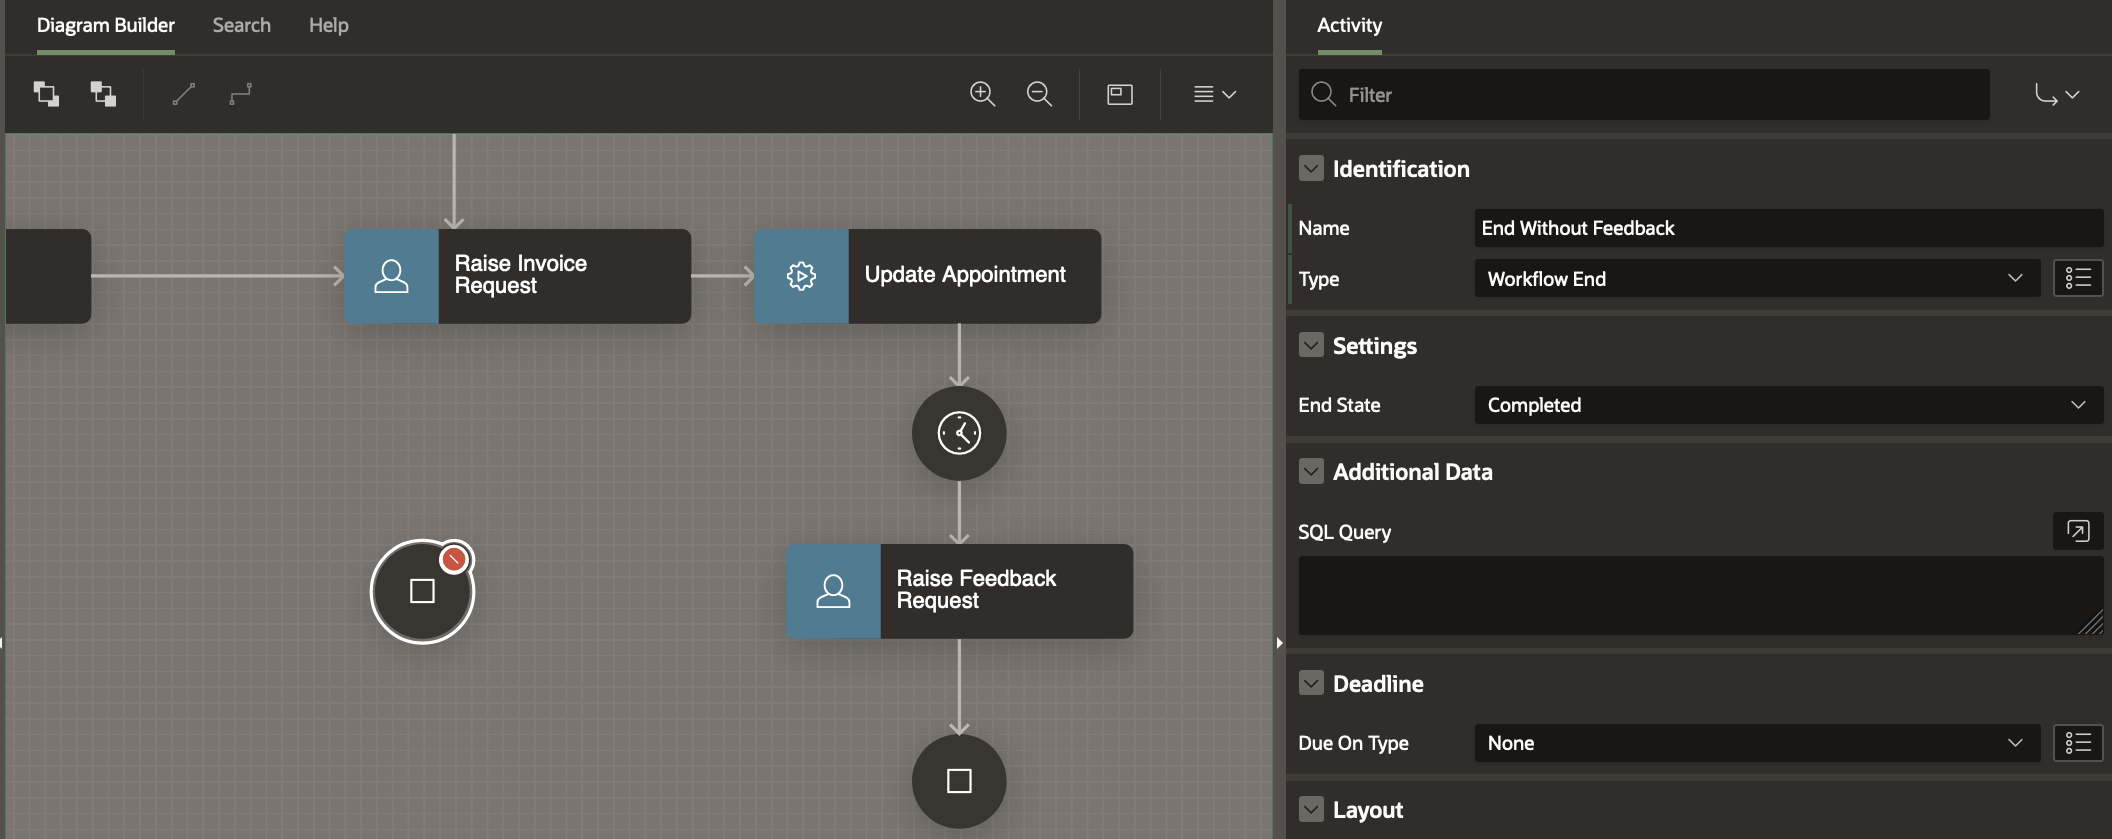
Draw a Connection from the Raise Feedback Request to the End Without Feedback Activity.
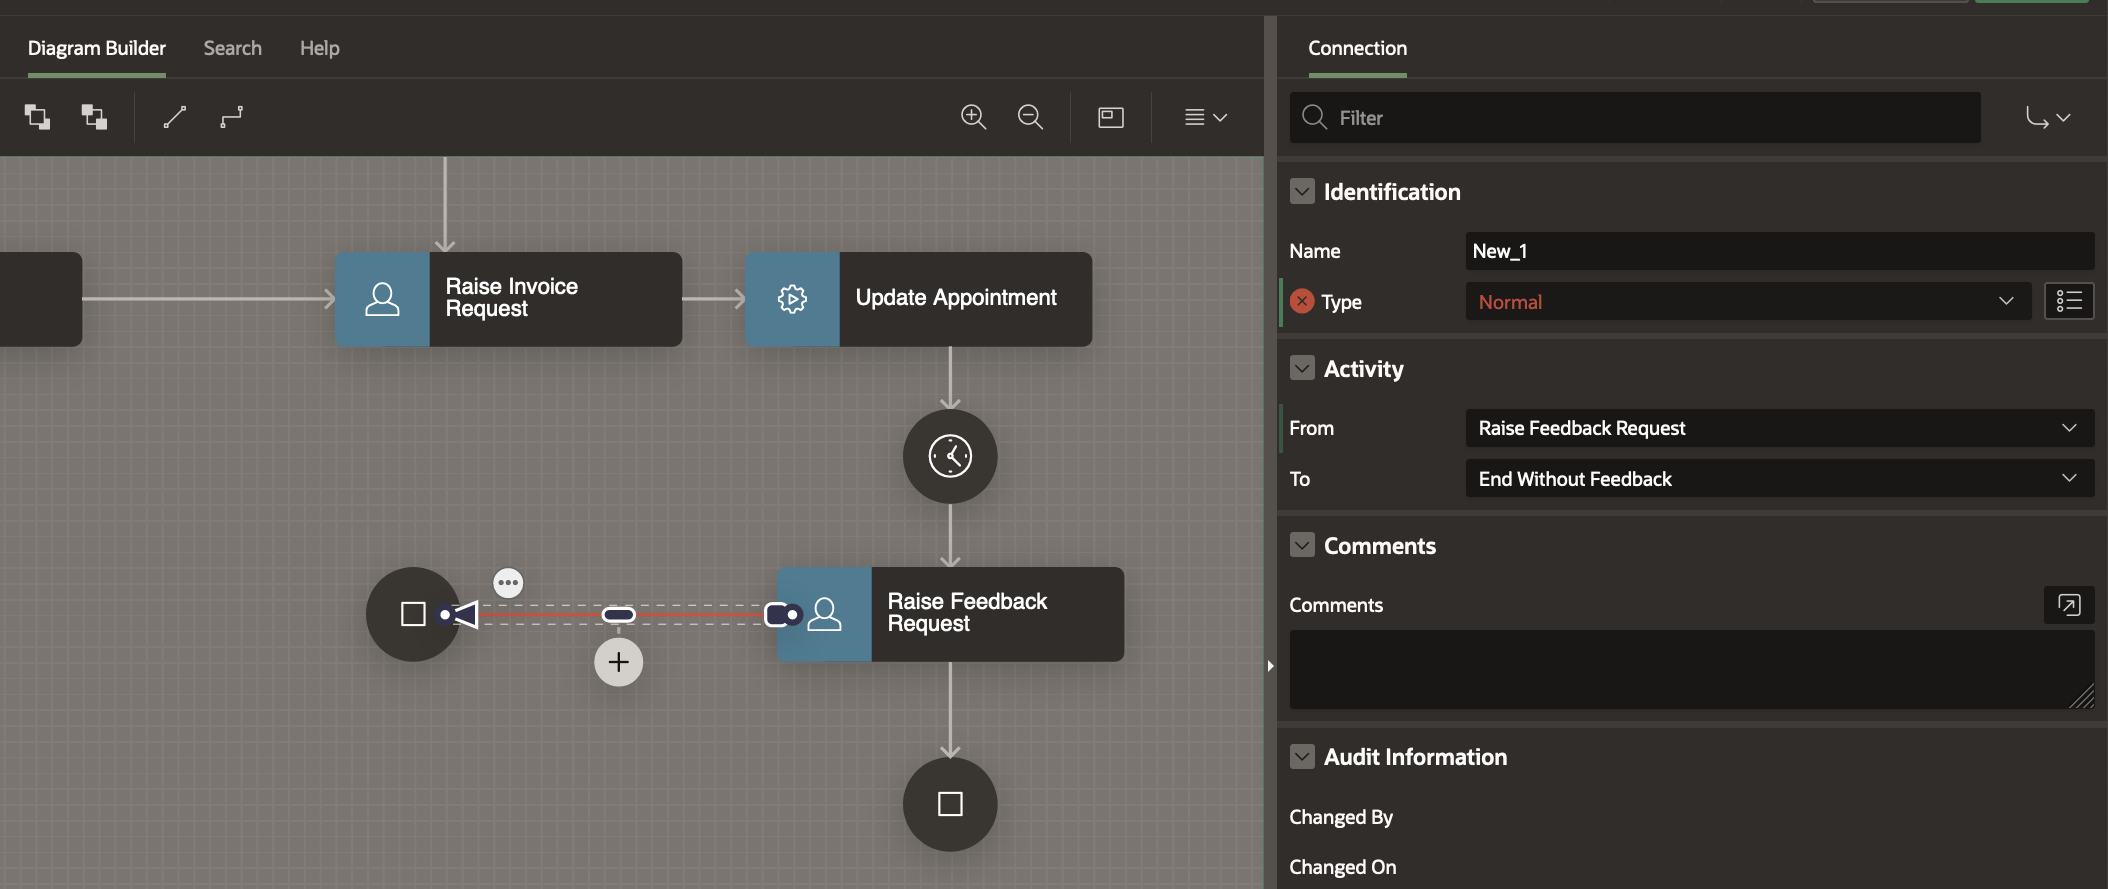
Notice that the connection is in RED and this is because an activity cannot have more than one outgoing connection of type Normal.
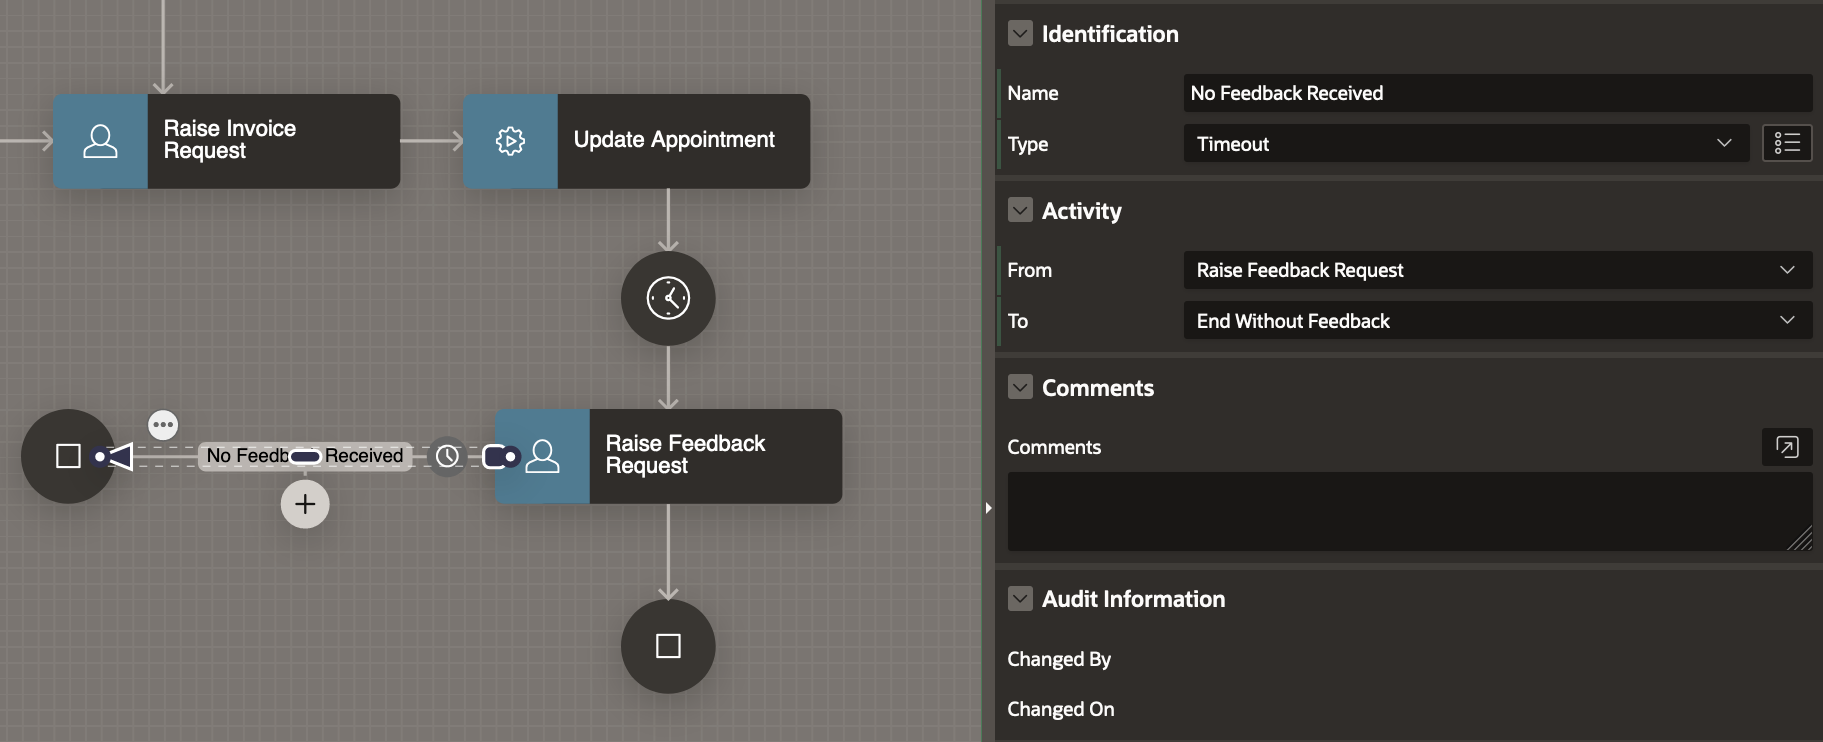
Click on the Connection and in the Property Editor
- Set the Type to Timeout
- Set the Name to No Feedback
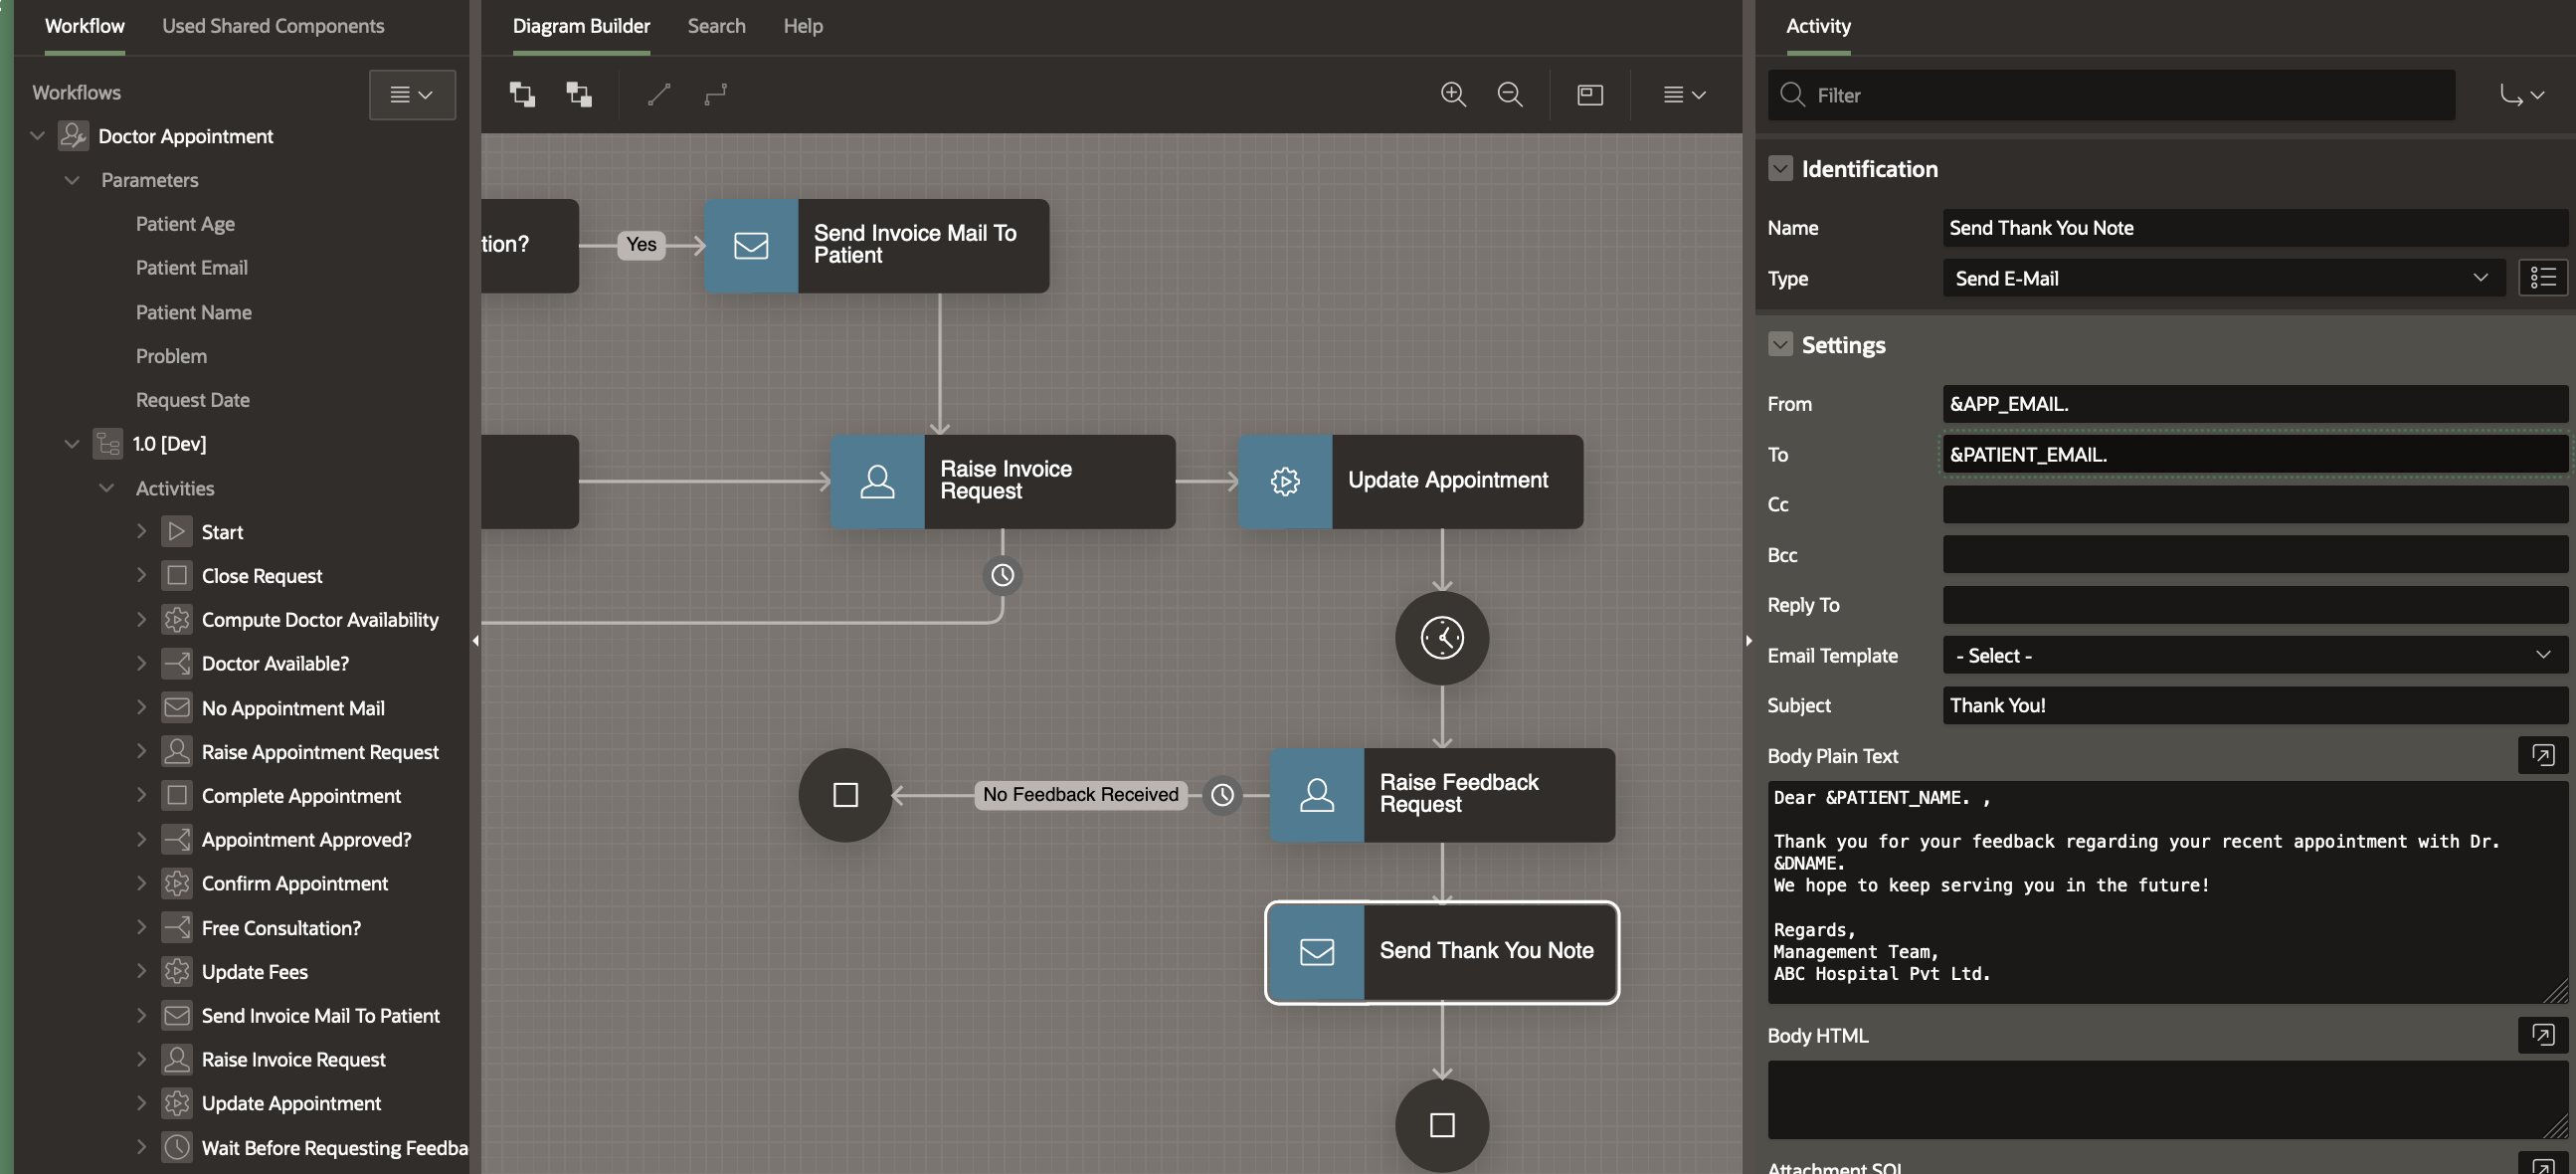
Drag a Send E-Mail Activity from the Activities Palette and drop it on the connection between Raise Feedback Request and Complete Appointment End Activity
In the Property Editor
- Set the Name to Send Thank You Note To Patient
- Set the To property in the Settings to &PATIENT_EMAIL.
- Set the Subject to Thank You!
- Set the Body Plain Text as shown below
Dear &PATIENT_NAME. ,

Thank you for your feedback regarding your recent appointment with Dr. &DNAME.
We hope to keep serving you in the future!

Regards,
Management Team,
ABC Hospital Pvt Ltd.
Save the changes by clicking the Save button.
At this point our Appointment Workflow model is Complete!
In the Next Section, we will to create Pages in the Application which will use the Workflow.