Public networking in Oracle Solaris Cluster is a set of
components that provides two mechanisms through which your client
applications can access services on the cluster: the logical hostname (LH) and the shared address (SA). It also monitors the IP
interfaces that can hold IP addresses for LH/SA, and manages restart and
failover of LH/SA. The IP interfaces are specified via a property of LH/SA called NetIfList. Oracle Solaris Cluster is designed to use only highly available IP interfaces for public networking.
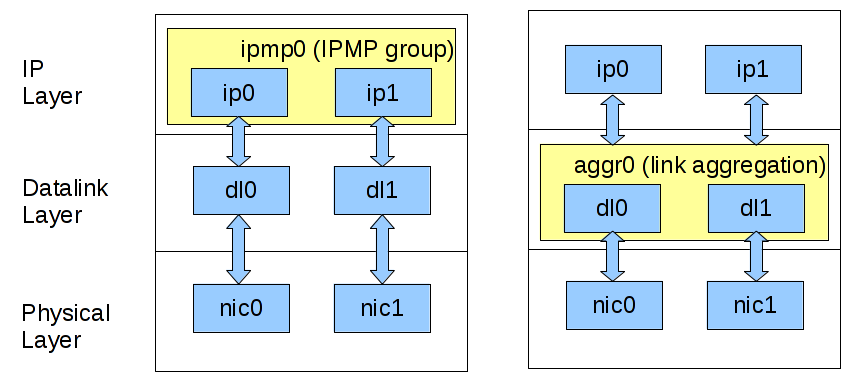
In Oracle Solaris, IPMP is an IP layer high availability solution
while link aggregation is a link layer high availability solution. Since link aggregation is highly available, VNIC that is created over link aggregation inherently becomes highly available. The
diagram below shows the difference between IPMP and link aggregation.
The benefits of using link aggregation versus IPMP are –
- Simplicity in the context of network virtualization (illustrated in the zone cluster example below).
- Able to use features of link layer such as link protection, user-defined flows and link properties customization(eg. bandwidth).
In 4.2 and earlier versions of Oracle Solaris Cluster, only IP multipathing (IPMP) can be
used as cluster public network interfaces which means cluster only
monitors the states of IPMP, and IP addresses for LH/SA must be held on
IPMP.
From Oracle Solaris Cluster 4.3 and on, in addition to IPMP, the cluster is able to use IP over
link aggregation and IP over VNIC over link aggregation for public
networking. Link aggregation can be either trunk or datalink multipathing (DLMP). The virtual network interface card (VNIC) has to be created directly over a link
aggregation to be eligible for public networking use.
Configure logical hostname using link aggregation vs. using IPMP
Let’s use a typical task of cluster public networking – configuring a logical hostname, to illustrate how cluster works with link aggregation and how it is
different from using IPMP. Assume there is a 2-node cluster, and each node has two network adapters, net0 and net1.
| Use IPMP |
Use Link Aggregation |
|
1. Create an IP interface over each of the two data links, on both nodes.
|
1. Create a link aggregation containing two data links on both nodes.
|
2. Create IPMP containing the two IP interfaces from the previous step, on both nodes.# ipadm create-ipmp -i net0,net1 ipmp0 |
2. Create an IP interface over the link aggregation from the previous step, on both nodes.
|
| 3. Create a resource group, on one of the nodes.
|
3. Create a resource group, on one of the nodes.
|
4. Create an LH and use the IPMP created in the previous step to hold IP, on one of the nodes.# clrslh create -g rg -h <hostname list> -N ipmp0@1,ipmp0@2 lh0 |
4. Create an LH and use the IP interface created in the previous step to hold IP, on one of the nodes.
|
| 5. Bring the resource group online, on one of the nodes.
|
5. Bring the resource group online, on one of the nodes.
|
Comparing the two examples above, we can see that it is very
straightforward to tell cluster what interfaces to use for public
networking – just specify the interfaces in NetIfList.
Configure logical hostname in zone cluster using VNIC backed by link aggregation
Here is a bit more complex use case which shows how zone cluster
administrators can benefit from using IP over VNIC for public
networking.
|
1. Create a link aggregation in the global zone.
2. Create a VNIC in the global zone over the link aggregation from the previous step.
3. Assign the vnic0 to the target exclusive-IP zone cluster. 4. Stay in the global zone and create an LH for the zone cluster.
|
This procedure is simpler and less error-prone than using IPMP in a zone
cluster, in which case you have to assign multiple links to the zone, log
into the zone, create IP, and then create IPMP to be used for public
networking. It also scales better. If you have multiple zone
clusters, you don’t need to log into each and every zone to do the
configurations.
Display public networking interfaces
As always, clnode(1CL) can be used to show all the IP interfaces that the cluster is monitoring.
| # clnode status -m — Node Public Network Status — Node Name PNM Object Name Status Adapter Status ——— ————— —— ——- —— node2 vlan0 Online vlan0 Online node2 trunk1 Online net4 Online node2 dlmp0 Online net2 Online node2 dlmp0 Online net3 Online node2 vnic0 Online vnic0 Online node2 sc_ipmp0 Online net0 Online node1 vnic0 Online vnic0 Online node1 trunk0 Online net2 Online node1 sc_ipmp0 Online net0 Online |