We can implement manifest with “normal manifest” or “derived manifest script”. The former is a fixed xml file while the latter is a shell script to run during installation to dynamically generate an XML. I will talk about a normal manifest only in this article.
Now I will create a manifest to the machine with mac address 08:00:27:82:9D:49, that is, no other machine can use this manifest. In official document we see many techniques to “select” an appropriate manifest depend on the client hardware configurations, such as CPU number, memory capacity ……, but I do not like it. So I will create a manifest depends on mac address only so that I can 100% sure what manifest will be associated to a client. We will lose some flexibility but gain more certainty.
Let’s start with the command “installadm list -m”,
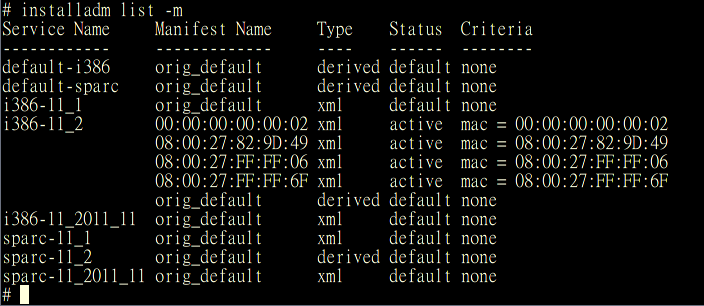
orig_default is the default manifest generated by “installadm create-service …”, and the type of orig_default for i386-11_2/sparc-11_2 (default-i386/default-sparc) is derived while that for other install services is xml. This is a new behavior in Solaris 11.2 to accept derived manifest script as the default manifest. But Solaris 11.2 can still accept xml format of manifest, check those names with mac address naming listed in i386-11_2.
Here is a typical normal manifest, (the lines in RED are comments)
<!DOCTYPE auto_install SYSTEM “file:///usr/share/install/ai.dtd.1”>
<auto_install>
<!–
The following lines specify the manifest name and auto reboot property.
1. I used mac address 08:00:27:82:9D:49 of my machine as the manifest name.
2. The auto_reboot = “false” makes AI client no auto reboot after installation finishes. Change it to true will let client auto reboot after AI finishes installation.
–>
<ai_instance name=”08:00:27:82:9D:49” auto_reboot=”false“>
<!–
The following lines create
1. an zfs root file system with the name rpool
2. a child file system export with mount point /export
3. also create /export/home
4. a boot environment (be) “solaris”.
–>
<target>
<logical>
<zpool name=”rpool” is_root=”true“>
<filesystem name=”export” mountpoint=”/export“/>
<filesystem name=”export/home“/>
<be name=”solaris“/>
</zpool>
</logical>
</target>
<!–
However if you intend to setup a mirror disk you have to explicitly specify disk names, such as c0t0d0, c0t1d0. You can also set swap and dump sizes.
Check out below example, disks c0t0d0 and c0t1d0 are in a zfs pool “rpool”, which is a mirrored root pool. You can take it effect by replacing above <target>…. </target> with the new <target>…</target> section. The two <zvol>…</zvol> for swap and dump size can be removed if you do not like this setting.
<target>
<disk whole_disk=”true” in_zpool=”rpool” in_vdev=”vdev_mirror“>
<disk_name name=”c0t0d0” name_type=”ctd”/>
</disk>
<disk whole_disk=”true” in_zpool=”rpool” in_vdev=”vdev_mirror“>
<disk_name name=”c0t1d0” name_type=”ctd”/>
</disk>
<logical>
<zpool name=”rpool” is_root=”true”>
<vdev name=”vdev_mirror” redundancy=”mirror”/>
<filesystem name=”export” mountpoint=”/export”/>
<filesystem name=”export/home”/>
<zvol name=”swap” use=”swap“>
<size val=”2g“/>
</zvol>
<zvol name=”dump” use=”dump“>
<size val=”2g“/>
</zvol>
<be name=”solaris“/>
</zpool>
</logical>
</target>
–>
<!–
Be noted that only single disk or mirror, including 3-way mirror can be specified in a
root pool (check zpool name rpool with is_root is true), raidz/stripe
are not supported.
However iscsi disk name is supported, such as,
<disk whole_disk=”true” in_zpool=”rpool” in_vdev=”vdev_mirror”>
<iscsi target_name=”iqn.2014-10.com.sun:02:1234567890abcdef” target_lun=”1″ target_ip=”192.168.1.30″/>
</disk>
–>
<!–
Following lines defines language locale facets to be installed. By default, 10 locale facets are installed, de_DE, en_US, es_ES, fr_FR, it_IT, ja_*, ko_*, pt_BR, zh_CN, zh_TW.
You can execute this command to retrieve all available locale facets other than C (C is the essential locale and will be installed in core OS) from IPS, (replace http://192.168.1.115:90/ with your own IPS)
# pkg contents -g http://192.168.1.115:90/ -r -m system/locale | ggrep -o “facet.local.[^\ ]*” | sort -u | sed -e ‘s/=true//’ -e ‘s/facet.locale.//’ | sort
Then, if you wanna install sr_ME, you need to install sr first, that is, you should add these two lines in manifest,
<facet set=”true”>facet.locale.sr</facet>
<facet set=”true”>facet.locale.sr_ME</facet>
–>
<software type=”IPS”>
<destination>
<image>
<!– Specify locales to install –>
<facet set=”false”>facet.locale.*</facet>
<facet set=”true”>facet.locale.de</facet>
<facet set=”true”>facet.locale.de_DE</facet>
<facet set=”true”>facet.locale.en</facet>
<facet set=”true”>facet.locale.en_US</facet>
<facet set=”true”>facet.locale.es</facet>
<facet set=”true”>facet.locale.es_ES</facet>
<facet set=”true”>facet.locale.fr</facet>
<facet set=”true”>facet.locale.fr_FR</facet>
<facet set=”true”>facet.locale.it</facet>
<facet set=”true”>facet.locale.it_IT</facet>
<facet set=”true”>facet.locale.ja</facet>
<facet set=”true”>facet.locale.ja_*</facet>
<facet set=”true”>facet.locale.ko</facet>
<facet set=”true”>facet.locale.ko_*</facet>
<facet set=”true”>facet.locale.pt</facet>
<facet set=”true”>facet.locale.pt_BR</facet>
<facet set=”true”>facet.locale.zh</facet>
<facet set=”true”>facet.locale.zh_CN</facet>
<facet set=”true”>facet.locale.zh_TW</facet>
</image>
</destination>
<!–
The following lines defines the IPS publisher origin http://192.168.1.115:90/ and name solaris
–>
<source>
<publisher name=”solaris“>
<origin name=”http://192.168.1.115:90/“/>
</publisher>
</source>
<!–
<software_data> specifies softwares to be installed
<name>pkg:/entire@latest</name>
tells AI to install latest version of baseline. You can replace “latest” with 0.5.11-0.175.1.21.0.4.1 to install latest baseline of
Solaris 11.1, or 0.5.11-0.175.0.13.0.4.0 for Solaris 11 2011/11 if you have these baselines in your publisher.
–>
<software_data action=”install”>
<name>pkg:/entire@latest</name>
<!–
These line <name>pkg:/group/system/solaris-small-server</name> specifies an installation group package to be installed.
An installation group package specifies the set of packages constitute a feature or tool.
- solaris-minimal-server delivers the minimal set of packages required to boot an Oracle Solaris system, log in, and add further packages as required. (Started from Solaris 11.2, not valid in Solaris 11.1 and 11 2011/11)
- solaris-small-server is a smaller set of packages on a server, make/top/DVD writing/DR…. are not installed.
- solaris-large-server contains all common network services and hardware drivers, such as InfiniBand drivers.
- solaris-desktop contains GNOME desktop, GUI applications such as web browsers and mail clients, graphical and audio drivers.
<name>pkg:/group/system/solaris-minimall-server</name>
<name>pkg:/group/system/solaris-small-server</name>
<name>pkg:/group/system/solaris-large-server</name>
<name>pkg:/group/system/solaris-desktop</name>
Be noted that if you do not specify solaris-desktop, you will not have an GNOME desktop (GUI) installed and only command line can be used.
–>
<name>pkg:/group/system/solaris-small-server</name>
<!–
Following lines specify additional softwares and services to be installed (if above installation group doesn’t install the software/service), such as,
/solaris/service/network/ftp -> ftp server
/solaris/network/ftp -> ftp client program
/shell/tcsh -> a more friendly shell tcsh
/network/telnet -> telnet client program
/service/network/telnet -> telnet server
/file/gnu-coreutils -> GNU utilities
–>
<name>pkg:/solaris/service/network/ftp</name>
<name>pkg:/solaris/network/ftp</name>
<name>pkg:/shell/tcsh</name>
<name>pkg:/network/telnet</name>
<name>pkg:/service/network/telnet</name>
<name>pkg:/file/gnu-coreutils</name>
</software_data>
</software>
</ai_instance>
</auto_install>
After the manifest content is prepared, save it as /root/a.xml (this file name doesn’t matter because AI server stores it with the name specified in <ai_instance name=xxx>, in this article, it’s 08:00:27:82:9D:49.
Validate the xml file first, and if there’s no problem, create this manifest by “installadm create-service”,
# installadm validate -n i386-11_2 -M /root/a.xml
Validating manifest /root/a.xml…
Passed
# installadm create-service -n i386-11_2 -f /root/a.xml -c mac=08:00:27:82:9D:49
Be noted that I’m associating this manifest to the machine with mac address 08:00:27:82:9D:49, that is, no other machine can use this manifest.
You can then remove this file /root/a.xml as AI server has stored the content to its own directory. Let’s verify it,
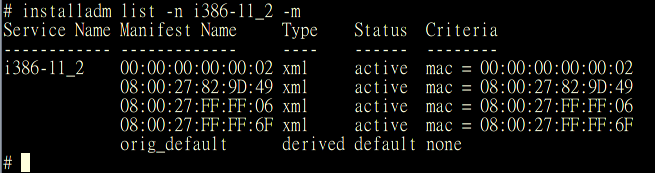
To review the manifest use “installadm export” to save its content to b.xml
# installadm export -n i386-11_2 -m 08:00:27:82:9D:49 -o b.xml
To update the manifest, modify b.xml, validate it, then run “installadm update-manifest”,
# installadm validate -n i386-11_2 -M b.xml
# installadm update-manifest -n i386-11_2 -f b.xml
(Be noted again that you can use any file name, a.xml, b.xml, asdfwarefvsdvas.xml….. it doesn’t matter.)
To delete the manifest use “installadm delete-manifest”,
# installadm delete-manifest -n i386-11_2 -m 08:00:27:82:9D:49
The last note in this article, for a complete list of manifest keywords and values please refer to man pages of ai_manifest by “man ai_manifest”.