Following the release of TCPS support for connecting and registering external databases in Oracle Cloud Infrastructure (OCI) , we announced that Oracle Cloud Infrastructure Database Management service (DBMS) also supports secure connections to cloud databases (Exadata Cloud Service, OCI VM/BM) using TCPS protocol.
Key use cases for TCPS support for cloud database
- Option to connect to external and cloud databases using TCP and TCPS protocols
- Support for Transport Layer Security (TLS) authentication via database wallet of your choice: Java Keystore or Public-Key Cryptography Standards (PKCS) #12
- Support for database wallet as a secret integrated with OCI Vault service
TCPS administration support details
TCPS support for cloud databases is now available on the Administration page under Managed Database/Enable Database Management pane. When enabling Database Management, you have the option of selecting either TCP or TCPS as the connectivity protocol to the cloud database. By default, TCP protocol is selected. To use Database Management with TCPS, the prerequisite would be to add a TCPS listener to the cloud database. This new listener can be used to talk to database via a secure channel.
TCPS setup to create a new database wallet
TCPS setup starts with the provisioning of a wallet on the database. This wallet is an encrypted file protected by a password and contains certificates that help establish a secure channel between the database and Database Management. As in any TLS connection there are two entities involved here, Database Management being the client and the database being the server.
Setting up the wallet involves the following steps:
- Create a wallet on database i.e., server wallet
- Create a wallet for Database Management i.e., client wallet
- Exchange certificates between the wallets to establish mutual TLS
- Update server sqlnet.ora with parameters for TLS connection
- Update listener to add the TLS port
The server and client wallets can be created using an orapki command line utility which is available out-of-the-box.
Here’s detailed information on how to set up the wallet. If you’ve already configured the wallet and listener, then skip these steps and move to the next section
Create a server wallet
The server wallet, created on the database, will contain all the user certificates and trusted certificates required to verify any clients making a call to the database over the secure port.
- Create a tcps_wallets folder under /u01/app/oracle.
- Run the following command to create a server wallet in the tcps_wallet folder:
orapki wallet create -wallet “/u01/app/oracle/tcps_wallet/serverwallet” -pwd <WALLET PASSWORD> -auto_login to create a serverwallet under tcps_wallet folder.
- Add a self-signed user certificate to the wallet using the following command:
orapki wallet add -wallet “/u01/app/oracle/tcps_wallet/serverwallet” -pwd <WALLET PASSWORD> -dn “CN=DB-CA,O=MYORG,C=MYOFFICE” -keysize 2048 -self_signed -validity 3650
Note that the keysize can either be 512|1024|2048 bits. The Federal Information Processing Standards (FIPS) mandates key size of 2048 bits.
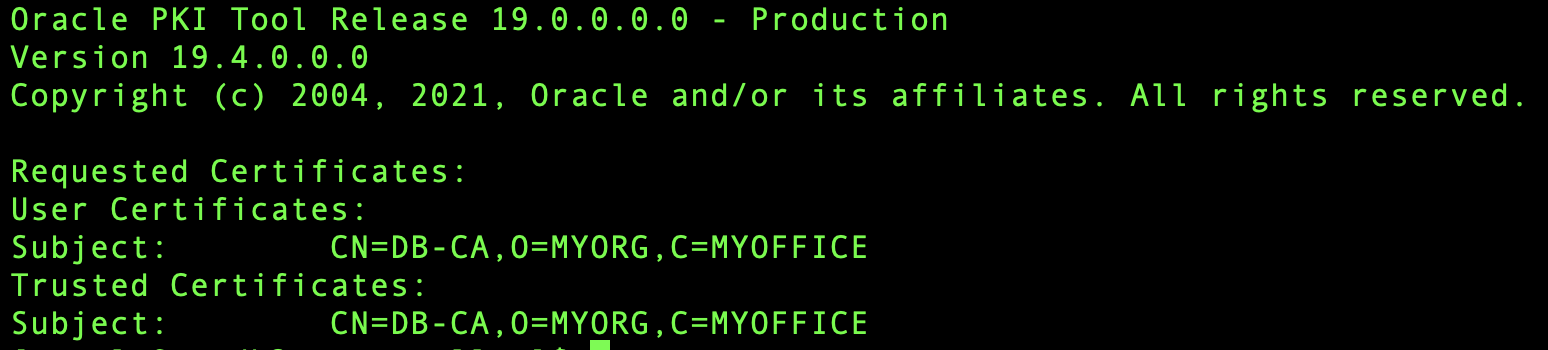
Now the sever wallet is created and you can run the following command to view/list the certificates added to the wallet: orapki wallet display -wallet “/u01/app/oracle/tcps_wallet/serverwallet”. The wallet should look something like this:
Create a client wallet
The client wallet will contain the certificate that represents the client in the certificate exchange. Eventually, both the client and server wallet exchange certificates and establish the mutual TLS (mTLS). In this case the client wallet will be used by Database Management.
Note: The client wallet is required only if the database user wants to establish mTLS between Database Management and the database. If TLS is the only requirement, then creating a client wallet is not be required.
- Move to tcps_wallets folder under /u01/app/oracle.
- Run the following command to create a client wallet in the tcps_wallet folder:
orapki wallet create -wallet “/u01/app/oracle/tcps_wallet/clientwallet” -pwd <WALLET PASSWORD> -auto_login to create a clientwallet under tcps_wallet folder
- Add a self-signed user certificate to the wallet using the following command:
orapki wallet add -wallet “/u01/app/oracle/tcps_wallet/clientwallet ” -pwd <WALLET PASSWORD> -dn “CN=DEV-CA,O=MYORG,C=MYOFFICE” -keysize 2048 -self_signed -validity 3650
Note that the keysize can either be 512|1024|2048 bits. The Federal Information Processing Standards (FIPS) mandates key size of 2048 bits.
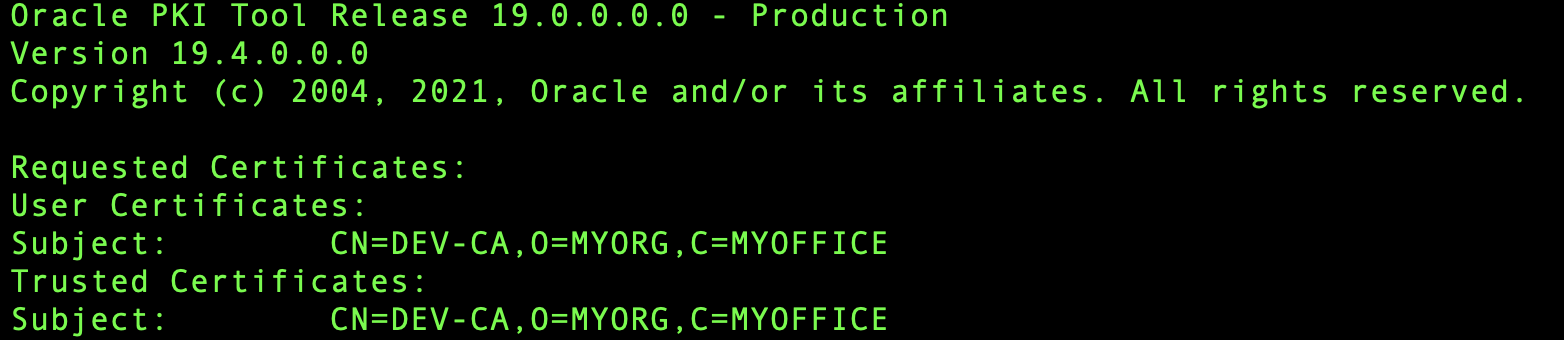
Now the client wallet is created and you can run the following command to view/list the certificates added to the wallet: orapki wallet display -wallet “/u01/app/oracle/tcps_wallet/clientwallet”. The wallet should look something like this:
As you can see the commands for creating a client and server wallet are the same only difference being the wallet provided for adding the certificates.
Exchange certificates between the wallets
Once the client and server wallets are provisioned, the next step is to exchange certificates. This ensures that only the client that has the client wallet created in the previous step can talk to the database over the secure port. This is called mutual TLS.
- Run following commands to export client and server wallet certificates:
- Export server wallet: orapki wallet export -wallet “/u01/app/oracle/tcps_wallet/serverwallet” -pwd <WALLET PASSWORD> -dn “CN=DB-CA,O=MYORG,C=MYOFFICE” -cert /u01/app/oracle/tcps_wallet/server-certificate.crt
- Export client wallet: orapki wallet export -wallet “/u01/app/oracle/tcps_wallet/clientwallet” -pwd <WALLET PASSWORD> -dn “CN=DEV-CA,O=MYORG,C=MYOFFICE” -cert /u01/app/oracle/tcps_wallet/client-certificate.crt
- Run the following commands to trust each other’s certificates:
- Trust client cert in server wallet: orapki wallet add -wallet “/u01/app/oracle/tcps_wallet/serverwallet” -pwd <WALLET PASSWORD> -trusted_cert -cert client-certificate.crt
- Trust server cert in client wallet: orapki wallet add -wallet “/u01/app/oracle/tcps_wallet/clientwallet” -pwd <WALLET PASSWORD> -trusted_cert -cert server-certificate.crt
Update sqlnet.ora with parameters for TLS connection
As the next step, add the following entries in the $ORACLE_HOME/network/admin/sqlnet.ora file on the server.
# Location to the server wallet
WALLET_LOCATION =
(SOURCE =
(METHOD = FILE)
(METHOD_DATA =
(DIRECTORY = “/u01/app/oracle/tcps_wallet/serverwallet)
))
SQLNET.AUTHENTICATION_SERVICES = (TCPS,NTS,BEQ)
# Turn on Client Authentication to be able to establish mTLS
SSL_CLIENT_AUTHENTICATION = TRUE
# Setting this to true would make sure that native encryption would not interfere with TCPS
SQLNET. IGNORE_ANO_ENCRYPTION_FOR_TCPS=TRUE
Update listener to add the TLS port
The final step of the setup is adding a listener for TLS. As in any network connection a new port needs to be introduced to handle the connection over this secure channel. For instance, 80 for HTTP and 443 for HTTPS.
- Open “$ORACLE_HOME/network/admin/listener.ora” and find an existing entry with key as LISTENER. Under the DESCRIPTION_LIST you should be able to find an existing entry for TCP.

Copy this TCP entry and add a new entry to description block with the following changes:- Change protocol to TCPS
- Change the port number to 2484 (or any available port on the database node).

- Add the wallet location to the listener.ora file.
# Location to the server wallet
WALLET_LOCATION =
(SOURCE =
(METHOD = FILE)
(METHOD_DATA =
(DIRECTORY = “/u01/app/oracle/tcps_wallet/serverwallet)
))
- Run the following commands to restart the listener:
- lsnrctl stop (Stops the listener)
- lsnrctl start (Starts the listener)
- lsnrctl status (Check the starts of listener after restart)
After the listener is restarted, the TCPS entry should be displayed in the listener status output.
Details to be noted down for using TCPS
Now that TLS/TCPS is configured on the database the following details would be required when enabling Database Management with TCPS protocol:
- TCPS listener port number, which is 2824 in this case.
- Database wallet file: /u01/app/oracle/tcps_wallet/clientwallet/ewallet.p12.
- Wallet password used when creating the client wallet.
- Certificate Distinguished Name of the client certificate.
Enablement of Database Management Using TCPS protocol
Database Management can now be enabled from the OCI console with the protocol as TCPS. As part of the flow, you will be asked to provide the wallet details noted above if you select the protocol as TCPS.
To enable Database Management for the cloud databases:
- Open the navigation menu in the OCI console, click Observability & Management. Under Database Management, click Administration.
- On the left pane on the Administration page, select the compartment in which the cloud database resides and click Enable Database Management.
- On the Enable Database Management dialog, provide the details pertaining to the cloud database of interest and select the TCPS option as the connection protocol.
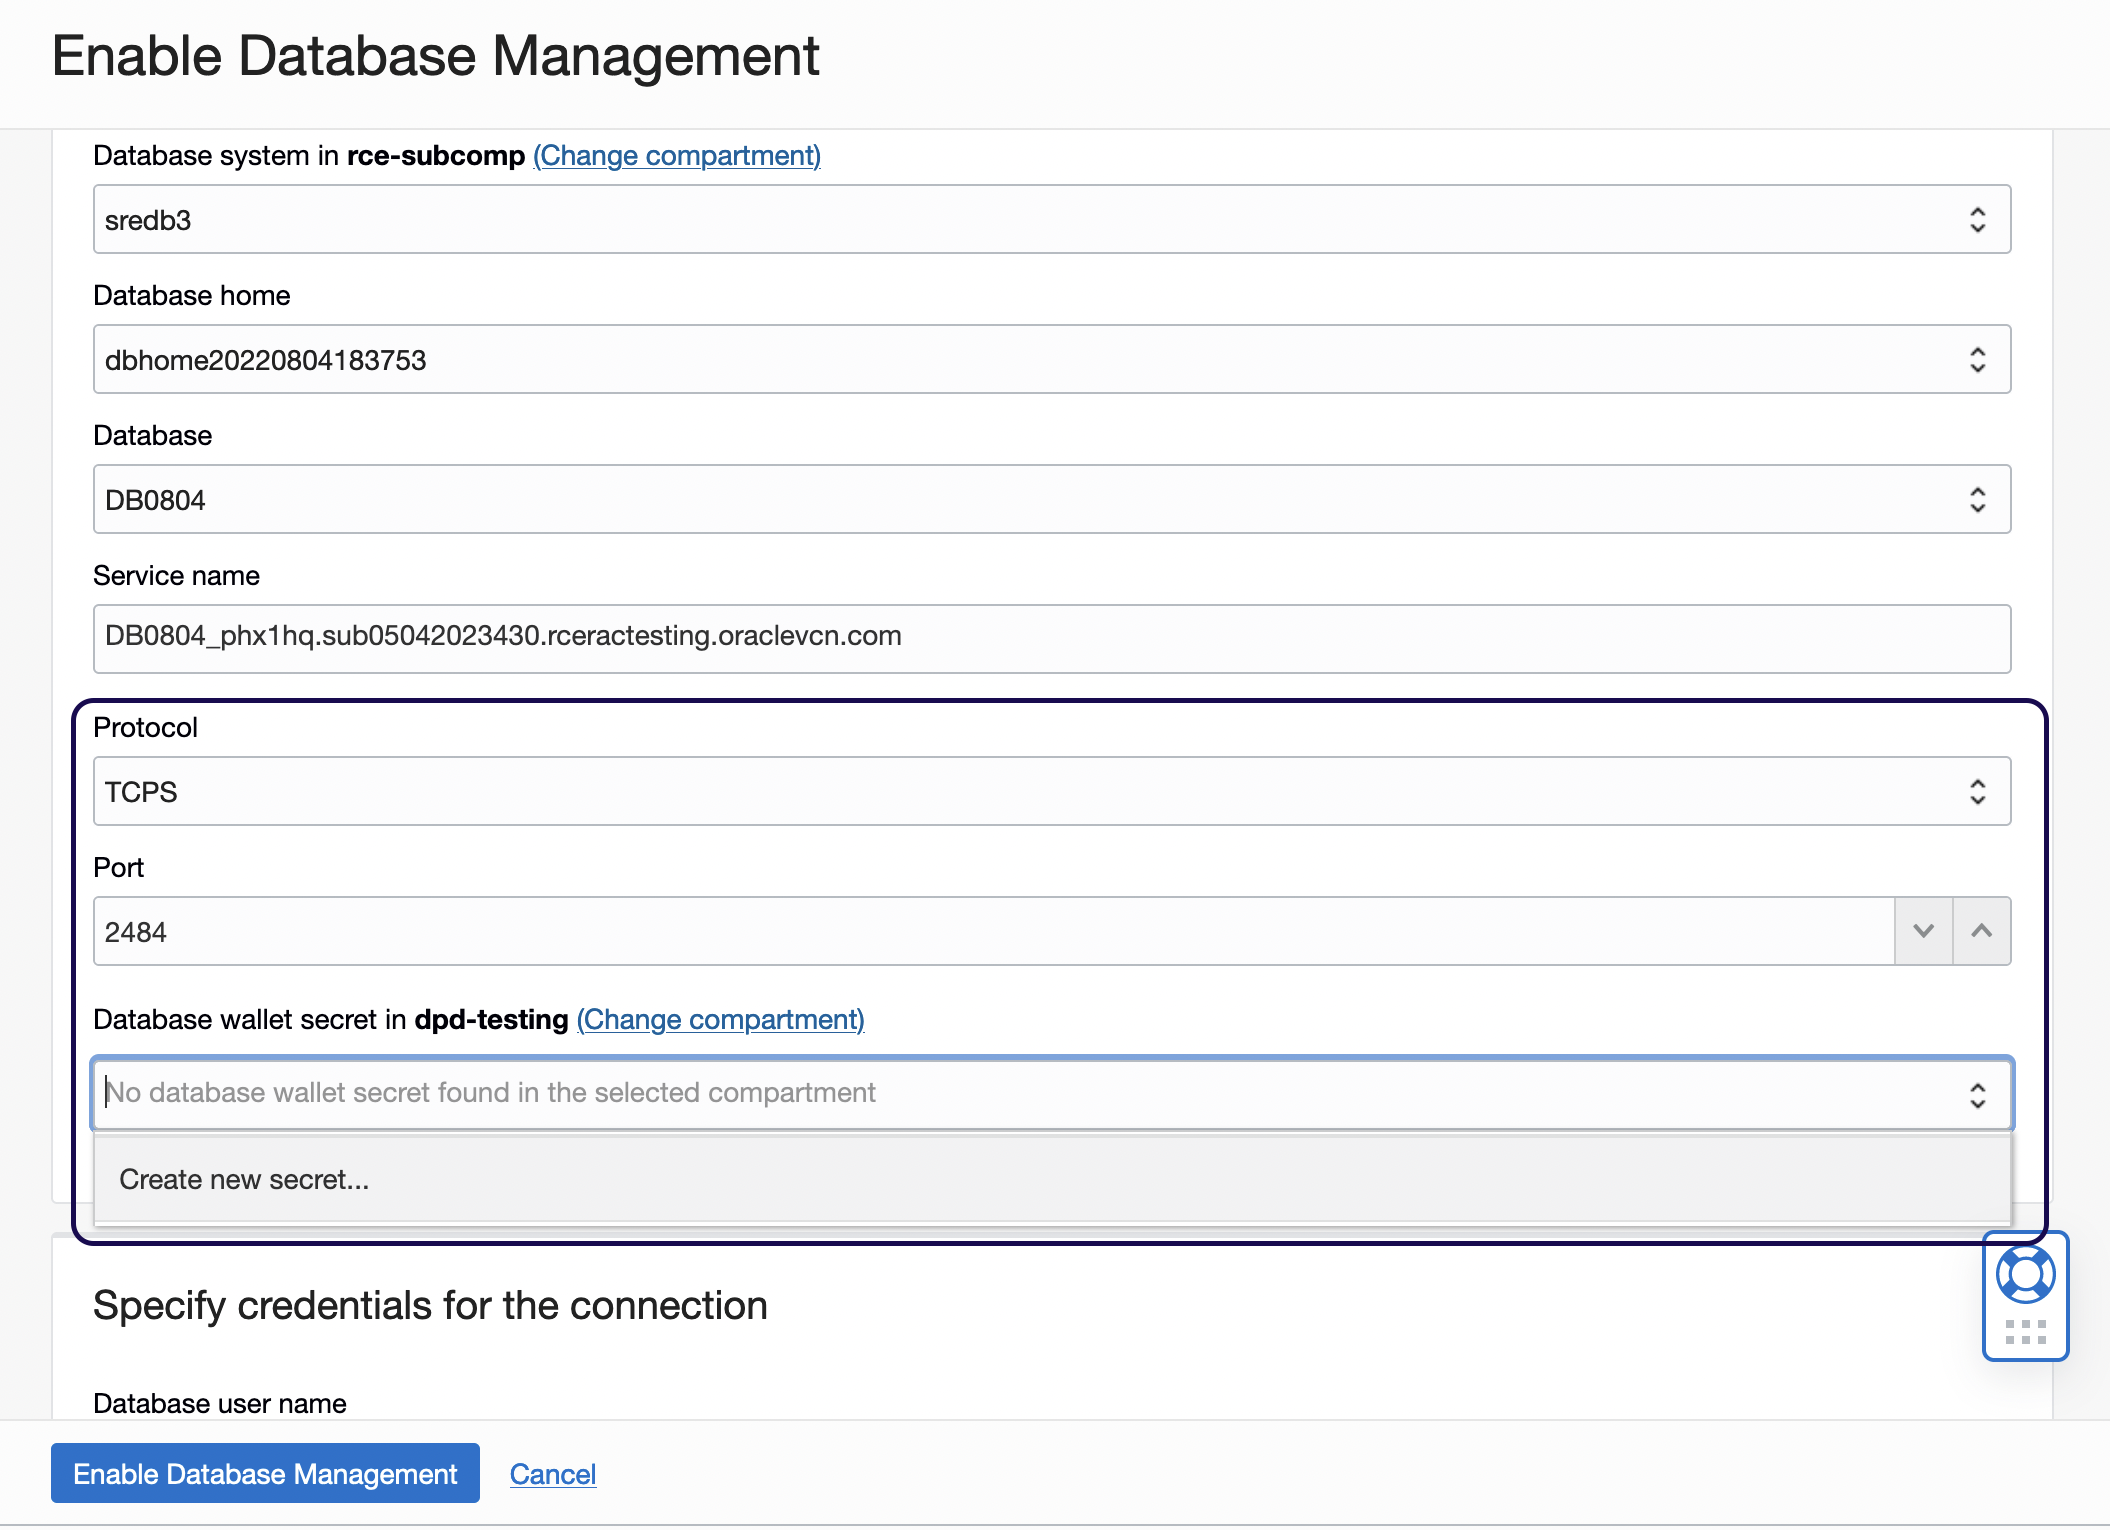
Figure 1: Protocol section in the Enable Database Management dialog box - In the new fields displayed in the Protocol section, provide the following details:
- Port: 2484
- Database Wallet Secret:
- Select the Create new secret… option and create a secret that contains the database wallet. The wallet secret will hold the wallet file, the wallet password and certificate Distinguished Name provided when creating the client wallet on the database. Depending on the wallet type selected i.e., Java Keystore or PKCS#12, you must enter necessary details respectively. In the Create database wallet secret dialog box (see Fig. 2):
- Provide a name for the secret.
- Optionally, add a description for the secret.
- Select the compartment where it will be saved to, the vault that would be used, encryption key
- Select the wallet format type i.e., Java Keystore or PKCS#12.
- Now, if you select PKCS#12 as your choice of database wallet the following information is required:
- Wallet password of the client wallet.
- The ewallet.p12 file from the client wallet.
- Certificate Distinguished Name of the certificate in the client wallet. For example, CN=DEV-CA,O=MYORG,C=MYOFFICE.
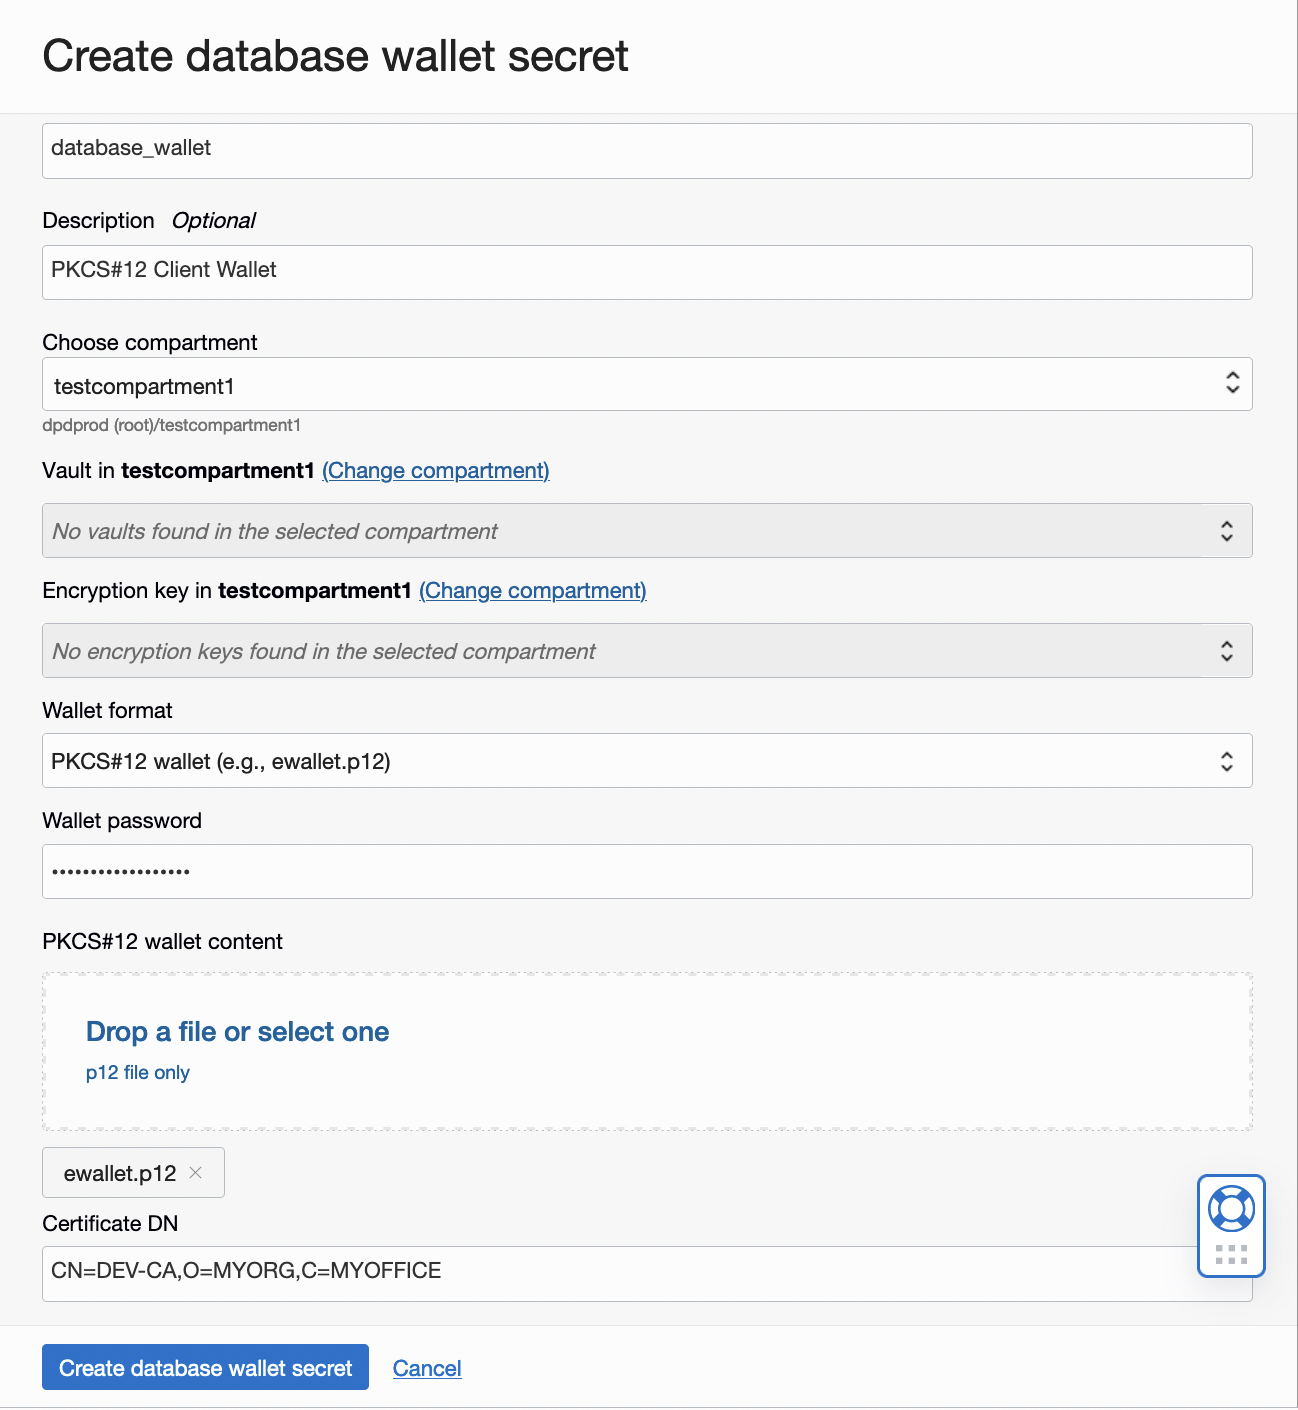
Figure 2: New Create Database Wallet Secret page-PKCS#12 specific work flow - Select the Create new secret… option and create a secret that contains the database wallet. The wallet secret will hold the wallet file, the wallet password and certificate Distinguished Name provided when creating the client wallet on the database. Depending on the wallet type selected i.e., Java Keystore or PKCS#12, you must enter necessary details respectively. In the Create database wallet secret dialog box (see Fig. 2):
- Under Specify credentials for the connection section provide the database username and select the secret that contains the database password
- Select the Database Management private endpoint to be used for the communication with Database Management.
- Choose between Full and Basic Management options. The Learn more link in Management options section has more details on what each option has to offer.
Once the database secret is created, clicking on Enable Database Management (Fig. 1) will initiate an OCI Work Request which can be tracked by checking the Work Requests section of the cloud database’s home page.
With the new port number, wallet details and selecting TCPS protocol, Database Management will now be able to communicate to the database over a secure channel using a mutual TLS which provides end-to-end security.
Availability
- This feature is available in all OCI commercial regions
- Supports both external and cloud databases (ExaCS/VM/BM)
- Support for Autonomous Database is on the roadmap
Having an option to securely connect to and register external and cloud databases in your organization or team is a requirement for lot of customers. Using OCI Database Management service’s TCPS support for cloud databases feature, you can now use the latest database wallet technology to connect, manage and monitor your databases across the fleet.
Sign up for an Oracle Cloud Infrastructure trial account today! For more information about these features and how you can use them, see the documentation.
Resources
- Technical documentation
- Database Management Technical Overview
- Pricing (Observability and Management Platform – Database Management)