In the world of DevOps, where efficiency and agility are paramount, the integration of Generative AI (GenAI) and Selective AI (Select AI) is revolutionizing how we interact with complex systems like Oracle Exadata. In this blog post, we explore how these cutting-edge technologies can be applied to enhance observability, making your Exadata environment more manageable and efficient.
GenAI can be used several ways in DevOps:
- Natural Language Processing – One of the most significant advantages of GenAI in DevOps is its natural language processing (NLP) capabilities. With NLP, DevOps teams can interact with complex systems like Exadata using conversational queries. This means that retrieving information and automating tasks no longer requires deep technical knowledge.
- Capacity Planning and Resource Management – GenAI also shines in capacity planning and resource management. By analyzing usage patterns and forecasting future needs, it helps DevOps teams make informed decisions. With GenAI, you can optimize resource allocation, ensuring that your Exadata environment is running efficiently without wasting valuable resources. For instance, GenAI can identify patterns in workload demands and predict future capacity requirements. This enables you to proactively plan for scaling, ensuring that your system can handle increasing demands without performance degradation.
- Training and Onboarding – The benefits of GenAI extend beyond day-to-day operations and into the realm of training and onboarding. GenAI facilitates personalized learning experiences, providing new team members with real-time answers to their questions. This accelerates the onboarding process, ensuring that your team can quickly become productive members of your DevOps environment.
Building a telemetry Data Warehouse for Exadata with GenAI and Select AI
Now, let’s dive into a practical example of how GenAI and Select AI can be applied to enhance Exadata observability. We’ll review the process of building a data warehouse to collect Oracle Exadata metrics and then query it using natural language statements.
Step 1: Collect Exadata Metrics with the Autonomous Database
The first step is to leverage the power of Oracle’s Autonomous Database, which provides a self-driving, self-securing, and self-repairing platform for your data. By using the Autonomous Database and Exawarehouse, you can effortlessly collect and store Exadata telemetry data, including performance metrics, resource utilization, and system logs.
With its machine learning capabilities, the Autonomous Database can automatically index and optimize the data, making it readily available for analysis. This eliminates the need for manual database administration, freeing up your time to focus on more strategic tasks.
Step 2: Integrate GenAI and Select AI with Enterprise Manager
Enterprise Manager provides a comprehensive management platform for your Exadata environment, offering deep insights into the health, performance, and availability of your system. With the addition of GenAI and Select AI, you can now interact with this wealth of information using natural language processing.
Step 3: Query the Data Warehouse with natural language
Now that your data warehouse is set up and AI technologies are integrated, it’s time to put it all together. Using natural language queries, you can ask questions about your Exadata system’s performance, resource utilization, or any other metric that has been collected. For example, you can ask, “How has disk utilization changed over the past month?” or “What were the top CPU-consuming processes last week?” GenAI, in conjunction with Select AI, will interpret these queries, retrieve the relevant data from the Autonomous Database, and present you with easy-to-understand responses.
Once you’ve set up the environment by following the steps outlined in the document, you can start querying your system using natural language processing capabilities through the Oracle Application Express (APEX) interface. APEX provides a user-friendly interface that allows you to interact with your database and leverage the power of natural language processing. Before you begin querying, ensure that you have the necessary database option enabled, which allows you to access and utilize the content stored in your database.
APEX Prompt:
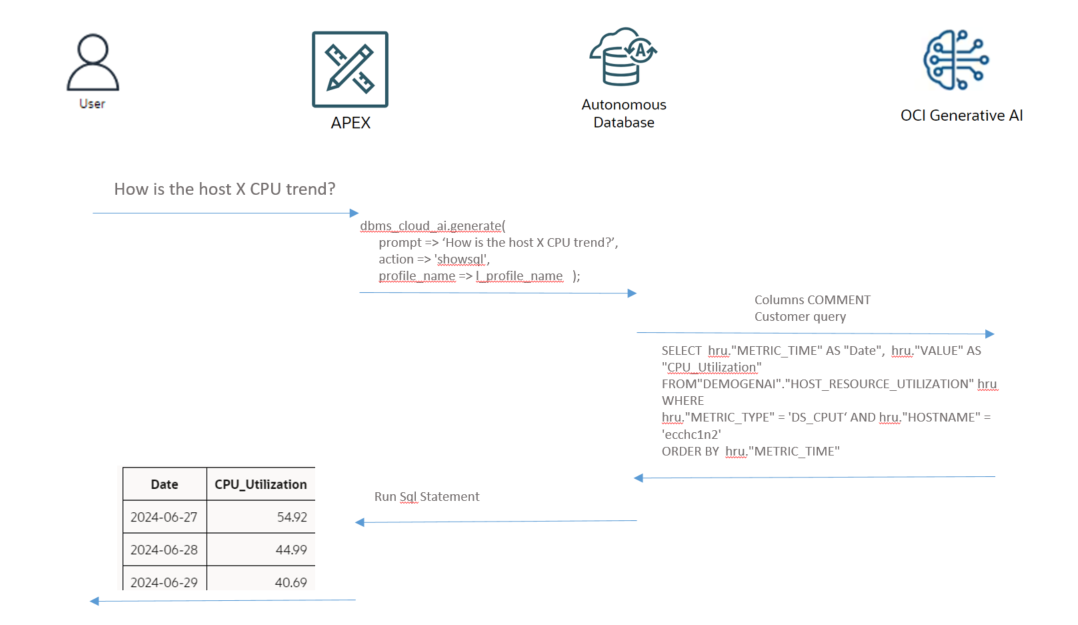
So, when you ask the system for the CPU trend on a specific host, the dbms_cloud_ai_generator, contacts the GenAI based on the selected AI preference. Using the column descriptions and your input, GenAI generates the SQL statement. APEX then executes the suggested statement and presents the results to you.
If you want to create a chart or explore the data further, select the Explorer option.
If you want a narrative result instead of a table, select the chat link.
Here is an APEX Dashboard Narrative:
In the APEX code, simply select a different results format:
return '<h3>Explanation: </h3><div><pre>'||dbms_cloud_ai.generate(

   prompt => 'explain this sql query to a non-technical user: '||l_showsql  ,

            action => 'chat',

            profile_name => l_profile_name

    )
In the APEX OCW23_PROMPTS table you can find the users conversation history.
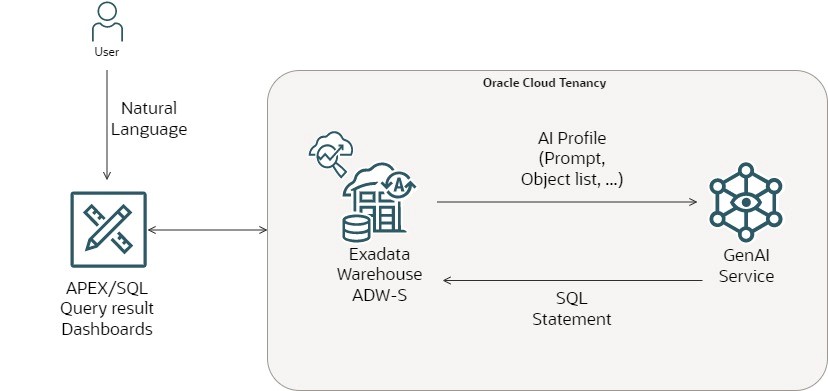
The power of NLP and the underlying technology stack can be applied to make this possible, providing users with a seamless and intuitive experience when querying complex systems. Let’s break down the information flow, starting from the APEX prompt:
1. APEX User Input: A user inputs a natural language query through the APEX interface, asking for specific information about the environment. This could be a question about performance metrics, resource utilization, or any other relevant data.
2. Natural Language Processing: The input query is then processed by the GenAI and Select AI technologies integrated into the platform. These AI models are trained to understand and interpret natural language, identifying the user’s intent and extracting relevant keywords and entities.
3. Query Understanding: The AI models analyze the query to understand its structure, semantics, and context. They identify the type of information being requested, any specific time frames or conditions mentioned, and the format in which the user expects the response (tables, charts, or text).
4. Data Retrieval: Based on the understood query, the system generates an appropriate database query to retrieve the requested information. This query is executed against the Autonomous Database, which stores the Exadata telemetry data.
5. Database Query Execution: The Autonomous Database, with its self-driving capabilities, optimizes and executes the generated query. It retrieves the relevant data from the telemetry warehouse, leveraging its machine learning-based indexing and data optimization features.
6. Data Processing: Once the data is retrieved, the system processes it according to the user’s preferences and the query context. This could involve aggregating, filtering, or visualizing the data to create tables, charts, or narrative text.
7. Response Generation: The processed data is then used to generate a response to the user’s query. This response is tailored to the user’s original request and presented in the preferred format, ensuring it is accurate, concise, and easy to understand.
8. User Interaction: The generated response is displayed to the user through the APEX interface. This could be in the form of interactive tables or charts, or as a narrative text response, providing the specific information requested in a user-friendly manner.
9. Continuous Learning: The AI models continuously learn from user interactions, feedback, and query patterns. This helps improve their understanding of user intent, enhance response accuracy, and adapt to the specific needs and preferences of different users.
Here ate the detailed steps to setup your environment:
Set up the Exadata Warehouse
The first step is to create a repository in Oracle Autonomous Database to store telemetry data. To populate the Exadata Warehouse, export telemetry data from the Oracle Enterprise Manager repository and upload it into an OCI Autonomous Warehouse.
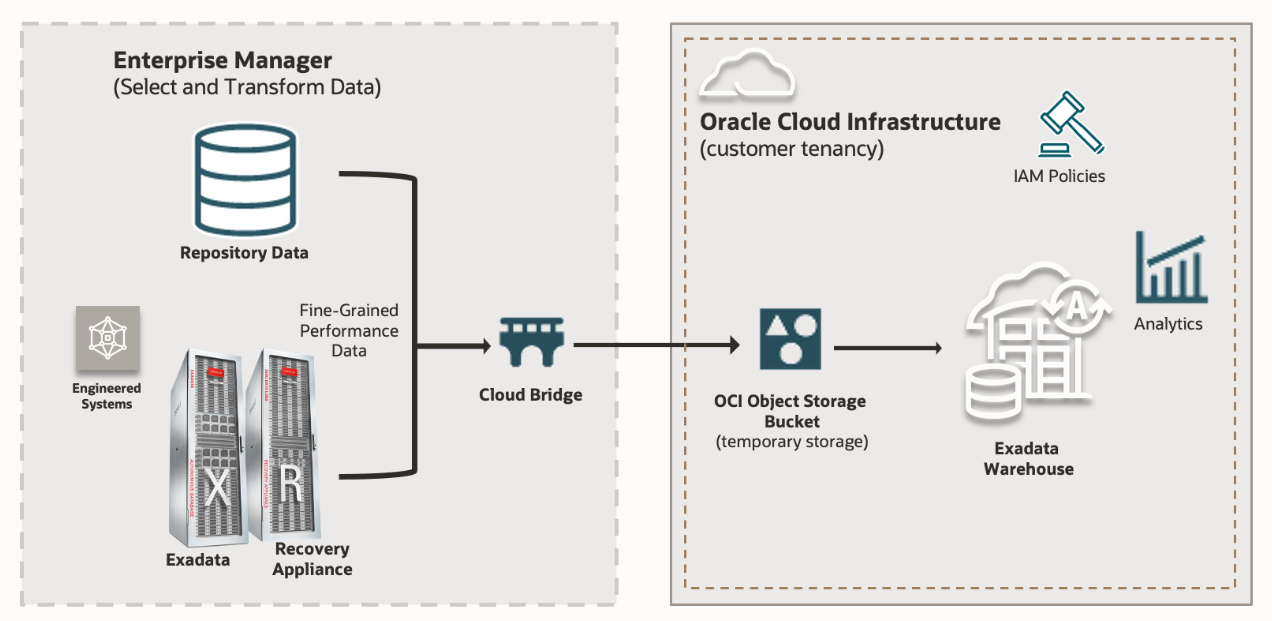
The Exadata Warehouse repository operates on Oracle Autonomous Data Warehouse. The schema is automatically created in Autonomous, containing information across several views and tables. For more detailed information, please refer to the resources provided at the end of the blog.
For this project, we focus on host metrics, but you can expand the schema by incorporating data from different hosts and host types. To do this, utilize the views XAWH_TARGETS and XAWH_DAILY_METRIC_DATA.
Create the GenAI link and metadata
On Autonomous Database, create a new database user (for example, DEMOGENAI), to be used to deploy APEX chat-db application and to setup Select AI. Then connect with a SQL client using the newly created user and set up the OCI credential:
BEGIN
  DBMS_CLOUD.CREATE_CREDENTIAL(
    credential_name => 'DEMO_GENAI_CRED01',
    user_ocid       => 'ocid1.user.oc1..***',
    tenancy_ocid    => 'ocid1.tenancy.oc1..***',
    private_key     => '<YOUR_PRIVATE_KEY>',
    fingerprint     => '<YOUR_PRIVATE_KEY_FINGERPRINT>'
  );
END;
/
The OCI IAM user should have the required permissions to use OCI Generative AI service. For more details, refer to: Getting Access to Generative AI
Create a new AI profile. In this demo, we used the following configuration:
BEGIN
  DBMS_CLOUD_AI.CREATE_PROFILE(
      'DEMO_GENAI_PROFILE01',
      '{"provider": "oci",
        "credential_name": "DEMOGENAI_OCI_CRED01"  ,
        "region": "us-chicago-1",
        "oci_compartment_id": "<YOUR_COMPARTMENT_OCID>",
        "comments": "true",
        "max_tokens": "4000",
        "model": "meta.llama-3-70b-instruct"
       }');
END;
/
Before proceeding with next steps, verify if the profile is working fine using a simple chat question:
EXEC DBMS_CLOUD_AI.SET_PROFILE('DEMO_GENAI_PROFILE01');
select ai chat what is Autonomous Database;
View the AI profile parameters with the following query:
select attribute_name,attribute_value from USER_CLOUD_AI_PROFILE_ATTRIBUTES where profile_name = 'DEMO_GENAI_PROFILE01' order by 1;
If needed, adjust them, using DBMS_CLOUD_AI.SET_ATTRIBUTE:
BEGIN
   DBMS_CLOUD_AI.SET_ATTRIBUTE('DEMO_GENAI_PROFILE01', 'temperature', '1');
END;
/
To finalize the configuration, add the tables and views in the AI profile, to generate SQL queries on a specific set of tables and views.
For this demo, we created a custom view (called HOST_RESOURCE_UTILIZATION), based on Exadata Warehouse standard views: XAWH_DAILY_METRIC_DATA and XAWH_TARGETS.
To improve Select AI results using prompt engineering, add comments to your tables/views, like the example below:
COMMENT ON COLUMN HOST_RESOURCE_UTILIZATION.METRIC_TYPE IS 'METRIC_TYPE is the type of metric. Possible values are:
DS_CPUT => cpu utilization;
DS_MEMUT => memory utilization;
N_NIC_KB_RCV_SEC => network received bytes;
N_NIC_KB_TRANS_SEC => network sent bytes.
';
Use DBMS_CLOUD_AI.SET_ATTRIBUTE to add tables and views to AI profile:
BEGIN
   DBMS_CLOUD_AI.SET_ATTRIBUTE('DEMO_GENAI_PROFILE01', 'object_list', '[{"owner": "DEMOGENAI", "name": "HOST_RESOURCE_UTILIZATION"}]');
END;
/
Finally, ask questions to Autonomous Database using natural language:
EXEC DBMS_CLOUD_AI.SET_PROFILE('DEMO_GENAI_PROFILE01');
select ai "what was the average CPU utilization of host ecchc2n1 in May 2024?";
- Deploy APEX application on Autonomous
Follow this tutorial to deploy the application. Use the same database to configure the SQLWarehouse schema.
Next steps
Leveraging GenAI, Select AI, Autonomous Database, and Enterprise Manager can help transform how you manage and interact with your Oracle Exadata environment. This combination supercharges observability, enabling efficient capacity planning, resource management, and streamlined training and onboarding processes. In this blog, we explored a limited scenario specific to an Exadata host. However, as Generative AI continues to evolve and shape the future of DevOps, the possibilities for enhancing system observability are endless. You can expand this to include all your assets by feeding the Autonomous Data Warehouse schema with additional metrics and/or targets.
Resources