Now that you have your data in the Oracle Cloud Infrastructure (OCI) and have begun using the secure storage in Oracle’s HeatWave for your organization’s most valuable assets (your data), you also need to think about how to protect your data from loss; either through human error or the unlikely possibility of natural disasters and hardware failures. We understand that your data and elastic resources are vital to you, and we want to ensure you have the best possible security by providing the best tools for backup and recovery.
Thus, to protect your investment, you must prepare and implement plans to recover your data should some event change, delete, or make your data inaccessible. One of our goals is to help you minimize any potential for lost revenue by providing cost-effective storage and resources to meet your continuity needs.
Fortunately, Oracle has many features you can leverage to protect your data. There are many features that you can use these features in a variety of strategies to reduce the risk of loss while matching the needs of your organization. For example, your data may be primarily static, and thus, periodic backups may be all you need. Conversely, your data may change frequently, and recovering it over a long period may be much more expensive. Thus, you will need a solution that reduces downtime.
The following sections briefly introduce two significant features: backup and high availability. Depending on how you want to use and protect your data, you will likely want to use several of these features.
Each section presents overviews of the features and options available to help you make a data protection and recovery plan to ensure your data is well protected. Also included is a brief illustration of each feature, where you can find it in the OCI console, and links to documentation and blogs demonstrating the more complex features.
Backup Features
HeatWave contains several essential backup and restore features that permit you to create a backup and recovery plan that meets your organization’s data protection needs. The following briefly introduces some of the key features and capabilities available in HeatWave.
Manual Backup
A manual backup is one of the most accessible tools to protect your data. You can take a backup of your data at any time. More importantly, you can initiate the backup when it is most convenient for your business needs, such as periods of low activity. Manual backups are also recommended before any significant changes to your applications or data so that should something go wrong, you can restore your data before the event.
Taking a manual backup of your HeatWave DB system is easy. You can do so in one of several ways. The easiest is to simply open the list of DB systems using the OCI menu, choose DB systems, right-click on the ellipses to the right of the DB system, and click Create manual backup, as shown in Figure 1.
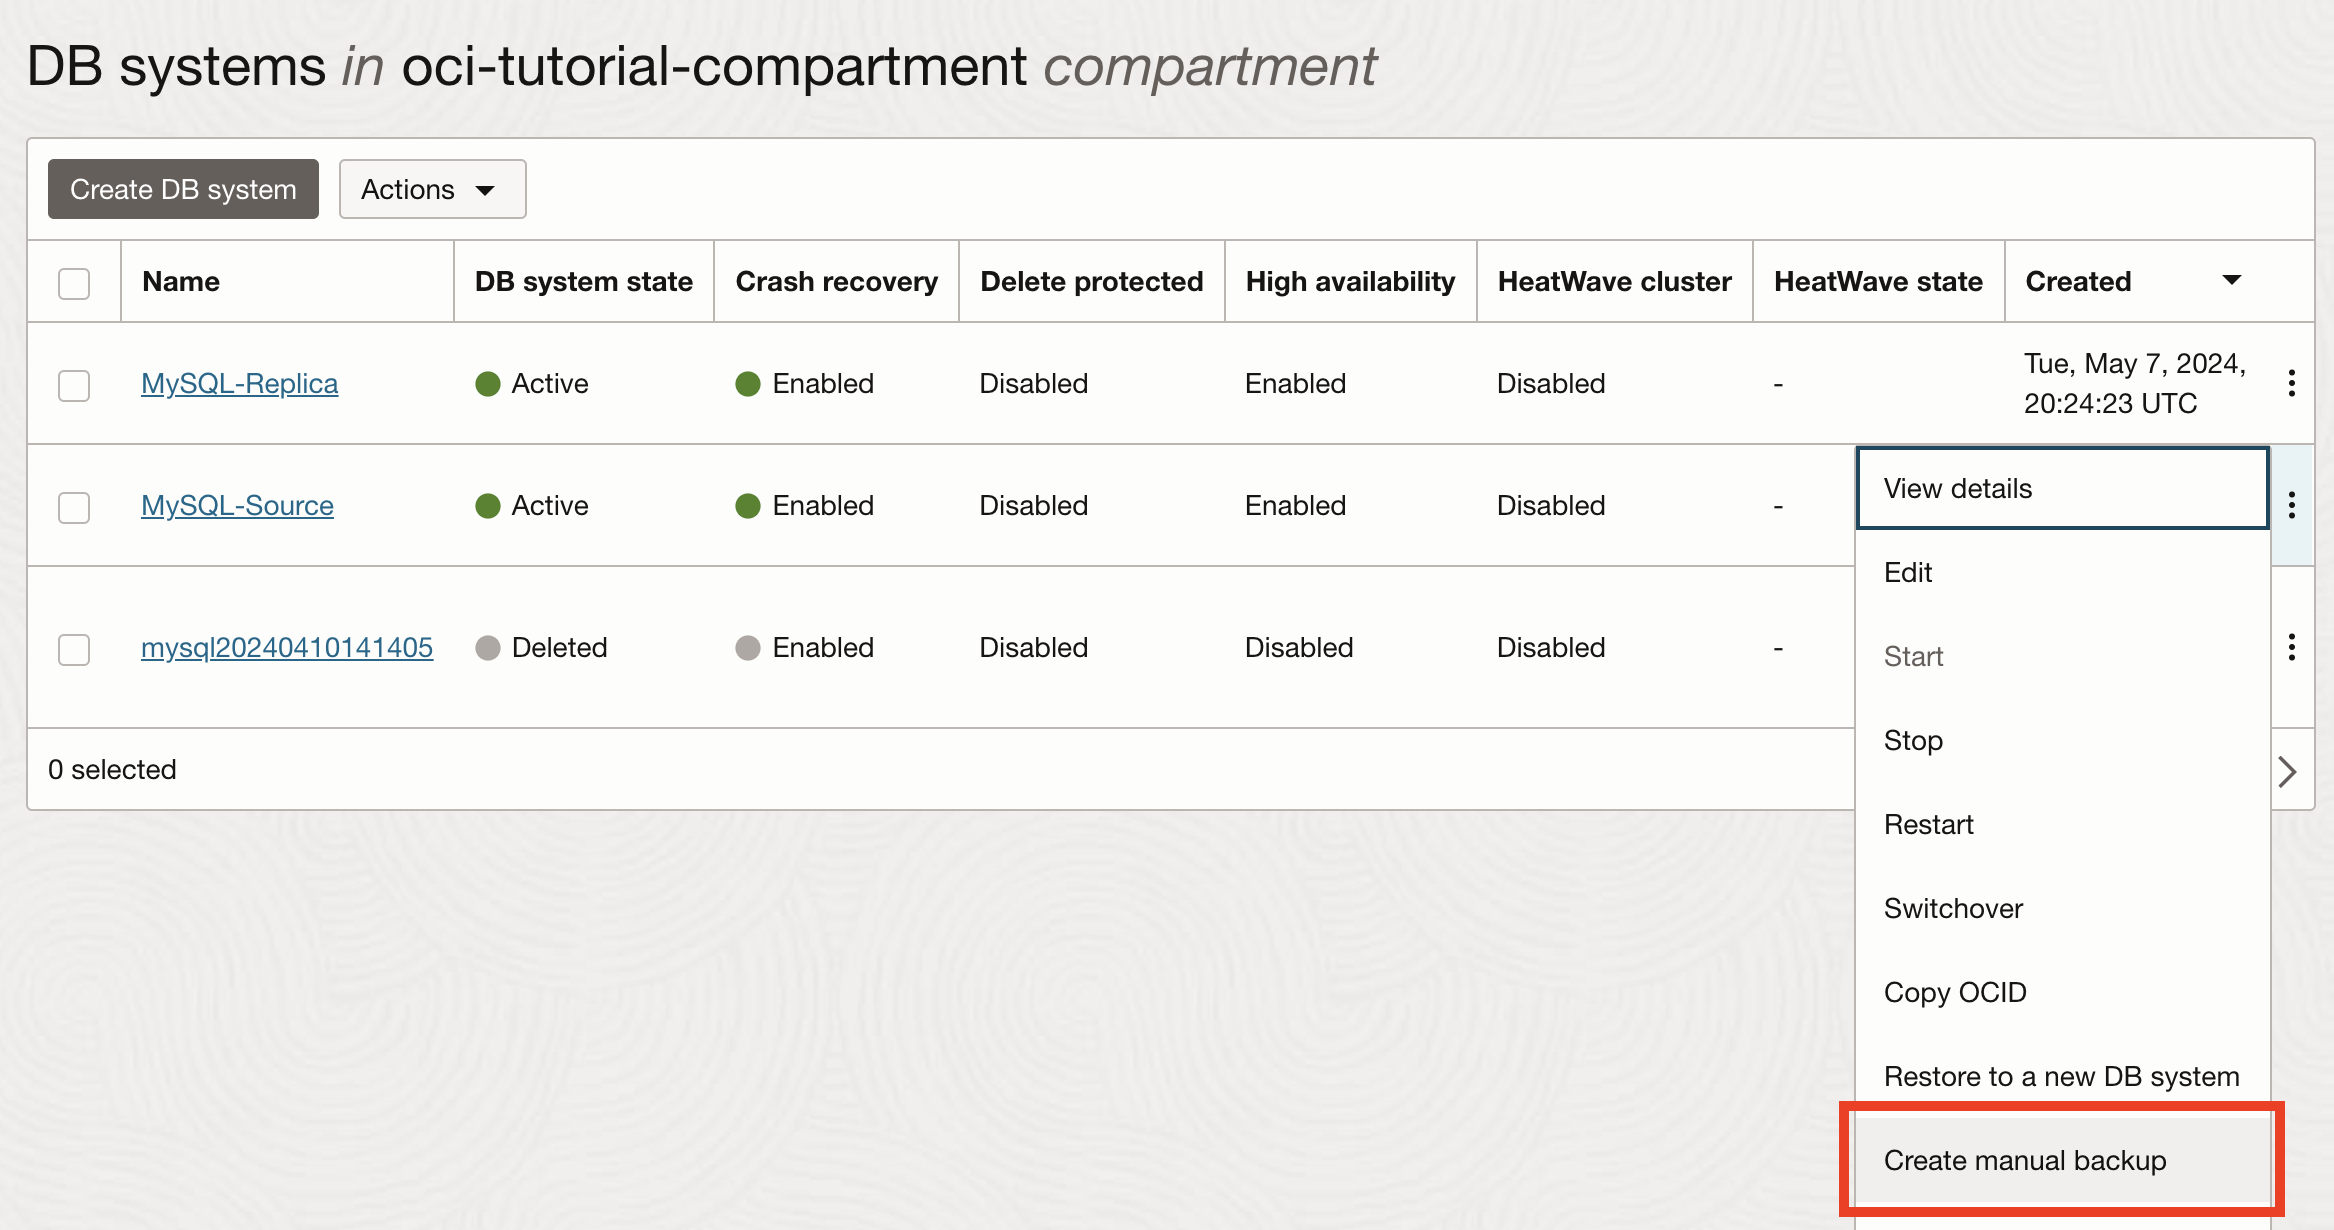
Figure 1. Taking a Manual Backup (DB systems list)
You can also initiate a backup from the DB system details page. Simply click on the More options drop-down menu and select Create manual backup, as shown in Figure 2.
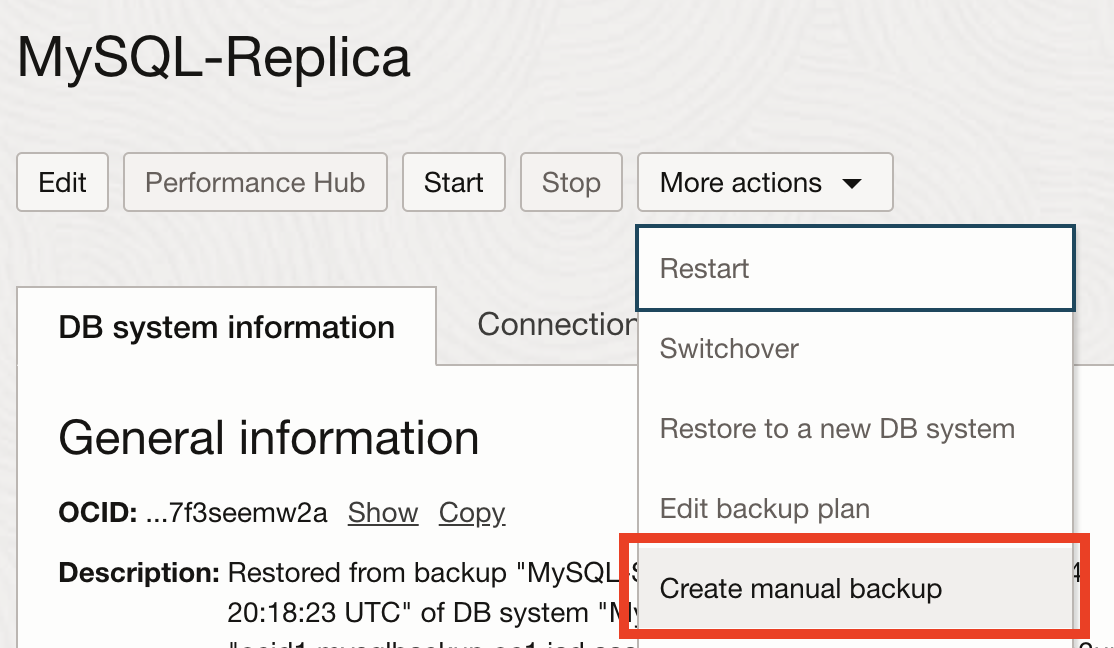
Figure 2. Taking a Manual Backup (DB system details)
See the Creating a Manual Backup section in the online documentation for more information about creating manual backups. You can also read the blog MySQL Database Service – find the info: part 1 – backups for more details and a demonstration of this feature.
Automatic Backup
Automatic backups are another easy feature to use. You only need to enable them for your DB systems; OCI will handle the rest. You can even set a retention period for how long it takes to save the backup before deleting it.
To enable automatic backups, visit the DB system details page, click edit next to Automatic Backups in the Backup section, as shown in Figure 3, and tick the box to enable it in the next dialog. You can also configure the retention period from 1 to 35 days to help you manage the backups saving the latest N days of backups. Nice.
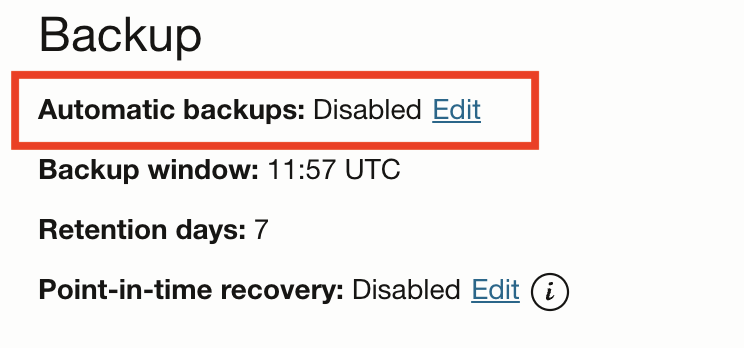
Figure 3. Enable Automatic Backups (DB system details)
You can also enable automatic backups when you create your DB system. Just scroll down to the Configure backup plan section at the bottom of the Create dialog, then click the box next to Enable automated backups as shown in Figure 4 to enable automatic backups and provide a retention period in the Backup retention period textbox.
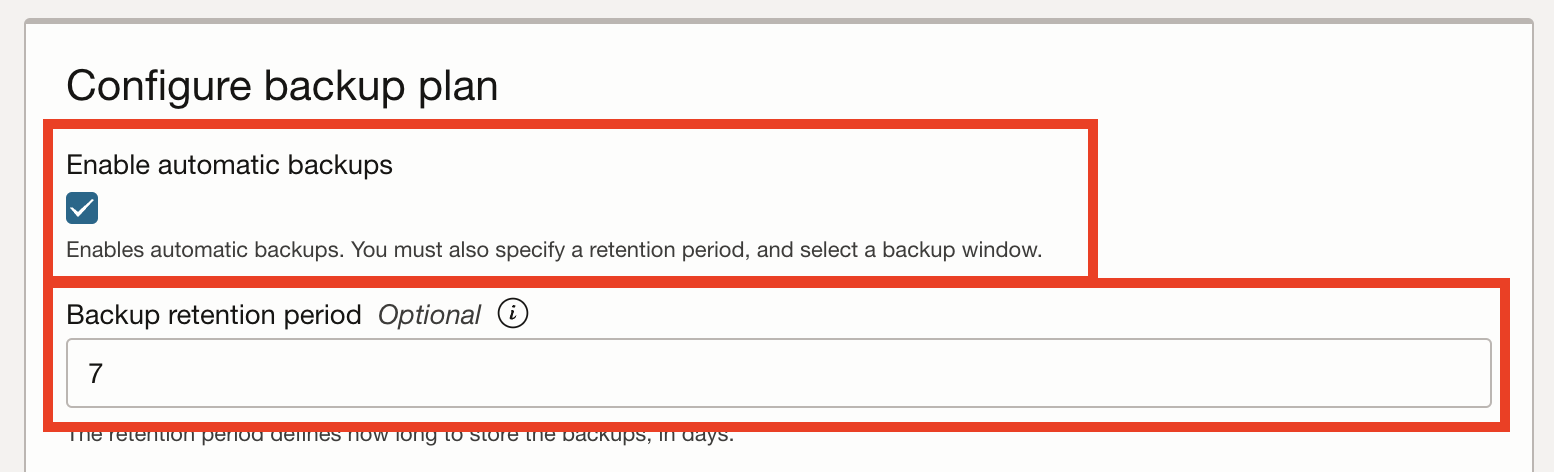
Figure 4. Enable Automatic Backups (DB system create)
See the Configure backup plan subsection in the Creating a DB System section in the online documentation for more information about enabling automatic backups.
Point-in-Time Recovery
Like automatic backups, point-in-time recovery (PITR) can be enabled anytime, making it easy to get started; however, unlike automatic backups that periodically backup your data, requiring you to restore to the last known good backup for recovery, PITR takes snapshots of your data in 5-minute intervals, providing a Recovery Point Objective (RPO) of up to the last five minutes for an active DB system. Therefore, if you want to ensure you can recover as much data as possible with minimal recovery time, PITR is the best choice.
To enable PITR, visit the DB system details page and click edit next to Point-in-time recovery in the Backup section of the DB system details, as shown in Figure 5, and tick the box to enable it in the following dialog.
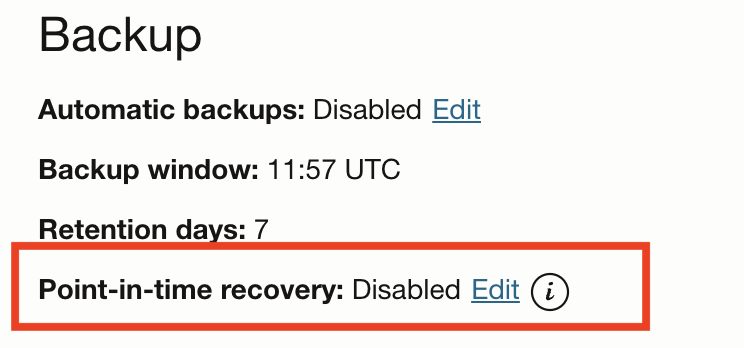
Figure 5. Enabling PITR (DB system details)
You can also enable PITR when you create a DB system. Just scroll down to the Configure backup plan section at bottom of the Create dialog and tick Enable point-in-time recovery as shown in Figure 6.
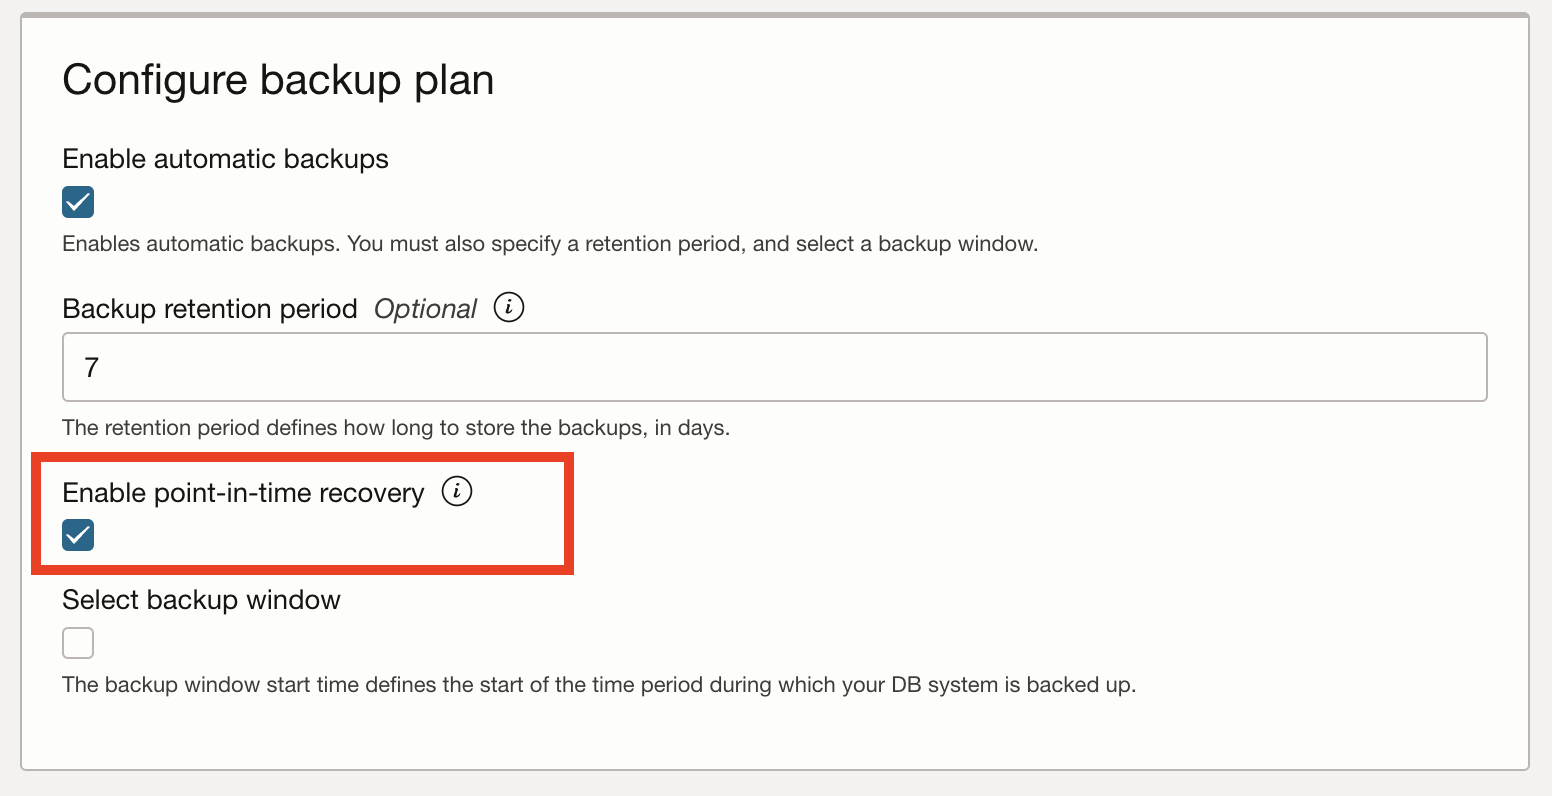
Figure 6. Enable PITR (DB system create)
See the Point-In-Time Recovery section in the online documentation for more information about PITR. You can also read the blog HeatWave Faster Point-in-time Recovery for the latest advances in the feature and a demonstration of this feature.
Final Backup
Another interesting backup feature is termed the final backup. This setting you can enable in your DB systems will cause HeatWave to take a backup before deleting a DB system. This protects your data from accidental deletion and ensures you can release unneeded resources (DB system) and recover the data for any forensic or after-action work you may require. For example, suppose you routinely create DB systems for projects, experiments, or client needs. In that case, you can archive the data with a final backup so that, should the need arise, you can restart the process after deleting the resources.
You can enable the final backup option when you create your DB system. Just scroll down to the Show Advanced Options section at bottom of the create dialog, click it to reveal additional options, then tick Require final backup as shown in Figure 7. Note that this feature is enabled by default for new DB systems.
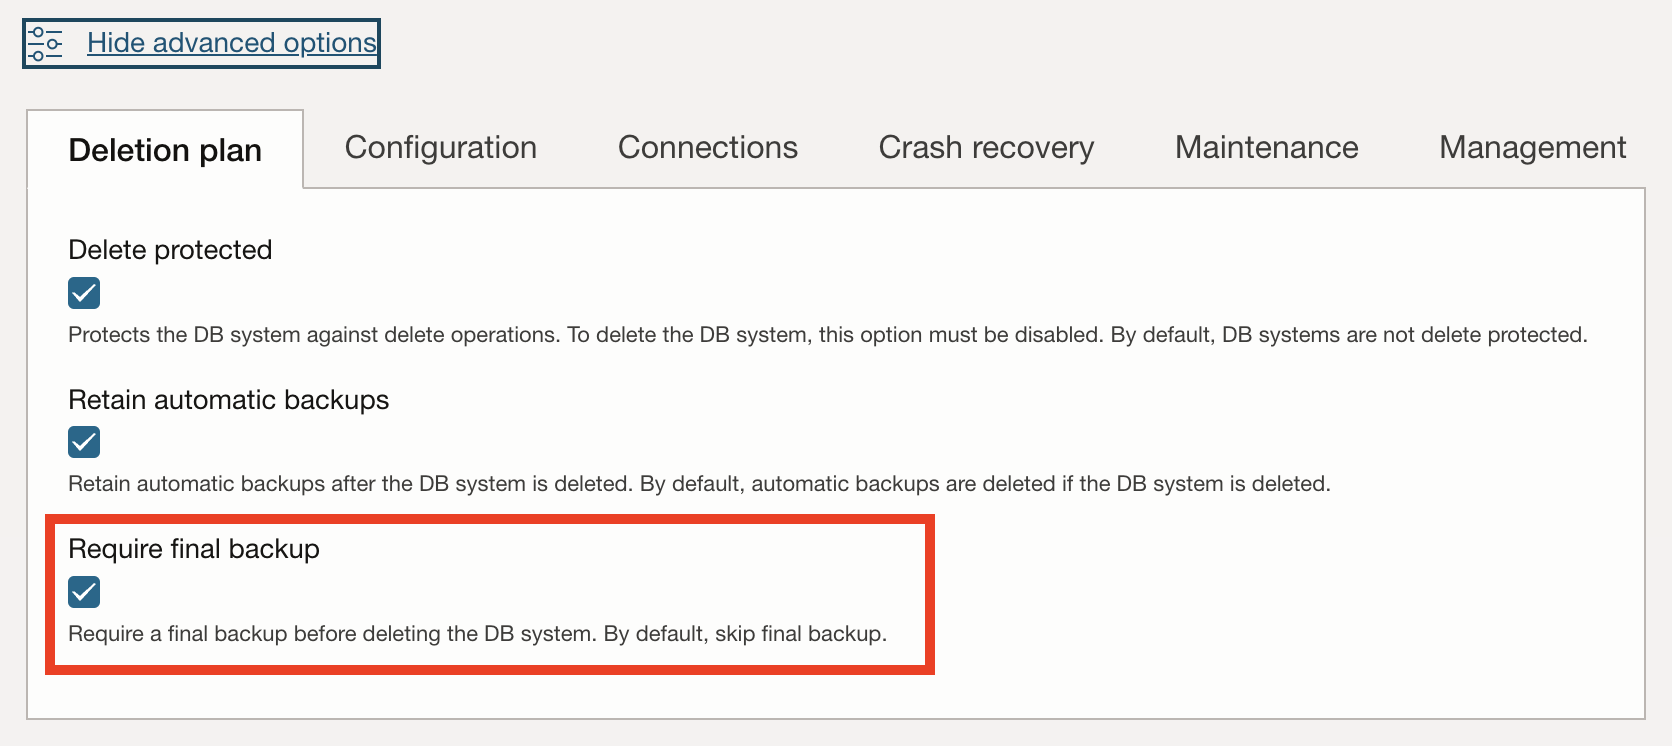
Figure 7. Enable Final Backup (DB system create)
Notice also that you can use the Retain automatic backups to keep any automatic backups that have not expired after the DB system is deleted. Note that this feature is enabled by default for new DB systems. This can be a lifesaver if you need access to historical data. However, you must delete these automatic backups after deleting the DB system.
Also, notice the Delete protected option to prevent DB systems from being deleted accidentally. When this option is enabled, your users and admins cannot delete the DB system from the menus. This option must be turned off before deleting the DB system. Note that this feature is enabled by default for new DB systems.
See the Configure backup plan subsection in the Creating a DB System section in the online documentation for more information about enabling automatic backups.
Note: You should periodically check the storage you use for your backups to ensure you are storing backups only as long as necessary. Deleting those backups you do not need can save storage fees.
MySQL Shell Dump to Object Storage
Finally, you can use MySQL Shell to take a logical backup of your data and store it in Object Storage. This feature is often used to make an offline copy of your data. To do so, you will use two technologies available in Oracle Cloud Infrastructure (OCI), ready for use with all the features you need: Cloud Shell and MySQL Shell. You will also use Object Storage to store your database in a bucket. You can then ship the backup data anywhere, such as downloading it for offline testing and processing.
The process takes a few steps to set up, but once you have Cloud Shell ready, have installed MySQL Shell, and have created a bucket to store the data, you can run the util.dumpInstance() method to dump the database into a bucket. Listing 1 shows an example of this command running. Here, we are using a bucket named bucket-mysql-instances.
Listing 1. Using MySQL Shell to Backup to Object Storage
> util.dumpInstance(“outbound_rpl”, {ocimds:true, osBucketName:”bucket-mysql-instances”})
Acquiring global read lock
Global read lock acquired
Initializing – done
2 out of 6 schemas will be dumped and within them 18 tables, 7 views, 6 routines, 6 triggers.
5 out of 8 users will be dumped.
Gathering information – done
All transactions have been started
Locking instance for backup
Global read lock has been released
Writing global DDL files
Writing users DDL
Running data dump using 4 threads.
NOTE: Progress information uses estimated values and may not be accurate.
Writing schema metadata – done
Writing DDL – done
Writing table metadata – done
Starting data dump
99% (47.27K rows / ~47.69K rows), 41.06K rows/s, 2.66 MB/s uncompressed, 619.22 KB/s compressed
Dump duration: 00:00:03s
Total duration: 00:00:04s
Schemas dumped: 2
Tables dumped: 18
Uncompressed data size: 3.03 MB
Compressed data size: 715.22 KB
Compression ratio: 4.2
Rows written: 47273
Bytes written: 715.22 KB
Average uncompressed throughput: 945.42 KB/s
Average compressed throughput: 222.85 KB/s
Average compressed throughput: 222.85 KB/s
Once the dump is complete, you can return to the OCI bucket list, click on the bucket, and then click on the list of objects. Note that this is a logical backup of your data and thus may consume more storage than a manual or automatic backup.
See the first few sections in the blog Outbound Replication from HeatWave DB System to On-premises MySQL Server for more information and a demonstration of this feature. As you will see in the blog, there is a demonstration of how to replicate your data from a DB system to an on-premises MySQL server. Cool!
High Availability Features
The high availability features in HeatWave are potent options you can use to help keep your data not only accessible but also more secure. In HeatWave, you can enable high availability on your DB systems, creating three compute instances (MySQL instances): primary and two secondary. Each uses the same configuration for block storage, shape, RAM, etc. The differences are that the primary is read/write while the secondary is read-only.
Should the primary fail, one of the secondaries is promoted to replace the primary. We call this failover, and when properly configured, it can help make your data access more reliable. While this is just one feature, HeatWave’s high availability provides much for those looking to make their data more available and minimize downtime in the event of losing access to the primary.
The following sections highlight how to enable high availability on your DB systems and a look at one of the many features you can use to help protect your data beyond the routine use of high-availability DB systems.
See the High Availability section in the online documentation for more information about high availability in HeatWave.
HA-Enabled DB Systems
Suppose you have a DB system and want to enable high availability (HA). In that case, you can do so at any time by clicking on Enable next to High availability in the High availability section of the DB system details page—Figure 8 shows where this is located (it currently shows HA enabled).

Figure 8. Enable High Availability (DB system details)
You can also enable high availability in any DB system you create. Choose the High availability option in the Create dialog, as shown in Figure 9.

Figure 9. Enable High Availability (DB system create)
See the Enabling or Disabling High Availability section in the online documentation for more information about enabling and disabling HA.
Outbound Replication
Having your data in the Oracle Cloud Infrastructure (OCI) and using HeatWave’s secure storage is a sound investment for any organization. Still, sometimes, there is a need to have access to the data outside of OCI. Outbound replication allows you to use your HeatWave DB system as a source and your on-premises (or another DB system) as a replica. Once configured, your replica will accept transactions that duplicate the source’s data. However, outbound replication is not a managed service, so you must configure and maintain the setup as you usually do for MySQL replication.
See the Outbound Replication section in the online documentation for more information about using outbound replication. Two detailed blogs demonstrate how to use outbound replication. To set up outbound replication for an on-premises MySQL server, see the blog Outbound Replication from HeatWave DB System to On-premises MySQL Server. Conversely, to learn how to set up outbound replication for another DB system, see the blog Replicating from One HeatWave DB System to Another.
Inbound Replication
There is one other high-availability feature you can leverage to protect your on-premises MySQL data using inbound replication, which uses a HeatWave DB system to create a replica of your MySQL server. Inbound replication is a feature that allows users to replicate data from one MySQL server to a HeatWave DB system in the Oracle Cloud Infrastructure (OCI). It works via a replication channel in OCI to connect the HeatWave DB system as a replica. However, like outbound replication, the inbound replication feature is not part of the managed HeatWave DB system. You will have to configure and maintain the replication channel yourself.
See the Inbound Replication section in the online documentation for more information about using outbound replication. Two detailed blogs demonstrate how to use outbound replication. To set up outbound replication for an on-premises MySQL server, see the blog HeatWave Inbound Replication – On-Premises to HeatWave DB System.
Conclusion
This blog has introduced the available backup and HA features and options for protecting your data in HeatWave, ranging from automatic backups to outbound replication for off-site storage. As you have seen, there are many features available that you can leverage to build a data protection and recovery plan to meet your needs. You can use the links provided as a jumping-off point to learn more about these features.
