High availability and replication is a must for any production environment in order to have a back-up process in place with minimum interruption in case of failure. In this article, I’ll explain how to configure this architecture for MySQL HeatWave on OCI.
The objective will be having the architecture below with two different Virtual Cloud Networks (VCNs) and one MySQL HeatWave instance in each VCN. I will use my own tenant in the Frankfurt (FRA) data center (Region) in the example setup below.
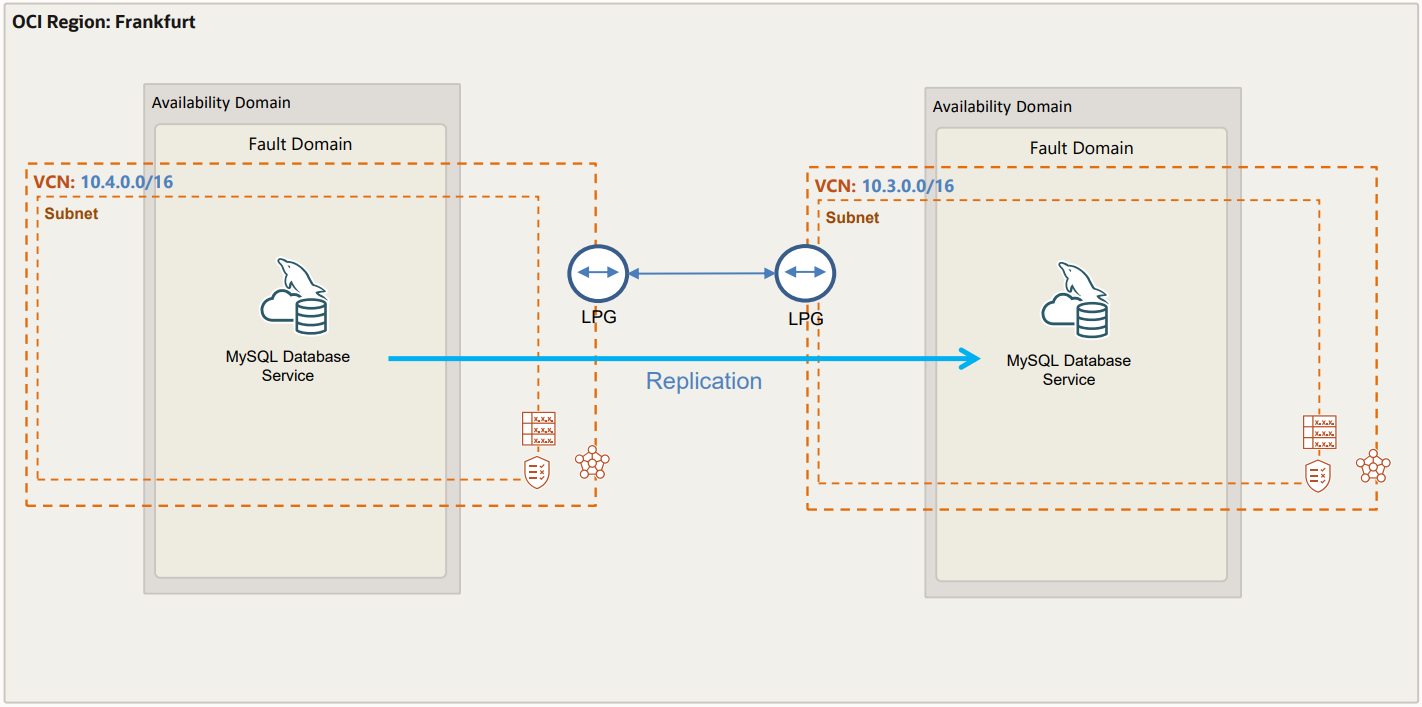
So, the setup contains redundancy cross two different VCN, we use same tenancy for both VCN, replication traffic is sent via VCN peering.
Important: Make sure you do not have overlapping CIDR’s between the two VCN’s.
I have already created two VCN’s:
- FRA VCN1 10.3.0.0/16
- FRA VCN2 10.4.0.0/16
I also created one compute instance in each VCN above to test connectivity.
Disclaimer:
- This guide will not cover the basics of Oracle Cloud or MySQL Database Services.
- This Guide will not cover any specific IAM policy setting needed, look here for more information.
Step by step guide to setup network peering and MySQL Replication
Watch the video at the bottom of this article to see a demo of all these steps.
1) Create LPG in each VCN
1.1) Create a LGP in VCN1
- Go to “Networking” > “Virtual Cloud Networks”
- Select VCN “VCN1”
- In left “Resources” meny select “Local Peering Gateways”
- Press “Create Local Peering Gateway” and specify a Name, let’s use “LPG-VNC1”
1.2) Create a LGP in VCN2
- Go to “Networking” > “Virtual Cloud Networks”
- Select VCN “VCN2”
- In left “Resources” meny select “Local Peering Gateways”
- Press “Create Local Peering Gateway” and specify a Name, let’s use “LPG-VNC2”
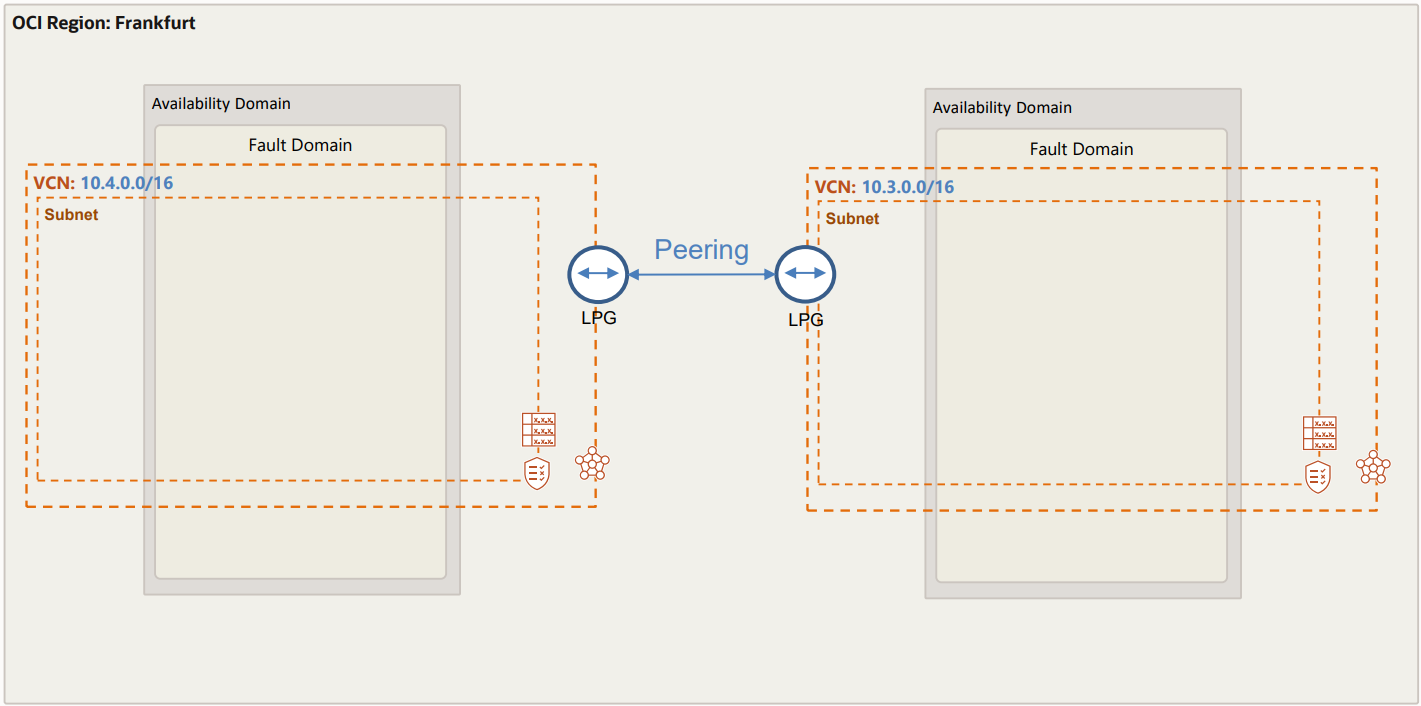
2) Establish a connection between the two VCN’s
Be aware that:
- Depending on IAM policies and whether you use the same tenancy the procedure might differ.
- If you are doing the setup with 2 different tenancies, you need the OCID from peer Local Peering Gateway (LPG).
- Typically, you also establish the connection from the requestor, in my tenancy policies are setup for both requestor/acceptor, more details on the IAM policies here.
Let’s establish the connection from VNC2.
- Go to “Networking” > “Virtual Cloud Networks”
- Select VCN “VCN2”
- In left meny select “Local Peering Gateways”
- Now, on right side of your LPG “LPG-VCN2”, click the Actions menu (three dots), and then click “Establish Peering Connection”.
- Then Specify which LPG you want to peer with:
- Select “Browse Below” and select “VCN1” and “LPG-VCN1” from the lists provided.
- Then click “Establish Peering Connection”
After a while you should see “Peering Status” changing to “Peered”, this means the two networks are connected.
3) Updating routing and firewalls
Next, we need to update the security lists to allow traffic from each others network and add routing entry’s for the local VCN.
3.1) Adding routing rules for VCN1
- Go to: “Networking” > “Virtual Cloud Networks” and select VCN1
- Under “Resources” click “Route Tables” and then click on “Default Route Table for VCN1”
- Click on “Add Route Rules” and add entry like:
- Select “Target Type” > “Local Peering Gateway”
- Destination CIDR Block “10.4.0.0/16” (this CIDR for VCN2)
- Select “Target Local Peering Gateway …” > select “LPG-VCN1
- Add description “Traffic to VCN2”
- Press “Add Route Rules”
3.2) Adding routing rules for VCN2
- Go to: “Networking” > “Virtual Cloud Networks” and select VCN2
- Under “Resources” click “Route Tables” and then click on “Default Route Table for VCN2”
- Click on “Add Route Rules” and add entry like:
- Select “Target Type” > “Local Peering Gateway”
- Destination CIDR Block “10.3.0.0/16” (this is CIDR for VCN1)
- Select “Target Local Peering Gateway …” > select “LPG-VCN2
- Press “Add Route Rules”
3.3) Adding Security Rules for VCN1
- Go to: “Networking” > “Virtual Cloud Networks” and click you VCN1
- Under “Resources” click “Security Lists” and then click on “Default Security List for VCN1”
- Click on “Add Ingress Rules” and add entry to allow ping from VCN2:
- Source CIDR: 10.4.0.0/16
- IP Protocol: ICMP
- Description: Ping from VCN2
- Press “Add Ingress Rules”
- Add another rule for MySQL traffic:
- Source CIDR: 10.0.0.0/8
- IP Protocol: TCP
- Destination Port Range: 3306,33060
- Description: MySQL traffic
- Press “Add Ingress Rules”
3.4) Adding Security Rules for VCN2
- Go to: “Networking” > “Virtual Cloud Networks” and click you VCN2
- Under “Resources” click “Security Lists” and then click on “Default Security List for VCN2”
- Click on “Add Ingress Rules” and add entry to allow ping from VCN1:
- Source CIDR: 10.3.0.0/16
- IP Protocol: ICMP
- Description: Ping from VCN1
- Press “Add Ingress Rules”
- Add another rule for MySQL traffic:
- Source CIDR: 10.0.0.0/8
- IP Protocol: TCP
- Destination Port Range: 3306,33060
- Description: MySQL traffic from VCN1
- Press “Add Ingress Rules”
3.5) Test connectivity
Simplest is to create one compute instance in both VCN1 and VCN2. Then test if you can ping (we added rule for ICMP traffic) your compute node from each other, that is ping compute in VCN2 from compute in VNC1 and vice versa.
4) Create MySQL databases
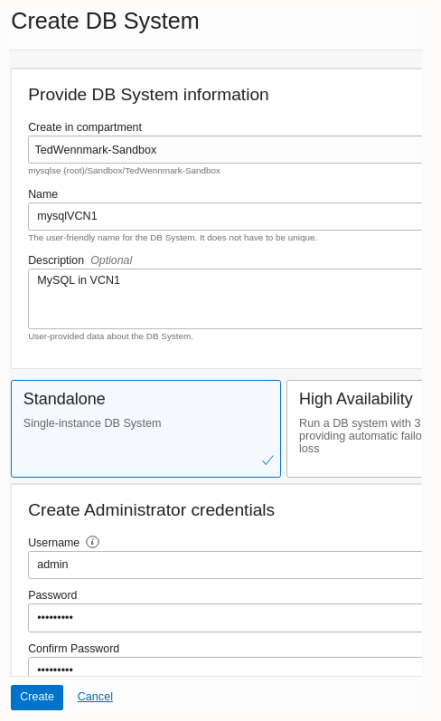
4.1) Create MySQL Database Service in VCN1:
Go to “Databases” > “MySQL” and press “Create MySQL DB System”
- Set name to “mysqlVCN1”,
- Select “Standalone”,
- Set a Username and Password (I use “admin” and “Welcome1!),
- Use VCN1 and corresponding subnet,
- Leave the rest as default and the press “Create”
After a few minutes your database should be up and running.
4.2) Create MySQL Database Service in VCN2:
Go to “Databases” > “MySQL” and press “Create MySQL DB System”
- Set name to “mysqlVCN2”,
- Select “Standalone”,
- Set a Username and Password (I use “admin” and “Welcome1!),
- Use VCN2 and corresponding subnet,
- Leave the rest as default and the press “Create”
After a few minutes your database should be up and running.
4.3) Test connecting to MySQL from the compute instance in same VCN (below is for compute in VCN1) and cross VCN’s
If not already done, install MySQL client:
Get private IP for MySQL Database Service in VCN1:
- “Databases” > “MySQL”, and click on “mysqlVNC1”, under section “Endpoint” > “Private IP Address”
Connect:
Get private IP for MySQL Database Service in VCN2:
- “Databases” > “MySQL”, and click on “mysqlVNC2”, under section “Endpoint” > “Private IP Address”
Connect:
4.4) Insert some test data into MySQL Database Service in VCN1 (source) from compute in VCN1:
Get private IP for MySQL Database Service in VCN1:
- “Databases” > “MySQL”, and click on “mysqlVNC1”, under section “Endpoint” > “Private IP Address”
Connect:
Insert some dummy data:
use ted;
create table t (i int primary key, ts timestamp);
insert into ted.t values (1,now());
insert into ted.t values (2,now());
insert into ted.t values (3,now());
select * from ted.t;
5) Configure and start replication
5.1) Create replication user on MySQL HeatWave instance in VCN1
This will be used to configure and start replication Chanel from MySQL HeatWave instance in VCN2.
- Login to your compute node on VCN1.
- Connect to MySQL HeatWave in VCN1:
- Get private IP for MySQL HeatWave in VCN1: “Databases” > “MySQL”, and click on “mysqlVNC1”, under section “Endpoint” > “Private IP Address”
- Connect:
- Create replication user:
mysql> GRANT REPLICATION SLAVE ON *.* TO ‘repl’@’10.4.%’;
5.2) Provision data from MySQL HeatWave in VCN1 to MySQL HW in VCN2
Create folder to store dump files:
Start MySQL Shell from compute in VCN1 (install by typing: sudo yum install mysql-shell):
(Connect to MySQL HeatWave in VCN1)
\connect admin@<private IP of MySQL Database Service in VCN1>
(input password Welcome1!)
(dump all data)
util.dumpInstance(“/home/opc/dump-files/20220412”, {ocimds:true, threads:8, showProgress:true, compatibility:[“force_innodb”,”strip_definers”,”strip_restricted_grants”,”strip_tablespaces”]})
(now connect to MySQL Database Service in VCN2)
\connect admin@<private IP of MySQL HeatWave in VCN2>
(load dump file into MySQL HeatWave instance in VCN2)
util.loadDump(“/home/opc/dump-files/20220412″,{updateGtidSet:”append”, threads:8, waitDumpTimeout:1800})
5.3) Setup replication from MySQL in VCN1 (source) > VCN2 (replica), replication channel is setup from VCN2 (replica)
- Go to “Databases” > “MySQL” and press “mysqlVCN2”
- Then under “Resources” select “Channels” and click “Create Channel”
- Enter a name “ReplicationFromVCN1toVCN2”
- Under “Source Connection” provide details from MySQL instance in VCN1, leave rest as default and press “Create Channel”
- After a few minutes you should see Channel in State “Active”
- If you navigate to “Databases” > “MySQL” and press “mysqlVCN2” you should also see status under section “Inbound Replication Channel”
5.4) Test replication setup
Insert some data into MySQL source in VCN1 and look at MySQL in VCN2.
Connect to MySQL source in VCN1:
- Get private IP for MySQL Database Service in VCN1: “Databases” > “MySQL”, and click on “mysqlVNC1”, under section “Endpoint” > “Private IP Address”
- Connect:
and then type:
Remove “CREATE TABLE” row below. Keep everything else.
insert into ted.t values (4,now());
insert into ted.t values (5,now());
select * from ted.t;
Connect to MySQL replica in VCN2:
- Get private IP for MySQL Database Service in VCN2: “Databases” > “MySQL”, and click on “mysqlVNC2”, under section “Endpoint” > “Private IP Address”
- Connect:
and then type:
+—+———————+
| i | ts |
+—+———————+
| 1 | 2022-03-31 15:40:34 |
| 2 | 2022-03-31 15:40:34 |
| 3 | 2022-03-31 15:40:34 |
+—+———————+
Replace with select above with this:
+—+———————+
| i | ts |
+—+———————+
| 1 | 2022-03-31 15:40:34 |
| 2 | 2022-03-31 15:40:34 |
| 3 | 2022-03-31 15:40:34 |
| 4 | 2022-03-31 16:37:57 |
| 5 | 2022-03-31 16:38:57 |
+—+———————+
So, all is done, and replication is up and running, below you have the setup we have completed!

Finally, below you have a video with a demo showing the same process as described above.
