integrated component
of Oracle Verrazzano
The Oracle Verrazzano container management platform uses a number of popular open source components for securing, monitoring and integrating containers in a local environment or cloud. A complete example using the included single sign on and identity management system “Keycloak” might show that a typical javascript based user interface and a java written REST service can be secured easily and that a user identity can be passed through from the frontend to the backend in a well performing way.
For a complete example, there is a number of frameworks for java and javascript available. Many of them have already been described in other blog articles, like integration of Keycloak with React or Angular for the frontend, and with SpringBoot and Micronaut as backends to provision secured REST services. Exactly as described there, the same configuration could have been used for Oracle Verrazzano, since its included component “Keycloak” is available there in an unchanged form and no specific customizations or specialities would have been required. To be complete, I will demonstrate how to configure single sign on or rather how to pass through a user identity from a frontend to a backend service by using two open source frameworks initiated by Oracle.
for user interface and backend logic
My first choice was to use Oracle JET (“ojet”), a JavaScript framework based on jQuery and Knockout with an especially nice and comprehensive collection of widgets and diagrams for a user interface. And secondly Helidon, a comprehensive collection of Java libraries compliant to the established Java Microprofile standard, aspiring and at least complementary to the Java Enterprise Edition standard and its well-kown application servers like WebLogic, Wildfly, Glassfish and so on.
But let’s start with configuring Keycloak as basis for managing identities and execution of single sign on operations. The easiest way to achieve this would be to use modern JSON web tokens (JWTs) as specified in the OpenID Connect standard.
1) Preparation of Keycloak
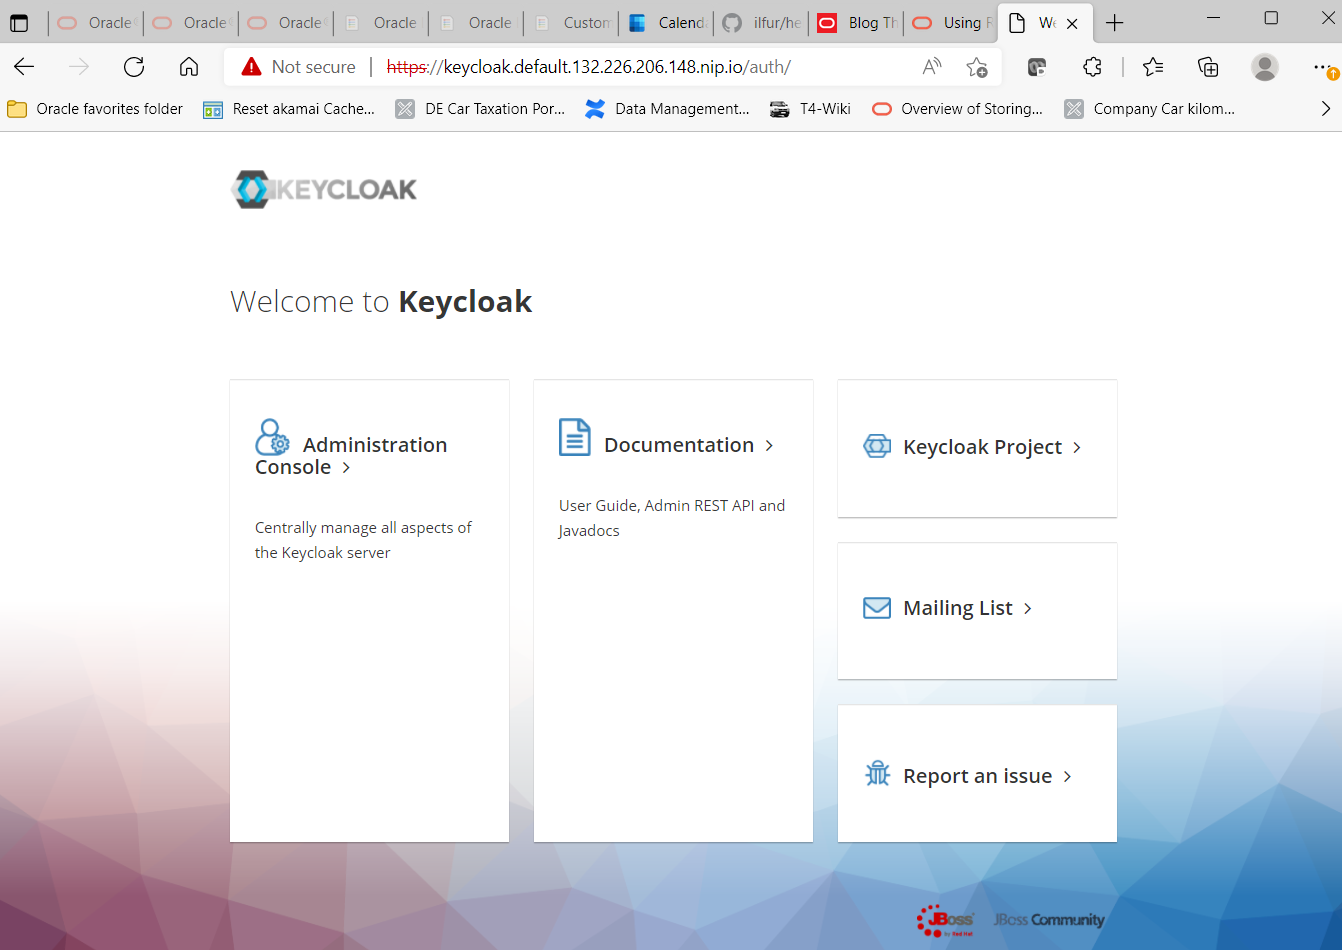
Log on to your Keycloak installation. In Oracle Verrazzano, there is a separate DNS entry for Keycloak and its admin console, e.g. https://keycloak.<domain-name> or in my personal sample environment https://keycloak.default.132.226.206.148.nip.io.
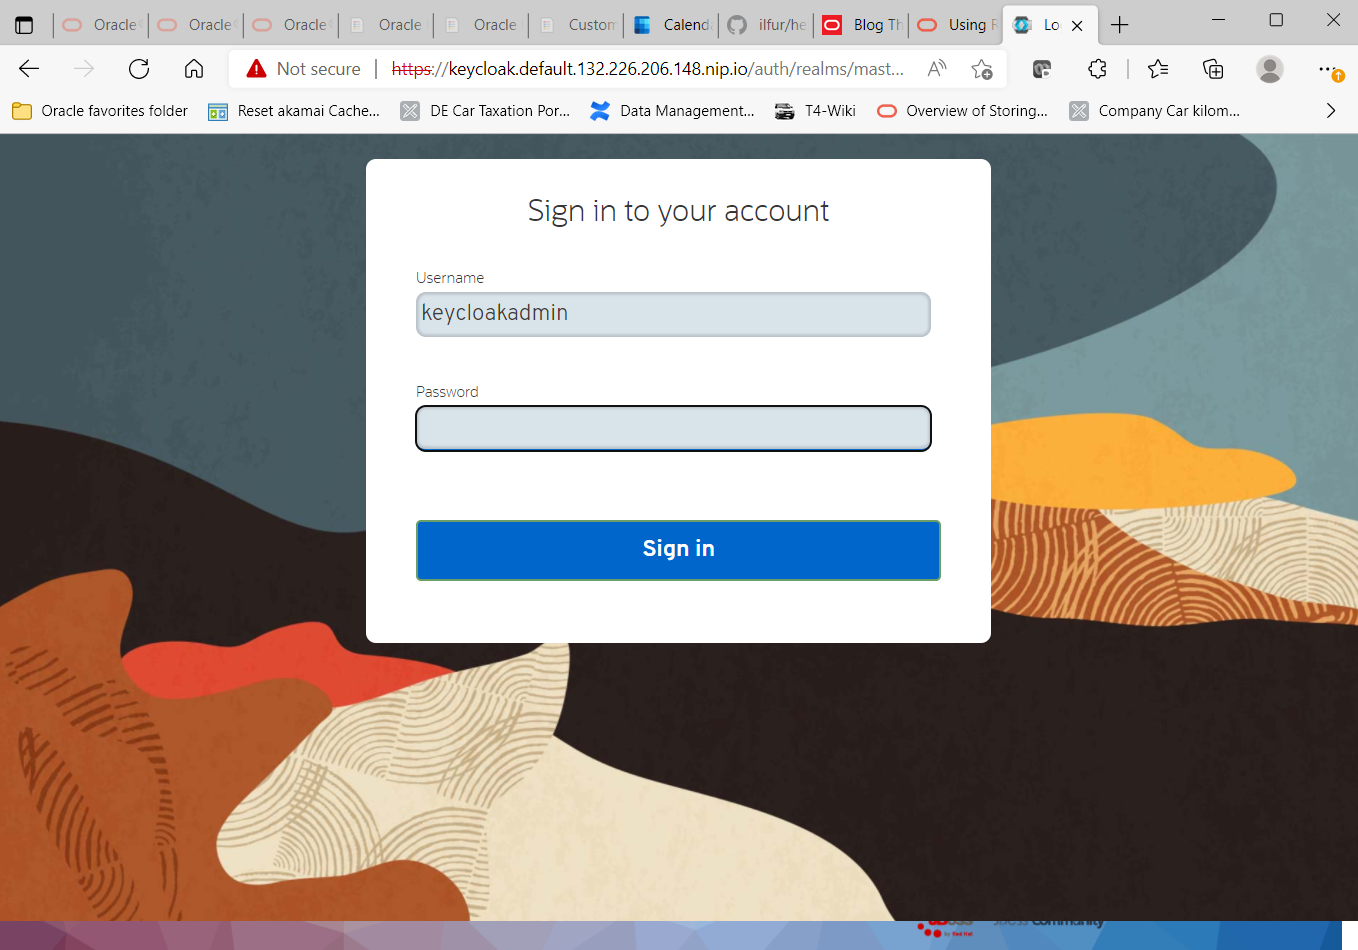
Click on “Administration Console”. You will see its the login screen. Log in as user “keycloakadmin“. The required password can be obtained in a Verrazzano environment by issuing a small kubectl command like the following:
kubectl get secret \
 --namespace keycloak keycloak-http \
 -o jsonpath={.data.password} | base64 -d ; echo
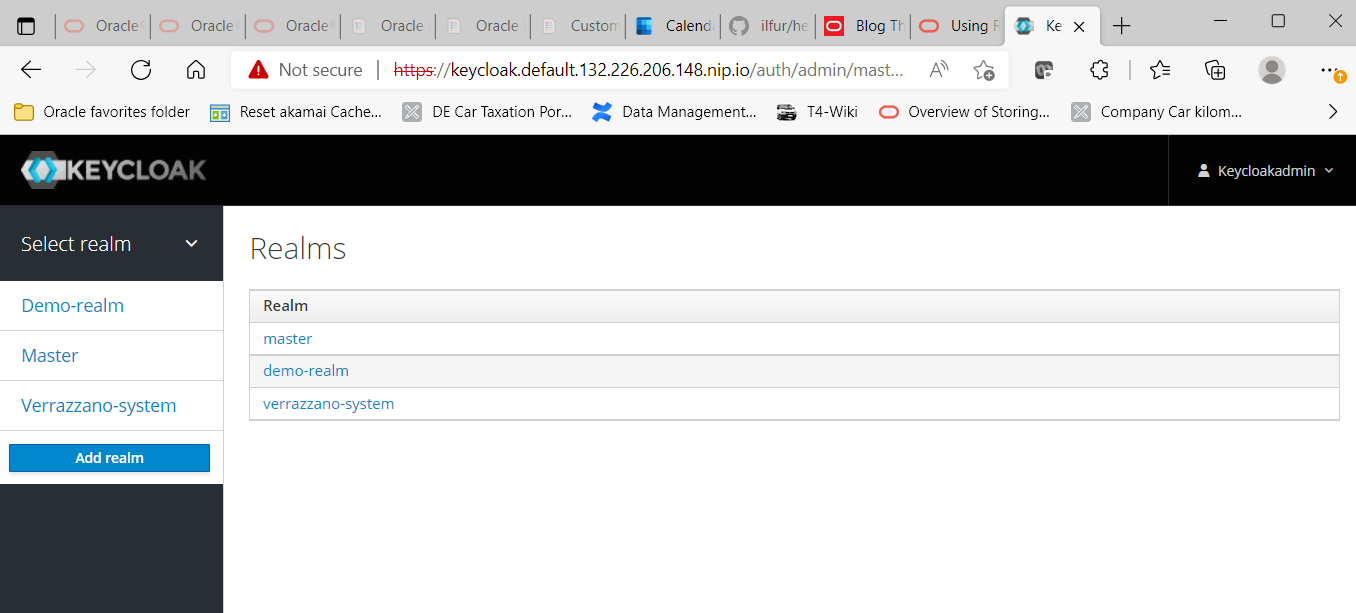
In the next step create a new environment for storing identities, defining application clients, attach external identity management systems etc. by clicking on the “Add Realm” button. The name of the new realm in our example would be “demo-realm“.
The realm settings themselves do not require any changes for now. Please do check if “OpenId Endpoint Configuration” is configured as an endpoint (besides SAML).
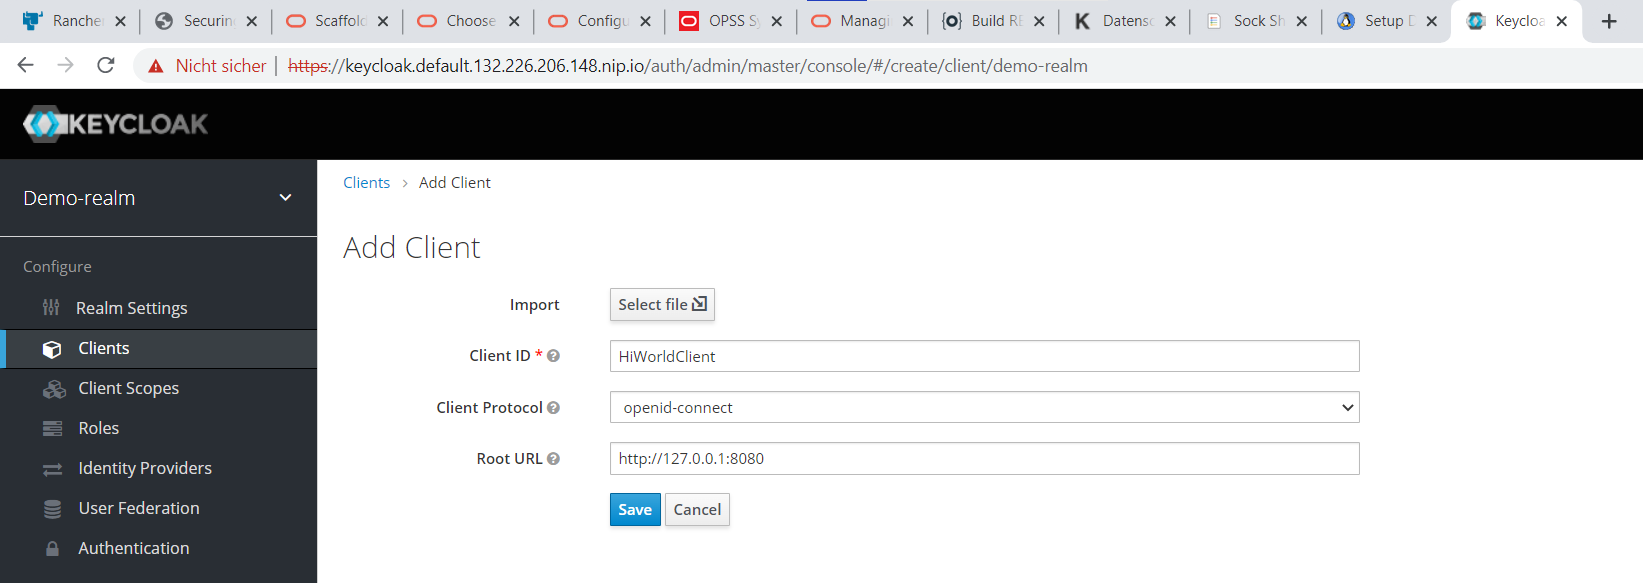
Now define a new client (or rather client type) that may log on to the realm, following some rules that are yet to be defined. For that, click on the “Clients” area to the left, then on the “create” button on the top right.
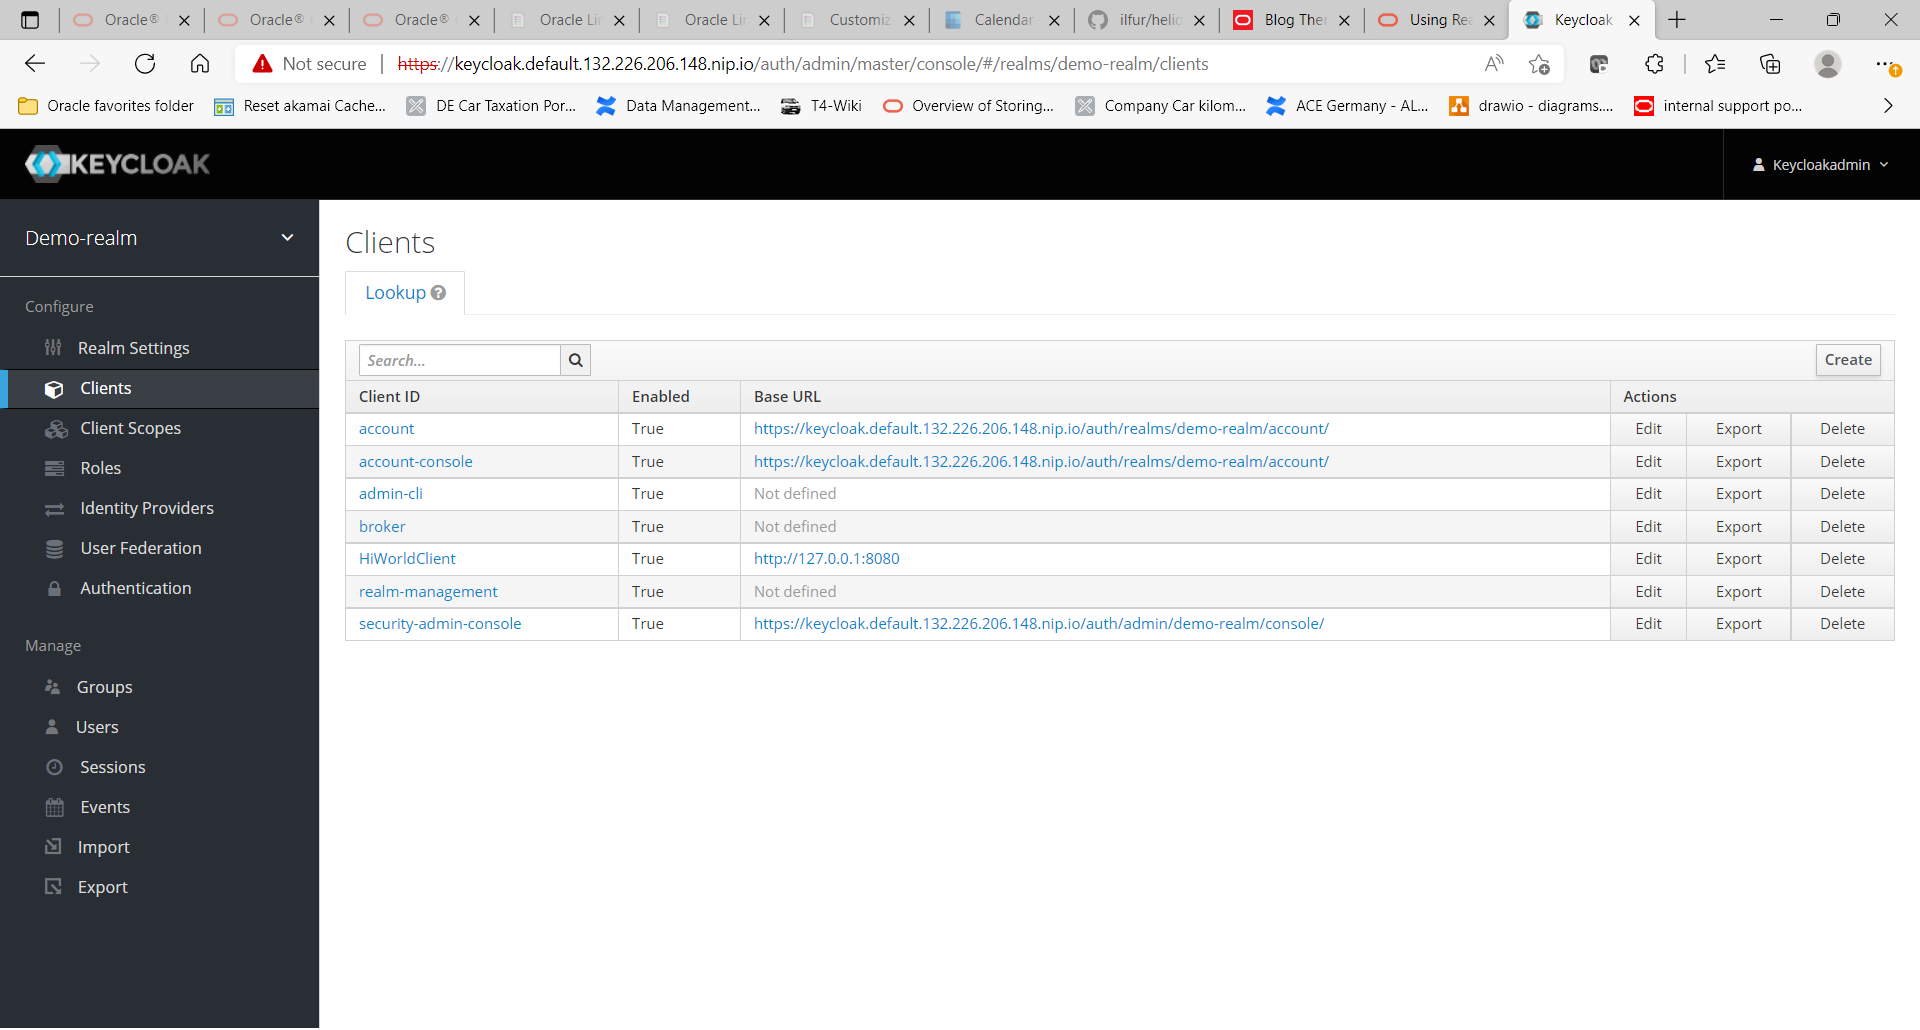
Enter a new client named “HiWorldClient“, which will be associated with our sample application. Since the application will be running on a local device at first, do use “http://127.0.0.1:8080” as root-URL. It’s also important to use “openid-connect” as protocol, not its alternative “saml”.
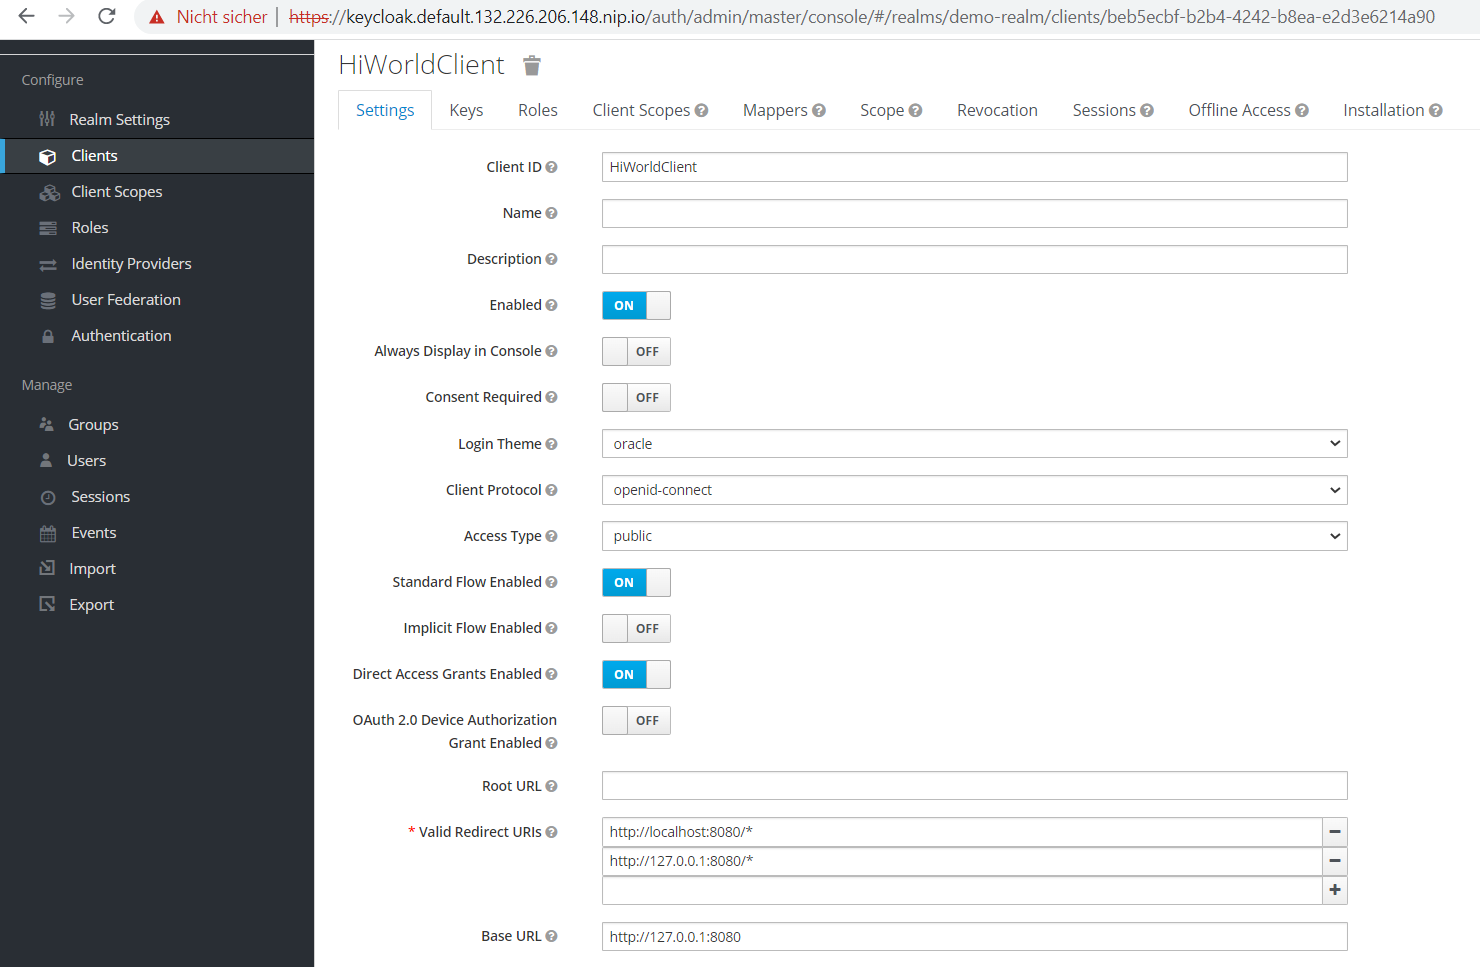
The client is still not fully configured. So please click on our HiWorldClient and on the first page (in tab “settings”), enter two URLs to be safe: “http://127.0.0.1:8080/*” and “http://localhost:8080/*”. Please do not forget the asterisk “*” at the end of each URL. If the settings are incorrect or missing, there will be a misleading error message “invalid redirect_url parameter” instead of showing a single sign on login screen. You can also use the nice and modern Oracle look and feel in the “Login Theme” instead of an almost empty default.
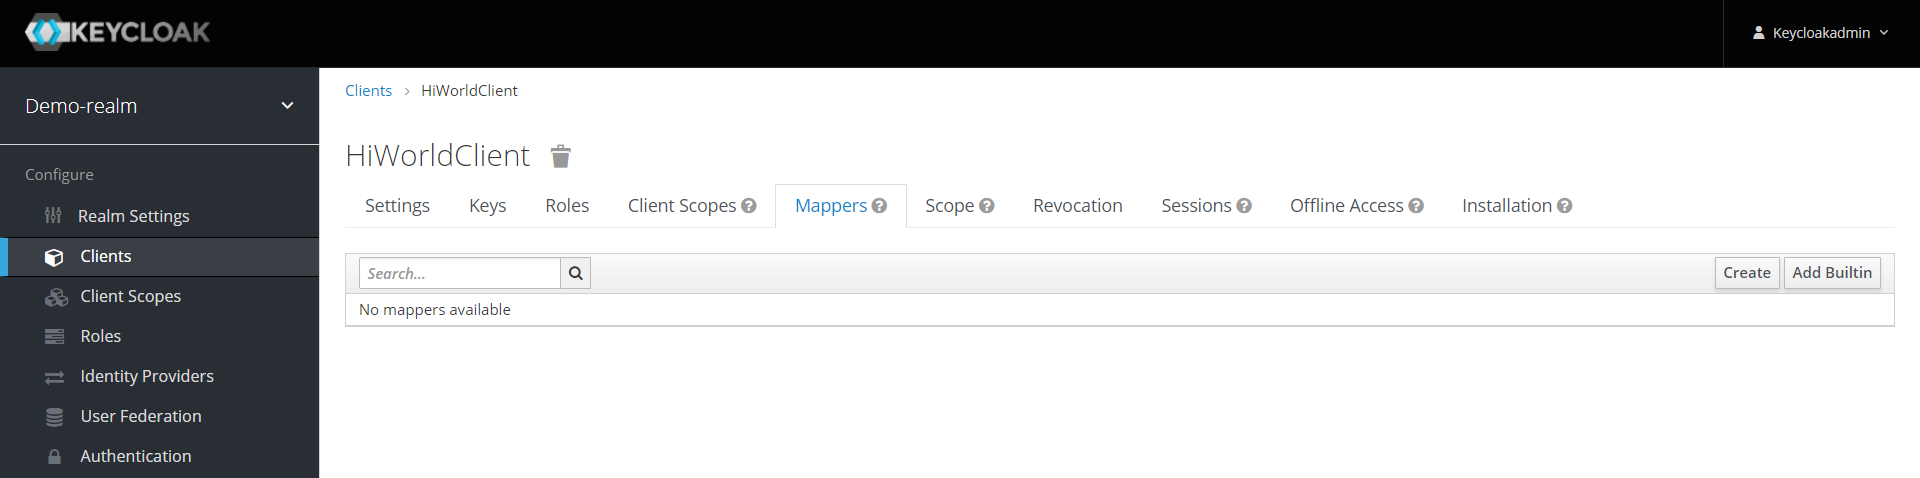
Please do not skip the next step: a default JWT login token contains only minimal information like a user name, expiration date, issuer and recipient (i.e. audience). The JWT standard also allows to add further, custom information. To allow for both authentication and authorisation in the most easy way, the login token should also contain a list of application roles which the logged in user is a member of. To achieve that, switch to the tab “Mappings“.
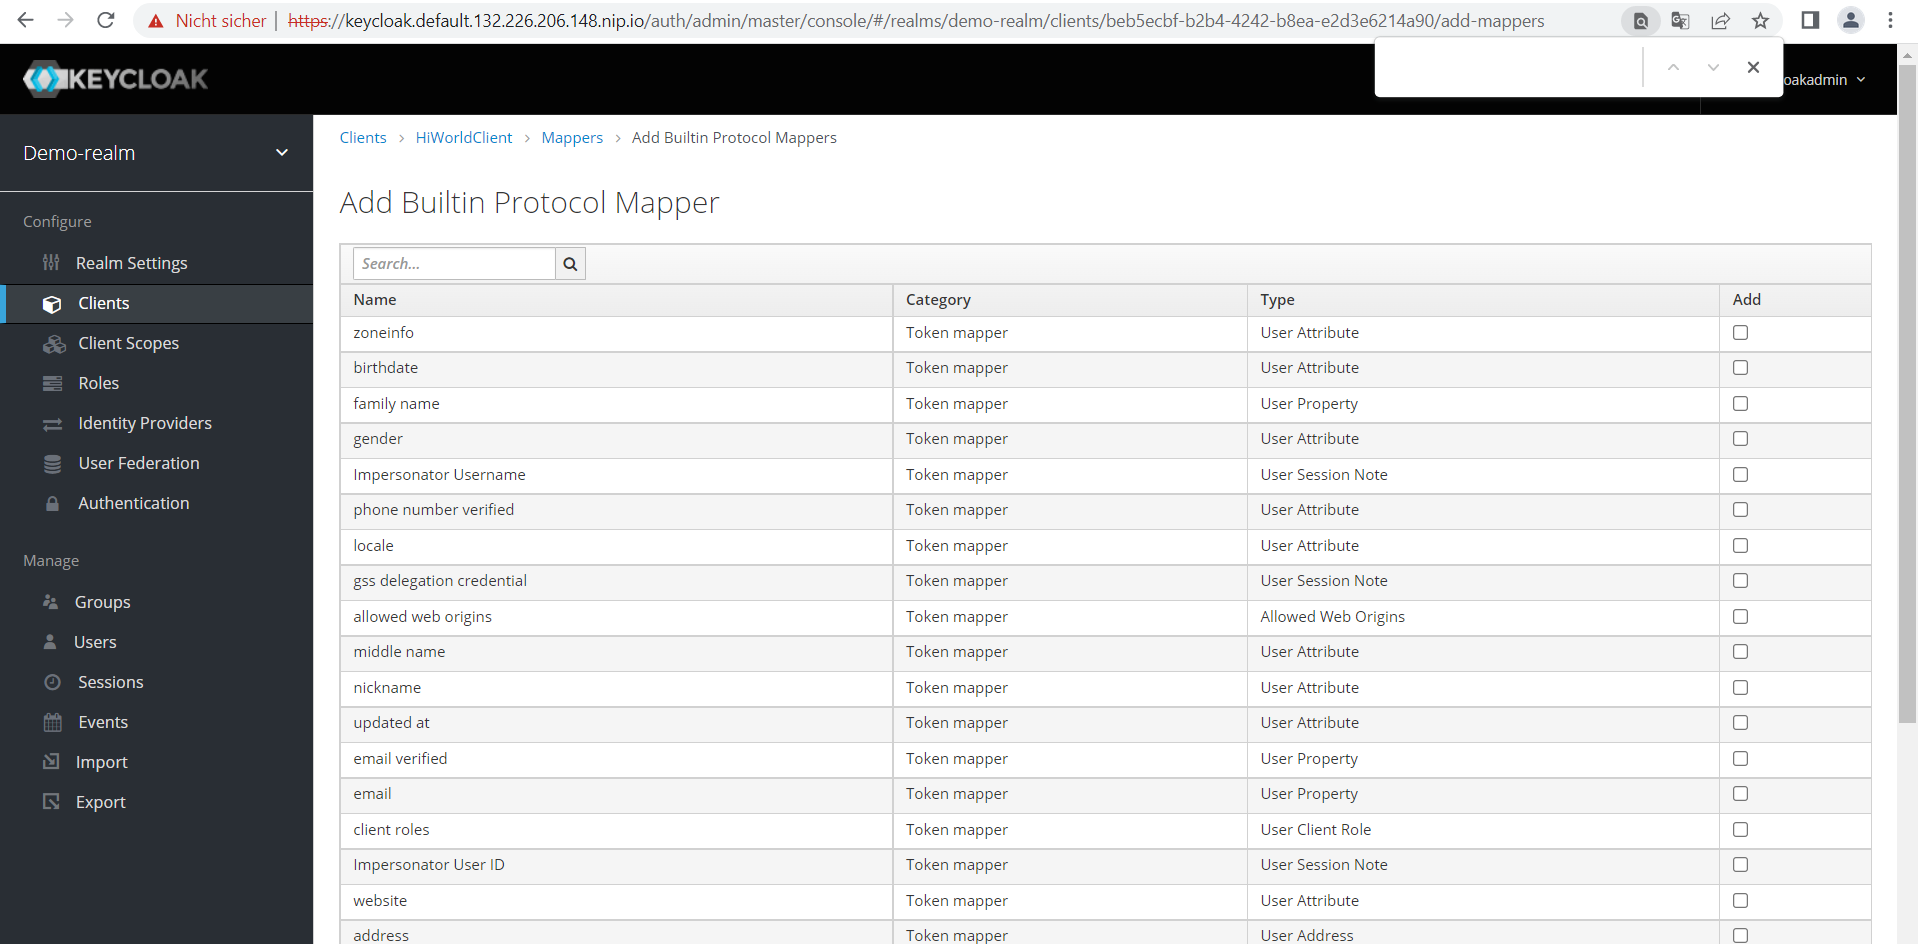
Click on “Add Builtin” and choose the entry “groups” from the list. (Just in case this entry is missing like in my test environment, choose “create” instead, then the type “User Realm Role” with token claim name “groups”, set multi-valued to “On”, and choose the claim JSON type “String”.)
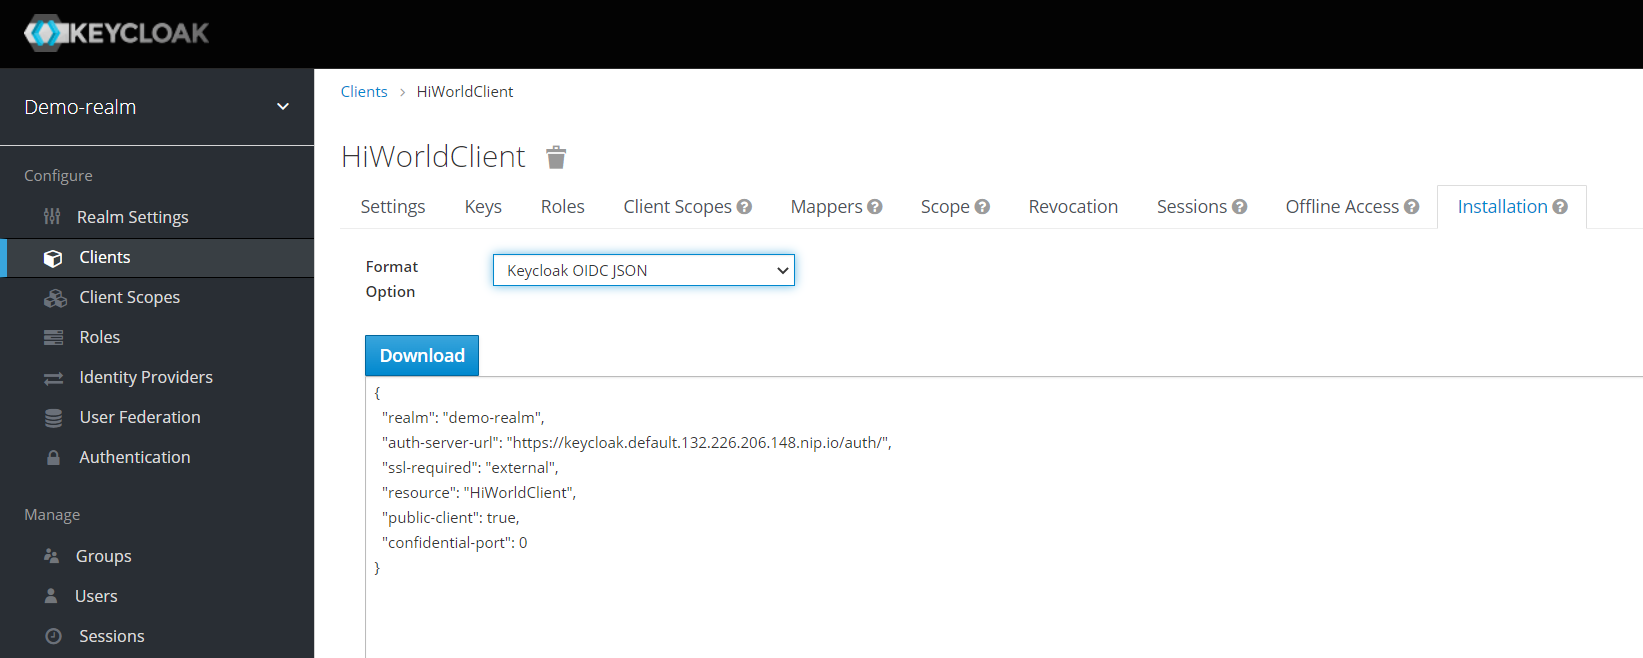
A JavaScript based client for Keycloak requires many of the settings just made in a configuration file.To create this file, download the configuration and save it into a file named “Keycloak.json” for later use. This can be achieved by clicking in the tab “Installation” and then selecting “Keycloak OIDC JSON” from an option list.
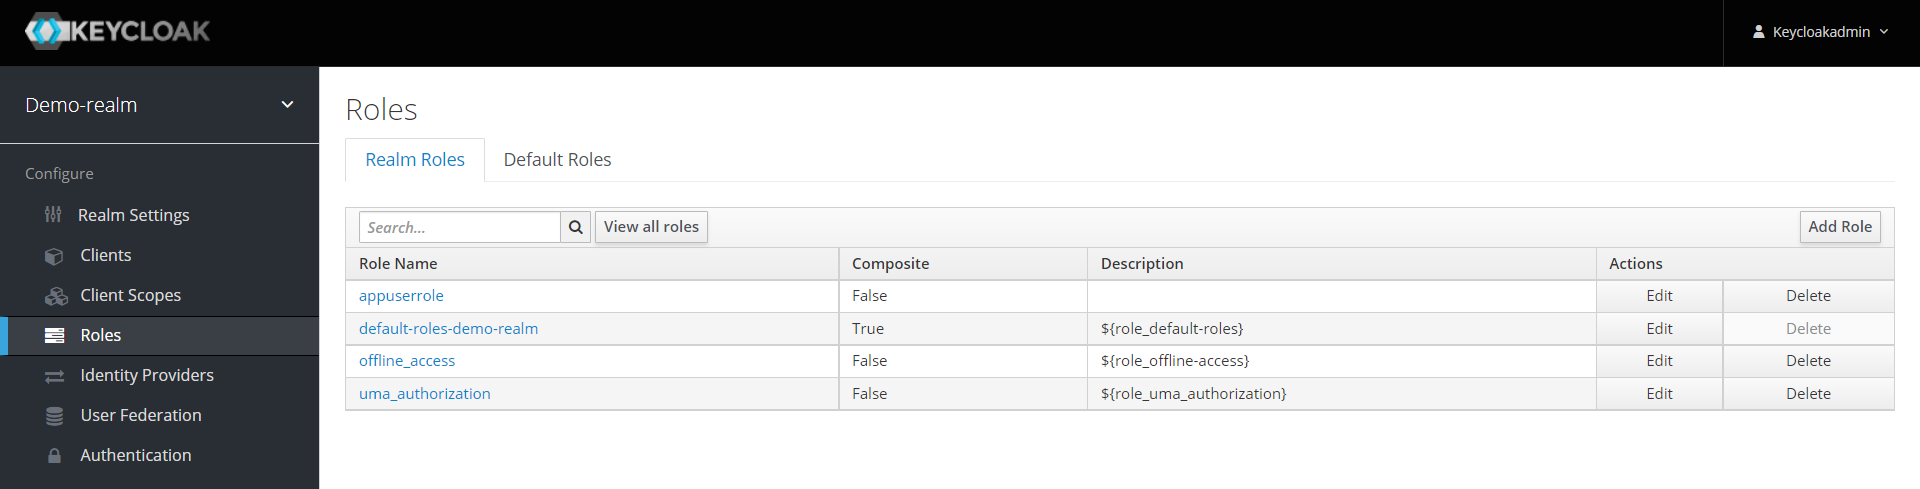
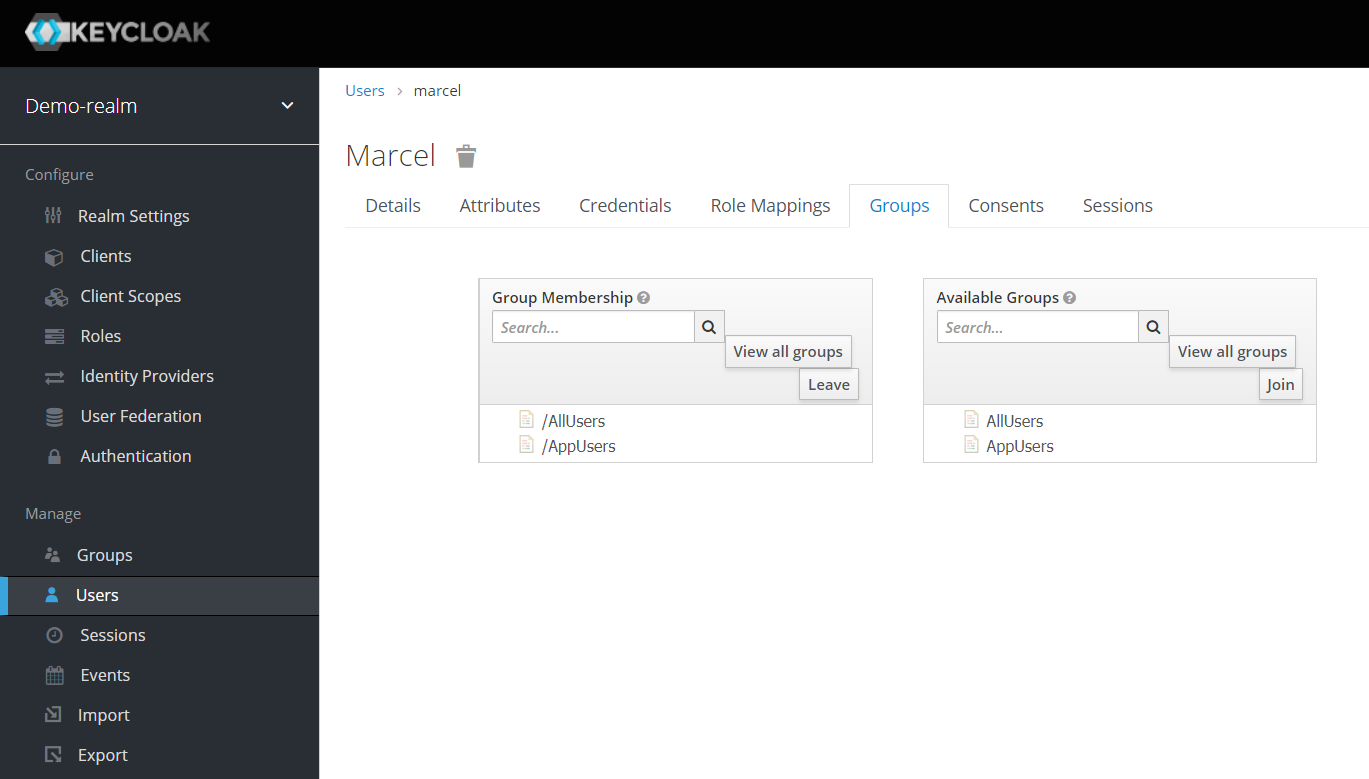
Now it is about time to create a new user, group and application role inside the realm to perform authentication and authorisation. Application roles are defined in Keycloak and not just in the applications deployment descriptor how it used to be in times of Java EE applications. Click on “Roles”, then “Add Role” and name the new role “appuserrole“. This exact name will be used later to do authorisation checks in the REST service.
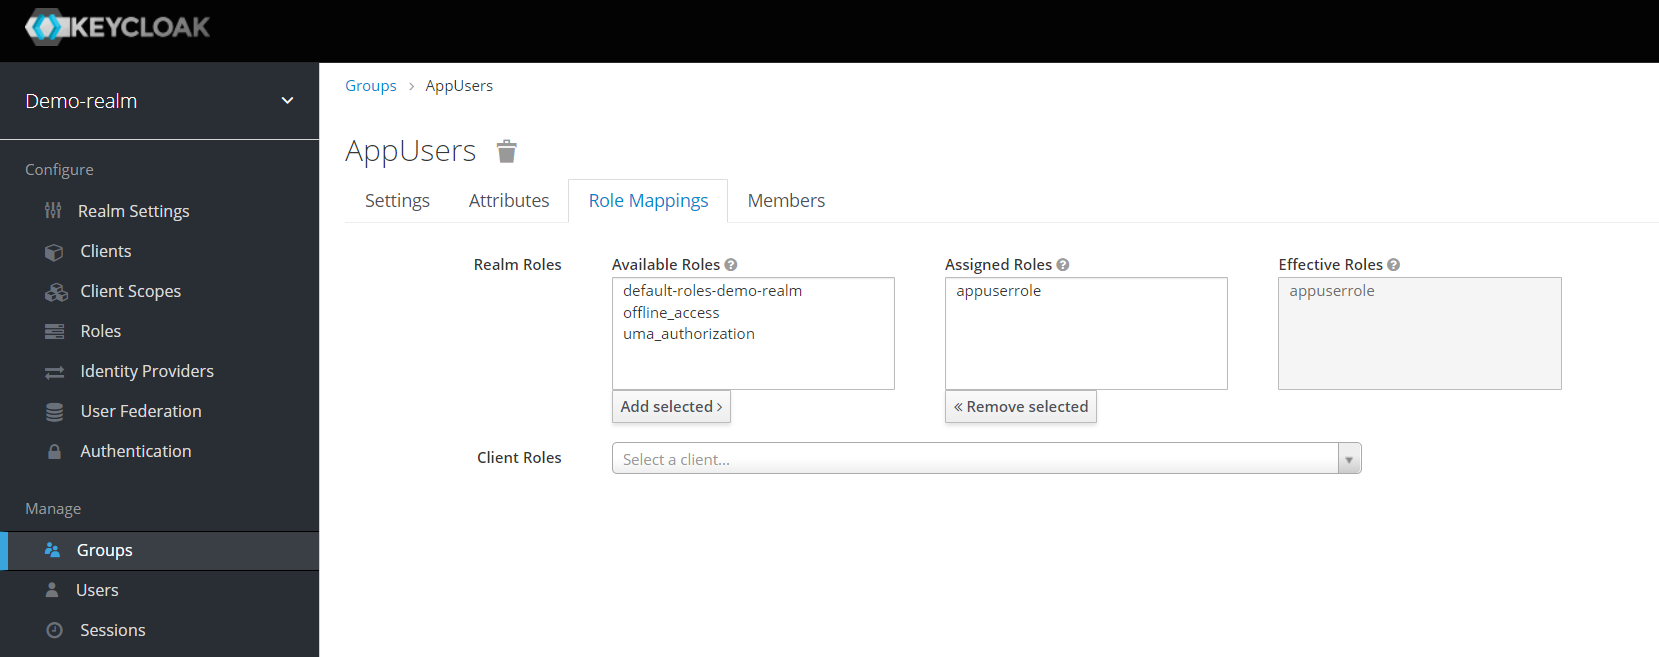
Please click on “Groups” and add a new group called “AppUsers“. Assign the application role “appuserrole” to this group.
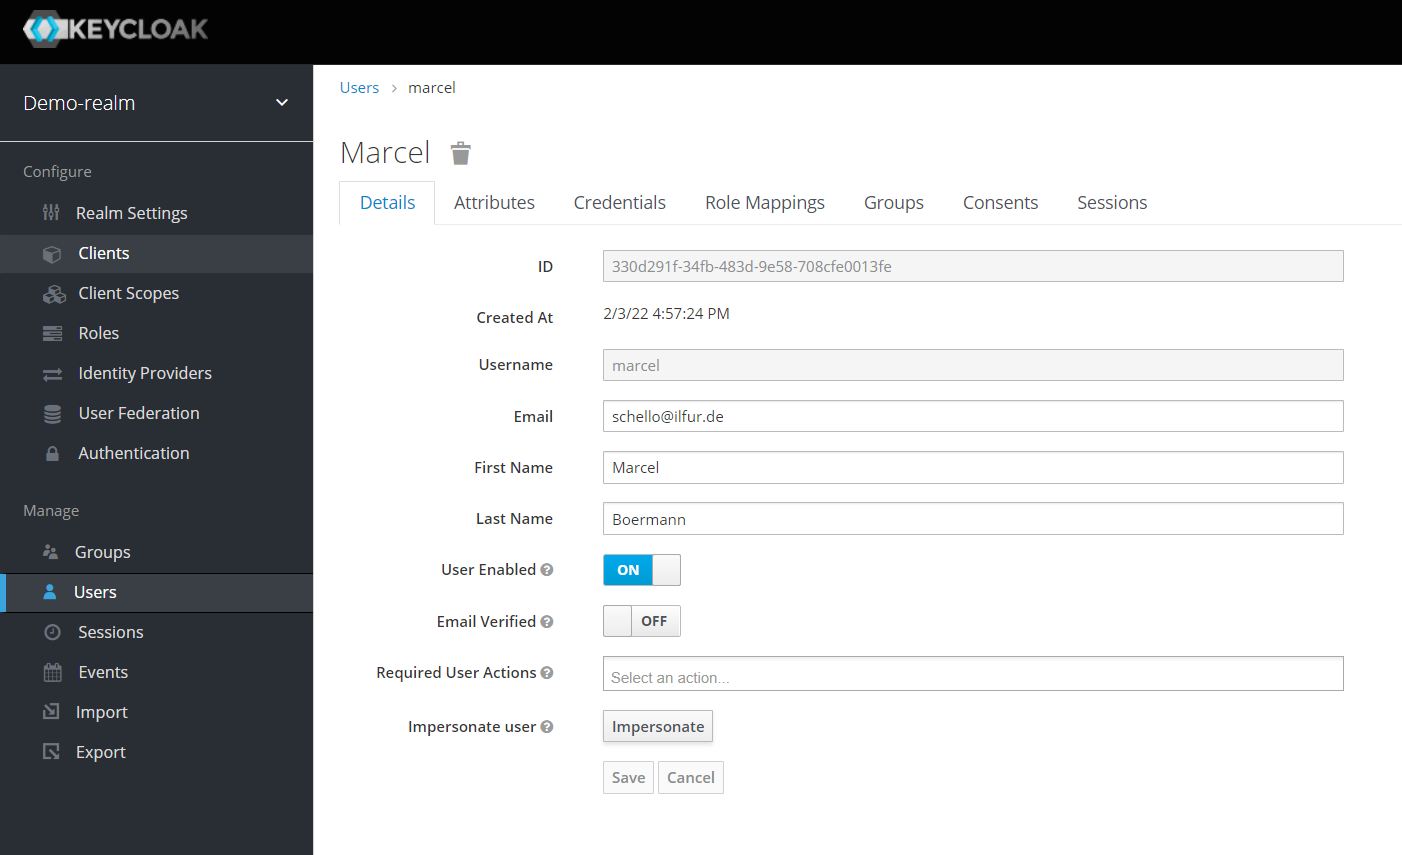
Finally, click on “Users” and add a new user of your choice, e.g. “Marcel”, with some meta data like full name and a complex password. Assign the group “AppUsers” to this user. You could also assign the application role “appuserrole” directly to the user. I wouldn’t recommend the latter, because it could complicate things later on when analyzing problems.
Now the Keycloak part of the full example is finished. Next step is the JavaScript client performing an authentication and after that a small Java REST service, performing authorisation by checking for assigned groups inside the login token in each call to the service.
2) The JavaScript client
Keycloak offers a number of client libraries for many different programming languages and environments. In the case of Java there are multiple libraries available for servlet filters, Tomcat, WildFly and there are also some generic libraries in the global maven repository (mvnrepository.com) which were not coded by the developers of Keycloak. For JavaScript, the keycloak client library is available as convenient NPM (node.js package manager) software package for a “managed” installation.
To build a JavaScript client, I decided to use the open source framework Oracle JET (JavaScript Extension Toolkit). Numerous examples for React and Angular are already available and thus a good reason for me for using a different path.
Oracle JET utilizes node.js to start a little web server (called “Express”) for hosting the self-written user interfaces for testing, but also to use NPM to manage additional JavaScript libraries for inclusion in projects and last but not least to compile native JavaScript applications for mobile devices using the popular Cordova framework.
Thus, to make using oJET possible, please first install a current version of node.js via this download link.
Now install the “ojet” command line through an NPM package. It creates new projects and directory structures, compiles and integrates NPM packages into a runtime structure and configures projects for different frontends like Web, Android, iOS.
npm install -g @oracle/ojet-cli
Create a new JET JavaScript project named “ojet-keycloak” containing tabs, a login area and popup/hamburger style menus.
ojet create ojet-keycloak --template=navdrawer
Switch into the directory ojet-keycloak and install the keycloak client package via NPM – locally, not globally:
cd ojet-keycloak
 npm install keycloak
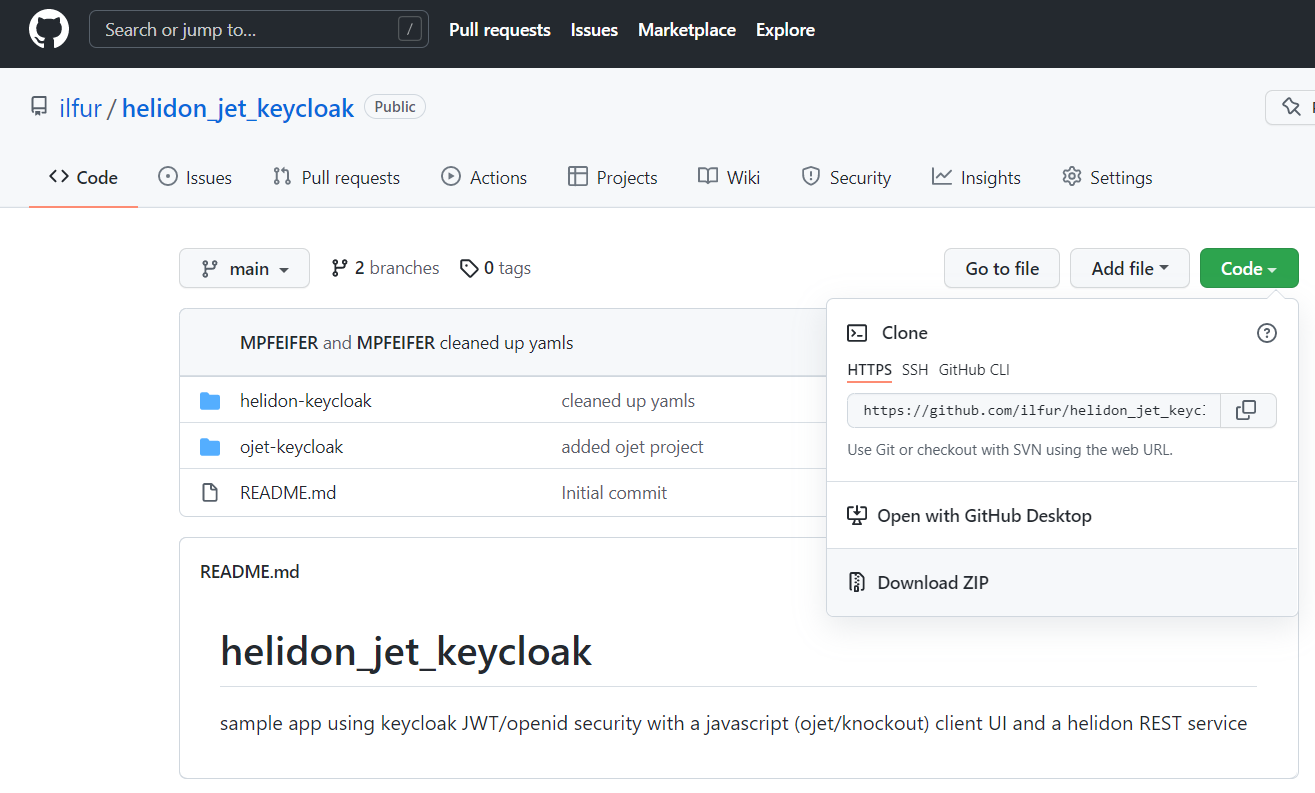
Now, copy an already prepared application into the ojet-keycloak directory structure. All customisations of that prepared application will be explained later on. First download the github-Project “ilfur/helidon_jet_keycloak” into a different directory. This can be achieved either via the following command:
git clone https://github.com/ilfur/helidon_jet_keycloak
Or by navigating to https://github.com/ilfur/helidon_jet_keycloak, then clicking on “Code” -> “Download ZIP” and unpacking the ZIP into a new, separate directory.
Now, copy the contents of the “ojet-keycloak/src” directory from your recent download recursively with all subdirectories into the freshly created project directory “ojet-keycloak/src”. Please take care that directories do not overlap during the copy operation and no new directories should be created. The directory structure should be the same after the copy operation with just some additional or changed files.
Right after the copy operation, the directory “ojet-keycloak/src” will contain a file named keycloak.json. Replace this file with the one you downloaded and saved during Keycloak configuration. The Keycloak JavaScript client needs this file to find the right login server using the correct client type (“HelloWorldClient”).
Next, start the build process which copies and combines all required files to create HTML and JavaScript files from templates. After this, there will be a new directory named “web” with some subdirectories, containing all static content required to serve the application from any kind of web server. Then start the integrated “express” server on port 8080 (because of the Keycloak configuration) to test the application:
ojet build
 ojet serve --server-port=8080
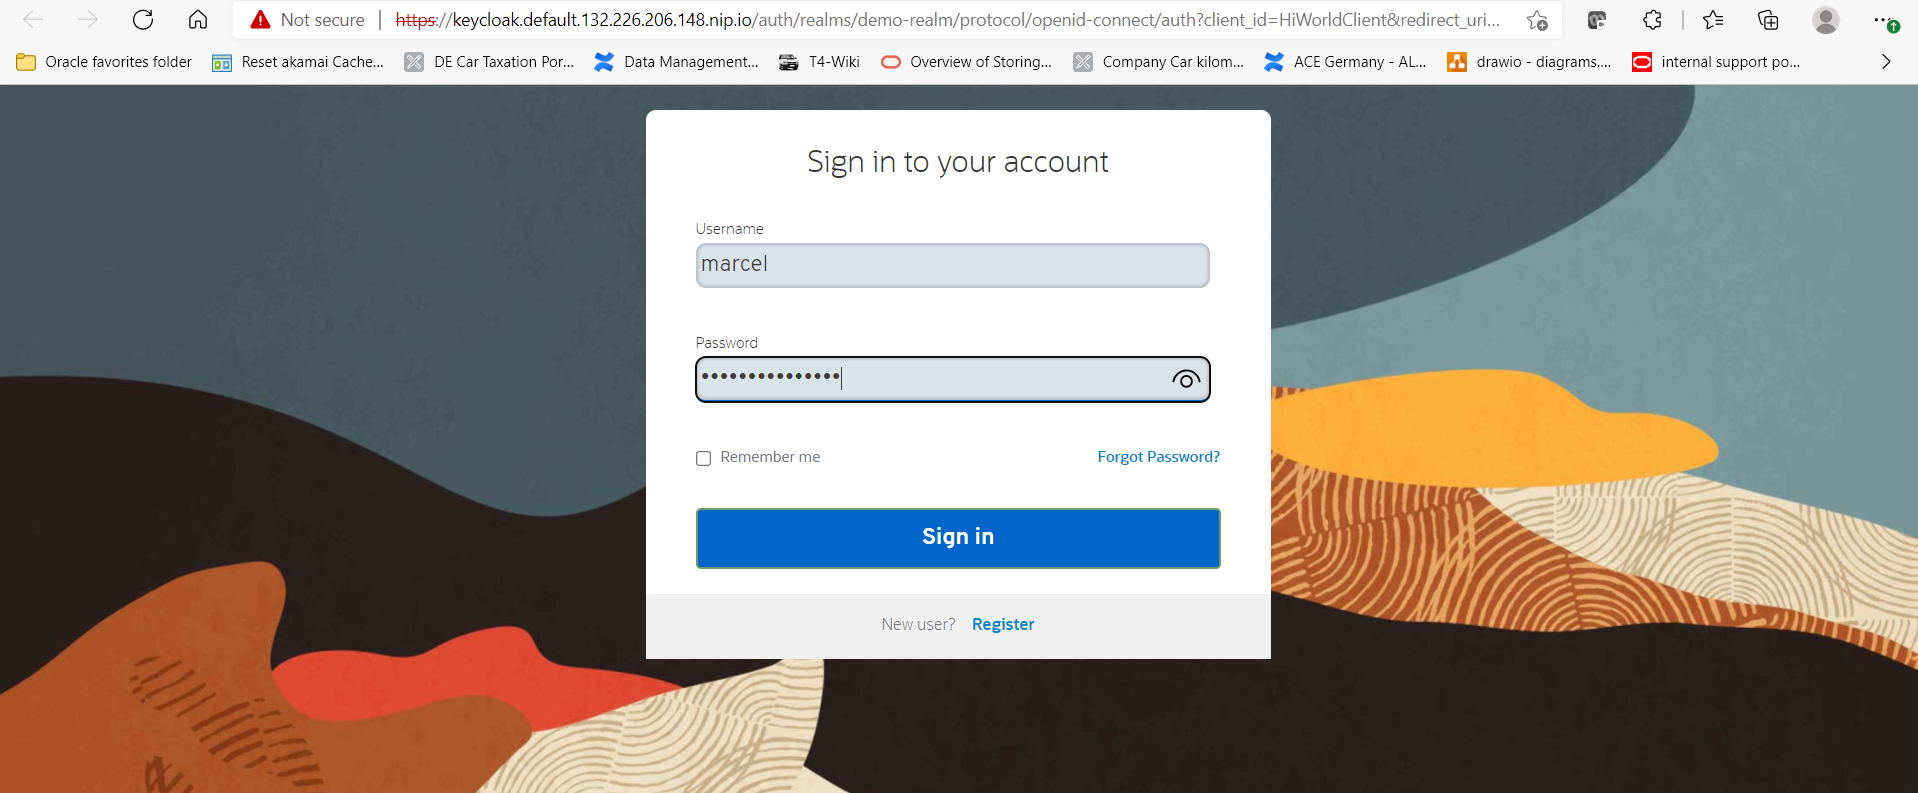
As soon as the small HTTP server has started, the default browser should also pop up with a new window, loading the application. Immediately after that, you will be passed to the Keycloaks login screen. Login with the user you created (here “marcel” ) during Keycloak configuration and its strong password.
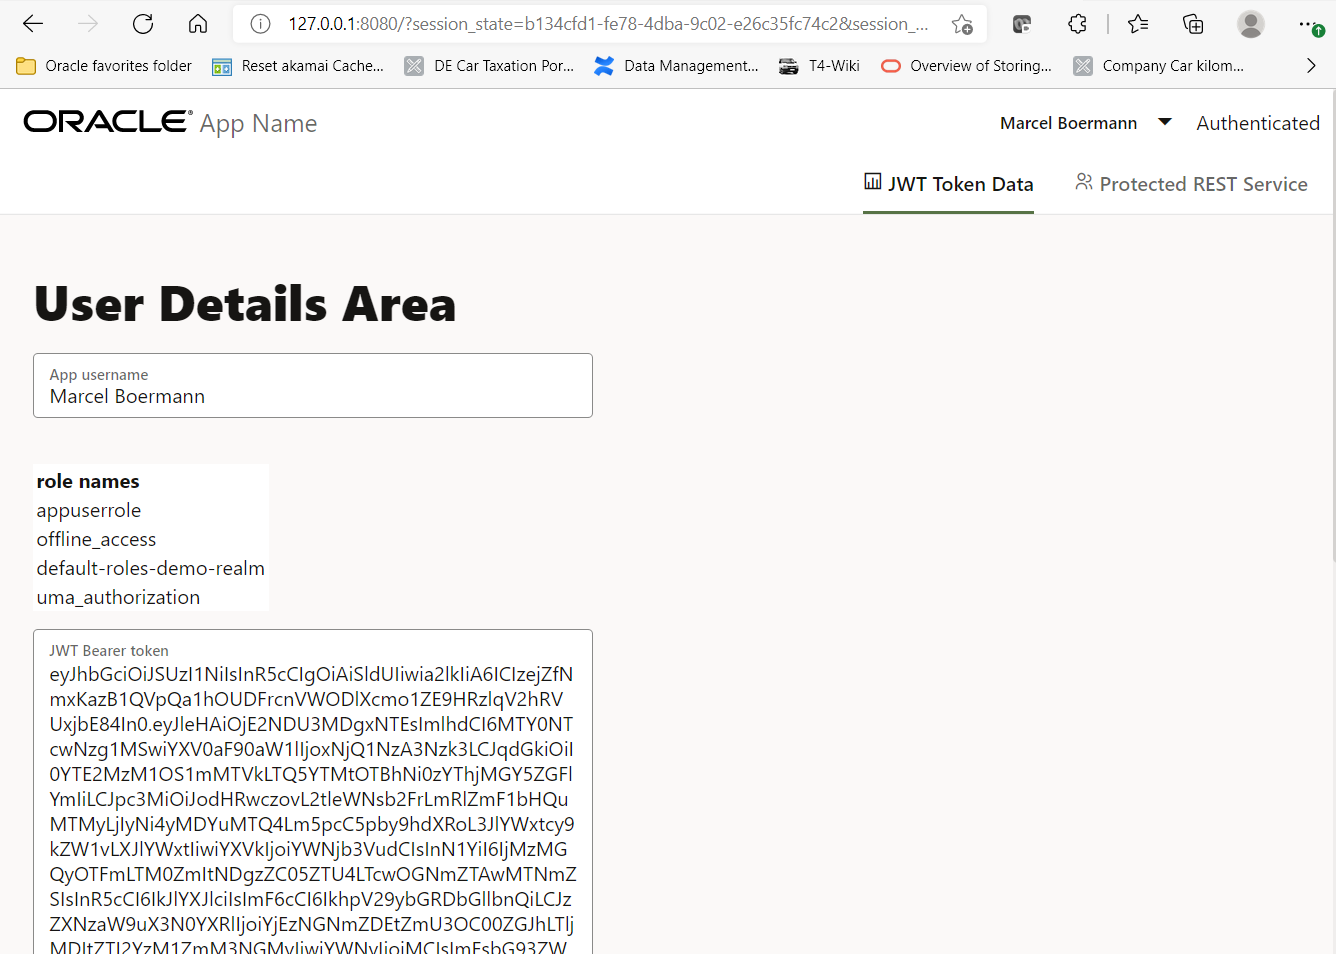
After a successful login, you will be redirected to the JavaScript application which will now display some user meta data like the full name of the user (if provided during Keycloak configuration), all granted application roles (including the “appuserrole” role) as well as the whole JWT login token in base64 format in a separate text area. This token is valid for several minutes and will be used to call a REST service which is using a JWT based protection and authorisation method.
In the case you are still user “Anonymous”, there may be some error messages in the background regarding attempted cross site access with the JavaScript application. Those error messages can be seen using the browsers debug function, often accessible with the CTRL-F12 key combination. To resolve the error: the application was probably loaded through the URL “localhost:8080”, but the Keycloak server returns to the URL “127.0.0.1:8080”. If you change the URL in the browser from “localhost:8080” to “127.0.0.1:8080” and reload the page, the login should work without any problems.
Congratulations! The first part – attach a JavaScript application using the knockout or oJET framework to Keycloak single sign on – is done.
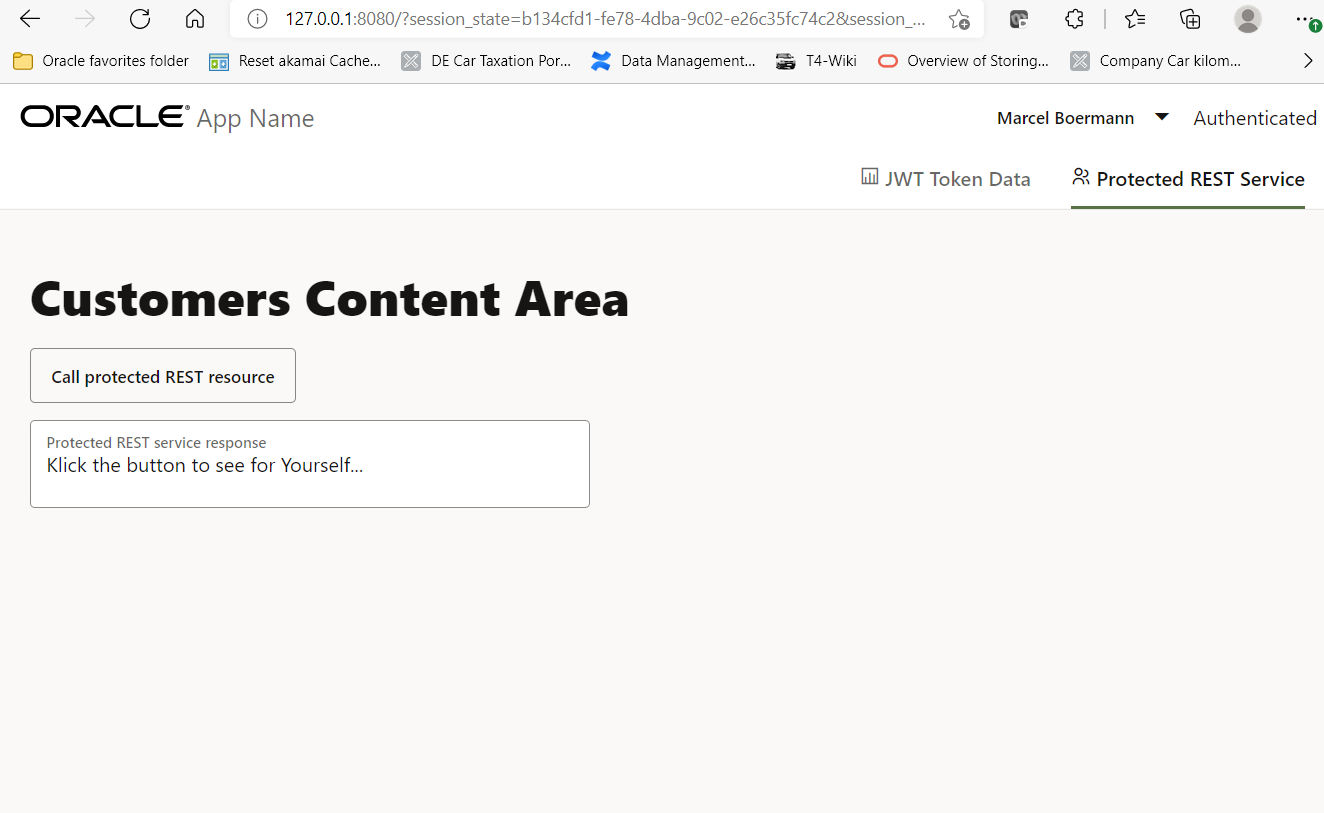
When switching over to the tab named “Protected REST Service”, you will see a small text area and a button. Please do NOT click the button yet. The click would initiate a call to a REST service, forwarding the login token to it in an HTTP request header. This service does not exist yet, we will create it right away in the next section.
What are the specifics in the Javascript code so that the JWT token is requested and parsed?
The JavaScript module “appController.js” loads the Keycloak client library which has been installed via NPM into the “node_modules” subdirectory.
define(['knockout', 'keycloak', 'ojs/ojcontext', 'ojs/ojmodule-element-utils', 'ojs/ojknockouttemplateutils', 'ojs/ojcorerouter', 'ojs/ojmodulerouter-adapter', 'ojs/ojknockoutrouteradapter', 'ojs/ojurlparamadapter', 'ojs/ojresponsiveutils', 'ojs/ojresponsiveknockoututils', 'ojs/ojarraydataprovider',
         'ojs/ojoffcanvas', 'ojs/ojmodule-element', 'ojs/ojknockout'],
 ......
A special feature of Oracle JET is that external libraries must be listed separately in a configuration file “path_mapping.json”. A command “ojet compile” then copies this library into the target “libs” directory and enters it into the file “main.js” as shortcut, so that the entry “keycloak” is found in this short form by require.js. The entry in “path_mapping.json” has to be done by hand. This looks like the following in this example:
{
“baseUrl”: “js”,
“use”: “local”,
“jet”: {
“prefix”: “https://static.oracle.com/cdn/jet/11.1.0/default/js”,
“css”: “https://static.oracle.com/cdn/jet/11.1.0/default/css”,
“config”: “bundles-config.js”
},
“3rdparty”: “https://static.oracle.com/cdn/jet/11.1.0/3rdparty”
},
“cdn”: “3rdparty”,
“cwd”: “node_modules/keycloak/”,
“debug”: {
“src”: “keycloak.min.js”,
“path”: “libs/keycloak/keycloak.min.js”,
“cdnPath”: “keycloak”
},
“release”: {
“src”: “keycloak.min.js”,
“path”: “libs/keycloak/keycloak.min.js”,
“cdnPath”: “keycloak”
}
},
“cdn”: “3rdparty”,
“cwd”: “node_modules/knockout/build/output”,
“debug”: {
“src”: “knockout-latest.debug.js”,
“path”: “libs/knockout/knockout-#{version}.debug.js”
…
usw
Further down in the appController.js module, this client library is initialized which causes an immediate forward to the login screen. The init-call to the keycloak class may have several parameters, e.g. by default there would be a separate minimized iFrame which could renew the token automatically after its expiration. This feature did not work together with the framework, so it is switched off. A separate JavaScript class with its own timer might need to be written instead.
this.keycloak = Keycloak();
 this.keycloak.onAuthSuccess = function () {
             this.statusTxt = ko.observable("Auth Success");
 };
this.keycloak.onAuthError = function (errorData) {
             this.statusTxt = ko.observable("Auth Error: " + JSON.stringify(errorData) );
 };
var initOptions = {
       responseMode: 'fragment',
       onLoad: 'login-required',
       flow: 'standard'
 };

 this.keycloak.init({onLoad: 'login-required', checkLoginIframe: false} )
              .success((auth) => {
                 this.statusTxt (auth ? 'Authenticated' : 'Not Authenticated');
                 this.userLogin(this.keycloak.tokenParsed.name);
                 this.groupNames = ko.observableArray (this.keycloak.tokenParsed.groups) ;
                 this.userToken = ko.observable (this.keycloak.token);
               });
The other JavaScript modules for each of the tabs may retrieve the JWT token by themselves from the appController.js module, together with other “global” variables like the user name. There is no need to retrieve the same token separately for each module from Keycloak. Have a look at file src/js/viewModels/dashboard.js:
var rootViewModel = ko.dataFor(document.getElementById('globalBody'));
 self.userLogin = rootViewModel.userLogin;
 self.userGroups = rootViewModel.groupNames;
 self.userToken = rootViewModel.userToken;
Other elements of the user interface, like text areas, buttons and menus use the “local” variables to display their content, like in file src/js/views/dashboard.html:
<div class="oj-hybrid-padding">
     <h1>User Details Area</h1>
         <div id="loginstatus" class="oj-flex-item oj-md-12 oj-sm-12 right">
             <oj-form-layout id="InfoForm" label-edge="inside">
                 <oj-input-text id="userName" value= "[[userLogin]]"
                                label-hint="App username"></oj-input-text>
                 <table class="oj-table-container oj-table-grid-display" >
                     <thead>
                         <tr><th align="left">role names</th></tr>
                     </thead>
                     <tbody data-bind="foreach: userGroups" >
                         <tr>
                             <td data-bind="text: $data"></td>
                         </tr>
                     </tbody>
                 </table>
                 <oj-text-area class="oj-form-control-full-width" id="token" max-rows="-1"
                               value= "[[userToken]]" label-hint="JWT Bearer token"></oj-text-area>
             </oj-form-layout>
         </div>
 </div>
Let’s now get to the REST service. To stay as simple as possible, we integrate our JavaScript application in the server process which hosts the REST service. This way, we will avoid one or the other cross origin error message.
3) The secured REST service
If not yet done as in the JavaScript example, please download the github project “ilfur/helidon_jet_keycloak” into a separate directory. This can be done through the command
git clone https://github.com/ilfur/helidon_jet_keycloak
Or use the URL https://github.com/ilfur/helidon_jet_keycloak ,then click on “Code” -> “Download ZIP”, and unpack it into a separate directory.
You get a directory structure “helidon-keycloak” parallel to the JavaScript example “ojet-keycloak”. The REST service contained can be compiled and started after two configuration steps. First, please change into the subdirectory helidon-keycloak/src/main/resources/META-INF.
cd helidon-keycloak/src/main/resources/META-INF
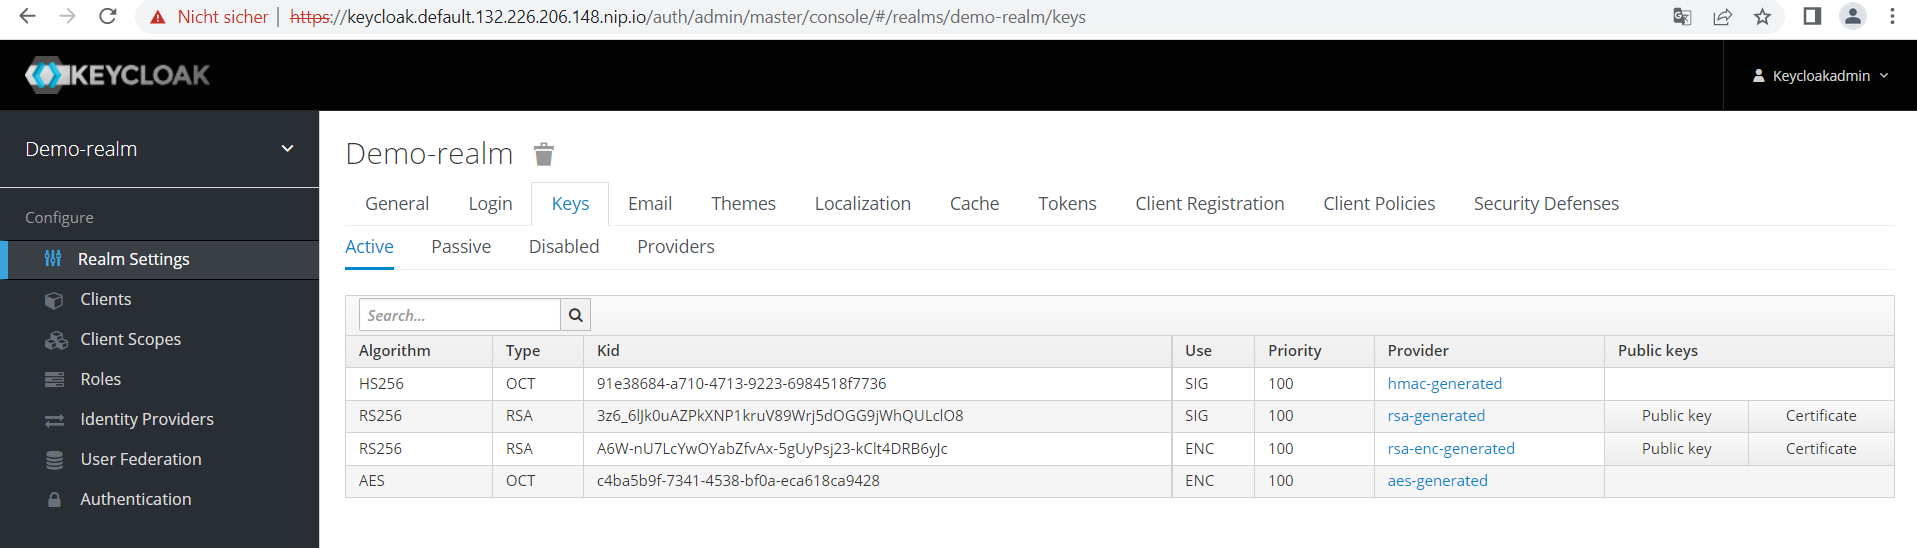
Then, copy the public key used for validation of the JWT token into the file “keycloak-public-key.pem”. The content of this key can be obtained from the Keycloak admin console by selecting our “demo-realm”, clicking on “Realm Settings”, Keys and then the “Public Key” button for the key that is used for signing (“SIG”) the token:
Select and copy the contents of the public key into the clipboard.
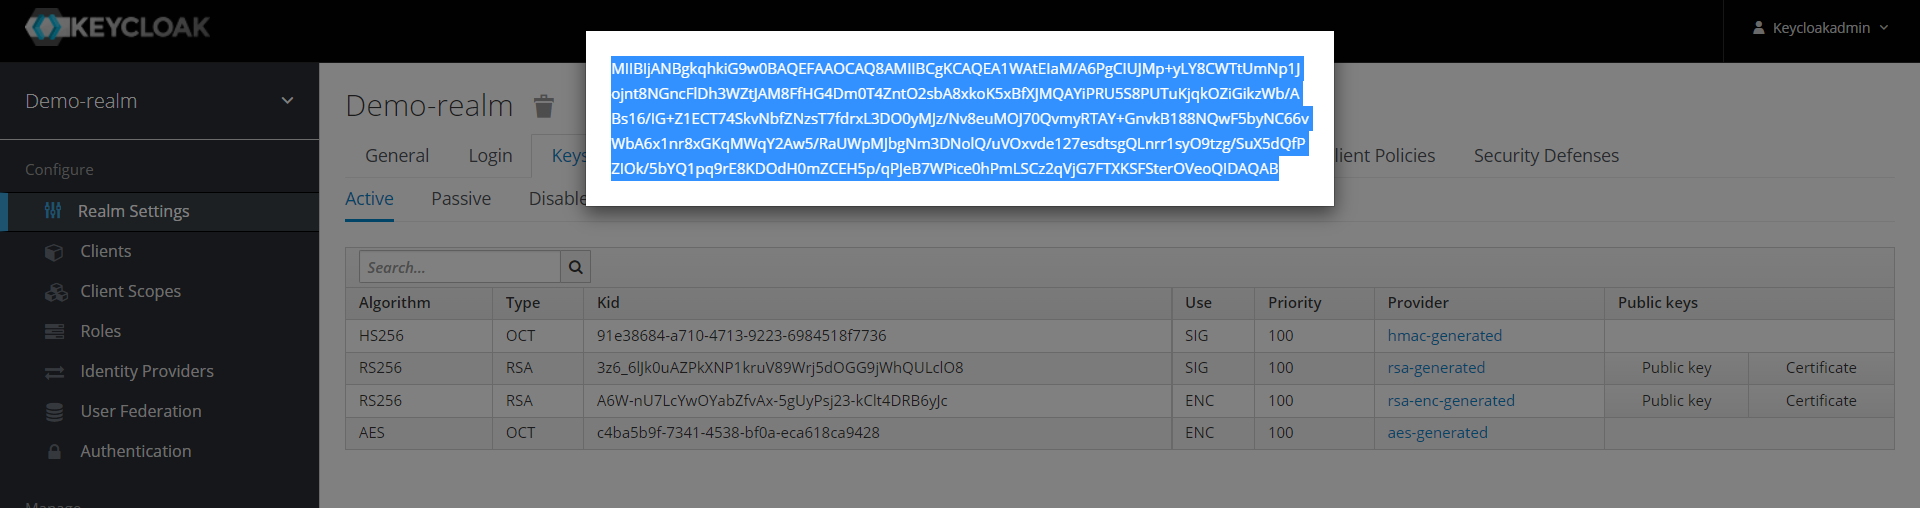
Insert the contents into the file “keycloak-public-key.pem”, so it basically looks like the following example (keep the header and footer lines):
-----BEGIN PUBLIC KEY-----
 MIIBIjANBgkqhkiG9w0BAQEFAAOCAQ8AMIIBCgKCAQEA1WAtEIaM/A6PgCIUJMp+yLY8CWTtUmNp1Jojnt8NGncFlDh3WZtJAM8FfHG4Dm0T4ZntO2sbA8xkoK5xBfXJMQAYiPRU5S8PUTuKjqkOZiGikzWb/ABs16/IG+Z1ECT74SkvNbfZNzsT7fdrxL3DO0yMJz/Nv8euMOJ70QvmyRTAY+GnvkB188NQwF5byNC66vWbA6x1nr8xGKqMWqY2Aw5/RaUWpMJbgNm3DNolQ/uVOxvde127esdtsgQLnrr1syO9tzg/SuX5dQfPZIOk/5bYQ1pq9rE8KDOdH0mZCEH5p/qPJeB7WPice0hPmLSCz2qVjG7FTXKSFSterOVeoQIDAQAB
 -----END PUBLIC KEY-----
Alternatively, you could also change the configuration file “microprofile-config.properties” in the same directory helidon-keycloak/src/main/resources/META-INF, by changing the value of the entry mp.jwt.verify.publickey.location to point to the Keycloak URL of our new realm’s certificate list. For example:
mp.jwt.verify.publickey.location=https://keycloak.default.132.226.206.148.nip.io/auth/realms/demo-realm/protocol/openid-connect/certs
Please take into account when starting the REST service, the server process will try to communicate with the Keycloak server to download the public keys. If the Keycloak URL is a HTTPS URL, then the servers certificate chain must be accessible by the servers JVM, e.g. by copying all required certificates to the JDKs “cacerts” file.
In each case, change the entry mp.jwt.verify.issuer in the same file “microprofile-config.properties” to point to your Keycloak installation and realm, e.g.:
mp.jwt.verify.issuer=https://keycloak.default.132.226.206.148.nip.io/auth/realms/demo-realm
Now, copy the JavaScript applications “web” subdirectory from the last chapter into the ojet-keycloak directory recursively, so that the server process of the REST service can also serve the JavaScript application:
cd <path-to-runnable-ojet-keycloak>/ojet-keycloak
 cp -R web <path-to-helidon-keycloak>
Compile the Java code and start the REST service with the JavaScript application in it. For compilation you will ideally need a JDK 11 in your path, JDK 8 will not work or compile here.
<path-to-helidon-keycloak>
 mvn package -DskipTests=true
 mvn exec:exec
The start process should now listen on port 8080 and show some output similar to the following.
Perhaps worth mentioning: please stop the JavaScript express server before running the Java process on the same port.
[INFO] Scanning for projects...
 [INFO] ------------------------------------------------------------------------
 [INFO] Detecting the operating system and CPU architecture
 [INFO] ------------------------------------------------------------------------
 [INFO] os.detected.name: windows
 [INFO] os.detected.arch: x86_64
 [INFO] os.detected.version: 10.0
 [INFO] os.detected.version.major: 10
 [INFO] os.detected.version.minor: 0
 [INFO] os.detected.classifier: windows-x86_64
 [INFO]
 [INFO] ----------------< io.helidon.examples:helidon-keycloak >----------------
 [INFO] Building HelidonKeycloak 1.0
 [INFO] --------------------------------[ jar ]---------------------------------
 [INFO]
 [INFO] --- exec-maven-plugin:1.6.0:exec (default-cli) @ helidon-keycloak ---
 2022.02.25 13:14:28 INFO io.helidon.common.LogConfig Thread[main,5,main]: Logging at initialization configured using classpath: /logging.properties
 2022.02.25 13:14:31 INFO io.helidon.tracing.tracerresolver.TracerResolverBuilder Thread[main,5,main]: TracerResolver not configured, tracing is disabled
 2022.02.25 13:14:31 WARNING io.helidon.microprofile.tracing.TracingCdiExtension Thread[main,5,main]: helidon-microprofile-tracing is on the classpath, yet there is no tracer implementation library. Tracing uses a no-op tracer. As a result, no tracing will be configured for WebServer and JAX-RS
 2022.02.25 13:14:31 INFO io.helidon.microprofile.security.SecurityCdiExtension Thread[main,5,main]: Authorization provider is missing from security configuration, but security extension for microprofile is enabled (requires providers configuration at key security.providers). ABAC provider is configured for authorization.
 2022.02.25 13:14:32 INFO io.helidon.microprofile.server.ServerCdiExtension Thread[main,5,main]: Registering JAX-RS Application: HelloApplication
 2022.02.25 13:14:34 INFO io.helidon.webserver.NettyWebServer Thread[nioEventLoopGroup-2-1,10,main]: Channel '@default' started: [id: 0x361104b4, L:/[0:0:0:0:0:0:0:0]:8080]
 2022.02.25 13:14:34 INFO io.helidon.microprofile.server.ServerCdiExtension Thread[main,5,main]: Server started on http://localhost:8080 (and all other host addresses) in 5948 milliseconds (since JVM startup).
 2022.02.25 13:14:34 INFO io.helidon.common.HelidonFeatures Thread[features-thread,5,main]: Helidon MP 2.4.0 features: [CDI, Config, Fault Tolerance, Health, JAX-RS, Metrics, Open API, REST Client, Security, Server, Tracing]
Now we can fully test the application. If the copy command of the JavaScript application was successful, calling the URL http://127.0.0.1:8080 in a browser should again load the application and show the Keycloak login screen:
After successful login, you should again see the starting page of the application with a user name, roles, and JWT token content:
Now switch over to the tab “Protected REST Service” and finally click on the button “Call protected REST resource”. The text area below the button should contain the message “{“hello”:”world”}”.
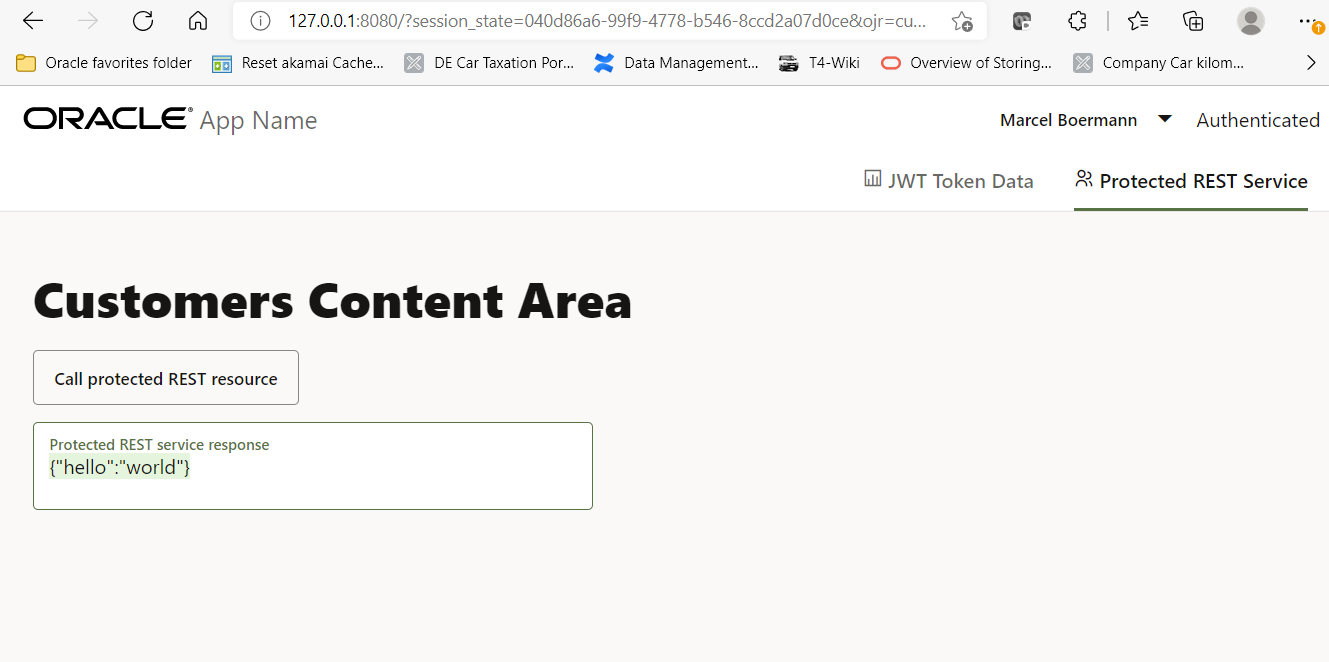
This means that the called REST service was successful in checking the token which was passed over by the JavaScript application, and the logged in user was member of the required application role “appuserrole”. You may check the REST service from command line by passing the JWT login token to the HTTP call as a parameter.
$ curl -v 127.0.0.1:8080/hello
 *   Trying 127.0.0.1:8080...
 * Connected to 127.0.0.1 (127.0.0.1) port 8080 (#0)
 > GET /hello HTTP/1.1
 > Host: 127.0.0.1:8080
 > User-Agent: curl/7.79.1
 > Accept: */*
 >
 * Mark bundle as not supporting multiuse
 < HTTP/1.1 401 Unauthorized
 < Content-Length: 0
 < Date: Fri, 25 Feb 2022 13:32:59 +0100
 < connection: keep-alive

 $ curl 127.0.0.1:8080/hello --header "Authorization: Bearer eyJhbGciOiJSUzI1NiIsInR5cCIgOiAiSldUIiwia2lkIiA6ICIzejZfNmxKazB1QVpQa1hOUDFrcnVWODlXcmo1ZE9HRzlqV2hRVUxjbE84In0.eyJleHAiOjE2NDU3OTI0NzQsImlhdCI6MTY0NTc5MjE3NCwiYXV0aF90aW1lIjoxNjQ1NzkwODU5LCJqdGkiOiI4MGU2NGNkMy01MzA3LTRiZjQtODAyMy1iZjBlYWNjOGU0NDQiLCJpc3MiOiJodHRwczovL2tleWNsb2FrLmRlZmF1bHQuMTMyLjIyNi4yMDYuMTQ4Lm5pcC5pby9hdXRoL3JlYWxtcy9kZW1vLXJlYWxtIiwiYXVkIjoiYWNjb3VudCIsInN1YiI6IjMzMGQyOTFmLTM0ZmItNDgzZC05ZTU4LTcwOGNmZTAwMTNmZSIsInR5cCI6IkJlYXJlciIsImF6cCI6IkhpV29ybGRDbGllbnQiLCJzZXNzaW9uX3N0YXRlIjoiMDQwZDg2YTYtOTlmOS00Nzc4LWI1NDYtOGNjZDJhMDdkMGNlIiwiYWNyIjoiMCIsImFsbG93ZWQtb3JpZ2lucyI6WyJodHRwOi8vMTI3LjAuMC4xOjgwODAiXSwicmVhbG1fYWNjZXNzIjp7InJvbGVzIjpbImFwcHVzZXJyb2xlIiwib2ZmbGluZV9hY2Nlc3MiLCJkZWZhdWx0LXJvbGVzLWRlbW8tcmVhbG0iLCJ1bWFfYXV0aG9yaXphdGlvbiJdfSwicmVzb3VyY2VfYWNjZXNzIjp7ImFjY291bnQiOnsicm9sZXMiOlsibWFuYWdlLWFjY291bnQiLCJtYW5hZ2UtYWNjb3VudC1saW5rcyIsInZpZXctcHJvZmlsZSJdfX0sInNjb3BlIjoiZW1haWwgcHJvZmlsZSIsInNpZCI6IjA0MGQ4NmE2LTk5ZjktNDc3OC1iNTQ2LThjY2QyYTA3ZDBjZSIsImVtYWlsX3ZlcmlmaWVkIjpmYWxzZSwibmFtZSI6Ik1hcmNlbCBCb2VybWFubiIsImdyb3VwcyI6WyJhcHB1c2Vycm9sZSIsIm9mZmxpbmVfYWNjZXNzIiwiZGVmYXVsdC1yb2xlcy1kZW1vLXJlYWxtIiwidW1hX2F1dGhvcml6YXRpb24iXSwicHJlZmVycmVkX3VzZXJuYW1lIjoibWFyY2VsIiwiZ2l2ZW5fbmFtZSI6Ik1hcmNlbCIsImZhbWlseV9uYW1lIjoiQm9lcm1hbm4iLCJlbWFpbCI6InNjaGVsbG9AaWxmdXIuZGUifQ.tkM5b0AaajAI-Ww5BsBoyjAjWupdk_o6CyrLpRApKMXyHIR-kwFwqWMEn0YWU_-CBhmdVNn79TXWQ4lx3-H37px6roiNv9eBNXVCje0ArvsqeNn4tYTk8oBCIH4aSd_1ZBnBajwS6VWDxO6QyBdzOmu3oKeKlZFxD8FKjybiBu24WEMZDYu_e8QUrLY12P525zf0zSkpyzlSxFDLlKFQu3OmOHZGPhL0kP1tdAIIjE8rwAXiHIpNcfAaakDEEszs_Lc_561fu8Qg4sW03pt2E9w8x0NTaH7B4bVwEzf1E6LhPGN9UfN1qJVk29XNsrjmaC_F7dcNAhDis907Q9jwiA"

 {"hello":"world"}
The error message “Unauthorized” may also pop up if the token is expired after some minutes.
Congratulation! Our protected small application works now in both frontend and backend with OpenID or JWT.
The special features of the Java backend were, apart from two entries in the configuration file “microprofile-config.properties”, basically two necessary annotations.
In a central startup-class, HelloApplication, all resource classes (i.e. REST services) that need to be loaded are listed; an our case, there is just one class named “HelloResource” which defines the “hello” REST service. At this point, a @LoginConfig annotation can be specified to define how the application needs to be protected. Using the method “MP-JWT” instead of e.g. “BASIC”, a standard library of the default Microprofile implementation, there is no need to include any of Keycloaks client libraries manually. Interestingly, this default implementation can also handle group names included with the token for authorisation purposes.
import org.eclipse.microprofile.auth.LoginConfig;
 import javax.enterprise.context.ApplicationScoped;
 import javax.ws.rs.core.Application;
 import java.util.Set;
@LoginConfig(authMethod = "MP-JWT")
 @ApplicationScoped
 public class HelloApplication extends Application{
     @Override
     public Set<Class<?>> getClasses() {
         return Set.of(HelloResource.class);
     }
 }
The resource class “HelloResource” protects its methods or REST services through a @RolesAllowed annotation which specifies in a list, which application roles may call the REST service (or method). It is not absolutely necessary to specify which roles exist at all (with the DeclareRoles annotation), but it would be possible by adding another annotation named @DeclareRoles.
import javax.annotation.security.RolesAllowed;
 ...
@Path("/hello")
 @RequestScoped
 public class HelloResource {
...
    @GET
     @Produces(MediaType.APPLICATION_JSON)
     @RolesAllowed("appuserrole")
     public Response getDefaultMessage(@HeaderParam("Host") String host) {
 ...
A small side note: to avoid cross-origin error messages in JavaScript, the REST service can inform the client via HTTP header that the call is legitimate because it comes from a permitted or trusted server. To do this, however, you must add an @OPTIONS annotation in the code before an empty method in the same @Path. An addition of the form “everything is allowed” is then possible through a @CrossOrigin annotation. You can also see the example in the HelloResource class:
@OPTIONS
 @CrossOrigin(
             //value = {"http://localhost:8000","http://127.0.0.1:8000"},
             //allowHeaders = {"Accept","Accept-Encoding"},
             value = {"*"},
             allowMethods = {HttpMethod.GET})
     public void optionsForGetDefaultMessage() {}
A so-called CORS HTTP header will not always be generated. Only if the “Origin” HTTP header of the request shows a different server name than the called URL, the HTTP header “Access-Control-Allow-Origin” will be created:
$ curl -v http://127.0.0.1:8080/hello --header "Authorization: Bearer eyJhbGc............._k0Q" --header "Origin: localhost:8080"
 > Origin: localhost:8080
 >
 * Mark bundle as not supporting multiuse
 < HTTP/1.1 200 OK
 < Access-Control-Allow-Origin: *
 < Content-Type: application/json
 < Date: Wed, 2 Mar 2022 11:49:45 +0100
 < Vary: Origin
 < connection: keep-alive
 < content-length: 17
 <
 {"hello":"world"}* Connection #0 to host 127.0.0.1 left intact
Wrap-up
In a few simple steps, a JavaScript application with its backend REST services can be protected using a single sign on procedure such as Keycloak and JWT. At first glance, there is no difference whether Keycloak is part of Oracle Verrazzano or has been installed separately. At second glance, you can enjoy a fully configured Keycloak installation, secured by SSL certificates and with single sign on already implemented between the other Verrazzano components such as Kibana, Grafana, Kiali etc. You can use this finished, production-ready installation for your own applications and it is available under Oracle Support as part of the support for Oracle Verrazzano or the Oracle WebLogic Suite.
As an access management solution, Keycloak almost never stands alone. A company-wide, central Identity&Access Management system must always be connected, such as Oracle Identity Cloud Service or Microsoft Active Directory Federation Services. This connection is usually made via the SAML protocol. I will show how such a connection can be made in one of the next blog articles.
As always, have fun testing and trying it out!