When working with Oracle Cloud Infrastructure (OCI), one of the first questions is:
How do I get access to OCI services and APIs?
Whether you are using the OCI Console, OCI CLI, an SDK, Terraform, a database, or a custom application, every operation ultimately results in an OCI API call. Before OCI can process that request, it must identify the caller and verify that the caller has permission to perform the requested action.
OCI provides several authentication mechanisms to address different environments and use cases. Some are designed for individual users working on a laptop, some for workloads running inside OCI, and others for applications and CI/CD systems running outside OCI. Examples include API Keys, Session Tokens, Instance Principals, Resource Principals, and Workload Identity Federation (WIF).
The good news is that while the authentication mechanisms differ, the goal is always the same: obtain valid credentials that OCI accepts and use them to securely access OCI services.
In this article, we will explore the most common OCI authentication methods, where their credentials are stored, how they are configured, and how they are used with OCI APIs, OCI CLI, SDKs, and Terraform.
Special attention is given to Workload Identity Federation (WIF), a modern approach that allows identities from external providers such as Microsoft Entra ID, GitHub Actions, GitLab, AWS, or Google Cloud to access OCI without relying on long-lived OCI API keys. We will follow the journey from obtaining a WIF-issued User Principal Session Token (UPST) to using it with OCI tools and services.
To make the comparison easier, we will use the same OCI operation throughout this article: oci os ns get
This command retrieves the Object Storage namespace of a tenancy. The OCI API being called remains exactly the same in every example; only the authentication method changes.
Part 1: OCI Authentication Options
The authentication methods at a glance:

API Key Authentication
Where is the credential stored?
The private key is typically stored on disk:
~/.oci/oci_api_key.pem
The OCI CLI configuration is stored in:
~/.oci/config
Example configuration
[DEFAULT]
user=ocid1.user.oc1..xxxxx
fingerprint=12:34:56:78:90
tenancy=ocid1.tenancy.oc1..xxxxx
region=eu-frankfurt-1
key_file=/home/user/.oci/oci_api_key.pem
A typical config in folder .oci where the api_key is moved in a session directory with a subdirectory for each profile which can be API key or session. The Config file points to the location of the files. For an API key the key_file entry:

Session directory lists profiles (both session and API usage here):

One Profile for API key usage with profile DEFAULT contains the API key:

How does OCI verify the request?
- OCI knows the uploaded public key.
- The CLI signs the request using the private key.
- OCI verifies the signature.
Flow

Sample call
oci os ns get
Advantages
- Simple
- Well understood
- Supported everywhere
Considerations
- Long-lived credential
- Key rotation required
- Private key protection required
Documentation: https://docs.oracle.com/en-us/iaas/Content/API/Concepts/apisigningkey.htm
Session Token Authentication
How to create a session token?
OCI CLI session authenticate* for an interactive session (requires browser).
In CLI/Bash:
oci session authenticate --profile-name SESSION --region eu-frankfurt-1This flow opens a browser, lets the user authenticate, and then writes the session token and profile data needed for OCI CLI usage.
With the WIF → UPST exchange a session token will also be created. See next section in this blog. The OCI UPST and Private Key need to be copied to the config, then API calls are equal as the call refers the session profile section which contains the token and the link to private key..
Where is the credential stored?
The token is typically stored in:
~/.oci/token
Configuration remains in:
~/.oci/config
Example configuration
[SESSIONname]
user=ocid1.user.oc1..xxxxx
tenancy=ocid1.tenancy.oc1..xxxxx
region=eu-frankfurt-1
key_file=/home/user/.oci/session_key.pem
security_token_file=/home/user/.oci/token
A typical config in folder .oci where the api_keys and sessions is moved in a session directory with a subdirectory for each profile which can be API key or session. The Config file points to the location of the files. Session directory lists profiles for both session and API usage. Screenshot for directories and listings see previous chapter.
One Profile for session usage with profile michael contains the session token and keys. All created during authentication through the session command:

How does OCI verify the request?
- OCI validates the session token.
- OCI validates the request signature using the key associated with the session.
Flow

Sample calls
(optional) Validate token:
oci session validate –profile SESSION –auth security_token
oci os ns get --profile SESSION --auth security_tokenAdvantages
- Temporary credential
- Reduced exposure
Considerations
- Token expires
- Renewal required
Documentation: https://docs.oracle.com/en-us/iaas/Content/API/SDKDocs/clitoken.htm
Workload Identity Federation (WIF)
Where is the credential stored?
The workload obtains UPST through token exchange.
The resulting token can be stored similarly to a session token:
~/.oci/token
A private key is also required which was created to be able to call the token exchange. e.g. private_key.pem
Example configuration
[WIFname]
user=ocid1.user.oc1..xxxxx
tenancy=ocid1.tenancy.oc1..xxxxx
region=eu-frankfurt-1
key_file=/home/user/private_key.pem
security_token_file=/home/user/.oci/token
A typical config in folder .oci where the api_keys and sessions is moved in a session directory with a subdirectory for each profile which can be API key or session. The Config file points to the location of the files. Session directory lists profiles for both session and API usage. Screenshot for directories and listings see previous chapter. One Profile for UPST with profile michaeltemp contains the session token and keys. All copied after token exchange. The public key is stored here for access as this is needed for further token exchanges.

How does OCI verify the request?
- OCI validates the UPST.
- OCI extracts the public key embedded during token exchange.
- OCI validates the request signature using that public key.
Flow

Sample call
oci os ns get --profile WIF --auth security_tokenAdvantages
- No OCI API keys
- Integrates with external identity providers
- Ideal for CI/CD and multi-cloud
Considerations
- UPST expires
- Renewal process required
- Private key still required for request signing
Documentation: https://docs.oracle.com/en-us/iaas/Content/Identity/api-getstarted/json_web_token_exchange.htm
Instance Principal Authentication
Where is the credential stored?
Nowhere. The OCI Compute instance receives identity from OCI IAM. No local private key or token must be managed.
Example configuration
No configuration file required.
How does OCI verify the request?
- OCI identifies the compute instance.
- OCI issues temporary credentials behind the scenes.
- SDKs and CLI use those credentials automatically.
Flow

Sample call
oci os ns get --auth instance_principalAdvantages
- No secrets
- No key management
Considerations
- Works only on OCI Compute
Resource Principal Authentication
Where is the credential stored?
No local credentials. The OCI service receives an identity directly from OCI IAM.
Examples include:
- OCI Functions
- Data Flow
- OKE Workload Identity
- Integration services
- Oracle Autonomous Database
Example configuration
No API key, session token, or WIF token must be managed by the application. The service receives temporary credentials automatically from OCI IAM.
How does OCI verify the request?
- OCI identifies the managed resource.
- OCI issues temporary credentials for that resource.
- OCI IAM policies determine which OCI services can be accessed.
- OCI SDKs use those credentials automatically.
Sample call
In practice, Resource Principals are normally used through SDKs rather than the OCI CLI.
Python example:
signer = oci.auth.signers.get_resource_principals_signer()Autonomous Database Example
An Autonomous Database can access OCI services without storing API keys.
For example Autonomous Database uses the Resource Principal to access Object Storage. A common use case is accessing Object Storage directly from PL/SQL.
The database first uses the built-in resource principal credentials:
BEGIN
  DBMS_CLOUD_ADMIN.ENABLE_RESOURCE_PRINCIPAL();
END
After the resource principal is enabled and IAM policies are configured, Object Storage can be accessed without any API keys.
Flow

Example:
SELECT object_name
FROM DBMS_CLOUD.LIST_OBJECTS(
       credential_name => 'OCI$RESOURCE_PRINCIPAL',
       location_uri    => 'https://objectstorage.eu-frankfurt-1.oraclecloud.com/n/<namespace>/b/<bucket>/o/'
     );
Notice that:
- No API key is stored.
- No session token is stored.
- No WIF token is stored.
- No OCI config file exists.
The database authenticates using its own OCI resource identity.
Advantages
- No secret management
- No API keys
- Automatic credential lifecycle management
- Native OCI integration
Considerations
- Available only in supported OCI services
- IAM policies still need to be configured correctly
Advantages
- No secret management
- No API keys
- Automatic credential lifecycle management
- Native OCI integration
Considerations
- Available only in supported OCI services
- IAM policies still need to be configured correctly
Overview:
| Authentication Method | Credential Stored Locally | Typical Environment | Credential Lifetime | Renewal Mechanism | Typical Usage | Works Outside OCI |
| API Key | Private key | Developer workstation, automation server | Long-lived | Manual key rotation | OCI CLI, SDKs, Terraform, custom automation, legacy integrations | Yes |
| Session Token | Session token + private key | Interactive user session | Hours to days | oci session refresh | OCI CLI, SDKs, Terraform during interactive user sessions | Yes |
| WIF (UPST) | UPST + private key | CI/CD pipelines, multicloud workloads, external applications | Typically ≤ 60 min | Obtain a new external JWT and perform token exchange again | OCI CLI, SDKs, Terraform, REST APIs from external workloads | Yes |
| Instance Principal | None | OCI Compute Instance | OCI-managed temporary credentials | Automatic | Applications, scripts, OCI CLI, SDKs, Terraform running on OCI Compute | No |
| Resource Principal | None | OCI-managed services (Functions, OKE, Data Flow, Autonomous Database, etc.) | OCI-managed temporary credentials | Automatic | OCI service integrations, Object Storage access, AI services, SDK-based applications | No |
Although all methods ultimately access the same OCI APIs, they differ significantly in how credentials are obtained, stored, and renewed. Choosing the right authentication method is therefore largely a question of where your workload runs and how credential management should be handled.
Part 2: Using a WIF Token with OCI
A short Recap of WIF can be found in the announcement blog:
https://blogs.oracle.com/cloud-infrastructure/oci-iam-workload-identity-federation
A specialized HowTo is e.g. here:
https://blogs.oracle.com/coretec/oci-workload-identity-federation-wif-with-microsoft-entra-id-applications-and-keycloak
The overall Flow for a WIF issued token to use with OCI tools:
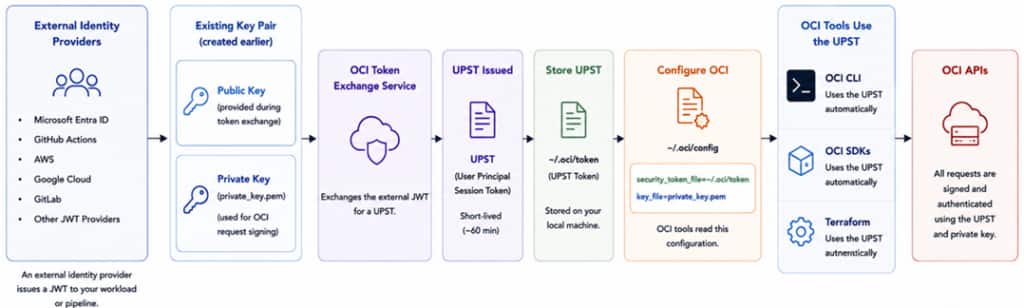
After exchanging an external JWT for a UPST, the token is stored locally and referenced from the OCI configuration. OCI CLI, SDKs, and Terraform automatically discover the token and private key and use them to authenticate OCI API requests.
Starting Point
Assume:
- IDP authenticates a workload.
- OCI trust configuration already exists.
- Token exchange succeeds.
- OCI returns a UPST.
Understanding the UPST
A UPST is:
- Short-lived
- Issued by OCI
- Accepted by OCI services
- Bound to a public key
- Used together with request signing
The UPST does not replace request signing.
Using the UPST with OCI REST APIs
The lowest-level integration is direct REST API access. No encapsulation with CLI or SDKs.
The workflow is: UPST + Private Key + OCI Request Signature = Authenticated OCI API Call
This approach provides maximum flexibility but requires implementing OCI request signing.
Using the UPST with OCI CLI
OCI CLI already understands security-token authentication.
Steps needed (see also previous part with authentication methods):
- Create a token file, e.g. ~/.oci/token
- Store the UPST inside the file.
- Create a profile (a section in config file):
[WIF]
region=eu-frankfurt-1
tenancy=<tenancy_ocid>
user=<user_ocid>
key_file=/home/user/private_key.pem
security_token_file=/home/user/.oci/token
Run commands:
oci os ns get --profile WIF --auth security_tokenThe CLI handles request signing automatically.
Using the UPST with OCI SDKs
OCI SDKs support security-token authentication.
The SDK:
- Reads the UPST.
- Uses the private key.
- Signs OCI requests.
Typical languages:
- Python
- Java
- Go
- .NET
This allows applications running outside OCI to authenticate without storing OCI API keys.
Of course an SDK can also trigger OpenID flows and all other authentication flows which are supported and configured by/in the used OCI IAM Domain.
Using the UPST with Terraform
Terraform uses the OCI provider.
Configure the provider:
provider "oci" {
  auth                = "SecurityToken"
  config_file_profile = "WIF"
}
Terraform then reads:
- security token
- private key
- OCI profile
and signs all OCI API requests automatically.
Token Lifetime Considerations
Unlike API keys, a UPST expires automatically. This improves security but introduces a new operational requirement: Token renewal. OCI does not automatically issue replacement UPSTs.
To do so:
- Obtain a new JWT from the external identity provider.
- Perform token exchange again.
- Receive a new UPST.
- Update the token used by the application.
Many CI/CD pipelines perform this sequence automatically at runtime.
Summary
OCI offers multiple authentication mechanisms designed for different execution environments.
For workloads running outside OCI, Workload Identity Federation provides a modern alternative to long-lived API keys.
After exchanging an external JWT for a UPST, the token can be used across the OCI ecosystem:
- REST APIs
- OCI CLI
- OCI SDKs
- Terraform
The result is a consistent authentication model that integrates OCI with external identity providers such as Microsoft Entra ID while avoiding the operational burden of managing OCI API keys.