Welcome back! Today, we’re learning about the Oracle Cloud Infrastructure (OCI) Functions feature in OCI Data Integration. In this blog post, we walk you through an example of how you can call your own functions in data flows to do all kinds of transformations.
While designing a data flow in Data Integration, we perform several steps to select the function, define the inputs, define any function configuration parameters, and define the outputs. In this example, we design a data flow to enrich our product input data with information from the Language AI service to perform named entity recognition on some unstructured text in the products. We can then filter the results by the score property returned and aggregate it by category, such as the geopolitical information.
Prerequisites
-
Refer to our previous blogs on Data Integration and Oracle documentation to set up a workspace, projects, and applications and understand the creation and execution of a data flow using integration tasks.
-
Define data assets for source and target in the workspace.
Let’s explore how to use OCI Functions in OCI Data Integration!
In this example, we can categorize and analyze data using Data Integration using the OCI Language features. Language is a serverless and multitenant service that’s accessible using REST API calls and the OCI software developer kits (SDKs), including Python. The OCI Language service provides pretrained models that are frequently retrained and monitored to provide you with the best results. We use the named entity recognition (NER) in OCI Language to identify the name of entities, such as people, locations, and organizations. You can find out more in the documentation.
In OCI Data Integration, we apply this functionality using a custom function within our OCI Data Integration data flow. The flow can prepare and shape data, processing all kinds of source data, then extract entities from the text and analyze, aggregating this information and making this data available for subsequent analysis. The NER function provides information on whether a particular entity exists and the context of the text. NER includes functionality for the following use cases:
-
Classifying content for news providers: Classifying and categorizing news article content can be difficult. The NER tool can automatically scan articles to identify the major people, organizations, and places in them. You can save the extracted entities as tags with the related articles. Knowing the relevant tags for each article helps with automatically categorizing the articles in defined hierarchies and enables content discovery.
-
Customer support: Recognizing relevant entities in customer complaints and feedback, such as product specifications, department details, or company branch details, helps to classify the feedback appropriately. You can then forward the entities to the person responsible for the identified product. Similarly, you can categorize feedback based on their locations and the products mentioned.
-
Efficient search algorithms: You could use NER to extract entities that are then searched against the query, instead of searching for a query across the millions of articles and websites online. When run on articles, all the relevant entities associated with each article are extracted and stored separately. This separation can speed up the search process considerably. The search term is only matched with a small list of entities in each article, leading to quick and efficient searches. With it, you can search content from millions of research papers, Wikipedia articles, blogs, articles, and so on.
-
Content recommendations: With NER, you can extract entities from a particular article and recommend other articles that mention the most similar entities. For example, you can effectively develop content recommendations for a media industry client with NER. It enables the extraction of the entities associated with historical content or previous activities. NER compares them with the label assigned to other unseen content to filter relevant entities.
-
Automatically summarizing job candidates: The NER tool can facilitate the evaluation of job candidates by simplifying the effort required to shortlist candidates with numerous applications. Recruiters can filter and categorize them based on identified entities, such as location, college degrees, employers, skills, designations, certifications, and patents.
Named entity recognition in OCI
After preparing the data, we can include the named entity recognition function to identify entities. The function that we’ve defined is generic. We specify which attribute in the input data to use for the entity recognition. You can try the API from the OCI Console, as shown in the following screenshot:
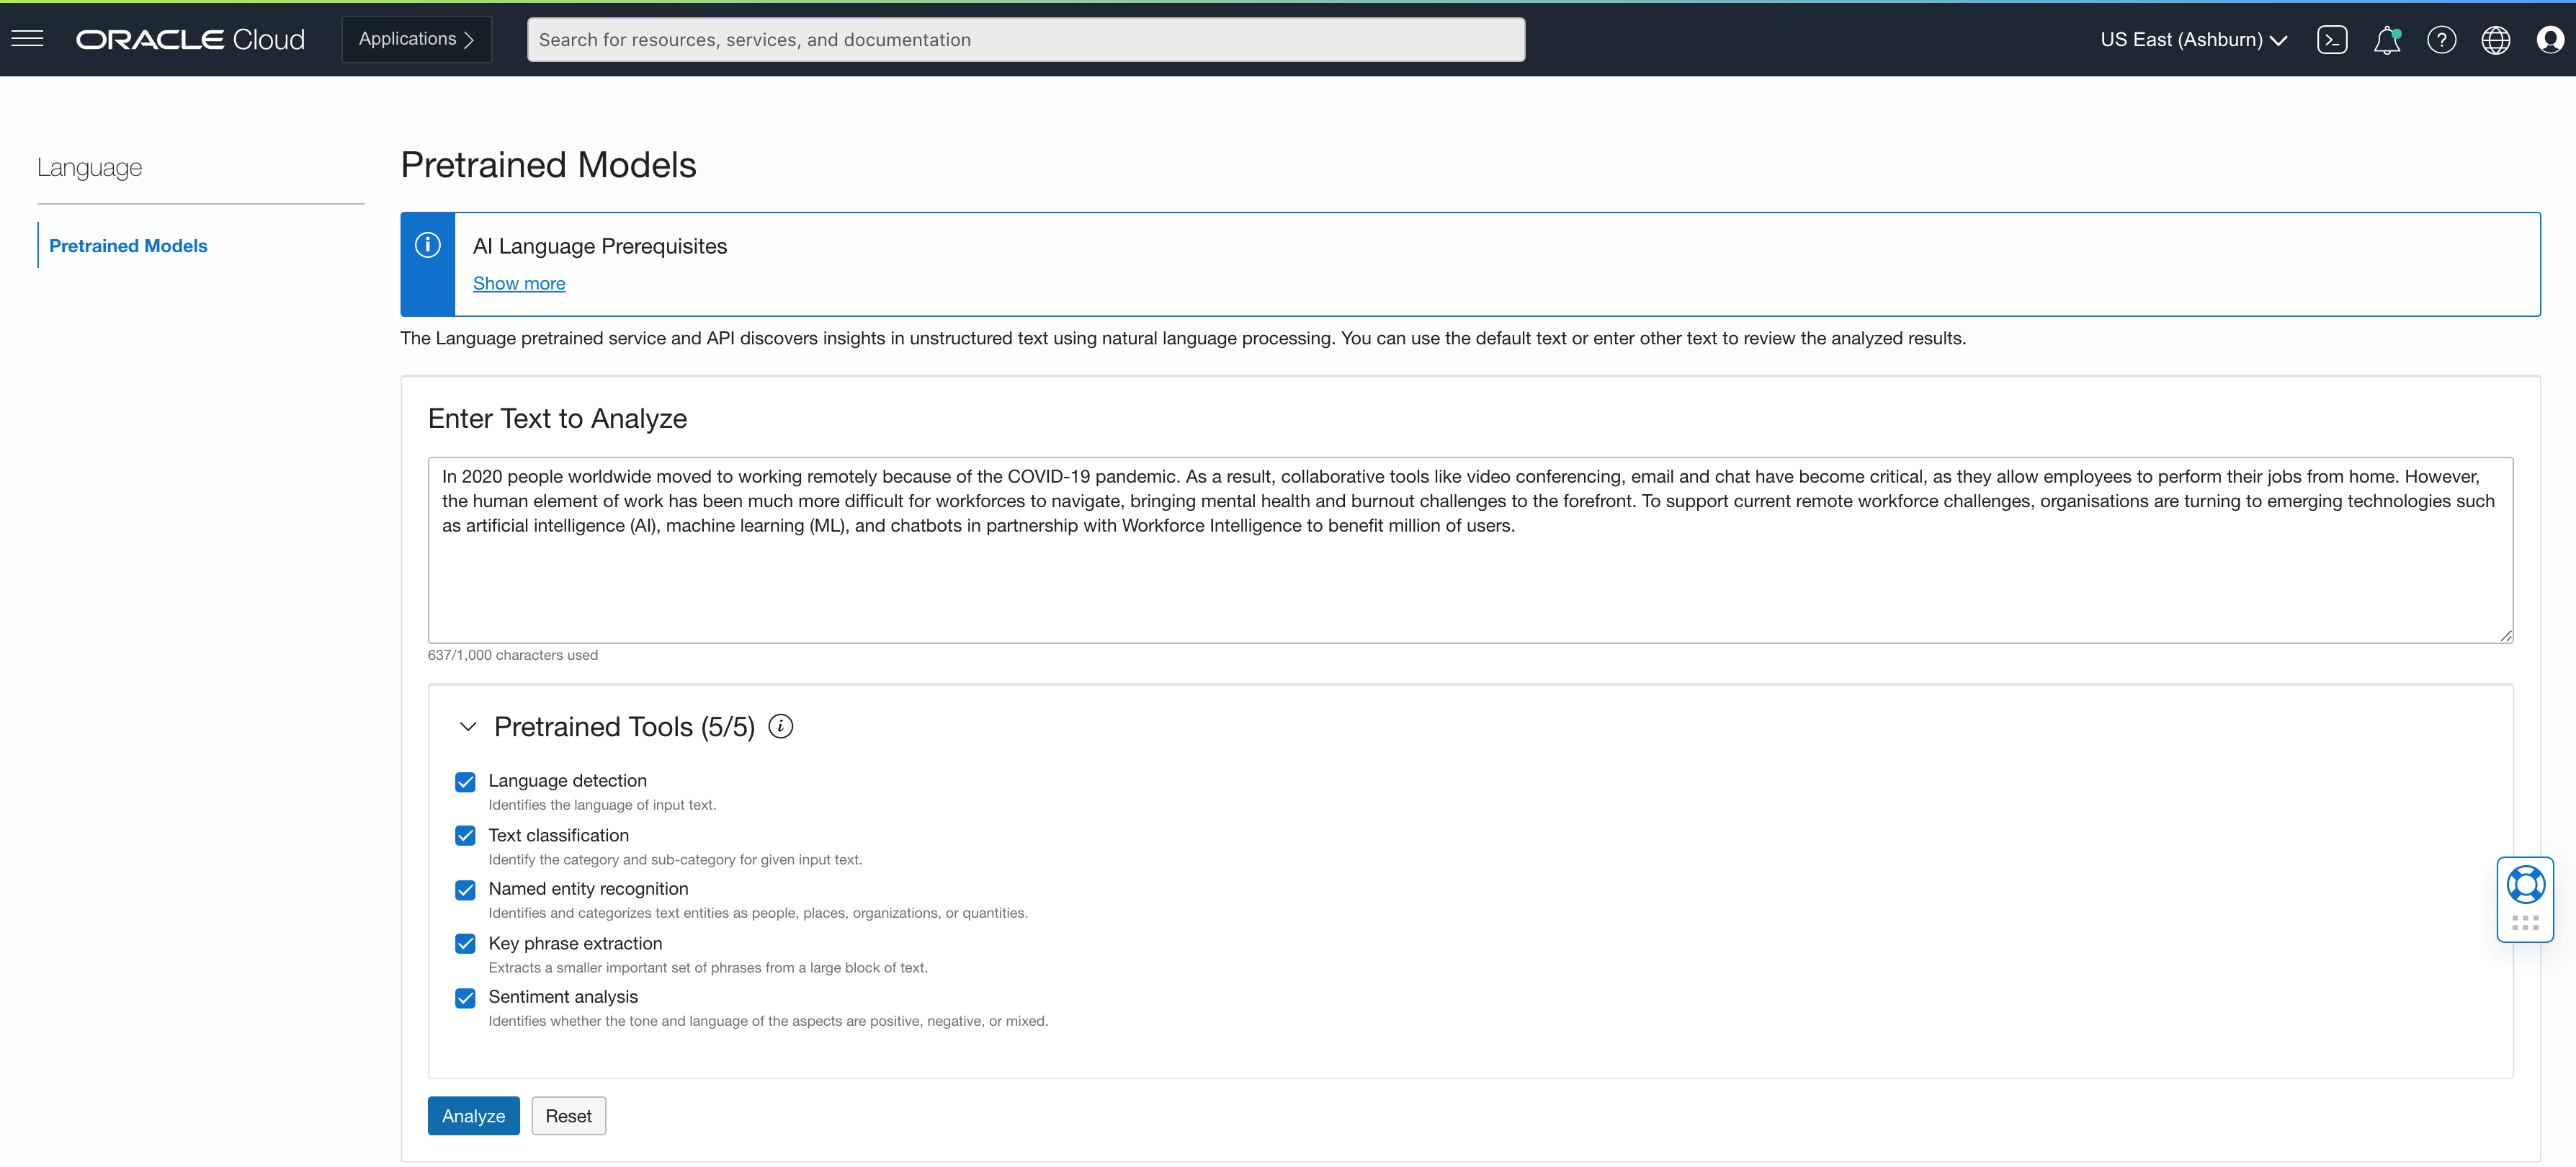
The results indicate the text, the type (date, event, organization, and so on), and the score (confidence level).

In OCI Data Integration, we design a data flow to prepare some input data from product data, then call the named entity recognition function to extract the attributes. The named entity recognition returns the following attributes, which we add as output attributes to the operator:
-
Offset (integer): The value to assign to the offset property of this entity
-
Length (integer): The value to assign to the length property of this entity
-
Text (varchar): The value to assign to the text property of this entity
-
Type (varchar): The value to assign to the type property of this entity
-
is_pii (boolean): The value to assign to the is_pii property of this entity. PII stands for personal identifiable information
-
Score (decimal): The value to assign to the score property of this entity
The following table shows the type of entities currently included. Each of these entity types has different potential integration and analysis use cases, such as analyzing by the geopolitical entity or by the organization by language.
| Entity full name |
Entity (In prediction) |
Is PII |
Description |
| DATE |
DATE |
Χ |
Absolute or relative dates, periods, and date range |
| |
|
√ |
|
| EVENT |
EVENT |
Χ |
Named hurricanes, sports events, and so on |
| FACILITY |
FAC |
Χ |
Buildings, airports, highways, bridges, and so on |
| GEOPOLITICAL ENTITY |
GPE |
Χ |
Countries, cities, and states |
| IP ADDRESS |
IPADDRESS |
√ |
IP address according to IPv4 and IPv6 standards |
| LANGUAGE |
LANGUAGE |
Χ |
Any named language |
| LOCATION |
LOCATION |
Χ |
Non-GPE locations, mountain ranges, bodies of water |
| MONEY |
MONEY |
Χ |
Monetary values, including the unit |
| NATIONALITIES, RELIGIOUS, and POLITICAL GROUPS |
NORP |
Χ |
Nationalities, religious, or political groups |
| ORGANIZATION |
ORG |
Χ |
Companies, agencies, institutions, and so on |
| PERCENT |
PERCENT |
Χ |
Percentage |
| PERSON |
PERSON |
√ |
People, including fictional characters |
| PHONENUMBER |
PHONE_NUMBER |
√ |
Supported phone numbers:
|
| PRODUCT |
PRODUCT |
Χ |
Vehicles, tools, foods, and so on (not services) |
| QUANTITY |
QUANTITY |
Χ |
Measurements, as weight or distance |
| TIME |
TIME |
Χ |
Anything less than 24 hours (time, duration, and so on) |
| URL |
URL |
√ |
URL. |
OCI Data Integration data flow
In the following data flow, we have the product data, where we enrich the unstructured product description information through the Language AI service, filter by geopolitical data scored greater than 0.9, and then aggregate by text to see the products by geopolitical entity. We didn’t have this information before the call to the named entity recognition service. We also write the raw data to an Object Storage bucket. You can see how to create this function in OCI Functions for named entity recognition.
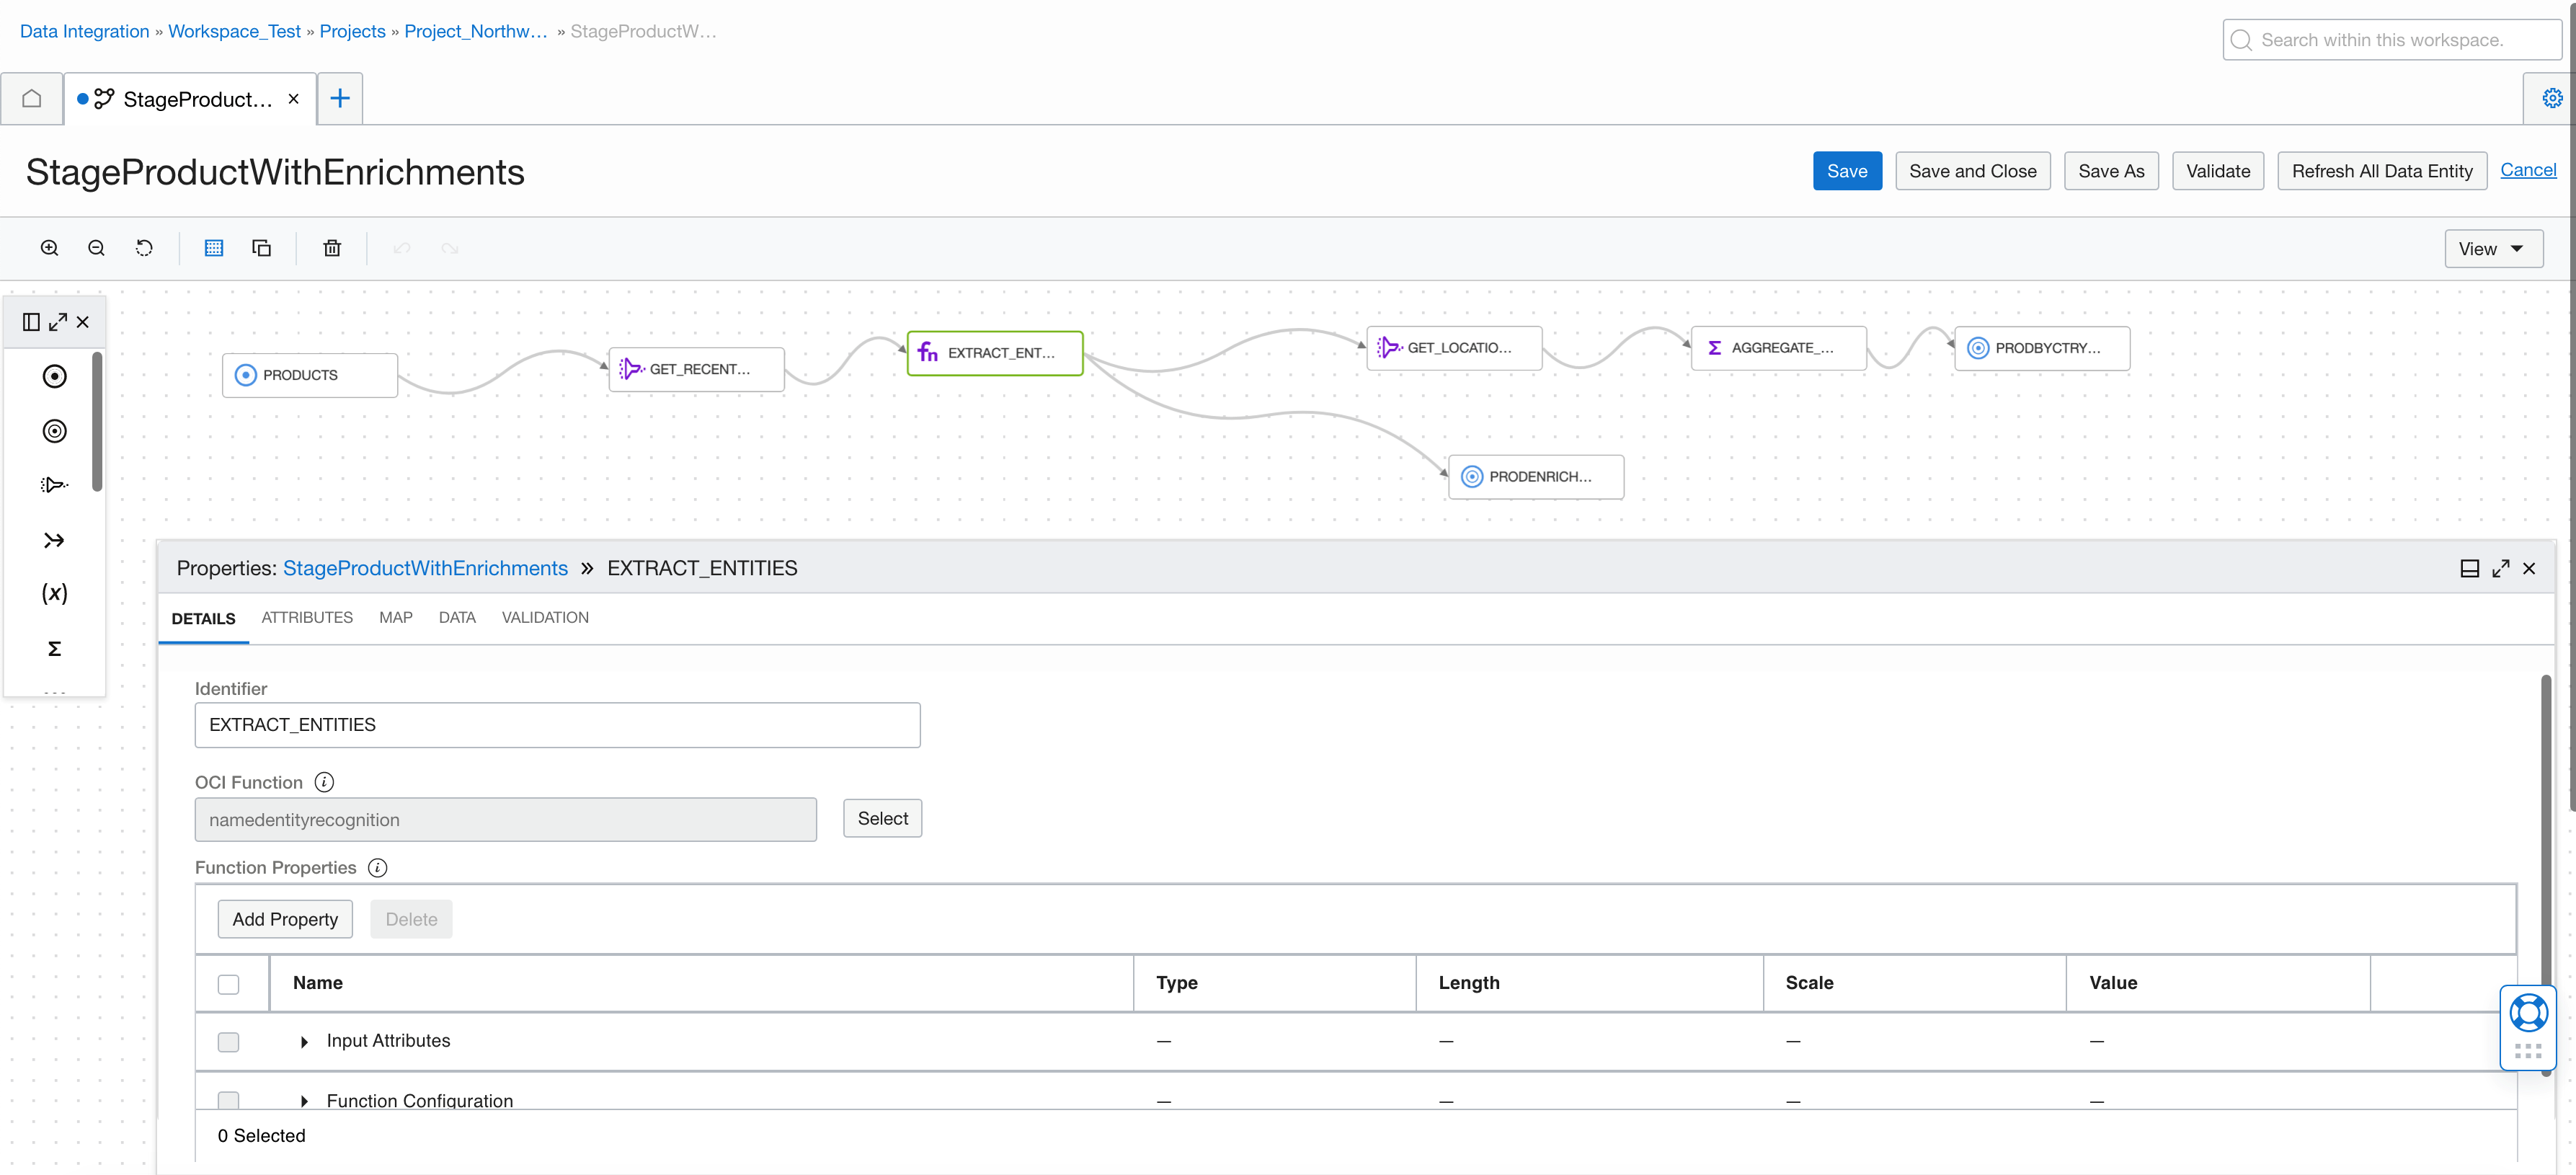
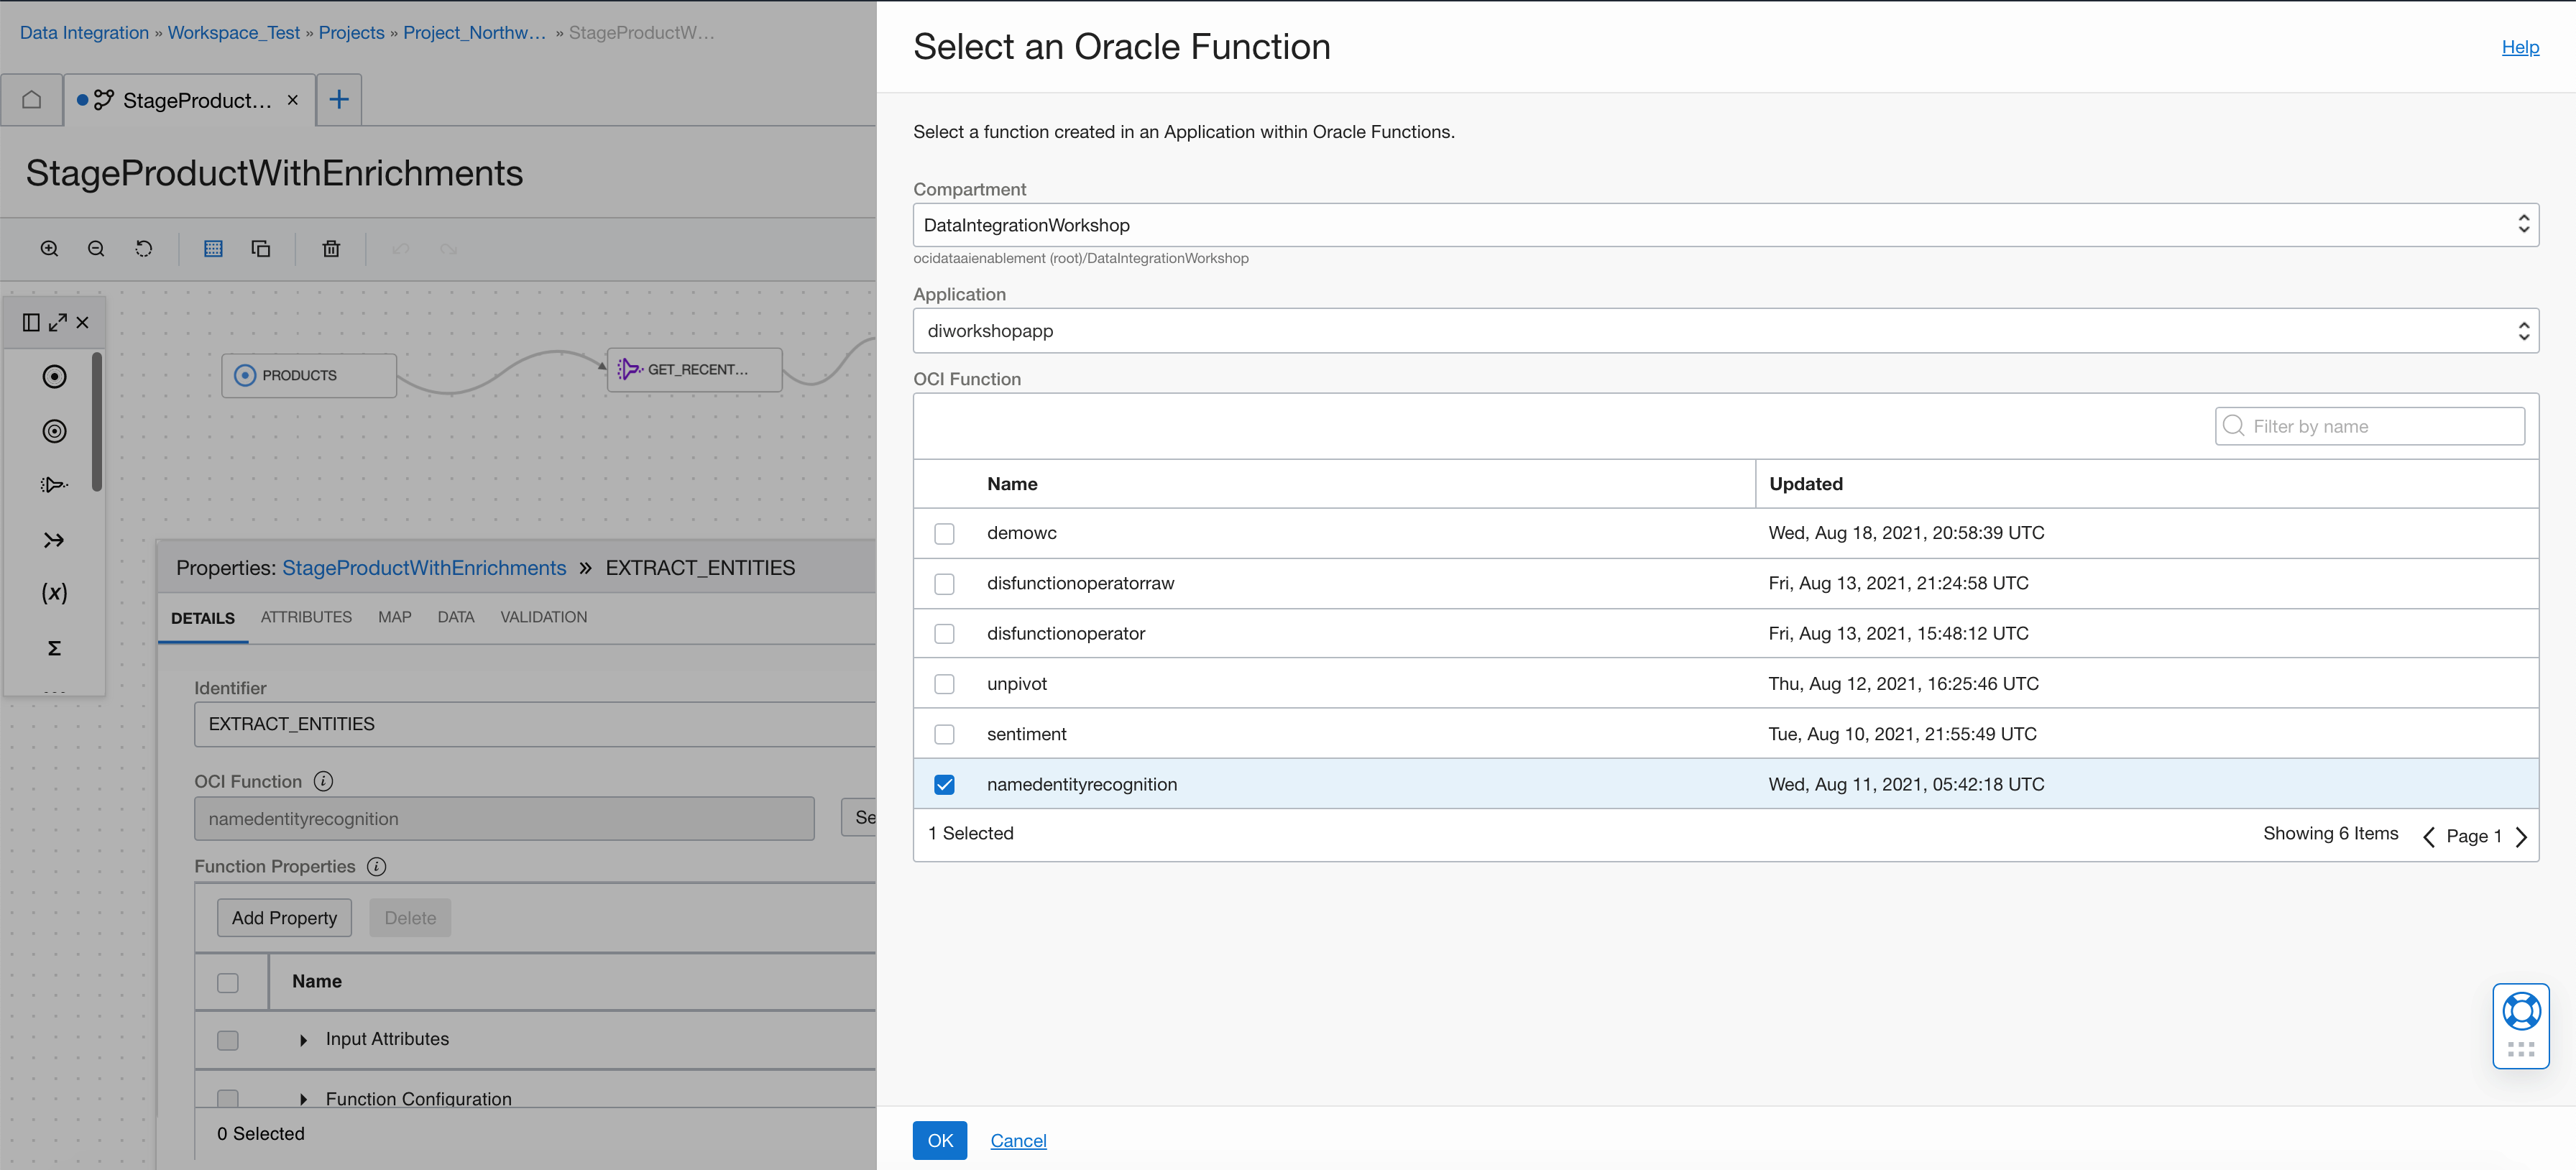
We pick the OCI function by selecting the function from an existing deployed function in an OCI Functions application.
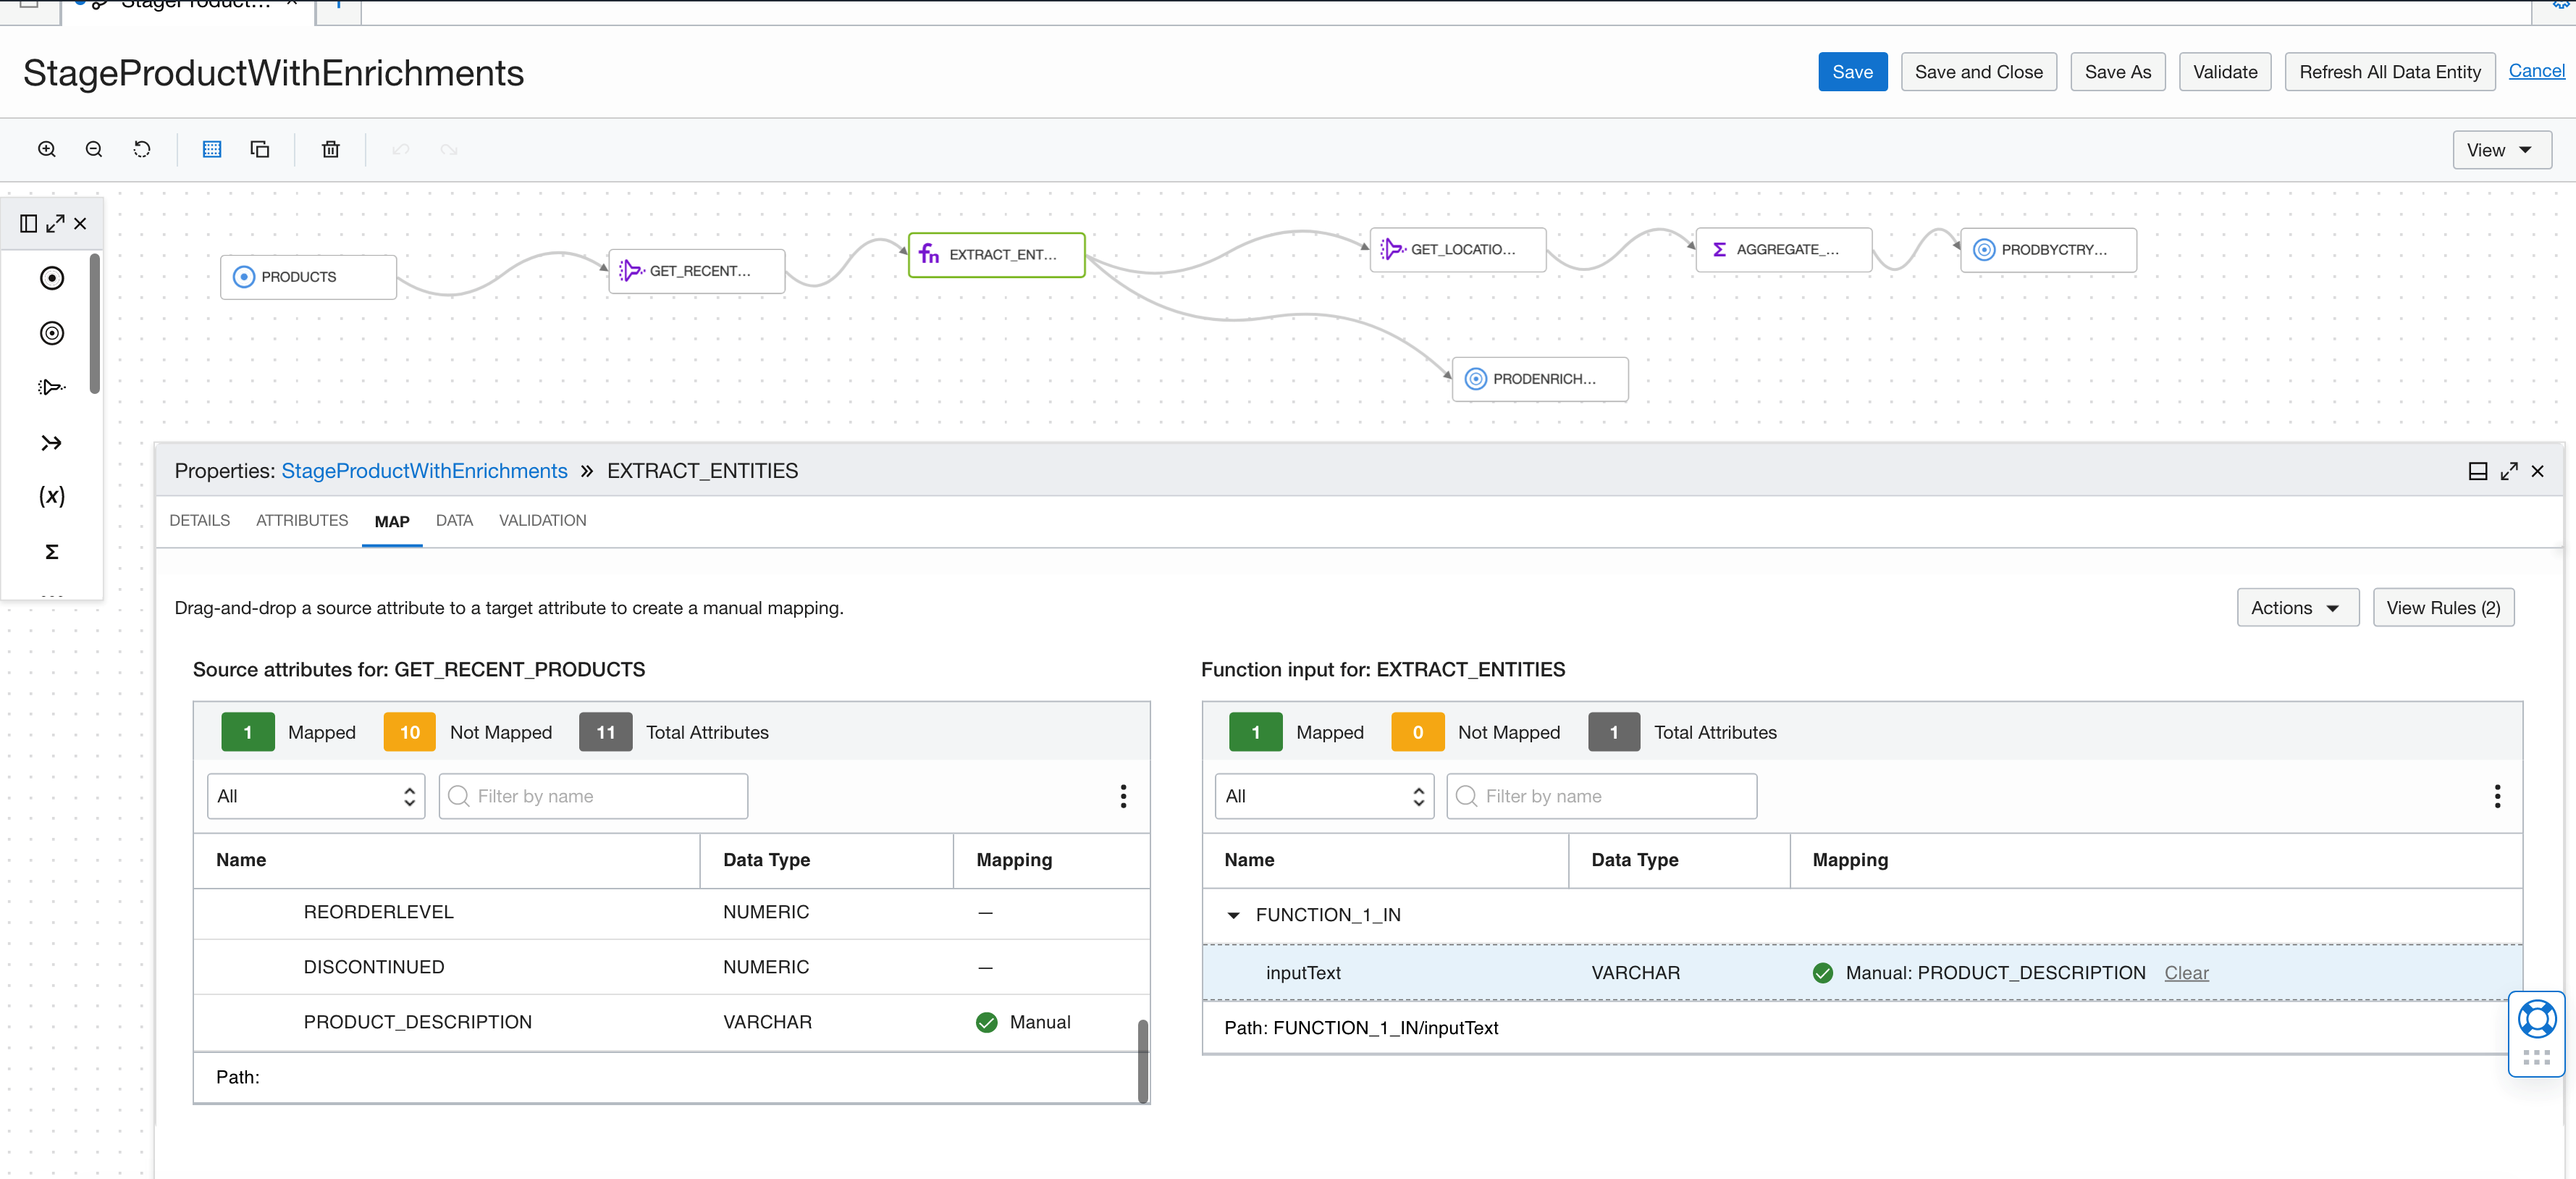
Then we define the input attributes for the function. We use the input ’inputText,’ which is a VARCHAR.
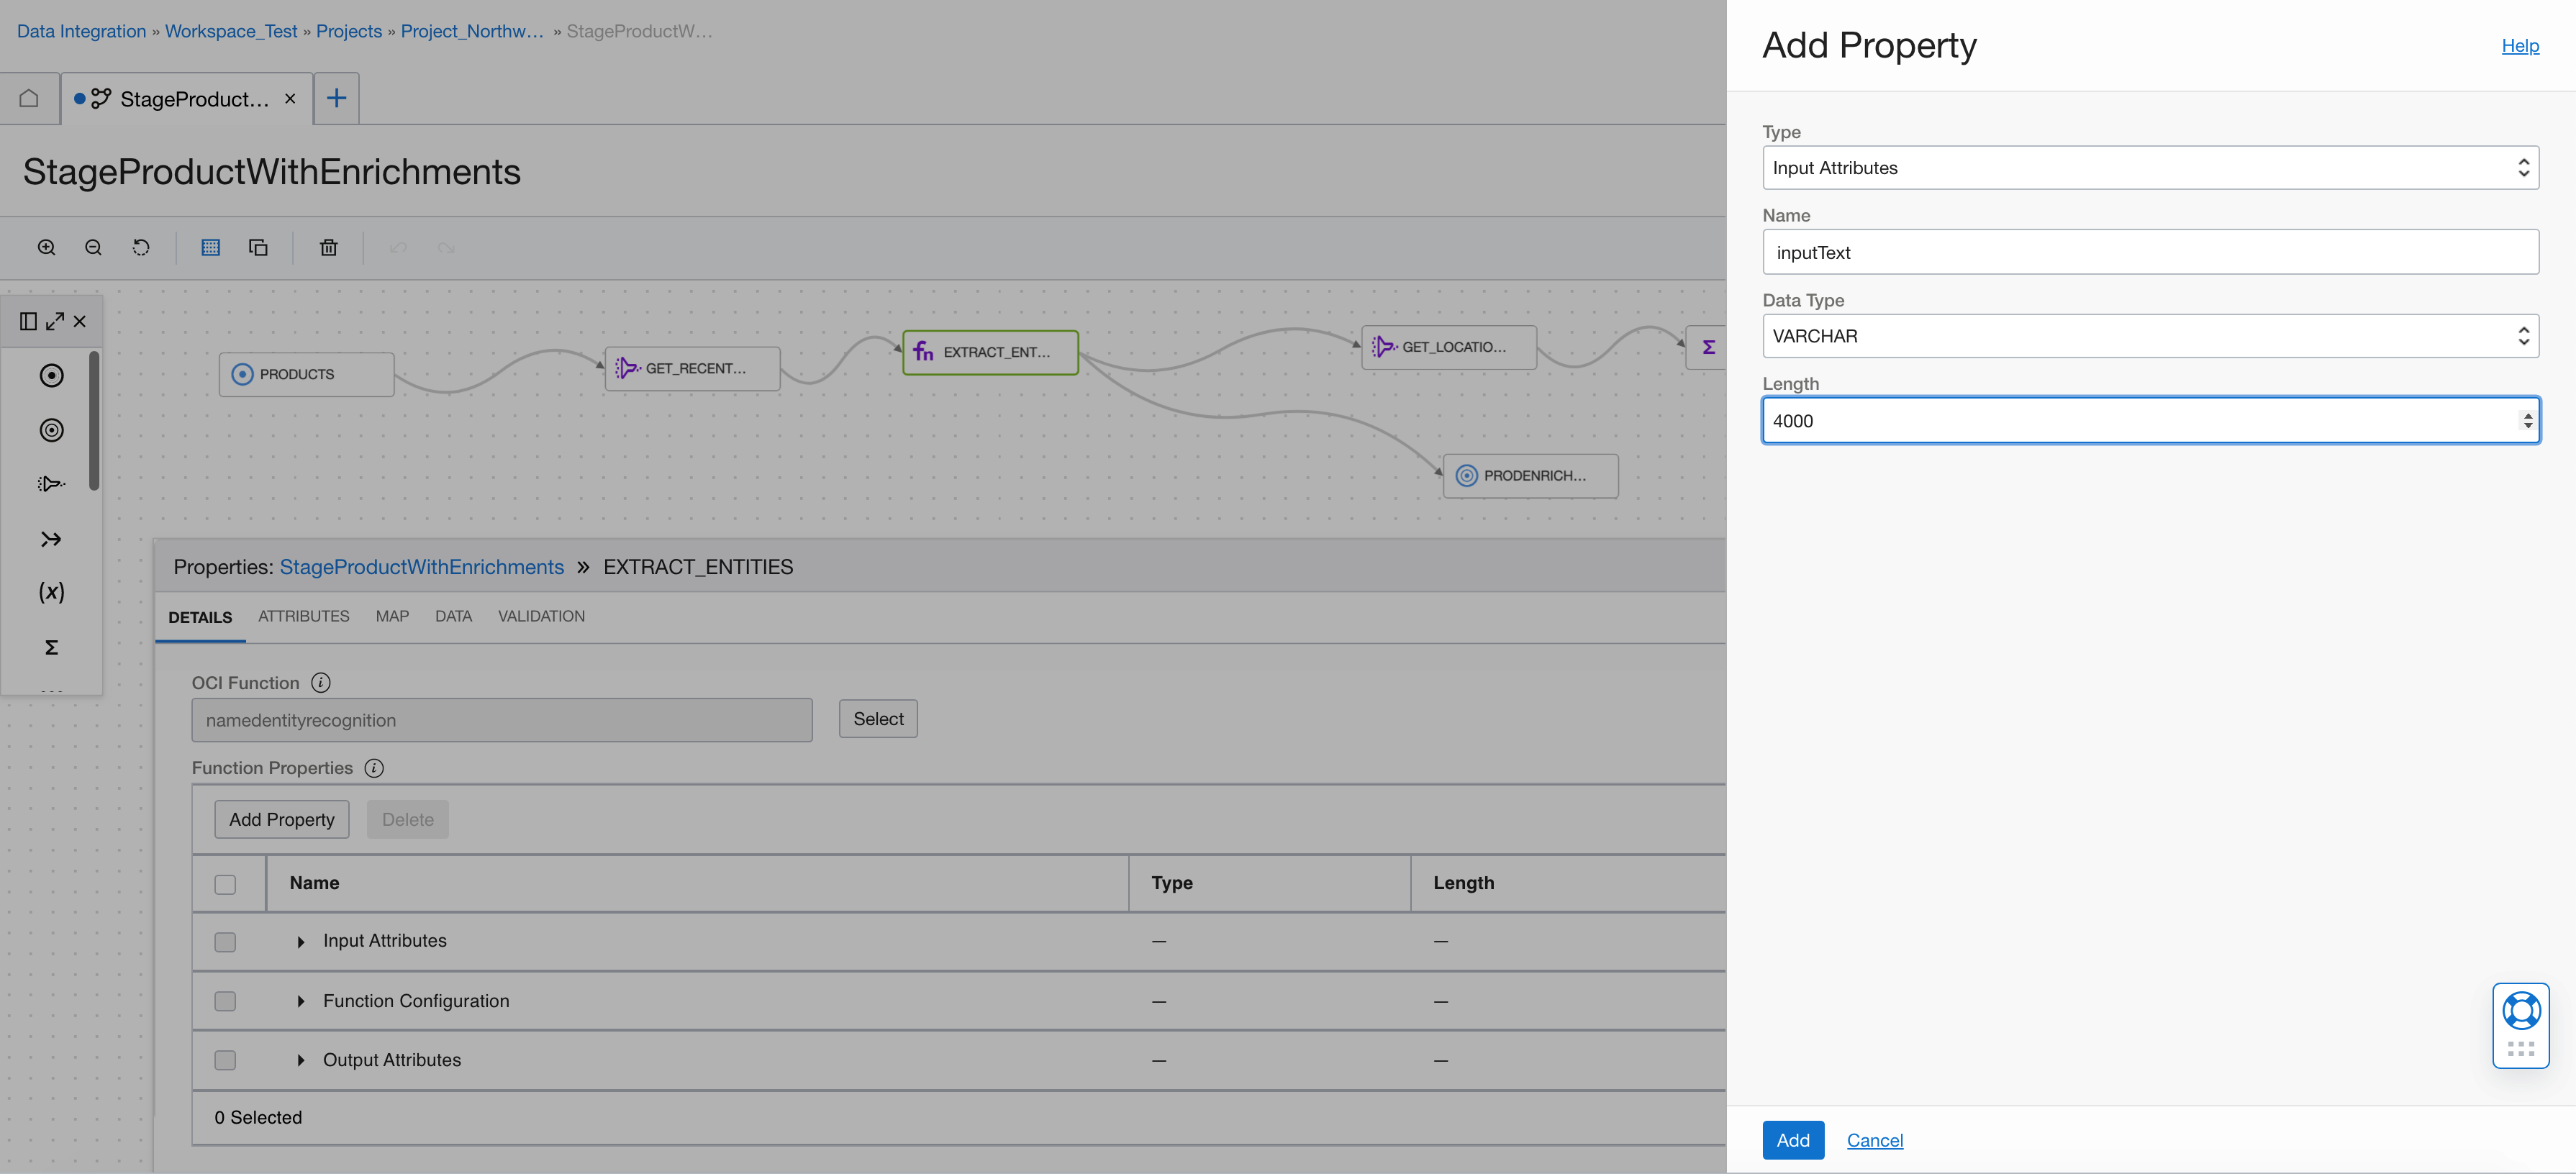
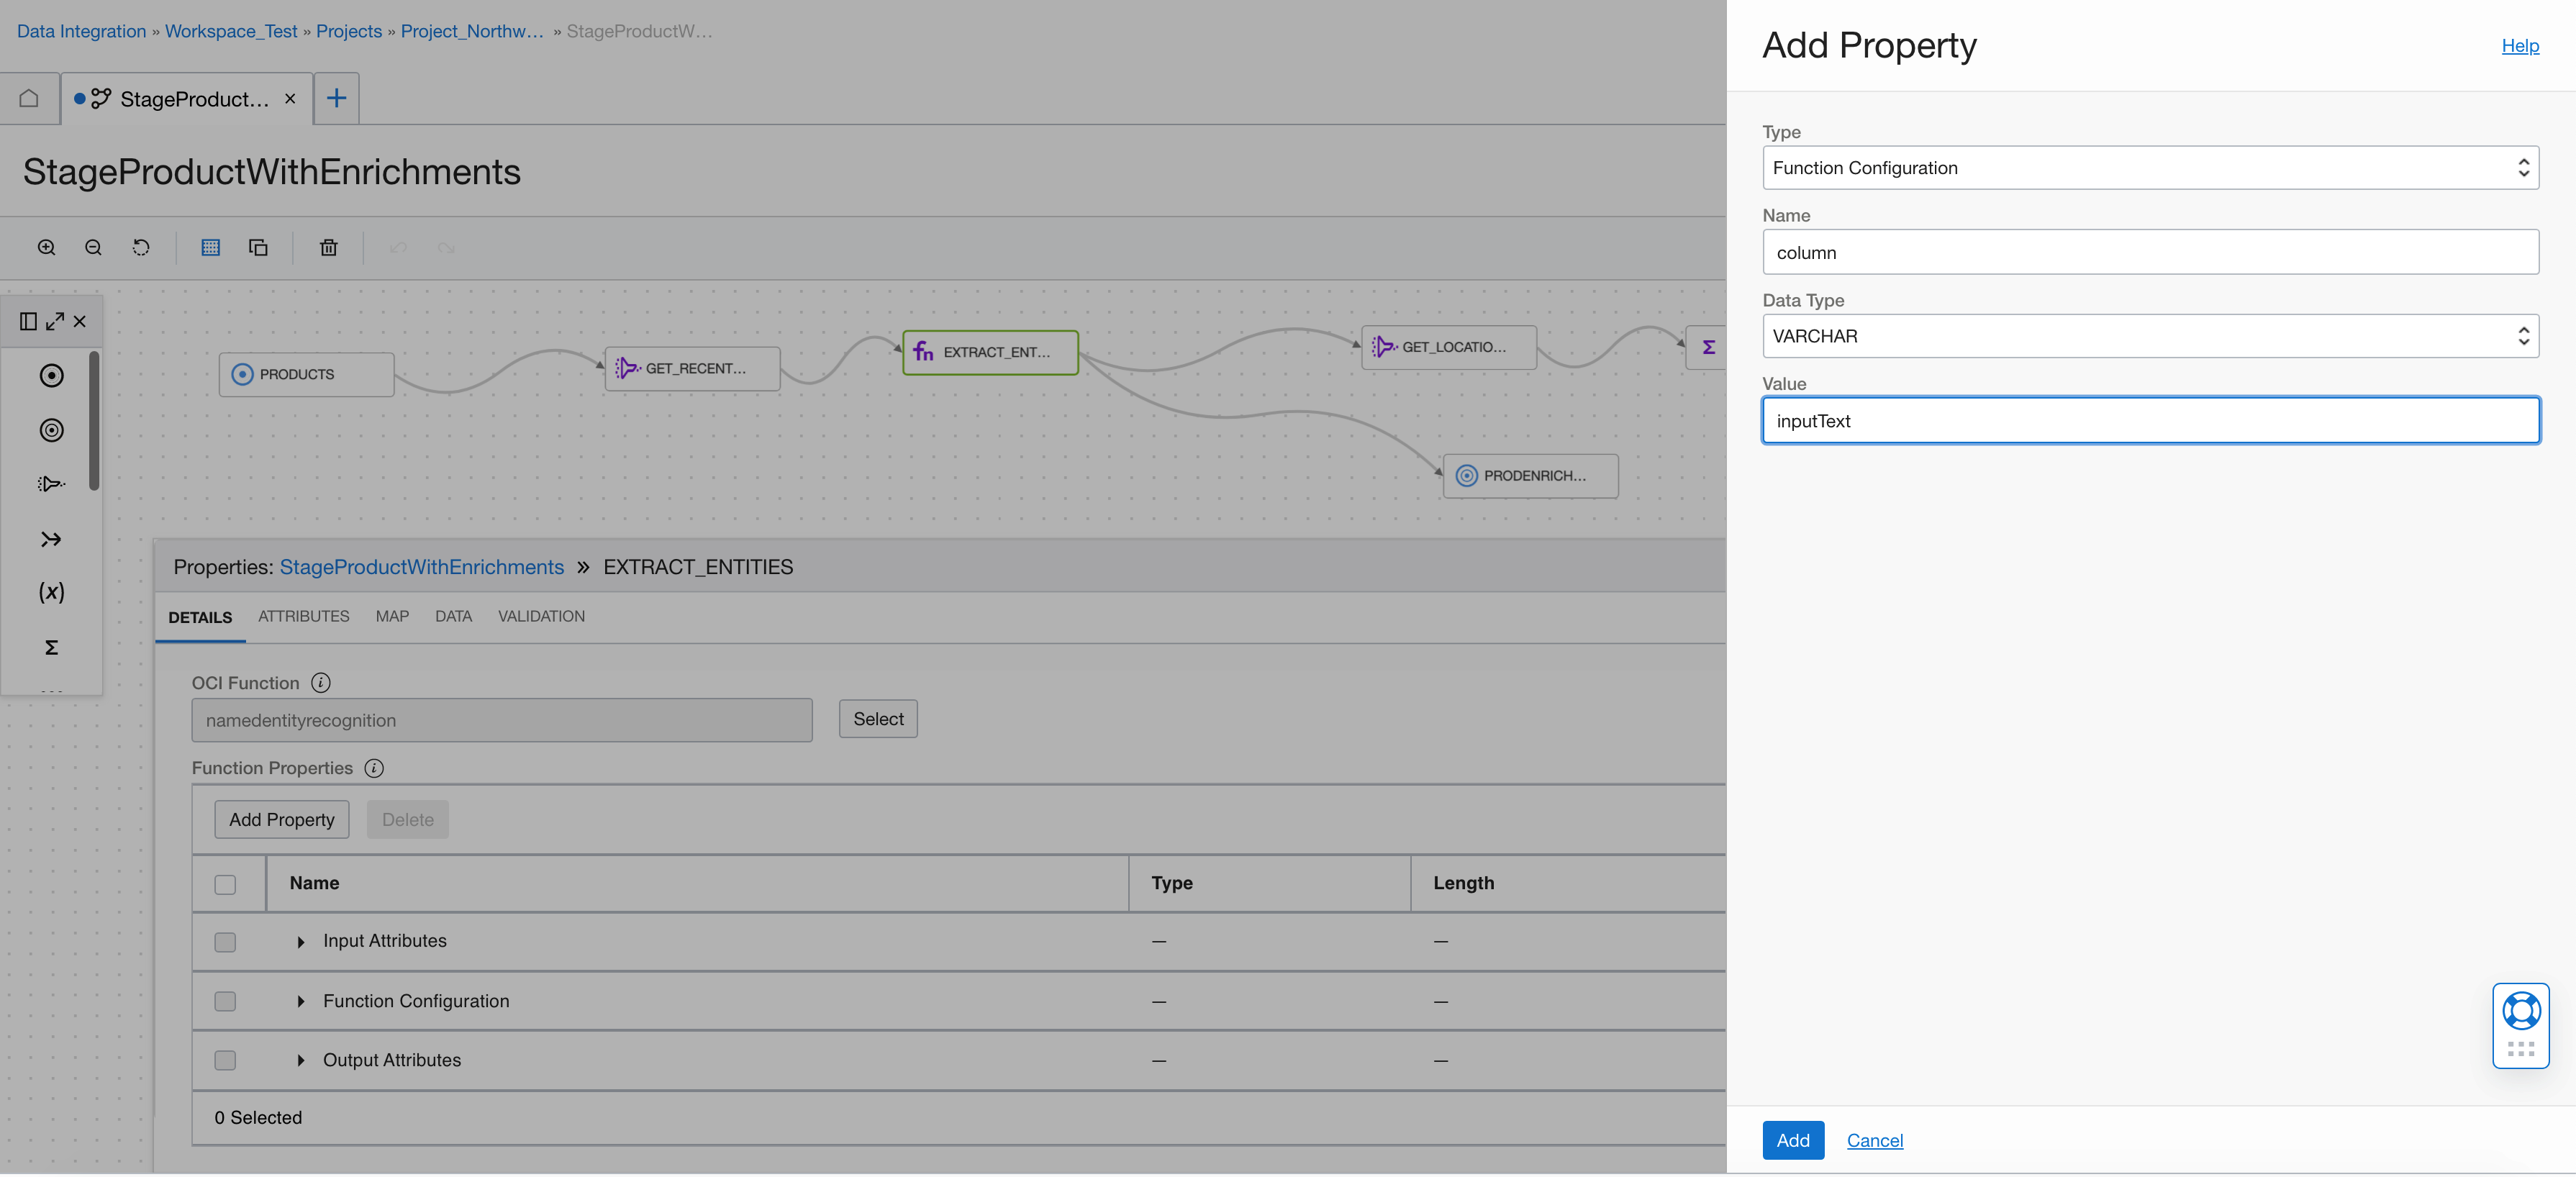
We add a function configuration attribute (column with value inputText). The function uses it to define which column to use for AI Language operation. This example only has one, so it’s redundant, but this capability is useful in other illustrations.
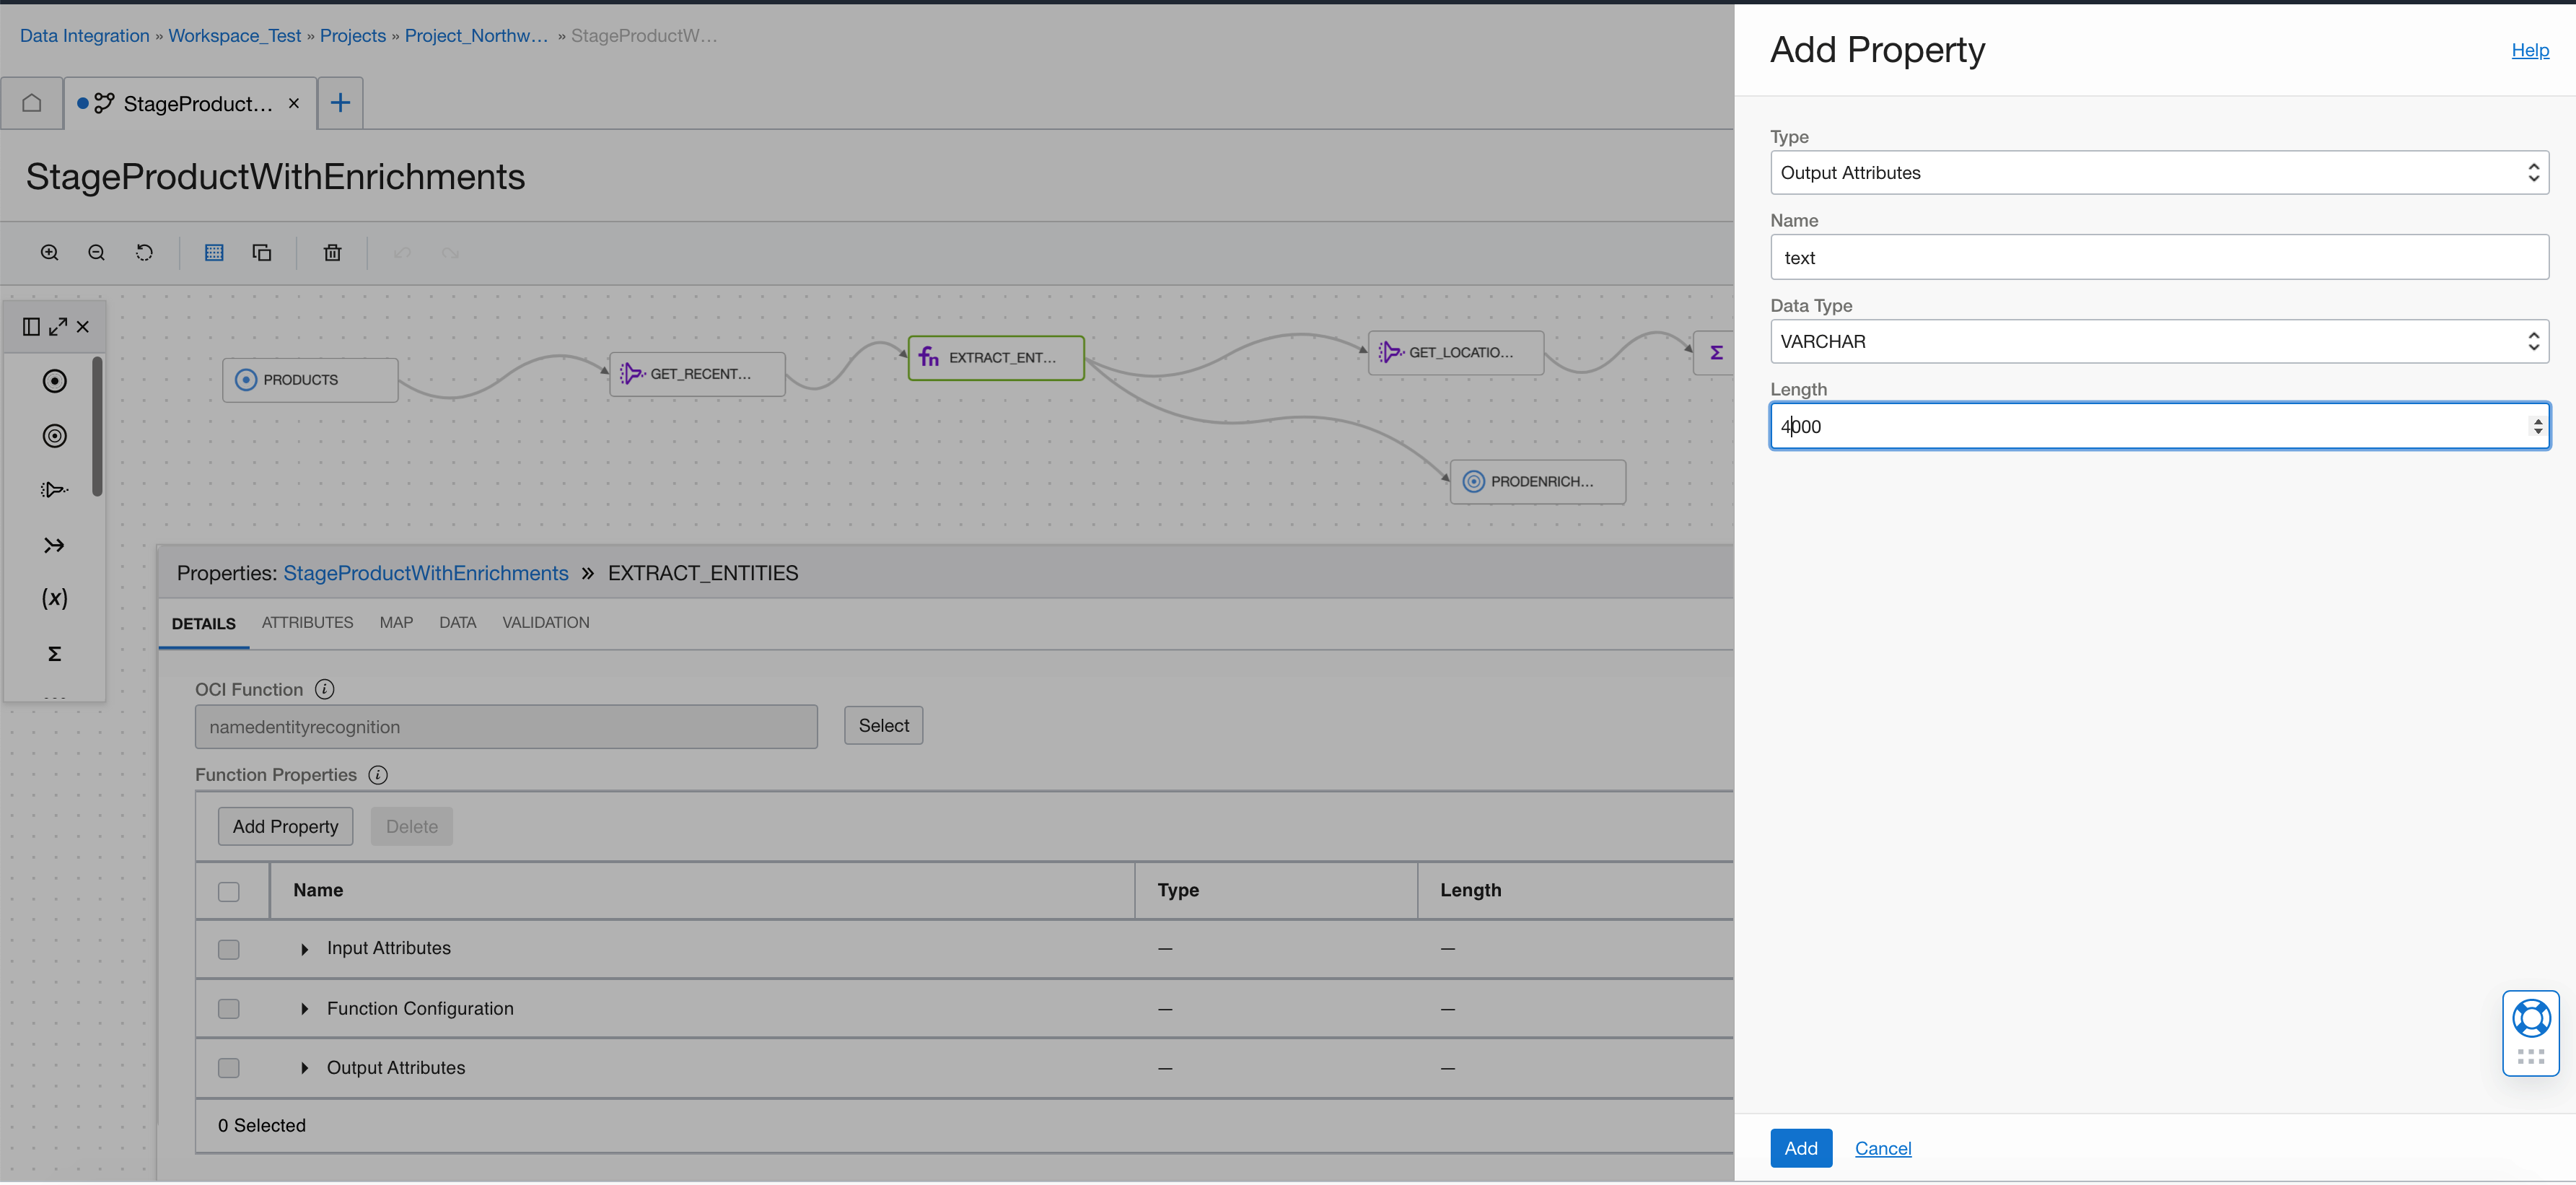
Now, define the output attributes returned by the named entity recognition call, such as score, text, type, is_pii, length, or offset. Add the text as a VARCHAR.
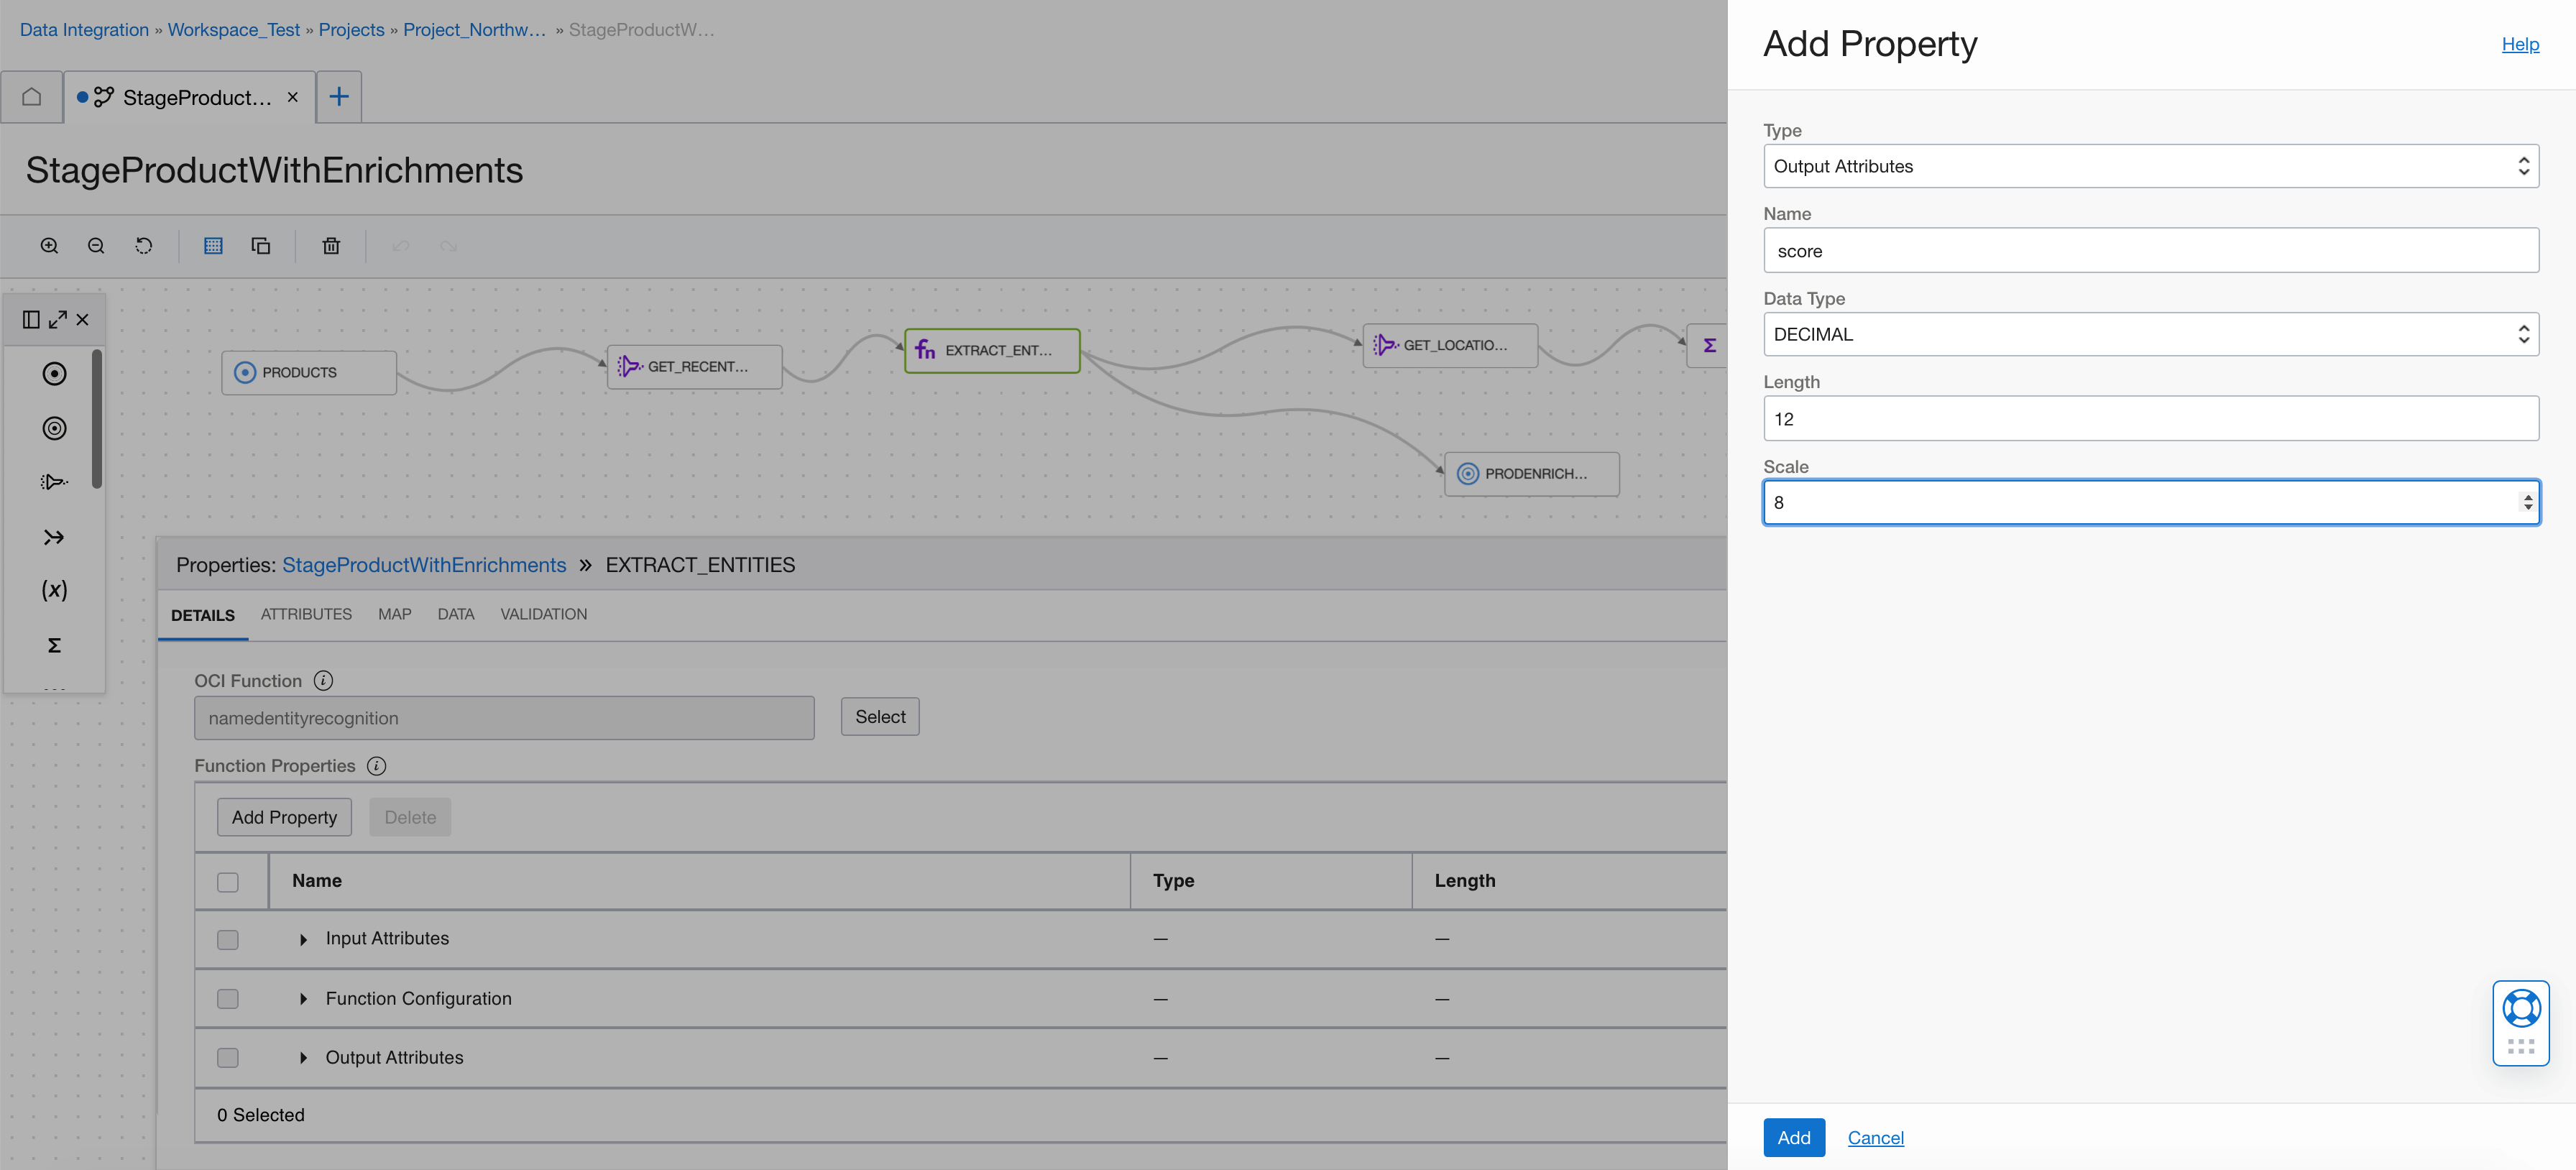
Add the score as a DECIMAL.
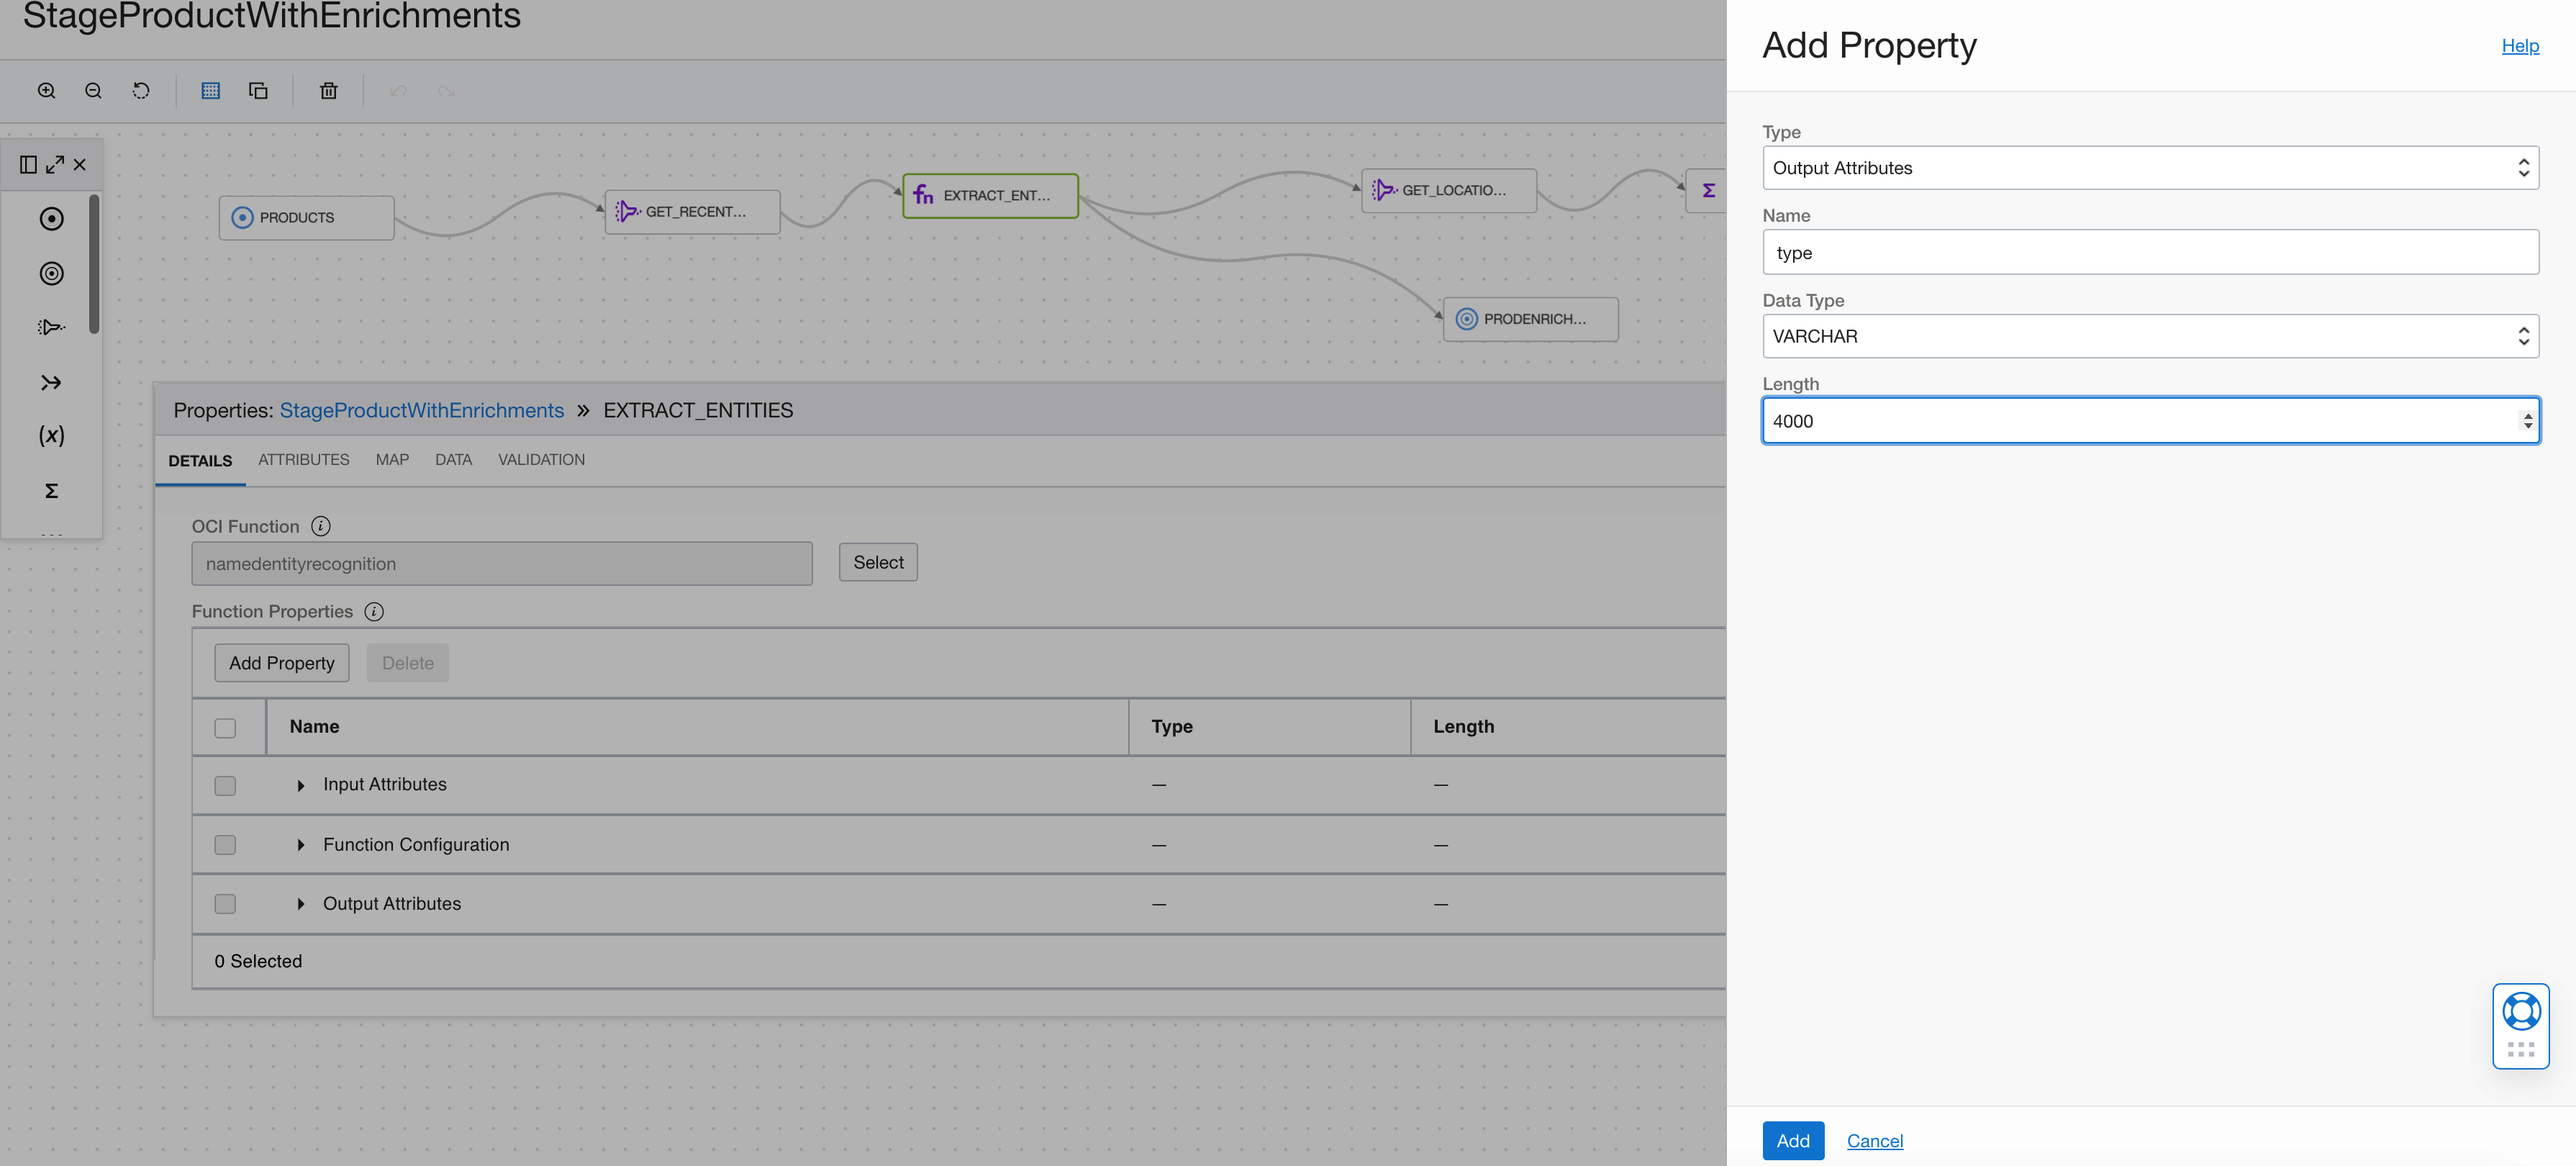
Add the type as a VARCHAR.
Add is_pii as a BOOLEAN.

Add the length as an INTEGER.

Add the offset as an INTEGER.
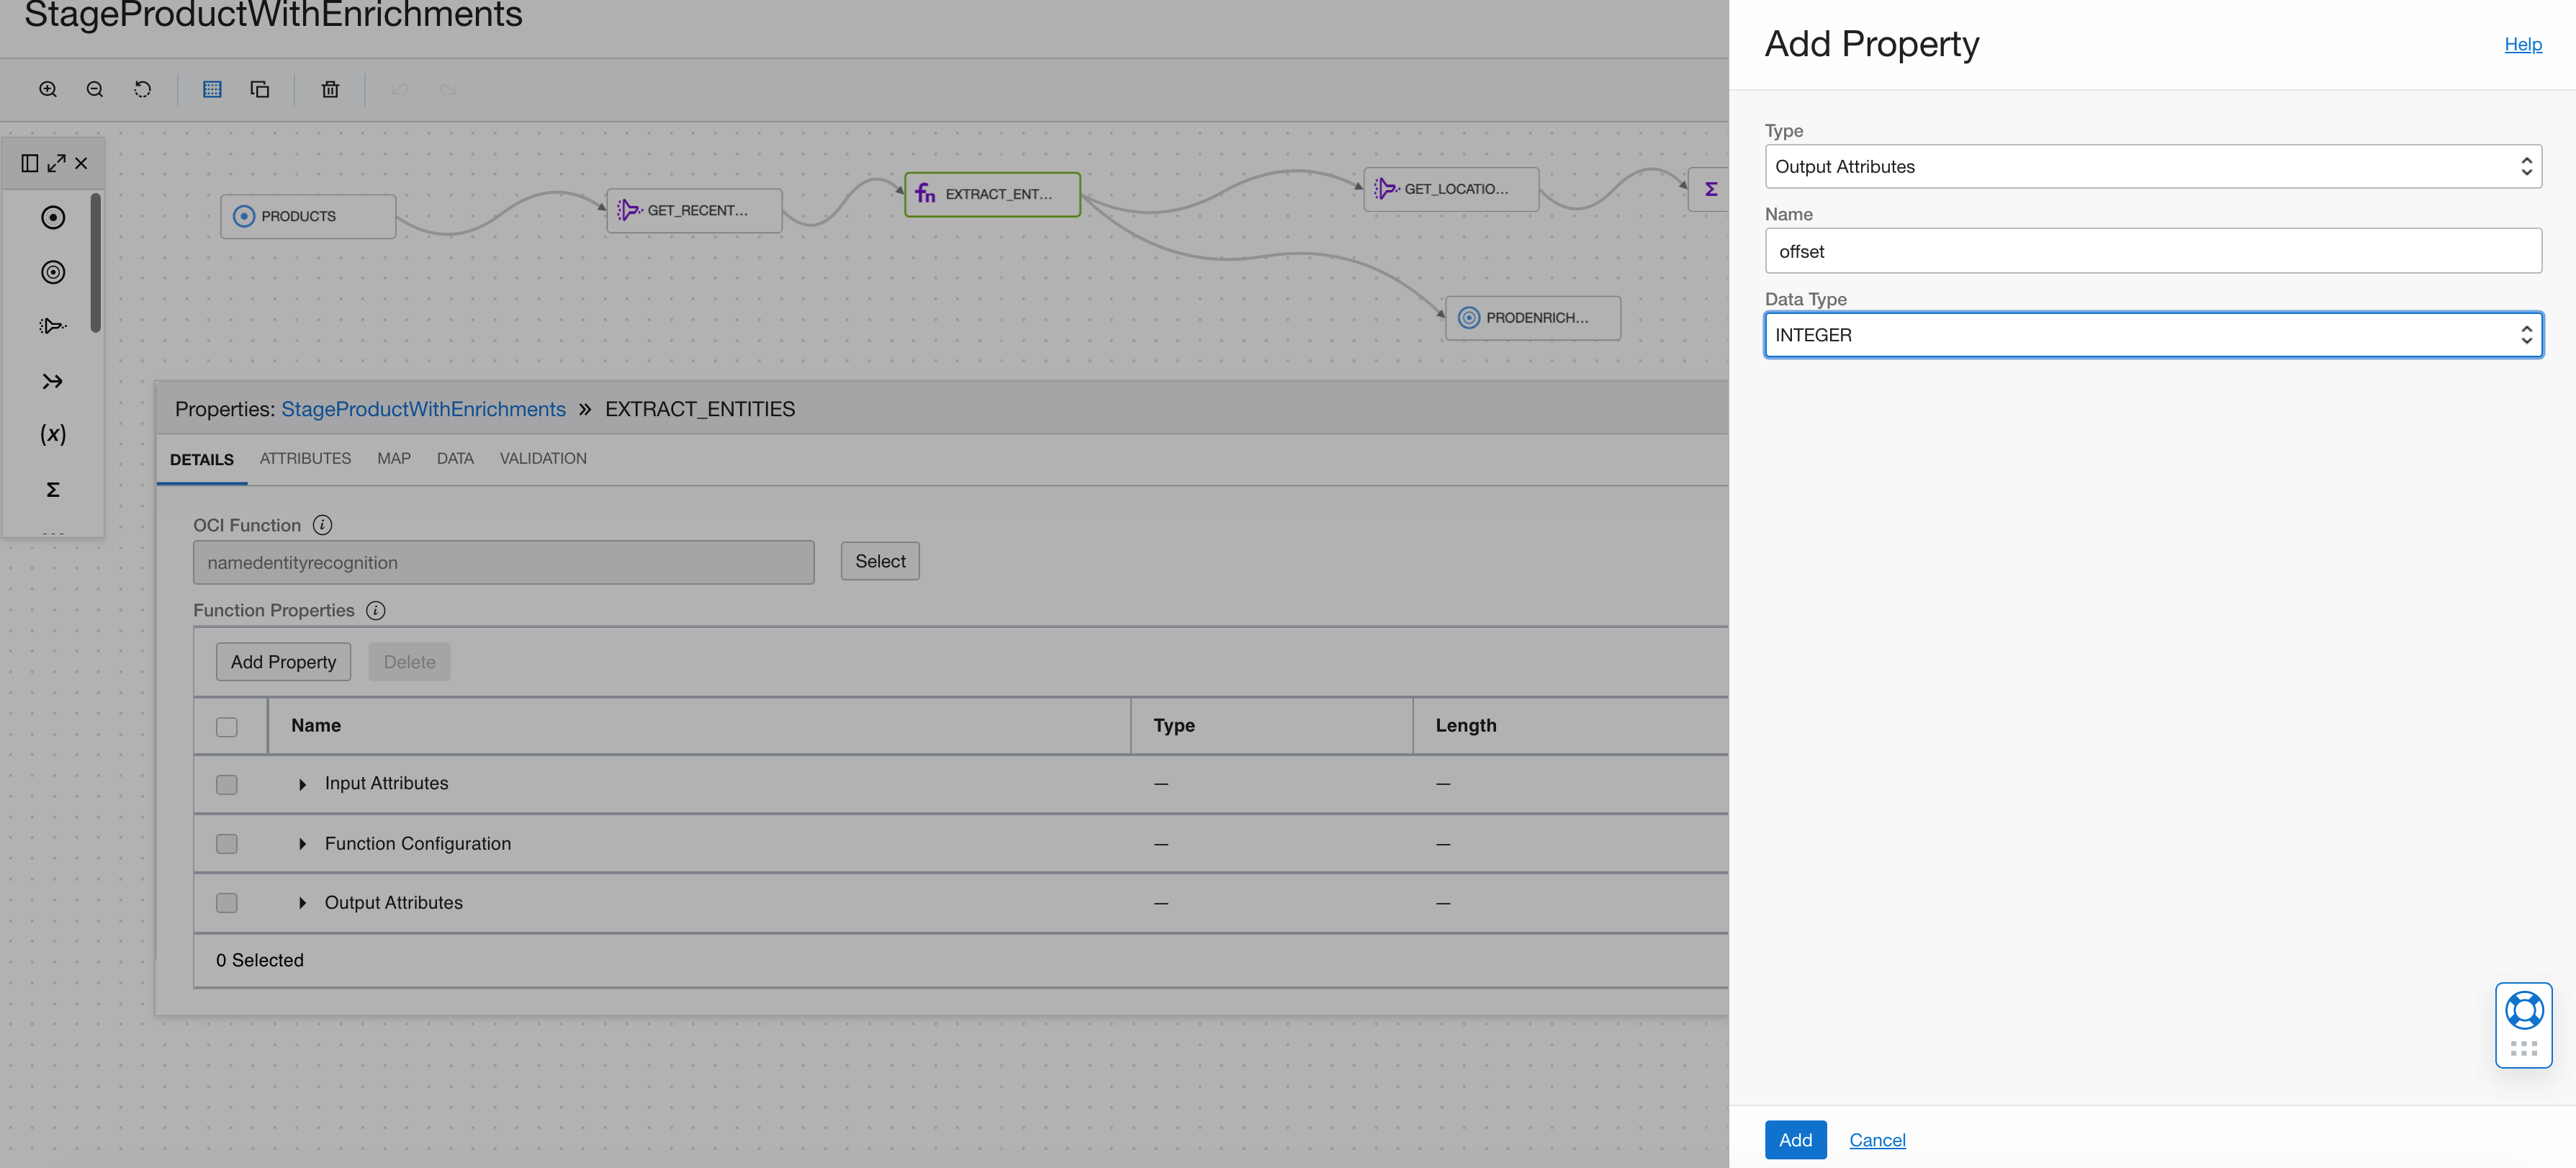
Our function operator is almost complete. Now, we map the upstream attributes to the functions input. You can drag and drop PRODUCT_DESCRIPTION from the left table to the inputText attribute in the right table to map. If the names match, then map by name automatically maps the attributes.
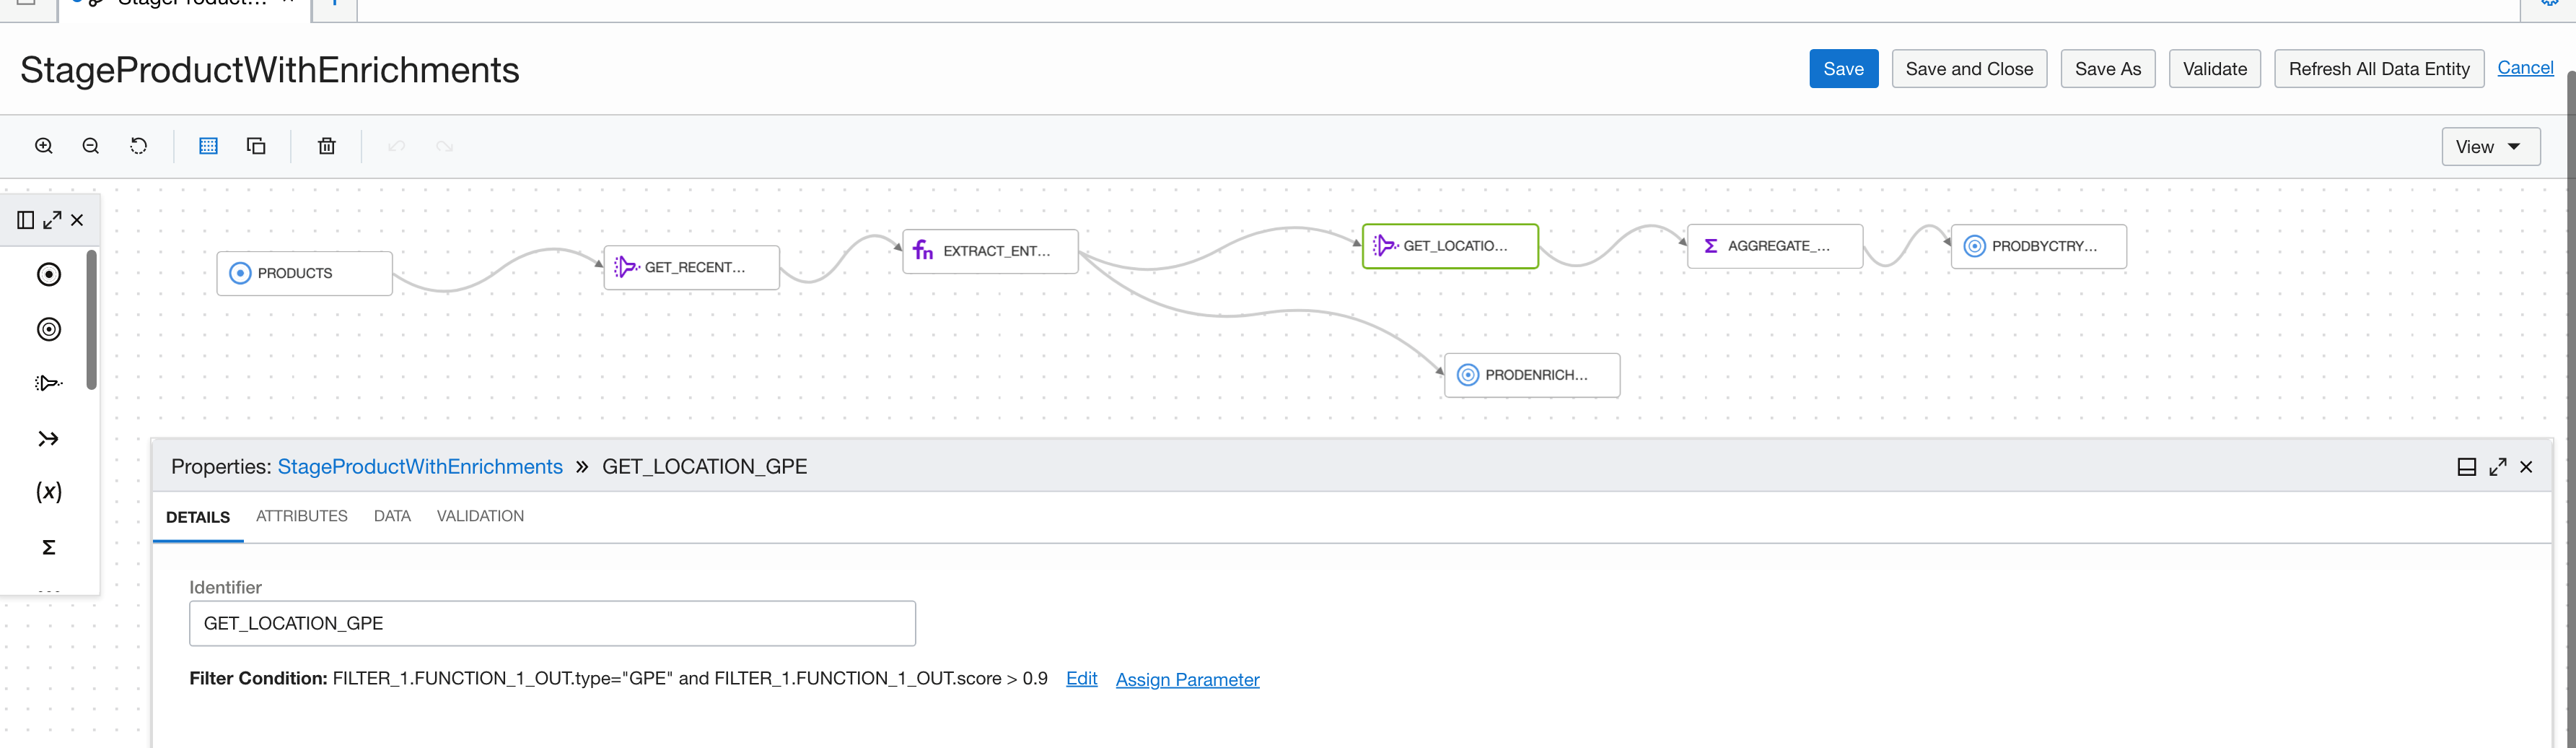
In our filter, we’re filtering to only return the entities with a confidence score greater than 0.9 and the type of entity is geopolitical entity (GPE).
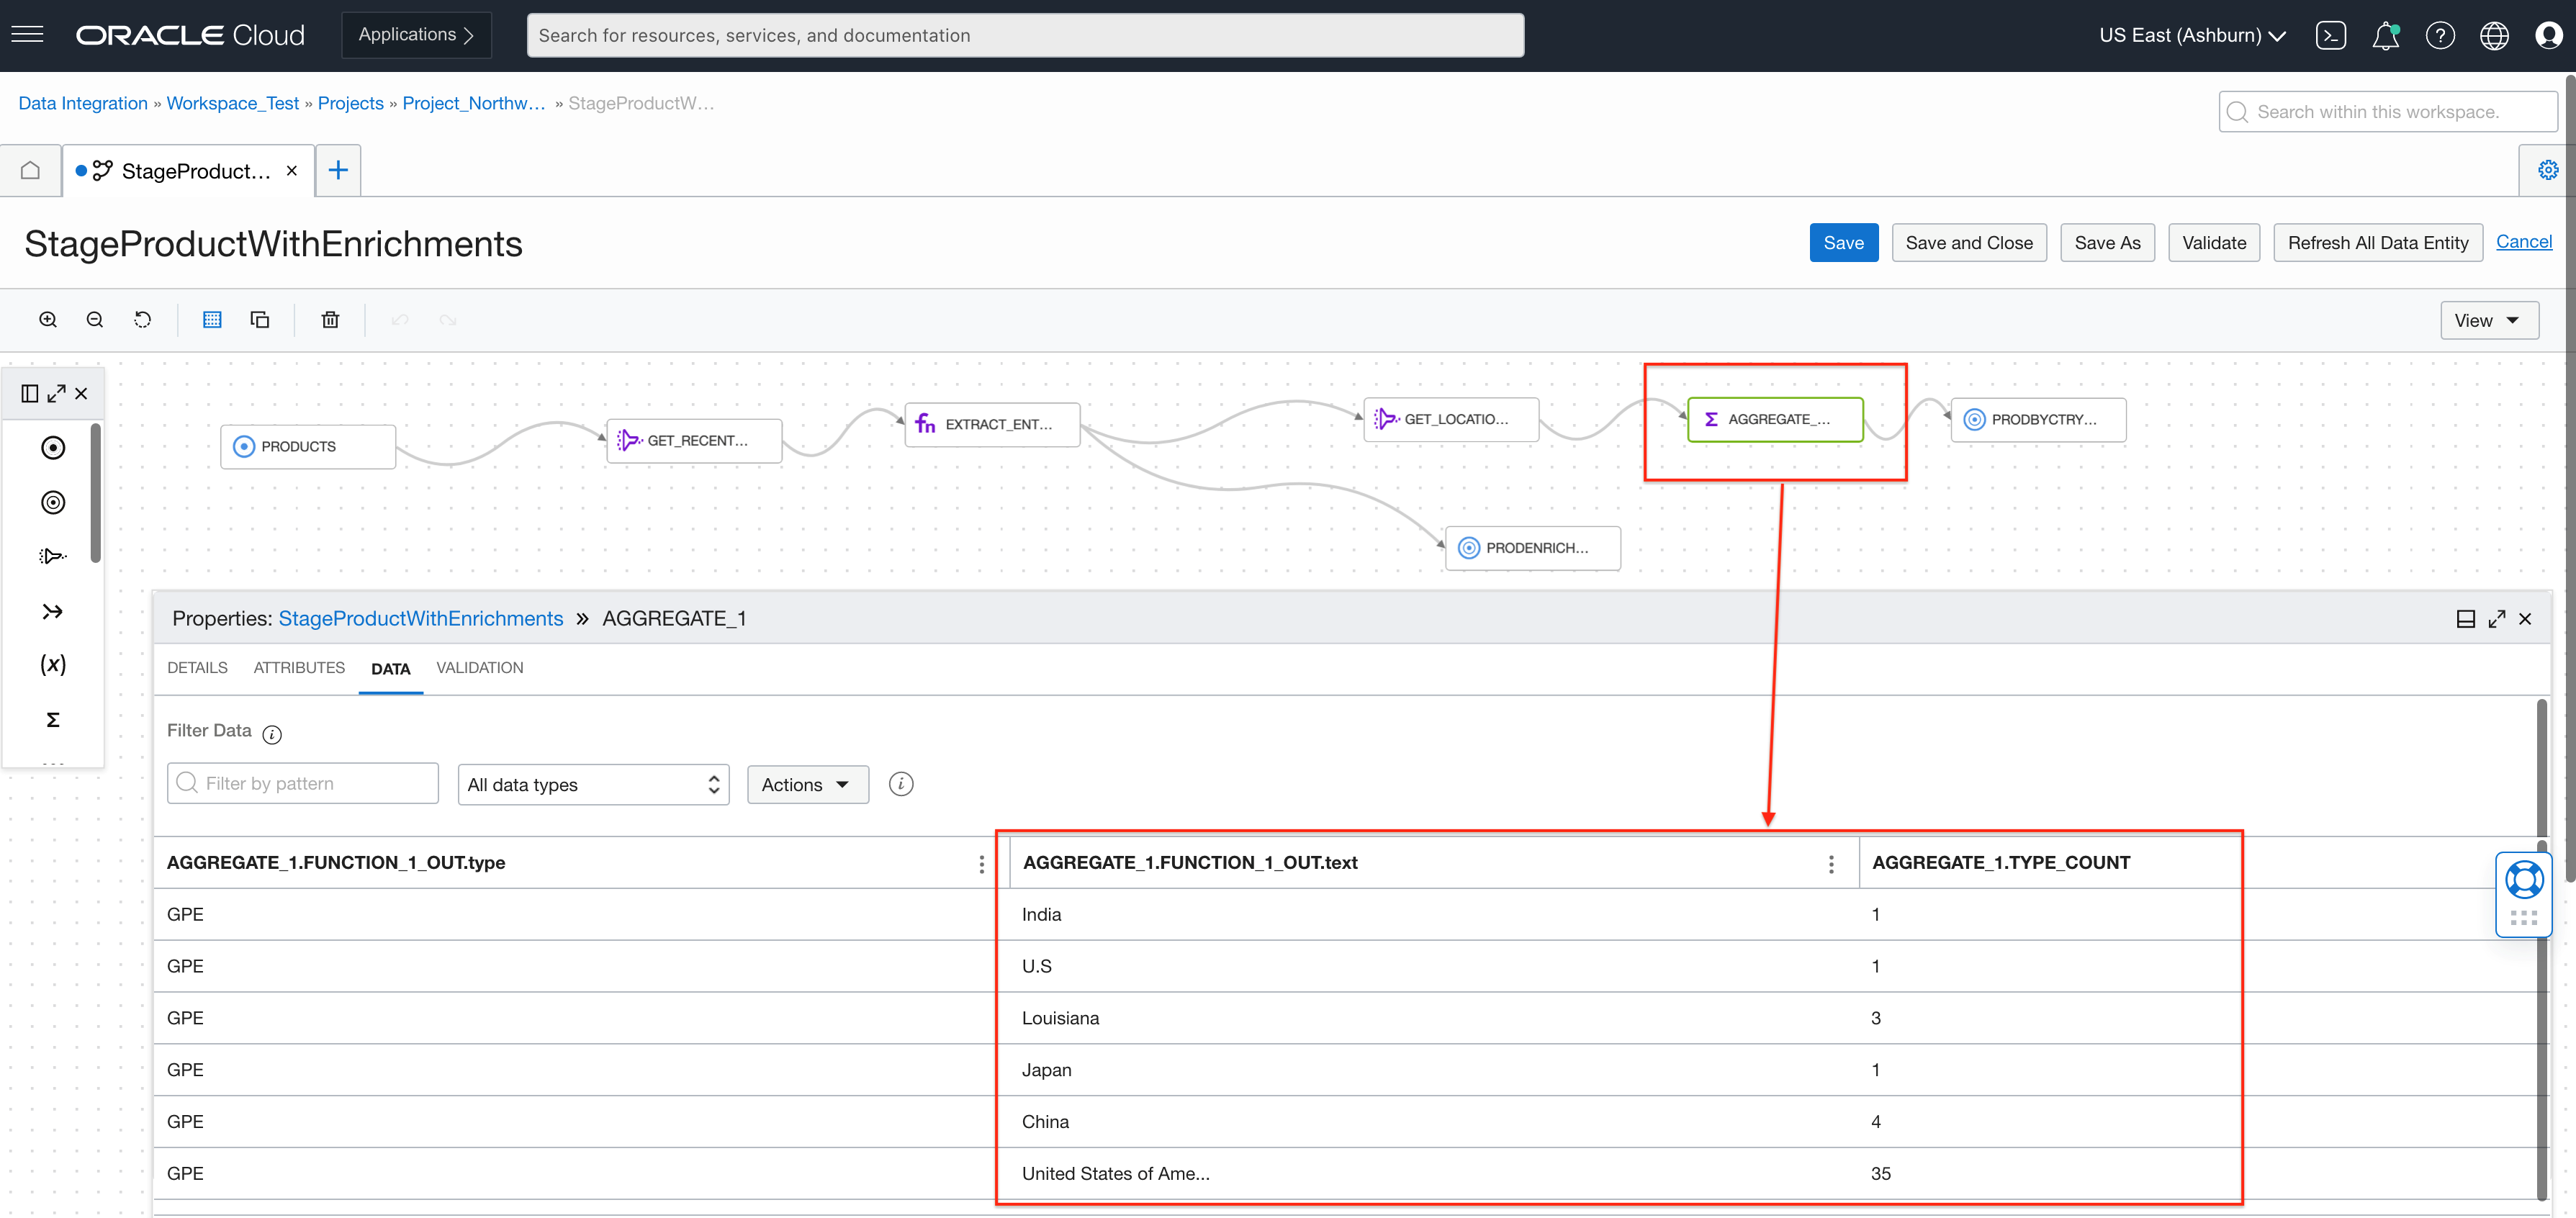
We can then aggregate the entity types to analyze by GPE.
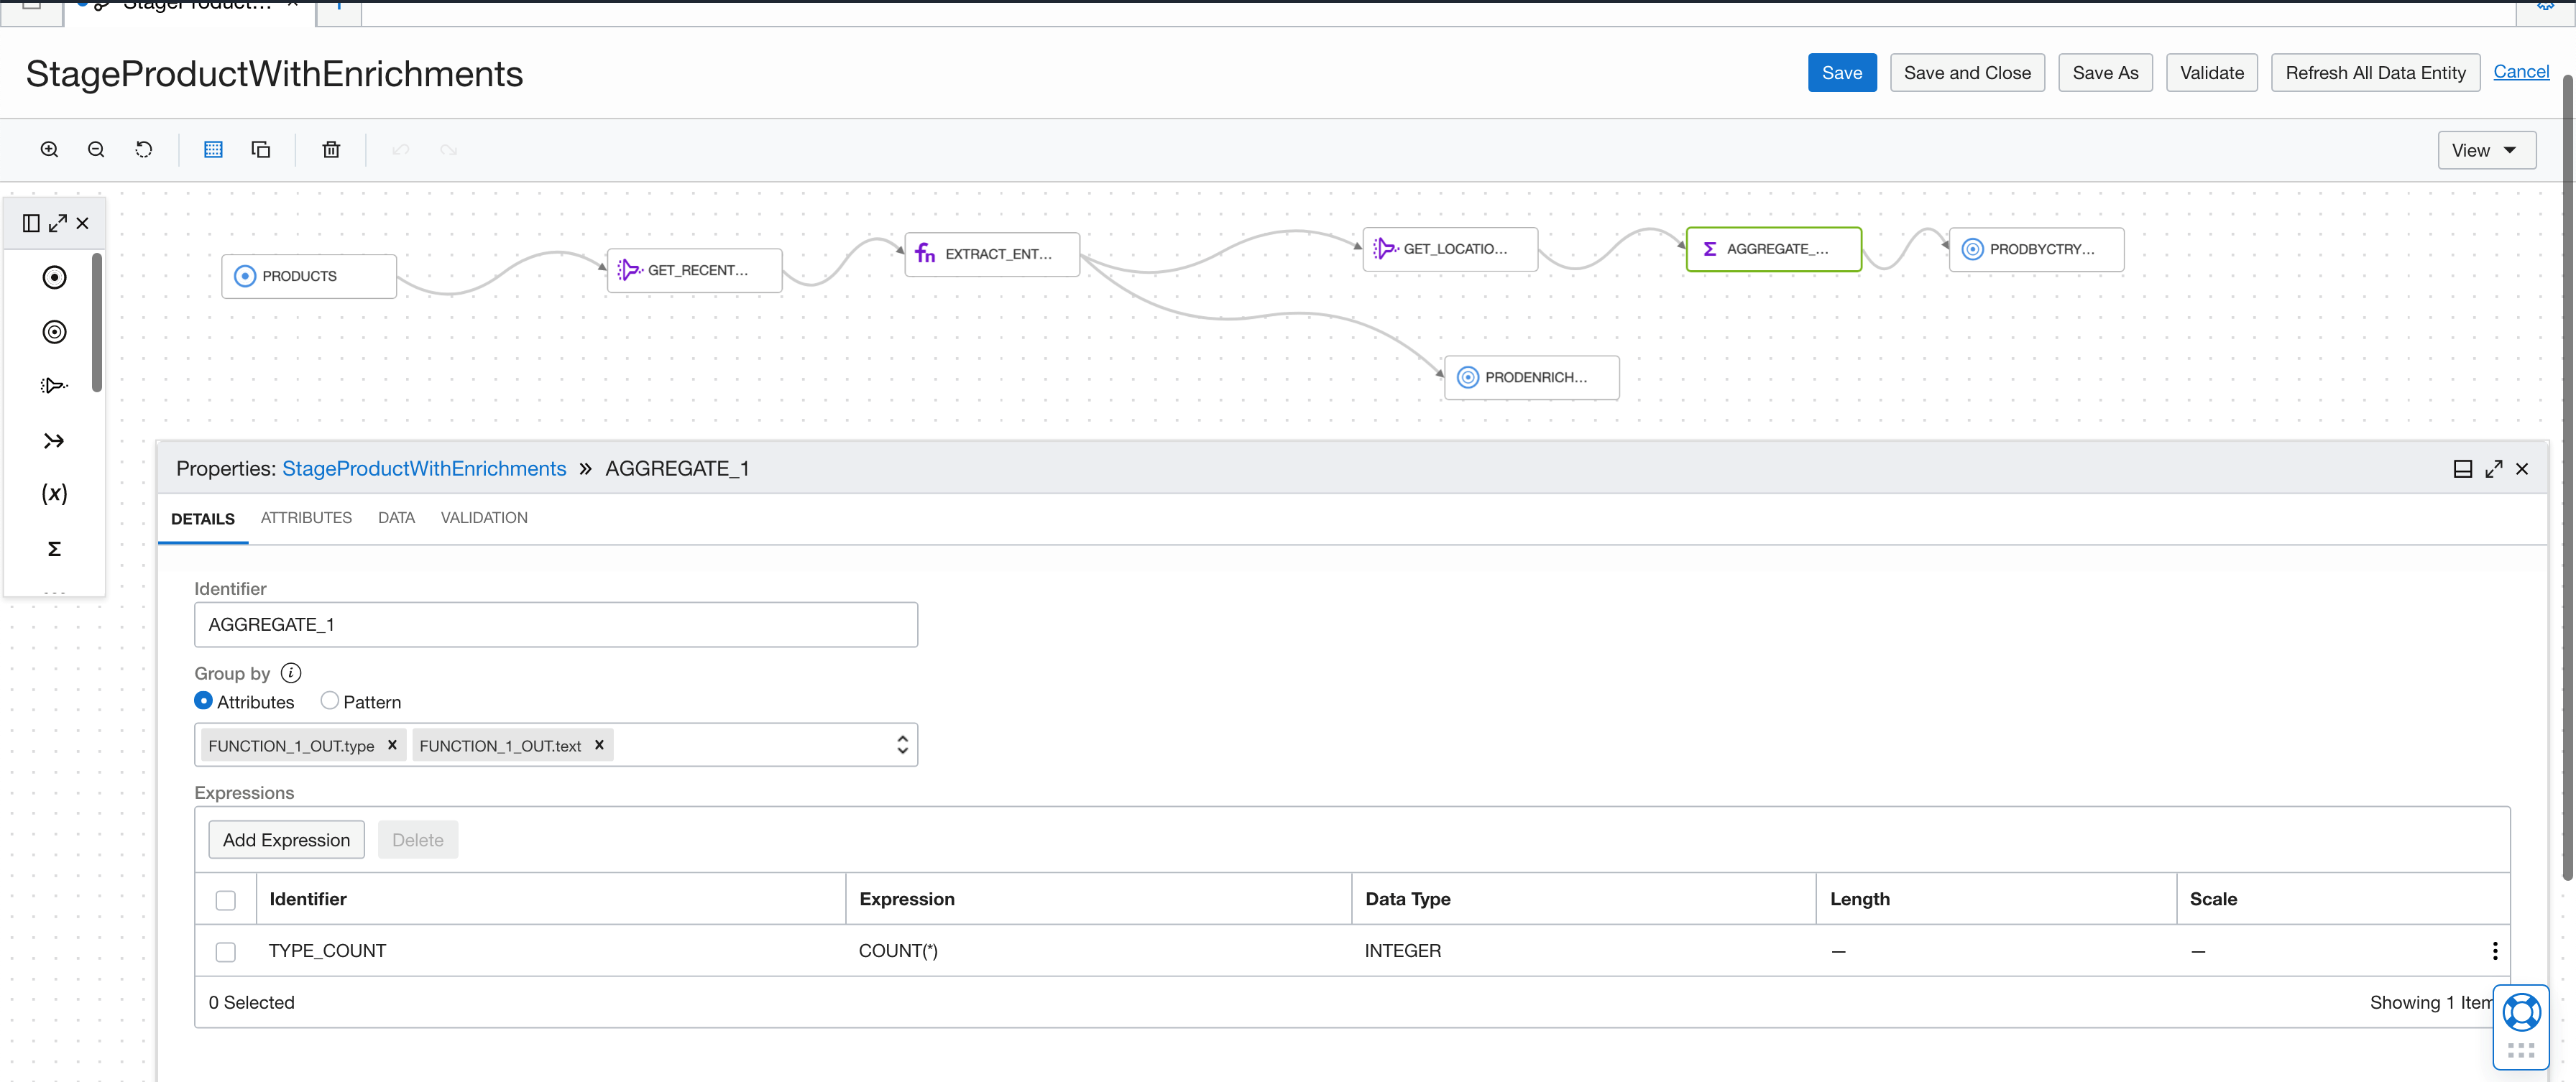
While designing the flow, we can also inspect the data. In the following screenshot, we can see the aggregated counts by geopolitical entities and that products with United States of America are occurring more than others. We write this aggregated information into a target bucket then analyze using Oracle Analytic Cloud or another analytic tool.
Let’s look under the cover and see how the function is built.
OCI Functions for named entity recognition
You can follow the OCI Functions tutorials for creating functions using the Function CLI in CloudShell or install it locally. The three artifacts you need are the Python function, the function YAML, and the requirements file.
import io
import json
import logging
import pandas
import base64

from fdk import response

import oci
from oci.ai_language.ai_service_language_client import AIServiceLanguageClient

def handler(ctx, data: io.BytesIO=None):

    signer = oci.auth.signers.get_resource_principals_signer()
    resp = do(signer,data)
    return response.Response(
        ctx, response_data=resp,
        headers={"Content-Type": "application/json"}
    )

def nr(dip, txt):
    details = oci.ai_language.models.DetectLanguageEntitiesDetails(text=txt)
    le = dip.detect_language_entities(detect_language_entities_details=details)
    return json.loads(le.data.entities.__repr__())

def do(signer, data):
    dip = AIServiceLanguageClient(config={}, signer=signer)

    body = json.loads(data.getvalue())
    input_parameters = body.get("parameters")
    col = input_parameters.get("column")
    input_data = base64.b64decode(body.get("data")).decode()
    df = pandas.read_json(input_data, lines=True)
    df[’enr’] = df.apply(lambda row : nr(dip,row[col]), axis = 1)
    #Explode the array of entities into row per entity
    dfe = df.explode(’enr’,True)
    #Add a column for each property we want to return from entity struct
    ret=pandas.concat([dfe,pandas.DataFrame((d for idx, d in dfe[’enr’].iteritems()))], axis=1)

    #Drop array of entities column
    ret = ret.drop([’enr’],axis=1)
    ret = ret.drop([col],axis=1)

    str=ret.to_json(orient=’records’)
    return str
The function has a JSON input containing two properties: Data (a base-64 encoded stream of JSON records) and parameters (a JSON map with the function configuration names and values). The output returns as an array of JSON records. One important property that also passed into the input and must pass to the output is secret_id_field column. The chunk has a value for each row, which Data Integration uses to correlate results from the function with the upstream input. Your upstream can have 200 attributes, but your function has one input attribute. The secret_id_field correlate the output from this function with that dataset.
The OCI Fn YAML file defines the name for the function, runtime, entrypoint, memory footprint, and timeout (make as long as possible for data integration cases).
schema_version: 20180708
name: namedentityrecognition
version: 0.0.1
runtime: python
entrypoint: /python/bin/fdk /function/func.py handler
memory: 256
timeout: 300
The following Fn requirements.txt file defines the dependencies that the function has:
fdk
pandas
numpy
oci>=2.39.0
Create the OCI Functions application, publish the function, and then you can test the function. The documentation has good tutorials here for OCI Functions to get started.
Common issues
-
If you see blank values or get java.lang.NumberFormatException, check that the attributes you defined on the output match the response from your function, such as case or spelling.
-
When viewing data in your dataflow, you see “com.oracle.bmc.model.BmcException: (-1, null, false) Processing exception while communicating to functions.null.oci.oraclecloud.com (outbound opc-request-id: nnnnnnnn).” Check that you selected a function in the Details panel of the Fn operator within the dataflow in OCI Data Integration.
-
When viewing data in your dataflow and you see something like “com.oracle.bmc.model.BmcException: (502, FunctionInvokeExecutionFailed, false) function failed (opc-request-id: nnnnnn),” check that you have mapped the input attributes of the function.
-
If your function fails, add some log messages for the function.
Conclusion
In this article, we illustrated how to integrate OCI Functions in data flows within OCI Data Integration. We also saw how using OCI Functions can help integrate custom transformations into a data flow to perform data transformation, data enrichment, and many more use cases. We hope that this blog helps as you learn more about Oracle Cloud Infrastructure Data Integration. For more information, check out the tutorials and documentation. Remember to check out all the blogs on OCI Data Integration!