In the first part of this blog series, we created the Linux VM in Oracle Cloud VMware Solution. In the second part of this blog series, we created the two autonomous databases to use for a private connection with the Linux VM from the first blog. In the last part of the blog, we created two Oracle Cloud Infrastructure (OCI) Autonomous Database services databases, one with access through a private endpoint within a VCN and another using access through a service gateway. We installed the Oracle client on the Oracle Cloud VMware Solution virtual machine (VM).
In part 3 of this blog, we configure the DNS and network connectivity for the Oracle Cloud VMware Solution VM to access the autonomous database and test the connectivity.
Step 1: Configure the DNS resolver on NSX to resolve the database DNS name from Oracle Cloud VMware Solution VM
This article is based on the document, Configuring DNS Forwarding in NSX-T.
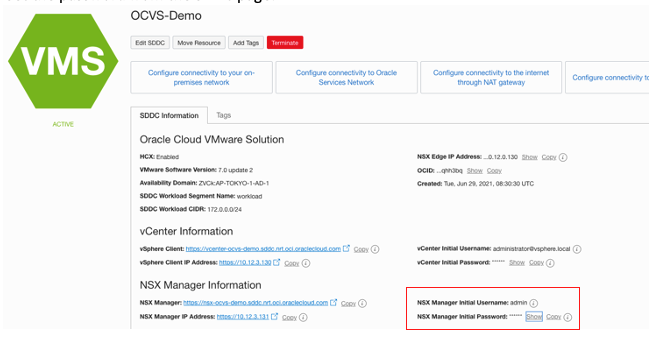
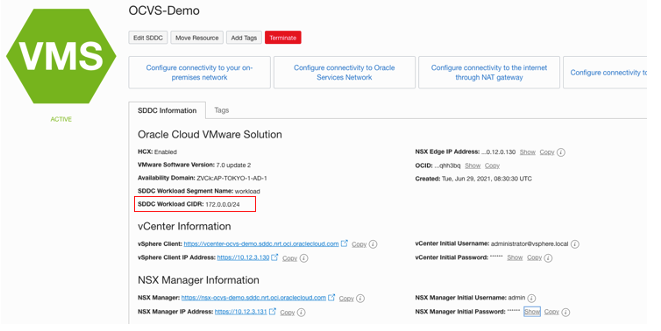
Connect to the NSX Manager from the JumpHost. To get the NSX Manager URL, username and password go to the Oracle Cloud VMware Solution SDDC page:
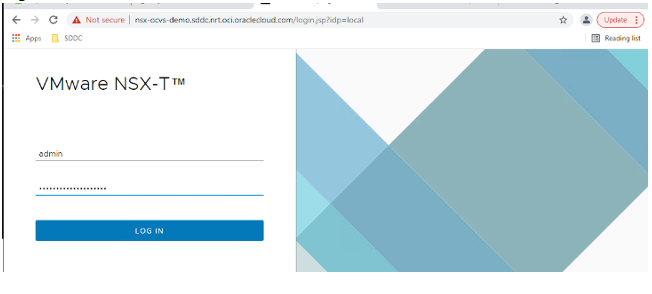
Then log in to the NSX URL.
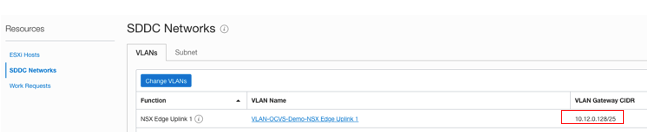
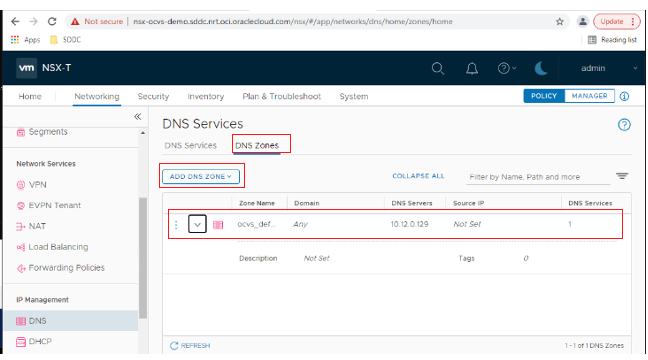
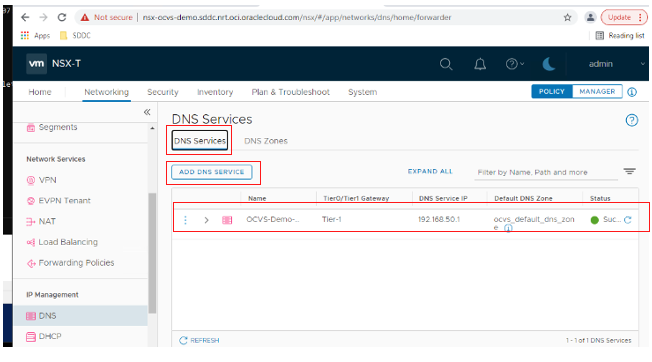
Select Networking, DNS (under IP Management), and DNS Zones. We create a DNS server with the IP address SDDC NSX Edge Uplink 1 VLAN and add one for the DNS Servers. To find out the IP address of the SDDC NSX Edge Uplink 1, go to the software-defined data center (SDDC) Networks section under Resources.
Back at the NSX manager, add a DNS zone with the IP address of the SDDC NSX Edge Uplink 1 and add 1 to the last octet.
Add a DNS service by clicking the DNS Services section and then Add DNS Service. You can use any private IP address that doesn’t conflict with the Oracle Cloud VMware Solution SDDC virtual cloud network (VCN) or SDDC workload network. In this case, I picked 192.168.50.1.
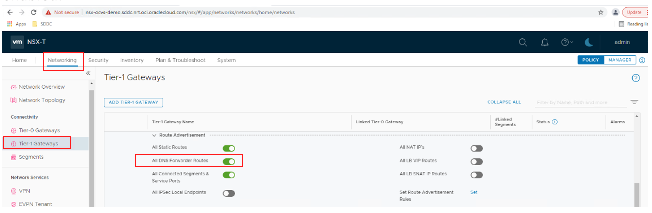
Then go to Networking, and under Tier-1 Gateways ensure that all DNS forwarder routes are enabled.
Then go to Networking, Tier-0 Gateways, and click the three dots. Then click Edit.
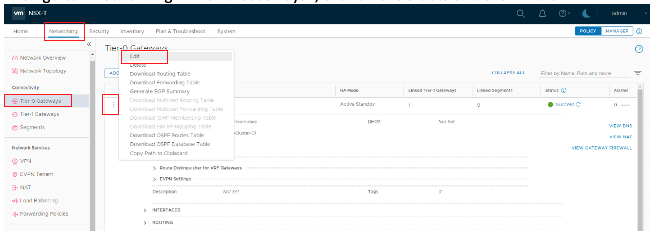
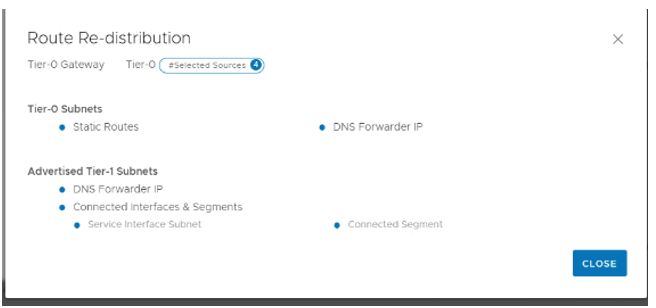
Click the 1 next to “Route Redistribution.”

Click Add Route Redistribution.
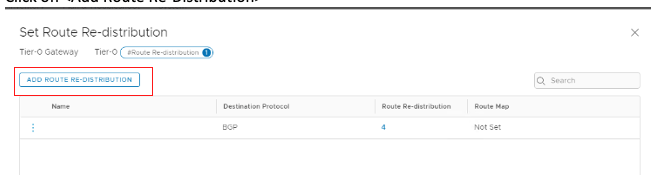
Update the route redistribution according to the following screenshot:
Step 2: Configure network connectivity and test access to Oracle Autonomous Database from Oracle Linux VM
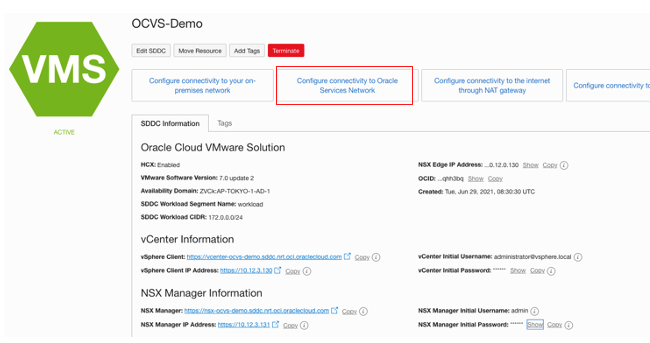
To enable the Oracle Cloud VMware Solution VM access to Autonomous Database through the service gateway, click Configure connectivity to Oracle Service Network on the Oracle Cloud VMware Solution cluster page.
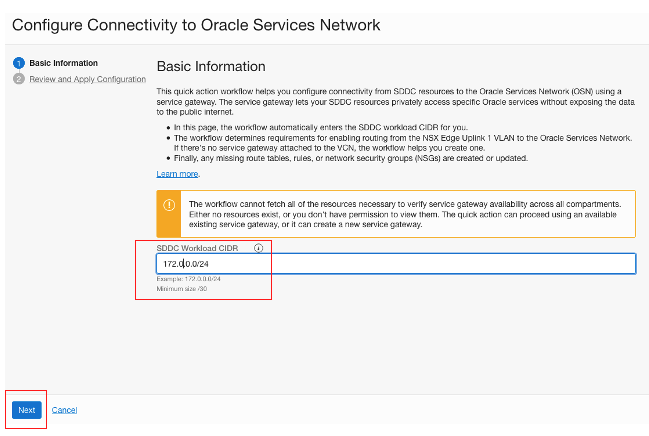
Enter the SDDC workload CIDR from the Oracle Cloud VMware Solution page and click Next.
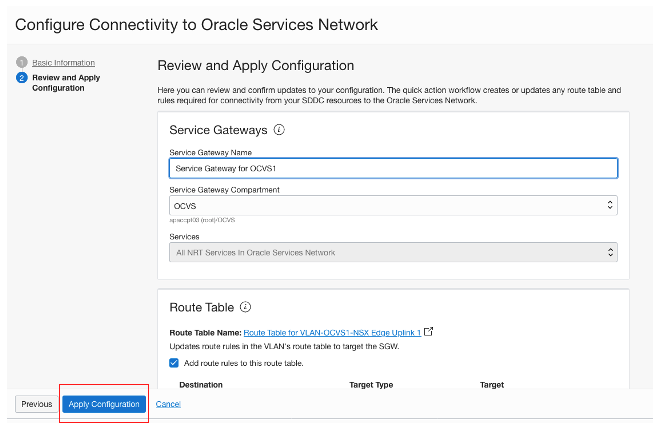
Review the connectivity information and click Apply Configuration.
On the target VM, unzip the two wallet ZIP files and extract the value for host from the tnsnames.ora to test connectivity to the host using the following commands.
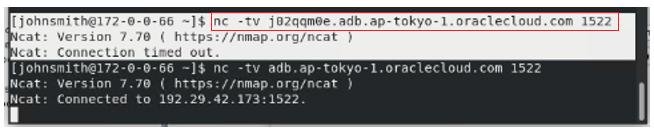
% nc -tv j0qqm02.adb.ap-tokyo-1.oraclecloud.com 1522 # database connectivity by VCN

% nc -tv adb.ap-tokyo-1.oraclecloud.com 1522 # database connectivity by service gateway
The connectivity to the database through the VCN isn’t working. However, connectivity to the database with connectivity setup through the service gateway is working.
If the DNS resolution for the host name isn’t resolving, check that the file on the virtual machine /etc/resolv.conf has the following entry for the DNS Service IP (in this case 192.168.50.1). You might need to reboot the VM. If the entry isn’t there, you might need to add it manually and then check that the hostname resolves using the previous commands.
% cat /etc/resolv.conf
# Generated by NetworkManager
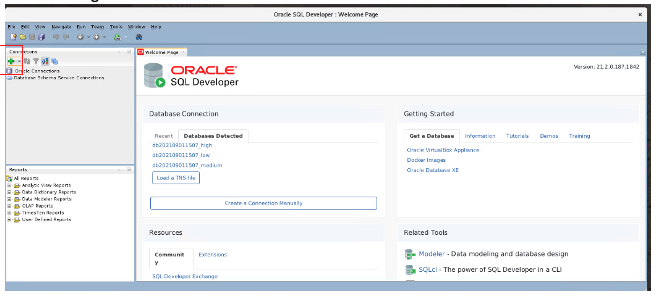
nameserver 192.168.50.1Go to the VM and open SQL Developer. Click the + sign, as shown within the Oracle SQL Developer application.
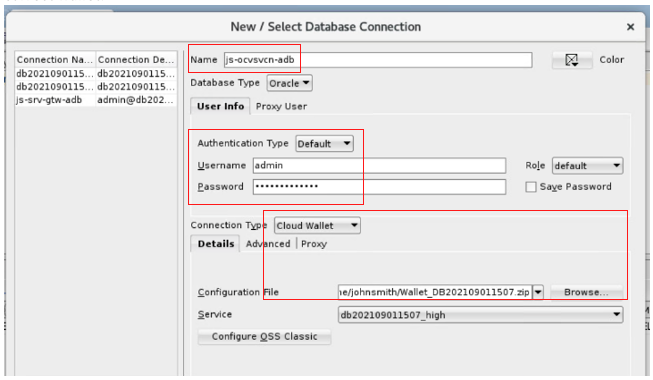
Enter the new database connection details.
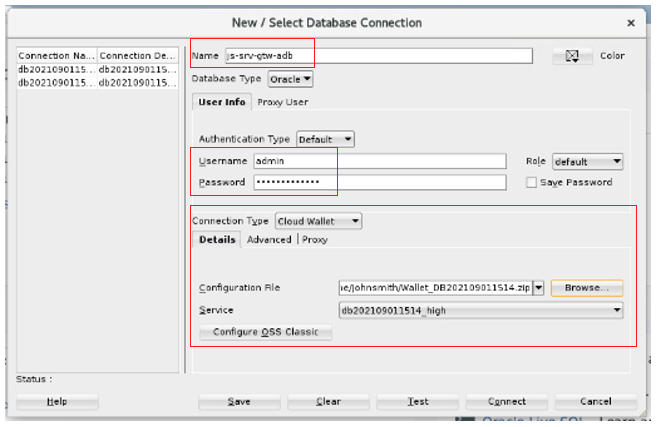
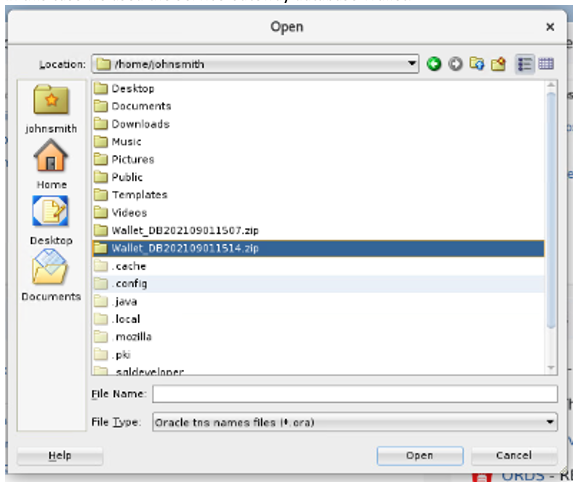
Enter the database name, admin username, and password. Choose cloud wallet for the connection type and click Browse to choose the wallet file. In this case, we use the autonomous database configured with access using the service gateway wallet.
Ensure that the connectivity to the database configured with connectivity through the service gateway is working.
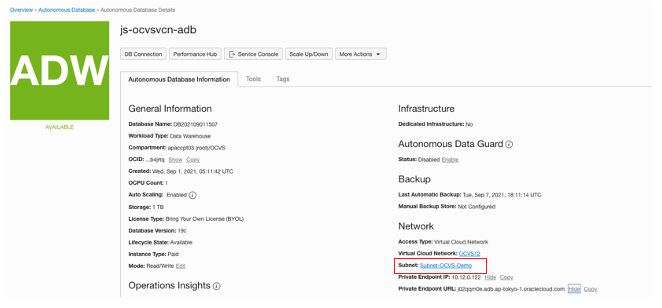
To fix the connectivity for the database “js-ocvsvcn-adb,” go to the database page and click the subnet. In this example, we use Subnet-Oracle Cloud VMware Solution-Demo.
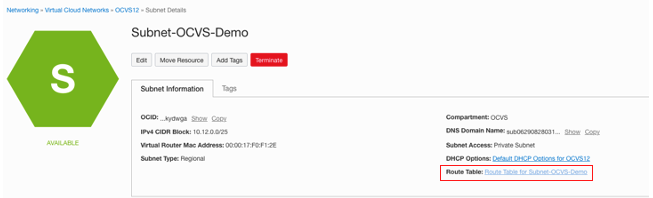
On the subnet page, click the route table. Our example uses “Route Table for Subnet-Oracle Cloud VMware Solution-Demo.”
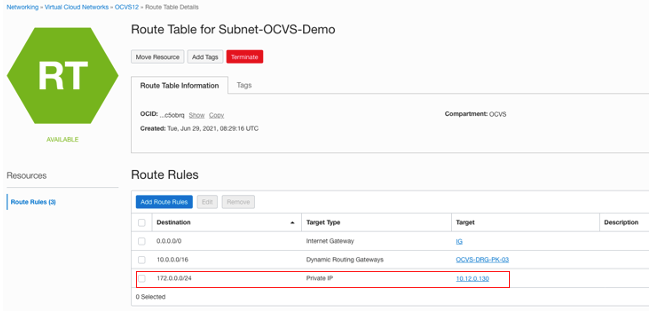
On the route table, add a route for the SDDC Workload CIDR block that points to NSX Edge.
To view the SDDC workload CIDR, go to the Oracle Cloud VMware Solution cluster page.
This time, connectivity to the database endpoint works. The IP address is the private endpoint IP address of the database.
% nc -tv 10.12.0.122 1522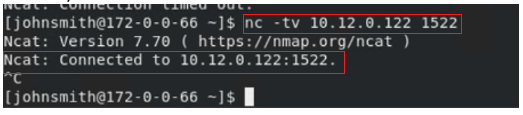
Back to the VM, in Oracle SQL Developer, click the + sign to add a connection. Enter the autonomous database configured with private endpoint wallet details.
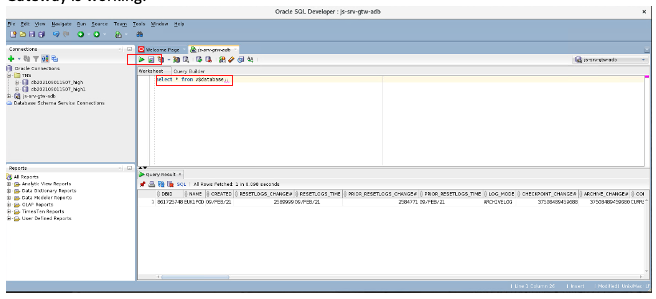
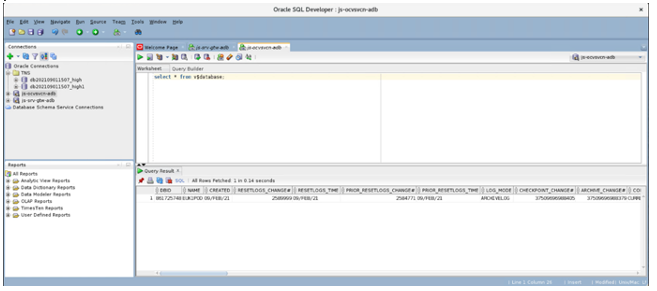
A new query builder session is created. Enter the following query:
Select * from v$database Click the green arrow button to get the following output:
This example demonstrates a successful connection from the OCI Oracle Cloud VMware Solution virtual machine to Oracle Autonomous Database using a VCN private endpoint and Oracle Autonomous Database using a service gateway.
Want to learn more?
For more information about Oracle Cloud VMware Solution and Autonomous, see the following resources: