Oracle Container Engine for Kubernetes (OKE) is a great service to host your microservices because it provides a certified Kubernetes environment to deploy custom applications and allows your application to utilize the full range of native Oracle Cloud Infrastructure (OCI) services. As the complexity of your application grows, you might want to consider introducing fine-grained security for your pods to access OCI services, such as Object Storage, Streaming, Database, and other services.
NOTE: As of March 2023, OKE now supports workload (pod) identity as a first class feature. Please refer to this blog for details on how to configure workload identity. You should use this new, productized approach moving forward.
Background
Suppose that you’re developing containerized applications and hosting them on Oracle Container Engine for Kubernetes. Your custom code, running inside a Kubernetes pod, needs fine-grained access to OCI services, such as Streaming, Object Storage, or Cloud Functions.
For example, some portion of your application can handle accounts receivable data while another portion handles accounts payable. For compliance purposes, you’ve segregated this data into two separate Object Storage buckets with different policy-based permissions. How do you control access so that pods hosting payables microservices can only access the payables bucket, while pods hosting receivables microservices can only access the appropriate bucket?
You can create a service account in OCI Identity and Access Management (IAM) service and inject those credentials into your microservices using a Kubernetes Secret so that your code can use them to authorize through the OCI software development kit (SDK). You can make Kubernetes Secrets in OKE even more secure by encrypting them at rest using OCI Vault. However, many organizations frown upon the use of service accounts, and utilizing this approach still requires you to manage credentials as part of your continuous integration and deployment (CI/CD) process, handle them securely in your code, and implement password rotation and revocation
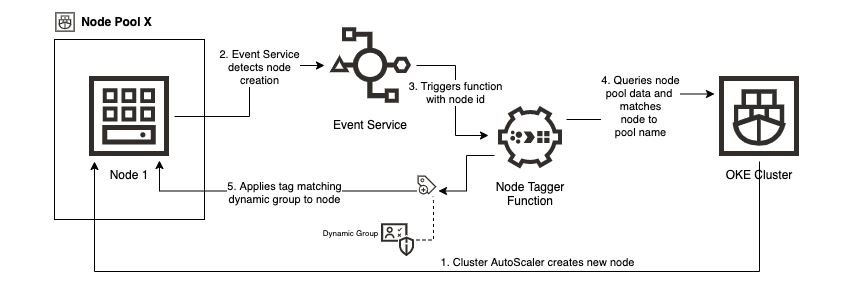
A more sophisticated approach uses the power of OCI instance principals to remove the need to create service accounts or pass credentials, instead tying authorization to a dynamic group based on tags. These groups are applied to the worker nodes within distinct OKE node pools and the matching of pods with the appropriate node pools by using node selector capabilities. This approach is described in the OKE documentation under the Controlling Which Nodes Pods May Access and Limit Access Given to Instance Principals sections and can be visualized in the following diagram:

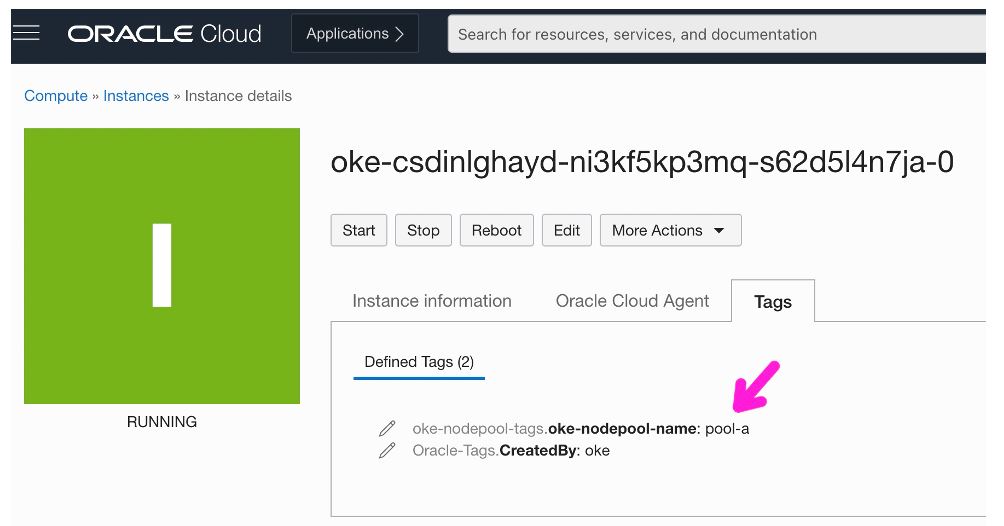
When creating an OKE node pool, the name of the node pool is automatically associated as a Kubernetes label. You can add more custom labels.
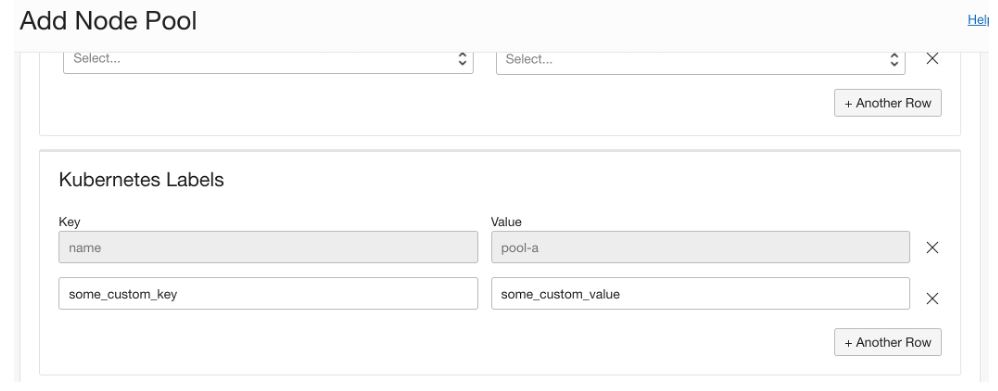
However, you can’t tag node pools and dynamic groups must target a tagged resource, so you must tag each Compute instance within the pool with the same Kubernetes label. This process is straightforward if you run a statically sized OKE cluster, but what if you have a dynamically growing and shrinking cluster that takes advantage of the Cluster Autoscaler?
With nodes constantly being added and removed, you can introduce automation to detect node creations, match the node to the appropriate node pool, and annotate the node with a tag matching the node pool’s Kubernetes label to give it membership in the correct dynamic group. Keep reading to learn this process!
Prerequisites
Provision an OKE cluster to use for your application. This sample demonstrates the concepts using a cluster with two node pools named pool-a and pool-b. As a starting point, these pools have no nodes in them. This example assumes that you have a working understanding of Oracle Cloud Functions and experience working with OCI identity constructs, such as policies and dynamic groups.
You also need the latest version of the OCI command line interface (CLI) installed and configured or to use the auto-configured version provided for you by OCI Cloud Shell. You can customize all names (node pool names, tag names, dynamic group names, function names, and so on) when you integrate into your own environment.
Finally, this blog comes with an accompanying GitHub repository, which contains the Cloud Functions code used in this example and a test harness to verify the installation. Clone the repository to your desktop or Cloud Shell environment for when we use it later in the blog.
Configuring your environment
The following steps guide you through configuring the automation depicted in the following diagram:
You need a tag namespace and defined tags to apply to your worker nodes and to build your dynamic group from. Start by running the following CLI commands to create a tag namespace named oke-nodepool-tags and a tag key called oke-nodepool-name. Replace mycompartment with your compartment OCID in the first command (creating the tag namespace) to use output to replace mytagnamespaceid with the OCID of the namespace that you created in the second command.
oci iam tag-namespace create --compartment-id "ocid1.compartment.oc1..mycompartment" --name "oke-nodepool-tags" --description "Namespace for OKE nodepool instances"
oci iam tag create --tag-namespace-id "ocid1.tagnamespace.oc1..mytagnamespaceid" --name "oke-nodepool-name" --description "Name of the OKE nodepool this instance is associated with"Next, create dynamic groups that use the tags that you defined as criteria for node inclusion. As in the previous commands, replace ‘mycompartment’ with your compartment OCID.
oci iam dynamic-group create --name "oke-pool-a-dg" --description "All worker nodes in OKE pool-a" --matching-rule "All {instance.compartment.id='ocid1.compartment.oc1..mycompartment',tag.oke-nodepool-tags.oke-nodepool-name.value='pool-a'}"
oci iam dynamic-group create --name "oke-pool-b-dg" --description "All worker nodes in OKE pool-b" --matching-rule "All {instance.compartment.id='ocid1.compartment.oc1..mycompartment',tag.oke-nodepool-tags.oke-nodepool-name.value='pool-b'}"You have now set up the infrastructure necessary to group nodes together using tags and to relate them to match the Kubernetes label assigned to your OKE node pool. Next, you need to prepare your serverless function to automatically tag nodes appropriately.
Implement the automation
Create a dynamic group to match functions created in your compartment. Run the following command, replacing mycompartment with your compartment OCID and xxxx with your compartment name.
oci iam dynamic-group create --name "all-functions-in-xxxx-compartment" --description "All functions in compartment xxxx" --matching-rule "All {resource.type = 'fnfunc', resource.compartment.id='ocid1.compartment.oc1..mycompartment'}"Next, write policy to permit functions in your compartment to use tag namespaces, read resources in the compartment, and update instance metadata. These fine-grained permissions allow your function to use the OCI SDK to read data about existing tag namespaces and tags, interrogate the OKE service to learn about node pool labels, and update tags applied to Compute instances. The policy has been written to grant the function only the permissions that it needs to do its job—no more or less. As in the previous step, replace your mycompartment with your compartment OCID and xxxx with your compartment name.
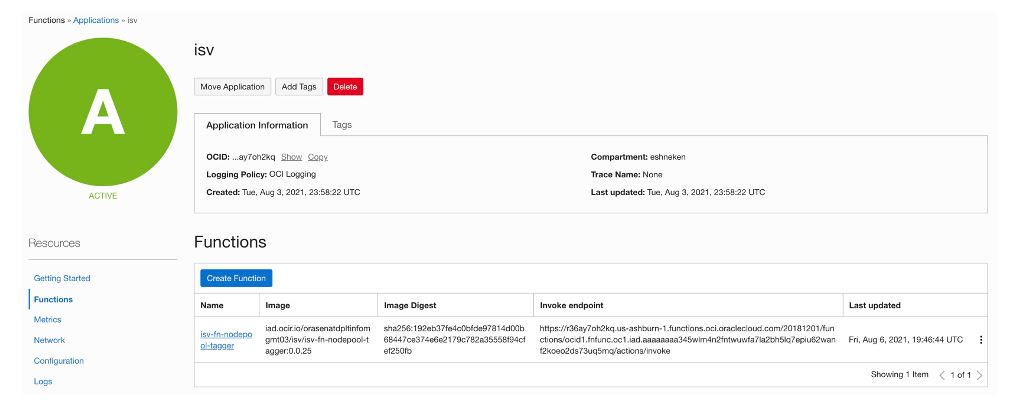
oci iam policy create --compartment-id "ocid1.compartment.oc1..mycompartment" --name "all-functions-in-xxxx-policy" --description "Permissions for function resources in xxxx compartment" --statements '["Allow dynamic-group all-functions-in-xxxx-compartment to use tag-namespaces in compartment xxxx","Allow dynamic-group all-functions-in-xxxx-compartment to read all-resources in compartment xxxx", "Allow dynamic-group all-functions-in-xxxx-compartment to manage instance-family in compartment xxxx"]'Now, we can create the function itself. The easiest way to do is to follow Functions Quick Start guide (either using Cloud Shell or your local environment) to get through all the steps before deploying the function. At this point, you want to swap out the contents of the directory created during the quick start process with the contents of the function directory in the repository supporting this blog. After you swap the code, complete the Quick Start process by deploying the function (Don’t worry about the final ‘invoke’ step).
You can now see your function visible in the OCI Console.
Complete the setup in the Console by selecting Logs and enabling logging.

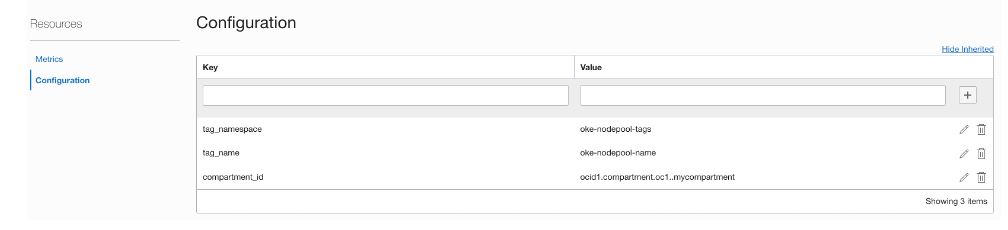
Select the function’s configuration, populate values for the tag_namespace, tag_name, and compartment_id, and replace ‘mycompartment’ with the OCID of your compartment.
Before you get too far, review the code that you deployed inside func.go. Every time the function is invoked, it receives the instance OCID of the Compute instance being provisioned through a CNCF Cloud Event message, triggered by the OCI Events service. It then uses the OCI SDK to query all OKE node pools, iterate through each node pool, and examine each node. If the triggering OCID matches the OCID of a node in the pool, the function retrieves the OKE label corresponding to the node pool’s name and applies it as a tag to the instance. This little piece of glue is the automated linkage that ties a node tag to a node pool identity and that implicitly grants the nodes (and pods running inside them) access to permitted resources.
The final piece of the puzzle is configuring a cloud event to detect provisioning of a new worker node because of a manual scaling operation triggered through the Console or from a Cluster AutoScaler scaling signal. Replace ‘mycompartment’ with the OCID of your compartment and ‘myfunction’ with the OCID of your newly created function.
oci events rule create --compartment-id "ocid1.compartment.oc1..mycompartment" --display-name "isv-nodepool-tagger" --description "On detect of compute instance creation check to see if it is part of an OKE nodepool and if a match exists tag the instance with the name of the nodepool" --is-enabled true --condition "{\"eventType\": [\"com.oraclecloud.computeapi.launchinstance.end\"]}" --actions "{\"actions\": [{\"action-type\": \"FAAS\",\"description\": null,\"function-id\": \"ocid1.fnfunc.oc1.iad.myfunction\",\"is-enabled\": true}]}"Test the solution
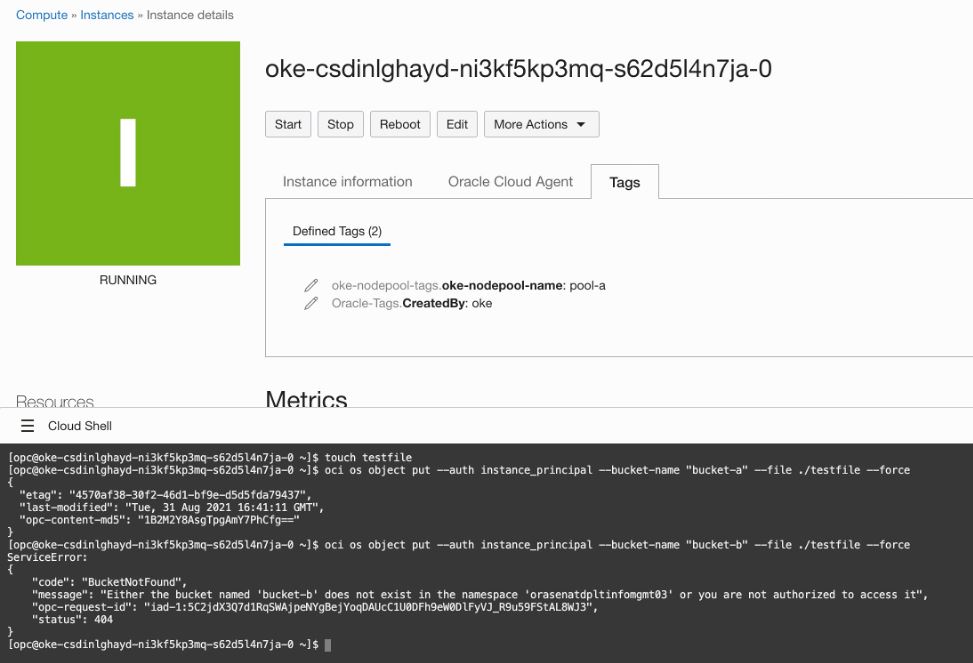
Start by creating two buckets (bucket-a and bucket-b) and write policy that enables the nodes in pool-a (dynamic group oke-pool-a-dg) to interact only with bucket-a and nodes in oke-pool-b-dg to interact only with bucket-b. Replace mycompartment with the OCID of your compartment and xxxx with the name of your compartment.
oci os bucket create --compartment-id "ocid1.compartment.oc1..mycompartment" --name "bucket-a"
oci os bucket create --compartment-id "ocid1.compartment.oc1..mycompartment" --name "bucket-b"
oci iam policy create --compartment-id "ocid1.compartment.oc1..mycompartment" --name "oke-nodepool-bucket-test-policy" --description "oke-pool-dg-a -> bucket-a and oke-pool-dg-b -> bucket-b" --statements '["Allow dynamic-group oke-pool-a-dg to manage objects in compartment xxxx where all {target.bucket.name='\''bucket-a'\''}","Allow dynamic-group oke-pool-b-dg to manage objects in compartment xxxx where all {target.bucket.name='\''bucket-b'\''}"]'You’re now ready to test the solution. First, convince yourself that this solution works at the node level. Scale up your node pools so that each of the two pools has a single node in it. Start by verifying that the event triggered the function and that your nodes were tagged appropriately.
As a first order test, SSH into the node associated with pool-a and use the OCI CLI to push a file to bucket-a and then to bucket-b. The first push succeeds, and the second fails. The inverse test works when SSHing into the node associated with pool-b.
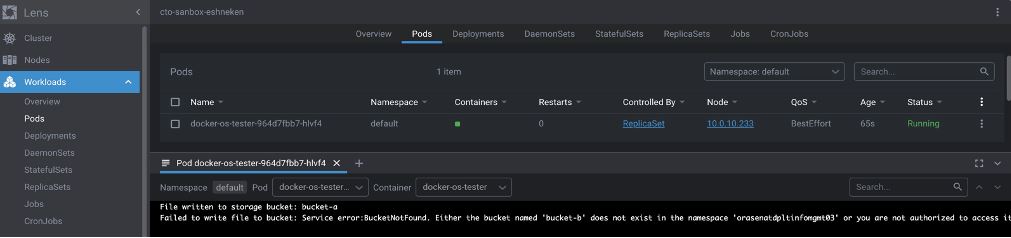
Now we know that InstancePrincipal authentication and authorization are working properly at the node level. Let’s verify that a pod running on a given node also inherits the appropriate permissions. Navigate to the Kubernetes test harness in the repository supporting this blog and ensure that you have a copy of it cloned locally.
Start by examining the code in directory to understand the following key components:
-
main.go: Code using the OCI SDK that does the same operations that you previously did using the CLI. It authenticates, writes a small file, attempts to write the file to bucket-a, and then attempts to write to bucket-b.
-
Dockerfile: A docker configuration that builds main.go on a slim Alpine Linux image with golang preinstalled and runs it on startup.
-
deploy-to-oke.yaml: A Kubernetes deployment that starts a single replica of the tester application. The nodeSelector targets this deployment specifically to node pool-a. Before running, edit the image containers and note the imagePullSecrets that references the name of Kubernetes Secret that provides access to the image repository.
For the remainder of this process, you need a development environment configured for Docker development and that has the Kubernetes command line (kubectl) installed and configured to point to your OKE environment. You can use OCI Cloud Shell, which has these binaries preinstalled, although you still need to configure kubectl access.
Ensure that you have a secret deployed to OKE that references the repository that you use for this deployment. In this example, I use Oracle Container Register (OCIR) and follow this process to create a secret. Create an IAM auth token to pass into the secret command.
Run the following command to create a secret and replace myregion, mytenancyname, my.name@email.com, and myauthtoken with the values appropriate to your environment.
kubectl create secret docker-registry ocirsecret \
    --docker-server=myregion.ocir.io  \
    --docker-username='mytenancyname/oracleidentitycloudservice/my.name@email.com' \
    --docker-password='myauthtoken'  --docker-email='my.name@email.com'
Next, build the tester code into a docker image by running a build command and then push to OCIR with a docker push. In both commands, replace myregion and mytenancyname with the appropriate values for your environment.
docker build --tag myregion.ocir.io/mytenancyname/isv/docker-os-tester.
docker push myregion.ocir.io/mytenancyname/isv/docker-os-testerFinally, edit deploy-to-oke.yaml and the image tag to replace myregion and mytenancyname. Deploy to OKE by running the following command:
kubectl apply -f deploy-to-oke.yamlYou’re now ready to verify the results. According to the deployment specification, your image deploys to a node in pool-a and tries to write an object first to bucket-a and then bucket-b. Based on the permissions that we defined, we expect the first operation to succeed and the second to fail.
Use whatever tools you prefer to examine the k8s pod logs. You can use kubectl or, as I prefer, a Kubernetes IDE like Lens. In my results, you can see that our test worked exactly as expected:
Summary
While OKE doesn’t support pod identity as a first-class feature, we have seen that you can assign finely grained IAM permissions to pods running inside OKE. We’ve also seen that you can use Oracle Cloud Infrastructure Events and Functions services to automate the mapping of worker nodes into the correct IAM dynamic groups in an autoscaled environment to facilitate the scalable deployment of these types of applications on OKE.