Finding solutions to access cloud resources with the least amount of privilege can be a challenge. To solve this problem, we’re pleased to announce the general availability of Oracle Container Engine for Kubernetes (OKE) Workload Identity. This feature provides fine grained enterprise-grade identity and access management control. It also allows you to grant Kubernetes pods policy-driven access to Oracle Cloud Infrastructure (OCI) resources using OCI Identity and Access Management (IAM).
When applications require access to OCI resources, Workload Identity enables you to write OCI IAM policies scoped to the Kubernetes service account associated with application pods. This feature enables the applications running inside these pods to directly access the OCI API, based on the permissions provided by the policies. The OCI Audit service also automatically tracks all API calls that the Kubernetes workloads make from your cluster.
With Workload Identity, you no longer need to store credentials as secrets in your Kubernetes cluster or rely on OCI dynamic groups for worker node policy-driven access to OCI resources.
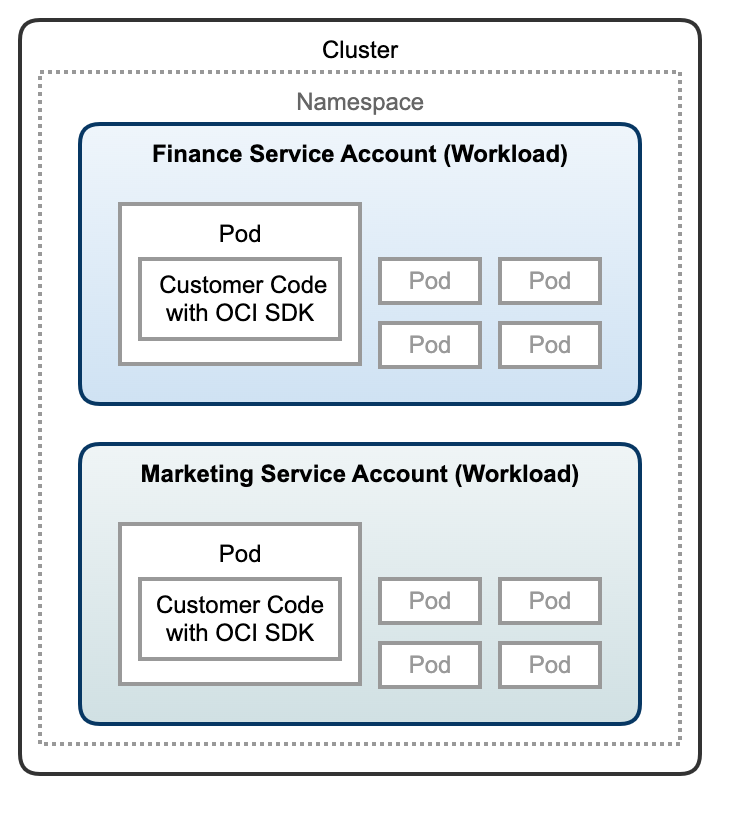
What is a workload?
A workload is an application running on Kubernetes. It can be comprised of a single component or several components that work together running inside a set of pods. Associate every pod in a workload with the same service account, which binds those pods to cluster role permissions and grants them access to Kubernetes resources. This feature then enables users to grant OCI resource permissions to an entire workload using the standard OCI policy configuration. A new plugin component enable authorization for the workloads. The following illustration shows how a workload fits into the context of a cluster.
Customer use case and benefits
Imagine that you have a containerized application that needs to connect to an OCI block volume to access application data, and your Security team requires that you follow the principle of least privilege to access cloud resources from your Kubernetes cluster without storing secrets. Your current solution uses instance principals. Instance principals enables worker nodes to be authorized actors (or principals) to perform actions on OCI resources. Using instance principals, you can isolate workloads across node pools with different OCI dynamic groups so that pods in each node pool have the minimal set of privileges. However, this solution forces you to distribute pods to specific worker nodes to ensure that least privilege access to the block volume is restricted to authorized pods.
With Workload Identity, you can now specify access at the pod level, enabling you to run pods on any worker node in your cluster. Now you need fewer worker nodes, decreasing your total cost of ownership (TCO) of your Kubernetes cluster.
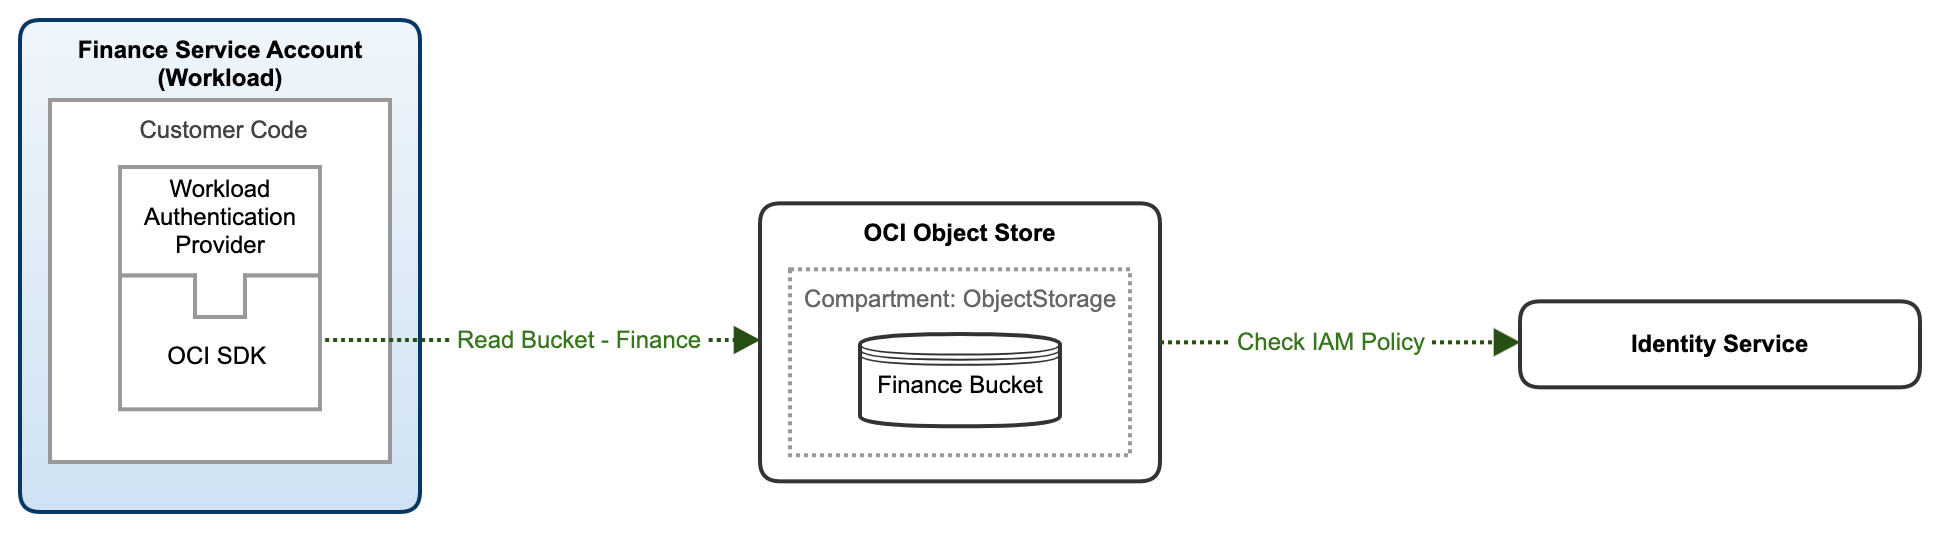
Accessing OCI Object Storage buckets with OKE Workload Identity
To get started using Workload Identity on an OKE cluster using the OCI Go software developer kit (SDK), let’s look at the following example.
Prerequisites
This tutorial requires an existing OKE cluster. To get started with OKE cluster creation, visit Using the Console to create a Cluster with Default Settings in the ’Quick Create’ workflow.
Tutorial

-
In your OKE cluster, note the cluster OCID, which you need for the workload policy creation. You can retrieve your cluster OCID from the Oracle Cloud Console under Cluster Details.
-
Create a namespace to use for the Kubernetes service account. You can also use the default namespace or any existing namespace. In this example, we create the “Finance” namespace with the following command:
kubectl create namespace finance -
Create a Kubernetes service account for your application to use. In this example, we create the Kubernetes service account named “FinanceServiceAccount” in the Finance namespace with the following command:
kubectl create serviceaccount financeserviceaccount \ --namespace finance -
Create the OCI IAM policy to use Workload Identity. Update your policies to use Workload Identity from your OKE cluster. The following policy permits the Kubernetes workload to manage OCI Object Storage buckets in the tenancy.
Allow any-user to manage objects in tenancy where all {request.principal.type=’workload’,request.principal.namespace =’finance’,request.principal.service_account = ’financeserviceaccount’,request.principal.cluster_id = ’ocid1.cluster.oc1.iad.xyz’} -
Using the GoLang OCI SDK, add a code snippet that creates the Object Storage bucket and place a file in the bucket. Add the Workload Identification provider and choose the OCI region in client.SetRegion for your cluster. To get started with GoLang on OCI, visit SDK for Go.
The file, ExampleObjectStorage_UploadFile, shows how to create a bucket and upload a file using OKE Workload Identity:
client.SetRegion("us-phoenix-1");
 func ExampleObjectStorage_UploadFile() {
rp, err := auth.OkeWorkloadIdentityConfigurationProvider() if err != nil { panic(err) } c, clerr := objectstorage.NewObjectStorageClientWithConfigurationProvider(rp)helpers.FatalIfError(clerr) ctx := context.Background() bname := helpers.GetRandomString(8) namespace := getNamespace(ctx, c) createBucket(ctx, c, namespace, bname) contentlen := 1024 * 1000 filepath, filesize := helpers.WriteTempFileOfSize(int64(contentlen)) filename := path.Base(filepath) defer func() { os.Remove(filename) }() file, e := os.Open(filepath) defer file.Close() helpers.FatalIfError(e) e = putObject(ctx, c, namespace, bname, filename, filesize, file, nil) helpers.FatalIfError(e) // Output: // get namespace // create bucket // put object -
Configure your deployment and pod to use the Kubernetes service account you created in step 4 with a yaml file using a text editor of your choice. The following code block shows an example manifest file. The Kubernetes service account name must be present, and the Kubernetes service account must have the service account token mounted.
vi WorkloadIdentity.yamlThen enter the following information in the manifest file:
apiVersion: v1 kind: Pod metadata: name: nginx spec: serviceAccountName: financeserviceaccount automountServiceAccountToken: true containers: - name: nginx image: nginx:1.14.2 ports: - containerPort: 80 -
Deploy the manifest file with following command:
kubectl create -f WorkloadIdentity.yaml -
Verify if your Object Storage bucket and file have been created using the Oracle Cloud Console. Under Storage, select Buckets to verify that the resources have been created.
Learn more
The OKE Workload Identity feature aims to provide a simplified Kubernetes experience for our customers. By using the feature, you’re both improving the security posture of access to OCI resources and decrease your TCO by having to run fewer nodes. To learn more on how you can simplify management of your Enterprise-grade Kubernetes clusters with different capabilities, please visit: