Kubernetes has become the de facto tool for managing distributed containerized applications. If you build a cloud app today and want it to be truly multicloud and portable, Kubernetes is your choice!
Although Kubernetes is awesome, there are a few challenges associated with it when you want to build something on top of it in a continuous delivery (CD) fashion and make developers more productive. With traditional Jenkins (Jenkins 2.0), you can implement a continuous delivery system with Kubernetes, but it is cumbersome. The process involves the following steps:
- Set up the Jenkins plugin for Kubernetes
- Set up a Kubernetes cluster and environment
- Set up pipelines
- Deploy containers to Kubernetes
- Generating YAML or Helm charts
- Adopt continuous delivery and promotion
Jenkins X
Jenkins X leverages Jenkins’ dominant CI/CD expertise and customer population in the industry and provides a CI/CD solution that fits naturally with the Kubernetes environment. With Jenkins X, you do not need to understand or perform comprehensive Kubernetes operations, and you can significantly improve the shipping rate of a product in the Kubernetes environment. You no longer have to deal with Docker files, tweak Helm charts, or write a jenkinsfile. You just create your apps and be happy. All the CI/CD happens automatically.
Jenkins X facilitates the following actions:
- Automates the installation and upgrade of tools required for Kubernetes deployment, all configured and optimized for Kubernetes, including the following ones:
- Helm (package manager for Kubernetes)
- Draft (build packs used to bootstrap applications so they build and run on Kubernetes)
- Skaffold (enabled RAD development, abstracts building and pushing images)
- Kaniko
- Jenkins
- Ksync
- Monocular
- Nexus
- Automates CI/CD for your applications on Kubernetes:
- Docker images
- Helm charts
- Pipelines
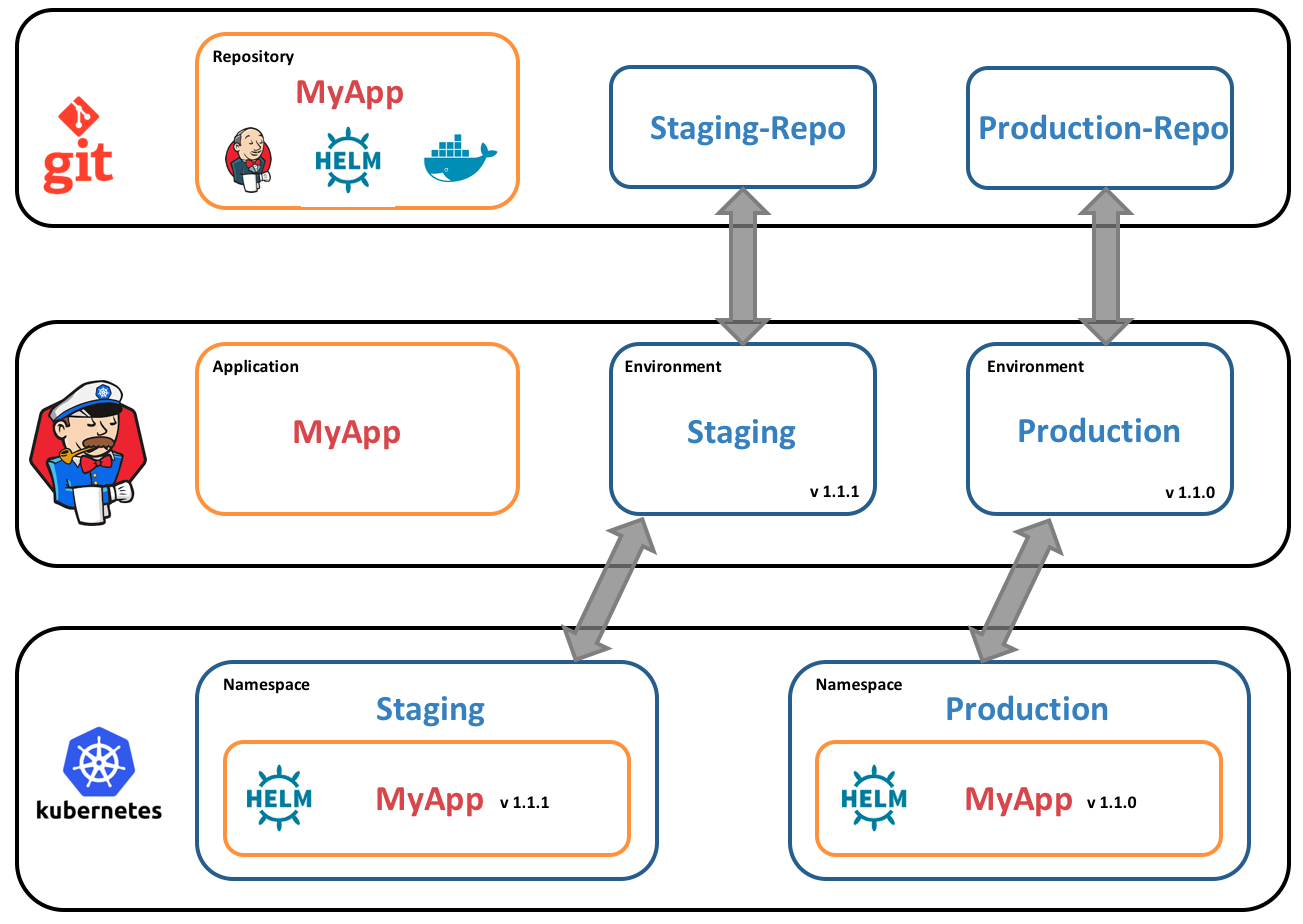
- Uses GitOps to manage promotion between environments, from test to staging to production
As of July 2018, Oracle Cloud Infrastructure is an official Jenkins X cloud, with native support for running Jenkins X within Oracle Cloud Infrastructure Container Engine for Kubernetes (OKE). Special thanks to Chenghao Shi, Hui Liu and their team for contributing to this project.
Run Jenkins X in OKE
There are two ways to get Jenkins X running on OKE. This post demonstrates how to use the Jenkins X command line tool, jx, to perform these operations.
- Create a new OKE cluster with Jenkins X installed (by using the jx create command)
- Install Jenkins X on existing OKE cluster (by using jx install command)
Create a New OKE Cluster and Install Jenkins X
The jx tool communicates with OKE by using the Oracle Cloud Infrastructure CLI. If the CLI is not installed before you create the cluster, jx identifies the CLI as a missing dependency and installs it for you at run time.
Following are the steps for creating a new OKE cluster and installing Jenkins X on it.
Note: Before proceeding, ensure that you have the necessary subnets, security list rules, and IAM policies configured for deploying an OKE cluster. The current release of jx doesn’t create these for you. For more information about how to create these resources, see the Cluster Engine for Kubernetes documentation. You can also use Terraform code to quickly provision these necessary resources. After these resources are in place, jx creates an ingress controller, PVCs, and so on before installing Kubernetes-related utilities and Jenkins X.
- Configure Git to perform development tasks:
sudo yum install git -y
- Install kubectl:
curl -LO https://storage.googleapis.com/kubernetes-release/release/$(curl -s https://storage.googleapis.com/kubernetes-release/release/stable.txt)/bin/linux/amd64/kubectl
chmod +x ./kubectl
sudo mv ./kubectl /usr/local/bin/kubectl
- Configure the oci config file to tell jx which Oracle Cloud Infrastructure resources it will work with. The CLI does not have to be installed at this point; it will be installed during run time.
mkdir ~/.oci
vi ~/.oci/config
vi ~/.oci/oci_api_key.pem
chmod 600 ~/.oci/config ~/.oci/oci_api_key.pem
- Install the Helm client to talk to the Helm server tiller, which will be installed in the OKE cluster:
wget https://storage.googleapis.com/kubernetes-helm/helm-v2.9.1-linux-amd64.tar.gz
tar -xvf helm-v2.9.1-linux-amd64.tar.gz
sudo mv linux-amd64/helm /usr/local/bin/
- Install the jx command line tool:
curl -L https://github.com/jenkins-x/jx/releases/download/v1.3.52/jx-linux-amd64.tar.gz | tar xzv
sudo mv jx /usr/local/bin
- Use jx to create a new OKE cluster with Jenkins X installed.
jx create cluster oke [flags]
You can specify numerous flags. Some of these flags are specific to Oracle Cloud Infrastructure, and the rest are generic jx flags. For example, you can create an OKE cluster using the following flags, or can run just the jx create cluster oke command and enter the necessary OCIDs at run time:
jx create cluster oke --name shoulderroad --compartment-id ocid1.tenancy.oc1..l3d6xxx4gziexn5sxnldyhja --vcn-id ocid1.vcn.oc1.phx.ofu4bbmfhj5ijidyde3gpdocybghidrmbq --kubernetes-version v1.10.3 --wait-for-state SUCCEEDED --serviceLbSubnetIds file:///tmp/oke_cluster_config.json --tiller-enabled false
The command creates a new Kubernetes cluster on OKE, installs required local dependencies, and provisions the Jenkins X platform. Add your $HOME/bin to $PATH; otherwise, jx will have an issue invoking the CLI command. If you have already installed the CLI, ensure that it’s in $PATH.
After the command finishes, you get a development environment (including Jenkins, Nexus, Docker registry, ChartMuseum, and Monocular) and other environments, like staging and production. Typically, we use Helm charts in these git repositories to define which charts are to be installed and which versions of them, and any environment-specific configuration and additional resources.
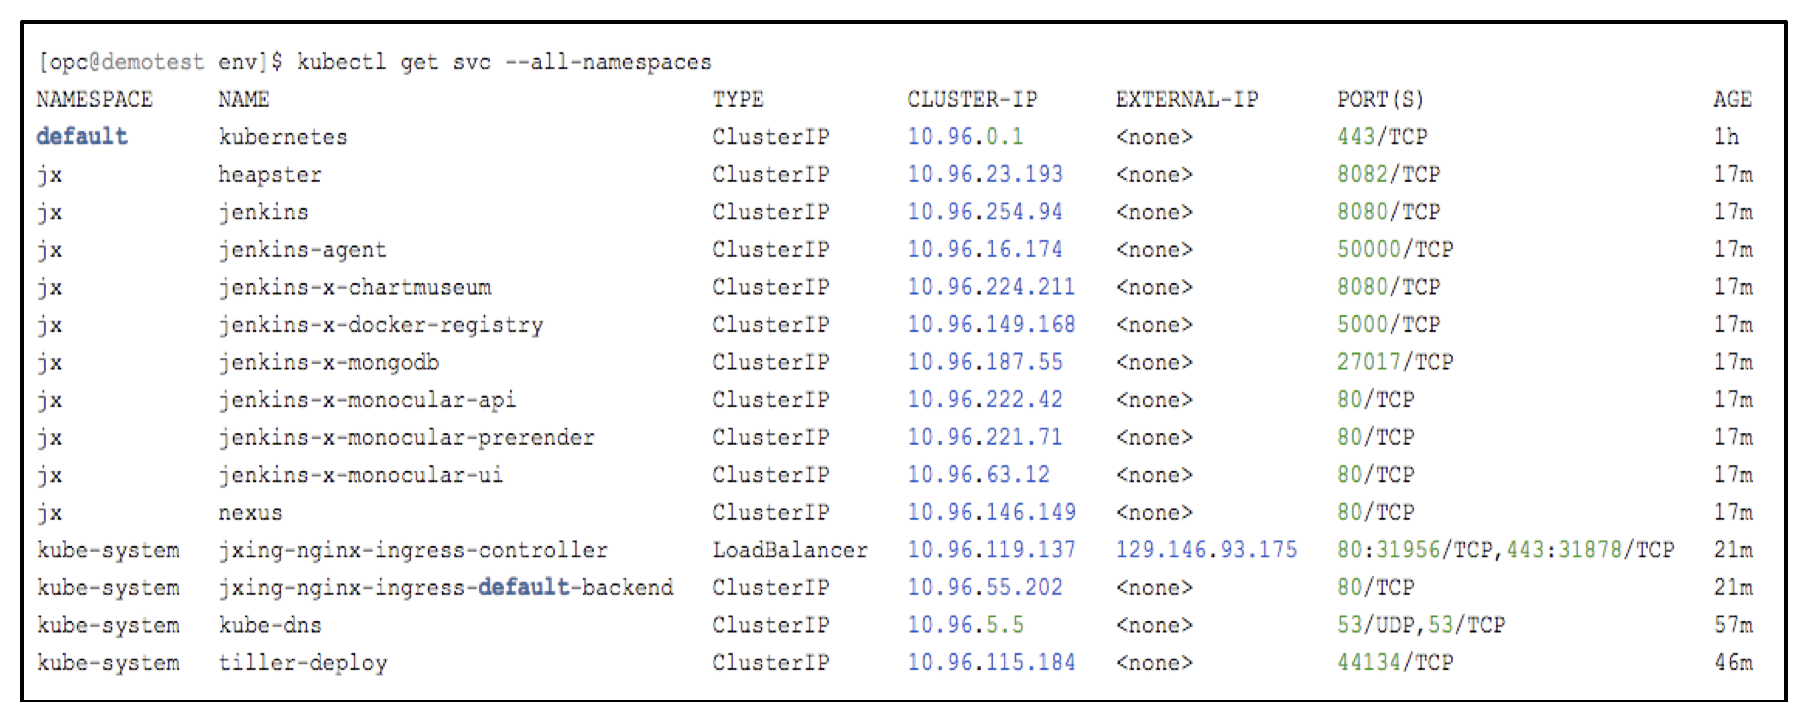
- Check the environment by entering the following command:
kubectl get svc --all-namespacesFollowing is example output:
Install Jenkins X on an Existing OKE Cluster
If you have an existing OKE cluster, you can use jx to deploy Jenkins X on it.
- To begin, run the following commands to prepare your environment:
chmod +x ~/get-kubeconfig.shexport ENDPOINT=containerengine.us-phoenix-1.oraclecloud.com~/get-kubeconfig.sh ocid1.cluster.oc1.phx.rdsztcmnstcnjsgy4taytcmctdqyrzheyw > ~/kubeconfig export KUBECONFIG=~/kubeconfig git config --global user.email"user.name@gmail.com"git config --global user.name"userName" - Configure the oci config file to tell jx which Oracle Cloud Infrastructure resources it will work with. The CLI does not have to be installed at this point; it will be installed during run time.
mkdir ~/.oci
vi ~/.oci/config
vi ~/.oci/oci_api_key.pem
chmod 600 ~/.oci/config ~/.oci/oci_api_key.pem
- Export your kubeconfig file:
export KUBECONFIG=~/kubeconfig
- Install Git if it’s not already installed:
sudo yum install git -y
- Install kubectl:
curl -LO https://storage.googleapis.com/kubernetes-release/release/$(curl -s https://storage.googleapis.com/kubernetes-release/release/stable.txt)/bin/linux/amd64/kubectl
chmod +x ./kubectl
sudo mv ./kubectl /usr/local/bin/kubectl
- Install the jx command line tool. If you are installing on an OS other than Linux, see these instructions).
curl -L https://github.com/jenkins-x/jx/releases/download/v1.3.52/jx-linux-amd64.tar.gz | tar xzv
sudo mv jx /usr/local/bin
- Install the Helm client to talk to the Helm server tiller if it is installed in the OKE cluster:
wget https://storage.googleapis.com/kubernetes-helm/helm-v2.9.1-linux-amd64.tar.gz
tar -xvf helm-v2.9.1-linux-amd64.tar.gz
cp linux-amd64/helm /usr/local/bin/
helm init
- Install Jenkins X by using jx:
jx install --provider=oke
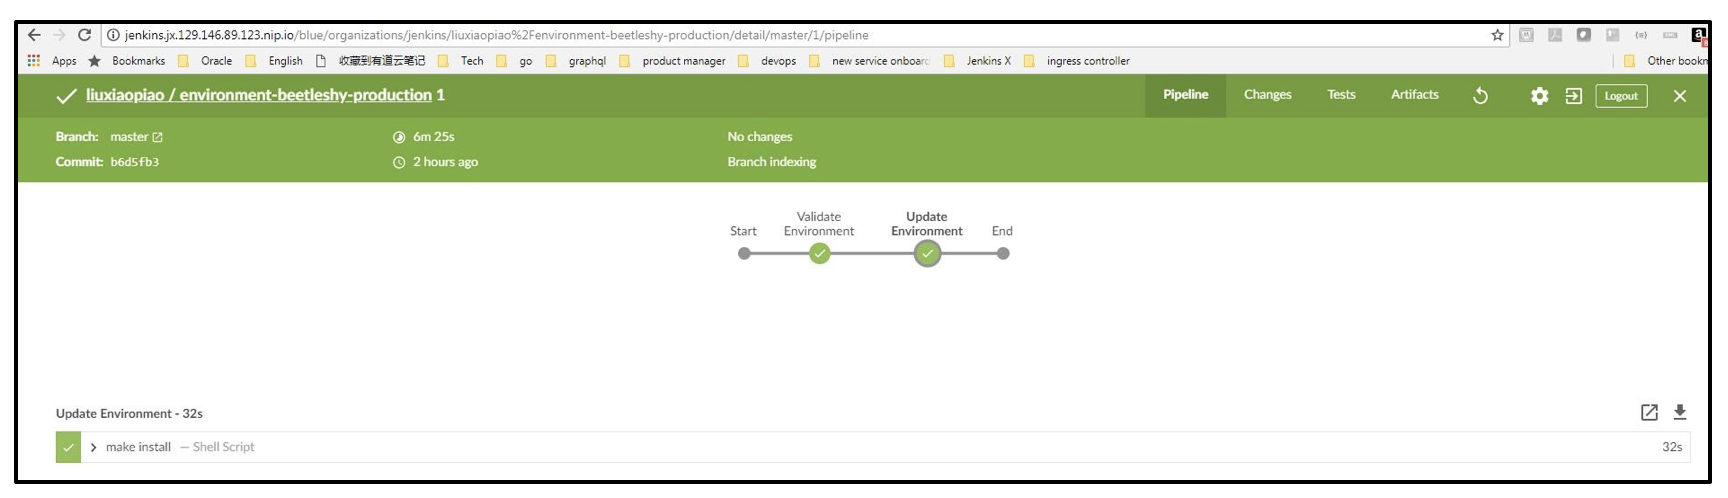
The installation process takes a couple of minutes. During that time, you can enter necessary parameters such as your GitHub username. When the installation is completed, two pipelines (staging and production) should be generated on the Jenkins dashboard, and code will be checked in to GitHub.

Other Jenkins X Options
So far we’ve looked at the jx create and jx install commands to get Jenkins X running on OKE. A few other jx commands are useful to help you quickly bootstrap a project in any language (jx comes with rich polyglot integration) and build a pipeline.
If you have an existing project, running the following command makes jx quickly detect the type of project that you are working on (for example, Spring Boot or JHipster):
jx import <app_name>
It also performs the following actions:
- Creates a build pipeline
- Sets up the project on a remote git service like GitHub (using your GitHub credentials) and creates the necessary web hooks
- Installs Kubernetes-specific tools like Helm charts and Monocular
- Ultimately runs the build for you and deploys it in a “staging” environment.
At this point, if everything looks correct, you can promote this build to production by running the following command:
jx promote --env production --version 1.0.1 <app_name>
If you don’t have an existing project, the easiest way to bootstrap a project with built-in CI/CD (using jx) is to use jx create (again!). Although, in this case if you want to create a Spring Boot application, for example, import the generated code into a git repo, and use Jenkins for CI/CD, you run the following command:
jx create spring [flags]
This command performs the following actions:
- Creates a fresh Spring Boot application with defaults
- Checks in the code to your git repo
- Pushes the code to a remote git repo like GitHub
- Add defaults for dockerfile, jenkinsfile, and Helm charts
- Runs a build and deploys it in to “staging” environment