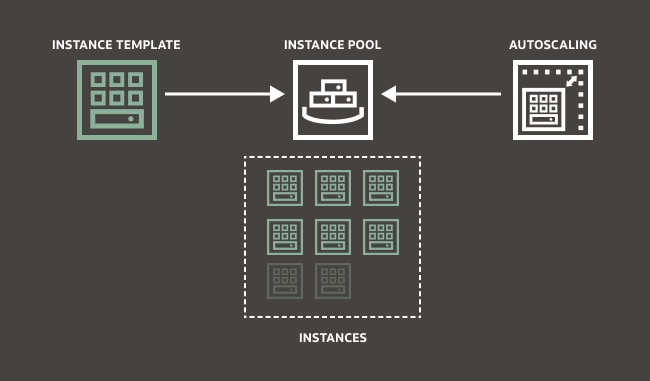
Autoscaling lets you automatically adjust the number or the lifecycle state of Compute instances in an instance pool. With autoscaling, you can provide consistent performance to your end users during spikes in demand and reduce your costs during periods of low demand.
We use autoscaling configurations to automatically manage the size and lifecycle state of your instance pools. When autoscaling automatically provisions instances in an instance pool, the pool scales out. When autoscaling removes instances from the pool, the pool scales down. You can also use autoscaling to stop and start instances in an instance pool based on a schedule.
To set up autoscaling, we deploy the following resources using Terraform:

Prerequisites
-
Instance OCID that you want to autoscale
-
Subnet OCID in which your instance resides
-
Compartment OCID in which all your resources are deployed
-
Create data.tf for storing data, which we use in Terraform scripts. We store availability domain data in this file. You can create data.tf with the following details:
data oci_identity_availability_domain US-ASHBURN-AD-1 { compartment_id = var.compartment_id ad_number = "1" } data oci_identity_availability_domain US-ASHBURN-AD-2 { compartment_id = var.compartment_id ad_number = "2" } data oci_identity_availability_domain US-ASHBURN-AD-3 { compartment_id = var.compartment_id ad_number = "3" } -
Create the var.tf file for storing variable used in the Terraform scripts. They store variables like compartment-id and region. Create var.tf with the following details. Replace the [compartment-ocid] with the OCID of your compartment in which all your resources are deployed.
variable compartment_id { default = “[compartment-ocid]” }
variable region { default = "us-ashburn-1" }
Create instance configuration using Terraform
An instance configuration defines the settings to use when creating Compute instances, including details such as the base image, shape, and metadata. Create the instance_configuration.tf with the following details. Replace [instance-ocid] with the OCID of the instance that you want to autoscale. You can find all other argument reference for creating instance configurations in the Terraform Registry.
resource "oci_core_instance_configuration" "tf_instance_configuration" {

    compartment_id = var.compartment_id
    display_name = var.instance_configuration_display_name
    instance_id = ”[instance-ocid]”
    source = "INSTANCE"
}
Create a load balancer using Terraform
The Oracle Cloud Infrastructure (OCI) Load Balancing service provides automated traffic distribution from one entry point to multiple servers reachable from your virtual cloud network (VCN). In this example, we create a public load balancer with a backend set, backend, and listener.
Create load_balancer.tf with the following parameters.
Load balancer
Replace [subnet-ocid] with the OCID of the subnet where you want to create this load balancer.
resource oci_load_balancer_load_balancer tf_lb {
  compartment_id = var.compartment_id
  display_name = "tf-lb"

  ip_mode    = "IPV4"
  is_private = "false"
  shape = "100Mbps"
  subnet_ids = [
    "[subnet-ocid]"
  ]
}
Load balancer backend set
We’re using a least connections policy, but you can change it according to your requirement. You can see all other arguments for Terraform in the Registry.
resource oci_load_balancer_backend_set tf_load_balancer_set {
  health_checker {
    interval_ms         = "10000"
    port                = "80"
    protocol            = "HTTP"
    response_body_regex = ""
    retries             = "3"
    return_code         = "403"
    timeout_in_millis   = "3000"
    url_path            = "/"
  }
  load_balancer_id = oci_load_balancer_load_balancer.tf_lb.id
  name             = "tf_load_balancer_set_LC"
  policy           = "LEAST_CONNECTIONS"
}
Load balancer backend
Load balancer backend set arguments for Terraform are available in the Registry.
resource oci_load_balancer_backend tf_demo_instance_backend {
  backendset_name  = oci_load_balancer_backend_set.tf_load_balancer_set.name
  backup           = "false"
  drain            = "false"
  ip_address       = "10.0.0.155"
  load_balancer_id = oci_load_balancer_load_balancer.tf_lb.id
  offline          = "false"
  port             = "80"
  weight           = "1"
}
Load balancer listener
You can find all load balancer listener arguments for Terraform in the Registry.
resource oci_load_balancer_listener tf_lb_listener {
  connection_configuration {
    backend_tcp_proxy_protocol_version = "0"
    idle_timeout_in_seconds            = "60"
  }
  default_backend_set_name = oci_load_balancer_backend_set.tf_load_balancer_set.name
  load_balancer_id = oci_load_balancer_load_balancer.tf_lb.id
  name             = "listener_lb_2022-0408-1500"
  port     = "80"
  protocol = "HTTP"
}
Create an instance pool using Terraform
Use instance pools to create and manage multiple Compute instances within the same region as a group. We use our tf_instance_configuration and tf_lb for creating instance pool
Create Instance_pool.tf with the following details. Replace [subnet-ocid] with the OCID of the subnet in which you want to create instance pool.
resource "oci_core_instance_pool" "tf_instance_pool" {
    compartment_id = var.compartment_id
    instance_configuration_id = oci_core_instance_configuration.tf_instance_configuration.id
    placement_configurations {

        availability_domain = data.oci_identity_availability_domain.US-ASHBURN-AD-1.name
        primary_subnet_id = "[subnet-ocid]"
    }
    size = "1"

    load_balancers {

        backend_set_name = oci_load_balancer_backend_set.tf_load_balancer_set.name
        load_balancer_id = oci_load_balancer_load_balancer.tf_lb.id
        port = "80"
        vnic_selection = "PrimaryVnic"
    }
}
Create autoscaling configuration using Terraform
Autoscaling configuration lets you automatically adjust the number or the lifecycle state of Compute instances in an instance pool. So, you can provide consistent performance for your end users during high demand and helps you reduce costs by decommissioning idle resources when demand is lower.
We’re creating a metric-based autoscaling configuration by using tf_instance_pool with the following configuration:
-
Initial virtual machines (VMs) in instance pool: 2
-
Maximum VMs in instance pool: 8
-
Minimum VMs Instance pool: 2
-
Scale out rule: When CPU utilization is greater than 80%, the count of VM increases by 1.
-
Scale in rule: When CPU utilization is less than 40%, the count of VM decreases by 1.
Create autoscaling_config.tf with the following details:
resource oci_autoscaling_auto_scaling_configuration export_demo-autoscaling-config {
  auto_scaling_resources {
    id   = oci_core_instance_pool.tf_instance_pool.id
    type = "instancePool"
  }
  compartment_id       = var.compartment_id
  cool_down_in_seconds = "300"
  display_name = "tf-autoscaling-config"

  is_enabled = "true"
  policies {
    capacity {
      initial = "2"
      max     = "8"
      min     = "2"
    }
    display_name = "tf-autoscaling-policy"
    is_enabled  = "true"
    policy_type = "threshold"
    rules {
      action {
        type  = "CHANGE_COUNT_BY"
        value = "1"
      }
      display_name = "scale-out-rule"
      metric {
        metric_type = "CPU_UTILIZATION"
        threshold {
          operator = "GT"
          value    = "70"
        }
      }
    }
    rules {
      action {
        type  = "CHANGE_COUNT_BY"
        value = "-1"
      }
      display_name = "scale-in-rule"
      metric {
        metric_type = "CPU_UTILIZATION"
        threshold {
          operator = "LT"
          value    = "40"
        }
      }
    }
  }
}
We have now created all the Terraform scripts we need.
Run the terraform plan command, which creates a run plan that lets you preview the changes that Terraform plans to make to your infrastructure.
![]()
The output indicates that Terraform creates seven resources, modify zero resources, and destroy zero resources.
The terraform apply command runs the actions proposed in the Terraform plan.
terraform apply --auto-approve![]()
The output indicates that Terraform created seven resources, modify zero resources, and destroy zero resources.
Conclusion
In this post, we learned about instance pools, instance configuration, load balancers, autoscaling configuration, and how to create these resources using Terraform. Then we configured a metric-based autoscaling, which helps provide consistent performance for your end users during increased load and helps you save costs during low demand.
For more details, see the following references: