Enterprises usually run many backend services behind a load balancer or network load balancer. These services power their customer-facing applications, dashboards, APIs, business logic, and more. As these applications scale, apply cloud native microservices-based architectures, or migrate to the public cloud, administrators look for an effective way to route arbitrary traffic to various services. Sometimes multiple teams or different teams using different node pools based on the nature of the applications use a single cluster in an environment. So, Kubernetes administrators need the load balancer to be wired to specific backends to avoid unrelated worker nodes impacting their load balancer updates. This configuration segregates the traffic in a single cluster and achieve granular node level workload management.
Oracle Cloud Infrastructure (OCI) Kubernetes gives you fine grained control over load balancer service types and how backend sets are added for those load balancer services. Today, we’re announcing the node-label-selector, a new configuration option that enables you to select specific worker nodes on Oracle Container Engine for Kubernetes (OKE) to serve as the backend set for any load balancer or network load balancer fronting your cluster.
What are node label selectors?
Node label selectors are key or value pairs that specify worker nodes that a service-on type load balancer directs traffic to. You can attach them to objects at creation time or added later and modified at any time. Each object can have a set of key or value labels defined. Each key must be unique for a given object.
Benefits of node label selectors
Talking to customers, we found that Kubernetes administrators and developers want to configure node label selectors to filter the traffic. Common use cases for filtering traffic include providing an easy way to filter worker nodes when the traffic is scaling up or down and triaging issues like network timeouts. Node label selectors are also useful when redirecting traffic to a new set of worker nodes or decommissioning a subset of them without disrupting live traffic.
In a scaled environment, if the load balancer is configured to look for pods local to the worker node (externalTrafficPolicy: Local), the health of the load balancers is critical because all nodes are added by default and not all the nodes have the wanted application pods. With a node selector, only a relevant subset can be added, so the load balancers’ health is more appropriate. Filtering worker nodes for backend registration also makes monitoring and alarms easier to set up and manage.
A load balancer node label selector in OKE also helps map the backend for each service in an ingress. Customers using ingress create multiple services (logical clusters) in a single OKE cluster. Each logical cluster or service is exposed to the customer through a public load balancer. With more than one load balancer for each service, every load balancer has all the worker nodes hosting the respective ingress endpoints as backends. Customers prefer to specify a one-to-one or one-to-many mapping for the backends of each ingress load balancer. For example, the public load balancer for the service has only one or many backends but not all the nodes hosting the ingress for that service.
Using a node label selector
The following diagram and steps represent how you can use the node label selector for an OCI load balancer or network load balancer fronting an OKE cluster.
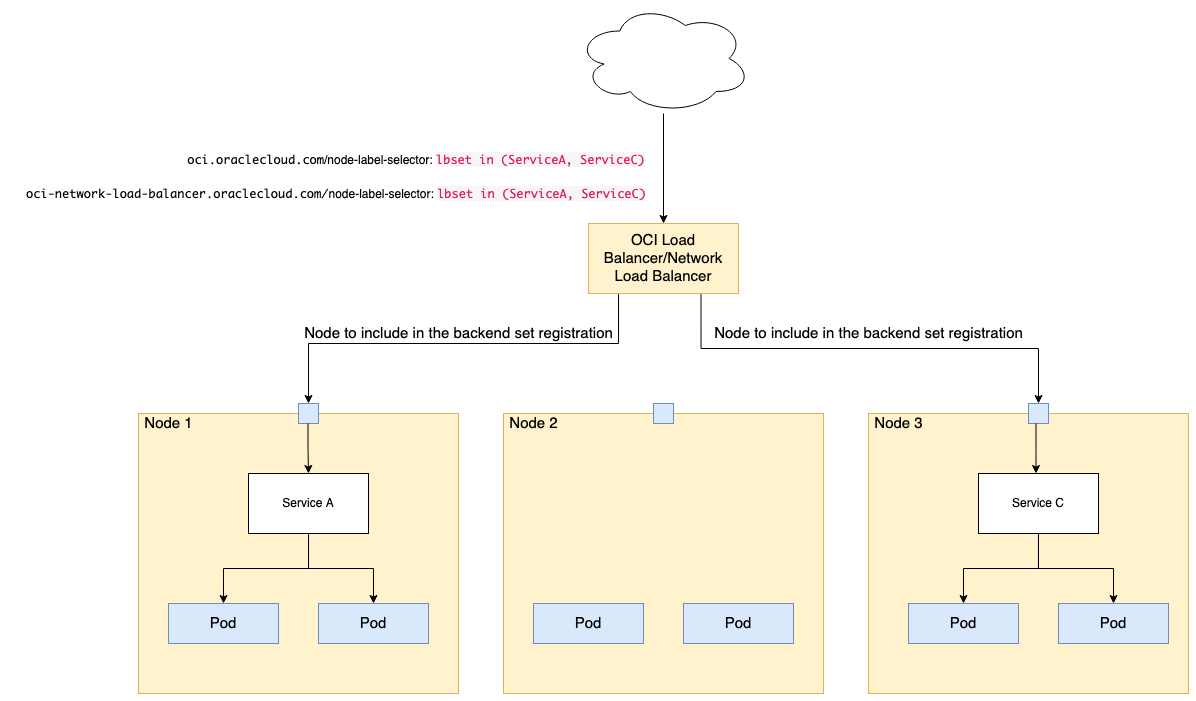
For any new or existing load balancer type service being created, you can add the following annotations to specify which nodes to include in the backend set registration.
The first step is to label the worker nodes.
kubectl label nodes <node-name> <node-label>. For example, you might use kubectl label nodes 10.0.1.2 lbset=ServiceA.
You can also configure the node pool to have a set of initialNodeLabels.
To select that node for inclusion in the load balancer backend set, include an annotation in the manifest. The following example shows a service manifest using the node-label selector annotation:
apiVersion: v1
kind: Service
metadata:
  name: my-nginx-svc
  labels:
    app: nginx
  annotations:
    oci.oraclecloud.com/node-label-selector: lbset=ServiceA
spec:
  type: LoadBalancer
  ports:
  - port: 80
  selector:
    app: nginx
For a network load balancer, use the following command:
oci-network-load-balancer.oraclecloud.com/node-label-selector: lbset=ServiceCThis annotation supports all k8s label selectors defined in this list. See the following examples:
lbset in (ServiceA, ServiceC)
lbset #checks existence
lbset=ServiceA
lbset=ServiceA,Prod=ServiceC #comma is logical AND
lbset != ServiceA
If you have all the backends in the backend set, adding this annotation to an existing service or load balancer triggers the load balancer work request and removes the unwanted nodes. Only the nodes that were labeled in the annotations are added as backends to the load balancer.
To ensure that your pods are always placed in the set of nodes that the load balancer is wired to, use node affinity. For example, the following manifest describes a pod that has a requiredDuringSchedulingIgnoredDuringExecution node affinity, lbset: ServiceA. The pod is scheduled only on a node that has a lbset=ServiceA label.
apiVersion: v1
kind: Pod
metadata:
  name: nginx
spec:
  affinity:
    nodeAffinity:
      requiredDuringSchedulingIgnoredDuringExecution:
        nodeSelectorTerms:
        - matchExpressions:
          - key: lbset
            operator: In
            values:
            - ServiceA
  containers:
  - name: nginx
    image: nginx
    imagePullPolicy: IfNotPresent
Next steps
The load balancer node label selector provides flexibility for Kubernetes administrators to direct traffic to the worker nodes of their choice. You’re no longer limited to sending traffic to all the backend servers of an OCI load balancer or network load balancer.
For more information, see the load balancer node label selector in the documentation. To experience this new feature and all the enterprise-grade capabilities that Oracle Cloud Infrastructure offers, create your Always Free account today and try the OKE networking options with our S$300 free credit.