The zone cluster feature of Oracle Solaris Cluster supports importing non-global zones into a zone cluster starting in version 4.3. This article is going to
focus on the methods to import a zone and get the Oracle Solaris Cluster
software installed in it.
With this feature you can import existing installed zones into a new zone cluster or an existing zone cluster configuration using the clzonecluster subcommand import-zone. The
syntax for this subcommand when using clzonecluster in interactive mode is:
zonename = zone-name
When using a command file with the clzonecluster configure command, the syntax is:
import-zone -y zonename = zone-name
There are two scenarios of importing a zone into a zone cluster.
In the first scenario, you can import a set of existing zones to create a new zone cluster. For example, in Fig(1) a 3-node cluster has three zones, one zone in each global-cluster node, which can be imported into a new zone cluster called webzc using the
import-zone feature. A possible use-case for this scenario is when you have a zone on one of the physical nodes of the cluster hosting an application and if in the future the admin plans to leverage the HA options provided by OSC, the admin can import this zone into a new zone cluster using this procedure and this zone essentially becomes the first node of the zone cluster and further nodes can be added or imported to the zone cluster based on the need.
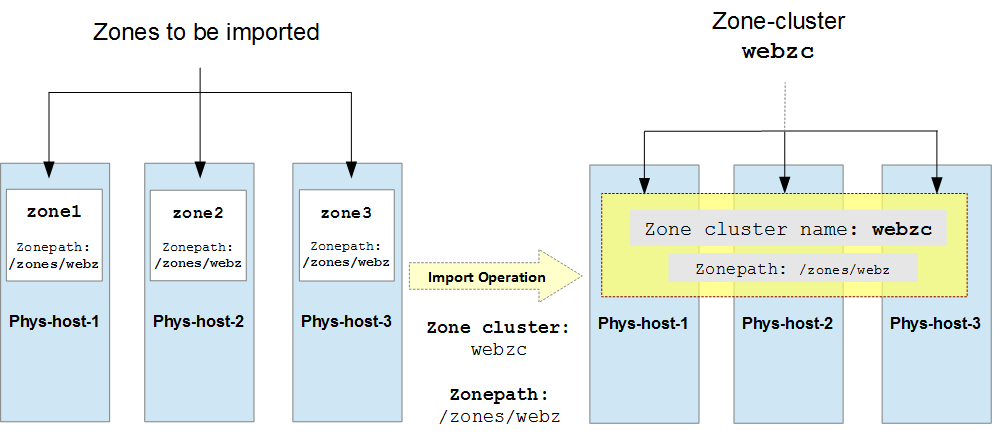
Fig 1: Importing zones zone1, zone2, and zone3 to a new zone cluster webzc
In the second scenario, an installed zone is imported into an existing zone cluster.
For example, in Fig (2), zone zone1 of a node can be imported into an
existing 2-node zone cluster webzc to form a 3-node zone cluster.

Fig 2: Importing zone zone1 to an existing zone cluster webzc
Requirements and Restrictions:
There are, however, certain restrictions and requirements which have to be met
before a zone can be imported to a zone cluster:
- The zone cluster properties zonepath, ip-type, and brand must be
defined in the zone cluster configuration. - The import-zone subcommand can be executed only in the node scope.
- The property physical-host must be specified in the node scope.
- The
rad:local SMF service, svc:/system/rad:local must be online on the
physical host hosting the zone. - Values
of properties such as zonepath, ip-type, and brand of the zone must
match the property values of the zone cluster. - The zone to be imported must be in an installed state.
- The property zonename of the zone being imported cannot be a part of the zonepath property of the zone cluster.
- The zone to be imported cannot be:
- on shared storage.
- configured as a failover highly available zone.
- part of any zone cluster configuration before
importing. - The imported zone will be renamed.
- Interactive mode: User will be prompted to
accept.
clzc:zc:node>import-zone zonename=zone1
This operation renames the zone: web-zone to the zone-cluster’s name: web-zc.
Do you want to proceed ([y]/n)? - Command file: An additional flag ‘-y’
needs to be set.
import-zone -y zonename=zone1
Example 1: Importing Installed Zones Into a New Zone Cluster:
In this example, we
are going to import the zones zone1, zone2, and zone3 to create a zone cluster webzc. The zones zone1, zone2, and zone3 are
present on the global-cluster nodes phys-host-1, phys-host-2,
and phys-host-3 respectively. The steps to perform the import operation are as
follows:
![]()
Step 1: Assume the root role on a node of the global cluster.
Step 2: Verify that the zones are in installed state.
Ensure that you meet the other
requirements listed above
phys-host-1# zoneadm -z zone1 list –v
ID NAME STATUS PATH BRAND IP
– zone1 installed /zones/webz solaris excl
————————————————————
phys-host-2# zoneadm -z zone2 list –v
ID NAME STATUS PATH BRAND IP
– zone2 installed /zones/webz solaris excl
————————————————————
phys-host-3# zoneadm -z zone3 list –v
ID NAME STATUS PATH BRAND IP
– zone3 installed /zones/webz solaris excl
Step 3: Run the clzonecluster configure command.
phys-host-1# clzonecluster configure webzc
Step 4: Create the zone cluster.
clzc:webzc:> create
Step 5: Set the necessary properties of the zone cluster.
clzc:webzc:> set zonepath=/zones/webz
clzc:webzc:> <span style="font-family:Courier;
color:#444444">set ip-type=exclusive
clzc:webzc:> set brand=solaris
Step 6:
Enter node scope using add node command.
clzc:webzc:> add node
Step 7: Set physical-host in the node scope.
clzc:webzc:node> set physical-host=phys-host-1
Step 8: Run the import-zone command.
clzc:webzc:node> import-zone zonename=zone1
Step 9: Accept the prompt and verify the imported the resources.
This operation renames the zone: zone1 to the zone-cluster’s name: webzc.
Do you want to proceed ([y]/n)? y
Validating the resources and properties...
Extracting the Zone configuration data ...
Importing zone configuration into the zone cluster...clzc:webzc:node> info
node:
        physical-host: phys-host-1
        hostname not specified.net:
address not specified
physical: vnic0
defrouter: 192.168.1.1
allowed-address: 192.168.1.11/24
configure-allowed-address: true
clzc:webzc:node>
This option imports all the pre-existing zone resources into the node scope. In this case we can see that the zone’s net resource with all its
pre-set properties (like defrouter, allowed-address, physical) has been
imported. After the import operation is over, proceed to the next
step.
Step 10: Set hostname in the node scope.
clzc:webzc:node> set hostname=host1
Step 11: (Optional) Set other node scope properties and
resources, if necessary.
# clzc:webzc:node> add privnet
# clzc:webzc:node:privnet> set physical=vnic1
# clzc:webzc:node:privnet> end
Vnics created on top of the private interconnect network cards can be used to set the privnet resources.
Step 12: End the node scope.
clzc:webzc:node> end
Repeat steps 6-12 for other zones.
clzc:webzc> add node
clzc:webzc:node> set physical-host= phys-host-2
clzc:webzc:node> <span style="font-family:Courier;
color:#444444">import-zone zonename= zone2
This operation renames the zone: zone1 to the zone-cluster’s name: webzc.
Do you want to proceed ([y]/n)? y
Validating the resources and properties...
Extracting the Zone configuration data ...
Importing zone configuration into the zone cluster...
clzc:webzc:node> set hostname=host2
clzc:webzc:node> end

clzc:webzc> add node
clzc:webzc:node> <span style="font-family:Courier;
color:#444444">set physical-host= phys-host-3
clzc:webzc:node> import-zone zonename= zone3
This operation renames the zone: zone1 to the zone-cluster’s name: webzc.
Do you want to proceed ([y]/n)? y
Validating the resources and properties...
Extracting the Zone configuration data ...
Importing zone configuration into the zone cluster...
clzc:webzc:node> set hostname=host3
clzc:webzc:node> end
Step 13: Commit the configuration and exit.
clzc:webzc:> commit
clzc:webzc:> exit
Step 14: (Optional) Verify that the zone has been
imported.
phys-host-1# clzonecluster show -v webzc
=== Zone Clusters ===
Zone Cluster Name:                              webzc
  zonename:                                        webzc
  zonepath:                                        /zones/webz
  autoboot:                                        TRUE
  brand:                                           solaris
  hostid:                                          <NULL>
  bootargs:                                        <NULL>
  pool:                                            <NULL>
  limitpriv:                                       <NULL>
  scheduling-class:                                <NULL>
  ip-type:                                         exclusive
  enable_priv_net:                                 FALSE
  resource_security:                               SECURE
  --- Solaris Resources for webzc ---
  --- Zone Cluster Nodes for webzc ---
  Node Name:                                    phys-host-1
    physical-host:                                 phys-host-1
    hostname:                                      host1
    Transport Adapter List:                        vnic1,vnic2
    --- Solaris Resources for phys-host-1 ---
  Resource Name:                                net
    address:                                       <NULL>
    physical:                                      vnic0
    defrouter:                                     192.168.1.1
    allowed-address:                               192.168.1.11/24
  Node Name:                                    phys-host-2
    physical-host:                                 phys-host-2
    hostname:                                      host2
    Transport Adapter List:                        vnic1,vnic2
    --- Solaris Resources for phys-host-2 ---
  Resource Name:                                net
    address:                                       <NULL>
    physical:                                      vnic0
    defrouter:                                     192.168.1.1
    allowed-address:                               192.168.1.12/24
  Node Name:                                    phys-host-3
    physical-host:                                 phys-host-3
    hostname:                                      host3
    Transport Adapter List:                        vnic1,vnic2
    --- Solaris Resources for phys-host-3 ---
  Resource Name:                                net
    address:                                       <NULL>
    physical:                                      vnic0
    defrouter:                                     192.168.1.1
    allowed-address:                               192.168.1.13/24
As you can see, the zones have been imported into a new zone
cluster webzc.
Example 2: Importing Installed Zone Into an Existing Zone Cluster:
In this example, we
are going to import a zone zone1 to an existing zone cluster webzc. The zone zone1 is present on the global-cluster node phys-host-3. The steps to perform the
import operation are as follows:
![]()
Step 1: Assume the root role on a node of the global cluster.
Step 2: Verify that the zone is in installed state.
Ensure that you meet the other
requirements listed above
phys-host-3# zoneadm -z zone1 list –v
ID NAME STATUS PATH BRAND IP
– zone1 installed /zones/webz solaris excl
Step 3: Run the clzonecluster configure command.
phys-host-3# clzonecluster configure webzc
Step 6:
Enter node scope using add node command.
clzc:webzc:> add node
Step 7: Set physical-host in the node scope.
clzc:webzc:node> set physical-host=phys-host-3
Step 8: Run the import-zone command
clzc:webzc:node> import-zone zonename=zone1
Step 9: Accept the prompt and verify the imported resources.
This operation renames the zone: zone1 to the zone-cluster’s name: webzc.
Do you want to proceed ([y]/n)? y
Validating the resources and properties...
Extracting the Zone configuration data ...
Importing zone configuration into the zone cluster...
clzc:webzc:node> info
node:
        physical-host: phys-host-3
        hostname not specified.net:
address not specified
physical: vnic0
defrouter: 192.168.1.1
allowed-address: 192.168.1.13/24
configure-allowed-address: true
clzc:webzc:node>
This option imports all the pre-existing zone resources into the node
scope. In this case we can see that the zone’s net resource with all its
pre-set properties (like defrouter, allowed-address, physical) has been
imported. After the import operation is over, proceed to the next
step.
Step 10: Set hostname in the node scope.
clzc:webzc:node> set hostname=host3
Step 11: (Optional) Set other node scope properties and
resources, if necessary.
# clzc:webzc:node> add privnet
# clzc:webzc:node:privnet> set physical=vnic1
# clzc:webzc:node:privnet> end
Vnics created on top of the private interconnect network cards can be used to set the privnet resources.
Step 12: End the node scope.
clzc:webzc:node> end
Step 13: Commit the configuration and exit.
clzc:webzc:> commit
clzc:webzc:> exit
Step 14: (Optional) Verify that the zone has been
imported.
phys-host-1# clzonecluster show -v webzc=== Zone Clusters ===
Zone Cluster Name: webzc
zonename: webzc
zonepath: /zones/webz
autoboot: TRUE
brand: solaris
hostid: <NULL>
bootargs: <NULL>
pool: <NULL>
limitpriv: <NULL>
scheduling-class: <NULL>
ip-type: exclusive
enable_priv_net: FALSE
resource_security: SECURE
--- Solaris Resources for webzc ---
--- Zone Cluster Nodes for webzc ---Node Name: phys-host-1
physical-host: phys-host-1
hostname: host1
Transport Adapter List: vnic1,vnic2--- Solaris Resources for phys-host-1 ---
Resource Name: net
address: <NULL>
physical: vnic0
defrouter: 192.168.1.1
allowed-address: 192.168.1.11/24
Node Name: phys-host-2
physical-host: phys-host-2
hostname: host2
Transport Adapter List: vnic1,vnic2
--- Solaris Resources for phys-host-2 ---Resource Name: net
--- Solaris Resources for phys-host-3 ---
address: <NULL>
physical: vnic0
defrouter: 192.168.1.1
allowed-address: 192.168.1.12/24
Node Name: phys-host-3
physical-host: phys-host-3
hostname: host3
Transport Adapter List: vnic1,vnic2
Resource Name: net
address: <NULL>
physical: vnic0
defrouter: 192.168.1.1
allowed-address: 192.168.1.13/24
As you can see, the zone has been imported into an existing
zone cluster webzc.
Booting And Installing the Imported Zone:
Once a zone has been imported, it has to be booted up
and the Oracle Solaris Cluster packages have to be installed in the zone. The
following are the steps to do the same:
Step 1: Boot the zones that have been imported.
phys-host-1# clzonecluster boot –n phys-host-1,phys-host-2,phys-host-3 webzc
Step 2: Install
cluster packages in the imported zones.
phys-host-1# clzonecluster install-cluster –n phys-host-1,phys-host-2,phys-host-3 webzc
Installing the cluster packages in zone cluster “webzc”
Once the zone is installed with cluster packages, it will
become a member of the zone cluster. Thus, in this way you can import an
existing zone into a zone cluster using the import-zone feature in Oracle
Solaris Cluster 4.3.
For more information:
a) Installation Guide: Importing a zone to a zone cluster
b) Man Page: clzonecluster(1CL)