※ 本記事は、Witold Swierzyによる”Oracle Database 23c Development Edition on Docker“を翻訳したものです。
2023年5月18日
目次
概要
Oracle Databaseは、古い、伝統的、純粋なリレーショナル、昔ながらの、などなど…モノリシック・データベースの優れた例であり、それに加えて、非常に高価であるという意見を、ほとんどの人が聞いたことがあります。そうですね。私もそれを聞いています。しかし、事実はそれが完全に偽りであるということです。この記事では、最新の開発アプローチをすべて満たすシステムを1分でプロビジョニングでき、可能なすべてのデータ・モデルを使用するアプリケーションの開発を開始するために必要なものがすべて揃っており、完全に無料であることを証明します。これを行うには、次のコンポーネントを使用します
- Oracle Database 23c DE
- Oracle REST Data Services 23.1.2
- Oracle Application Express 22.2
次の図は、Oracle Databaseのほとんどのユーザーおよび管理者にとっても非常によく知られていると思います。Oracle Databaseのマルチテナント・オプションの明らかなユースケースの1つである、コンテナ化されたアプリケーションのサポートについて説明しています。
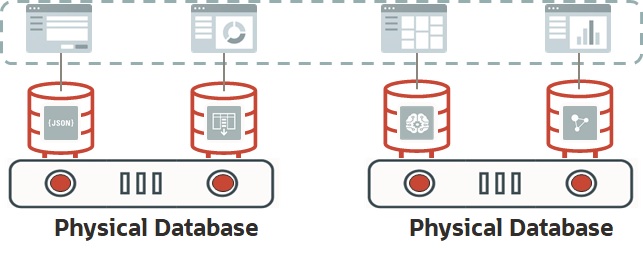
ただし、この記事では、様々なシナリオについて説明します。: 外部コンテナのサポートを提供する代わりに、SODA、PGQL、REST、MongoDB API、APEXなど、一般的なOracle Converged Databaseサービスすべてを提供するコンテナを構築します。Oracleのコンバージド・データベース機能についてさらに学習する場合は、「Oracle Database Development #blockchain #graph #JSON #lowcode #spatial #SQL #textsearch #XML」の投稿の概要を参照してください。
それでは、これから始めましょう!
Dockerソフトウェアのインストール
最初の段階でdockerをインストールする必要があります。次の手順では、Oracle Linux 8でのインストールについて説明し、他のオペレーティング・システムでは異なる場合があります。この投稿では、ホスト・マシンがすでに稼働しており、このオペレーティング・システムの制御下で動作していると想定しています。Oracle Linux 8は、ここからダウンロードできます。
次のすべてのコマンドは、ホスト・マシンでrootとして実行する必要があります。:
# We will start from installing required packages...
dnf install -y dnf-utils zip unzip java-17-openjdk
# ...after that we will add Docker official repo to our host OS...
dnf config-manager --add-repo=https://download.docker.com/linux/centos/docker-ce.repo
# ...runc needs to be uninstalled, as it is in conflict with Docker software...
dnf remove -y runc
# ...now we can install Docker...
dnf install -y docker-ce
# ...create directory for Docker images and containers...
mkdir /var/lib/docker
# ...and start the Docker engine as a system service
systemctl enable --now docker.service
# ...finally we need to create an OS account, belonging to "docker" group...
# ...we will use this account to work with containers and images...
# ...in case, when an OCI instance is used, it is enough to add "opc" user to this group
useradd -m -d /home/docker -g docker docker
ここで、システム・ファイアウォールを再構成する必要があります。
# We need to enable masquerading to provide network services to containers...
firewall-cmd –-permanent --zone=public --add-masquerade
# ...open well-known ports used by Oracle software...
firewall-cmd --permanent --add-port=1521/tcp
firewall-cmd --permanent --add-port=5500/tcp
firewall-cmd --permanent --add-port=8080/tcp
firewall-cmd --permanent --add-port=8443/tcp
# ...and remember about MongoDB port - it will be used by MongoDB API, which we plan to enable
firewall-cmd --permanent --add-port=27017/tcp
コンテナ構成
Dockerをインストールして構成したら、プロジェクトの第2段階(Oracle Database 23c Development Edition Dockerイメージの開発)の作業を開始できます。まず、「ゴールデン・イメージ」(Docker Oracle Linux 8コンテナ)の作成から始めます。このコンテナでは、すべてが発生します…(現在、rootとして動作する必要はありません。かわりに、Dockerインストール・ステージの最後のステップで作成または変更されたアカウントを使用します)。
# As we need to install a couple of packages, like Oracle preinstall check, Oracle RDBMS, ords,...
# ...instead of uploading everything into the container, it is better to create it with a folder shared with the host...
# ...we also need to remember about port mapping...
# ...and providing some environment variables into the container, which we will use during software configuration
mkdir $HOME/orainstall
docker create -it --name oracle23de -p 1521:1521 -p 5500:5500 -p 8080:8080 -p 8443:8443 -p 27017:27017 \
-e DBA_PWD=ConvergedDB_1234 -e USR_PWD=ConvergedDB_1234 \
-e DOCKER_HOST=NOHOSTNAME \
-v $HOME/orainstall:/orainstall oraclelinux:8
ここでは
- DBA_PWDは、コンテナDBAのパスワードを提供する環境変数です。前述の例では、これを”ConvergedDB_1234″に設定しており、もちろん後でカスタマイズできます。
- USR_PWDは、コンテナのエンド・ユーザーのパスワードを提供する環境変数です。前述の例では、”ConvergedDB_1234″も設定されています
- DOCKER_HOSTは環境変数で、ORDSのSSLをアクティブ化する場合にのみ必要です。その場合は、ホストマシンの実際の「hostname.domain」またはIPアドレスに設定する必要があります。前述の例では、後で「NOHOSTNAME」の値が原因で、そのORDSは非SSLモードでのみ機能します。
次の手順を完了するには、$HOME/orainstallにダウンロードして、次のソフトウェアをインストールする必要があります。
- Oracle Database 23c Developer Edition
- Oracle REST Data Services 23.1.2
- Oracle Application Express 22.2
これで、コンテナの構成を開始できます。次のように接続します。:
# let's create a root session inside of the container
docker start oracle23de
docker exec -it oracle23de /bin/bash
ここでは、構成で使用される標準のlinuxパッケージをいくつかインストールします
# inside of the container...
dnf install -y sudo hostname zip unzip which java-17-openjdk
ご覧のとおり、この投稿では、OracleJDKのかわりにOpenJDKを使用しています…ライセンス関連の質問がある場合は、「OracleJDK Licensing FAQ」ページを参照するか、営業担当者に連絡してください。
これで、orainstallフォルダにダウンロードしたソフトウェア(Oracle Database 23c Preinstall Check、Oracle Database 23c DE、ORDSおよびApex)をインストールできるようになりました。この手順は、物理マシンにインストールする場合とまったく同じであるため、この手順では説明しません。唯一の違いは、Oracle DatabaseソフトウェアをDockerコンテナにインストールする場合、ORACLE_DOCKER_INSTALL環境変数をtrueに設定する必要がある点です。:
#...still inside of the container...
export ORACLE_DOCKER_INSTALL=true
#...typical Oracle rpms (preinstall check and database 23c DE) installation and database configuration takes place here...
#PLEASE NOTE, that we assume in this post, that during execution of "oracle-free-23c configure" the DBA password will be set to "ConvergedDB_1234"
次の手順は技術的にオプションです。sudoをrootにするために、oracleユーザーをsudoersファイルに追加できます(ただし、技術的な要件ではありません)。ただし、「Golden Oracle Database Image」をカスタマイズ可能にする場合は、それを行う必要があります。sudoを実行して、このインストールの機能を拡張できます。
#...and still inside of the container...
vi /etc/sudoers
root    ALL=(ALL)       ALL
oracle  ALL=(ALL)       ALL # this is the line we want to add to /etc/sudoers file
その後、いくつかの環境変数をoracleの.bashrcファイルに追加し、このアカウントのパスワードを設定することで、短期間で使いやすくなります。
# ...still and still inside of the container...
vi /home/oracle/.bashrc
# User specific aliases and functions
export ORACLE_NET_HOME=/opt/oracle/product/23c/dbhomeFree/network/admin
export ORACLE_CFG_SCRIPTS=/opt/oracle/scripts
export ORACLE_HOME=/opt/oracle/product/23c/dbhomeFree
export ORACLE_SID=XE
export ORDS_HOME=/opt/oracle/ords
export ORDS_CONFIG=$HOME/ordsconfig
export PATH=$ORACLE_CFG_SCRIPTS:$ORACLE_HOME/bin:$ORDS_HOME/bin:$PATH
# ...now let's setup the password for oracle to ARandomOne_1234. It will be changed automatically to $DBA_PWD value
# during the first start of the container with all the software installed
passwd oracle
ORDSおよびAPEXをインストールできるようになりました。つまり、ファイルを適切なディレクトリに解凍します…
# ...let's become "oracle" user inside of the container we're working on...
su - oracle
# ...being already "oracle" - create a directory for ORDS configuration...
mkdir $HOME/ordsconfig
# ...and another directory, where we'll place all the scripts required to automate the startup and configuration process...
mkdir /opt/oracle/scripts
# ...and "install" ords and apex - which means simply unzipping aOracle REST Data Services 23.1.2ppropriate files into appropriate directories.
unzip /orainstall/ords-latest.zip -d /opt/oracle/ords
unzip /orainstall/apex_22.2.zip -d /opt/oracle/product/23c/dbhomeFree
次のステップは、物理マシンに従来のインストールの場合とまったく同じ方法で、APEXおよびORDSを構成することです。これらのプロセスは多くのマニュアル、ブログ投稿、およびいくつかのYoutubeビデオでよく文書化されているため、ここでは説明しませんが、SSLベースの構成を実行する予定がある場合にも、このことを付け加えておきたいと思います。ORDSの初期構成段階で、httpモードとポート8080のみを構成します… なぜでしょう? もちろん、SSL証明書がある場合は、最初の実行からhttpsを使用するようにORDSを構成できます。ただし、この投稿では、コンテナが本番目的で構築されていないこと(通常は会社の証明書、パブリック・ドメインなどがあること)、およびデモンストレーションのために構築されていることを前提としています。その場合、–secureパラメータで開始されたORDSは、独自の自己署名証明書を生成します。これは、Webブラウザが警告を生成する原因であっても、デモを行うのに十分です…
ORDSの構成後は、(ORDSインストールで自動的に実行されないため)必要な場合があります。
- 追加のデータベース・ユーザーを作成します。これによって「developer」のロールが再生され、このアカウントにデータベース・アプリケーションの開発を許可する権限が付与されます。
- データベース・アクション・ユーザーを構成します。たとえば、ここで説明されています。
- MongoDB APIを有効にします。たとえば、ここで説明されています。
- サンプル・データベース・スキーマを作成します。また、複数の場所でよく説明されています。
最後のステップは、私たちの構成に特化したもので、最も重要なのは、OracleNet、データベースおよびodsの初期構成および起動を自動化する必要があることです。もちろん、その方法はたくさんありますが、dockerベースのインストールと物理や仮想上(ただし「伝統的な仮想化」マシン)へのインストールとの根本的な違いについて、常に覚えておく必要があります: Docker Oracle Linux 8イメージではsystemdは使用されません。このような場合、一般的なoratabベースのメソッドは適用されないためです。この記事では、古くからある(幸いにもほとんど忘れられていない)シェル・スクリプトの技術を使用します ;)。
次の図は、開発するスクリプトを示しています。これらはすべて、/opt/oracle/scripts ディレクトリに格納され、”oracle”ユーザーが所有します。
startup.sh (main script, which will be used in EntryPoint attribute of the Docker image we're working on)
    |
    |---- oraclenetsetup.sh (executed only once, during container first start, it configures listener.ora and tnsnames.ora files
    |
    |---- dbstartup.sh (executed every time when container starts. It starts listener and the database)
    |            |
    |            |
    |             ---- dbstartup.sql (starts the database)
    |
    |---- oraclepwdsetup.sh (executed only once, during container first start, it configures passwords for database users
    |     and oracle OS user
    |            |
    |            |
    |             ---- oraclepwdsetup.sql (called by oraclepwdsetup.sh, it changes passwords directly in the database)
    |
    |
     ---- apexstartup.sh (executed every time container starts - it starts ords)
そのため、最初はOracleNetファイル構成を自動化します。その内容(listener.oraおよびtnsnames.ora)はCONTAINERのホスト名に依存するため、これを行う必要があります。また、このホスト名は、コンテナの作成中に自動的に設定される場合があります…
# ...being still "oracle" user inside of the container...
# ...let's copy listener.ora and tnsnames.ora to .sample files....
cp $ORACLE_NET_HOME/listener.ora $ORACLE_NET_HOME/listener.sample
cp $ORACLE_NET_HOME/tnsnames.ora $ORACLE_NET_HOME/tnsnames.sample
# ...and change all occurences of the container hostname to %HOSTNAME% tag in these .sample files...
# ...and now we can start to work on the first of the serie of scripts we need to develop...
--- content of oraclenetsetup.sh ---
#!/bin/bash
if [ ! -f ${ORACLE_CFG_SCRIPTS}/system_already_configured ];
then
        export HOSTNAME=`hostname`
        printf "Configuring new container %s.\n" $HOSTNAME
        cp $ORACLE_NET_HOME/listener.sample $ORACLE_NET_HOME/listener.ora
        cp $ORACLE_NET_HOME/tnsnames.sample $ORACLE_NET_HOME/tnsnames.ora
        sed -i 's/%HOSTNAME%/'$HOSTNAME'/g' $ORACLE_NET_HOME/listener.ora
        sed -i 's/%HOSTNAME%/'$HOSTNAME'/g' $ORACLE_NET_HOME/tnsnames.ora
        printf "Container %s configured.\n" $HOSTNAME
fi
--- end of oraclenetsetup.sh ---
次の2つのスクリプトは、データベース・パスワードを$DBA_PWDおよび$USR_PWD (oraclepwdsetup.sqlおよびoraclepwdsetup.sh)に変更します。
--- oraclepwdsetup.sql content ---
alter user sys identified by &1;
alter user system identified by &1;
alter session set container=xepdb1;
alter user pdbadmin identified by &1;
alter user hr identified by &2;
alter user oe identified by &2;
alter user pm identified by &2;
alter user ix identified by &2;
alter user sh identified by &2;
alter user bi identified by &2;
exit
--- end of oraclepwdsetup.sql content ---


--- oraclepwdsetup.sh ---
#!/bin/bash
# it changes oracle user password to the value provided by DBA_PWD environment variable...
echo -e "ARandomOne_1234\n${1}\n${1}"|passwd
# ...and executes oraclepwdsetup.sql with values provided by DBA_PWD and USR_PWD environment variables.
sqlplus "/ as sysdba" @/opt/oracle/scripts/oraclepwdsetup.sql ${1} ${2}
--- end of oraclepwdsetup.sh ---
データベースの起動には、他に次の2つのスクリプトが必要です。:
--- dbstartup.sql ---
startup
exit
--- end of dbstartup.sql ---


--- dbstartup.sh ---
#!/bin/bash
lsnrctl start
sqlplus "/ as sysdba" @${ORACLE_CFG_SCRIPTS}/dbstartup.sql
--- end of dbstartup.sh ---
スクリプトがORDSを起動しました…
--- apexstartup.sh ---
#!/bin/bash

if [ "$DOCKER_HOST" = "NOHOSTNAME" ];
then
        # if we have not changed DOCKER_HOST value to a non-default, then it means that we want to use only non-SSL configuration
        nohup ords serve >> ${ORACLE_CFG_SCRIPTS}/oracle23de.log 2>&1 &
else
        # we have provided a non-default value for DOCKER_HOST, then it means, that we want to use SSL-based configuration
        # in that case ords will generate its own self-signed certificate during the first startup
        nohup ords serve --secure --port 8443 >> ${ORACLE_CFG_SCRIPTS}/oracle23de.log 2>&1 &
fi
--- end of apexstartup.sh ---
今こそ、小規模なプロジェクトを完成させるときです。メイン・スクリプト – startup.sh
--- startup.sh ---
#!/bin/bash

# as we will use this script as the container entrypoint, it will not execute $HOME/.bashrc...
# ...so we need to setup the environment.
export ORACLE_NET_HOME=/opt/oracle/product/23c/dbhomeFree/network/admin
export ORACLE_CFG_SCRIPTS=/opt/oracle/scripts
export ORACLE_HOME=/opt/oracle/product/23c/dbhomeFree
export ORACLE_SID=FREE
export ORDS_HOME=/opt/oracle/ords
export ORDS_CONFIG=$HOME/ordsconfig
export PATH=$ORACLE_CFG_SCRIPTS:$ORACLE_HOME/bin:$ORDS_HOME/bin:$PATH

if [ ! -f ${ORACLE_CFG_SCRIPTS}/system_already_configured ];
then
        printf "Starting OracleNet configuration\n" >> ${ORACLE_CFG_SCRIPTS}/oracle23de.log 2>&1
        ${ORACLE_CFG_SCRIPTS}/oraclenetsetup.sh >> ${ORACLE_CFG_SCRIPTS}/oracle23de.log 2>&1
        printf "OracleNet configuration completed\n" >> ${ORACLE_CFG_SCRIPTS}/oracle23de.log 2>&1
        if [ "$DOCKER_HOST" != "NOHOSTNAME" ];
        then
                printf "ORDS SSL reconfiguration.\n"
                # we need to remove an old self-signed certificate if it exists. Otherwise ords will not generate a new one
                rm -f ${ORDS_CONFIG}//global/standalone/self-signed.*
                # we need to configure standalone.https.host property in order to make SSL-based configuration working
                ords config set standalone.https.host ${DOCKER_HOST} >> ${ORACLE_CFG_SCRIPTS}/oracle23de.log 2>&1
                printf "ORDS SSL reconfiguration completed.\n"
        fi
fi


# if the database instance is not up, there's need to start it up with apex
if [ `ps -ef|grep lgwr|wc -l` -lt 2 ];
then
        ${ORACLE_CFG_SCRIPTS}/dbstartup.sh >> ${ORACLE_CFG_SCRIPTS}/oracle21xe.log 2>&1
        ${ORACLE_CFG_SCRIPTS}/apexstartup.sh >> ${ORACLE_CFG_SCRIPTS}/oracle21xe.log 2>&1
fi


# if we start the container for the first time, there is need to change default passwords
if [ ! -f ${ORACLE_CFG_SCRIPTS}/system_already_configured ];
then
        printf "Starting password configuration\n" >> ${ORACLE_CFG_SCRIPTS}/oracle23de.log 2>&1
        ${ORACLE_CFG_SCRIPTS}/oraclepwdsetup.sh ${DBA_PWD} ${USR_PWD} >> ${ORACLE_CFG_SCRIPTS}/oracle23de.log 2>&1
        printf "Password configuration completed\n" >> ${ORACLE_CFG_SCRIPTS}/oracle23de.log 2>&1
        touch ${ORACLE_CFG_SCRIPTS}/system_already_configured >> ${ORACLE_CFG_SCRIPTS}/oracle23de.log 2>&1
        printf "New system configuration completed\n" >> ${ORACLE_CFG_SCRIPTS}/oracle23de.log 2>&1
fi

tail -f /opt/oracle/scripts/oracle23de.log

--- end of startup.sh ----
もちろん、作成したすべての*.shスクリプトに実行権限を追加することを覚えておく必要があります。:
#...being still oracle inside of the container...
chmod 755 ${ORACLE_CFG_SCRIPTS}/*.sh
「ゴールデン・イメージ・コンテナ」での作業が完了しました!
Dockerイメージの作成
最後に、コンテナ内のジョブが完了します。ここで必要なことは、Dockerイメージを作成し、(別のイメージをインスタンス化して)動作するかどうかをテストし、これを行う場合はレジストリに公開することです。それ以降、次のステップはホスト・マシンで実行されます。
まず、準備したコンテナからイメージを作成する必要があります。:
# ...inside of the host machine...
# ...let's stop the container we were working on...
docker stop oracle23de
# ... create a "golden image" from this container ...
docker commit -a "Author's data" --change='ENTRYPOINT ["/opt/oracle/scripts/startup.sh"]' \
--change='USER "oracle"' --change='ENV DOCKER_HOST=NOHOSTNAME' \
oracle23de oracle23degoldenimage
次に、テスト・コンテナを作成して、設定の動作を確認できます。
# ...still in a host machine as a docker user...
docker create -it --name test \
-p 1521:1521 -p 5500:5500 -p 8080:8080 -p 8443:8443 -p 27017:27017 \
-e DOCKER_HOST="<host>.<domain>|<host_ip_address>" \
oracle23degoldenimage
# ...and finally - start the test container...
docker start test
コンテナが提供するサービスを次の方法でテストできます。:
- データベース、SQLcl: sql user/password@<docker_host_machine>:1521/xepdb1 などを使用
- Application Express
- SSLが構成されている場合: https://<docker_host_machine>:8443/ords
- SSLが構成されていない場合: http://<docker_host_machine>:8080/ords
- Database Actions
- SSLが構成されている場合: https://<docker_host_machine>:8443/ords/sql-developer
- SSLが構成されていない場合: http://<docker_host_machine>:8080/ords/sql-developer
もちろん、oracleユーザーが/etc/sudoersファイルにあるため、コンテナのrootアカウントを使用して追加のパッケージをインストールするか、通常、さらにカスタマイズを実行できます。一般に、作成したイメージを完全に制御できます。テスト・インストールの場合は、かなりの利点があります(ただし、このようなイメージをプロダクションの目的で使用する場合は、そのような構成がセキュリティ・スレッドに駆動する場合があります)。
まとめ
完了したすべてのステップをまとめると:
- Dockerイメージを作成し、Oracle Databaseを基盤として使用して、最新の開発環境で必要なすべてのサービスを提供しています。
- このイメージは、新しい環境を1分でプロビジョニングおよび起動するために使用できます。
- 最後に、完全に無料です!
このようなOracle Database Golden Imageは、様々なCI/CDシナリオで簡単に使用でき、最新の開発環境またはDevOps/SysOpsアプローチの要件を満たします。また、Oracle 23c DEには、PartitioningやIn-Memoryオプションなど、Enterprise Editionから直接提供される多くの機能があります。また、コンバージド・データベースのマルチモデルおよびクロスモデル・アプローチもサポートします。もちろん、いくつかの制限もありますが、それは無料であることの明らかな結果です :)。というわけで、うわさや偽りの意見を信じてはいけません…
Oracle Converged DatabaseとDockerコンテナで楽しんでください 🙂
重要なリソース
Oracle 23 Developer Editionメイン・ページ
Oracle 23c Developer Editionダウンロード
