A few months ago we released the Oracle Database API for MongoDB on Autonomous Database. This allows you to switch MongoDB applications to run transparently in Oracle’s converged database. It preserves the existing application but opens up the data to many more use-cases, such as SQL access for complex analytic queries, and the ability to freely mix and merge JSON document data with relational, spatial and other data types.
In case you’re on Autonomous Database and missed the earlier announcement, you can read about it here.
With the latest 22.3.0 release of Oracle REST Data Services (ORDS), the Database API for MongoDB is now available for unmanaged Oracle Database on-premises as well as in the cloud.
It can be installed against
- Any Oracle Database 21c (or 23c when available)
- Any Autonomous Database, including ADB Serverless, ADB-Dedicated and ADB on Exadata Cloud@Customer, which all run Oracle Database 19c.
- Possibly any Oracle Database 19c with a very recent patch set, but for that you need to talk to us …
This blog post walks you through the steps needed to set up ORDS and your database on a Linux machine, and connect to it using the standard Mongo Shell tool. ORDS is platform-independent, so the tool can be set up on Windows or Mac machines as well, but the instructions here will concentrate on Linux (and specifically Oracle Linux or similar RedHat-based systems when we come to set up the firewall for remote access).
Customers on Autonomous Database are able to configure their own unmanaged ORDS service with the Database API for MongoDB. We will explore that option at the end of the article.
Pre-requisites
Before you start you should ensure you have the following:
- An Oracle Database 21c or later. The main instructions will assume this is an on-premise database, ADB cloud databases will be described at the end.
- Java version 11 or later.
- Knowledge of your TNS connection details for the database. This can either be Server/Port/Servicename, or a TNS alias string.
- Knowledge of an administrative user with ‘AS SYSDBA’ level access – normally SYS – and the password for that user.
- MongoDB client tools such as Mongo Shell or Compass installed somewhere to test the API
Steps
Step 1: Download
Download the latest ORDS release from http://oracle.com/rest. Make sure the release version is at least 22.3.0. I downloaded it to my Downloads directory, /home/oracle/downloads
Step 2: Create Directories
Create a directory for ORDS itself, and a config directory. I chose /home/oracle/ords and /home/oracle/ordsconfig. So I did:
mkdir /home/oracle/ords
mkdir /home/oracle/ordsconfig
Step 3: Unzip the ORDS download
Unzip the downloaded file into the ORDS directory you created (note that the file name could be different)
cd /home/oracle/ords
unzip /home/oracle/Downloads/ords*.zip
Step 4: Set Environment Variables
We need to set our PATH variable to point to the ords/bin directory, and another variable ORDS_CONFIG to point to the config directory we created:
export PATH=/home/oracle/ords/bin:$PATH
export ORDS_CONFIG=/home/oracle/ordsconfig
You will probably want to put those in your startup file (e.g. .bashrc) as well as running them on the command line. You don’t need to set ORDS_CONFIG, instead you can use --config <directory> in each ords command.
Step 5: Run the ORDS installer
You can start the ORDS install simply by running:
ords install
Choose the default option 2: Create or update a database pool and install/upgrade ORDS in the database.
You will now be prompted for your database connection details, using one of hostname/port/service name, TNS alias and directory, or a custom URL. I chose option 1 – Basic (hostname, port, service name). After providing those, you will be prompted for an admin user (normally SYS. You cannot use SYSTEM or PDBADMIN for this step).
Next you will be prompted for tablespaces – you should be able to accept the defaults, unless you specifically want ORDS metadata stored elsewhere.
Then you’ll be prompted for additional features. You should choose the default: [1] Database Actions (Enables all features). At the next prompt, choose [1] Configure and start ORDS in standalone mode.
Finally, we get the choice to install ORDS for HTTP or HTTPS. To use HTTPS we will need a certificate – we can either provide our own (see this article for an easy way to do it) or have ORDS generate one. But for now I’ll assume we’re going to use HTTP. You will be prompted for a port – accept the default 8080 unless you already have something running there.
ORDS will now start. You will see a lot of output, then the session may appear to hang. This is simply because the ORDS server is running in this session. We need to do some further manual configuration, so stop the server using CTRL-C.

Step 6: Configure ORDS to enable MongoDB API
Run the following command (ensuring that ORDS_CONFIG is still set in the current session):
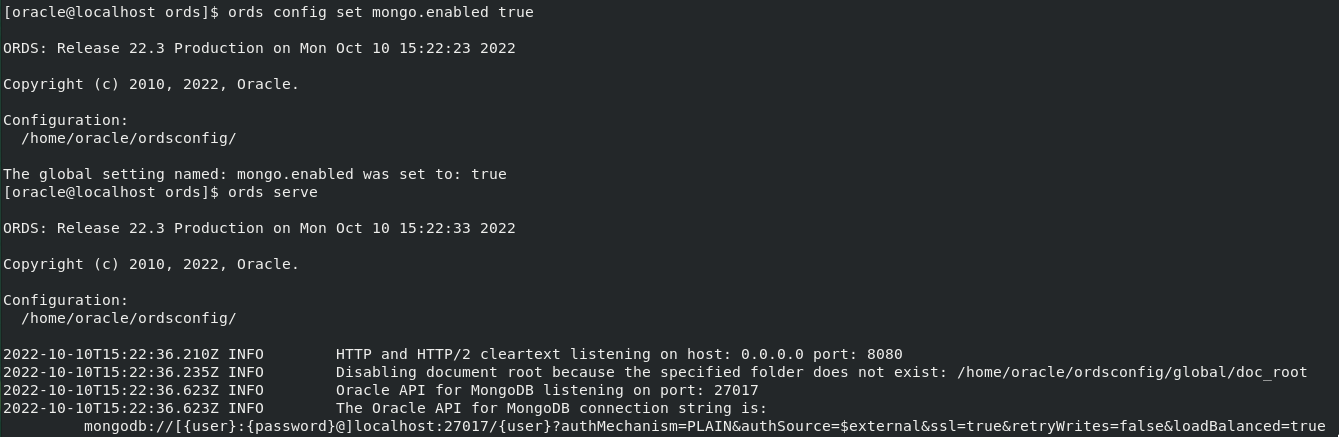
ords config set mongo.enabled true
Step 7: Restart ORDS
Restart ords by running:
ords serve
ORDS will now run in that terminal, so you will need to continue in a separate terminal (or start it in the background). Near the start of the output, you should see something like:
2022-09-15T14:32:43.168Z INFO The Oracle API for MongoDB connection string is:
mongodb://[{user}:{password}@]localhost:27017/{user}?authMechanism=PLAIN&authSource=$external&ssl=true&retryWrites=false&loadBalanced=true
You should copy that URI for later use.
Step 8: Configure a database user
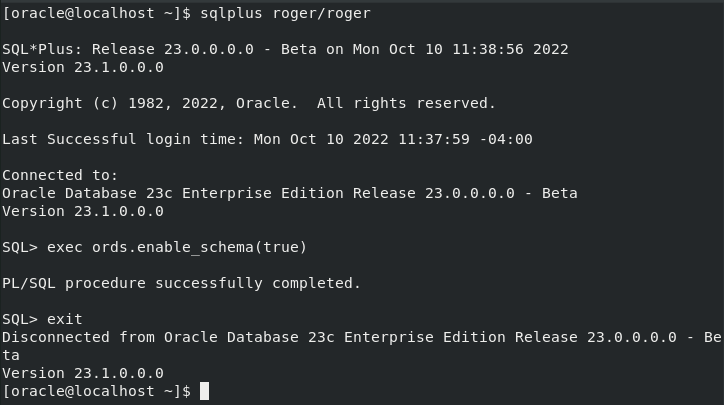
Choose or create a database user to use the MongoDB API and host JSON collections. The user should have normal database roles such as CONNECT and RESOURCE, execute privilege on SODA_APP and a suitable tablespace quota (it’s a common mistake to forget the SODA_APP privilege). I used an existing database user called ROGER. We must connect to the database using that user (from SQL*Plus, SQL Developer, SQLcl or other tools) and call a procedure ORDS.ENABLE_SCHEMA with parameter TRUE. For example:
sqlplus roger/password
exec ords.enable_schema(true)
quit
Step 9 (Optional): Run Database Actions
We can fire up Database Actions by opening http://localhost:8080/ords/sql-developer (assuming the browser is on the same machine). If you chose HTTPS and a self-signed certificate you will likely get a security warning from your browser which you will need to override.
Step 10: Configure Firewall
The ORDS server is set up on port 8080 by default. The MongoDB API listener runs on port 27017. If you want to connect to either or both from a different machine, you will need to configure the firewall on ORDS machine to allow incoming connections on ports 8080 and 27017. The method for doing this varies with Linux version, but on Oracle Linux or other RedHat-type distributions, you should be able to use these commands (either as root or using sudo):
firewall-cmd --zone public --permanent --add-port 27017/tcp
firewall-cmd --zone public --permanent --add-port 8080/tcp
firewall-cmd --reload

If you’re running ORDS on an OCI Cloud VM, you will also need to add Ingress Rules (and possibly Egress Rules if egress is not unrestricted) for ports 27017 and 8080. You can find those in Security List Details for the Virtual Cloud Network being used by your VM.
Step 11: Run your favorite MongoDB tool or program!
All you need to do now is take the URI you saved above, and modify it as follows:
- Surround the URI with quotes if you’re going to use it on the command line (for Mongo Shell, for example). Use single quotes for Linux, double quotes for Windows
- Change ‘localhost’ to the IP address or full machine name of the machine where ORDS is running (you can leave it as localhost if the MongoDB tool or program is running on the same machine)
- Change [{user}:{password}@] to our database username and password. Retain the @ symbol but remove all the brackets.
- Change the {user} later in the URL to our database username as well.
So if my machine is called ordshost.example.com, my database username is ‘roger’ and my database password is ‘Password1’ then he full URI on a Mac machine would be:
'mongodb://roger:Password1@ordshost.example.com:27017/roger?authMechanism=PLAIN&authSource=$external&ssl=true&retryWrites=false&loadBalanced=true'
Note: If your password contains certain special characters, they will need to be escaped according to the table in the documentation.
The URI can be used whenever you want to connect using a MongoDB tool or driver to the Oracle Database.
One addition is that if you are running ORDS over HTTP, or over HTTPS with a self-signed certificate, you will need to to specify –tlsAllowInvalidCertificates (or its equivalent for non-shell-based tools). So our full command for Mongo Shell would be:
mongosh --tlsAllowInvalidCertificates 'mongodb://roger:Password1@ordshost.example.com:27017/roger?authMechanism=PLAIN&authSource=$external&ssl=true&retryWrites=false&loadBalanced=true'

If you don’t already have MongoDB shell installed, you can get it from the MongoDB download page.
Step 11: Migrate your application
Now that you’ve shown you can connect to Oracle Database using Mongo Shell, you can use the exact same connect string in your application. Just swap out the existing connection URL and include the one for your ORDS/Oracle Database instead.
Using ORDS and the Database API for MongoDB with Autonomous Database
The Database API for MongoDB is available pre-configured for ADB Serverless. Should you wish to run it with ADB-Dedicated or ADB on Exadata Cloud@Customer you will need to install a “customer managed” ORDS installation and configure that for the MongoDB API. In fact, even ADB Serverless users may wish to install a customer-managed ORDS, since this gives greater control over ORDS configuration.
The process is slightly different from installing for an on-premise database. You should follow the instructions in the documentation: Installing and Configuring Customer Managed ORDS on Autonomous Database. In section 7.4, you simply need to add the extra configuration step:
ords --config <configuration_directory> config set mongodb.enable true
Conclusion
We hope you’re as excited as we are by this new innovation. Now you just need fifteen minutes to set it up for youself. We’d love to hear from you, with any comments or feedback, and we’d also love to hear about the applications you’re moving from MongoDB to Oracle’s Converged database. Just get in touch.
Further Reading
- Web Page: Oracle JSON
- Web Page: Autonomous JSON Database
- LiveLab: Developing with JSON and SODA in Oracle Database
- LiveLab: Using the Database API for MongoDB
- More blogs: JSON category at Database Insider
- GitHub: Oracle JSON
- Web Page: Get Autonomous JSON Database for free
The full docs for the Database API for MongoDB are available here: