

Oracle Fusion Applications teams often need a faster way to investigate scheduled-process failures, audit events, access activity, security changes, metadata updates, and SOA activity. Oracle Log Analytics centralizes this information so teams can search the underlying records in Log Explorer and use Oracle-defined dashboards to investigate common issues.
In the previous post, we introduced the Oracle-defined Fusion dashboards available in OCI Log Analytics. This post explains how to configure the OCI Log Analytics side of the solution so that Fusion data is collected and available for analysis.
By the end of this post, you will have a Management Agent collecting selected Fusion log sources into OCI Log Analytics. You can then verify the data in Log Explorer and open the corresponding Oracle-defined dashboards.
Note: This post does not cover the Fusion Applications-side configuration, including the service account, roles, privileges, and API access. Complete those prerequisites first by following the Part 1 post on required permissions for Fusion Applications audit and security log ingestion.
What you will configure
To collect Fusion Applications logs, you will:
- Create an OCI Compute instance.
- Install and verify the Management Agent and Log Analytics plugin.
- Create a credential JSON file and register it in the Management Agent credential store.
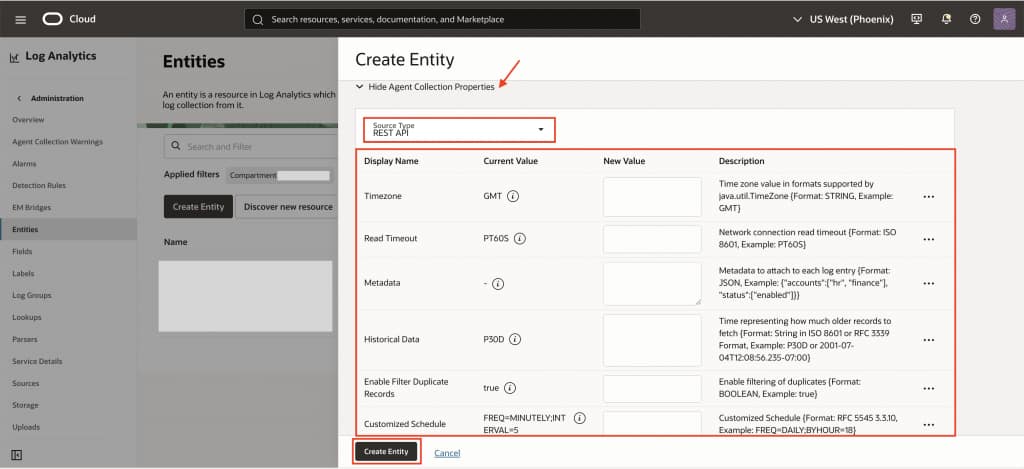
- Create an Oracle Fusion Applications entity in Log Analytics and configure its REST API properties.
- Associate Oracle-defined Fusion log sources with the entity.
- Verify that records are arriving in Log Explorer.
Before you begin
Before starting this configuration, ensure that the Fusion Applications service account, roles, privileges, and REST API access have been configured. These Fusion-side prerequisites are covered in Part 1.
You also need an OCI Compute instance that can connect to the Fusion Applications endpoints over HTTPS. Note the Fusion pod_url, login_url and, if your network requires it, a proxy_url.
Confirm OCI IAM policies
Before configuring collection, ensure that the required OCI IAM policies for Oracle Log Analytics and Management Agents are in place. These policies allow administrators to install and manage Management Agents and allow the agents to upload collected log records to OCI Log Analytics.
For the required user-group policies, Management Agent dynamic group, and log-upload permissions, see Allow Continuous Log Collection Using Management Agents.
1. Create a Compute instance and install the Management Agent
Create an OCI Compute instance in a compartment where you can manage the Management Agent and Log Analytics resources. The instance must have outbound HTTPS connectivity to both Fusion Applications and OCI Log Analytics.
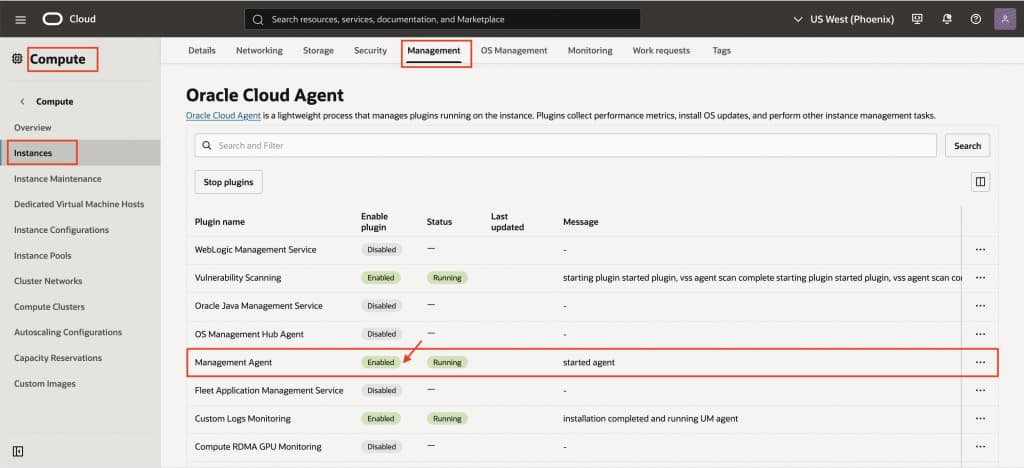
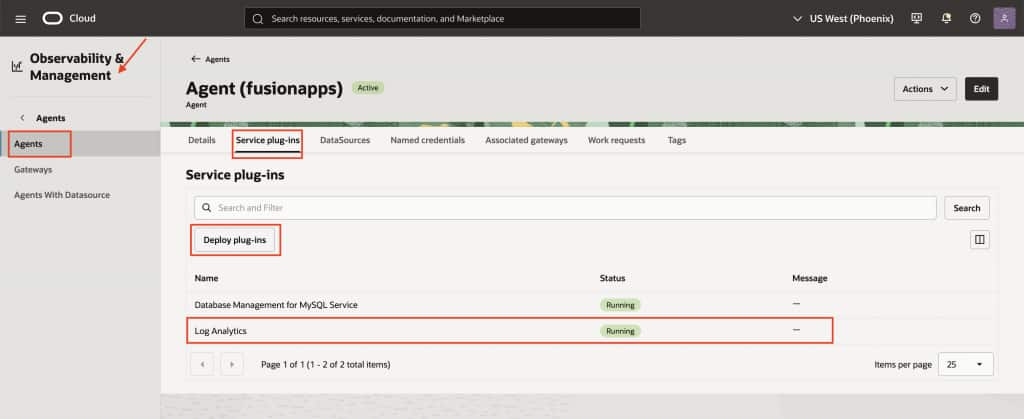
On the Compute instance, enable the Management Agent plugin through Oracle Cloud Agent. Ensure the Log Analytics plugin is deployed as part of the installation.
You should see the Management Agent in an Active state in the OCI Console before continuing.
2. Create and register the Fusion Applications credential
Navigate to the Management Agent bin directory for your installation. For an agent deployed through Oracle Cloud Agent, the directory is:
/var/lib/oracle-cloud-agent/plugins/oci-managementagent/polaris/agent_inst/binFor a manually installed Management Agent, use:
/opt/oracle/mgmt_agent/agent_inst/binCreate a credential JSON file. The following example creates FA-CREDS.json in /tmp:
cat > /tmp/FA-CREDS.json <<'EOF'
{
  "source": "lacollector.la_rest_api",
  "name": "FA-CREDS",
  "type": "HTTPSBasicAuthCreds",
  "description": "Fusion Applications REST API credentials",
  "properties": [
    {
      "name": "HTTPSUserName",
      "value": "CLEAR[<fusion-service-account-username>]"
    },
    {
      "name": "HTTPSPassword",
      "value": "CLEAR[<fusion-service-account-password>]"
    }
  ]
}
EOF
Replace <fusion-service-account-username> and <fusion-service-account-password> with the Fusion Applications service-account credentials configured as part of the Fusion-side prerequisites.
Then register the credential with the Management Agent:
cat /tmp/FA-CREDS.json | ./credential_mgmt.sh -s logan -o upsertCredentialsVerify that the credential is registered:
./credential_mgmt.sh -o listCredentials -s loganConfirm that FA-CREDS appears in the credential list. This confirms that the credential is available to the Management Agent.
After registration, securely delete the temporary JSON file.
3. Create an Oracle Fusion Applications entity
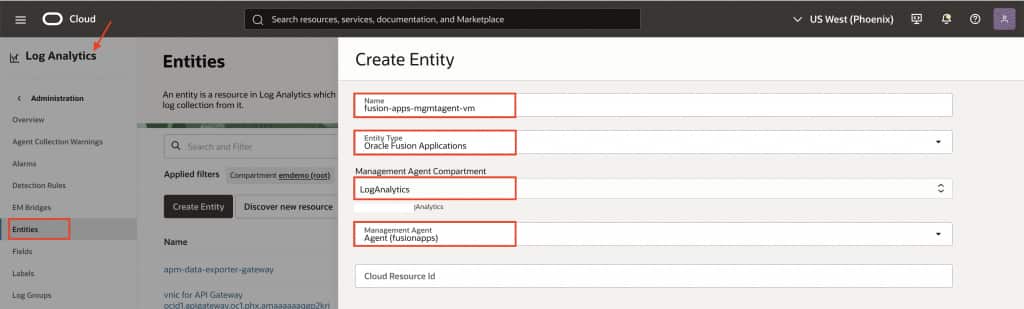
In the OCI Console, go to Observability & Management > Log Analytics > Administration > Entities.
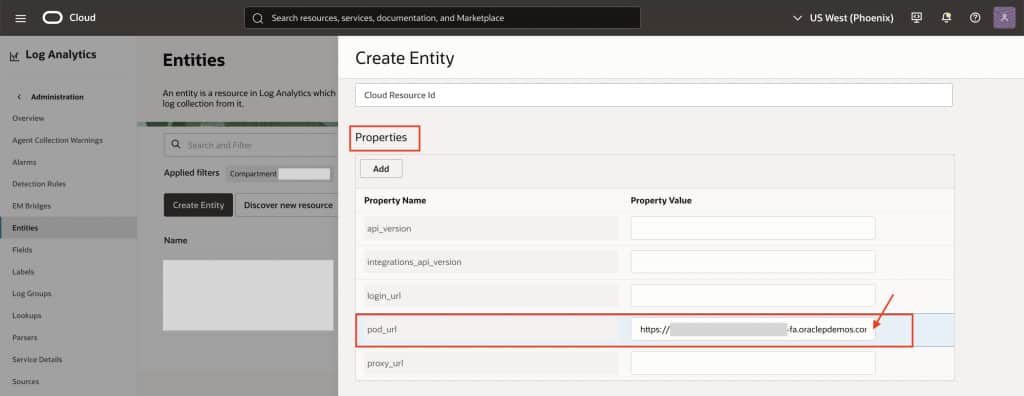
Create an entity with the following configuration:
| Field | Value |
|---|---|
| Entity type | Oracle Fusion Applications |
| Management Agent | The Management Agent installed on the Compute instance |
login_url | Fusion Applications login URL |
pod_url | Fusion Applications pod base URL |
proxy_url | Optional proxy URL, if required |
| Source type | REST API |
Select the same Management Agent where you registered the FA-CREDS credential. The agent uses this credential when it calls the Fusion REST API endpoints.
Use a meaningful entity name, such as fusion-apps-mgmtagent-vm or fusion-prod, so the environment is easy to identify in Log Explorer and dashboards.
In the entity’s agent collection properties, configure the REST API collection schedule, historical-data collection, and duplicate-record filtering based on your operational requirements.
Optional: Simplify credential management for multiple environments
If one Management Agent collects Fusion Applications logs from multiple environments, such as Dev and QA, you can use an entity property to avoid specifying the credential name separately in every log entity.
Add an entity property named CREDS and set its value to the name of the credential registered on the Management Agent for that environment.
| Entity | CREDS value |
|---|---|
fusion-dev | dev-FA-CREDS |
fusion-qa | qa-FA-CREDS |
When associating ESS, OPSS, MDS, SOA, or other Fusion log sources, configure each source to use the entity’s CREDS property as its REST API credential name.
This lets all sources associated with an entity use one credential setting. If you need to switch that environment to a different named credential, update CREDS once on the entity rather than updating every associated source.
4. Associate Oracle-defined Fusion sources
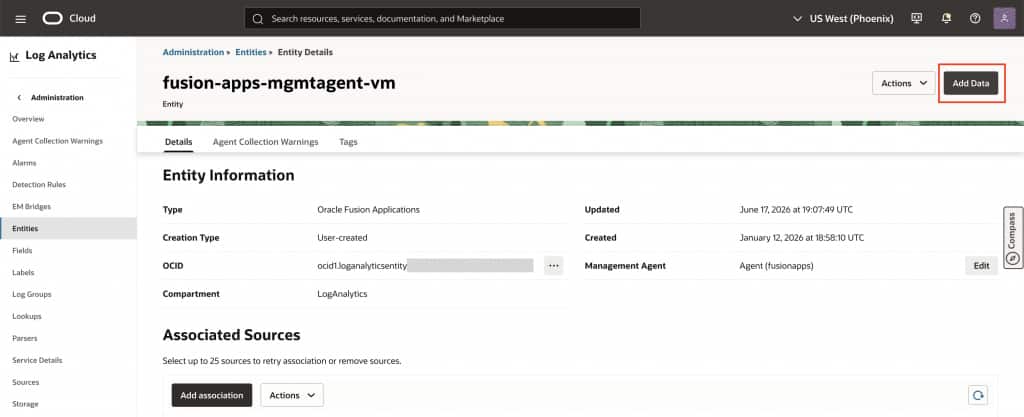
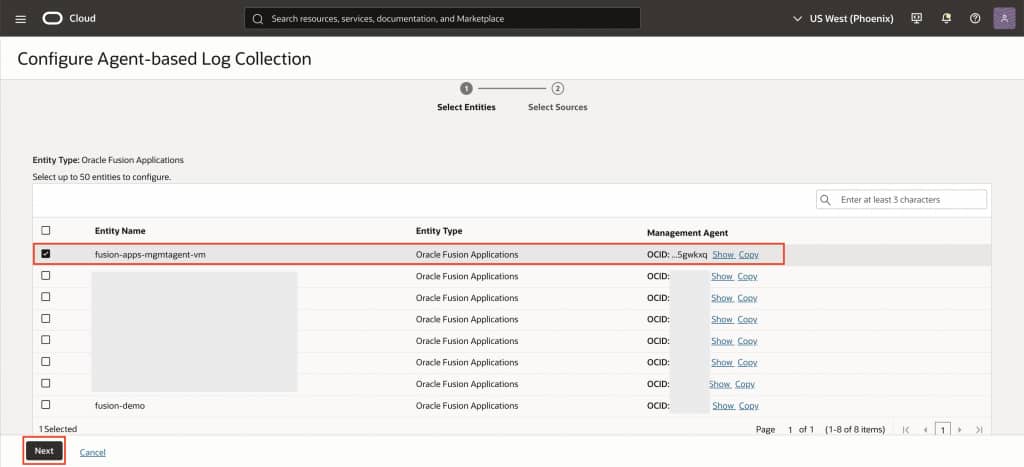
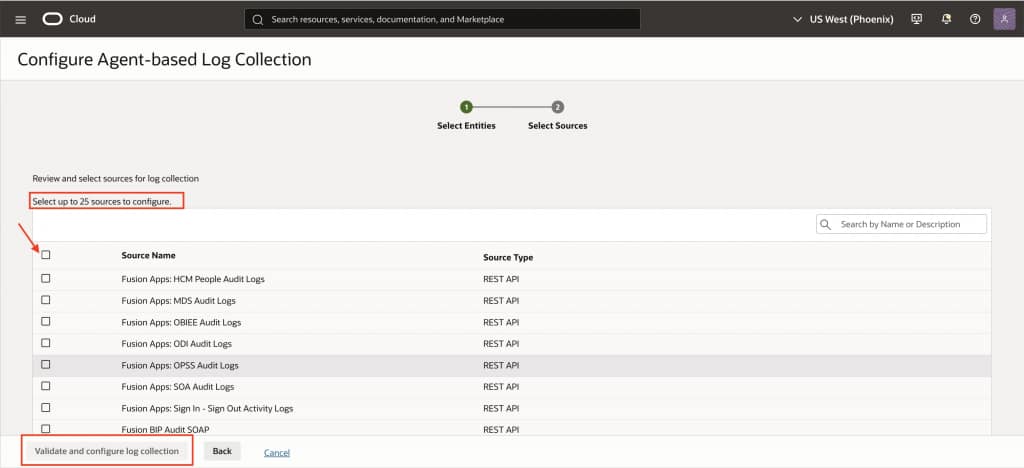
On the entity details page, select Add Data and search for Fusion Apps: Select the Oracle-defined sources that support your use cases, choose a log group, and validate the configuration before starting collection.
Start with the sources most relevant to your immediate needs:
| Use case | Oracle-defined source |
|---|---|
| ESS job requests, status, and performance | Fusion Apps: Enterprise Scheduler Service Request Logs |
| HCM business-object audit | Fusion Apps: HCM People Audit Logs or Fusion Apps: HCM Payroll Audit Logs |
| Metadata and customization audit | Fusion Apps: MDS Audit Logs |
| Role, policy, and permission audit | Fusion Apps: OPSS Audit Logs |
| Fusion workflow and service-oriented process activity | Fusion Apps: SOA Audit Logs |
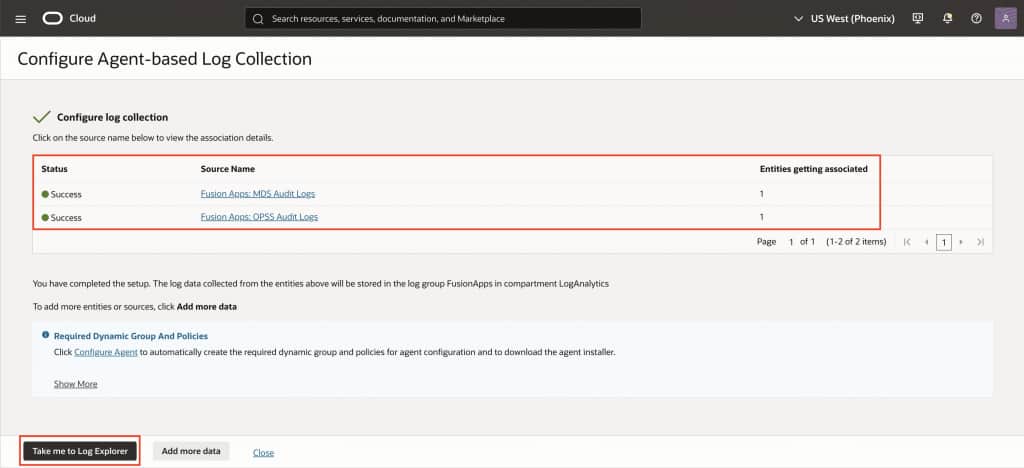
When prompted for a REST API credential, select FA-CREDS. Validation should complete successfully before you configure the association.
After validation succeeds, configure the association. The Management Agent begins collecting data from the selected Fusion REST API sources.
5. Verify data in Log Explorer
After collection starts, go to Observability & Management > Log Analytics > Log Explorer.
Set a recent time range and run a query similar to this:
'Log Source' in (
  'Fusion Apps: Enterprise Scheduler Service Request Logs',
  'Fusion Apps: OPSS Audit Logs',
  'Fusion Apps: MDS Audit Logs',
  'Fusion Apps: SOA Audit Logs'
)
| stats count as logrecords by 'Log Source'
| sort -logrecords
If the query returns records, collection is working. You can then open the appropriate Oracle-defined dashboard, select the compartment and time range, and begin investigating the data.
For example, open Fusion ESS Request Logs Analysis after ESS records arrive, or Oracle Fusion Apps: OPSS Audit after OPSS audit records are collected.
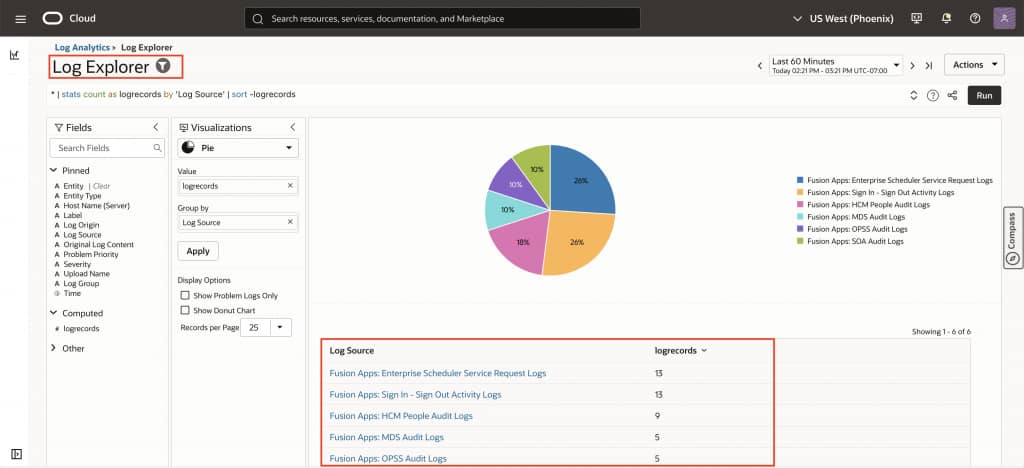
A successful result returns one or more log-record counts by log source. If the result is empty, continue to the troubleshooting section.
Troubleshooting:
If data does not appear in Log Explorer, check the following:
- The Management Agent is active.
- The Compute instance can reach the Fusion Applications endpoint.
- The entity contains the correct
login_urlandpod_url. - The credential name in the source configuration matches the credential registered with the agent.
- The Fusion-side API roles and privileges were configured as described in Part 1.
- The OCI IAM policies allow the Management Agent to upload log records.
- The source-entity association completed successfully.
- The selected time range includes the collection period.
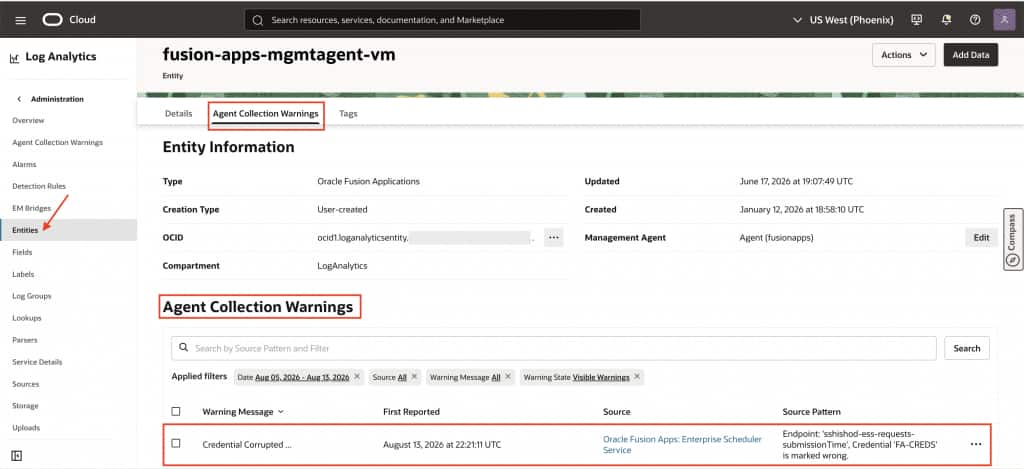
Start with Log Explorer to confirm that records are present. Once you see the records, open the corresponding Oracle-defined dashboard to investigate the data.
Next steps
Once you confirm data in Log Explorer, open the Oracle-defined Fusion dashboards covered in the previous post. Use them to investigate ESS failures, HCM changes, metadata activity, role and policy updates, and SOA audit events without starting from custom queries.