Application Performance Monitoring (APM) is a powerful tool that provides end-to-end visibility into an application’s performance, allowing developers and DevOps teams to quickly identify bottlenecks and areas for improvement in real-time.
The distributed tracing capability of APM is particularly useful in modern distributed systems, where transactions often involve multiple components and services. By tracking every step of every transaction without sampling or aggregation, APM provides a complete and accurate picture of the system’s performance.
This level of visibility enables teams to:
- Identify performance bottlenecks: By analyzing the entire transaction flow, teams can pinpoint exactly where slowdowns or errors are occurring.
- Optimize system performance: With real-time data, teams can make informed decisions about how to optimize system resources, improve code efficiency, and reduce latency.
- Improve user experience: By resolving issues quickly and efficiently, teams can ensure a better user experience and reduce the risk of errors or downtime.
- Simplify troubleshooting: With detailed transaction data at their fingertips, teams can quickly diagnose issues without having to sift through mountains of logs or data.
APM with distributed tracing capability is an essential tool for organizations looking to optimize its application performance and deliver high-quality user experiences
This blog is for those who have already configured the APM Java agent and are collecting APM data. This overview is provided to help you understand APM data, its impact on billing, and how to optimize the agent configuration to exclude less important data. This optimization can help you reduce operational costs while maintaining performance insights.
For a step-by-step guide on onboarding APM agents, refer to the blog – How OCI APM can help manage the complexity of modern application monitoring.
Understanding APM data
APM Java agent collects data in the form of Trace and Span, More related details on Traces and Spans are given below.
- Trace: Represents the complete lifecycle of a single request or transaction as it propagates through a distributed system. It provides an end-to-end view of the request’s path, covering all involved services and components.
- Span: Represents an individual unit of work within a trace. Spans are the building blocks of a trace, containing detailed information about specific operations, such as timing, service names, and metadata.
In summary, Trace represents the end-to-end journey of this transaction. It consists of multiple Spans, each representing a distinct operation. This trace helps in debugging performance bottlenecks or failures in distributed systems.
Understanding Trace and Spans with examples
A demo application is equipped with the APM Java agent and APM Real User Monitoring agent to track both frontend and backend activities. The APM UI below displays data captured from transactions executed on the demo application.
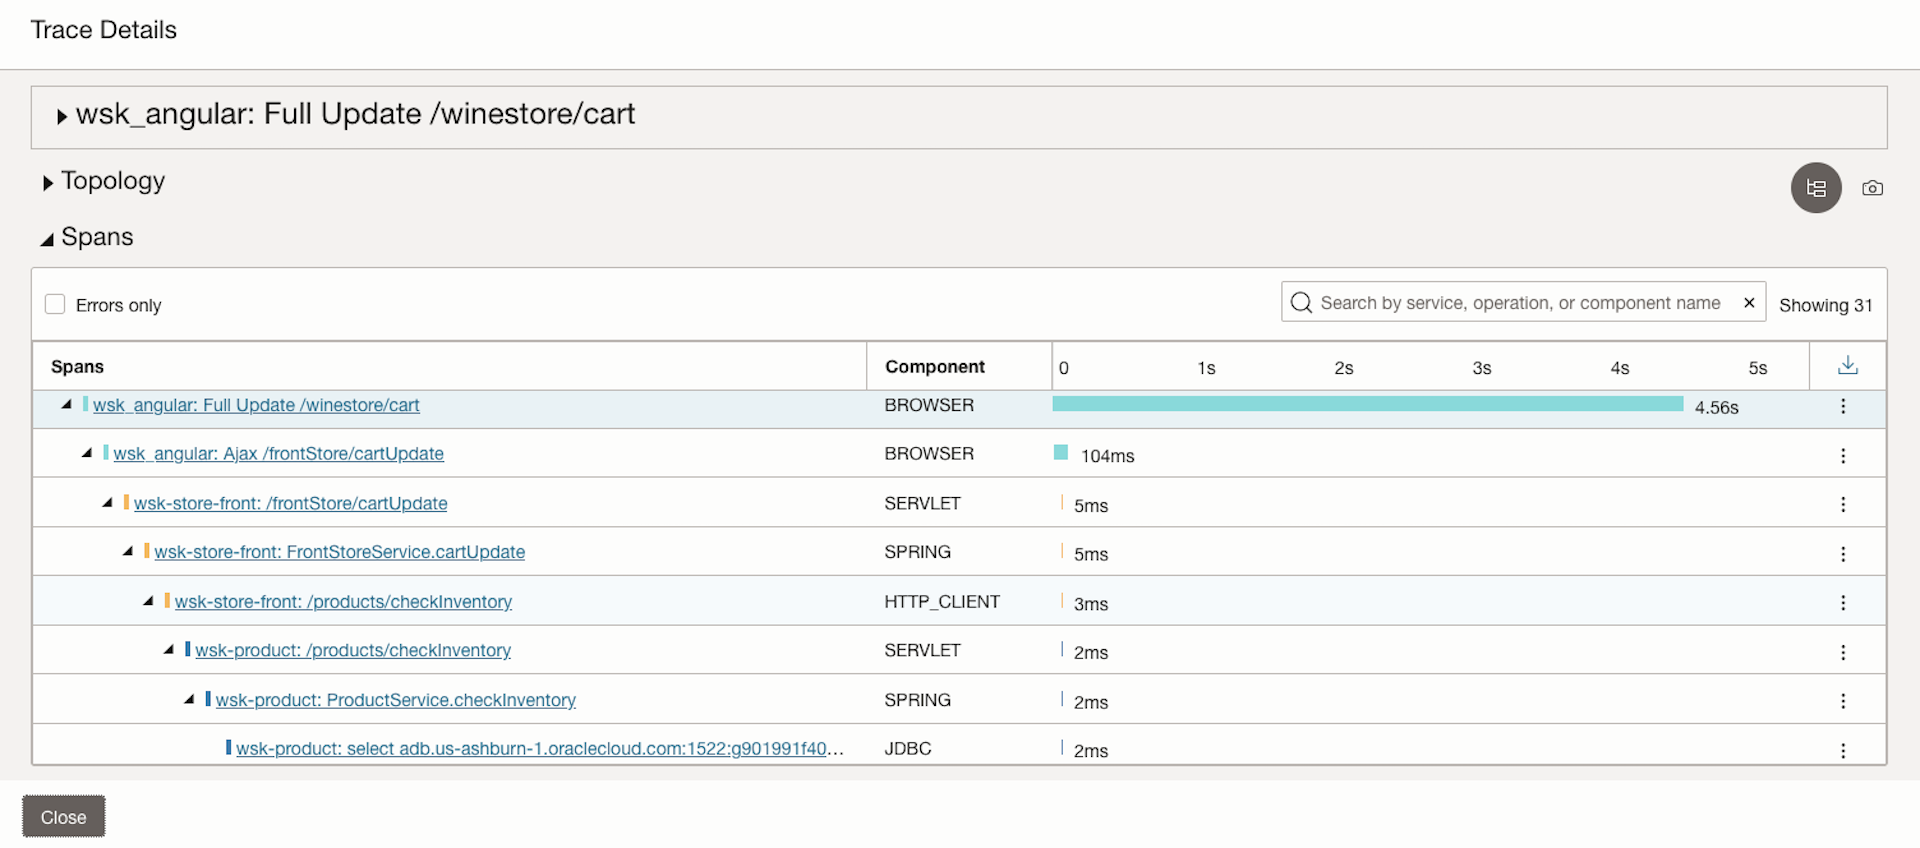
- The APM UI trace details show a trace composed of multiple spans with a parent-child relationship.
- Each transaction captures independent operations within the transaction flow as spans.
- In the example above:
- The browser creates the root span (initial span).
- The application server generates a child span (SERVLET).
- The SERVLET span contains multiple spans for different components, including:
- HTTP_CLIENT
- SPRING
- JDBC
APM usage and billing details
APM data is structured in the form of traces and spans. APM billing is determined by the number of spans collected per hour.
Understanding APM Billing – Estimate costs for APM using the Oracle Cloud Cost Estimator
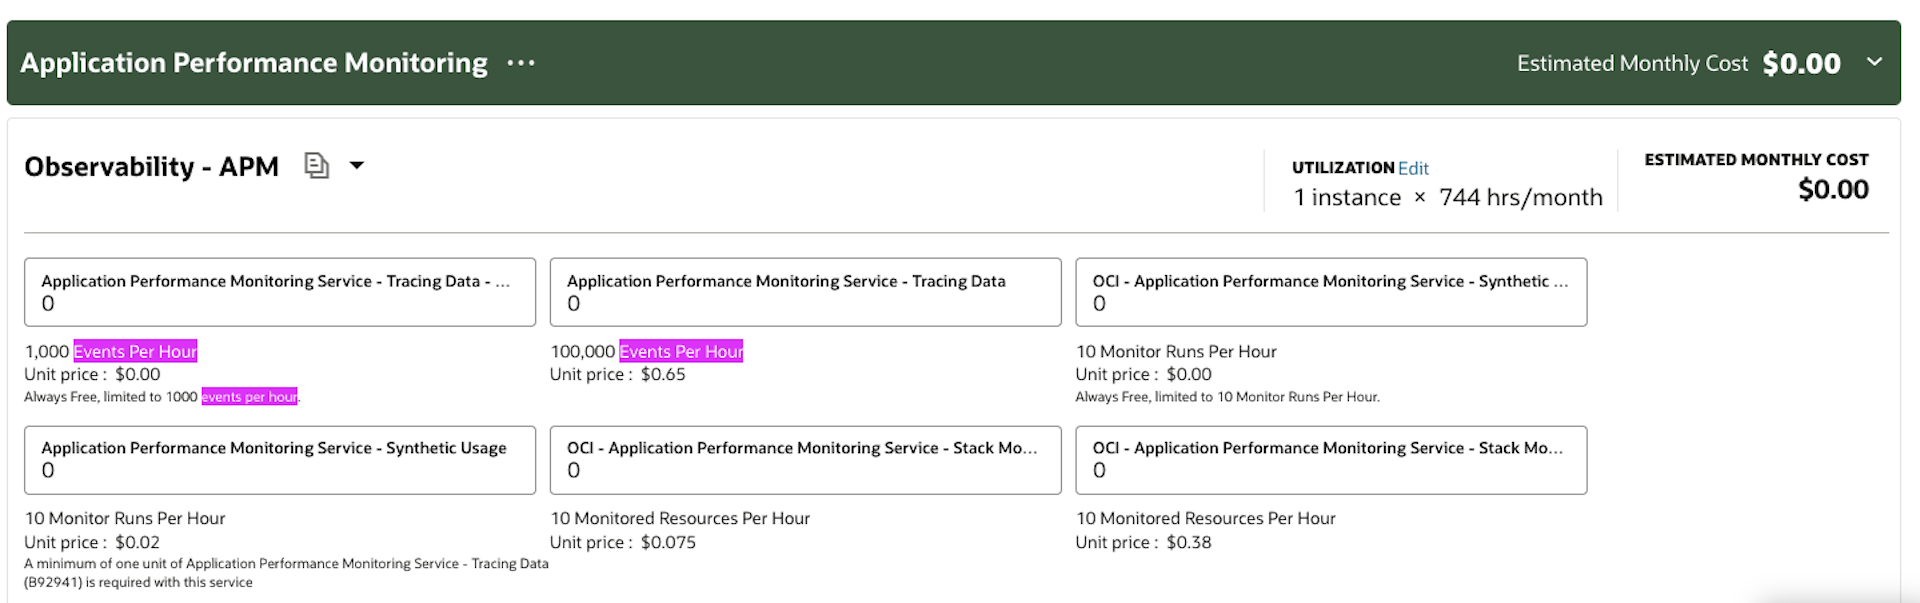
These values in the above image represent the following:
“100,000 Events Per Hour”:
- 0 to 100,000 spans/hour = 1 unit
- 100,001 to 200,000 spans/hour = 2 units
- 200,001 to 300,000 spans/hour = 3 units, and so on.
“1,000 Events Per Hour” with note “Always Free, limited to 1000 events per hour.”
If you created the APM domain resource with the “Always free” option, there is no charge with limited functionality. You can collect up to 1000 spans per hour. Any spans beyond 1000 will be throttled. That is, it will not be shown in UI or API response.
Check the current active usage (i.e. number of spans) your application is generating.
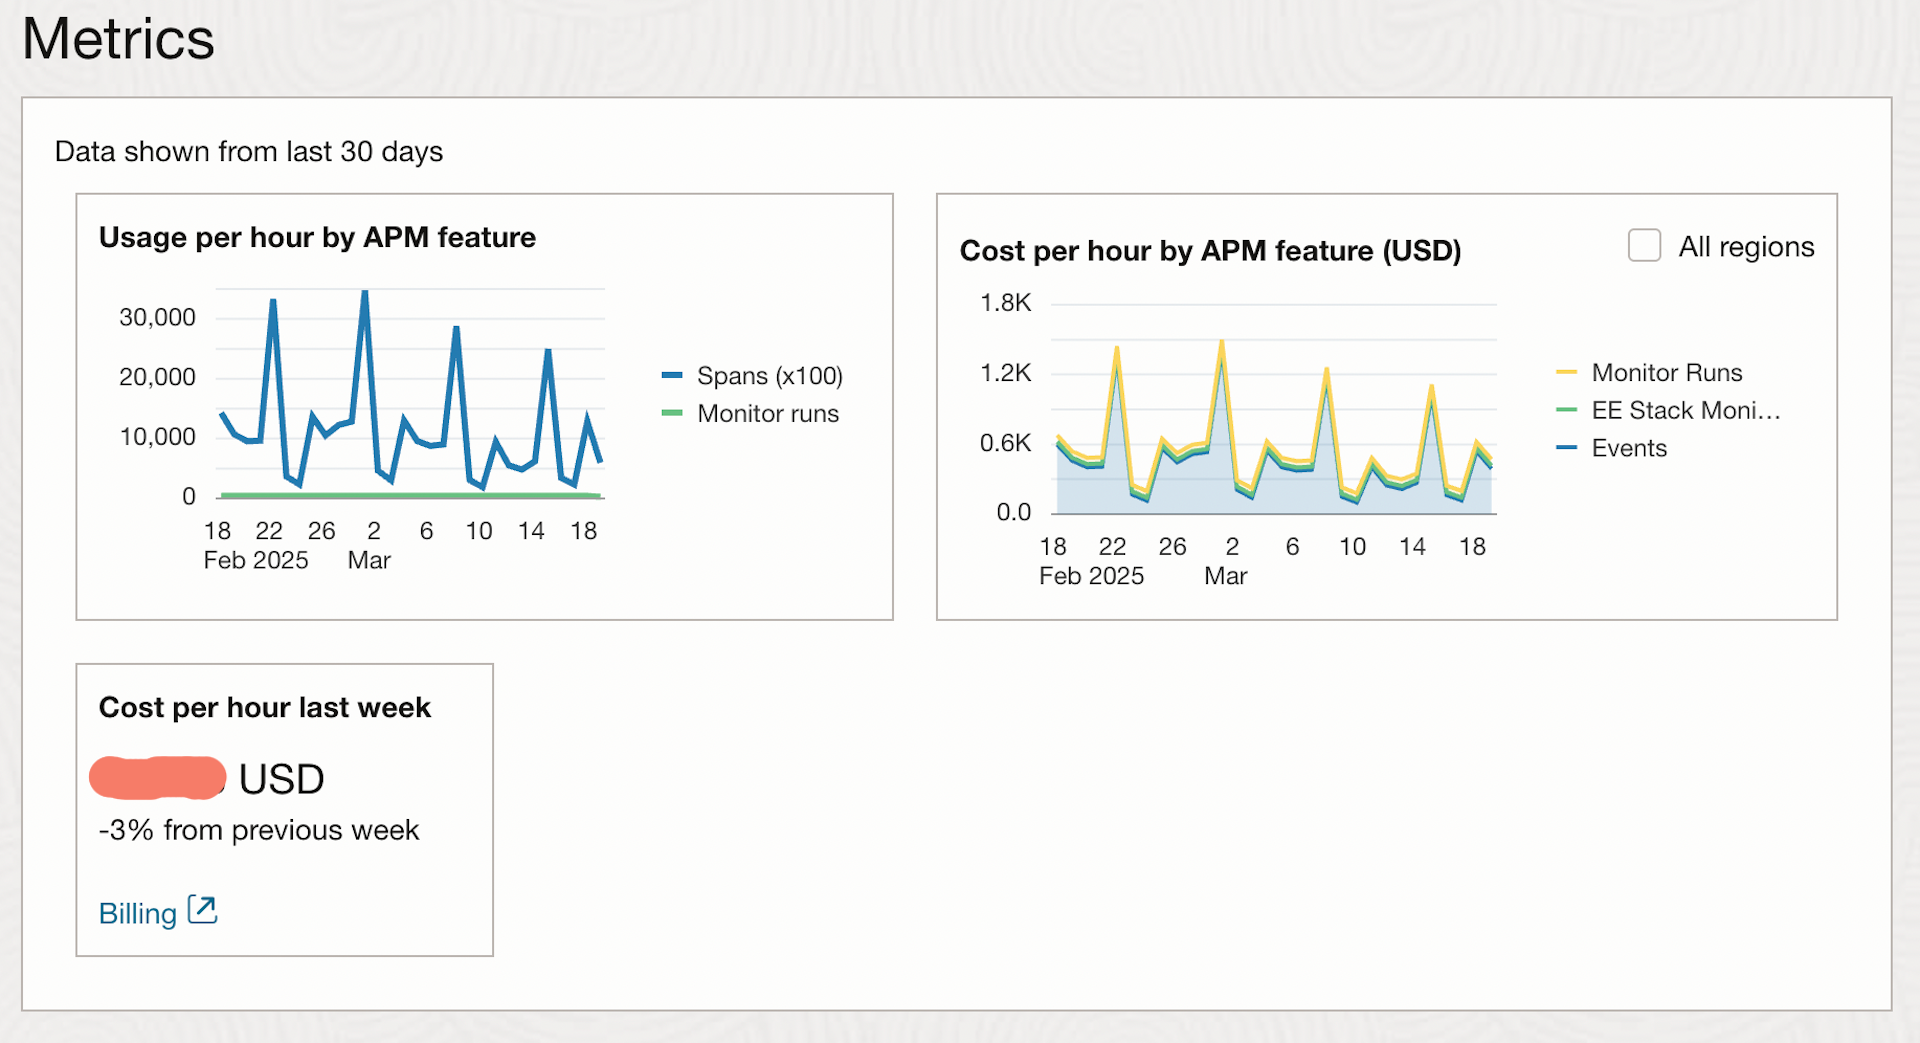
How to check APM usage
Use the APM “Overview” page to get the APM Billing details and Usage. This page shows at the region level how many spans are being generated by your application with a line chart.
How to optimize data collection using the APM Java agent
The APM Java agent offers two configuration options for optimizing data collection: “abridge” and “sampling.” Please note that this step is optional and should only be performed when necessary to reduce noise or optimize billing.
Using the abridge mode functionality
The APM Java agent has an “abridge” feature , which is designed to eliminate cases of excessive span count per trace. When too many spans are created in a single call, the agent may cause a higher than desired overhead, it may also increase the hourly span count, causing a higher-than-expected charge.
One approach is to check traffic pattern along with span duration to decide if adding an “abridge” call based on span duration as threshold will help this optimization.
Example 1
Run the trace query (TQL) below in the APM Trace Explorer Page:
show spans Component, avg(Spanduration),percentile(Spanduration, 50),percentile(Spanduration, 80),percentile(Spanduration, 90),count(*) group by Component order by count(*)

In the above example, the spans for component “SPRING” are 16k+. Of this, 50% of the spans are less than 100 ms. The configuration option below helps to “abridge” or stop collecting SPRING span which are less than 100 ms. In this example, if you choose to remove SPRING spans under 100ms to reduce noise or optimize billing, the following configuration change is required.
For instance, if you are sending 105k spans per hour and remove 50% SPRING component, it reduces the count by 8k spans per hour. Based on the above scenario, this change would result in paying for 1 unit per hour instead of 2.
abridged_probes:
 summarize: true
 settings_by_probe:
 - probe: "SPRING"
    threshold:
      duration: 100
      start_thresholding_after: 10
Example 2
Run the trace query (TQL) below in the APM Trace Explorer Page.
show spans operationname, avg(Spanduration),percentile(Spanduration, 50),percentile(Spanduration, 80),percentile(Spanduration, 90),count(*) group by operationname order by count(*)

In this example, we have 28k+ spans with operationname “/products/getProducts” in one hour. Of this, 50% of the spans are less than 3 ms. The APM Agent configuration using the “ abridge” option can stop collecting this operationname. Please note that this step is optional and should only be performed when necessary to reduce noise or optimize billing. Please check overview page to see the changes in the usage and billing to review the change and update.
Update <Destination Directory>/oracle-apm-agent>/config/<version>/ProbeConfig.acml file to achieve this. This change in Agent config file does not require an app server bounce.
In this example, if you choose to remove operation name “/products/getProducts” spans under 3ms to reduce noise or optimize billing, the following configuration change is required.
For instance, if you are sending 105k spans per hour and remove 50% SPRING component, it reduces the count by 14k spans per hour. Based on the above scenario, this change would result in paying for 1 unit per hour instead of 2.
abridged_probes:
summarize: true
settings_by_probe:
- probe: " SERVLET"
   span_limit: 50
   excluded_patterns:
    - contains: " /products/getProducts"
      excluded: true
    threshold:
      duration: 3
      start_thresholding_after: 10
Using the APM Java agent with sampling functionality
How sampling works:
- A decision algorithm (random, deterministic, or rule-based) determines whether the trace is sampled.
- Sampled traces are collected, stored, and sent to an APM tool for analysis, while unsampled traces are discarded.
- 80% sampled means we take 80% of incoming data and discarding 20% of data.
The APM agent, by default, collects all sampling. To change the sampling configuration, you need to configure custom sampling. You can update <Destination Directory>/oracle-apm-agent>/config/<version>/AgentConfig.properties file to achieve this.
Example1: Configure to collect only the first 100 traces per operation in 60 seconds:
com.oracle.apm.agent.sampling.rule= per-operation-rate
com.oracle.apm.agent.sampling.param= 100/60
Example 2: Probability based sampling of 80%
com.oracle.apm.agent.sampling.rule= probabilistic
com.oracle.apm.agent.sampling.param=0.8
In this example, you are enabling sampling that reduces overall span count. For instance, if you are sending 105k spans per hour and remove 20% spans with 80% sampling, it reduces the count to less than 100k spans per hour. Based on the above scenario, this change would result in paying for 1 unit per hour instead of 2.
Once you have onboarded APM agents and understood APM data, check the transaction details, looking for traces and spans. Implement the optimization based on examples above to save on billing costs. Please check overview page to see the changes in the usage and billing to review the change and update.
To get started, try APM for free or practice with our O&M Hands on Lab.
