Oracle’s Command Line Interface (CLI) is a small-footprint tool that you can use on its own or with the Console to complete Oracle Cloud Infrastructure (OCI) tasks. The CLI provides the same core functionality as the Console, plus additional commands. Some of these, such as the ability to run scripts, extend Console functionality.
The CLI is built on the Oracle Cloud Infrastructure SDK for Python and runs on Mac, Windows, or Linux. The Python code makes calls to Oracle Cloud Infrastructure APIs to provide the functionality implemented for the various services. These are also REST APIs that use HTTPS requests and responses. For more information, see About the API.
Installation is very easy, and instructions are on this web page.
This post will give you a few examples of how to use the CLI to start or shutdown a HeatWave MySQL instance and an OCI compute instance. Some HeatWave customers don’t need to have the HeatWave instance or a compute instance running 24 hours a day, or maybe they want to shut it down over the weekend to reduce costs. With the CLI, they can quickly and easily turn the instance on or off – either manually from a command line, or via a scheduled task like a cron job. There are some requirements for using the CLI, and you may find those on this web page. But once you have met the requirements and have installed the CLI, using it is fairly easy.
Most CLI commands must specify a service, followed by a resource type and then an action. The basic command line syntax is:
oci <service> <type> <action> <options>For example, this syntax is applied as follows:
computeis the <service>instanceis the resource <type>launchis the <action>, and- the rest of the command string consists of <options>.
The following command to launch an instance shows a typical command line construct.
oci compute instance launch --availability-domain "EMIr:PHX-AD-1" -c [compartment_OCID] --shape "VM.Standard1.1" --display-name "Instance 1 for sandbox" --image-id [image_OCID] --subnet-id [subnet_OCID]
(replace the OCID’s with the appropriate values from your OCI account)
HeatWave MySQL Instance
The command syntax to start a HeatWave MySQL instance is:
oci mysql db-system start --db-system-id [DB_System_OCID]
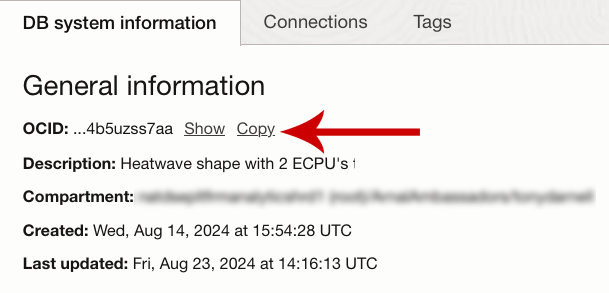
Just replace [DB_System_OCID] with the OCID of your HeatWave DB System. You may find your DB System OCID from the DB system details page for that particular HeatWave instance:
![]()
Next to the OCID heading, click the “Copy” link to copy the DB system OCID:
Then, add the OCID to the command after –db-system-id. Example:
oci mysql db-system start --db-system-id ocid1.mysqldbsystem.oc1.iad.aaaaaaaa745573eg5ldkdpwikd;kdyxt5sgkdxd5dnfxissn4b5uzss7ab
To stop the HeatWave instance, use this syntax (again, replacing [DB_System_OCID] with the HeatWave DB System OCID), and the action will use stop (instead of start) and you will need to add a shutdown-type option and value:
oci mysql db-system stop --shutdown-type slow --db-system-id [DB_System_OCID]
Example:
oci mysql db-system stop --shutdown-type slow --db-system-id ocid1.mysqldbsystem.oc1.iad.aaaaaaaa745573eg5ldkdpwikd;kdyxt5sgkdxd5dnfxissn4b5uzss7ab
For the shutdown process, there are three shutdown-type values:
Fast – Flushes dirty pages before shutting down the DB system. Some flush operations must be performed during next startup.
Slow – Flushes dirty pages and purges undo log pages for older transactions. The shutdown can take longer, but the subsequent startup is faster.
Immediate – Does not flush dirty pages and does not purge any undo log pages. Stops the database immediately. Page flushes and log purging will take place during the next startup, increasing the duration of the startup process.
Compute Instance
The command syntax to start a compute instance is:
oci compute instance action --action start --instance-id [Instance_OCID]
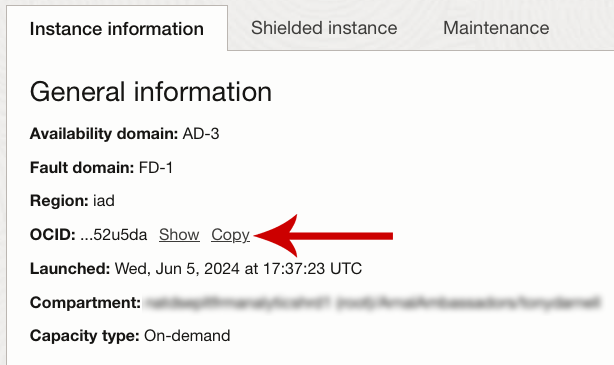
Just replace [Instance_OCID] with the OCID of your compute instance. You may find your compute instance OCID from the instance details page for that particular compute instance:
![]()
Next to the OCID heading, click the “Copy” link to copy the compute instance OCID:
Then, just add that OCID to the command after –instance-id. Example:
oci compute instance action --action start --instance-id ocid1.instance.oc1.iad.anuwcljrxr7bp5ictxieuifkrr6dy2gvyawpo53sqaohairwlayiqim52u5da
To stop the compute instance, change the action to stop and use this syntax (again, replacing [Instance_OCID] with the compute instance OCID):
oci compute instance action --action stop --instance-id [Instance_OCID]
Example:
oci compute instance action --action stop --instance-id ocid1.instance.oc1.iad.anuwcljrxr7bp5ictxieuifkrr6dy2gvyawpo53sqaohairwlayiqim52u5da
Other Resources
There are a lot of other actions and tasks you can perform with the CLI for 125 different Oracle Cloud services. And, as you begin to learn how to use CLI, you can use it in interactive mode to guide you through command usage. Once in Interactive Mode, you can use the tab key to display a suggested list of valid options for the next part of the command. You can also get immediate help on any CLI command by executing oci --help from the command line. You can also view the Command Line Reference, which is derived from the APIs and help text in the Python source code. Finally, here are links for more commands and options for DB Systems and Compute Instances. Visit the Oracle Cloud Infrastructure CLI Command Reference page for a full list of available commands.
There are also some nice developer tutorials available as well.