This blog post will describe how to start working with MySQL HeatWave in OCI. We will interconnect MySQL HeatWave instance with OCI Compute instance and even import data and execute SQL commands over them.
First, I will describe the overall picture of what we want to achieve. Then I’ll walk you through the setup of MySQL HeatWave Server and Compute Instance in OCI.
Then we will setup connection through SSH, import data and execute SQL commands upon them.
Overview
Our setup will consist of following components
- VCN
- Compute Instance
- MySQL HeatWave Instance
On the picture below is depicted overall architecture.
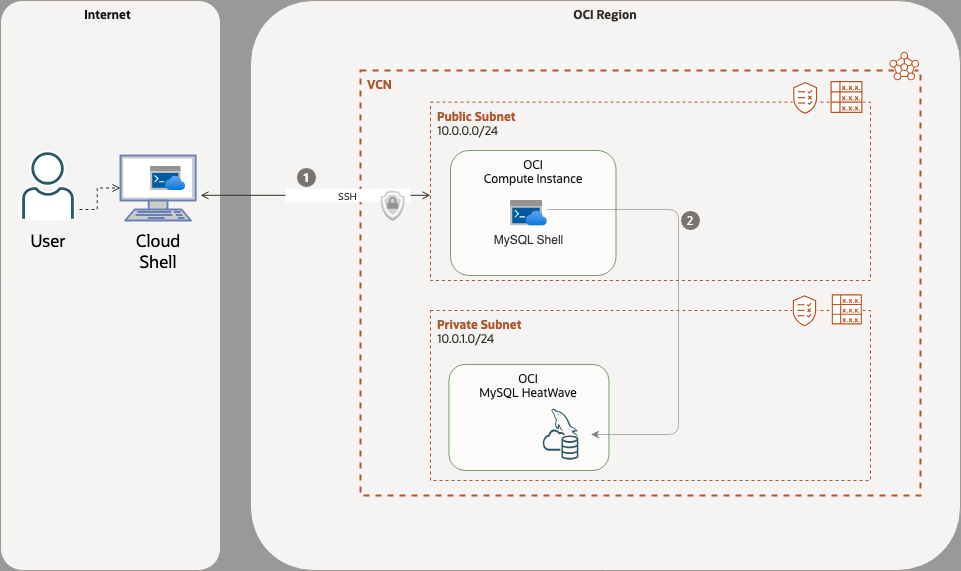
The MySQL Heatwave and Compute Instance resides in private VCN. Furthermore, this VCN contains 2 subnets – private and public. This means, that within the private network different components can communicate through open ports. However, these ports are not accessible from outside.
To allow the communication from outside, in our case from Cloud Shell, the SSH port (22) needs to be open on public subnet, where Compute Instance will reside.
When this is done, we can access Compute Instance and install MySQL shell inside it. Via mysql shell we can then connect to MySQL HeatWave, located in private subnet, through port 3306 and execute commands.
Therefore the overall setup will follow these steps:
• Setup Virtual Cloud Network (VCN)
• Setup MySQL HeatWave Instance
• Setup Compute Instance
• Install MySQL shell on Compute Instance
• Import data and execute SQL commands upon them
Setup VCN
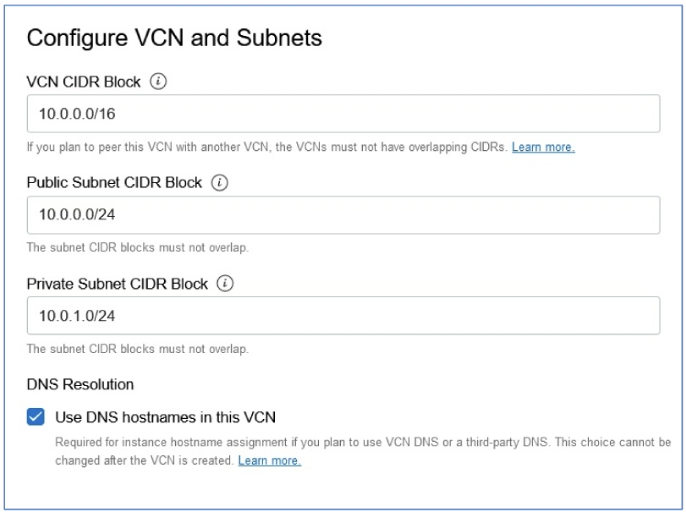
First we need to create VCN with both public and private subnet. Assuming that you already have your own account in OCI visit https://cloud.oracle.com and login.
- From nvigation Menu select Networking -> Virtual Cloud Networks and click on Start VCN Wizard.
- Select VCN with Internet Connectivity and click Start VCN Wizard
- Fill in VCN Name and Compartment
- On Configure VCN and Subnets leave the default values (as in picture above)
- The VCN wizard creates a VCN with all the basic components (subnets, gateways, security lists and route tables). Click Next and on next page click Create
- When network is created – navigate to Ingress Rules
- Click on Add Ingress Rules and enter following parameters:
- Stateless: leave unselected
- Source type: default CIDR
- Source CIDR: 0.0.0.0/0
- IP Protocol: TCP
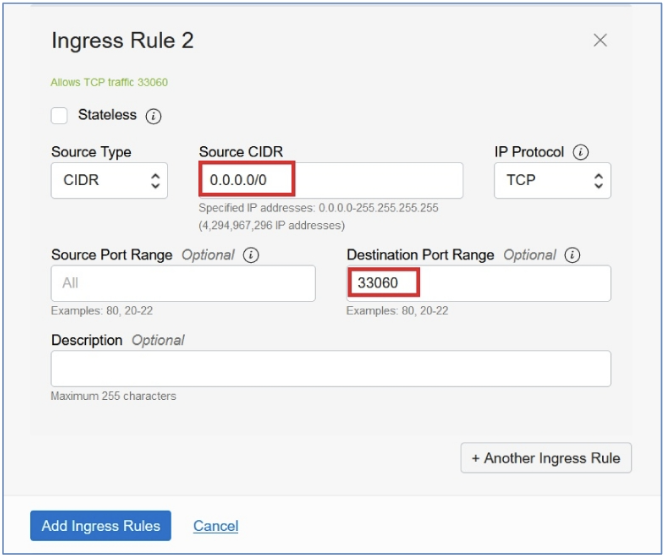
- Source port range: leave blank
- Destination port range: 3306
- Repeat the same process for port 33060 (as in picture above)
- The Ingress rules are created – access is granted to port 3306 and 33060 on the private subnet.
Setup MySQL HeatWave Instance
For creating MySQL HeatWave instance, where our database system will reside, go through these steps:
- Go to navigation menu and select Databases -> MySQL -> DB Systems
- Select compartment (previously created) and click Create MySQL DB system
- Fill the DB System parameters:
- Create in Compartment (your compartment should be selected)
- Name
- Standalone (default)
- Networking
- Virtual Cloud Network: Select your VCN (previously created)
- Subnet: Select your private subnet
- Placement: default
- Hardware
- Select a Shape: Leave default
- Data Storager Size: Leave default
- Configure Backup Plan: Leave default
- Click Create
The creation process should take no longer than 15 minutes to complete. After finishing the indicating icon should become green. Notice, that IP Address is automatically assigned from within IP range of VCN private subnet. You can check that in DB System Information -> Endpoint -> Private IP Address
Setup Compute Instance
In this part we will create desired Compute Instance and generate ssh key pair, in order to be able to access it from outside – from Cloud Shell.
Create SSH key pair
To create SSH key pair follow these steps:
- Open Cloud Shell terminal
- Run ssh-keygen command
- Enter name for ssh key pair (e.g. mykey)
- You can leave passphrase empty
The private key is saved under mykey and public under mykey.pub
You can verify, that both keys are created by ls mykey* command
Close clouds shell by running exit command.
Create Compute Instance
To create Compute Instance, follow these steps:
- From Navigation menu select Compute -> Instances
- Select your Compartment and click Create Instance
- Fill in Compute Instance parameters:
- Name
- Compartment: Select your compartment
- Placement: Leave default value
- Image and Shape (important!)
- Image: Oracle Linux 8
- Shape: VM.Standard2.1
- Networking
- Virtual Cloud Network: Select your VCN (previously created)
- Subnet: Select your public subnet
- Public IP Address: Select Assign a public IPv4 address
- Add SSH Keys: Select Paste public keys
- Extract created ssh public key by running cat mykey.pub
- Copy & Paste the key to SSH Keys field
- Close the Cloud Shell & click Create
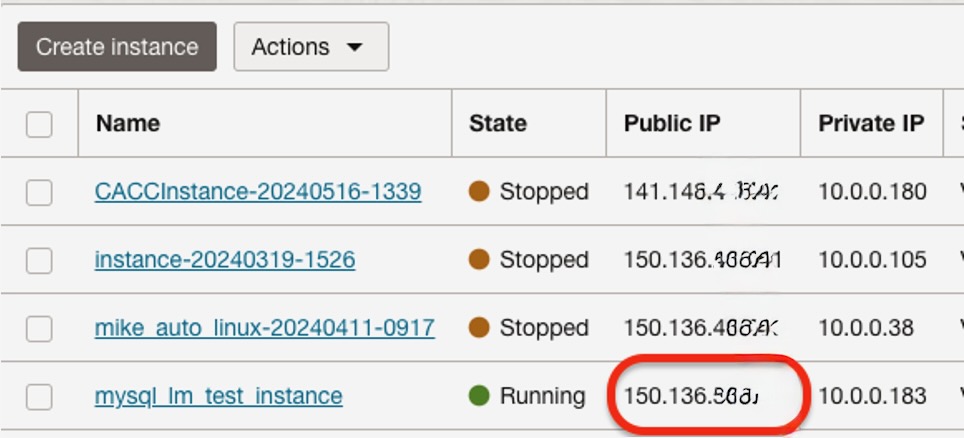
- After the compute instance is created, its status will change to “RUNNING”
You can review Public IP address under Instance information -> Instance access -> Public IP address
Connect to MySQL HeatWave from Compute Instance
Now we will interconnect both components, MySQL HeatWave Database and Compute Instance. For this, we will:
- Connect to Compute Instance with SSH
- Install MySQL Shell on Compute instance
- Connect to MySQL HeatWave Database through MySQL Shell
Connect To Compute Instance with SSH
To access Compute Instance follow these steps:
- From Navigation menu select Compute -> Instances
- Select your Compartment in left panel
- Find the Public IP column
- Run the ssh command `ssh -i mykey opc@<publicIP>` to connect to Compute Instance using your private ssh key
- Your console prompt should change to [opc@<yourComputeInstanceName> $]
Once, you’re connected, you can continue with MySQL Shell installation on Compute instance
Install MySQL Shell on Compute Instance
To install MySQL Shell, make sure, that you stay connected to Cloud Shell. Also get the actual list of MySQL Community releases from https://dev.mysql.com/downloads/repo/yum/
Depending on your goal, you can choose between Innovation or LTS version. In my case, I used LTS version. In time of writing this blogpost – the last LTS version was MySQL 8.4.5.
When all above is addressed, we can continue the installation by executing following steps:
- Download and install last stable version using yum
- sudo yum -y install https://dev.mysql.com/get/mysql84-community-release-el9-1.noarch.rpm
- Install MySQL Shell by running:
- `sudo yum -y install mysql-shell —nobest`
Now, you have installed all the necessary tools to connect to MySQL HeatWave Database. So let’s do that.
Connect to MySQL HeatWave Database
To connect to MySQL HeatWave, we first need to obtain its private IP address:
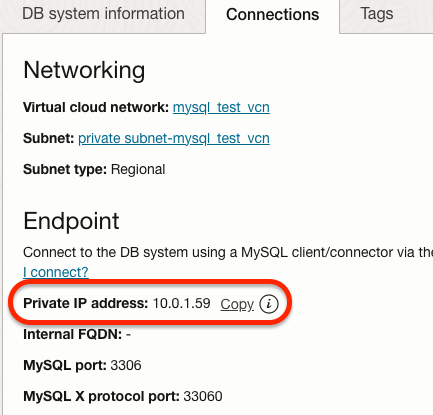
- From Navigation menu select Databases -> MySQL HeatWave -> DB Systems
- Find your DB instance and click on name to get to details page
- Navigate to Connections tab and under Endpoint section copy Private IP address
Now, when we have IP address, we should open the (still running) cloud shell with Compute Instance prompt and connect to MySQL HeatWave using mysql shell. To do so we should run:
`mysqlsh —sql -u admin -p -h<PrivateIP>`
The console will ask for previously created password, and after confirming, we are now connected to MySQL HeatWave database.
To verify the connection we could execute simple SQL commands, such as:
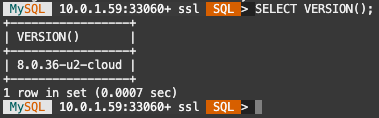
`SELECT VERSION()`
8.1 Importing data
Now, as we have all set, we can import the data.
For this we need to download and extract external dataset in Compute Instance. Then we will import the data remotely with mysql shell into MySQL HeatWave and finally we will verify, that data were imported correctly.
In our case we will use this public dataset: https://downloads.mysql.com/docs/world-db.zip
So to do all that follow these steps:
- Open cloud shell and connect to Compute instance, or reopen the one still running, as described in previous steps.
- Download dataset with `wget https://downloads.mysql.com/docs/world-db.zip`
- Extract data with `unzip world-db.zip`
- Connect to MySQL HeatWave with `mysqlsh —sql -u admin -p -h<PrivateIP>`
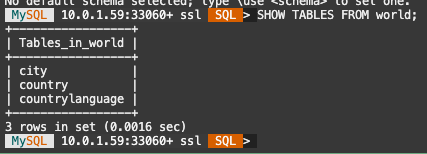
- Now we can import data simply by running `SOURCE world-db/world.sql`. You should see queries execution upon your database. Wait for finishing the job.
- Now, when the data are imported, you can verify this by running `SHOW TABLES FROM world;`
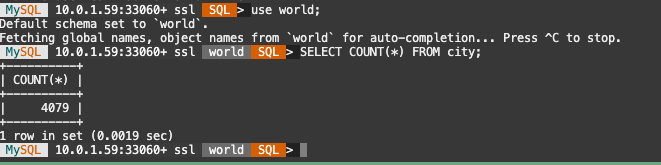
- You can also verify the number of records with `use world; SELECT COUNT(*) FROM city`
- Before finishing, exit the SQL shell with `\exit` command.
Conclusion
In this blogpost we manage to setup working example of DB System, where we store our data inside private MySQL HeatWave instance and are able to access it through Compute instance, which acted as client.
Congratulation for good work and stay tuned for next blogposts, where we deep dive more into the MySQL HeatWave features and configuration.
Where next?
With your MySQL HeatWave connection now established, you can dive deeper into OCI with Oracle University’s current promotion. This includes learning paths covering:
- MySQL Essentials (database design, installation, security, backup, replication, high availability, and MySQL HeatWave)
- MySQL for Database Administration (server configuration, replication, security, backups, recoveries, query performance optimization, and high availability)
- MySQL for Developers (building applications with PHP, Java, or Python)
- HeatWave MySQL Essentials (managing and optimizing the HeatWave MySQL service in the cloud).
Engaging with these resources can help you thoroughly understand and validate your setup, learn best practices, and optimize performance.
And what’s best about this – you can now start for free with Oracle Cloud Free Tier program. So don’t wait and sign up here.