In this article we will see how to perform a live migration from Azure/MySQL to OCI/MySQL HeatWave.
As Azure allows public connections directly to the database, this is what I will use to migrate and replicate the data between both clouds.
Also, since this content is focused on data migration, I won’t explore all the networking options for connecting Azure and OCI, such as VPNs, in this blog post. But it is of course a recommended method, especially if you plan to maintain the connection between the two systems for a longer period of time.
Architecture
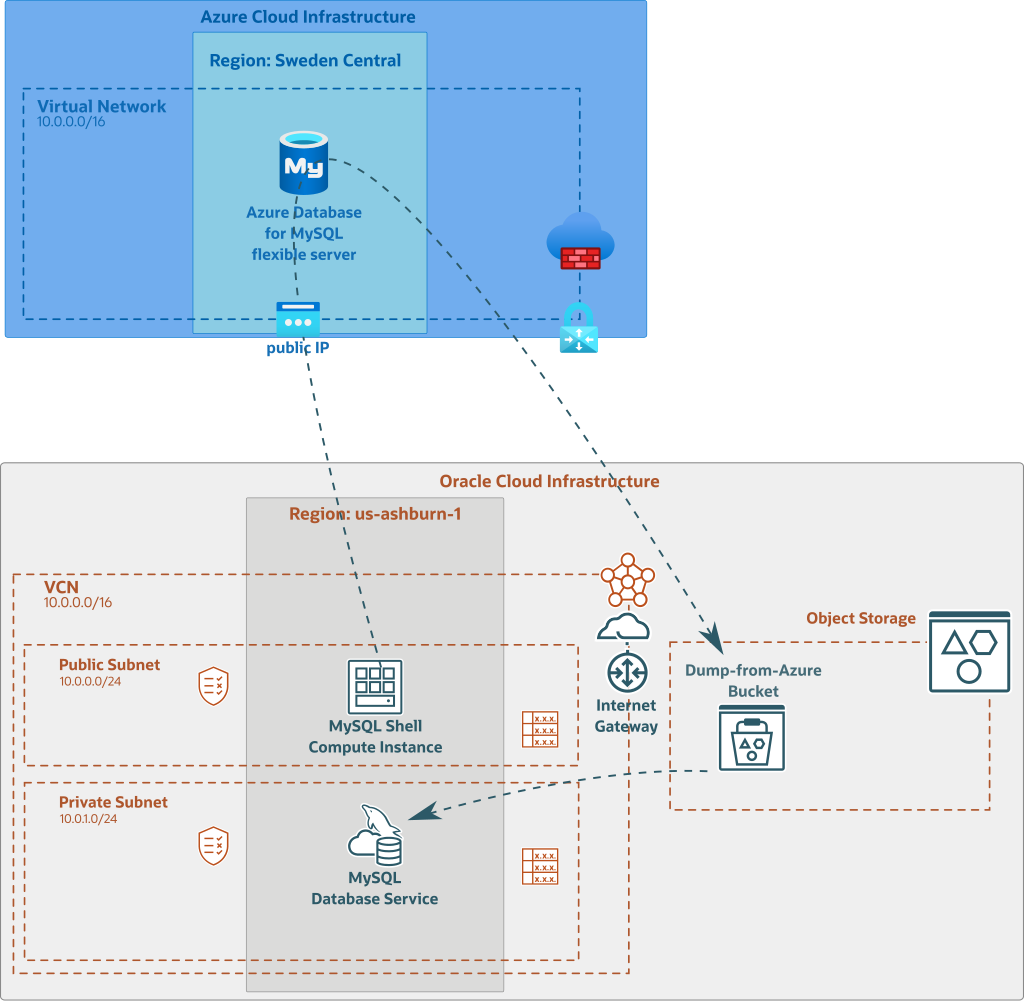
Above, you can see an illustration of the architecture and the process to migrate the data:
- we prepare Azure Database for MySQL to use GTIDs
- we use a Compute Instance on OCI where we have installed MySQL Shell
- we configure OCI’s config file on the Compute Instance (to access Object Storage)
- we open Azure firewall to allow connections from our Compute Instance’s public IP
- we dump the data to Object Storage
- we create a new MySQL HeatWave Database Service Instance and we use the dump in Object Storage as initial data
Once the MySQL HeatWave Instance is running, we need to create a replication channel:
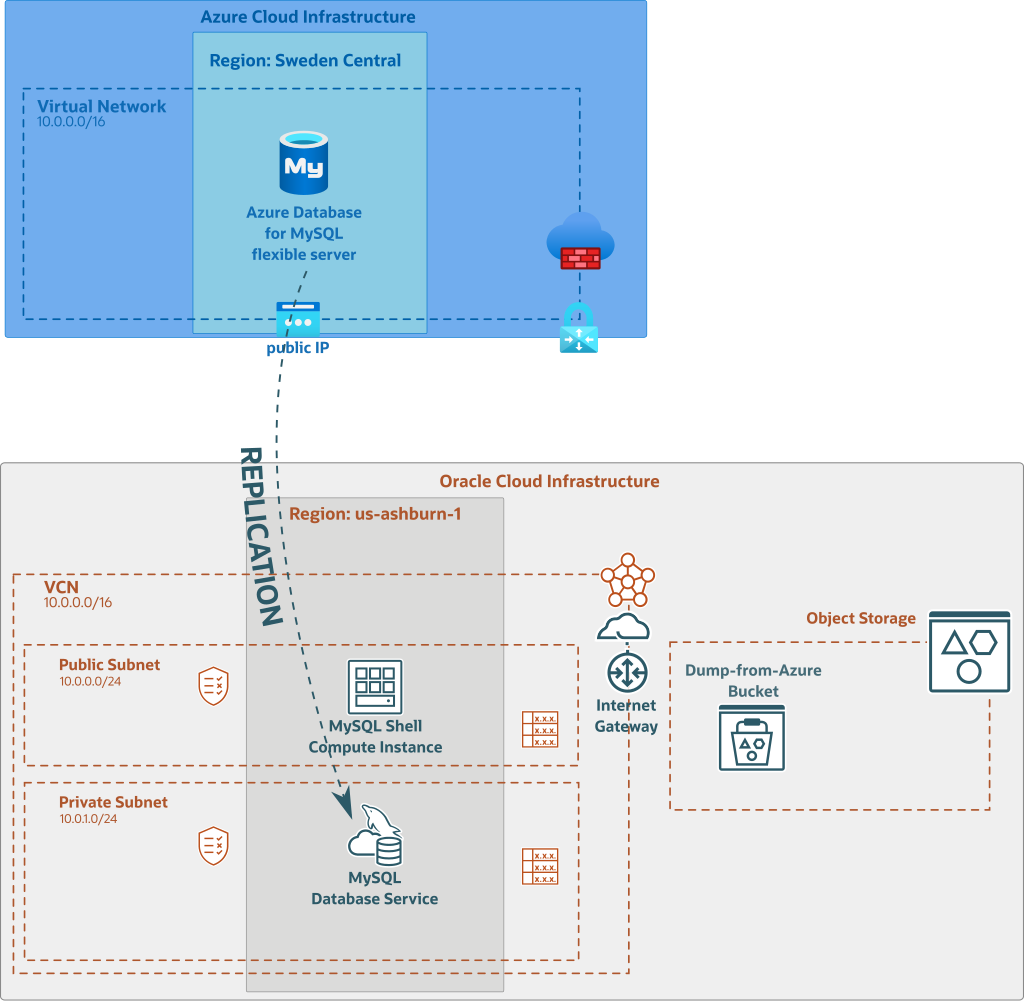
To create such asynchronous replication link, we need to perform the following operations:
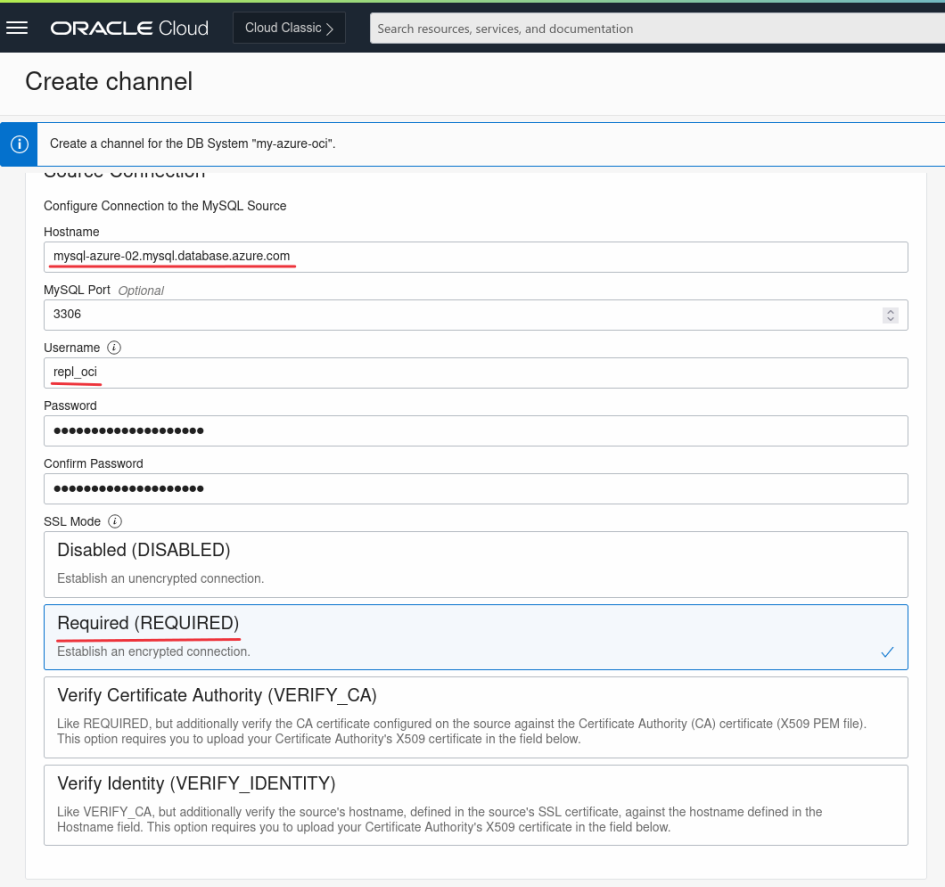
- create a dedicated user for replication on Azure Database for MySQL
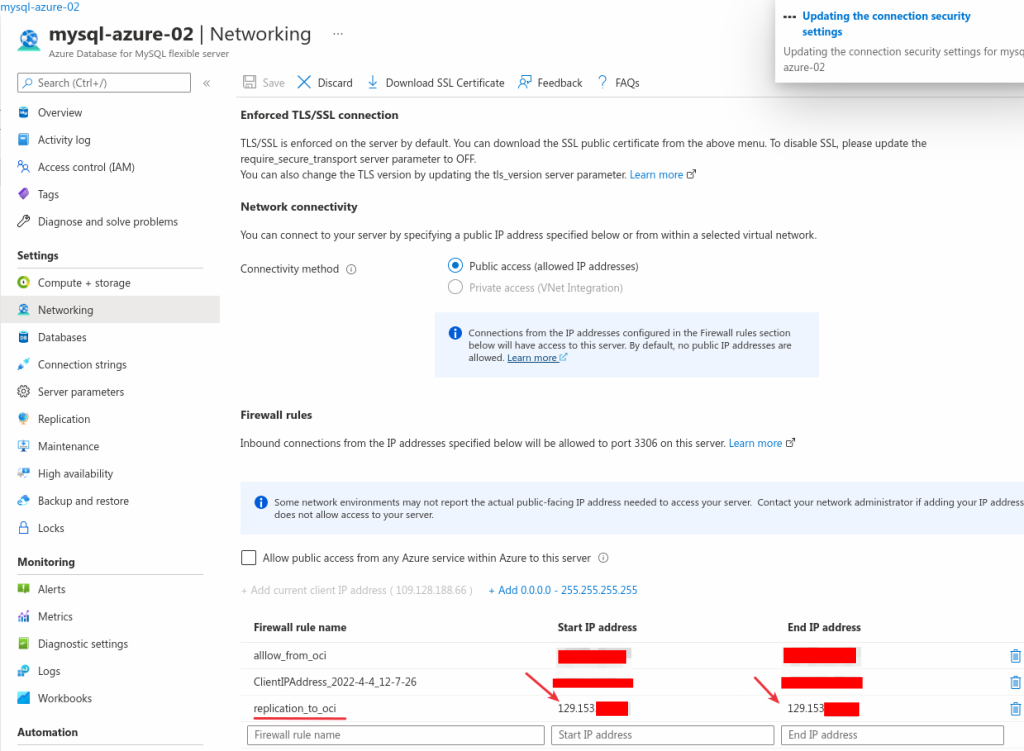
- open the firewall on Azure to allow connection from our OCI NAT Gateway’s public IP
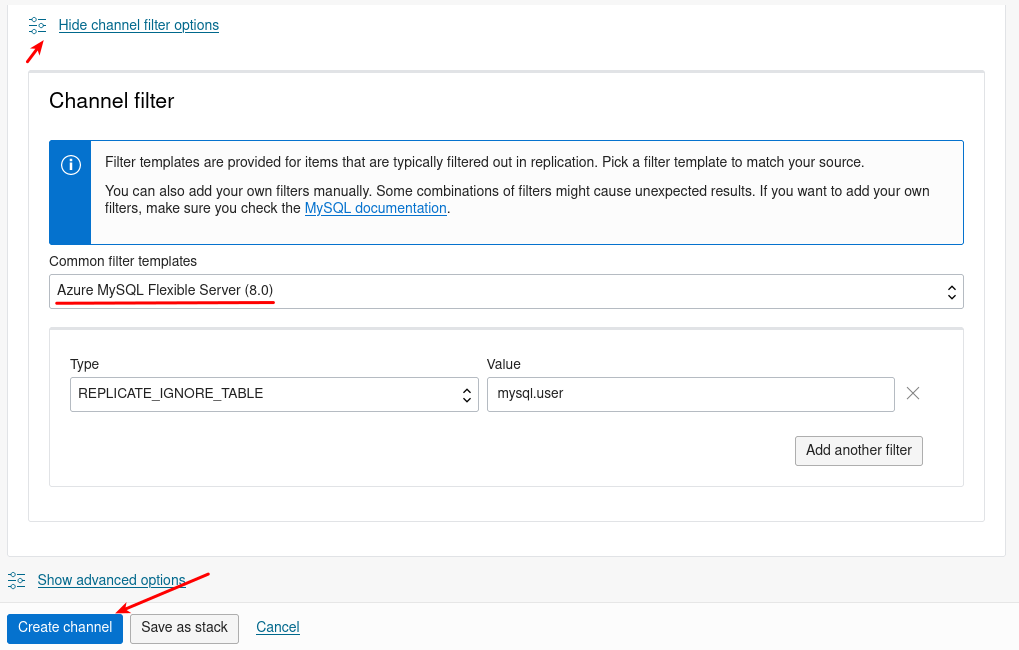
- create a replication channel on MySQL HeatWave Database Service Instance and use the right replication filter Template
- fix some eventual issues due to inconsistent dump (more on this later)
Preparing Azure Database for MySQL
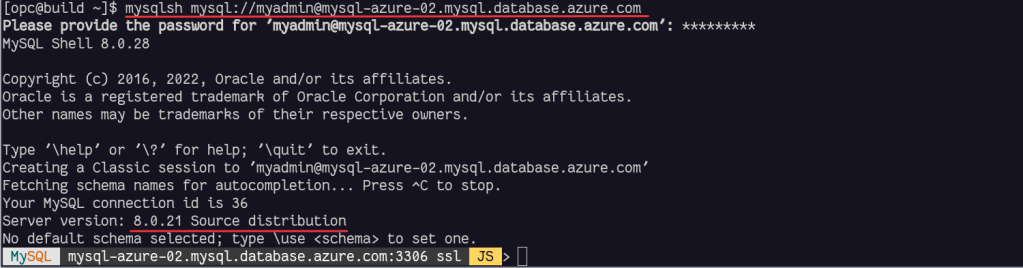
The Azure Database for MySQL I am using is MySQL Flexible server 8.0 (8.0.21).
As we want to keep or Azure Database for MySQL available during the migration (and maybe after while we perform tests on OCI), we will need to use MySQL Replication between Azure Cloud and Oracle Cloud Infrastructure.
By default, Azure Database for MySQL is not using GTIDs, we need then to enable them:

We need to use Azure’s web console and deploy the changes step-by-step like this:
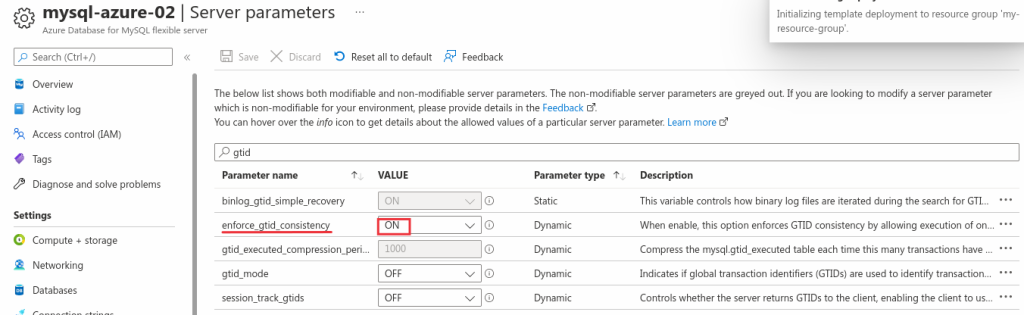
And save the change:
After having deployed the change og enforce_gtid_consistency, we need to change the gtid_mode 3 times to enable it without restarting the system:
OFF_PERMISSIVEON_PERMISSIVEON
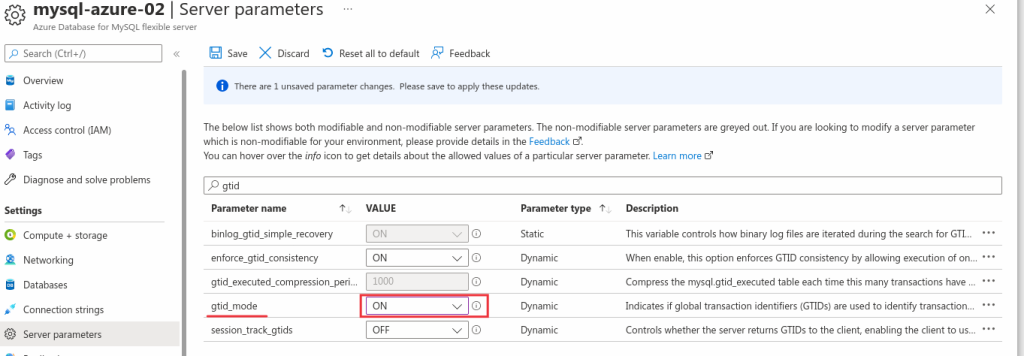
You must do the change one by one and save them each time. You are not allowed to go from gtid_mode=OFF to gtid_mode=ON directly. If you try, it will fail.
And finally, we need to create a dedicated user for the replication to OCI:
CREATE USER 'repl_oci'@'%'
     IDENTIFIED BY 'C0mpl1c4t3d!Passw0rd' REQUIRE SSL;
GRANT REPLICATION SLAVE ON *.* TO 'repl_oci'@'%';
If we don’t want to use the wildcard (%) as host, we can use the public IP of OCI VCN’s NAT Gateway. As we use the Azure Firewall, this is less important and will allow us to eventually replicate to other region with the same credentials if we want.
OCI Compute Instance
In this article I don’t cover the OCI account and VCN creation, please check previous posts or the OCI manual if you don’t know how to do it.[1][2] I assume you already have a VCN with two subnets.
In the public subnet we need to deploy a compute instance that will be used to dump the data to Object Storage. The same instance can be used to load the data in case you have already an existing MDS instance you want to use. If not, the load will be performed at the instance’s creation using the optimized Data Import feature.
If you prefer, it’s also possible to use MySQL Shell on a compute instance deployed on Azure Cloud as mentioned in this blog post by Chandan.
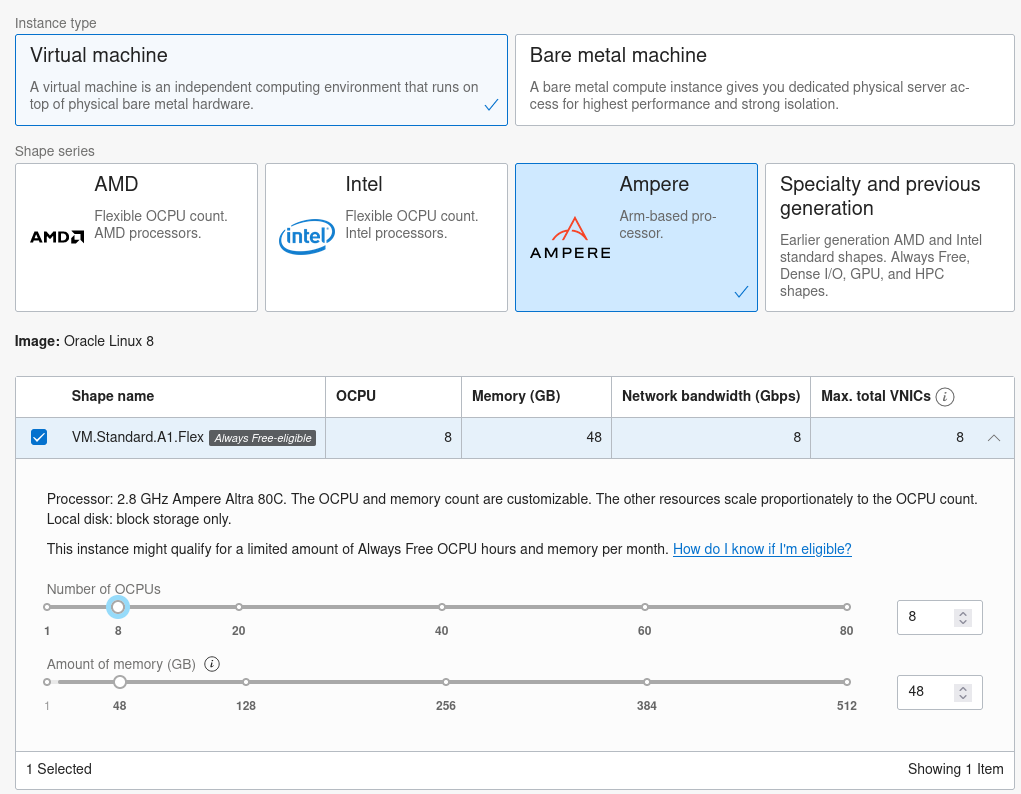
I use an always Free Ampere shape that is powerful and with multiple cores to benefit from MySQL Shell Dump & Load parallelism.
Then on that freshly deployed Compute Instance, install MySQL Shell (sudo dnf install -y mysql-shell).
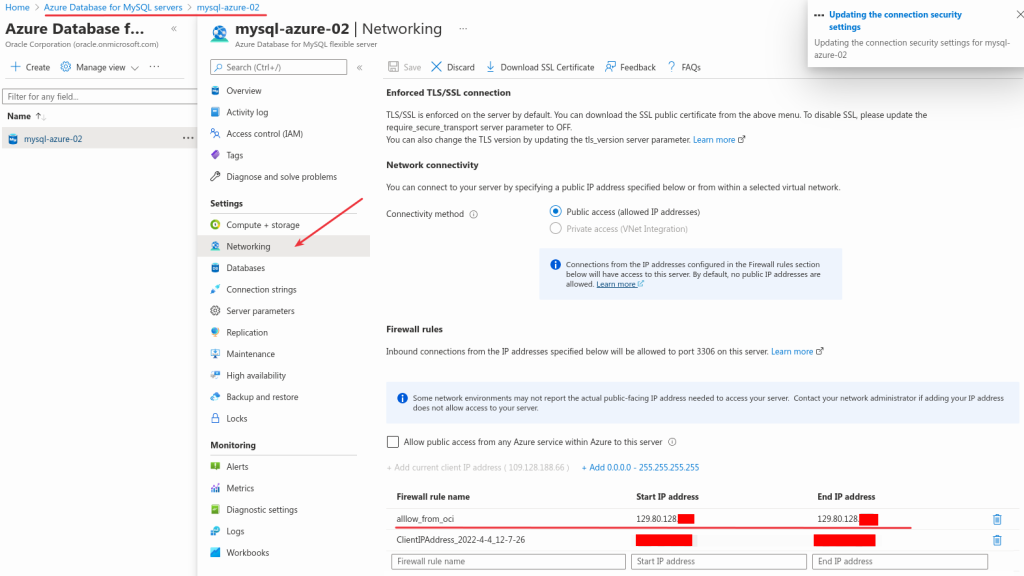
Before being able to connect to the Azure Database for MySQL instance, we need to open the firewall in Azure Cloud to allow connections from our OCI Compute Instance’s public IP:
We can test that we have access from MySQL Shell inside our OCI Compute Instance to Azure Database for MySQL:
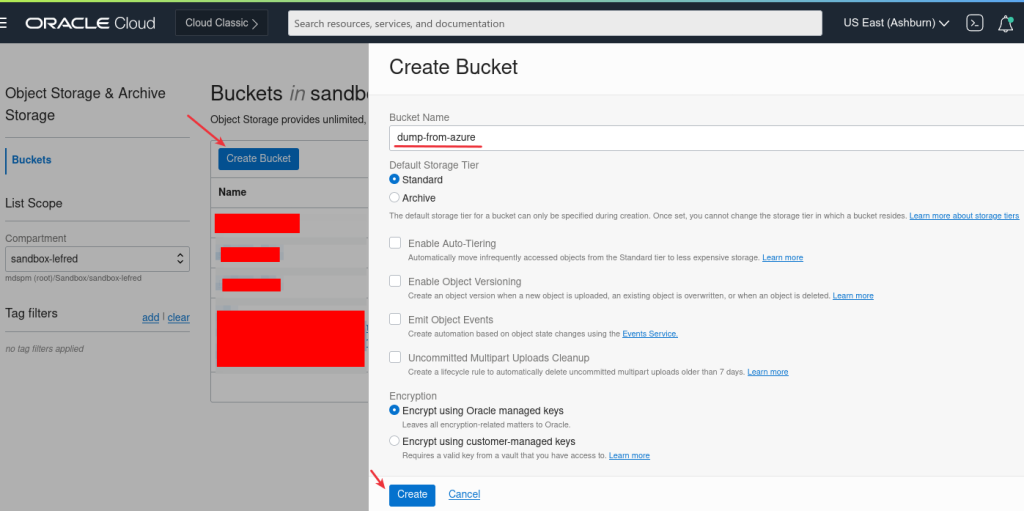
Object Storage Bucket
On OCI console, we need to create a bucket to receive the dump:
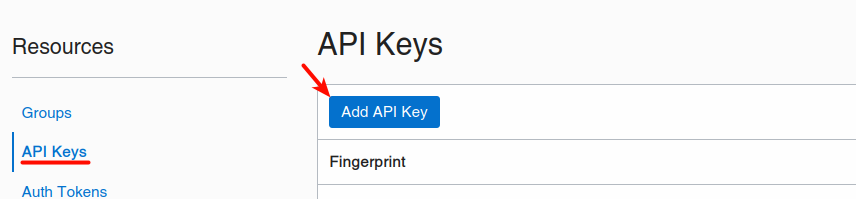
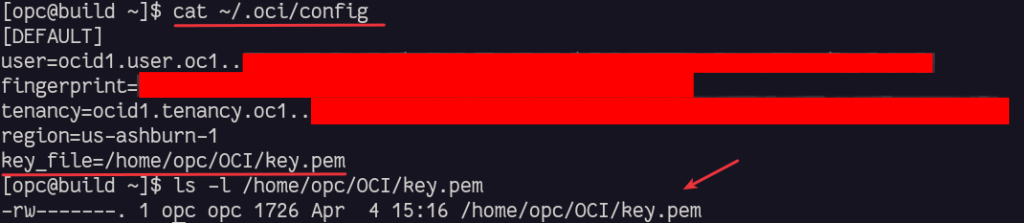
On the Compute Instance we also need an oci config file that MySQL Shell will use to store the data in Object Storage.
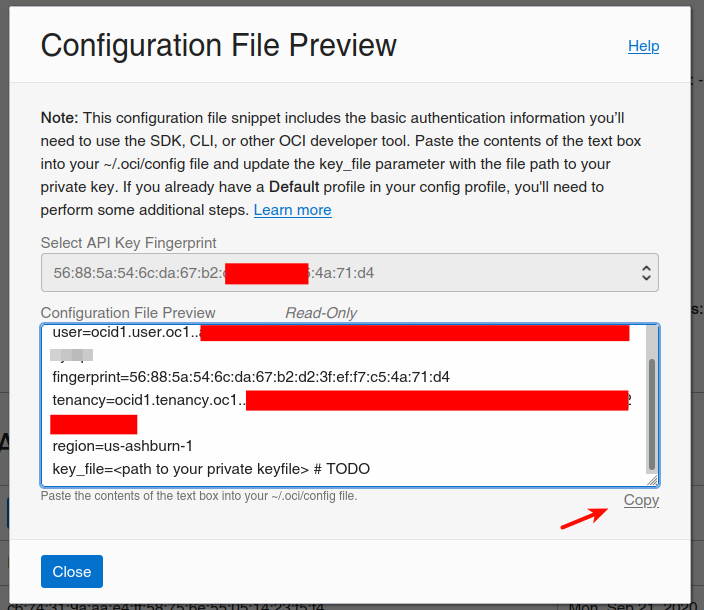
We can create this config file from OCI Dashboard for our user (Identity -> User -> User Details):
We must download the keys if we choose to generate them and copy the content of the config in ~/.oci/config. We also need to set the private key’s location and filename:
As example, this is the output on the Compute Instance:
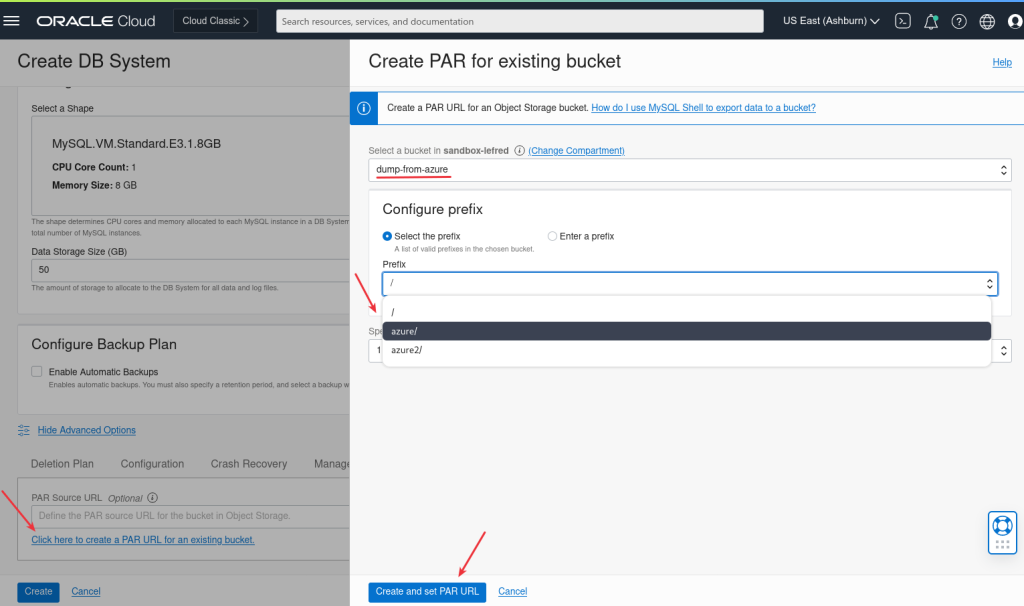
And we can already create a Pre-Authenticated Request URL to use later when we will restore/load the data to the MySQL Database Service (if we don’t do it, we also have the possibiltiy to create it again later):
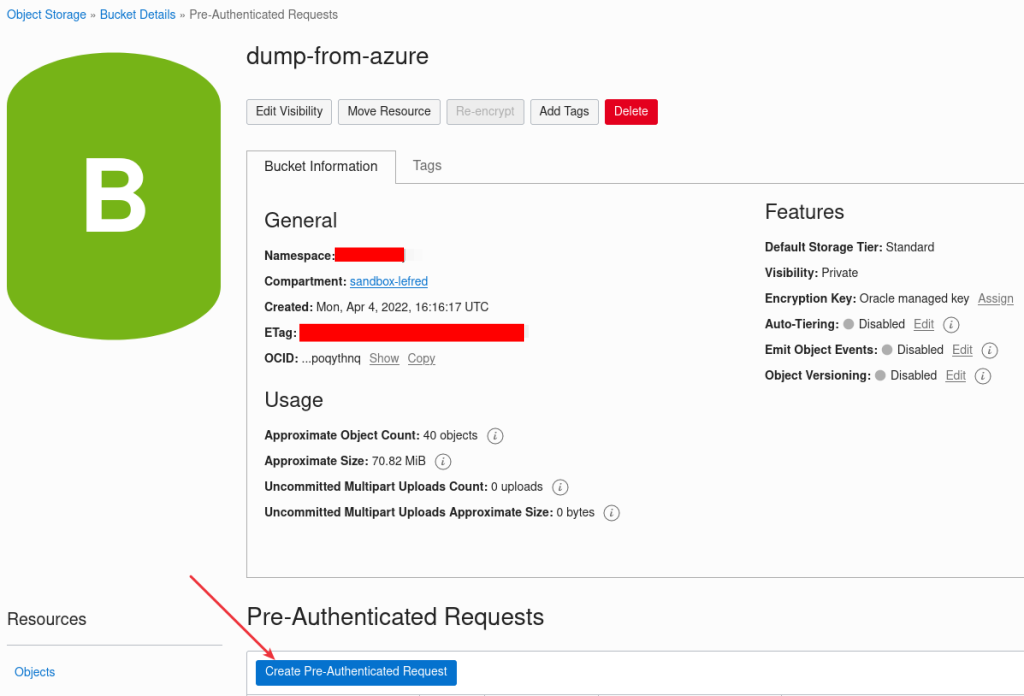
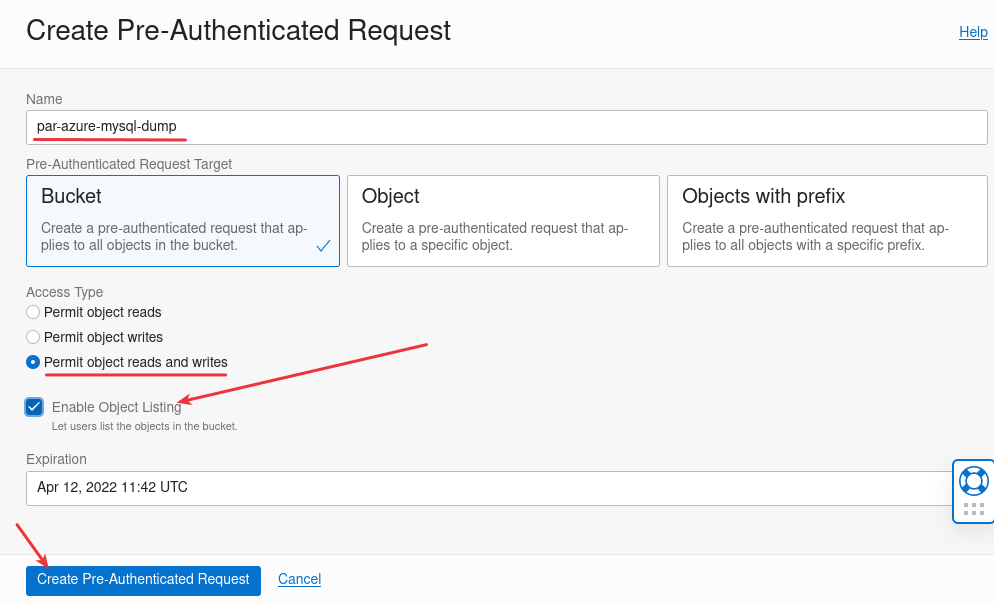
It’s important to Enable Object Listing feature.
Copy and save the generated URL for later.
Dumping the data with MySQL Shell
We are now ready to dump the data from Azure to Object Storage on OCI:
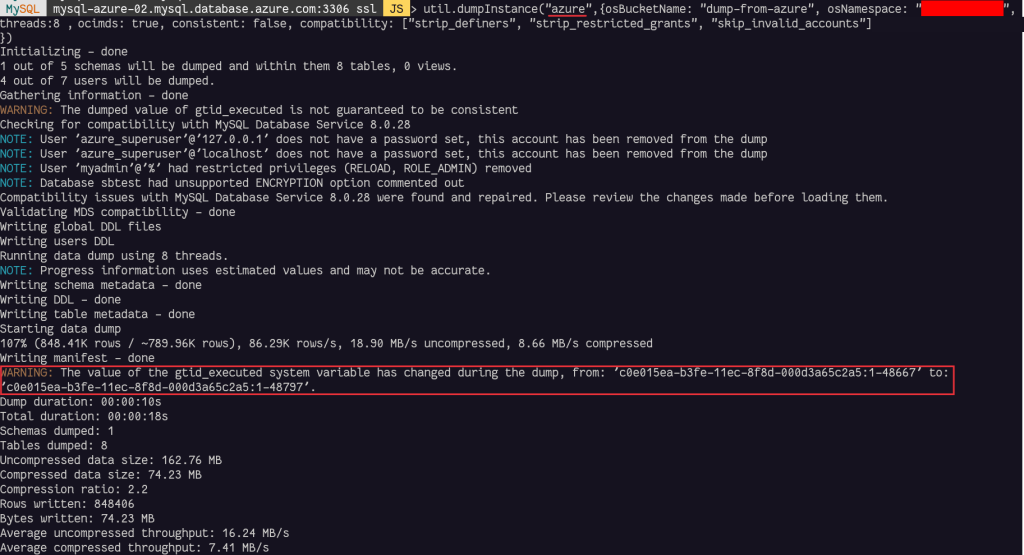
Some options are mandatory to dump the data to Object Storage correctly:
- osBucketName: is the name of the Object Storage Bucket
- osNamespace: is the option to identify the namespace for the bucket
- ocimds: enables checks and modifications for compatibility with MySQL HeatWave Database Service
- consistent: when enabled, consistent data dumps by locking the instance for backup during the dump.
Depending on the available privileges or MySQL Shell version, the backup can be consistent or have a warning like ilustrated above.
If you can stop the load on Azure Database for MySQL, it will be easier to start replication later, if not, more steps to fix some issues will be required in case of inconsistency.
MySQL HeatWave Database Service Instance’s creation
It’s time to create our MySQL Database in OCI and load the initial data during the creation using the initial Data Import feature:
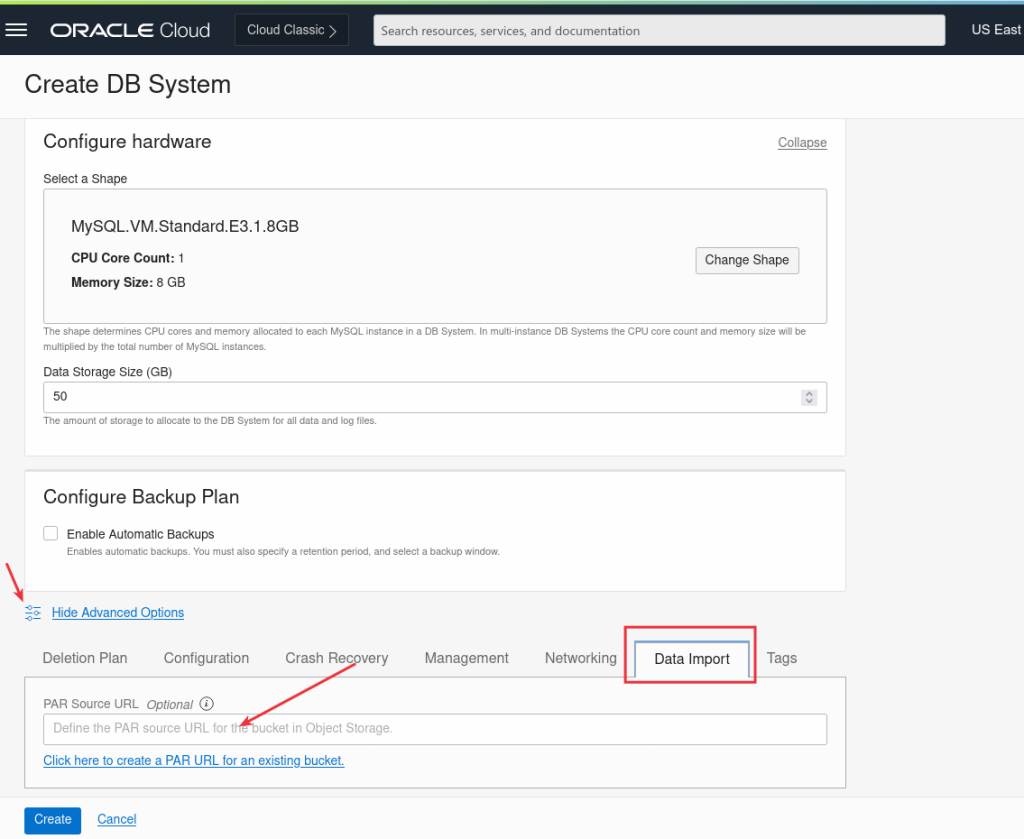
And we paste the PAR url we saved earlier or if we have not, we can just click to create a new one:
As soon as the MySQL HeatWave Instance is deployed, we can connect to it and the initial data will be already imported. We can also check the value of the GTID executed:
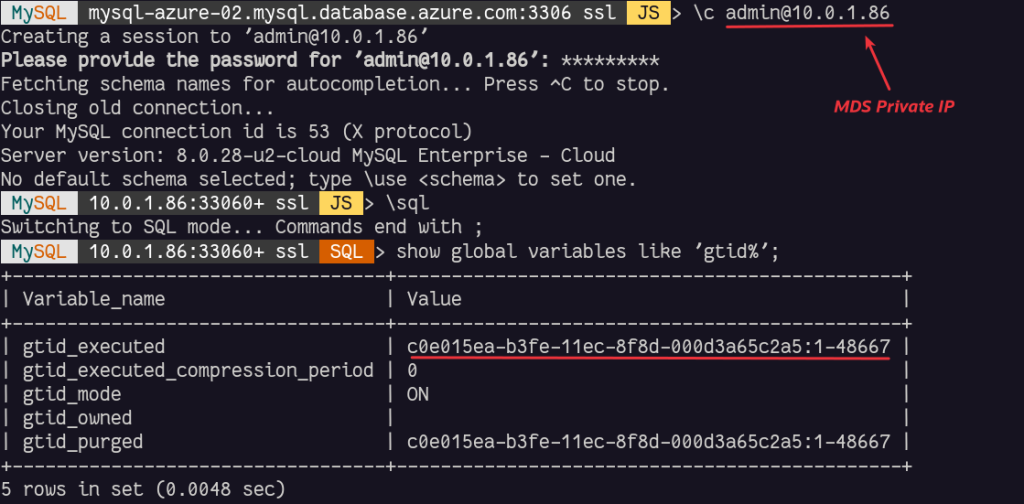
We can already notice that the GTID executed are equal than the value when the dump started on Azure Database for MySQL. Of course we noticed that when the dump ended as there was still load, the value was higher and some of these transactions are already present in the loaded data.
If there was not load on the source database during the dump, there would not have been any difference (or very small if Azure’s internal monitoring would have created some write operations).
Replication Channel
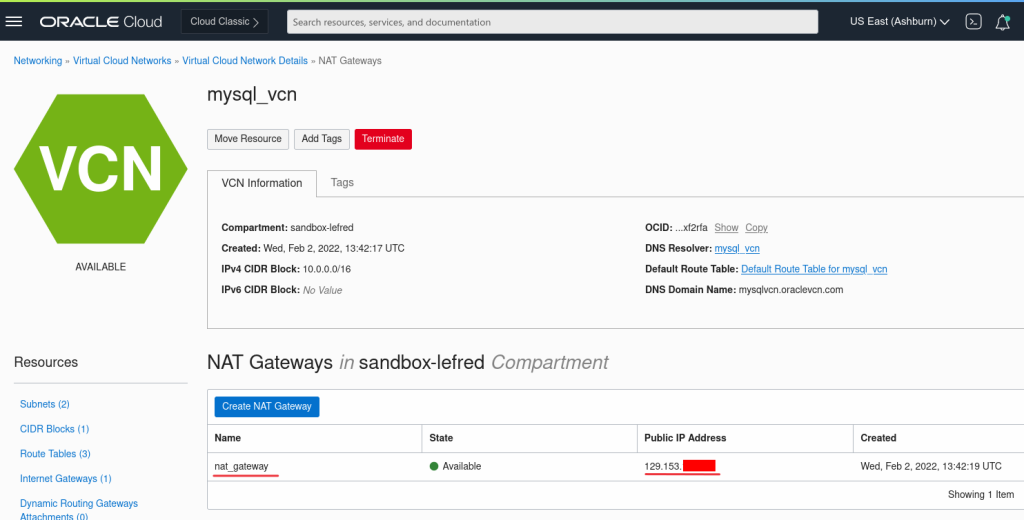
Before creating the channel, we will allow the connection from our OCI VCN’s NAT gateway to Azure:
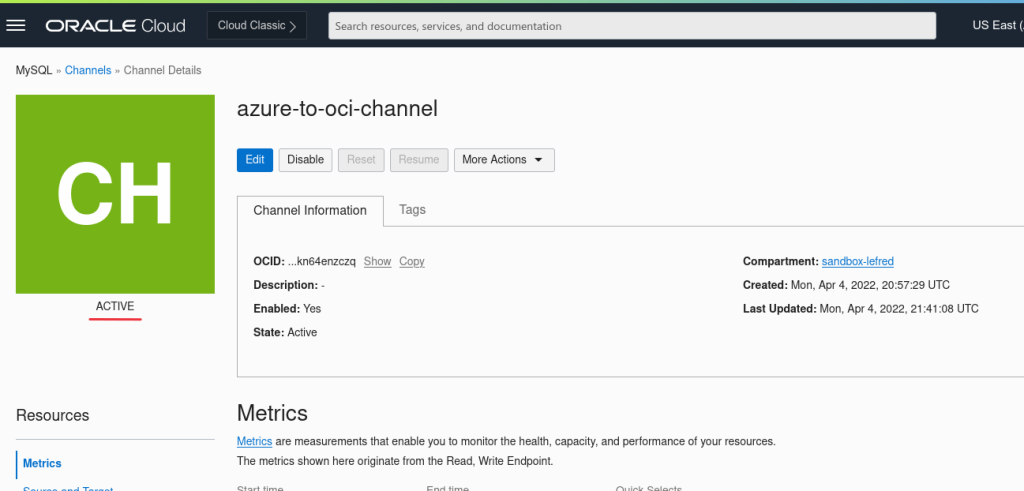
And we create the Replication Channel using the credentials we created earlier:
We also need to select the right replication filter template:
If there was no write load or if the dump was consistent, the channel will be active and we are done:
If there was load and the dump was inconsistent with a GTID difference between the start and the end of the dump operation, the channel will turn orange.
As reminder the difference from the dump was:
from: 'c0e015ea-b3fe-11ec-8f8d-000d3a65c2a5:1-48667'
  to: 'c0e015ea-b3fe-11ec-8f8d-000d3a65c2a5:1-48797'
If this is the case, it means that the replication stopped.
If we have an inconsistent backup, replication may also stop .
To illustrate this, I’m using some procedures I’ve created:

The eventual errors are in performance_schema tables: replication_applier_status_by_worker and replication_connection_status:

This means that the transaction c0e015ea-b3fe-11ec-8f8d-000d3a65c2a5:1-48668 was already applied and we need to skip it.
We will add it to the GTIDs already PURGED:
call sys.set_gtid_purged("+c0e015ea-b3fe-11ec-8f8d-000d3a65c2a5:48668");
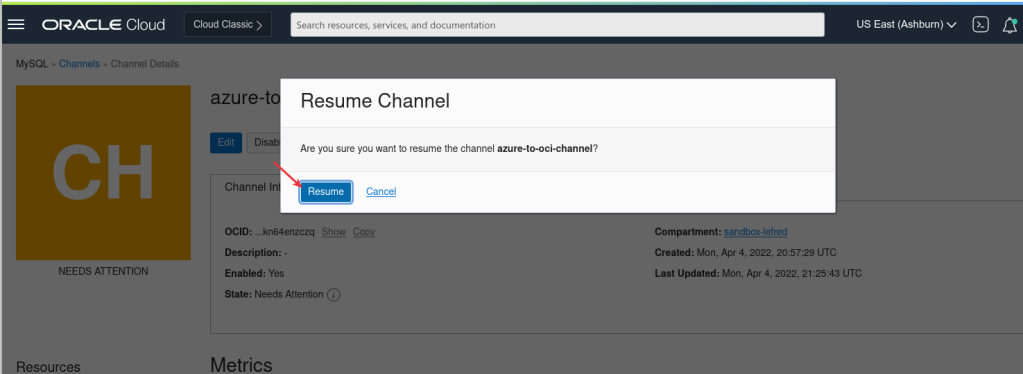
And we need then ro resume the replication channel from OCI console:
In case of the need of multiple GTID to skip, we need to reproduce those steps several times. It’s also possible to purge GTID ranges like this:
call sys.set_gtid_purged(“+c0e015ea-b3fe-11ec-8f8d-000d3a65c2a5:48686-48697”);
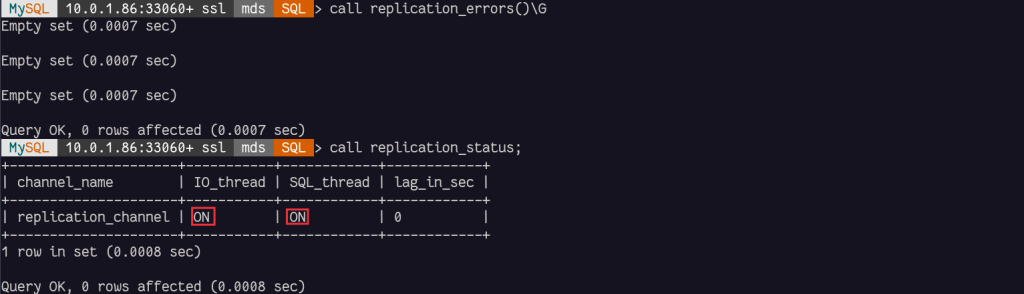
When finished, there won’t be error anymore and the status will be ON:
Extra
Azure is also adding extra non-standard tables in mysql schema. The mysql schema is protected in MySQL HeatWave and doesn’t allow user changes. So, if on your Azure MySQL instance, you have some of these tables I recommend to also add them in the Replication Channel filters:
SQL> show tables like '__az%';
+----------------------------------+
| Tables_in_mysql (__az%)          |
+----------------------------------+
| __az_action_history__            |
| __az_changed_static_configs__    |
| __az_replica_information__       |
| __az_replication_current_state__ |
+----------------------------------+
Conclusion
Migrating data from Azure Cloud to OCI MySQL HeatWave Database Service is not complicated. However if you want to replicate the data and you cannot stop writing on the source during the process, you might need some time to fix some eventual replication issues. With the latest MySQL Shell, those inconsistency are almost null.
Asynchronous replication between Azure and MySQL with the new replication filters is stable and this provide a migration or a multi-cloud solution.
For more free migration resources, take a look at our MySQL HeatWave Migration Program.
Enjoy MySQL, enjoy MySQL HeatWave and enjoy your live migration to OCI !