Today’s developers strive for agility without sacrificing security or performance, especially when building data-driven apps and AI solutions. That’s why we’re excited to introduce the MySQL HeatWave REST Service (MRS), a fully managed, integrated solution that lets you create RESTful API endpoints instantly, directly from your MySQL HeatWave databases. There’s no need for backend coding, middleware, or third-party frameworks to provide streamlined and secure access to your data over HTTPS.
With MRS, you can:
- Eliminate complexity: Connect your apps to your data with simple HTTP requests, no additional backend layers required.
- Accelerate development: Build progressive web apps, AI-powered solutions, and dashboards faster by auto-generating REST endpoints mapped to your MySQL schemas and tables.
- Leverage built-in security and scalability: Role-based access, flexible authentication, and a high-performance HTTP server are all included out of the box for easy yet robust operations.
Whether you’re a frontend developer, data analyst, or full-stack engineer, the MySQL HeatWave REST Service lets you focus on building innovative applications while Oracle handles the REST infrastructure for you.
This blog guides you through setting up a Rest Service with MySQL HeatWave, enabling you to securely expose and consume MySQL data via REST in a few straightforward steps.
Step-by-Step: How to Deploy and Enable MRS for MySQL HeatWave
1. Provision a MySQL DB System with HeatWave Enabled
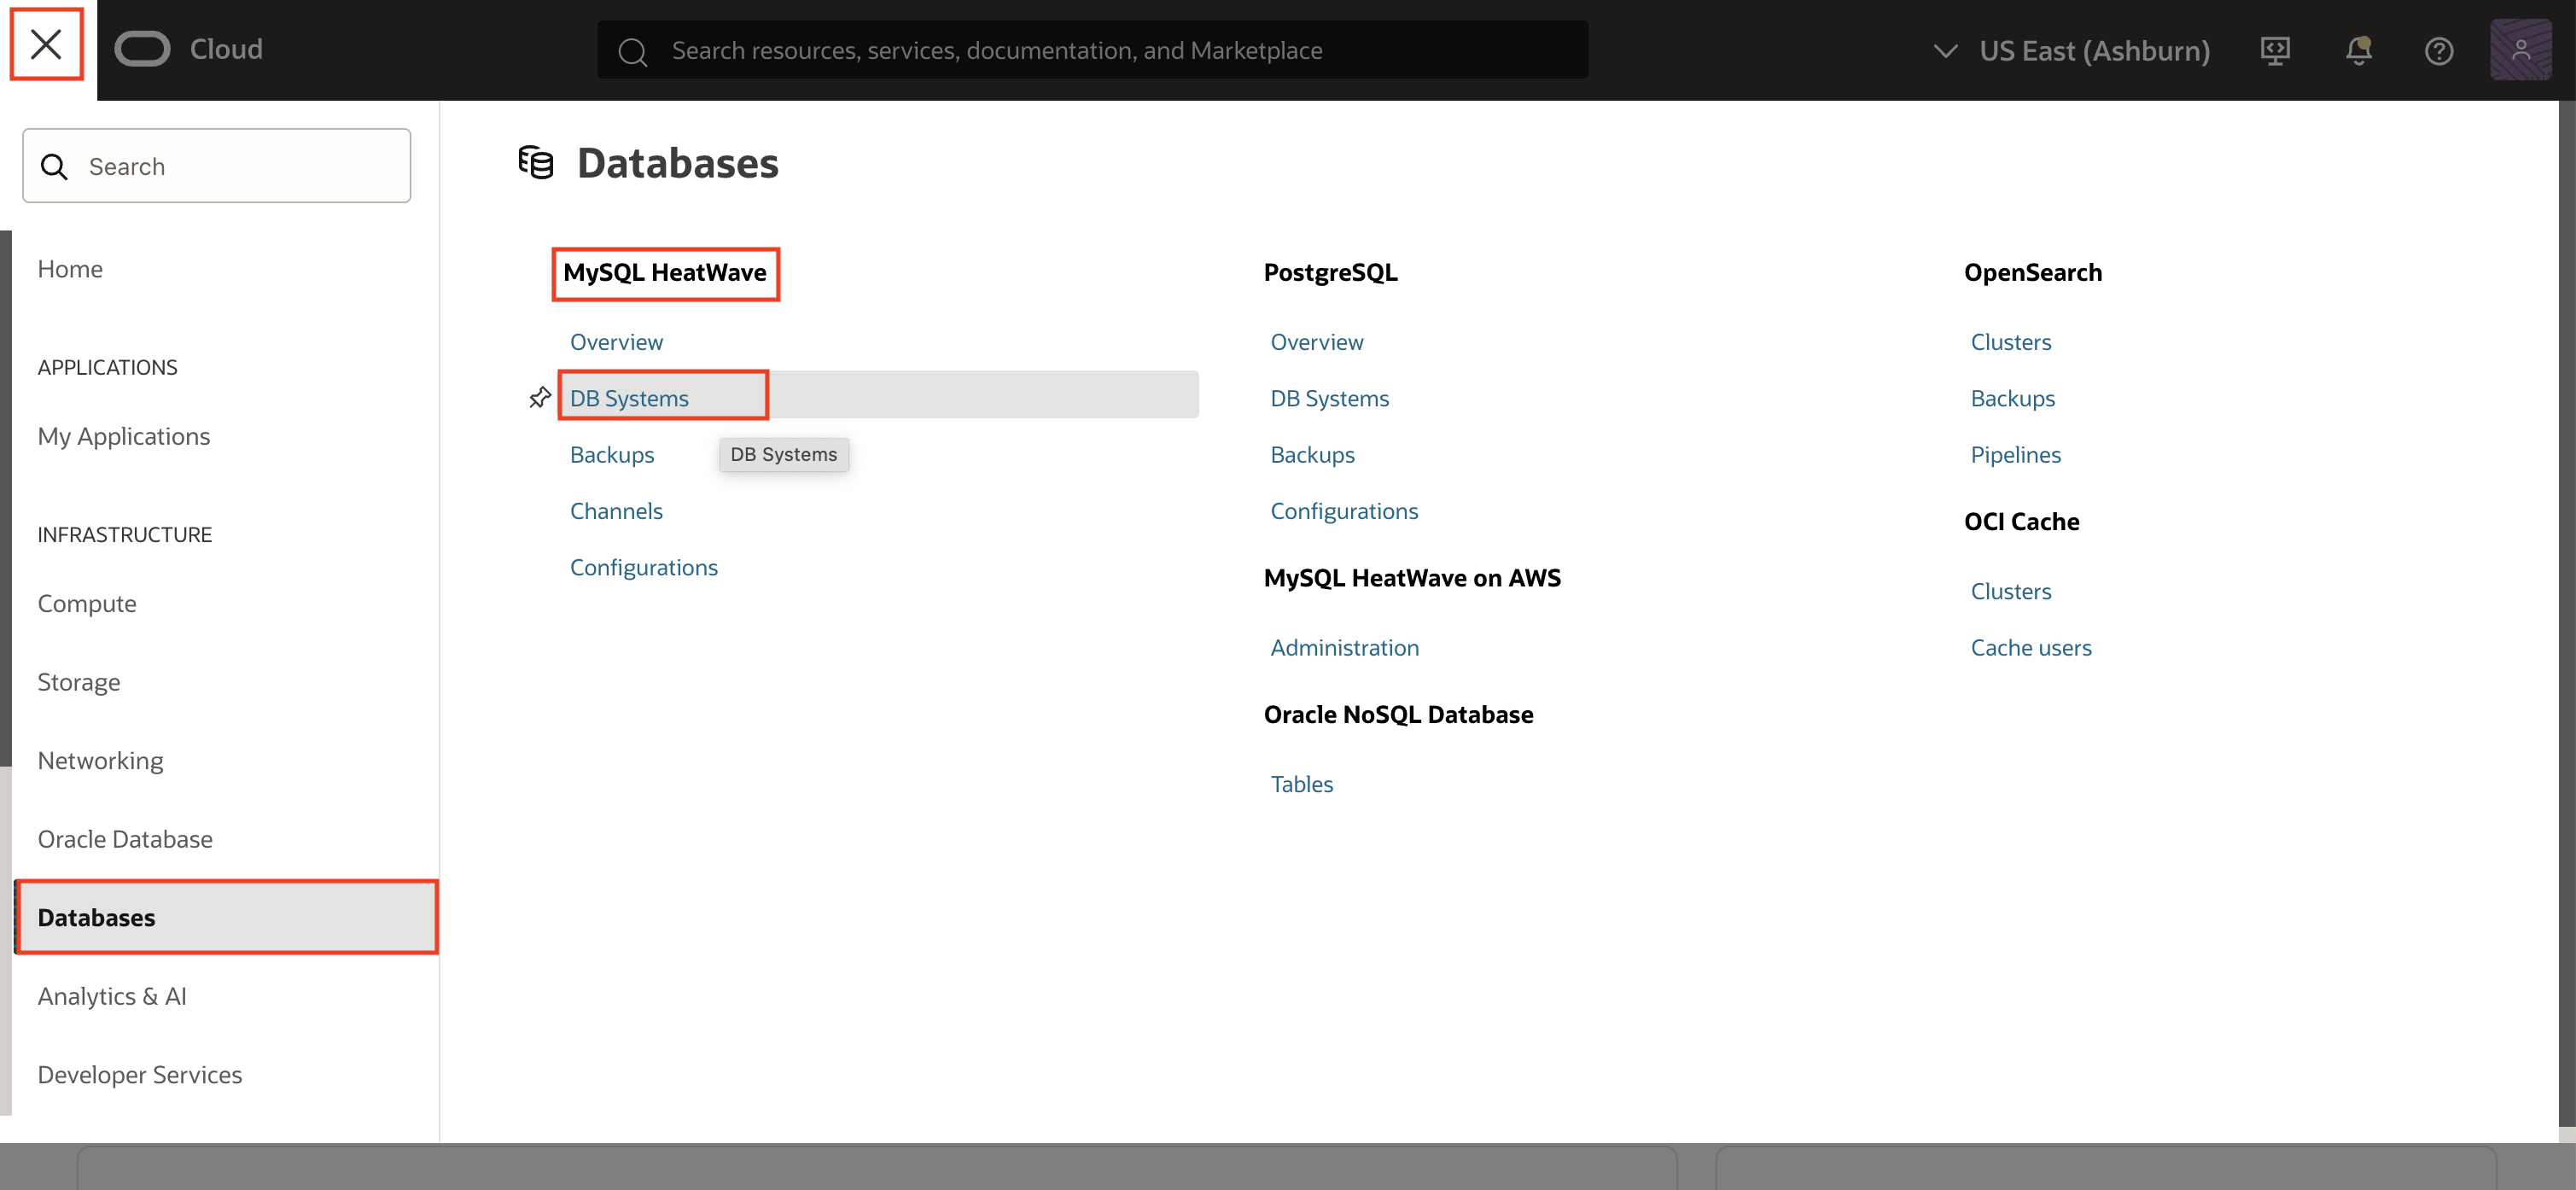
- Login to the Oracle Cloud console, navigate to MySQL HeatWave -> DB Systems and click Create DB System.
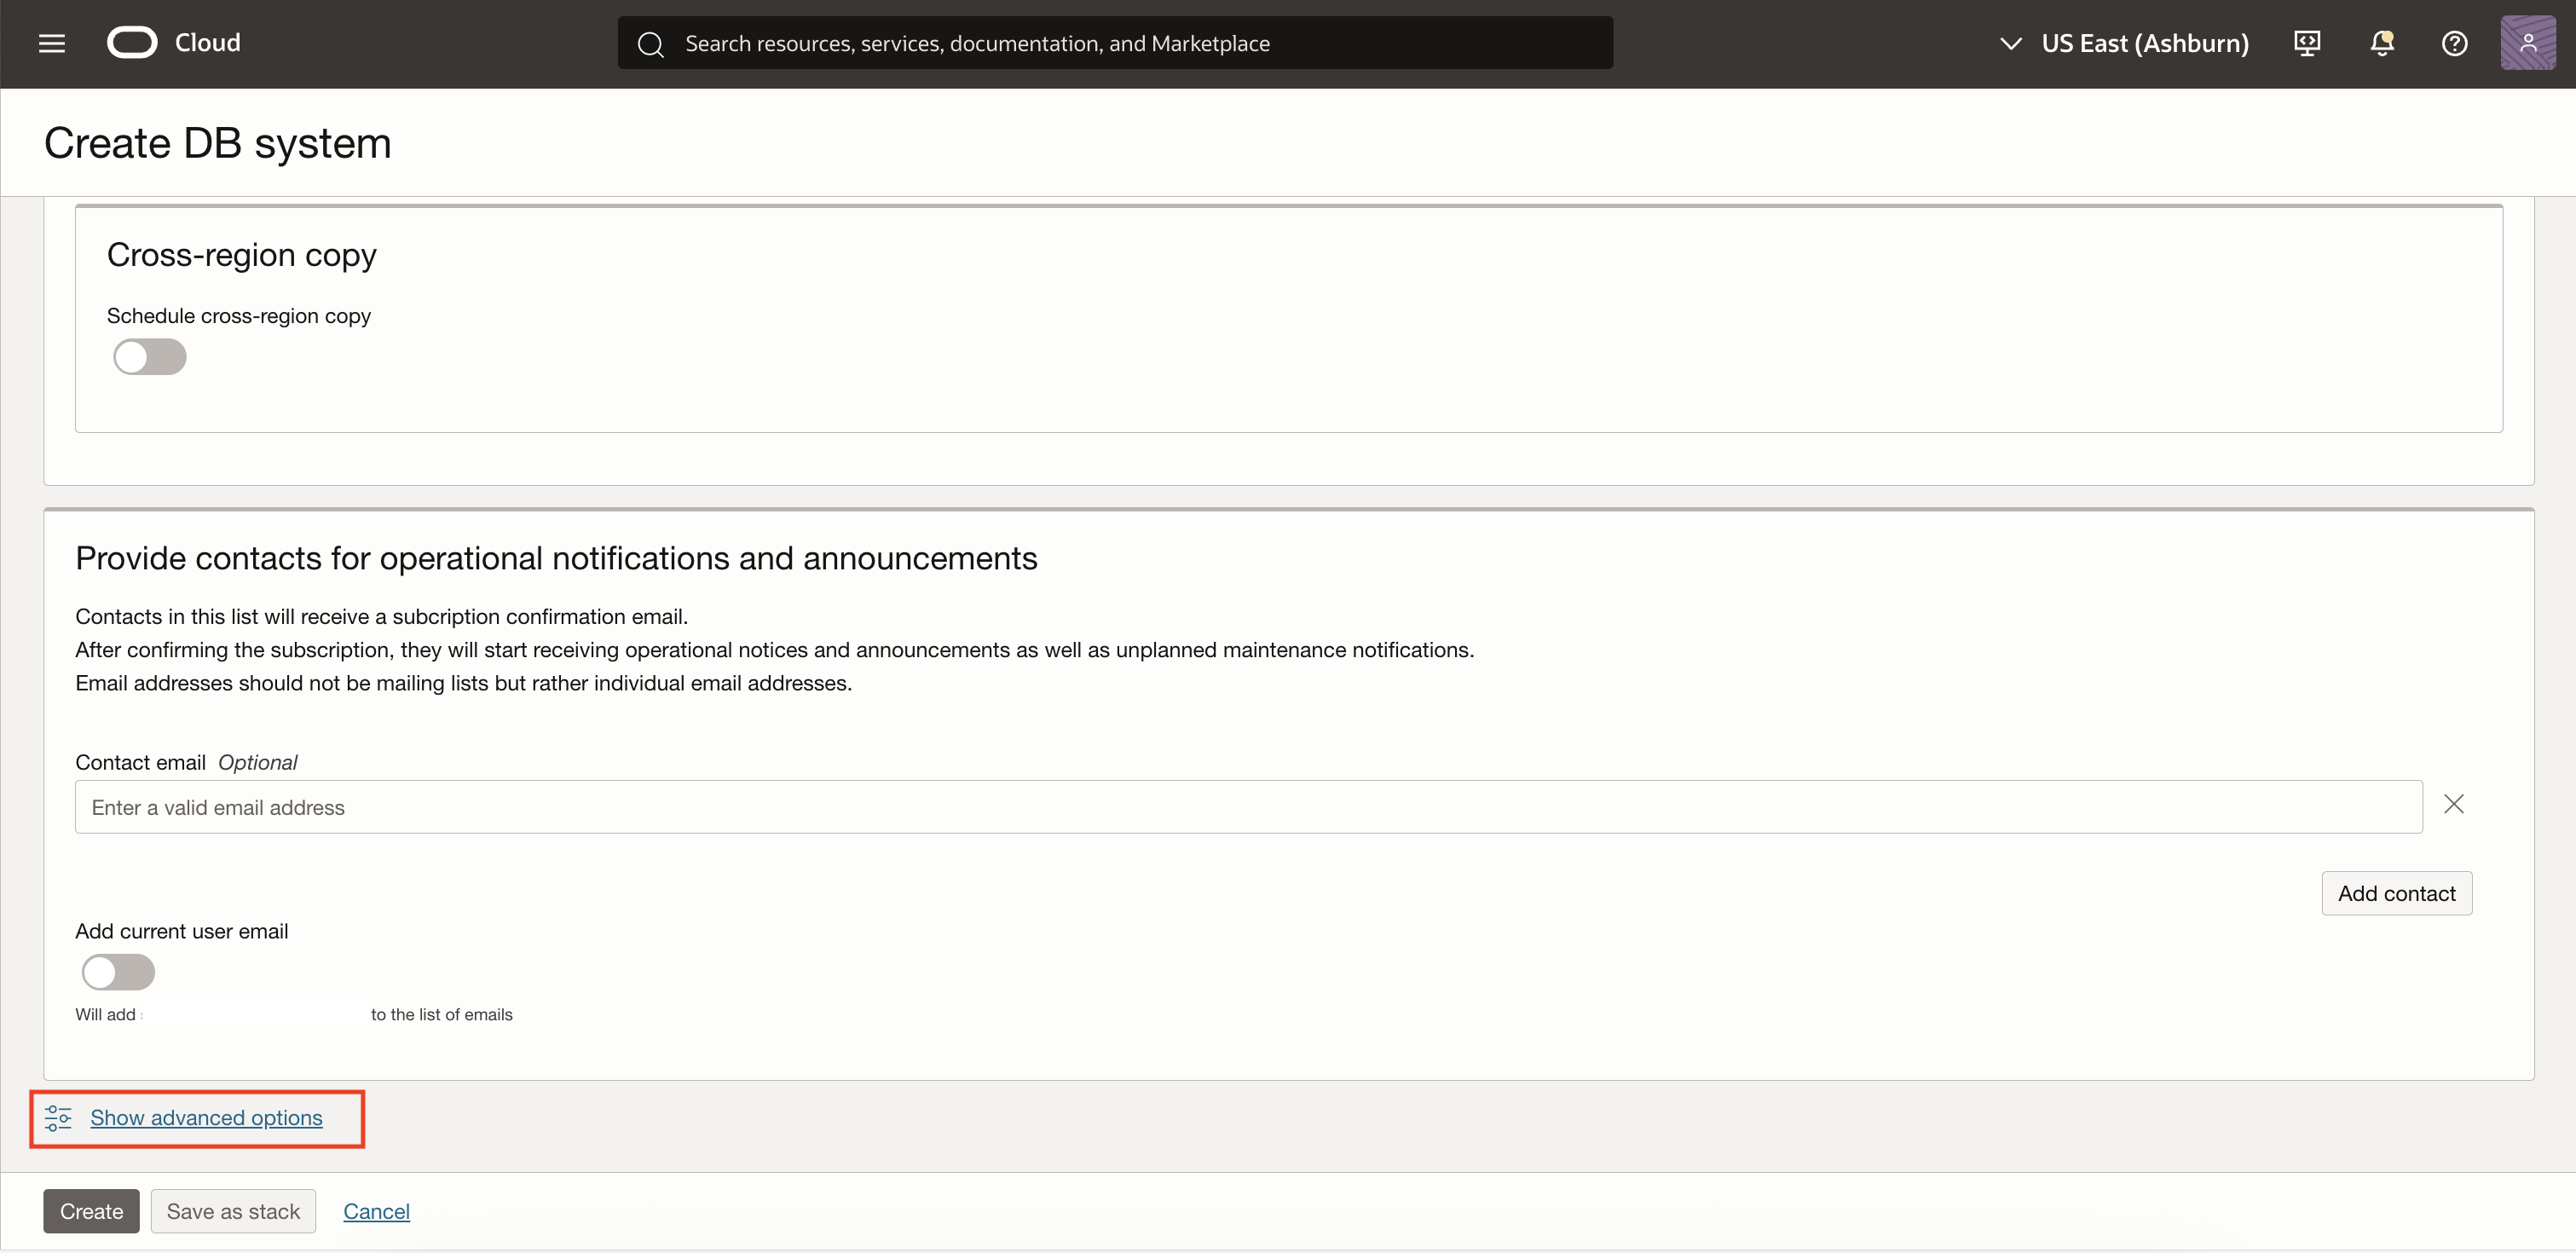
- Provide DB system information, administration credentials, and configure networking to create a DB system. For more information, on how to create a DB system, refer to the following video.
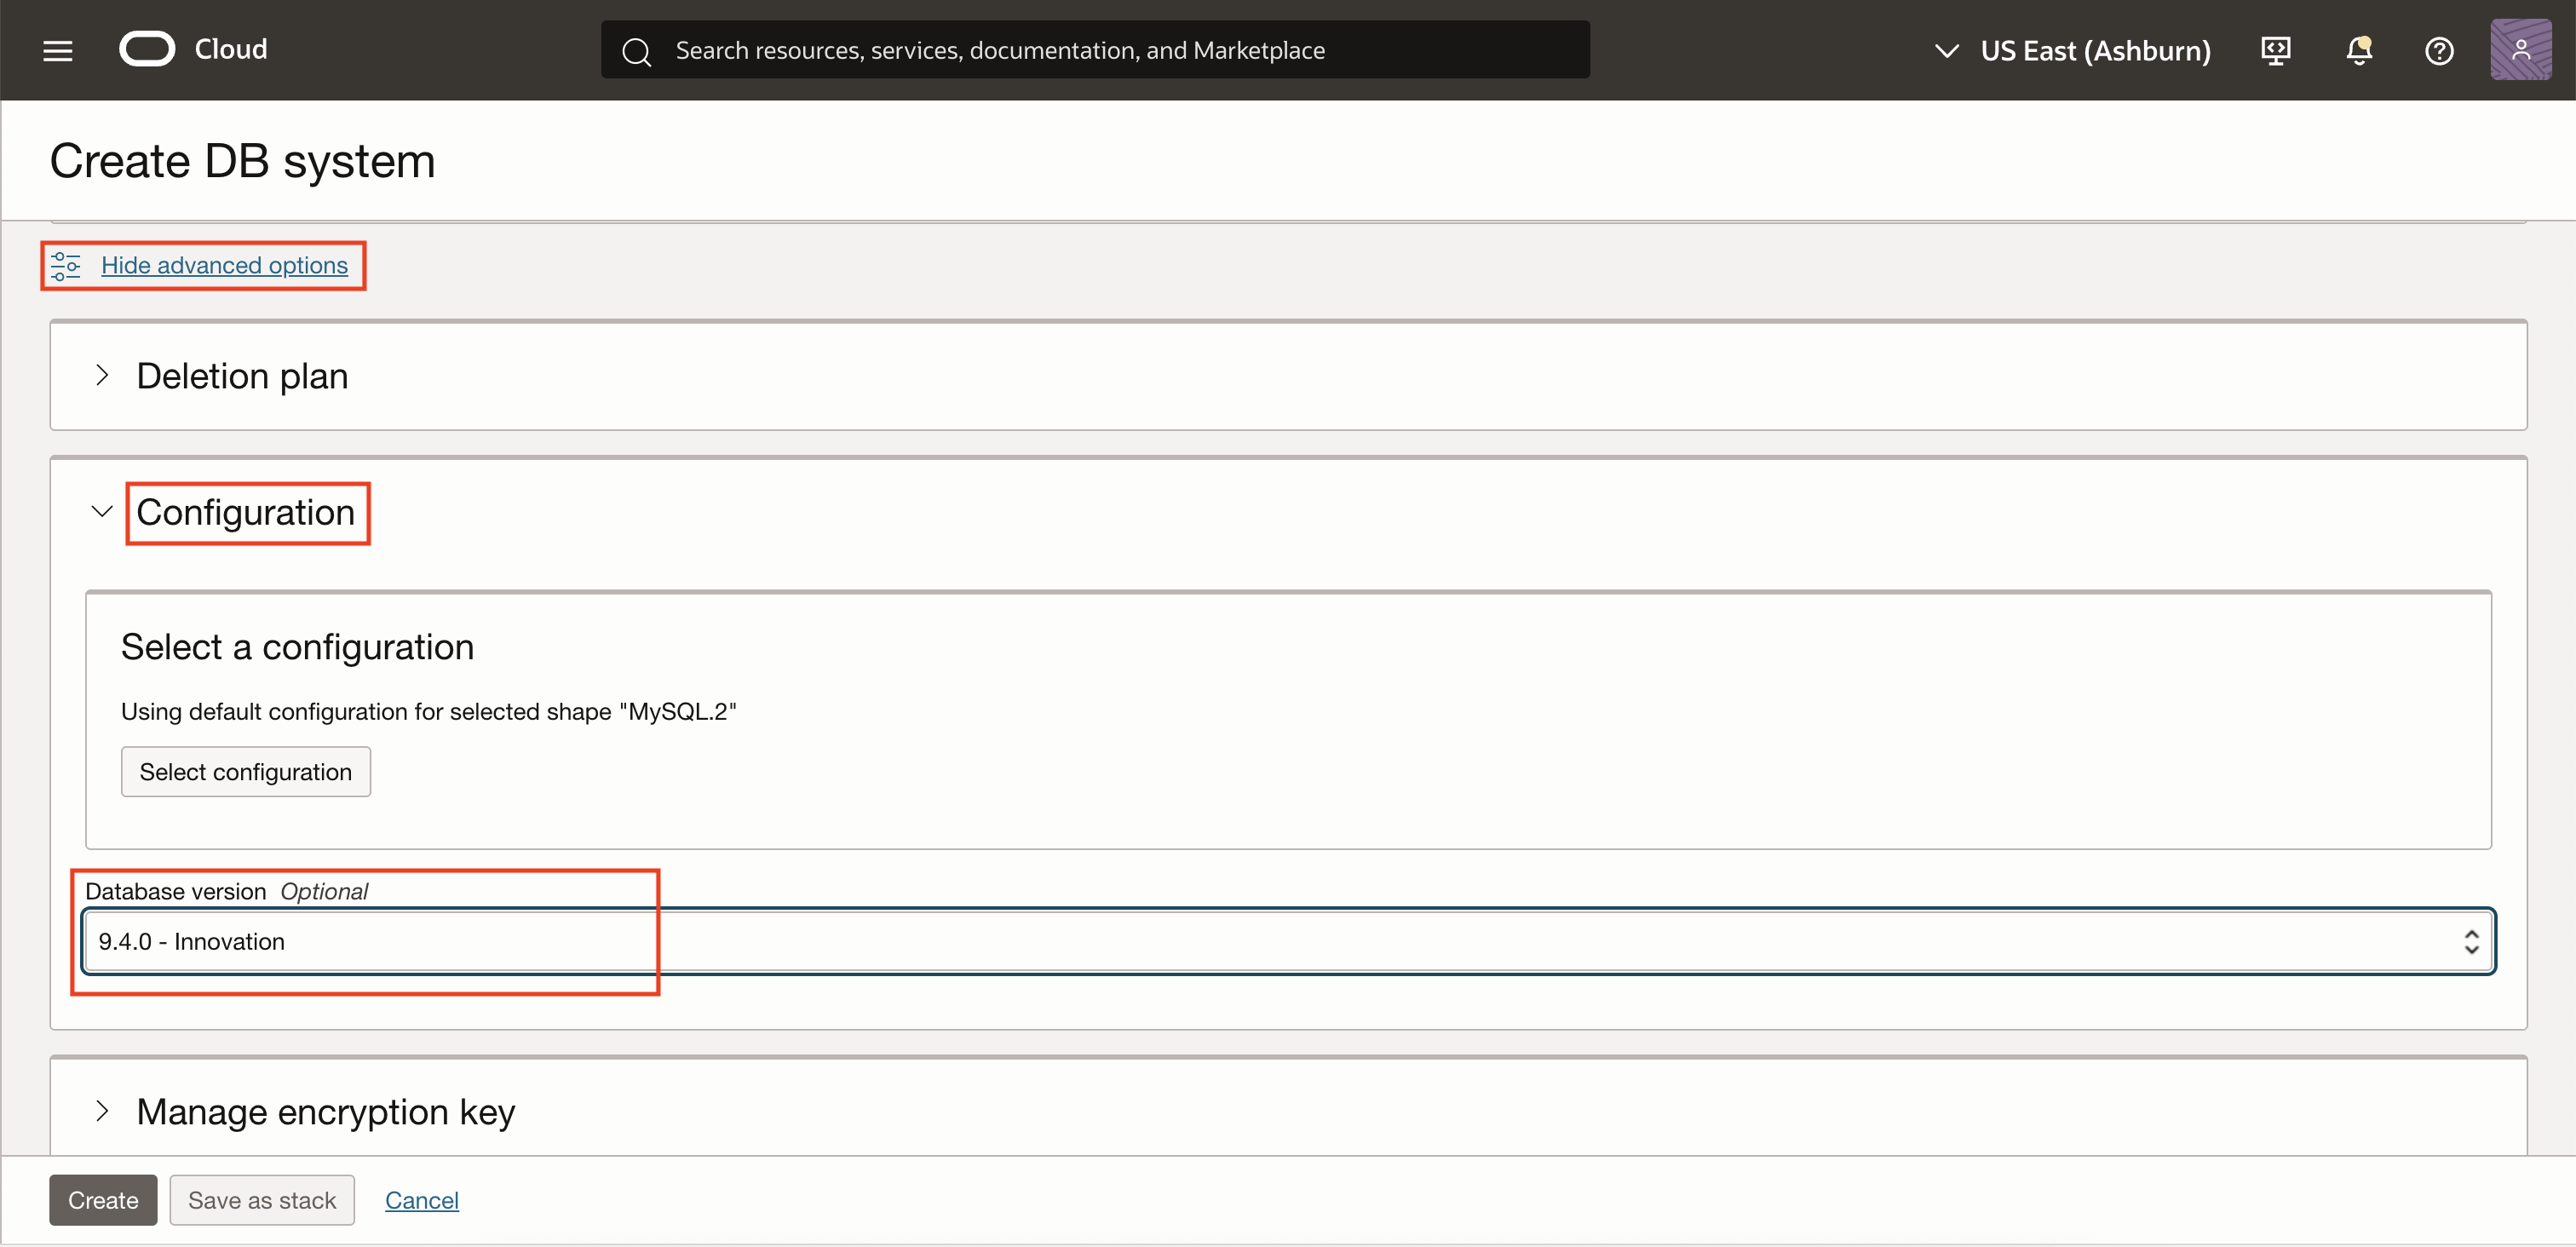
- Choose MySQL version 9.3.1 or later for the latest REST features from the Configuration tab of the advanced options.
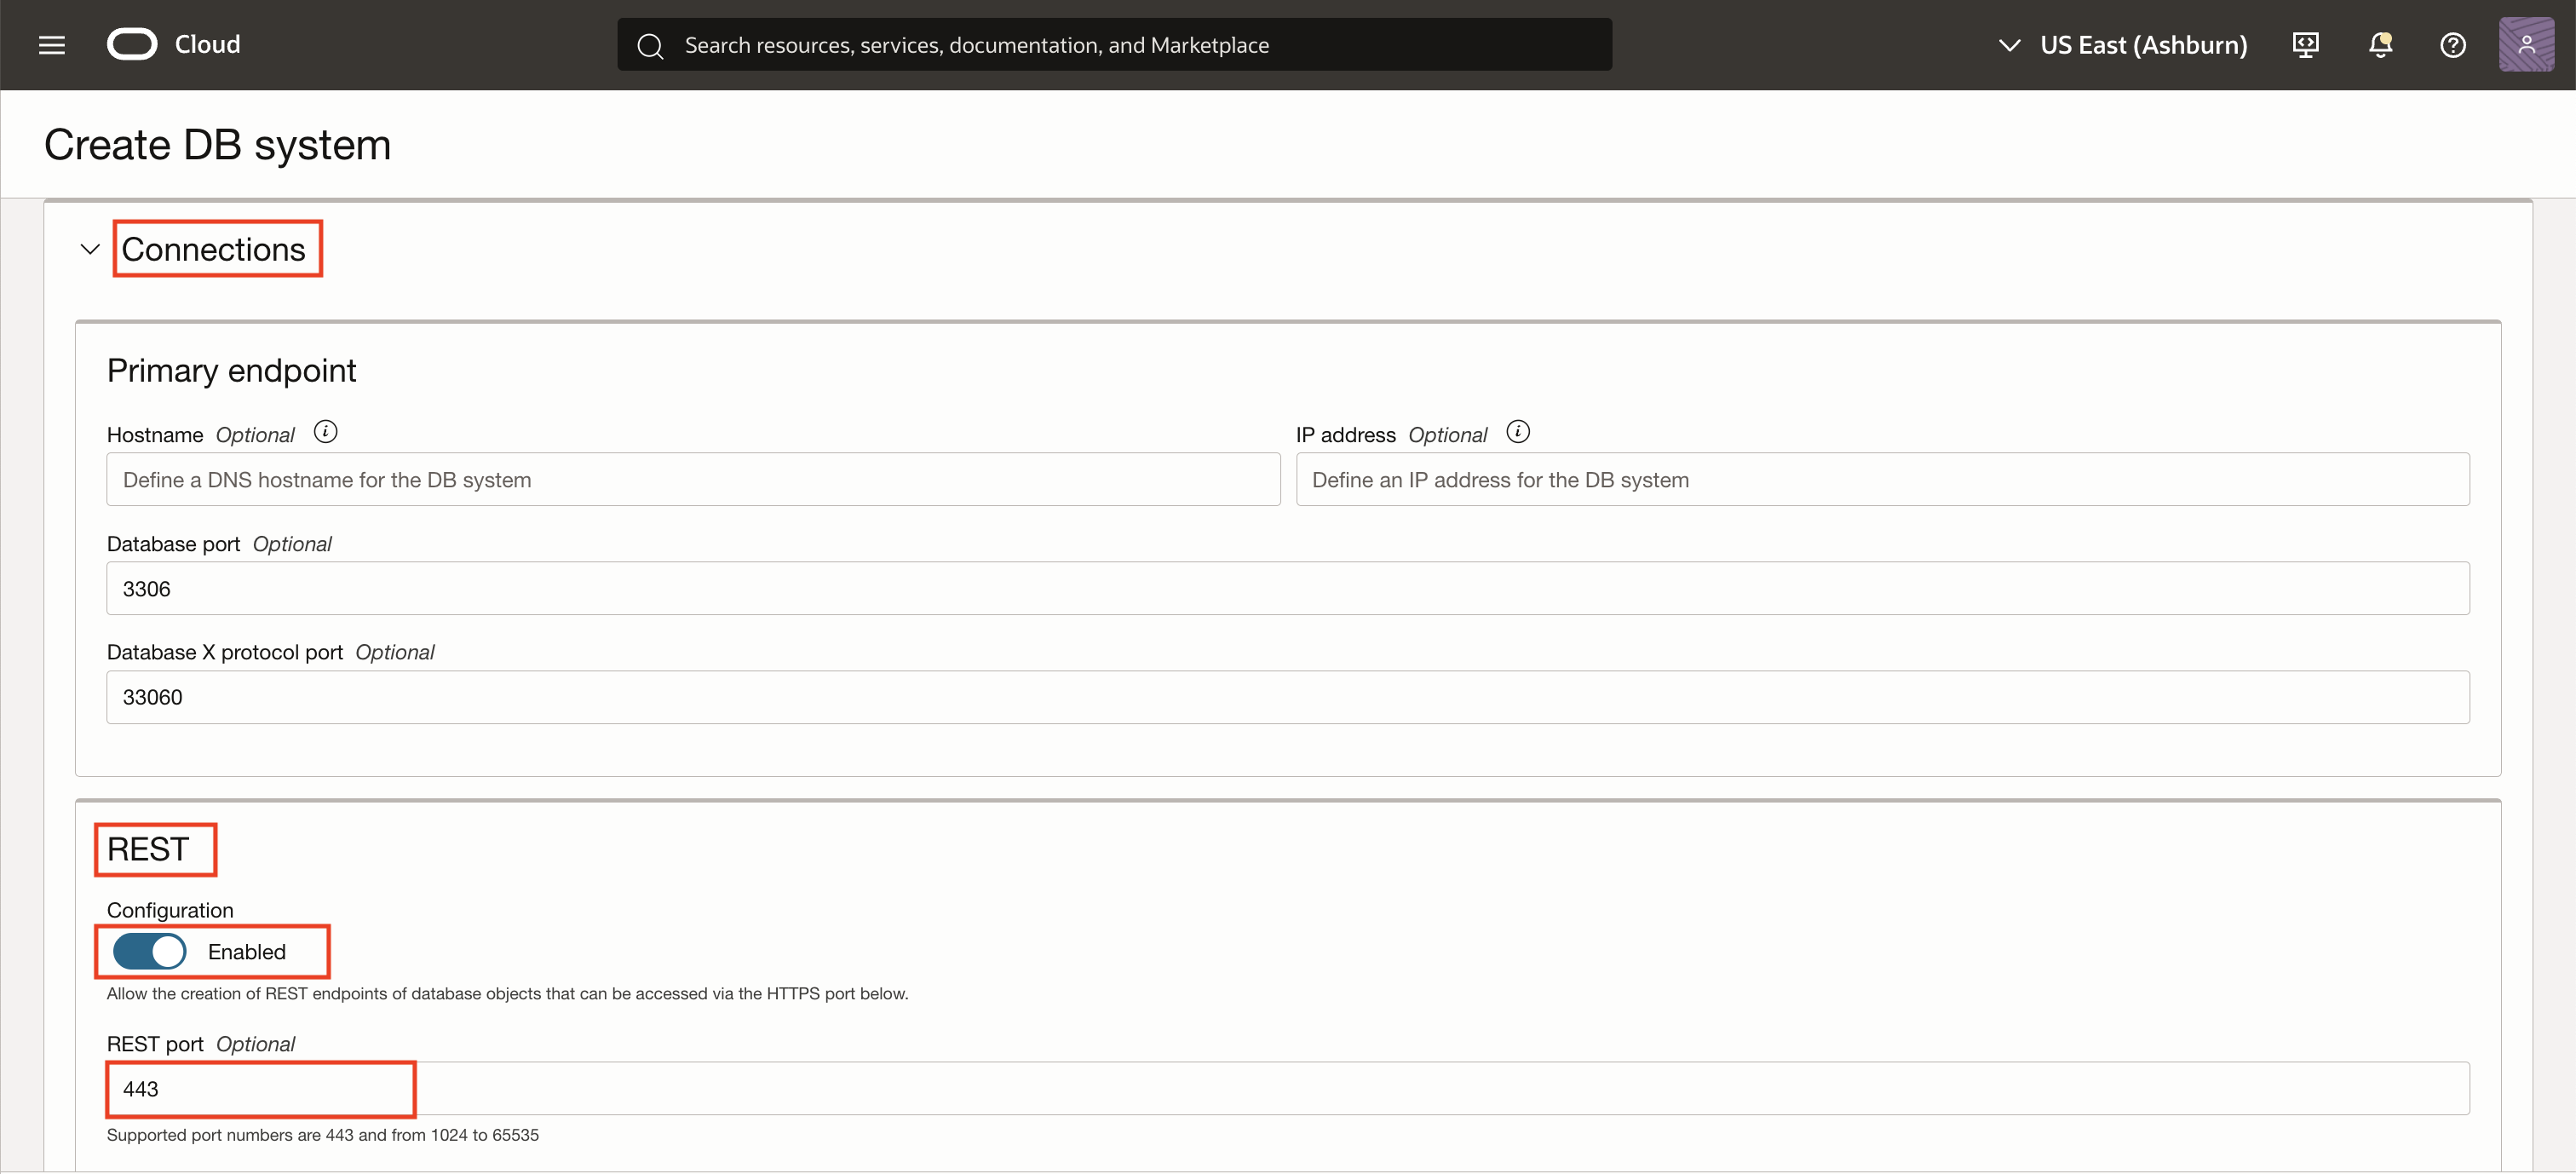
- Locate the MySQL REST Service (MRS) under Connections in the advanced options and enable it.
- Set the listening port to 443 (HTTPS)
Tip: Never expose the REST port directly to the internet; proxy access via Oracle Bastion is strongly recommended.
2. Create Your Database Schema and Tables
Once your DB System is active:
- Connect using MySQL Shell, command line, or the VS Code MySQL extension. In this blog, we are connecting to our database using MySQL Shell extension for VS Code. For more details on how to connect your MySQL HeatWave DB system using the VS Code MySQL Shell extension, refer to the following blog.
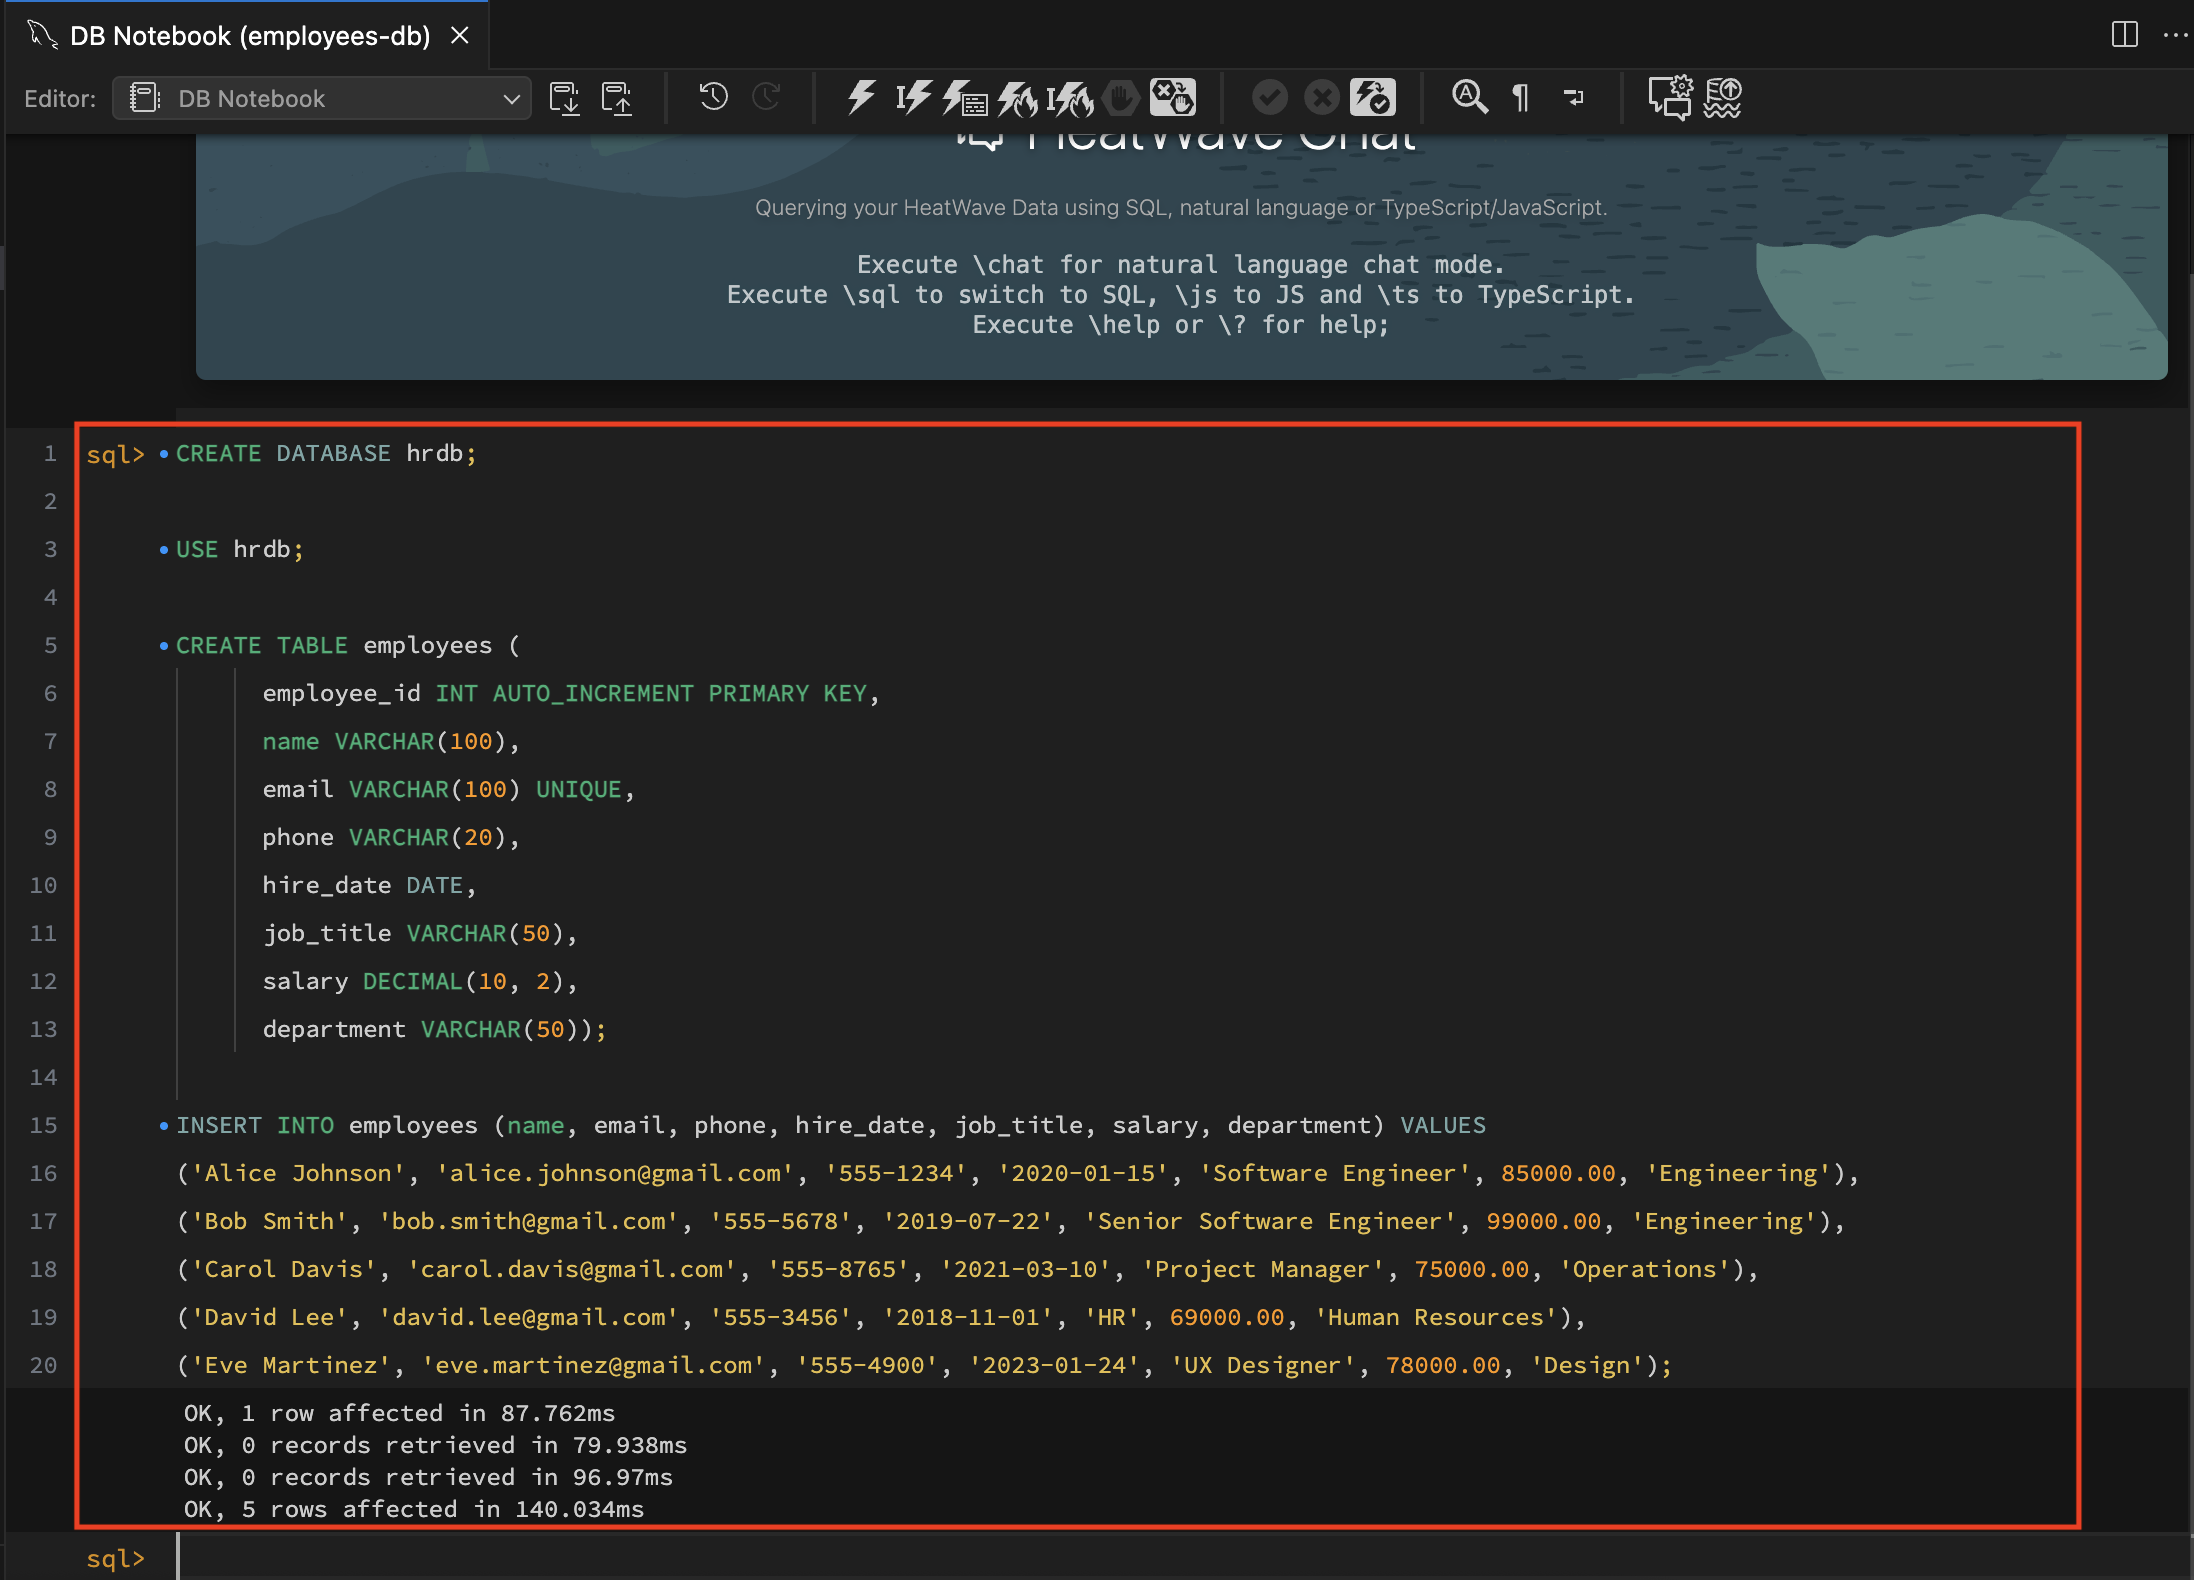
- Create a schema and table, for example:
CREATE DATABASE hrdb;

    USE hrdb;

    CREATE TABLE employees (
    employee_id INT AUTO_INCREMENT PRIMARY KEY,
    name VARCHAR (100),
    email VARCHAR (100) UNIQUE,
    phone VARCHAR (20),
    hire_date DATE,
    job_title VARCHAR (50),
    salary DECIMAL(10,2),
    department VARCHAR (50));
INSERT INTO employees (name, email, phone, hire_date, job_title, salary, department) VALUES
    ('Alice Johnson', 'alice.johnson@gmail.com', '555-1234', '2020-01-15', 'Software Engineer', 85000.00, 'Engineering'),
    ('Bob Smith', 'bob.smith@gmail.com', '555-5678', '2019-07-22', 'Senior Software Engineer', 99000.00, 'Engineering'),
    ('Carol Davis', 'carol.davis@gmail.com', '555-8765', '2021-03-10', 'Project Manager', 75000.00, 'Operations'),
    ('David Lee', 'david.lee@gmail.com', '555-3456', '2018-11-01', 'HR', 69000.00, 'Human Resources'),
    ('Eve Martinez', 'eve.martinez@gmail.com', '555-4900', '2023-01-24', 'UX Designer', 78000.00, 'Design');
3. Set Up an MRS User and Assign Privileges
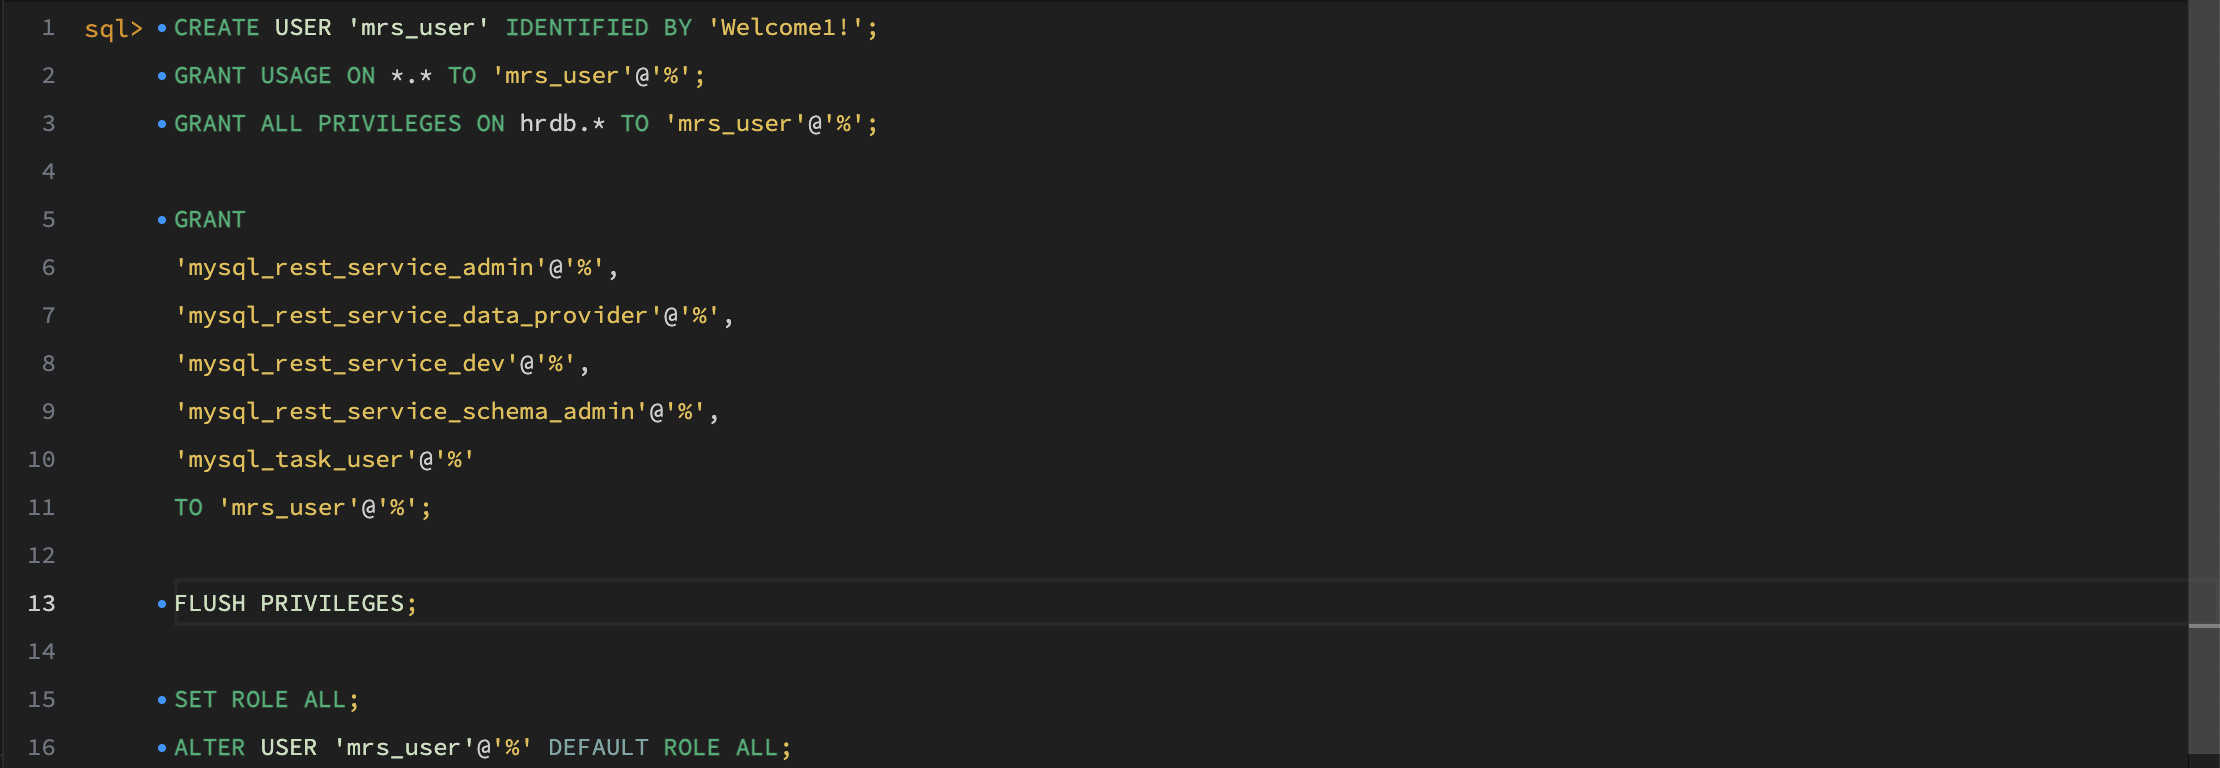
A dedicated service account for MRS access is a good practice. This helps isolate REST API interactions from other database operations and enhances security by limiting the scope of access. As an admin, run these SQL statements in the VS Code:
CREATE USER 'mrs_user' IDENTIFIED BY 'Password!';

    GRANT USAGE ON *.* TO 'mrs_user'@'%';

    GRANT ALL PRIVILEGES ON hrdb.* TO 'mrs_user'@'%';

    GRANT ALL PRIVILEGES ON hrdb.employees TO 'mrs_user'@'%' WITH GRANT OPTION;

    GRANT
    'mysql_rest_service_admin'@'%',
    'mysql_rest_service_data_provider'@'%',
    'mysql_rest_service_dev'@'%',
    'mysql_rest_service_schema_admin'@'%',
    'mysql_task_user'@'%'
    TO 'mrs_user'@'%';

    FLUSH PRIVILEGES;

    -- Activate all roles for seamless REST access

    SET ROLE ALL;
    ALTER USER 'mrs_user'@'%' DEFAULT ROLE ALL;
Swap in your own secure password!
4. Secure Access Using Oracle Bastion Enable SSH Tunneling/Bastion
To ensure security, REST endpoints should never be opened publicly. Here’s how to secure access:
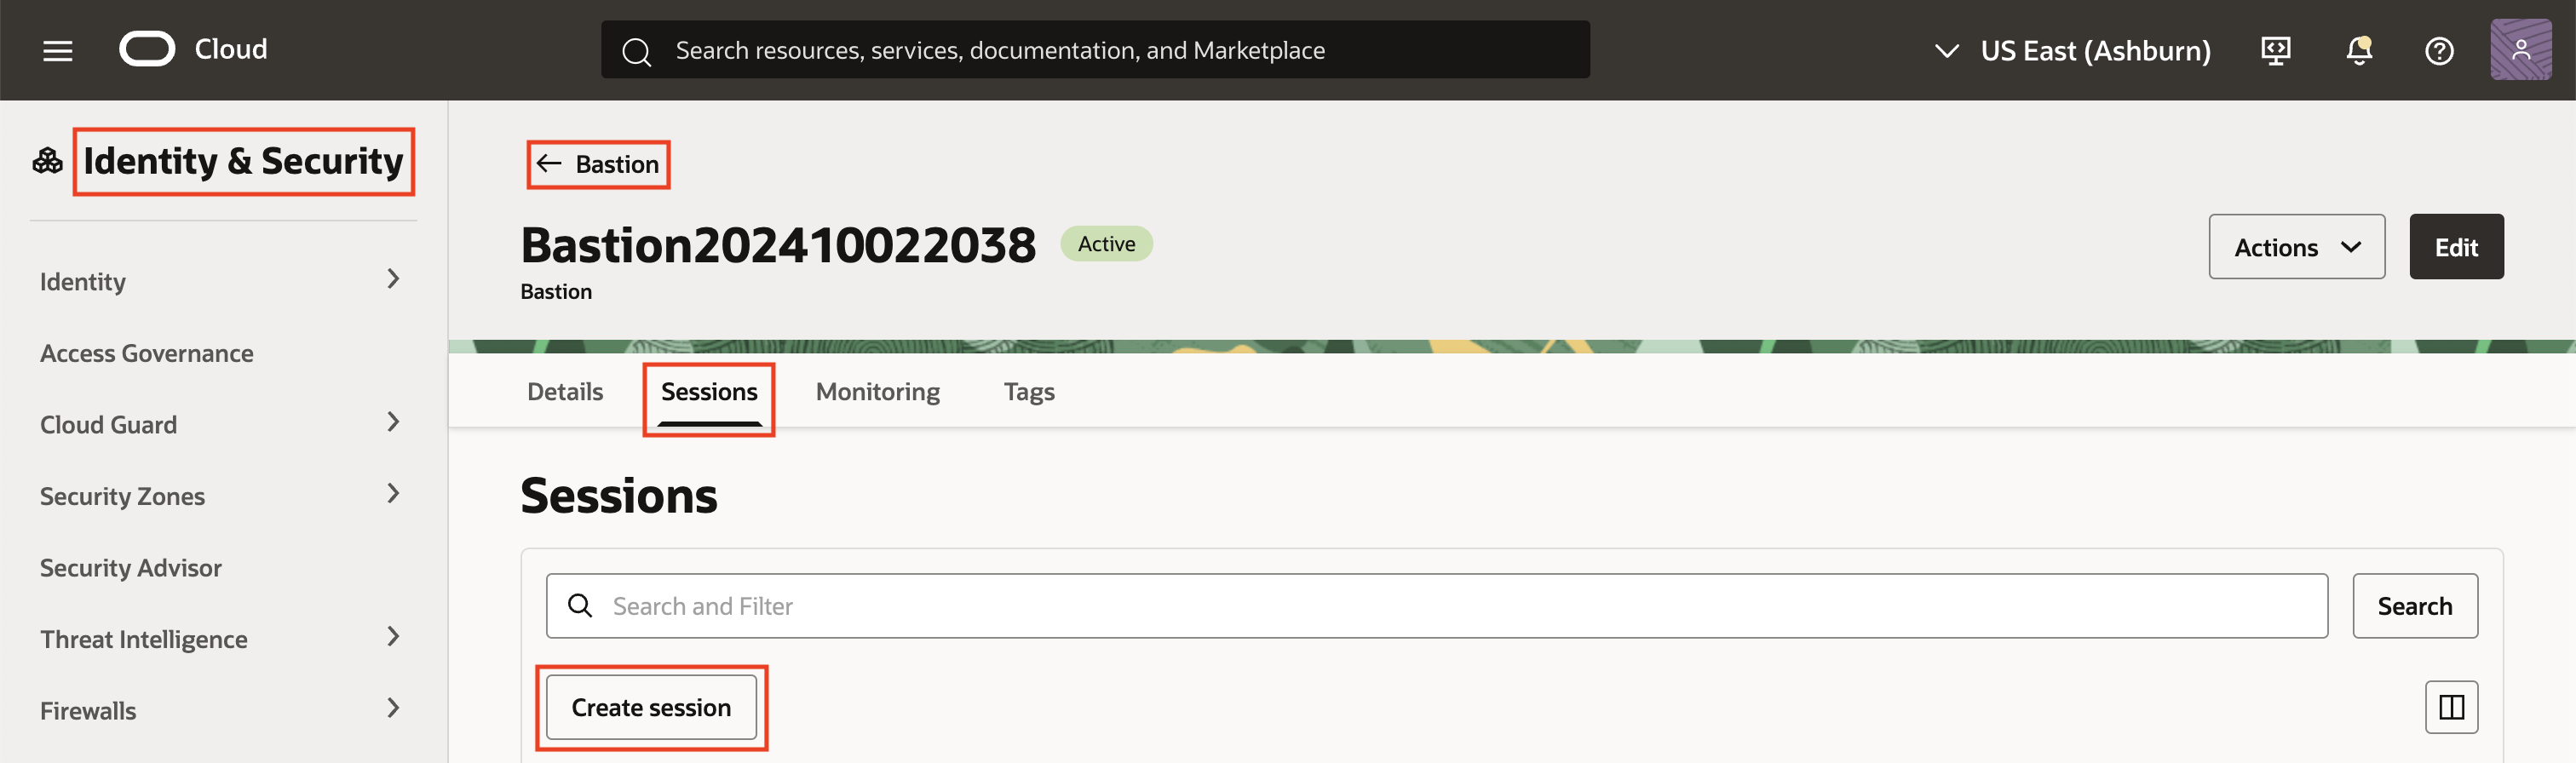
- In Oracle Cloud, navigate to Bastion. Create a Bastion for your VCN. Once created, proceed to create a session.
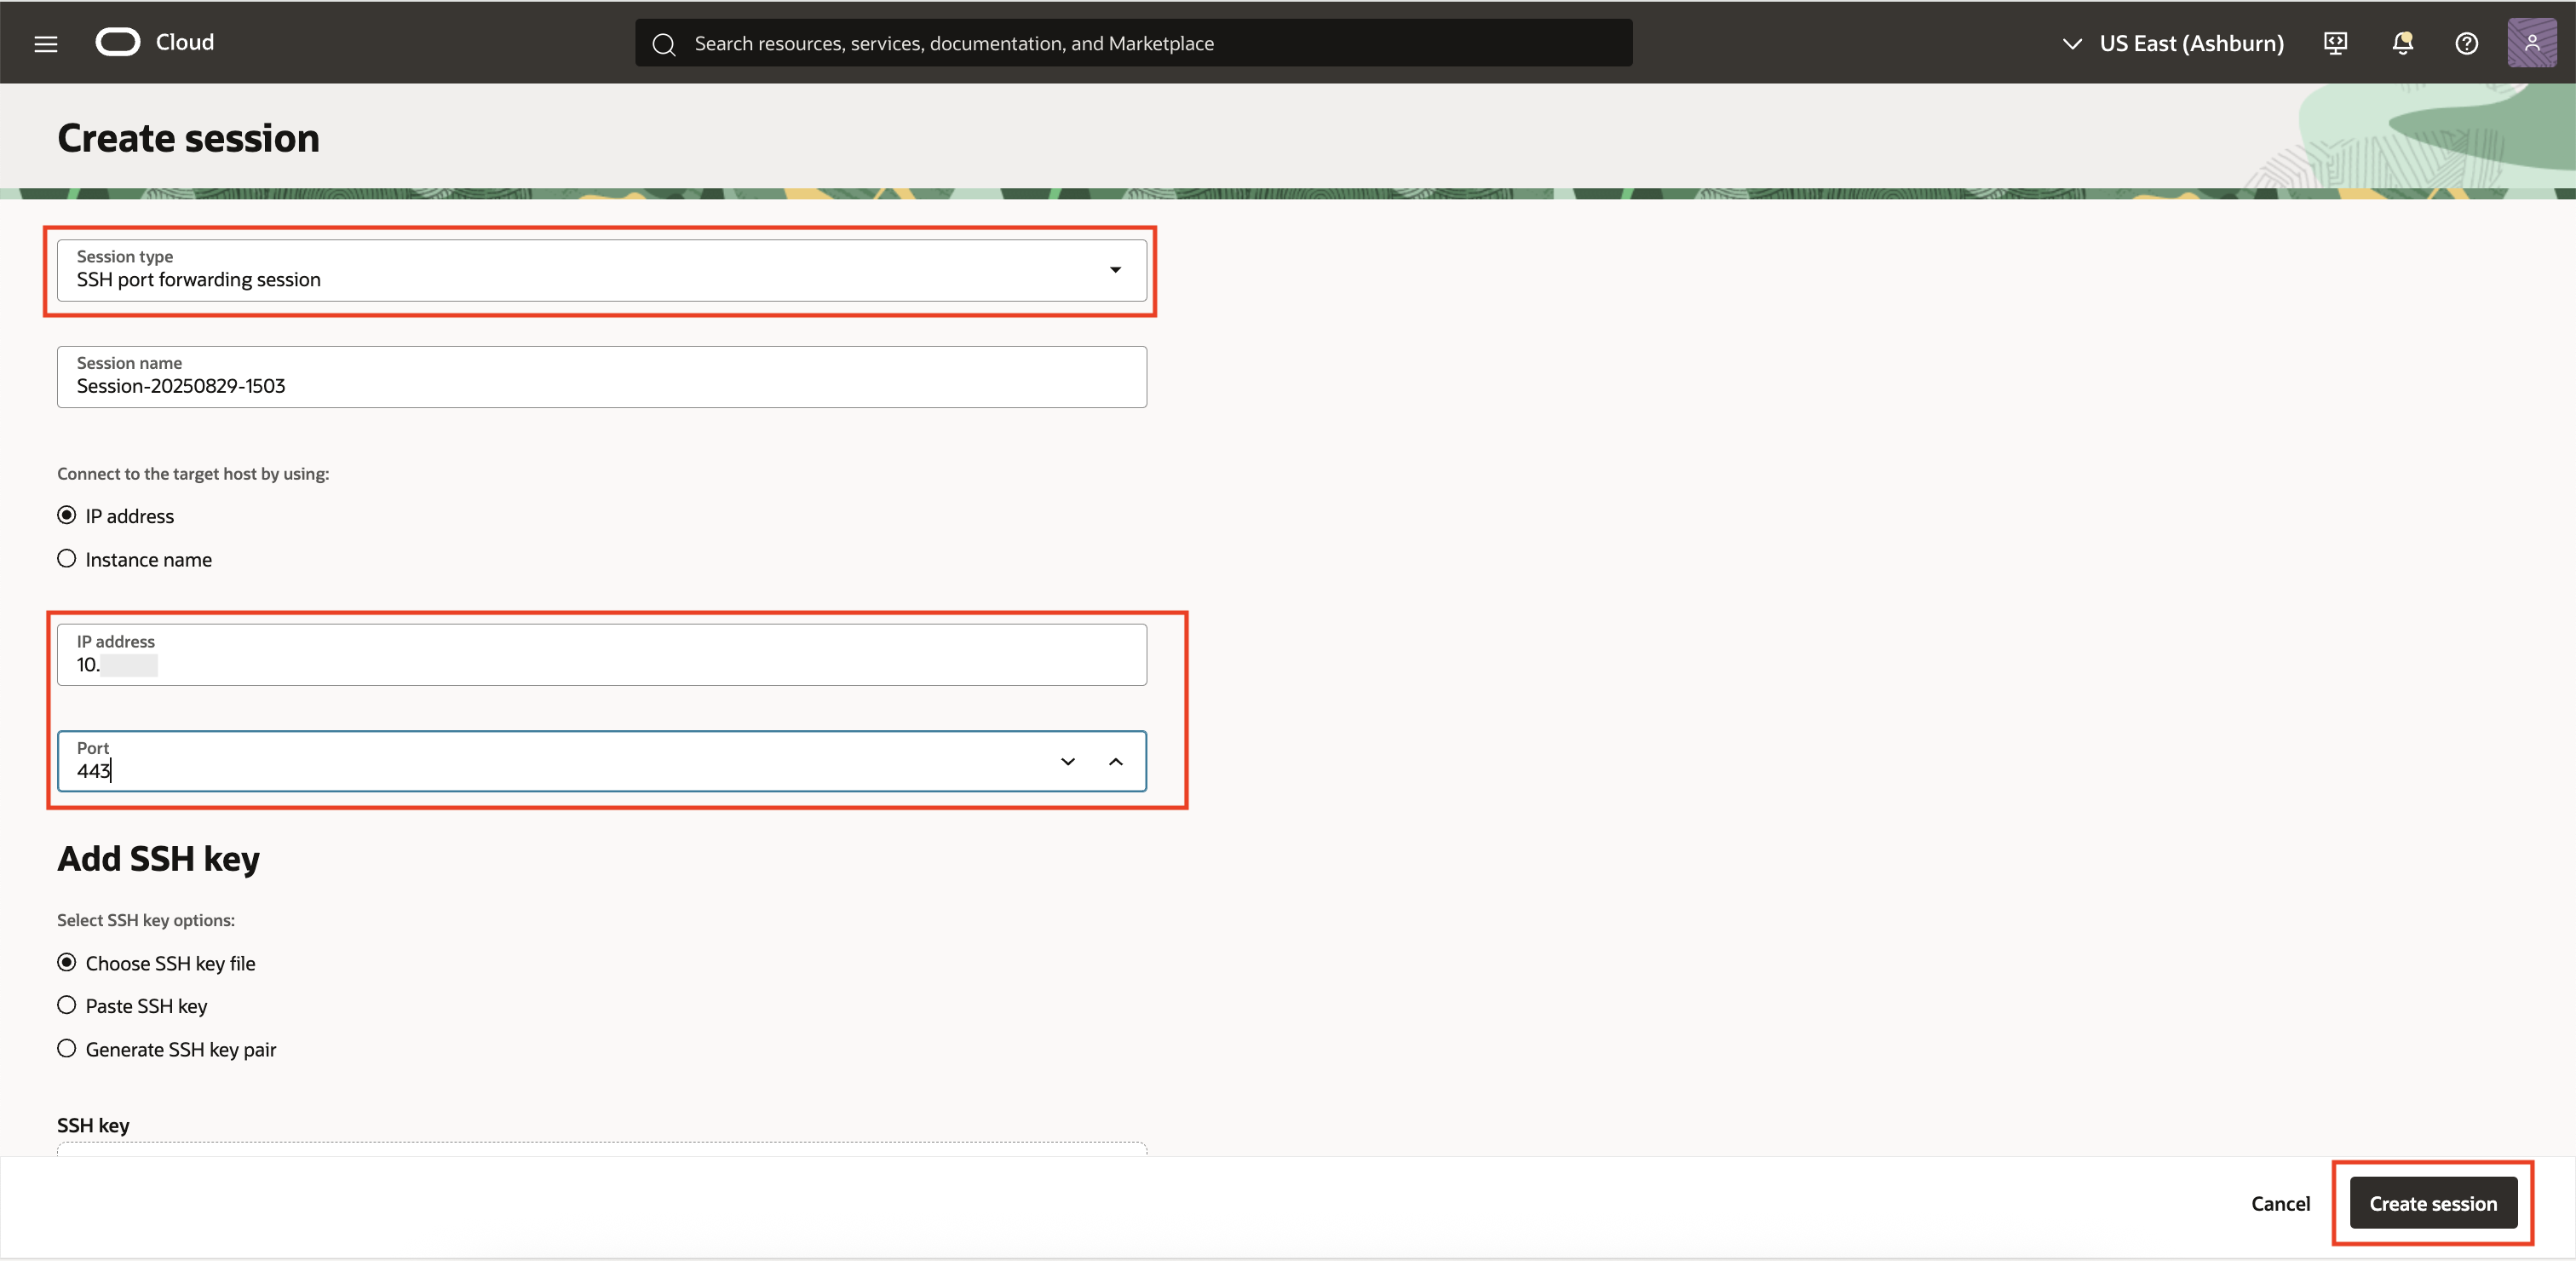
- Create a session using the private IP of your MySQL DB system and port 443. Choose an option to upload your public key to access the bastion port forwarding session.
- Use the provided SSH command to set up a local tunnel. For example:
ssh -i ~/.ssh/my-key -N -L 8446:<db-private-ip>:443 ocid1.bastionsession…@host.bastion.<region>.oci.oraclecloud.com
- Run this command on a terminal window with the tunnel being active, you (or your development tools) can access https://localhost:8446 as a secure proxy to the MRS endpoint.
5. Configuring MRS and Creating a MRS Service
- Connect to the database as `mrs_user` (using MySQL Shell extension for VS Code).
- In the VS Code MySQL extension of the mrs_user, navigate and expand the MySQL REST Service section.
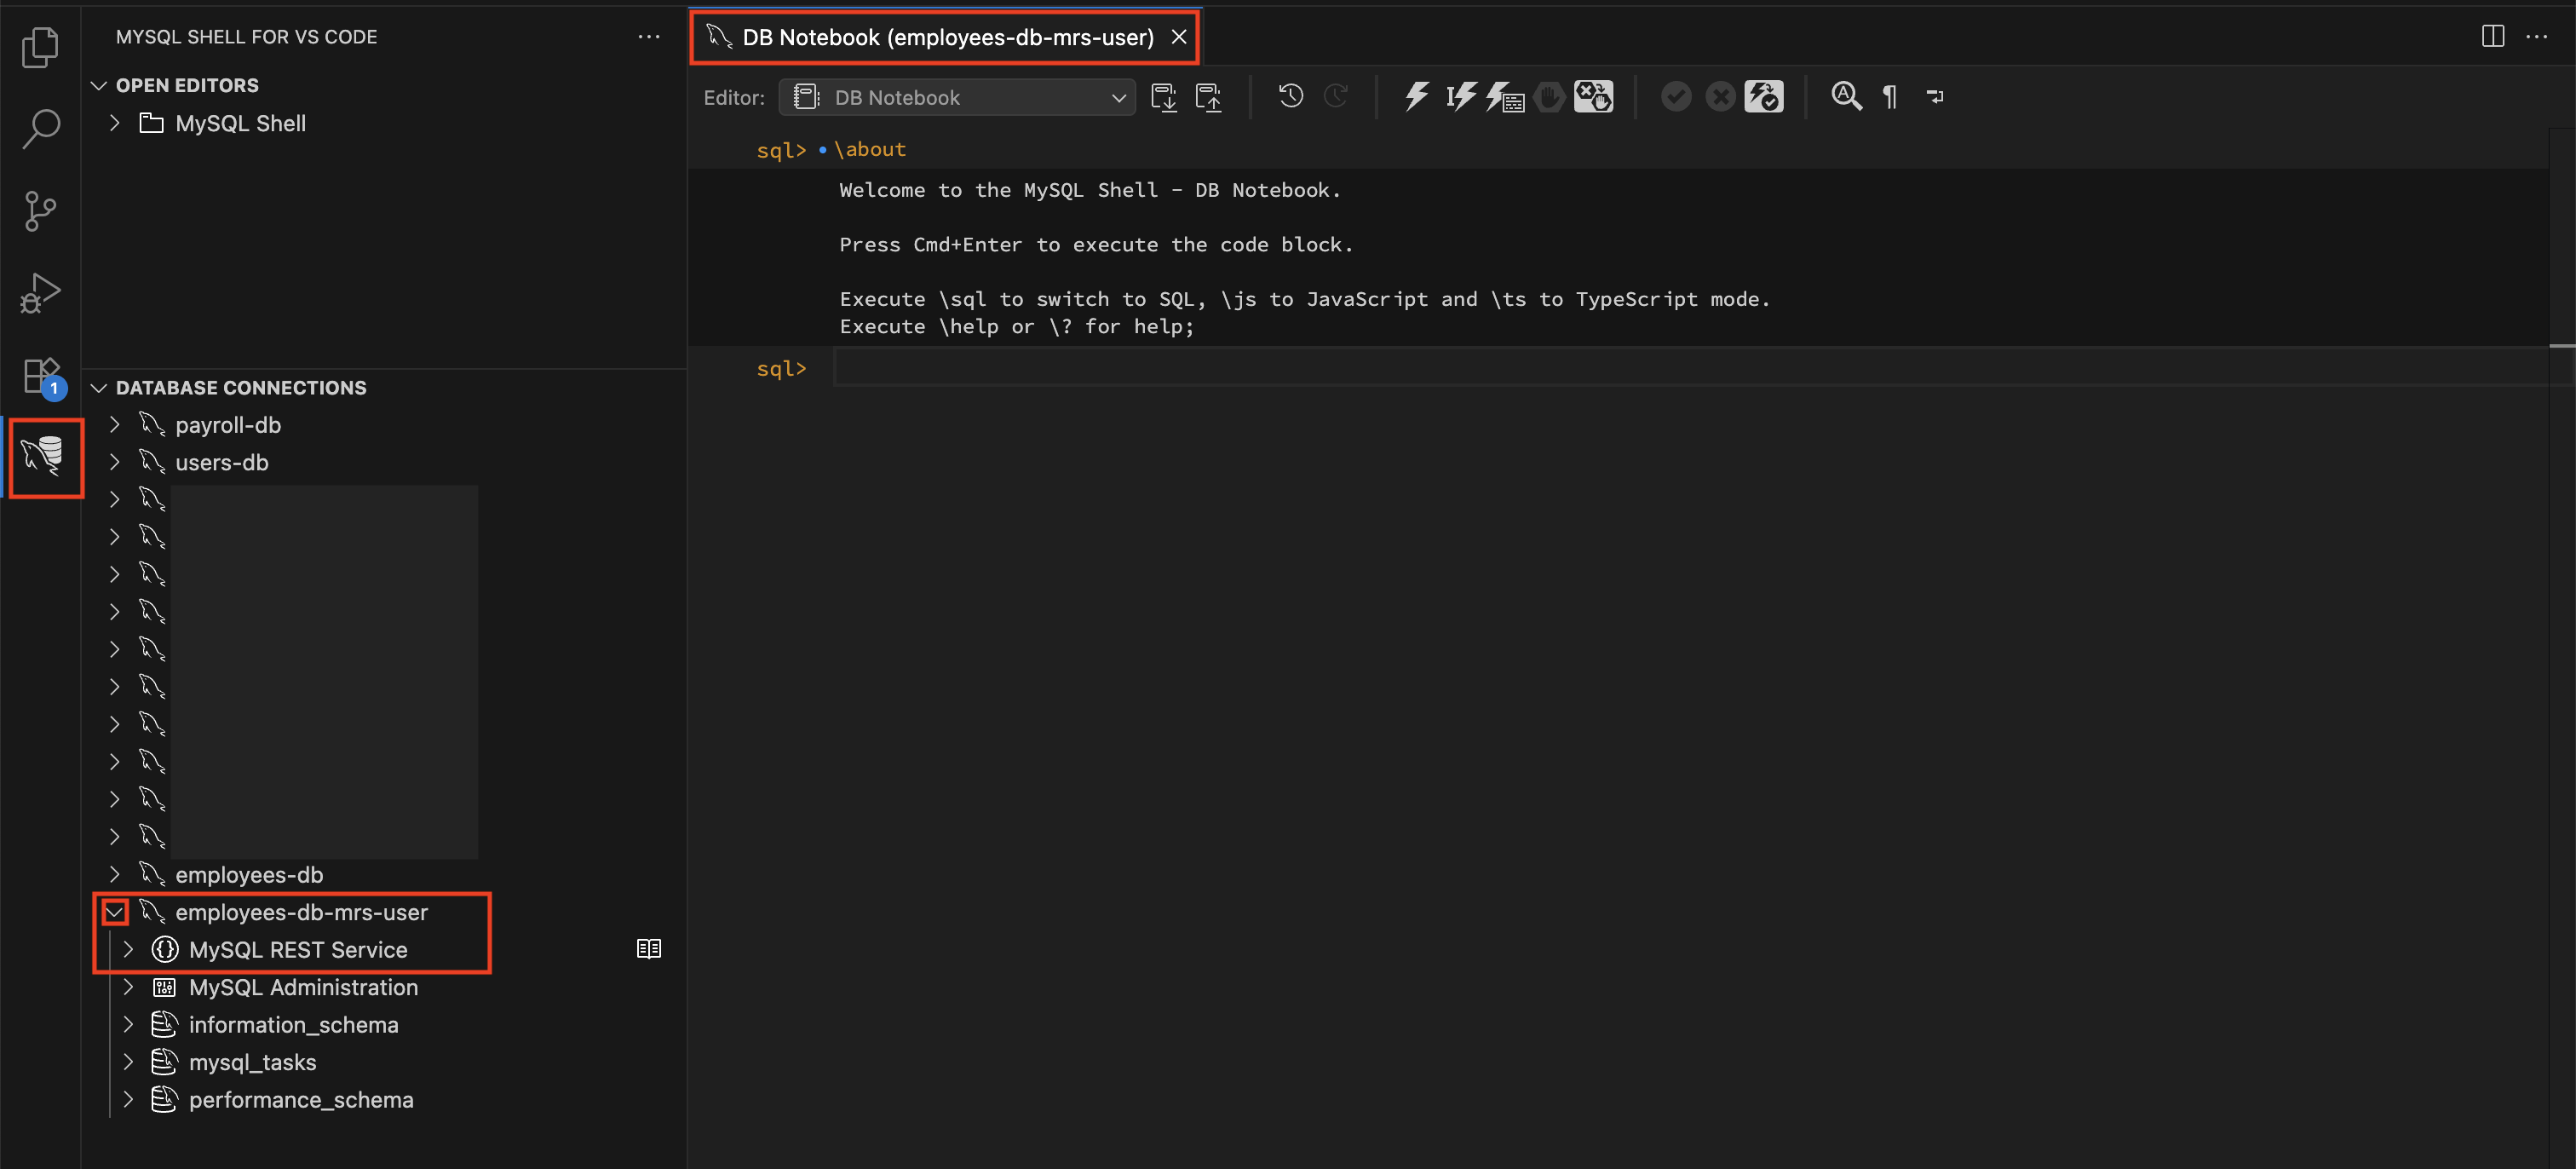
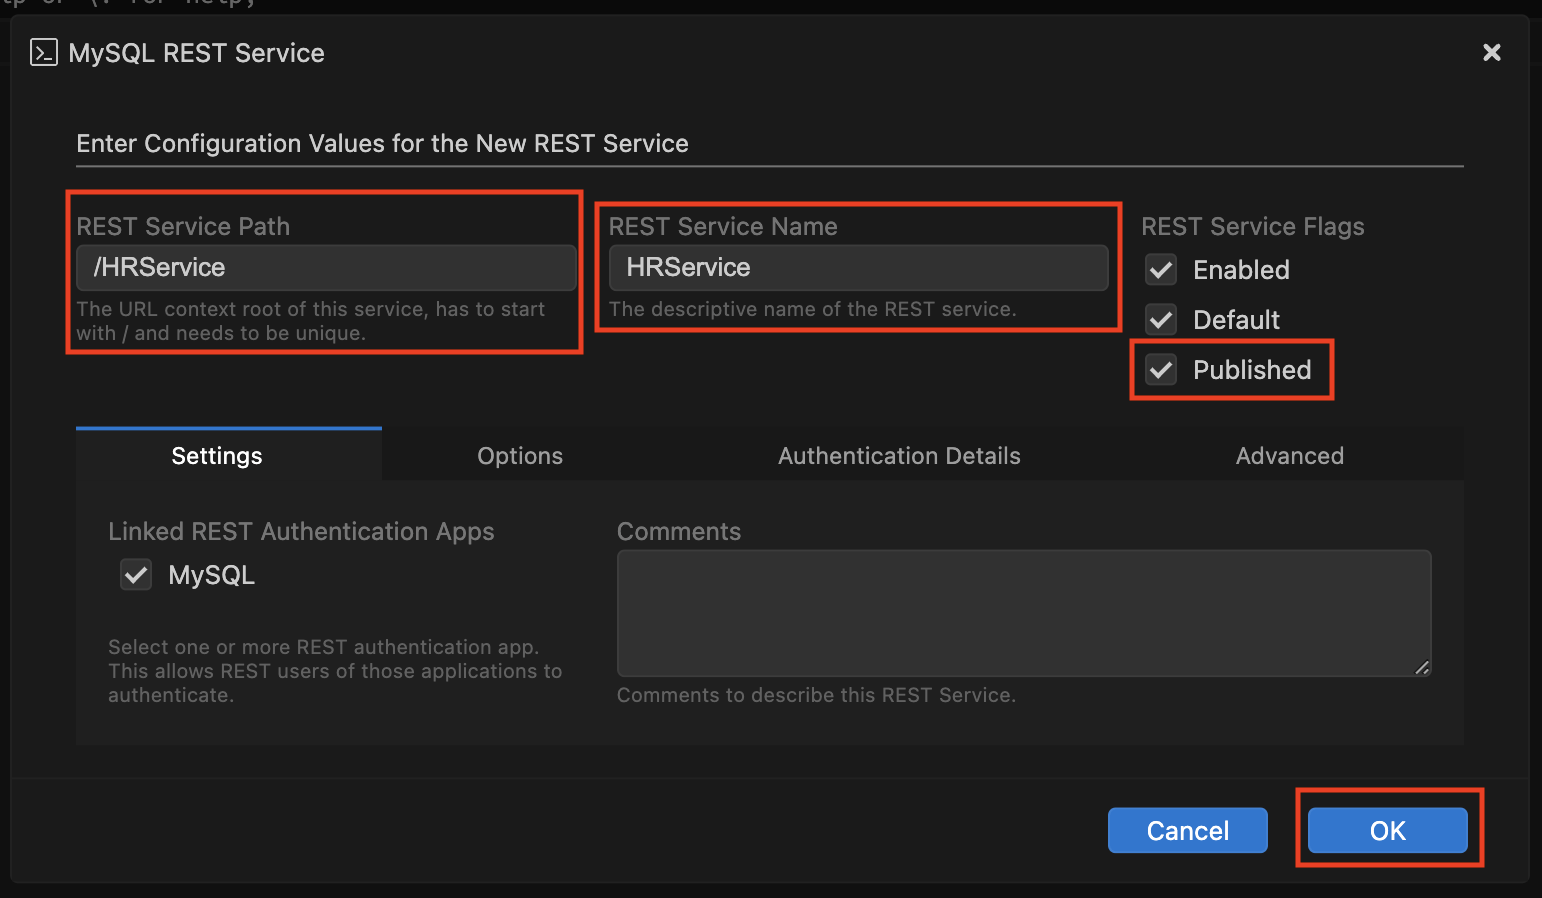
- Since MRS has been already configured, a new REST Service can be added. Open the Database Connection and right click the MySQL REST Service entry to select Add REST Service.

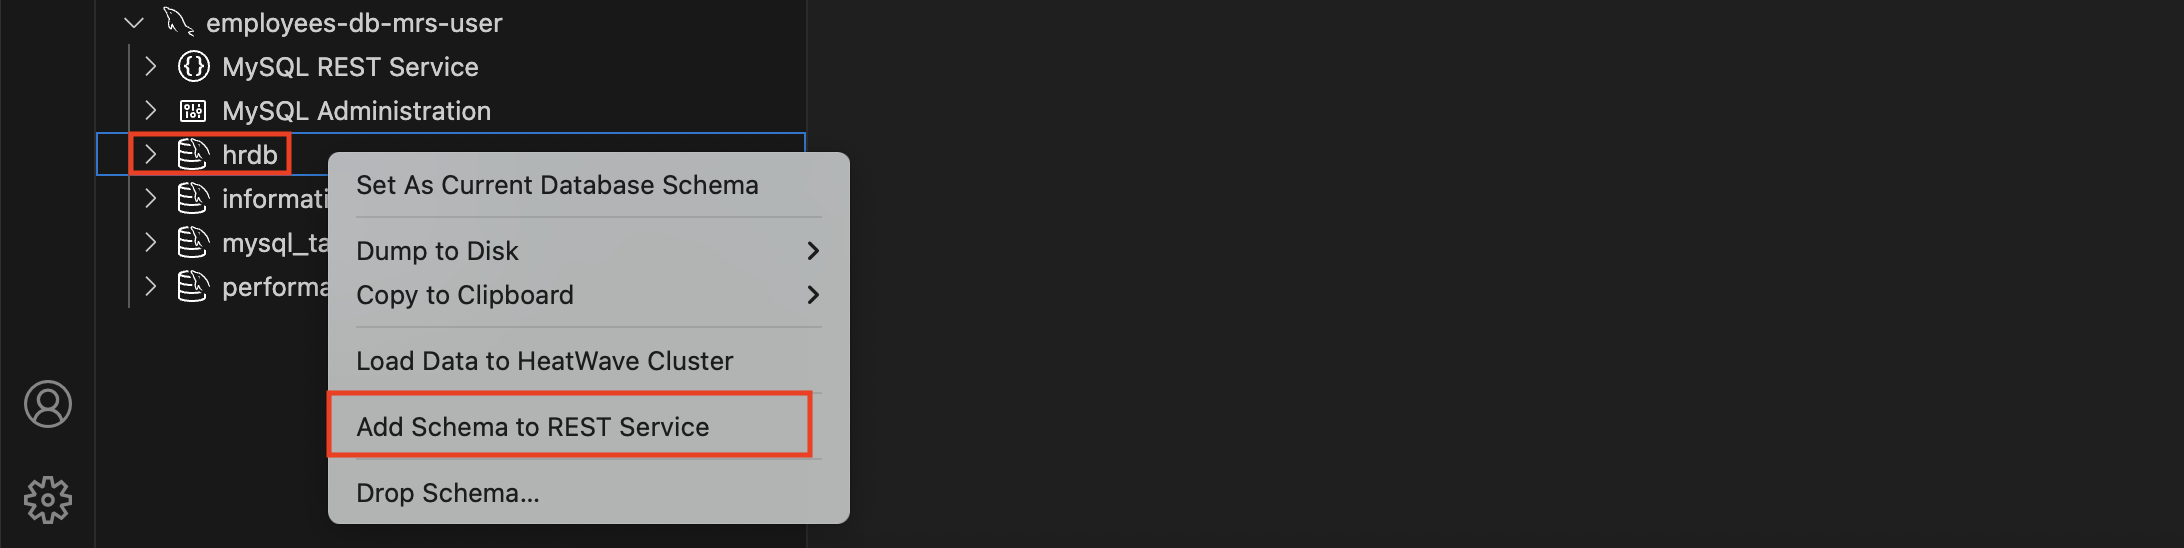
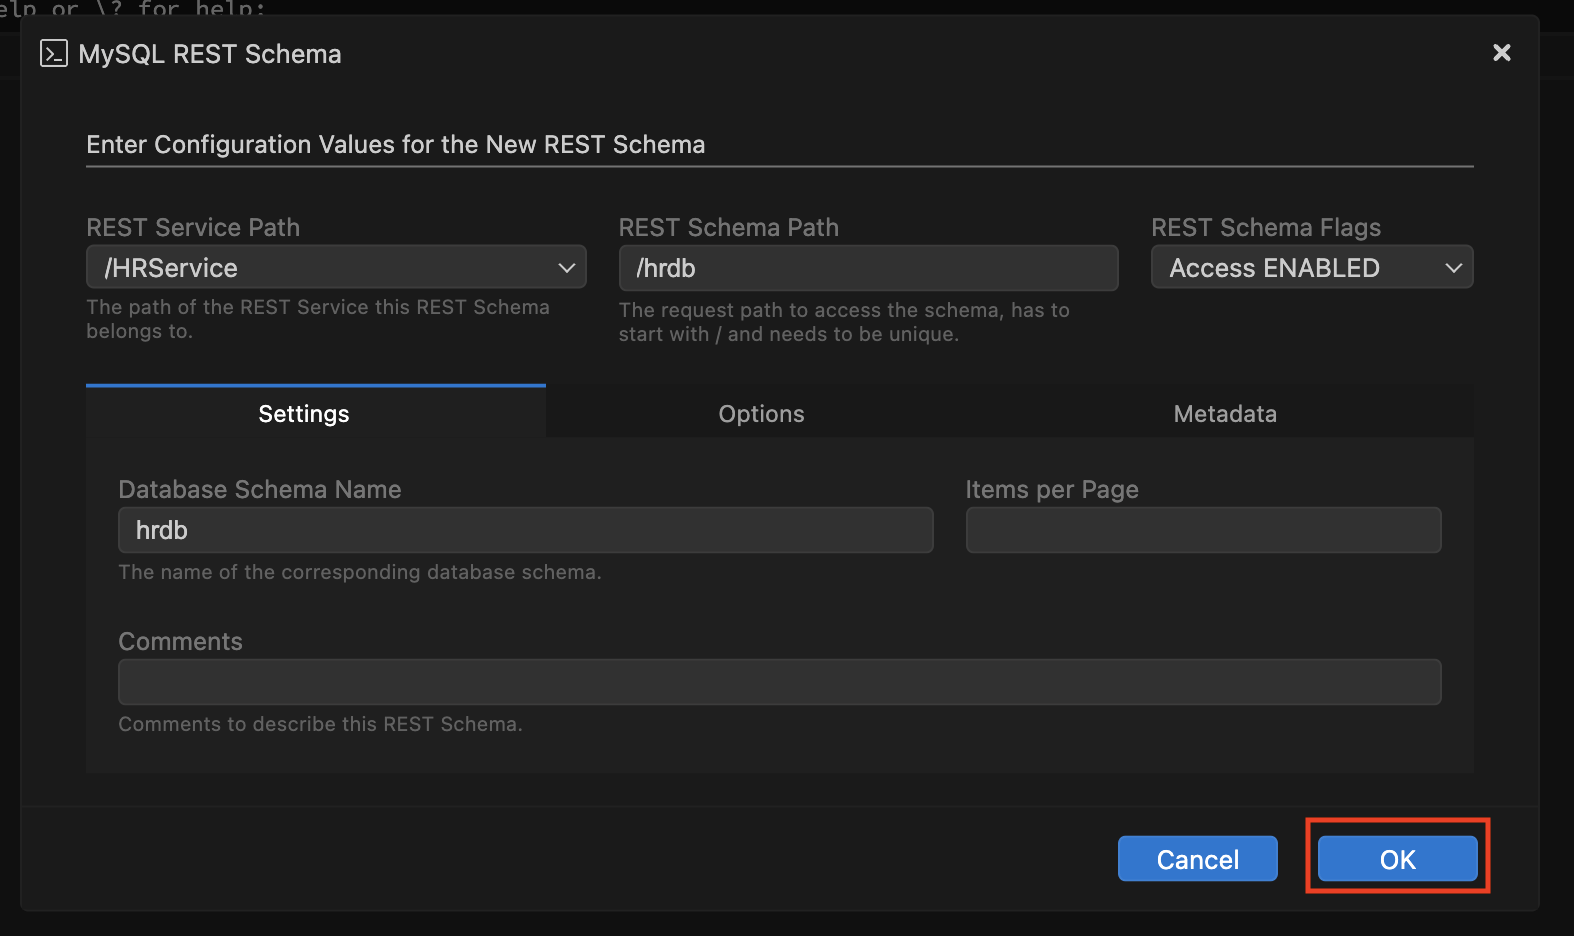
- Add MySQL database schema to the MRS Service by simply right clicking on the schema in the DATABASE CONNECTIONS view and select Add Schema to REST Service from the popup menu. Verify details and click OK and the schema will be added to the MRS Service.
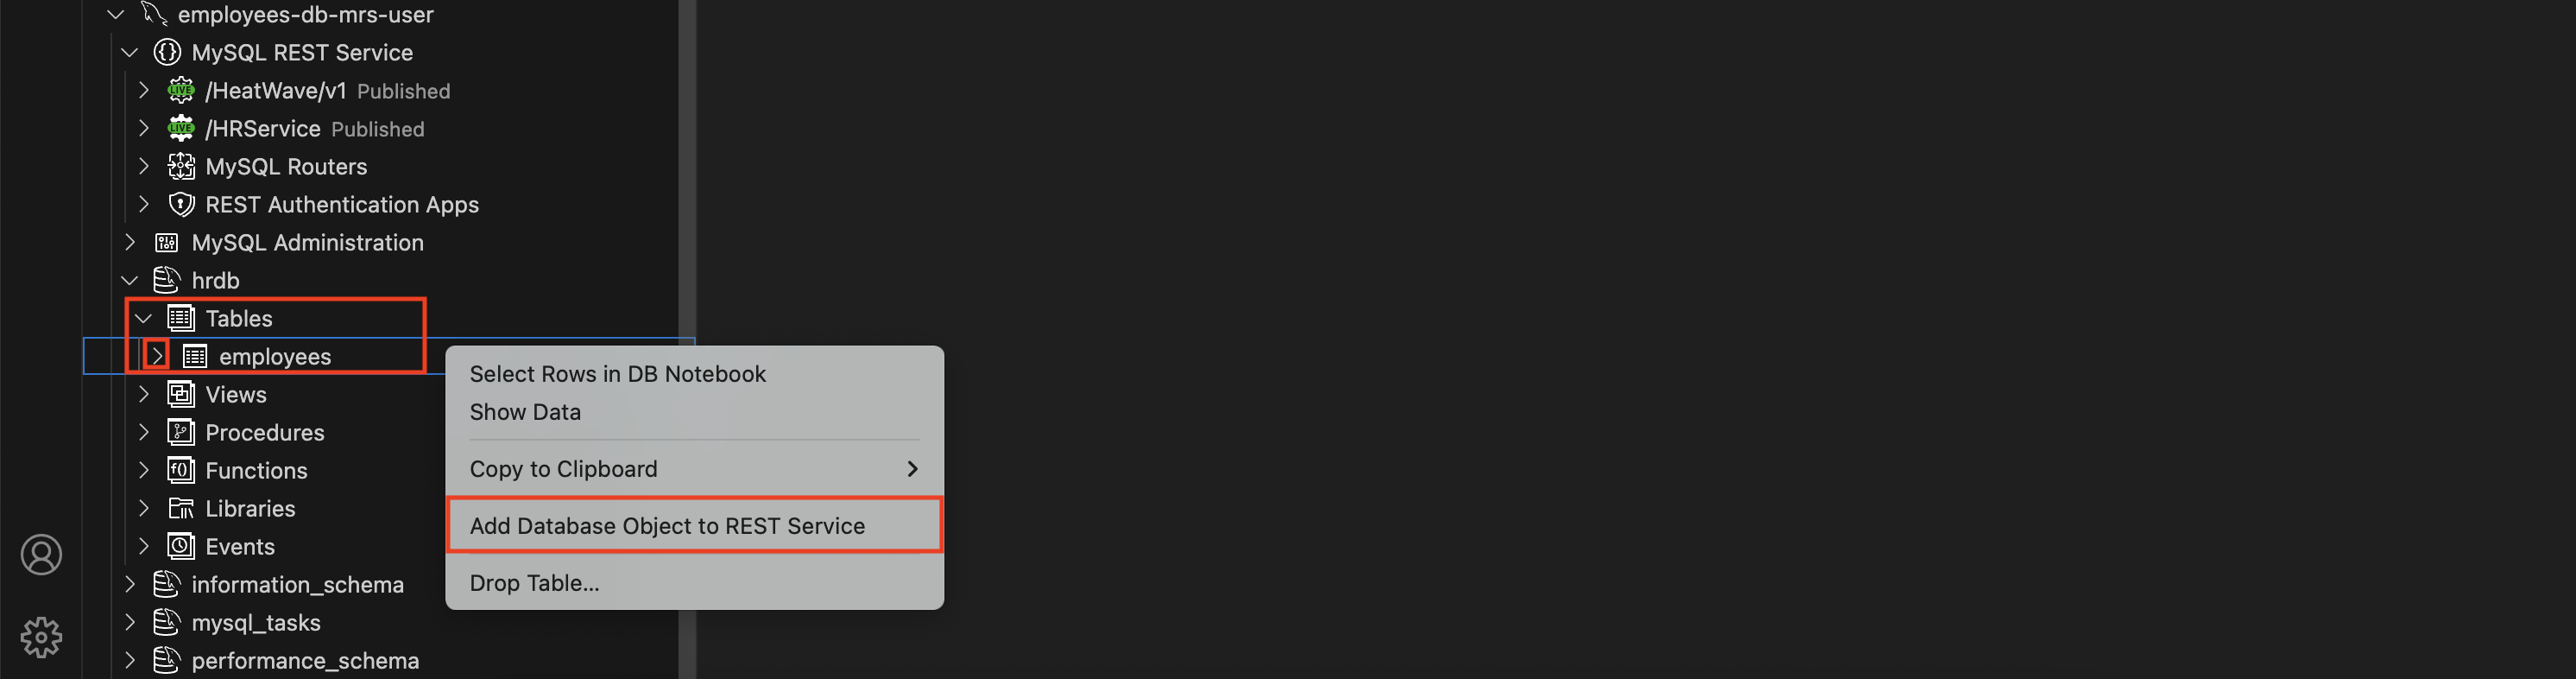
- In the next step, a MySQL table can be added. Right click on the table in the DATABASE CONNECTIONS view and select Add Database Object to REST Service from the popup menu.
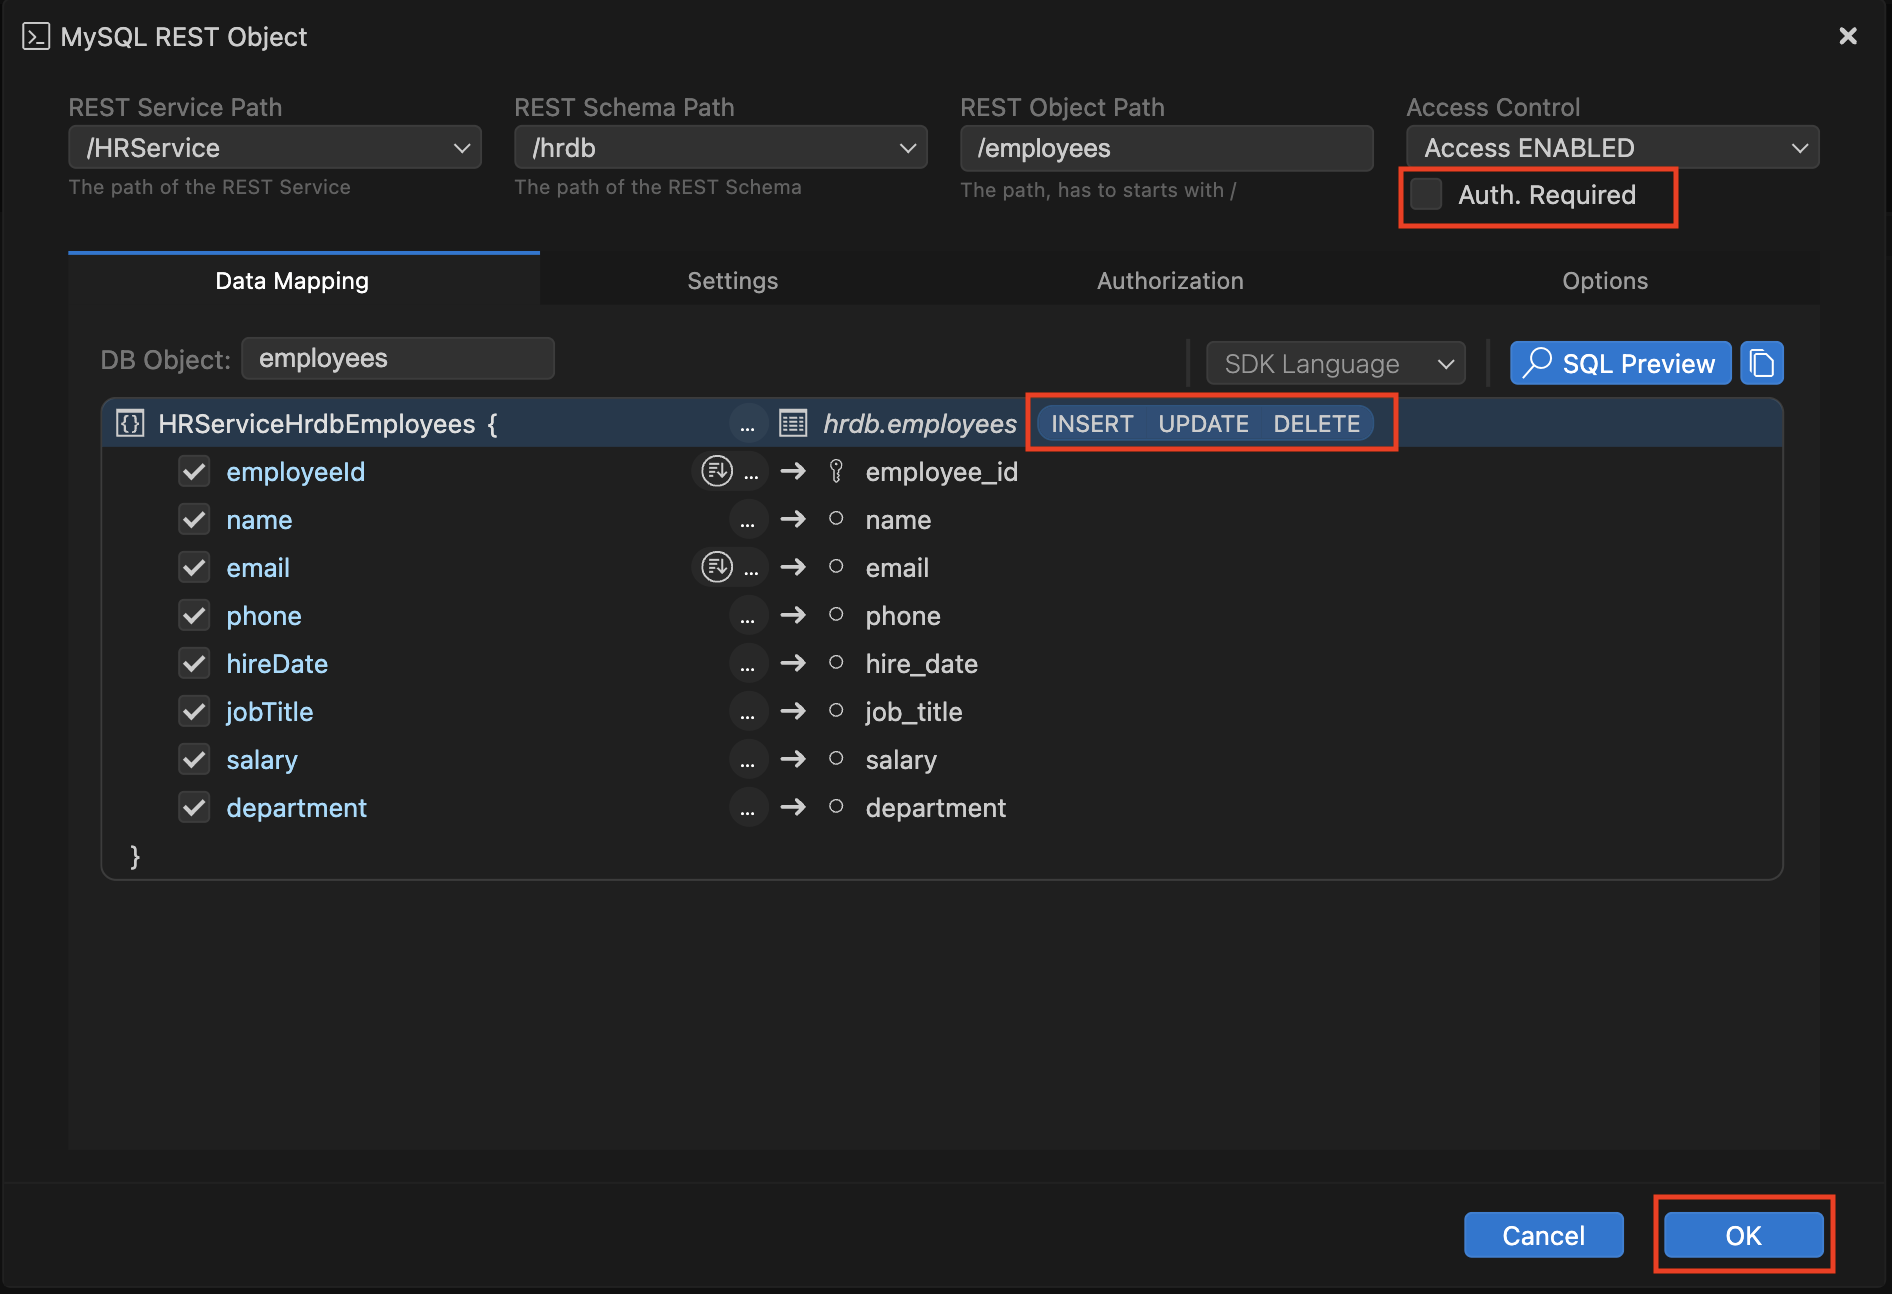
- Ensure the desired CRUD operations are selected (READ is selected by default) and again remove the checkmark from the Requires Authentication flag to make the object publicly available.
- Now that a REST Service has been created and the MySQL Router has been started, we can access the REST endpoints with a web browser.
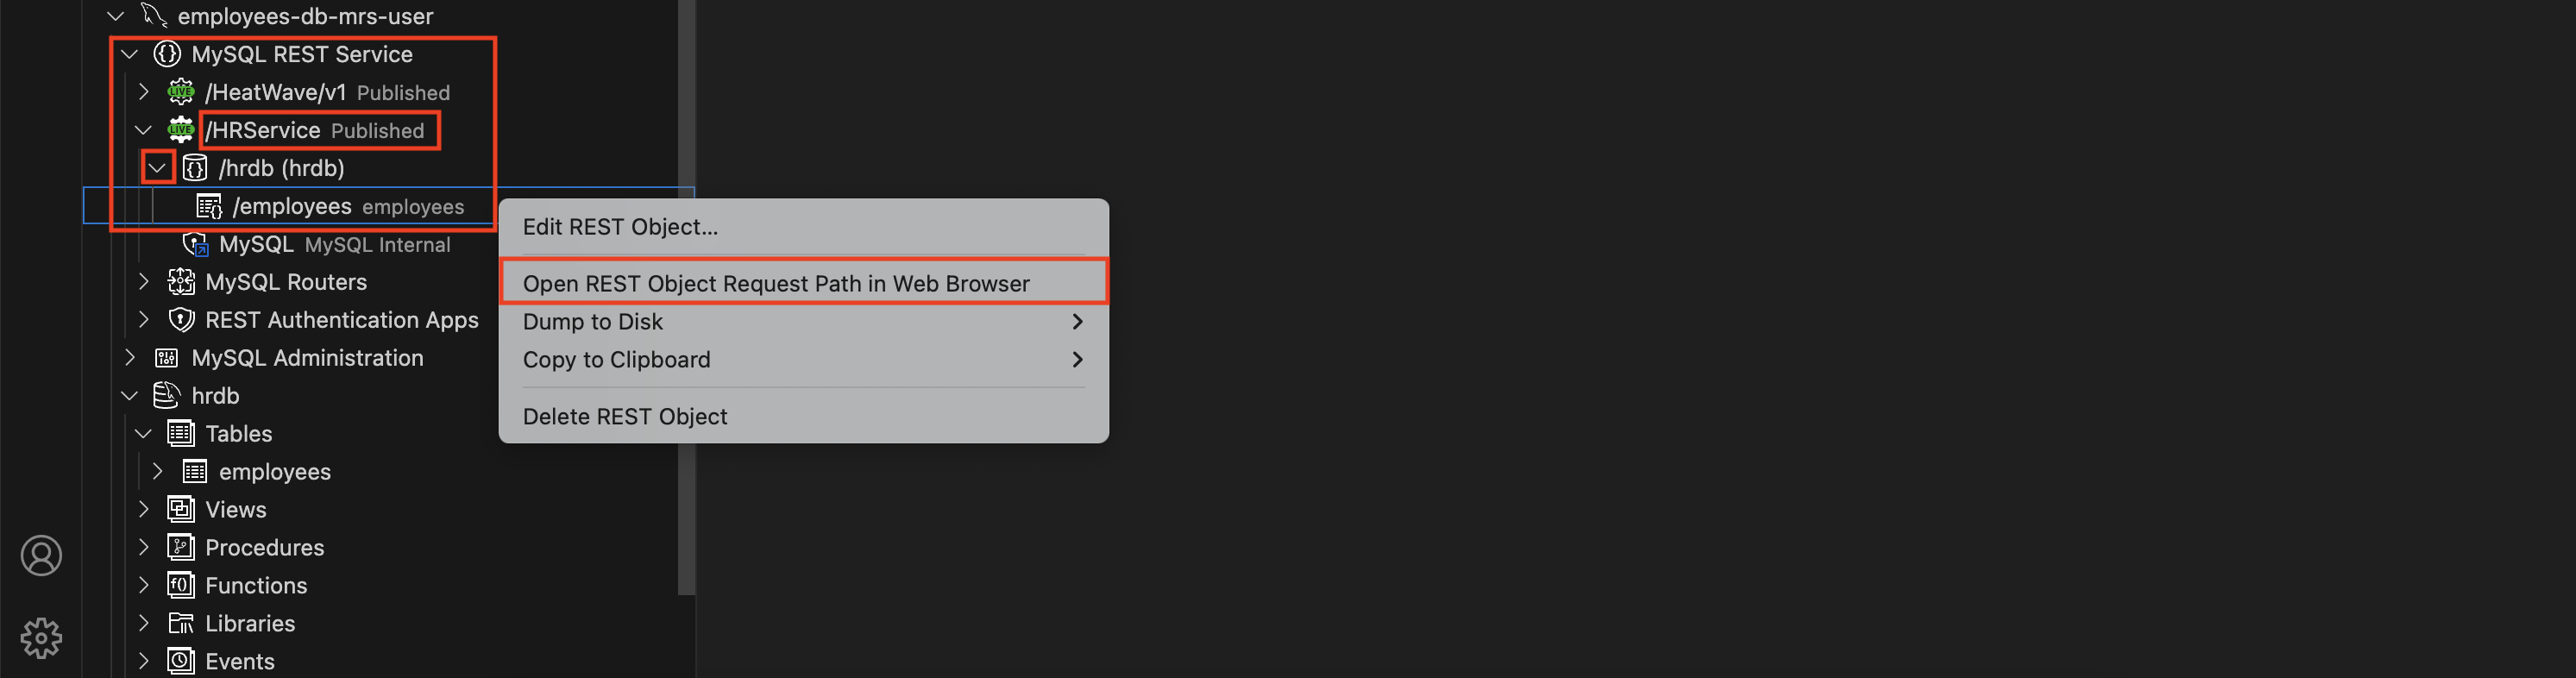
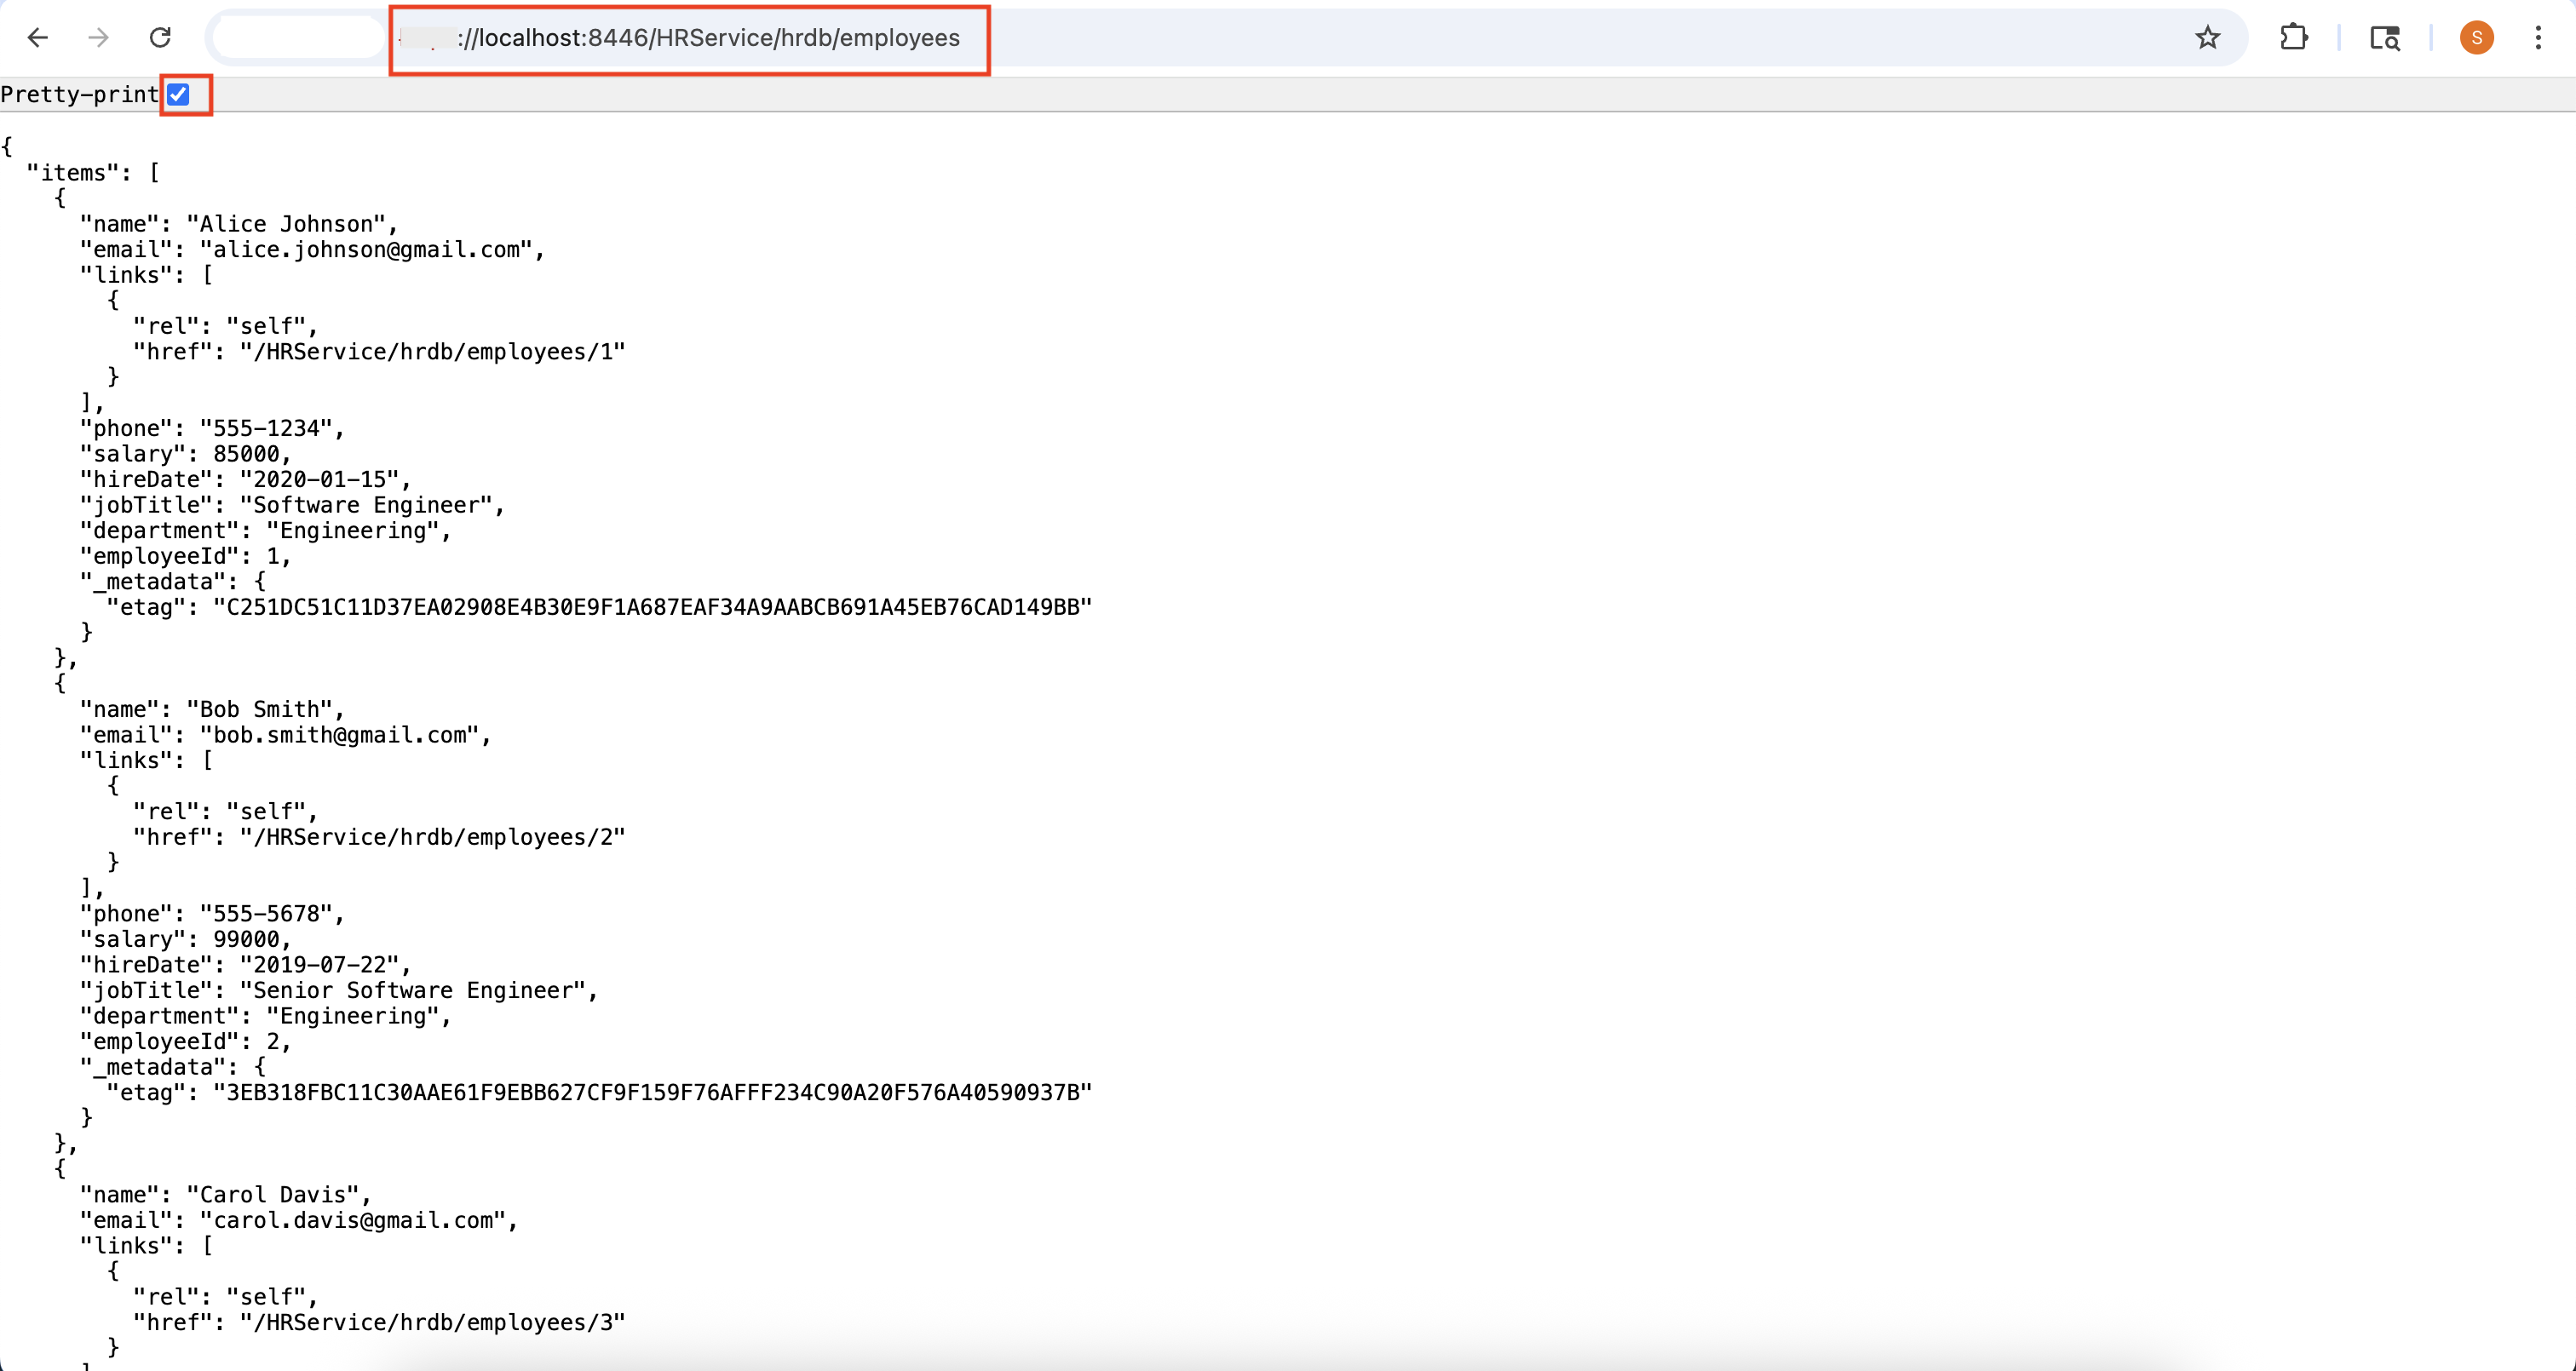
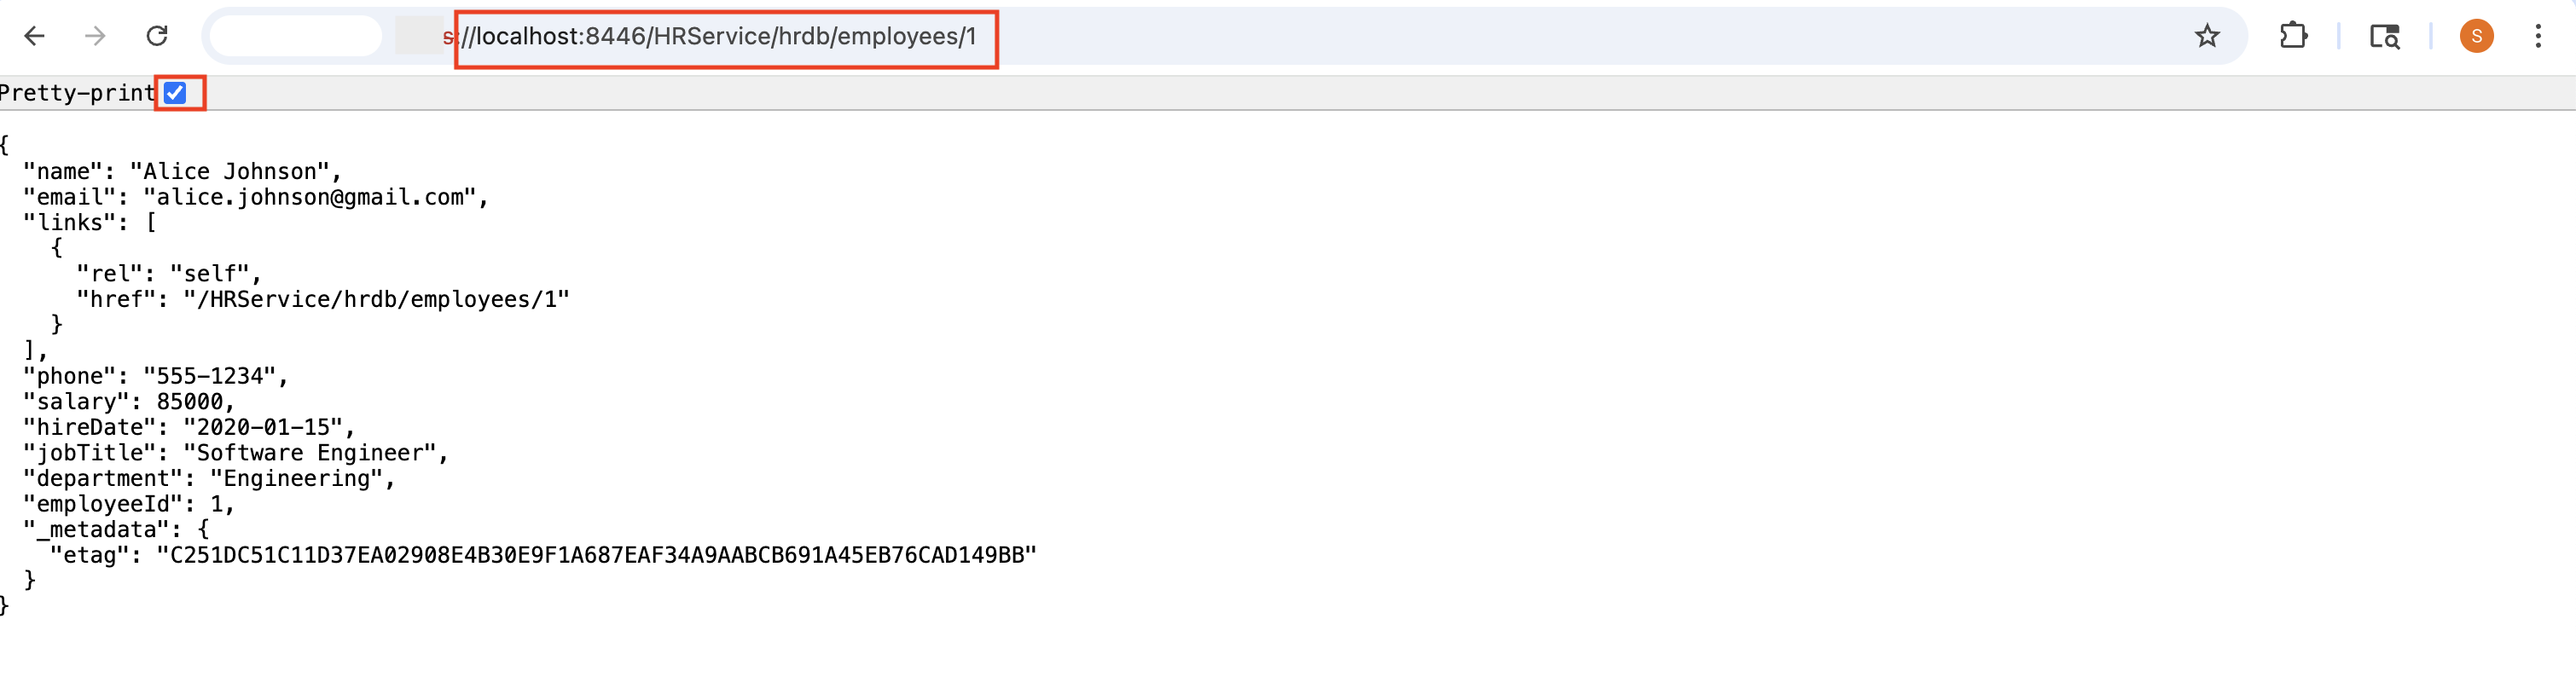
- Right click on a REST object and select Open REST Object Request Path in Web Browser. https://localhost:8446 will be added automatically and the default web browser will be opened and the JSON result of the GET request will be displayed.
- Adding a Primary Key value to the request path (e.g. /1) will filter the result to a single data set.
- Adding offset and limit as query parameters allow you to page the full data set. The default page size can be set in the REST Schema and REST Object settings.
MRS supports a JSON based query language to filter down the result set. Please take a look at the documentation for further details.
6. Deploy OpenAPI Web UI and Test CRUD Operations
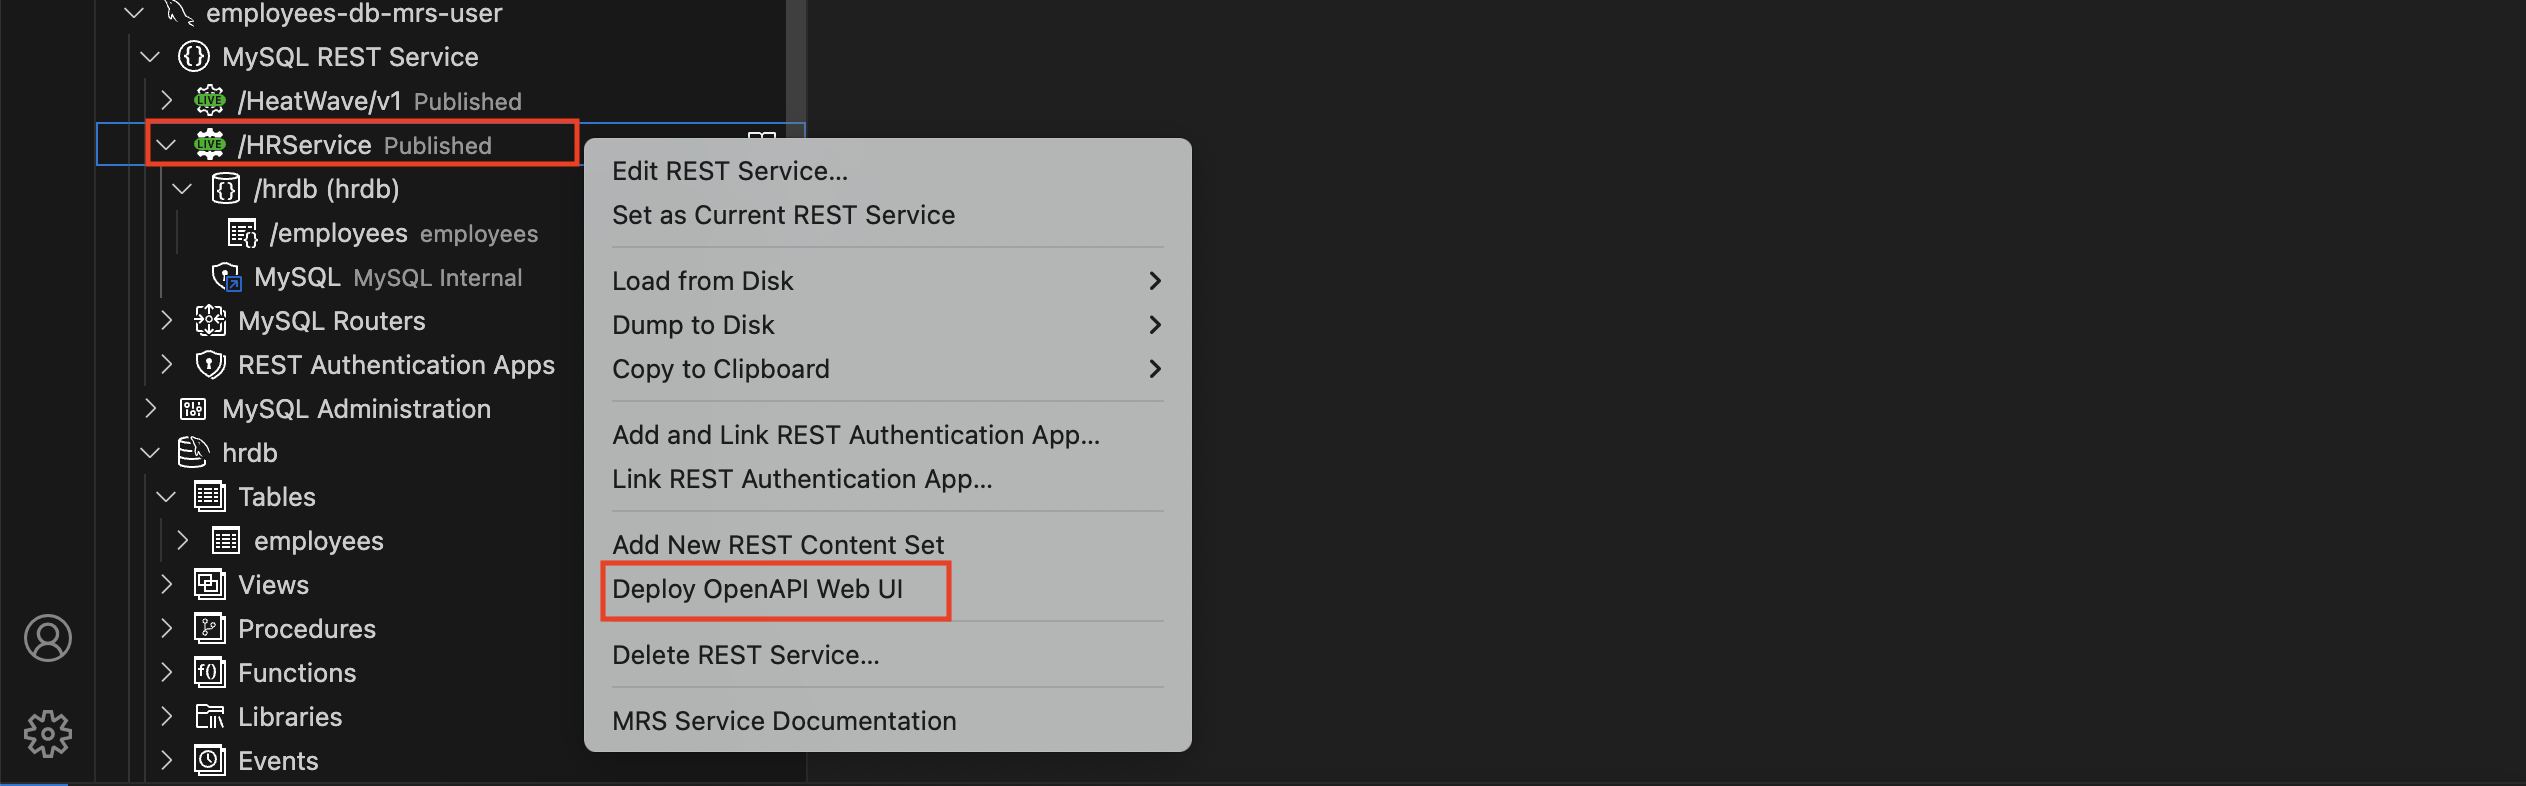
- Under the database connection, right click on the service and select Deploy OpenAPI Web UI which will expose your REST endpoints through a browsable OpenAPI-based UI.
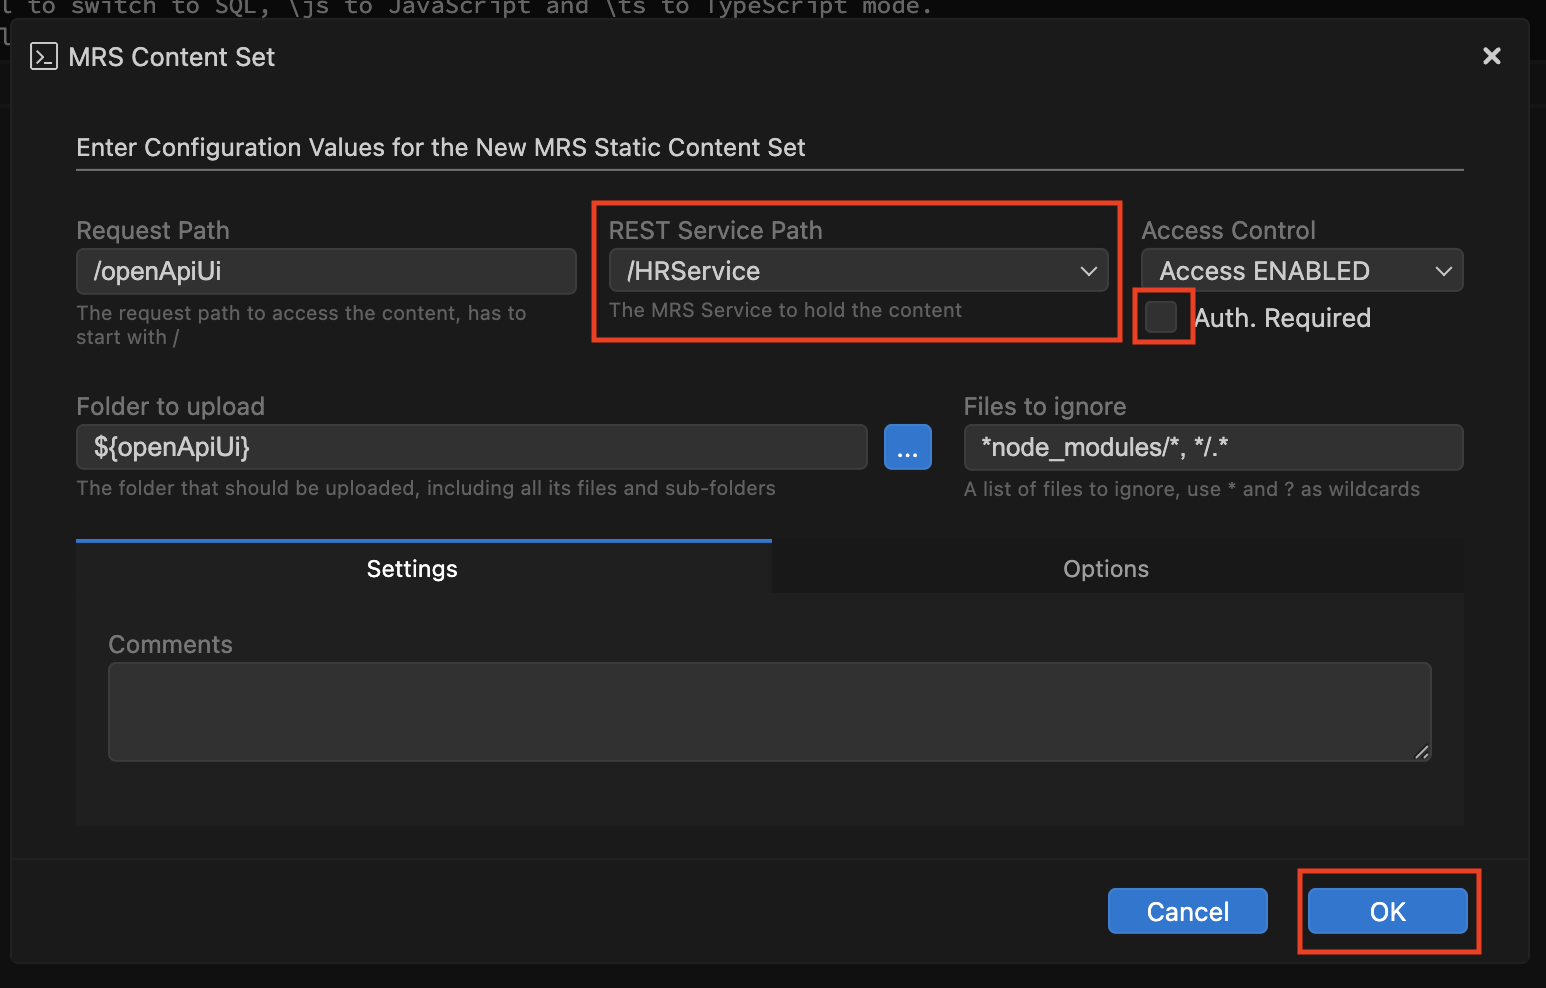
- Once the deployment window opens, leave all the default values as they are and select the respective Rest Service created and simply click OK to proceed. This will trigger the deployment of your service and make the OpenAPI-based Web UI available for interaction.
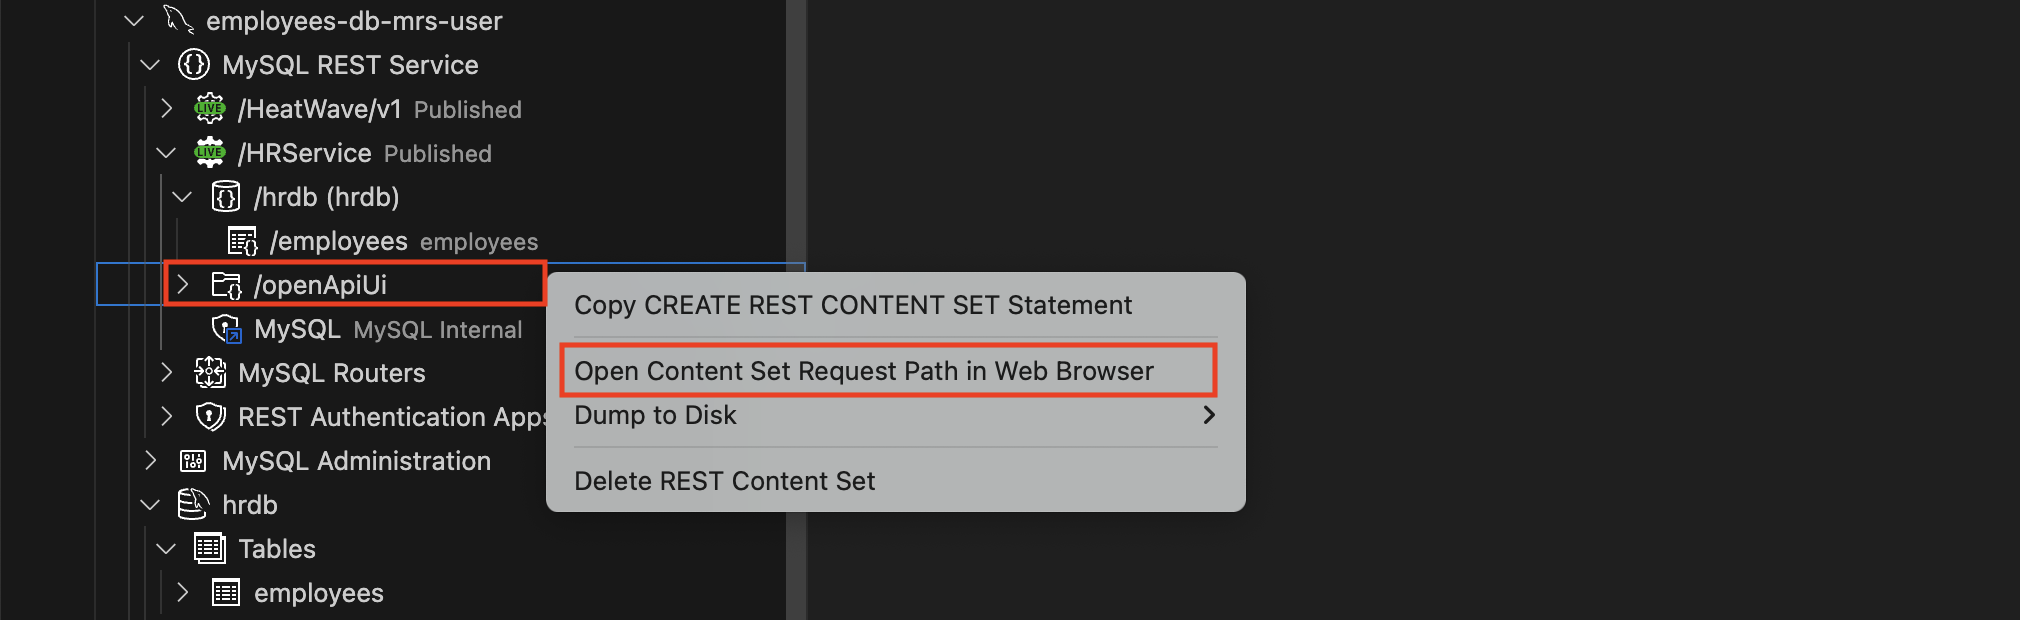
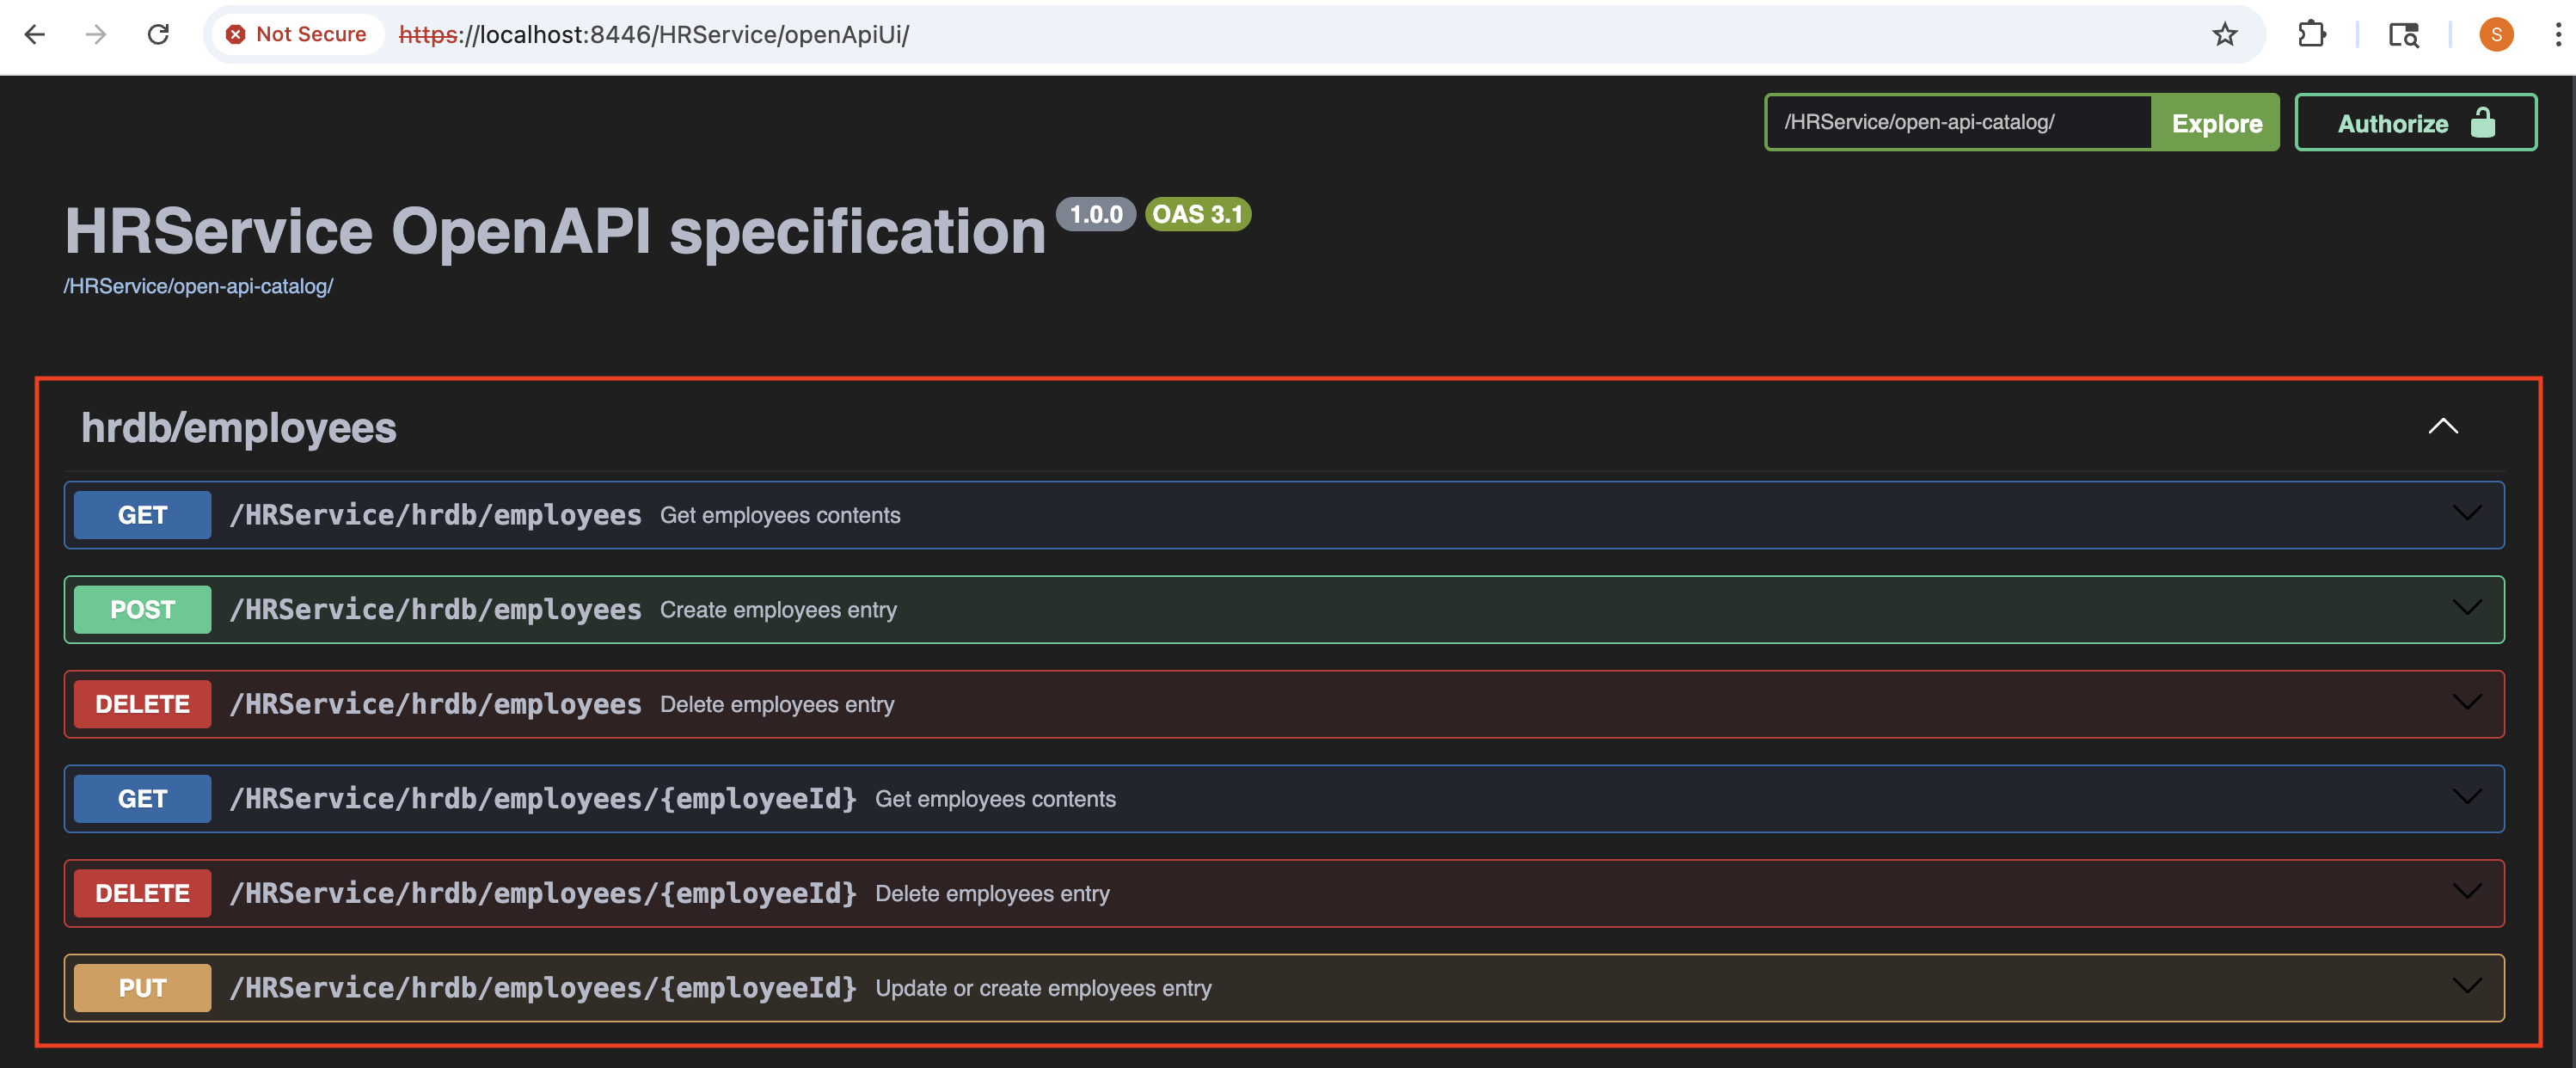
- After deployment completes access the Web UI. Open in your browser to launch OpenAPI Web UI, where you can test and explore the REST endpoints for your hrservice https://localhost:8446/myService/openApiUi/#/.
- Once the Web UI loads, you’ll see a list of available endpoints grouped by HTTP methods. You can expand each one to try them.
- GET /employee – List employees
- POST /employee – Create employee
- PUT /employee/{employeeId} – Update employee
- DELETE /employee/{employeeId} – Delete employee
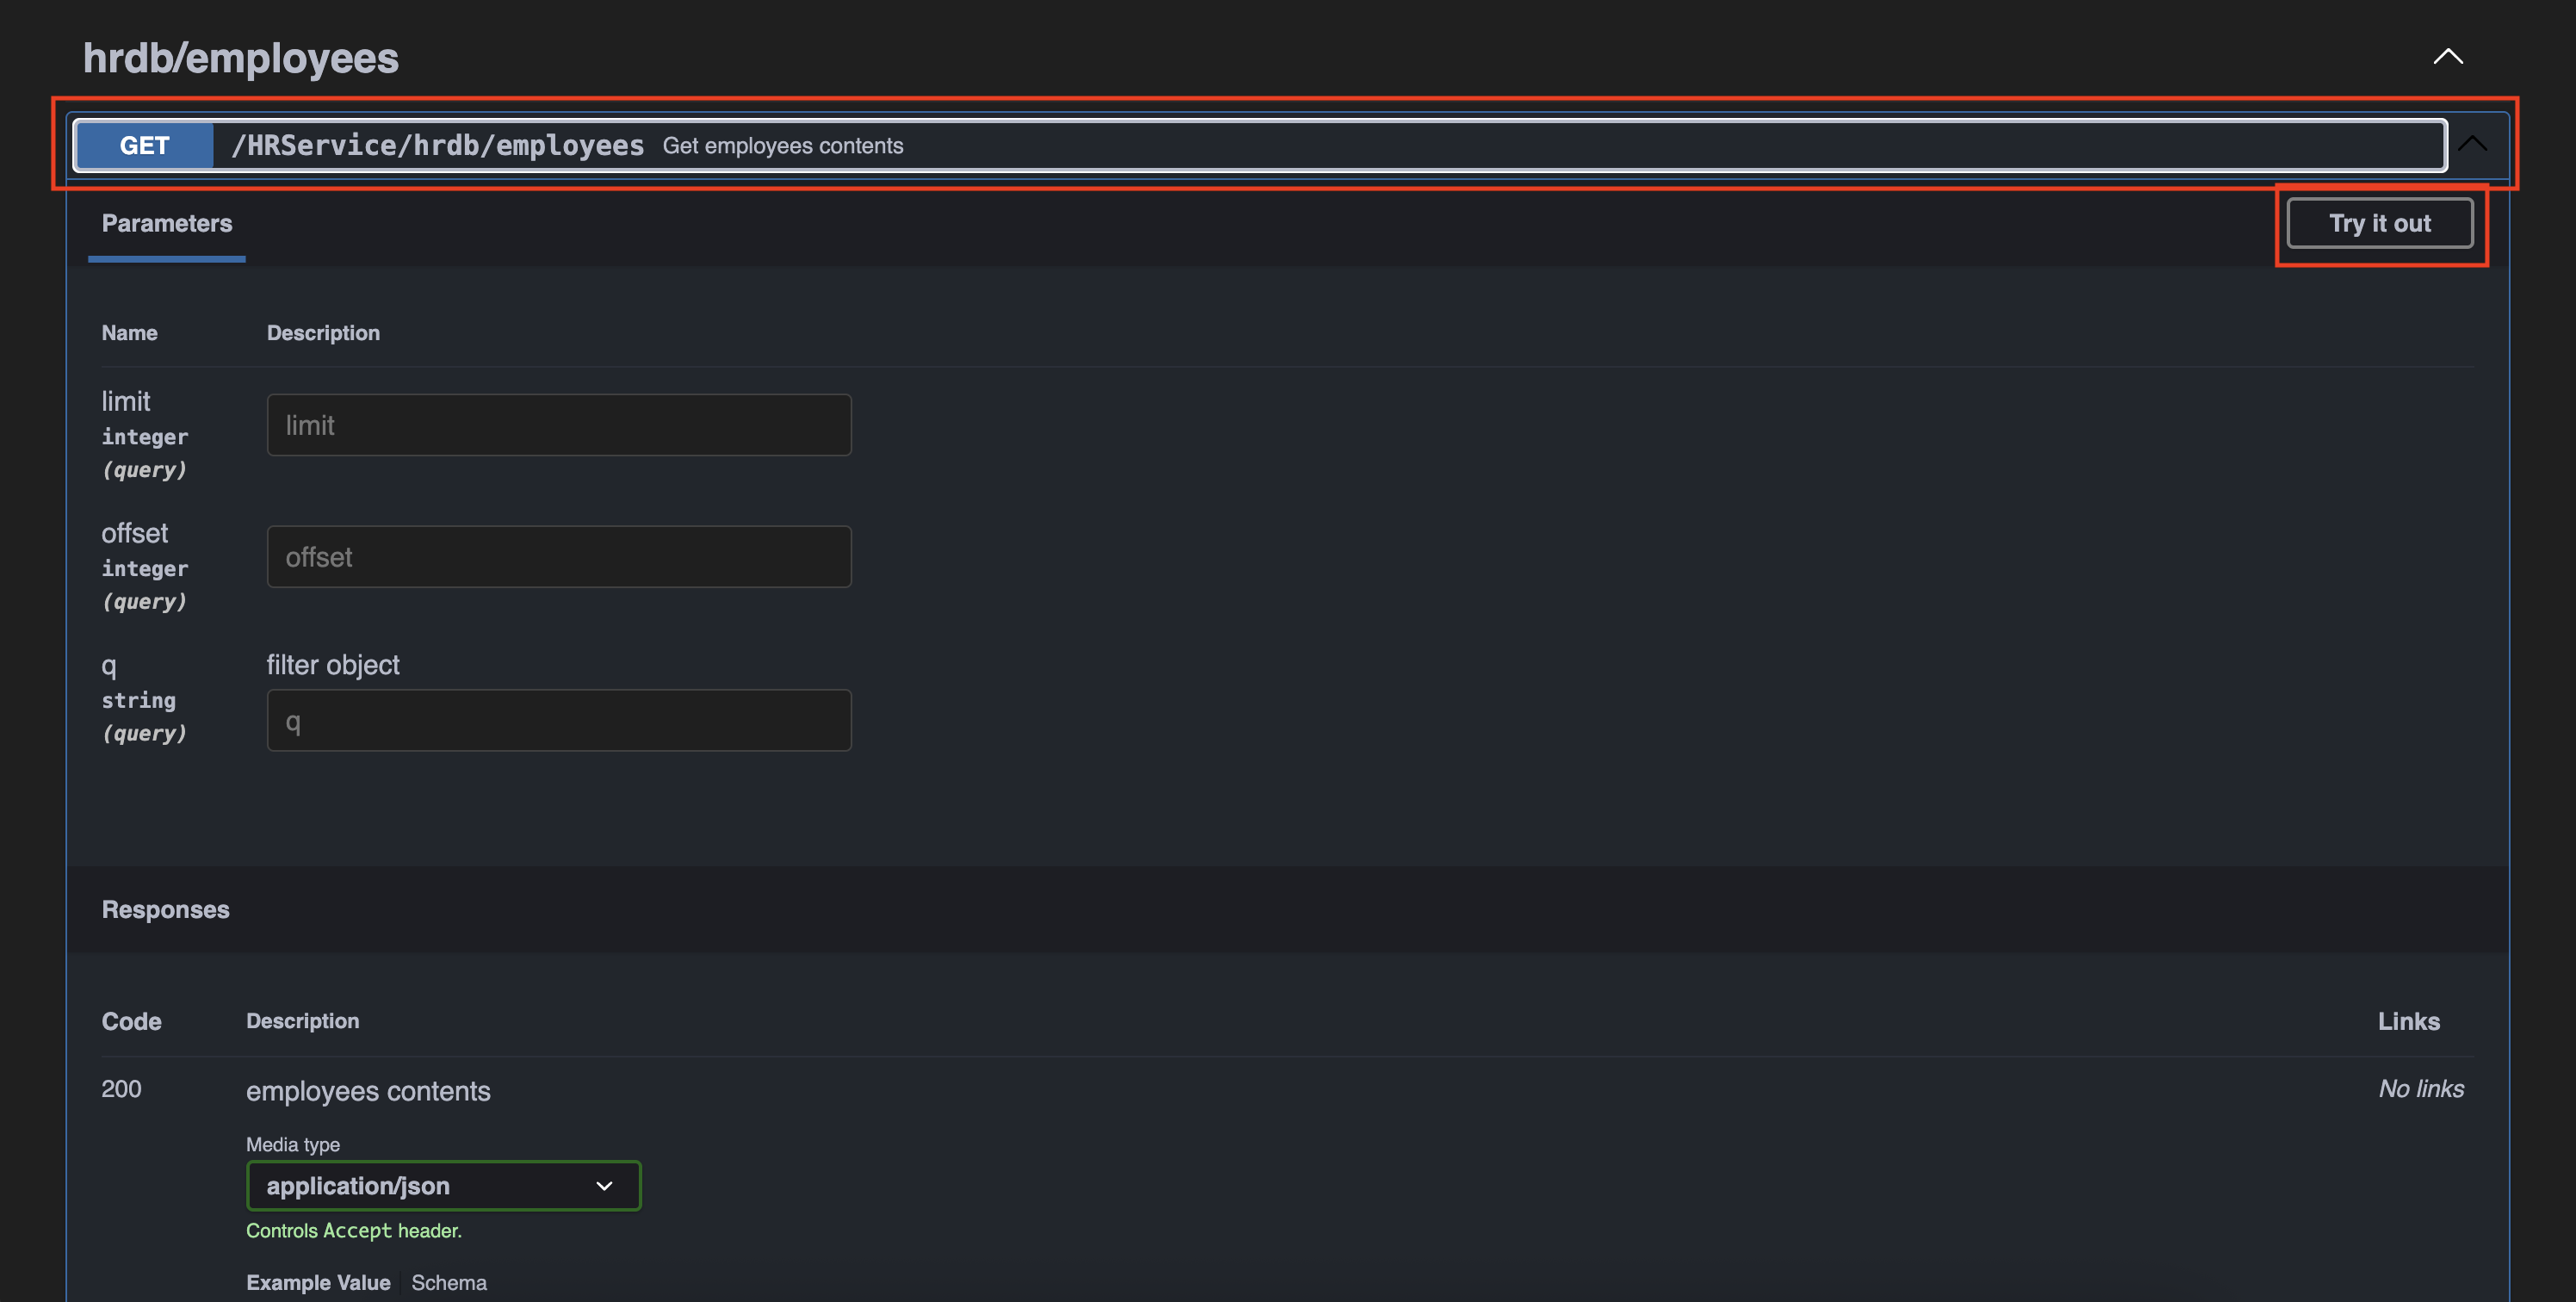
- Get method retrieves all employees. Scroll to the GET /HRService/HRDB/employee endpoint and expand the menu. Click Try it out.
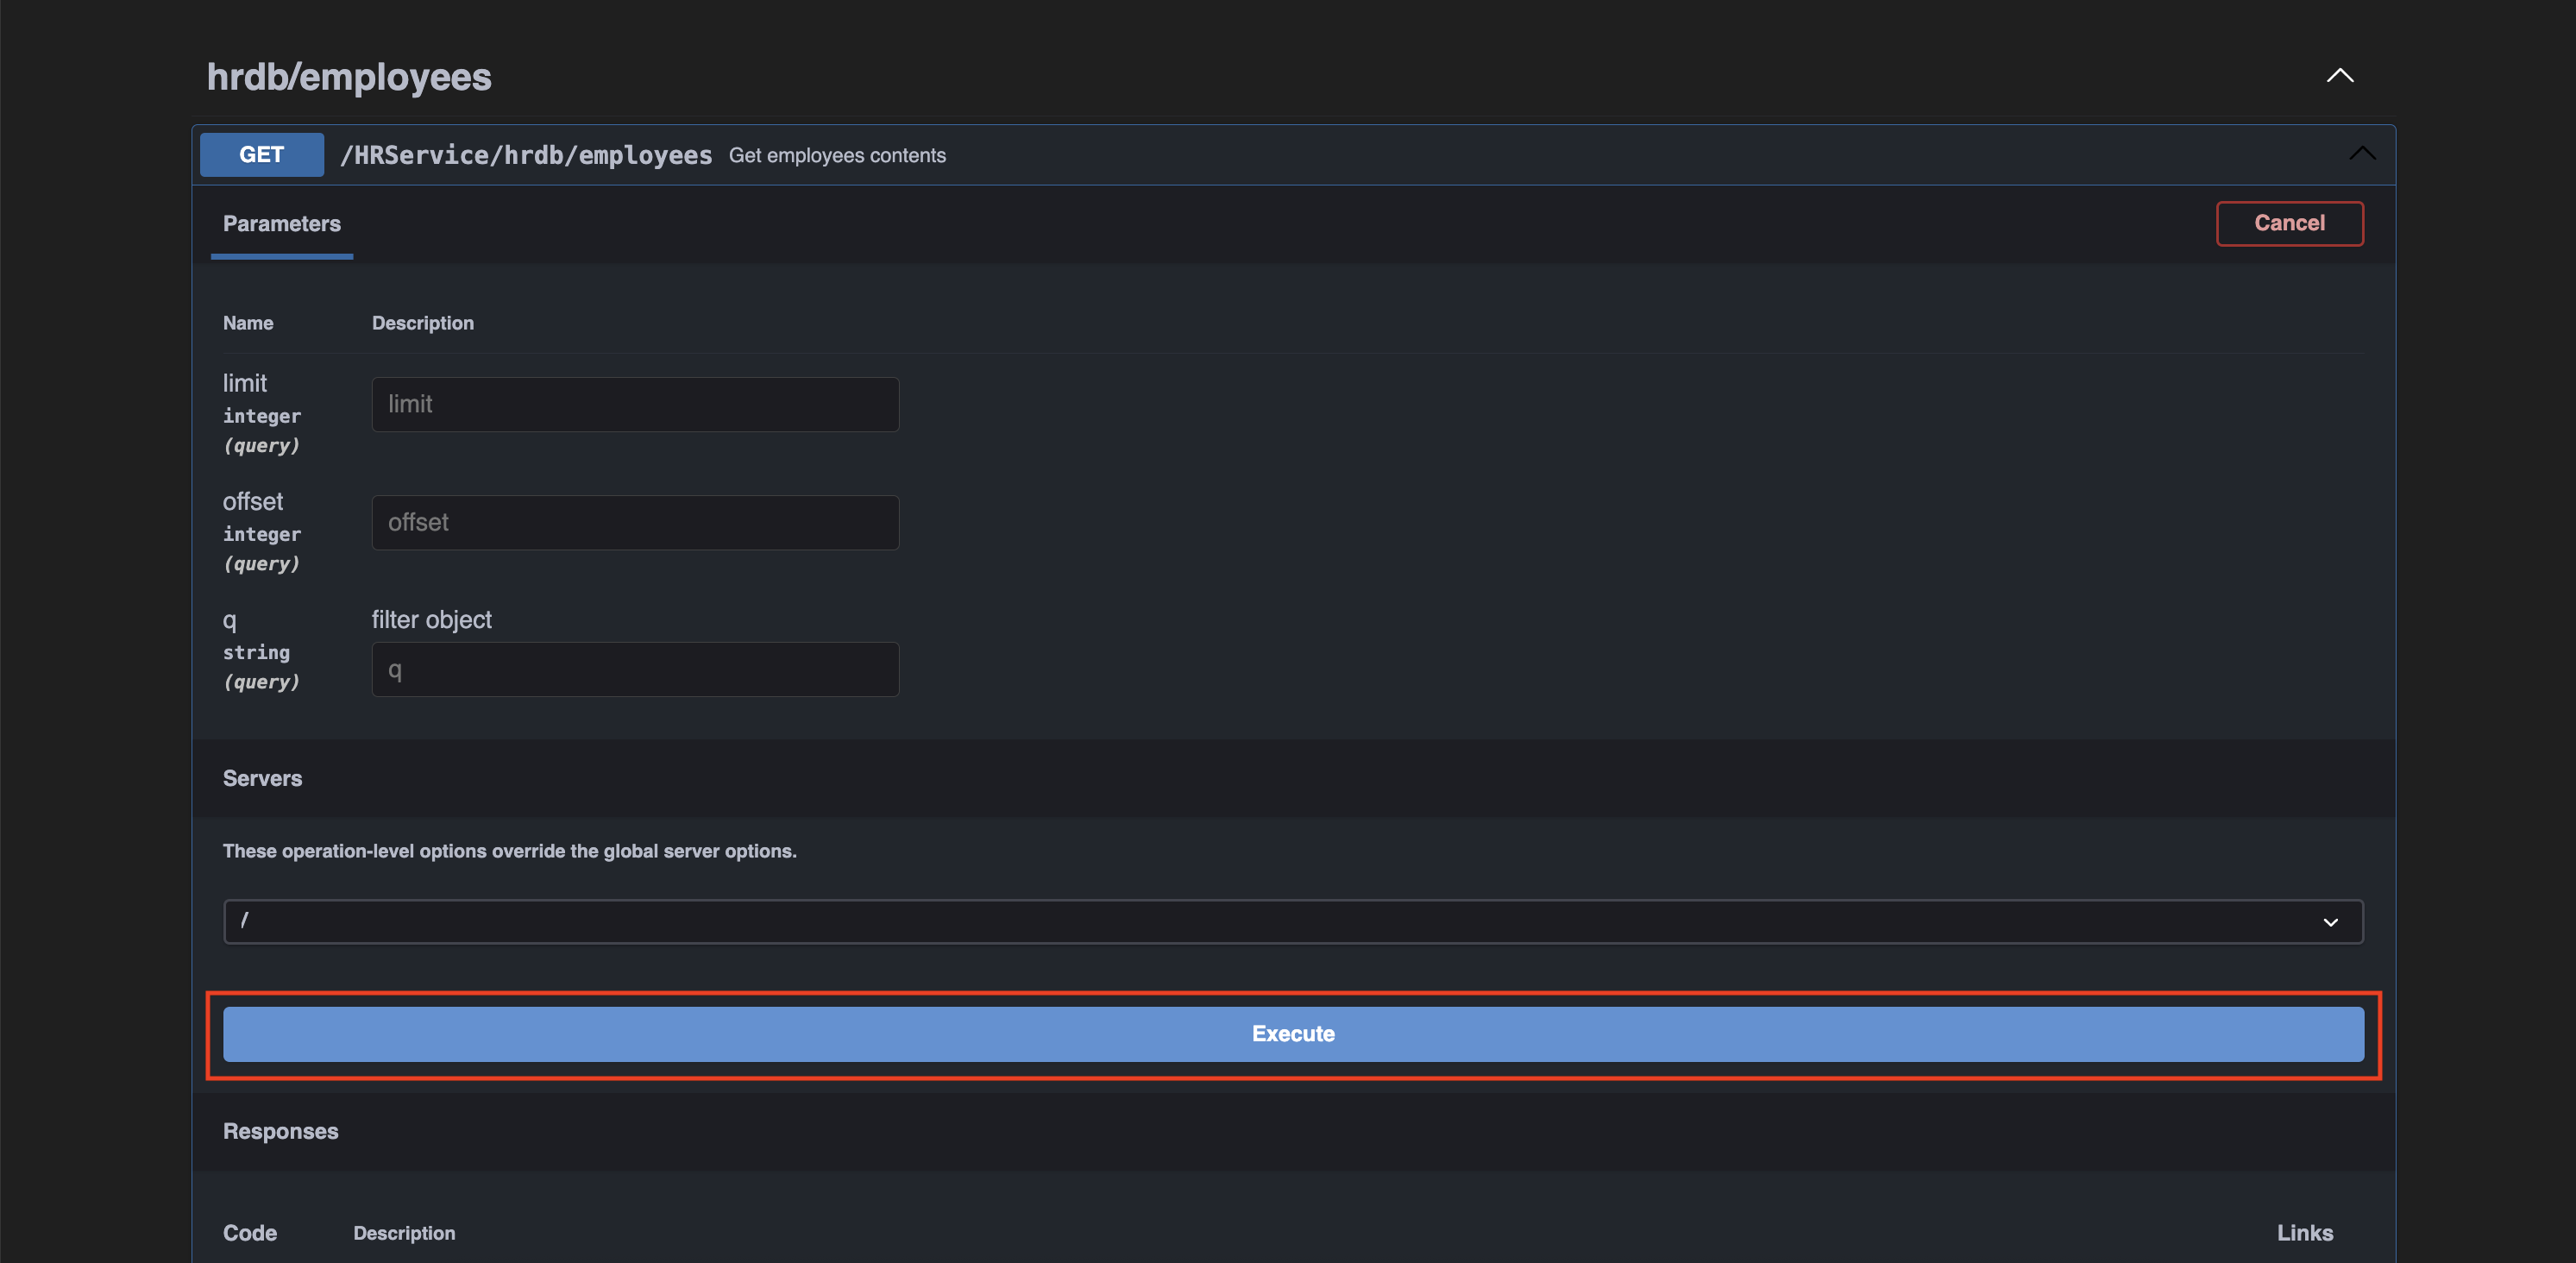
- Then click on Execute. You’ll get a list of current employees from the HR service in the response section below.
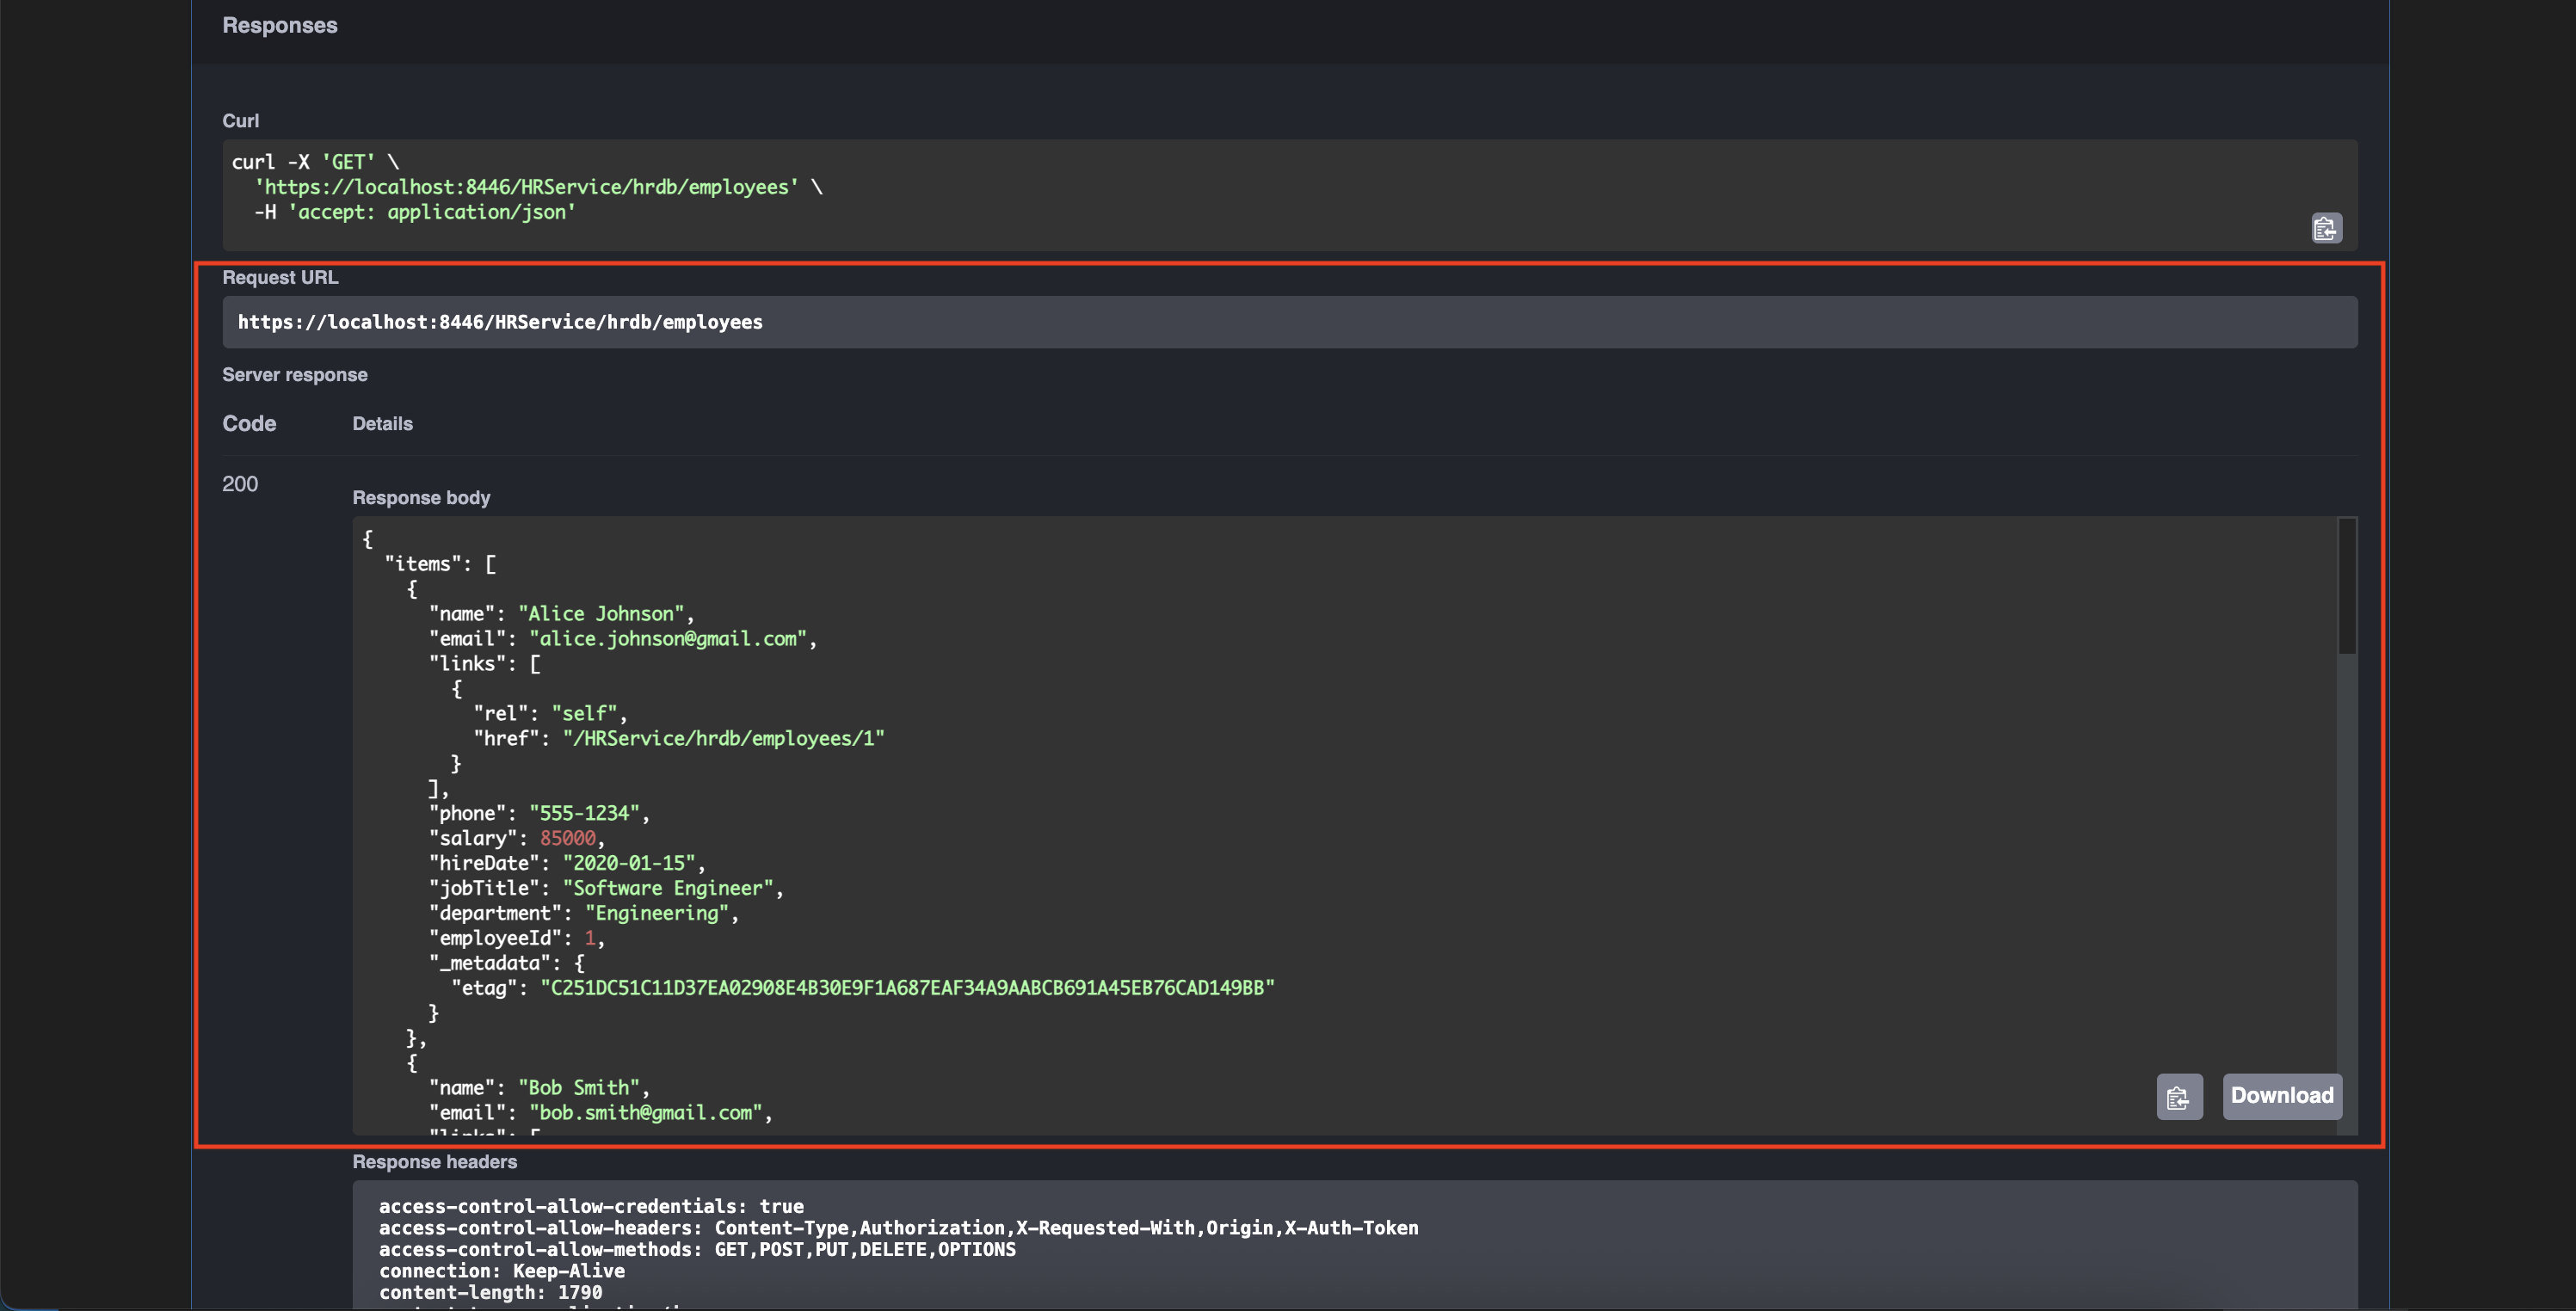
In a similar way, you can try for the rest of the endpoints to access the data.
With MRS, you get more than just REST endpoints:
- Role-based access and endpoint control to govern who can access (and change) what.
- Flexible authentication including MySQL user accounts or external identity providers.
- Automatic API generation for CRUD, joins, and even in-database ML/LLM operations, letting you build AI-powered apps with ease.
- Integration with familiar tools like MySQL Shell and Visual Studio Code.
Conclusion:
The MySQL HeatWave REST Service represents the next evolution in how applications connect to MySQL natively, simply, and securely. With just a few steps, you can expose secure, high-performance APIs on your HeatWave-accelerated data, cut down on stack complexity, and accelerate your innovation.
Resources:
- Technical Documentation
- MySQL Shell in VS Code
- Seamlessly Connect to your MySQL Heatwave- from VS Code using the MySQL Shell Extension
- Introducing the MySQL Rest Service
- Announcing General Availability of the new Heatwave Rest Service
Ready to get started?
Provision your MySQL HeatWave instance, enable the REST Service, and start building with no middleware required!