Now that you have been working with your MySQL HeatWave DB systems, you may be ready to import your data. There are various methods of achieving data import, but suppose you want to replicate data from your on-premises MySQL Server or another MySQL HeatWave DB Server. Savvy MySQL users are likely to look for some way to setup replication from the source server to the MySQL HeatWave DB system. Fortunately, MySQL HeatWave has a solution called Inbound Replication.
Inbound replication is a feature that allows users to use replicate data from one MySQL server to a MySQL HeatWave DB system in the Oracle Cloud Infrastructure (OCI). It works via a replication channel in OCI to connect the MySQL HeatWave DB system as a replica to a source. While a source can support multiple channels to replicate data, a replica supports only one channel for data updates.
For those looking to experiment with inbound replication or use it for periodic import or updates, you do not need to keep the channel open (connected) because replication is asynchronous, permitting you to connect your source to your replica at any time to receive updates. For example, you could only connect once per day to send updates daily or use the connection as part of your application/data rollout, connecting only when updates have been validated and are ready for production use.
In this blog, we will demonstrate how to connect an on-premises MySQL server acting as a source and a DB system acting as a replica. We will see how changes to the data on-premises are replicated in the DB system. Nice!
Log in to your OCI account if you want to follow along.
Wait, what’s a replication channel?
A replication channel represents a path through which changes produced by transactions on a source MySQL server or DB system are replicated to a target DB system. Channels have their own lifecycle and can be enabled/disabled, reset and resumed.
Note: The inbound replication feature is not part of the managed MySQL HeatWave DB system. You will have to configure and maintain the replication channel yourself.
Requirements
As you may have imagined, there are some requirements for using inbound replication, and a complete list is located here, but there are three essential requirements you should consider. First, you must establish a virtual private network (VPN) to connect any MySQL server from your local network to OCI. Second, the replica (DB system) must run a version of MySQL that is the same or later (newer) than the source (on-premises MySQL server).
For best results, the MySQL version of the source (your on-premises MySQL server) should match the version used in your MySQL HeatWave DB system. If that is not possible due to excessive work to upgrade your local on-premises MySQL server, be advised that your MySQL server must be version 5.7.29 or higher.
Finally, the replica and source must be configured using the same lowercase table name option and a row-based binary logging format. See the online documentation for more information about the replication server variables and options used for binary logging format.
See the “Source Configuration” in the online documentation for additional information on how to properly configure your source server.
Finally, you should create your DB system and have it ready before completing the following steps because you will need critical information from the DB system to complete the setup.
Ok, now we are ready to set up inbound replication.
Setup Inbound Replication
Inbound replication permits you to connect your on-premises MySQL database server to your MySQL HeatWave DB system through a virtual private network (VPN) you access through a VPN service. You can use Site-to-Site VPN, FastConnect, or OpenVPN Access Server for the connection.
Tip: A blog with a walkthrough of setting up and configuring OpenVPN Access Server can be found at Using MySQL HeatWave with OpenVPN Access Server.
The process for setting inbound replication is as follows.
- Configure the source
- Configure the replica
- Create a replication channel
Note: You must have your target MySQL HeatWave DB system configured before proceeding (but it can be stopped until you are ready to set up the channel).
Let’s see these steps in action.
Configure the Source
Configuration of the on-premises MySQL server depends on whether there is existing data. If you are working with existing data, you must create a backup and upload it to be restored on your MySQL HeatWave DB system. A complete walkthrough of this process can be found at Using MySQL HeatWave with OpenVPN Access Server.
Aside from the data, you must also ensure that there are no transactions in the binary log that could fail to execute on the MySQL HeatWave DB system. You should ensure that the binary logs in the source (the on-premises MySQL server) does not contain change entries that are incompatible with the state of the data on the MySQL HeatWave DB system to ensure that replication can start without errors. For tips on resolving similar issues, see “Restrictions on Replication with GTIDs” in the online documentation.
In addition, if you are using the OpenVPN Access Server to create a VPN connection, your on-premises MySQL server must be set to listen to all network interfaces by placing the following in your configuration file.
bind-address=0.0.0.0
Next, we must create a replication user on the on-premises MySQL server. Use the following commands to create the replication user and assign a password. Be sure to choose a user ID and password that meet your security requirements. In the example below, we named the user rpl_user with a password. They, we grant the user the REPLICATION SLAVE privilege at the global level. Be sure to record the password so that you can use it in a later step. Notice that we turn off the binary log before creating the user so that these events are not replicated. Also, notice that we require an SSL connection for the user.
> SET sql_log_bin=0;
Query OK, 0 rows affected (0.0090 sec)
> CREATE USER rpl_user@’%’ IDENTIFIED BY ‘******’ REQUIRE SSL;
Query OK, 0 rows affected (0.0090 sec)
> GRANT REPLICATION SLAVE ON *.* TO rpl_user@’%’;
Query OK, 0 rows affected (0.0090 sec)
> SET sql_log_bin=1;
Query OK, 0 rows affected (0.0090 sec)
Note: GTIDs should be enabled before you take the backup to ensure that all transactions are replicated.
For best results, the on-premises MySQL server should be set up to use global transaction identifiers (GTIDs). See the online MySQL documentation for more details.
Once the on-premises MySQL server is configured, we can configure the replica.
Configure the Replica
The replica in this demonstration is a MySQL HeatWave DB system. It would be best to experiment with inbound replication using a new MySQL HeatWave DB system to protect any data on your existing MySQL HeatWave DB system.
In this example, we will use a DB system without HeatWave and HA enabled. Let’s see how to create a new DB system for this demonstration.
Begin by navigating the OCI main menu to choose Databases | DB systems, then set the compartment (I used oci-tutorial-compartment in this example), and finally click Create DB system, as shown in Figure 1.

Figure 1. Create DB system (DB system list)
Next, enter a name for the DB system, such as mysql-test-inbound, and then choose the Standalone option as shown in Figure 2.
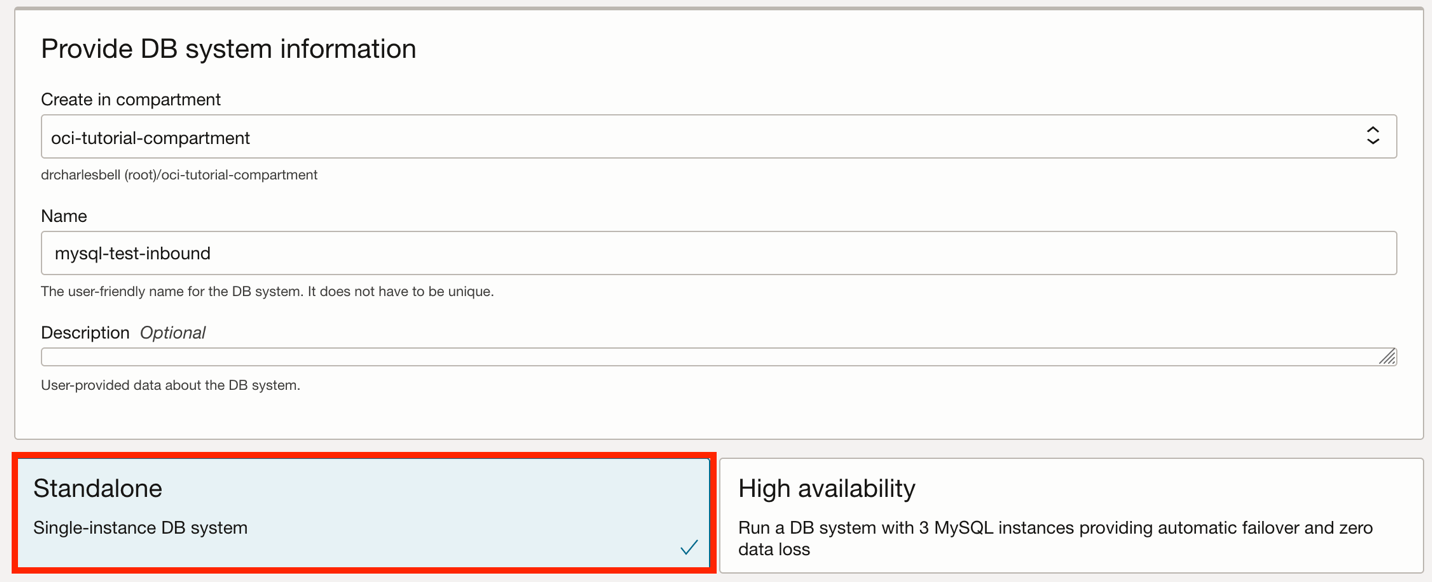
Figure 2. DB system configuration (create DB system)
Next, enter the MySQL admin username and password. In this example, I used mysql_admin, as shown in Figure 3. Remember the password because you cannot reset it yourself and may need to contact MySQL HeatWave support to reset it if you forget it.
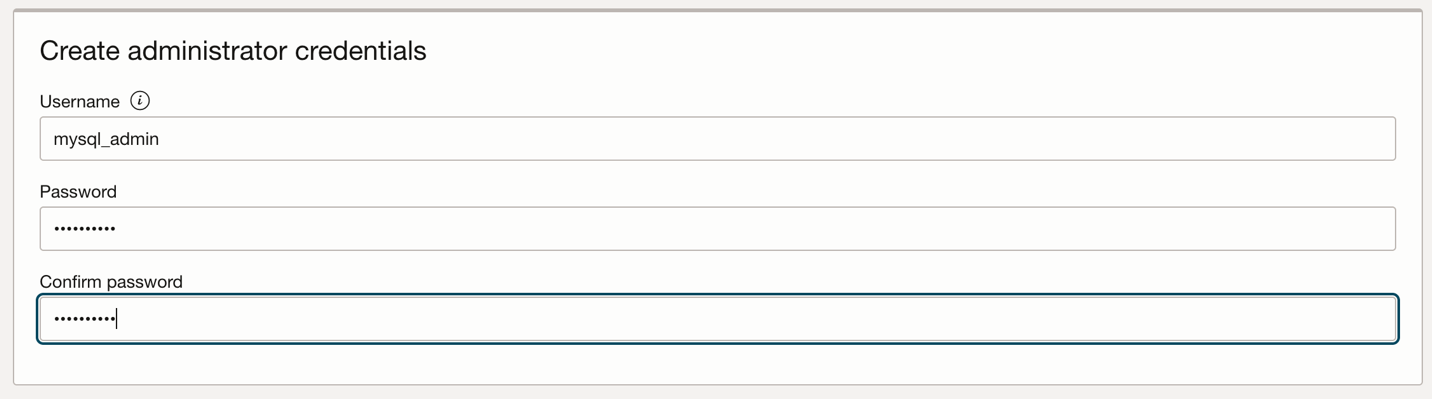
Figure 3. Set MySQL admin user (create DB system)
You can optionally change the shape if you’d like, but if you are experimenting, the cost of the shape may not be significant since you will likely delete the resource once you finish. You may, however, wish to change the backup option to turn off the automatic backup and final backup option. Similarly, you may want to turn off the delete protection by expanding the advanced options and unticking the tick boxes in the Deletion plan tab, as shown in Figure 4.

Figure 4. Configure backup plan (create DB system)
Once the options are selected, click the Create button to create the DB system. You will then see the DB system details page. Wait until the DB system is ACTIVE, then note the public IP address on the Connections tab shown in Figure 5.
Note: If you are working with a source that has existing data you want replicated, you should dump the data on the source first with MySQL Shell and then load it on the replica. See Using MySQL Shell to Dump Data To And Read Data From OCI Storage Buckets for more information about how to do this with MySQL Shell.
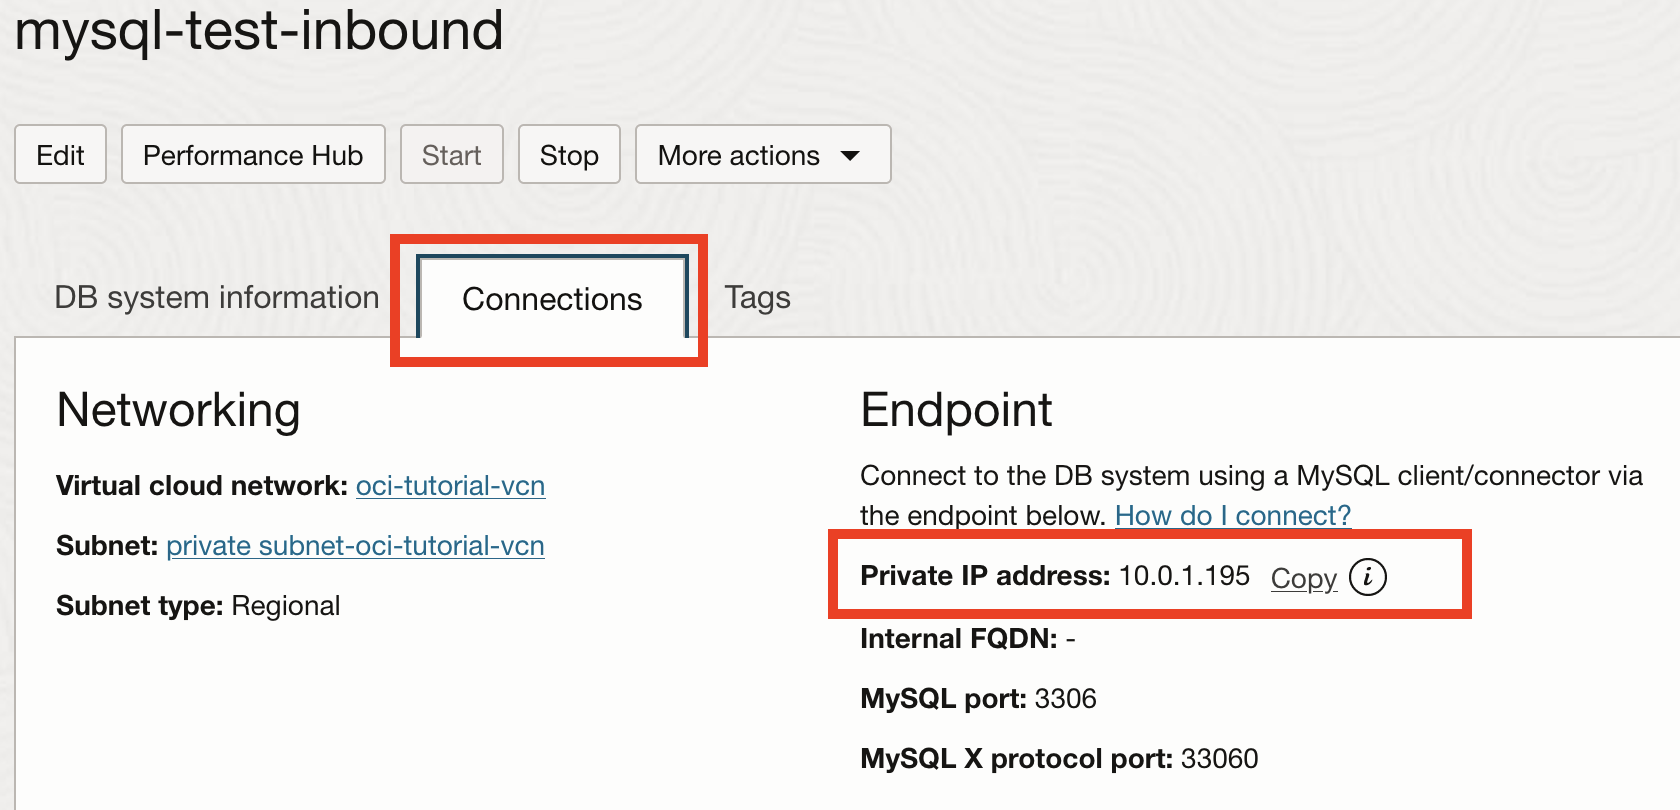
Figure 5. Private IP address (DB system details page)
Next, we should test the VPN connection by logging into the DB system from our on-premises PC. Use MySQL Shell and connect to the DB system using the following command with the correct IP address. This shows that we can connect from our on-premises to the VCN.
$ mysqlsh –sql mysql_admin@10.0.1.195:33060
Once we are sure that we can connect via MySQL Shell, we are ready to set up the replication channel.
Create a Channel
To create a replication channel, navigate the OCI menu to Databases | Channels and click Create Channel, as shown in Figure 6. You can also create a new channel from the DB system details page by clicking More Actions | Create Channel.

Figure 6. Create a channel (channel list)
On the create channel dialog, you must provide the IP address that your on-premises MySQL server is listening (the static IP address assigned to your VPN client), the replication user (rpl_user) and password (you must enter it twice) that you created on the source. Figure 7 shows the top part of the Create Channel dialog, including the optional name and description entries.
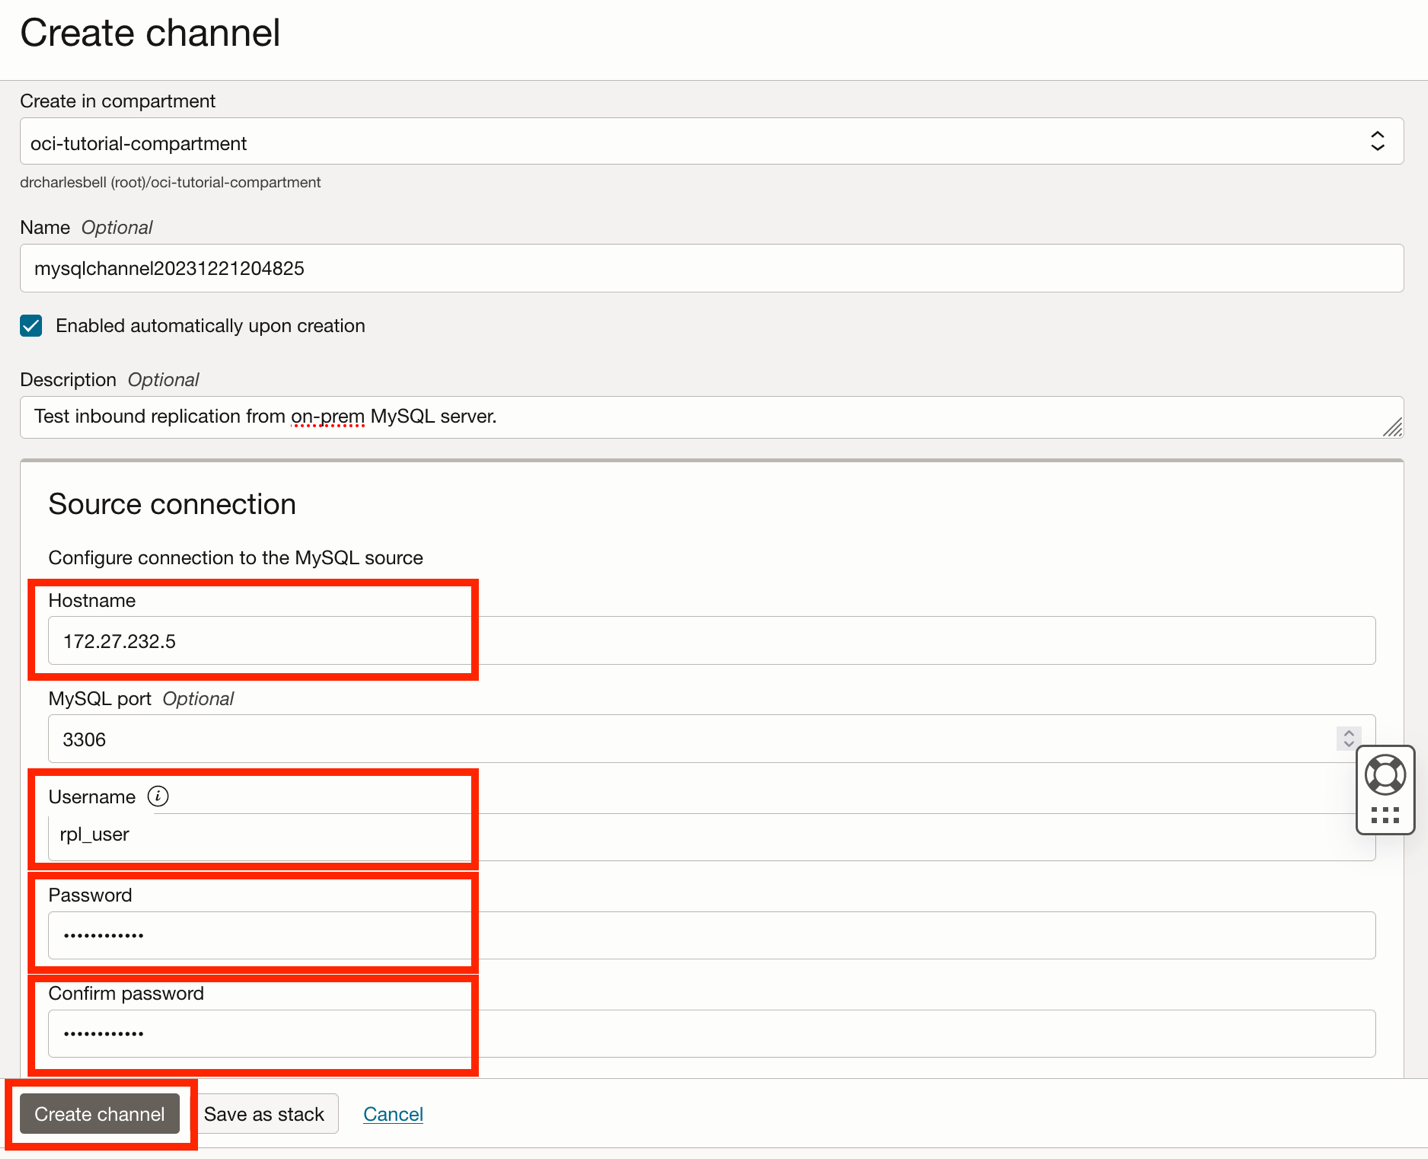
Figure 7. Channel details page
You also need to choose the target DB system. Scroll down in the dialog, click the target DB system entry, and select the DB system we just created, as shown in Figure 8.
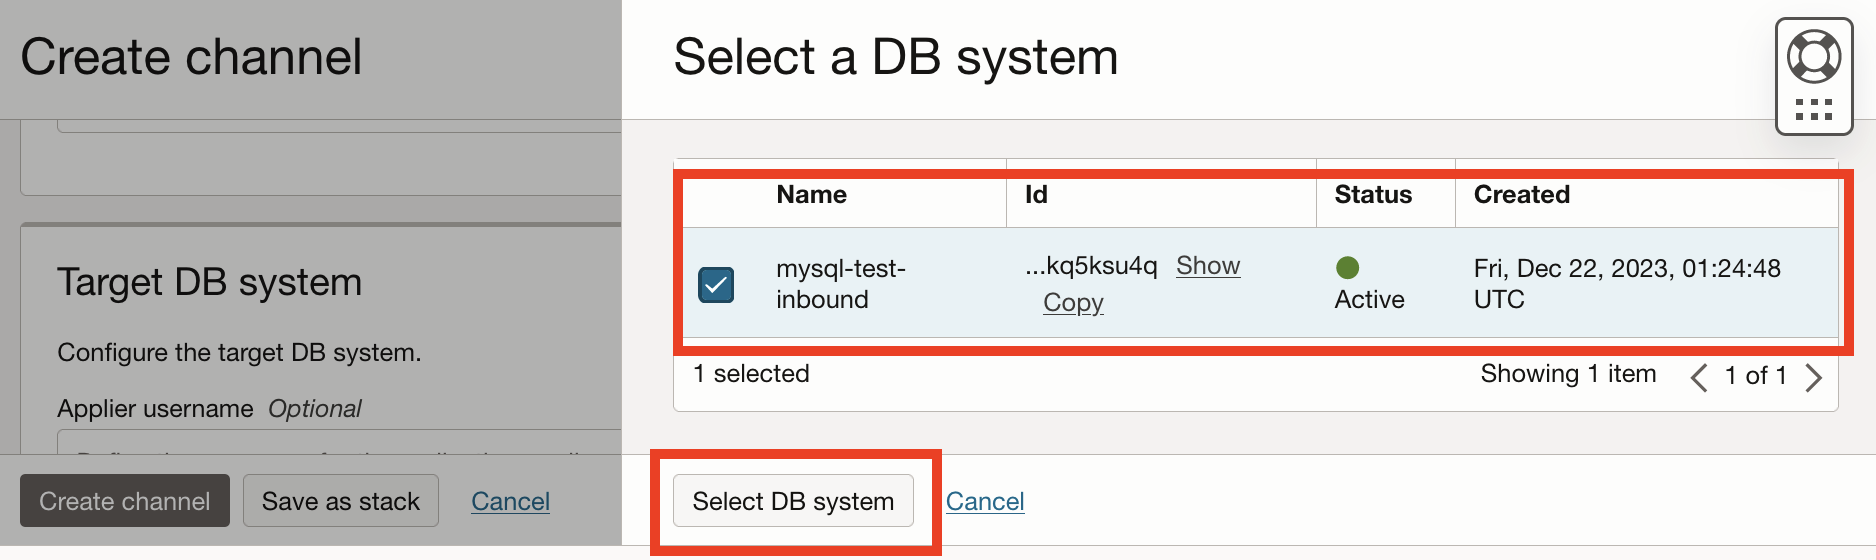
Figure 8. Choose a target DB system (create a channel)
When selecting the DB system, you can click the Create button, as shown in Figure 9.

Figure 9. Create channel
The channel will take some time to set up, and when it is complete, you should see the status set to ACTIVE, as shown in Figure 10.
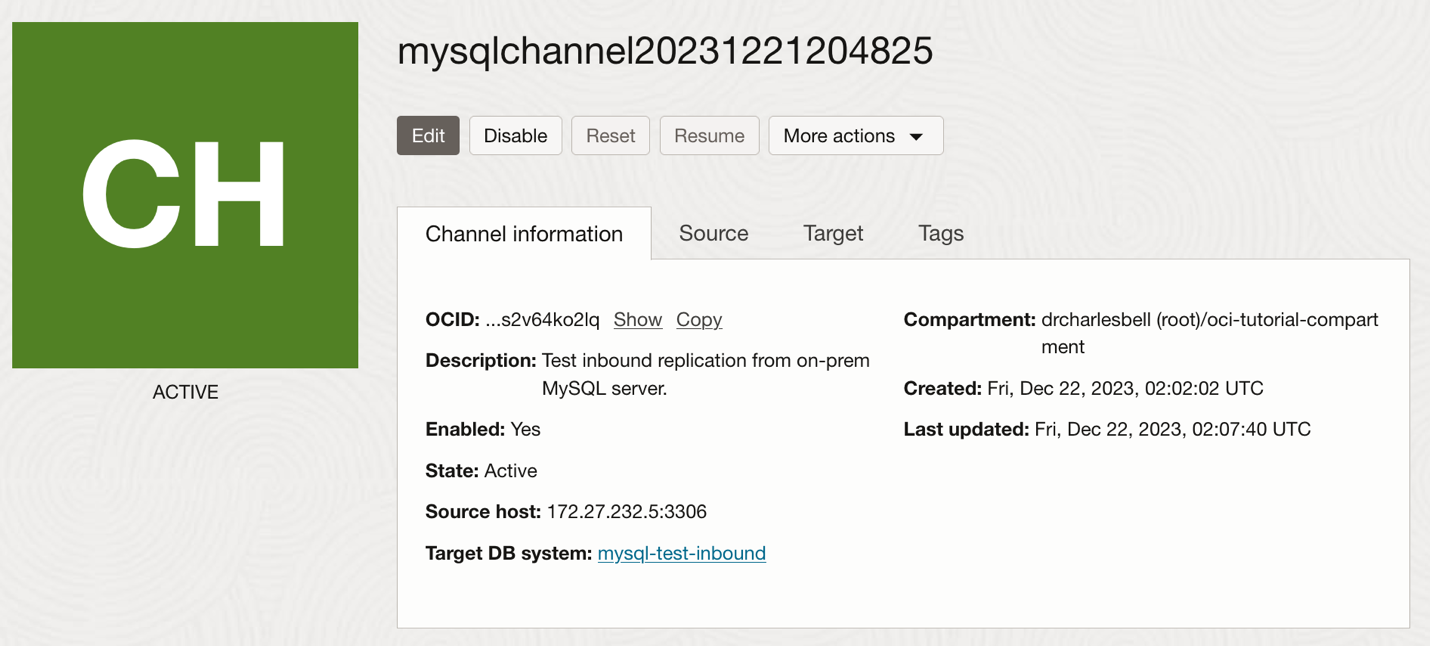
Figure 10. Channel read (channel details page)
You can explore the channel details page to see information about the source and target by clicking on the tabs in the dialog. If you need to stop the channel, you can click Disable, and to start it, click Enable. To restart an enabled channel that stopped due to errors, click Resume.
Tip: See Managing a Replication Channel for more details on working with disabled or failed channels.
If you see the state NEEDS ATTENTION, you may have a problem with your connectivity to your on-premises MySQL server or transactions in the binary log that cannot be executed on the DB system. To check the replica state, connect to and log into the DB system with MySQL Shell and run the SHOW REPLICA STATUS command, as shown in Listing 1.
To diagnose the problem, you can check the error messages, resolve those issues, and resume the channel from the channel details page.
Notice an error in the replication username (oops!) in this example. We can edit the channel and then resume it to correct this.
Listing 1. Replica status command
> SHOW REPLICA STATUS \G
*************************** 1. row ***************************
Replica_IO_State: Connecting to source
Source_Host: 172.27.232.5
Source_User: rpl_useer
Source_Port: 3306
Connect_Retry: 60
Source_Log_File:
Read_Source_Log_Pos: 4
Relay_Log_File: relay-log-replication_channel.000001
Relay_Log_Pos: 4
Relay_Source_Log_File:
Replica_IO_Running: Connecting
Replica_SQL_Running: Yes
Replicate_Do_DB:
Replicate_Ignore_DB:
Replicate_Do_Table:
Replicate_Ignore_Table:
Replicate_Wild_Do_Table:
Replicate_Wild_Ignore_Table:
Last_Errno: 0
Last_Error:
Skip_Counter: 0
Exec_Source_Log_Pos: 0
Relay_Log_Space: 157
Until_Condition: None
Until_Log_File:
Until_Log_Pos: 0
Source_SSL_Allowed: Yes
Source_SSL_CA_File:
Source_SSL_CA_Path:
Source_SSL_Cert:
Source_SSL_Cipher:
Source_SSL_Key:
Seconds_Behind_Source: 0
Source_SSL_Verify_Server_Cert: No
Last_IO_Errno: 1045
Last_IO_Error: Error connecting to source ‘rpl_useer@172.27.232.5:3306’. This was attempt 2/0, with a delay of 60 seconds between attempts. Message: Access denied for user ‘rpl_useer’@’10.0.1.19’ (using password: YES)
Last_SQL_Errno: 0
Last_SQL_Error:
Replicate_Ignore_Server_Ids:
Source_Server_Id: 0
Source_UUID:
Source_Info_File: mysql.slave_master_info
SQL_Delay: 0
SQL_Remaining_Delay: NULL
Replica_SQL_Running_State: Replica has read all relay log; waiting for more updates
Source_Retry_Count: 0
Source_Bind:
Last_IO_Error_Timestamp: 231222 02:03:49
Last_SQL_Error_Timestamp:
Source_SSL_Crl:
Source_SSL_Crlpath:
Retrieved_Gtid_Set:
Executed_Gtid_Set:
Auto_Position: 1
Replicate_Rewrite_DB:
Channel_Name: replication_channel
Source_TLS_Version: TLSv1.2,TLSv1.3
Source_public_key_path:
Get_Source_public_key: 1
Network_Namespace: mysql
1 row in set (0.0515 sec)
Once the channel is Active, you can test it with some sample data.
Test the Channel
Now, let’s test the channel. Since our on-premises MySQL server is the source, we will create a new database and table and then check the DB system to ensure the data was replicated. The commands to create a test database and some sample data are shown in Listing 2.
Listing 2. Creating Test Data (on-premises)
> CREATE DATABASE test_inbound;
Query OK, 1 row affected (0.0034 sec)
> CREATE TABLE test_inbound.t1 (a int auto_increment primary key, b char(10));
Query OK, 0 rows affected (0.0101 sec)
> INSERT INTO test_inbound.t1 VALUES (NULL, ‘a’), (NULL, ‘b’), (NULL, ‘c’);
Query OK, 3 rows affected (0.0060 sec)
Records: 3 Duplicates: 0 Warnings: 0
> SELECT * FROM test_inbound.t1;
+—+—+
| a | b |
+—+—+
| 1 | a |
| 2 | b |
| 3 | c |
+—+—+
3 rows in set (0.0007 sec)
> INSERT INTO t1 VALUES (NULL, ‘d’);
Query OK, 1 row affected (0.0034 sec)
> INSERT INTO t1 VALUES (NULL, ‘e’);
Query OK, 1 row affected (0.0034 sec)
> SELECT * FROM t1;
+—+—+
| a | b |
+—+—+
| 1 | a |
| 2 | b |
| 3 | c |
| 4 | d |
| 5 | e |
+—+—+
5 rows in set (0.0232 sec)
Next, we can log in to our DB system and display the data as shown in Listing 3.
Listing 3. Viewing the Test Data (DB system)
> USE test_inbound;
Default schema set to `test_inbound`.
Fetching table and column names from `test_inbound` for auto-completion… Press ^C to stop.
> SELECT * FROM t1;
+—+—+
| a | b |
+—+—+
| 1 | a |
| 2 | b |
| 3 | c |
| 4 | d |
| 5 | e |
+—+—+
5 rows in set (0.0232 sec)
If you see results similar to those shown in the listing, congratulations! You have just set up inbound replication to automatically replicate data on your on-premises MySQL server to your OCI MySQL HeatWave DB system. Huzzah!
Tip: For more details about using inbound replication in OCI, see the OCI documentation on inbound replication. See the replication channels documentation for more information about configuring and using channels in MySQL server.
