You may know that machine learning models can be built using Oracle Autonomous Database, but did you know you could do so using the output of Fusion Applications-based Analytics Publisher (formerly BI Publisher) report? These reports are one of the approved ways of extracting data from Fusion and pull data from various Fusion modules like Finance, Order Management, Supply Chain, etc., making them effective data sources for custom machine learning models for various use cases—including track delays in payments, invoices where follow-up is required, products that could potentially be out of stock etc. This blog demonstrates the steps needed to use Analytics Publisher (AP) reports to build machine learning models.
Note – As a prerequisite, please refer to blog for full details of how to access the Analytics Publisher’s report output and save it as a table in Autonomous Database.
Details about the example AP Report and Data
The report is built using data retrieved from the Oracle Transactional Business Intelligence (OTBI) subject area: Receivables – Payment Schedules Real Time – as shown below. It includes additional formulas to this query along with an extra column — “Followup_Required” – to indicate whether further follow-up is required for the respective transaction; valid values are “Yes” or “No.”
The data used for this report is from a demo pod using Vision Corp data (sample fictitious data provided with Fusion Applications based on a fictitious company called Vision Corp). The actual report output consists of 10 columns, and the details are as follows:
| Column Name | Description |
|---|---|
| Transaction_ID | Unique identifier of the transaction |
| Aging_Bucket | Defines the overdue bucket as ‘Overdue 1-30 Days’, ‘Overdue 31-60 Days’, ‘Overdue 61-90 Days’ or ‘Overdue 90+ Days’ |
| Days_since_due | Total number of days since the amount is due |
| Amount_Remaining | Remaining amount to be paid |
| Expected_Uncollected_amount | Expected amount that is likely not to be collected based on the formula matching business requirements |
| AR_Overdue_1_30_Amt AR_Overdue_31_60_Amt AR_Overdue_61_90_Amt AR_Overdue_90plus_Amt |
Amount due that falls under the respective bucket. As each transaction is unique, the amount would be non-zero for 1 of these 4 buckets and 0 for the remaining buckets |
| Followup_Required | This column is filled using a formula based on the business requirement, to determine whether further follow-up on this transaction is needed or not. The goal of the machine learning model we are building is to predict this column value. |
In our example, we’ll use Logistic Regression to predict “Followup_Required”. As the “Followup_Required” (our target column) is set to “Yes” or “No” mainly based on the respective amount value from various aging buckets and the type of bucket they are in, we’ll drop “Transaction_ID”, “Days_since_due”, “Expected_Uncollected_amount”, “Amount_Remaining” columns. Rest of the columns will be used as features for the prediction.
The following is the sample query used to build the report in Analytics Publisher, in case you want to try in your environment. Please note that this query is based on the OTBI subject area Receivables—Payment Schedules Real Time. As you can see, the column “Followup_Required” is added to this based on the amount due and “Aging_Bucket” (under which bucket the amount is currently due).
SELECT "Receivables - Payment Schedules Real Time"."Payment Schedules Details"."Transaction ID" Transaction_ID,
   CASE WHEN TIMESTAMPDIFF(SQL_TSI_DAY,"Receivables - Payment Schedules Real Time"."Payment Schedules Details"."Due Date",CURRENT_DATE) BETWEEN 1 AND 30 THEN 'Overdue 1-30 Days' WHEN TIMESTAMPDIFF(SQL_TSI_DAY,"Receivables - Payment Schedules Real Time"."Payment Schedules Details"."Due Date",CURRENT_DATE) BETWEEN 31 AND 60 THEN 'Overdue 31-60 Days' WHEN TIMESTAMPDIFF(SQL_TSI_DAY,"Receivables - Payment Schedules Real Time"."Payment Schedules Details"."Due Date",CURRENT_DATE) BETWEEN 61 AND 90 THEN 'Overdue 61-90 Days' WHEN TIMESTAMPDIFF(SQL_TSI_DAY,"Receivables - Payment Schedules Real Time"."Payment Schedules Details"."Due Date",CURRENT_DATE)>90 THEN 'Overdue 90+ Days' ELSE 'Other (Error)' END Aging_Bucket,
   TIMESTAMPDIFF(SQL_TSI_DAY,"Receivables - Payment Schedules Real Time"."Payment Schedules Details"."Due Date",CURRENT_DATE) Days_since_due,
   "Receivables - Payment Schedules Real Time"."Payment Schedules"."Line Entered Amount Remaining" Amount_Remaining,
   CASE WHEN TIMESTAMPDIFF(SQL_TSI_DAY, "Payment Schedules Details"."Due Date", CURRENT_DATE) BETWEEN 1 AND 30 THEN .01 * "Payment Schedules"."Line Entered Amount Remaining" WHEN TIMESTAMPDIFF(SQL_TSI_DAY, "Payment Schedules Details"."Due Date", CURRENT_DATE) BETWEEN 31 AND 60 THEN .03 * "Payment Schedules"."Line Entered Amount Remaining" WHEN TIMESTAMPDIFF(SQL_TSI_DAY, "Payment Schedules Details"."Due Date", CURRENT_DATE) BETWEEN 61 AND 90 THEN .10 * "Payment Schedules"."Line Entered Amount Remaining" WHEN TIMESTAMPDIFF(SQL_TSI_DAY, "Payment Schedules Details"."Due Date", CURRENT_DATE) > 90 THEN .40 * "Payment Schedules"."Line Entered Amount Remaining" ELSE 0 END Expected_Uncollected_amout,
   case (CASE WHEN TIMESTAMPDIFF(SQL_TSI_DAY,"Receivables - Payment Schedules Real Time"."Payment Schedules Details"."Due Date",CURRENT_DATE) BETWEEN 1 AND 30 THEN 'Overdue 1-30 Days' WHEN TIMESTAMPDIFF(SQL_TSI_DAY,"Receivables - Payment Schedules Real Time"."Payment Schedules Details"."Due Date",CURRENT_DATE) BETWEEN 31 AND 60 THEN 'Overdue 31-60 Days' WHEN TIMESTAMPDIFF(SQL_TSI_DAY,"Receivables - Payment Schedules Real Time"."Payment Schedules Details"."Due Date",CURRENT_DATE) BETWEEN 61 AND 90 THEN 'Overdue 61-90 Days' WHEN TIMESTAMPDIFF(SQL_TSI_DAY,"Receivables - Payment Schedules Real Time"."Payment Schedules Details"."Due Date",CURRENT_DATE)>90 THEN 'Overdue 90+ Days' ELSE 'Other (Error)' END) when 'Overdue 1-30 Days' then "Receivables - Payment Schedules Real Time"."Payment Schedules"."Line Entered Amount Remaining" else 0 end AR_Overdue_30_Amount,
   case (CASE WHEN TIMESTAMPDIFF(SQL_TSI_DAY,"Receivables - Payment Schedules Real Time"."Payment Schedules Details"."Due Date",CURRENT_DATE) BETWEEN 1 AND 30 THEN 'Overdue 1-30 Days' WHEN TIMESTAMPDIFF(SQL_TSI_DAY,"Receivables - Payment Schedules Real Time"."Payment Schedules Details"."Due Date",CURRENT_DATE) BETWEEN 31 AND 60 THEN 'Overdue 31-60 Days' WHEN TIMESTAMPDIFF(SQL_TSI_DAY,"Receivables - Payment Schedules Real Time"."Payment Schedules Details"."Due Date",CURRENT_DATE) BETWEEN 61 AND 90 THEN 'Overdue 61-90 Days' WHEN TIMESTAMPDIFF(SQL_TSI_DAY,"Receivables - Payment Schedules Real Time"."Payment Schedules Details"."Due Date",CURRENT_DATE)>90 THEN 'Overdue 90+ Days' ELSE 'Other (Error)' END) when 'Overdue 31-60 Days' then "Receivables - Payment Schedules Real Time"."Payment Schedules"."Line Entered Amount Remaining" else 0 end AR_Overdue_3160_Amount,
   case (CASE WHEN TIMESTAMPDIFF(SQL_TSI_DAY,"Receivables - Payment Schedules Real Time"."Payment Schedules Details"."Due Date",CURRENT_DATE) BETWEEN 1 AND 30 THEN 'Overdue 1-30 Days' WHEN TIMESTAMPDIFF(SQL_TSI_DAY,"Receivables - Payment Schedules Real Time"."Payment Schedules Details"."Due Date",CURRENT_DATE) BETWEEN 31 AND 60 THEN 'Overdue 31-60 Days' WHEN TIMESTAMPDIFF(SQL_TSI_DAY,"Receivables - Payment Schedules Real Time"."Payment Schedules Details"."Due Date",CURRENT_DATE) BETWEEN 61 AND 90 THEN 'Overdue 61-90 Days' WHEN TIMESTAMPDIFF(SQL_TSI_DAY,"Receivables - Payment Schedules Real Time"."Payment Schedules Details"."Due Date",CURRENT_DATE)>90 THEN 'Overdue 90+ Days' ELSE 'Other (Error)' END) when 'Overdue 61-90 Days' then "Receivables - Payment Schedules Real Time"."Payment Schedules"."Line Entered Amount Remaining" else 0 end AR_Overdue_6190_Amount,
   case (CASE WHEN TIMESTAMPDIFF(SQL_TSI_DAY,"Receivables - Payment Schedules Real Time"."Payment Schedules Details"."Due Date",CURRENT_DATE) BETWEEN 1 AND 30 THEN 'Overdue 1-30 Days' WHEN TIMESTAMPDIFF(SQL_TSI_DAY,"Receivables - Payment Schedules Real Time"."Payment Schedules Details"."Due Date",CURRENT_DATE) BETWEEN 31 AND 60 THEN 'Overdue 31-60 Days' WHEN TIMESTAMPDIFF(SQL_TSI_DAY,"Receivables - Payment Schedules Real Time"."Payment Schedules Details"."Due Date",CURRENT_DATE) BETWEEN 61 AND 90 THEN 'Overdue 61-90 Days' WHEN TIMESTAMPDIFF(SQL_TSI_DAY,"Receivables - Payment Schedules Real Time"."Payment Schedules Details"."Due Date",CURRENT_DATE)>90 THEN 'Overdue 90+ Days' ELSE 'Other (Error)' END) when 'Overdue 90+ Days' then "Receivables - Payment Schedules Real Time"."Payment Schedules"."Line Entered Amount Remaining" else 0 end AR_Overdue_90_Amount
FROM "Receivables - Payment Schedules Real Time"
WHERE
((("Payment Schedules"."Line Entered Amount Remaining" > 0) AND (TIMESTAMPDIFF(SQL_TSI_DAY, "Payment Schedules Details"."Due Date", CURRENT_DATE) > 0) AND ("Payment Schedules Details"."Transaction Type" = 'Invoice')))
Tools Used
The example uses OML Notebooks in Autonomous Database along with Python language paragraphs with Oracle Machine Learning for Python (OML4Py). Conda environment was created using a third-party library called Zeep. The Zeep library is used for handling the SOAP-based webservices in Python. For more details on the Zeep library, see this GitHub page.
Pull and Prepare Data
As a first step, download and activate your Conda environment containing zeep library, as discussed in full details in the previous blog. For additional details, refer to Announcing custom third-party Python and R packages for use on Autonomous Database and documentation. For the sample used here, the Conda environment was created with the name “mypyenv”.
1. Import the libraries needed to access the Analytics Publisher report.
%conda

download mypyenv --overwrite
activate mypyenv

%python

import requests
from zeep.transports import Transport
from zeep import Client
from zeep import helpers
2. Define a report request, like the following, but replace <server_name>, user_name, and passwd with your values. The chunking requirement and attribute format-related details are discussed here. Please also read the Best Practices document of BI Publisher web services in Fusion Applications.
%python

WSDL = "https://<server_name>/xmlpserver/services/ExternalReportWSSService?wsdl"
user_name = "???"
passwd = "***"

bip_report_request = {
    'reportAbsolutePath': '/Custom/ADB_OML/RP_AR_Inv.xdo',
    'sizeOfDataChunkDownload': '10000',
    'byPassCache': 'False',
    'flattenXML': 'False',
    'attributeFormat': 'csv'
}
3. Invoke the runReport method to perform the following steps:
- Obtain a valid session through requests.Session().
- Authorized the session with the user_name and passwd.
- Get a transport object by passing the authorized session to it.
- Initiate the bip_client object by providing the WSDL and the transport object.
- Invoke the runReport method of Analytics Publisher web service ExternalReportWSSService by passing bip_report_request dictionary declared above and report-specific parameter values (none required for this specific case).
%python

bip_session = requests.Session()
bip_session.auth = (user_name, passwd)
bip_transport = Transport(session=bip_session)

bip_client = Client(wsdl=WSDL, transport=bip_transport)
bip_rep_result = bip_client.service.runReport(reportRequest=bip_report_request, appParams="")
4. The result obtained from the web service invocation is converted into a Python dictionary with helpsers.serialize_object. The Python dictionary variable bip_rep_result_dict now holds various key/value pairs returned by the web service call. Among them, the ‘reportBytes’ key contains the report output in the form of encoded bytes. Capture the decoded report output into the string variable rows_str. With this, the rows_str now contains the report output in a human-readable string with CSV format. As the last step of this paragraph, close the bip_session.
%python

bip_rep_result_dict = helpers.serialize_object(bip_rep_result, target_cls=dict)

rows_byte = bip_rep_result_dict['reportBytes']
rows_str = rows_byte.decode()

bip_session.close()
z.show(rows_str)
5. Print the report output retrieved from Analytics Publisher:
RANSACTION_ID,AGING_BUCKET,DAYS_SINCE_DUE,AMOUNT_REMAINING,EXPECTED_UNCOLLECTED_AMOUNT,AR_OVERDUE_1_30_AMT,AR_OVERDUE_31_60_AMT,AR_OVERDUE_61_90_AMT,AR_OVERDUE_90PLUS_AMT,FOLLOWUP_REQUIRED
1285059,"Overdue 1-30 Days",26,34698,347,34698,0,0,0,No
1284978,"Overdue 31-60 Days",44,46982,1409,0,46982,0,0,Yes
1284963,"Overdue 61-90 Days",71,86942,8694,0,0,86942,0,Yes
1284954,"Overdue 90+ Days",632,1304130,521652,0,0,0,1304130,Yes
1286115,"Overdue 1-30 Days",15,607719,6077,607719,0,0,0,Yes
1284561,"Overdue 1-30 Days",25,10430,104,10430,0,0,0,No
1286108,"Overdue 90+ Days",554,786969,314788,0,0,0,786969,Yes
1284551,"Overdue 31-60 Days",58,10061,302,0,10061,0,0,Yes
1286101,"Overdue 61-90 Days",63,74140,7414,0,0,74140,0,Yes
1284540,"Overdue 90+ Days",179,4182,1673,0,0,0,4182,Yes
1286092,"Overdue 1-30 Days",22,46982,470,46982,0,0,0,No
1286208,"Overdue 31-60 Days",35,148354,4451,0,148354,0,0,Yes
1284528,"Overdue 61-90 Days",80,4253,425,0,0,4253,0,Yes
1286202,"Overdue 90+ Days",99,154790,61916,0,0,0,154790,Yes
1284517,"Overdue 90+ Days",120,4756,1902,0,0,0,4756,Yes
1284505,"Overdue 1-30 Days",12,2800,28,2800,0,0,0,No
1284494,"Overdue 31-60 Days",45,6385,192,0,6385,0,0,No
1286037,"Overdue 61-90 Days",68,285386,28539,0,0,285386,0,Yes
1284481,"Overdue 90+ Days",96,4852,1941,0,0,0,4852,Yes
1286030,"Overdue 1-30 Days",17,103975,1040,103975,0,0,0,Yes
1284664,"Overdue 1-30 Days",22,761,8,761,0,0,0,No
1286177,"Overdue 1-30 Days",29,30958,310,30958,0,0,0,No
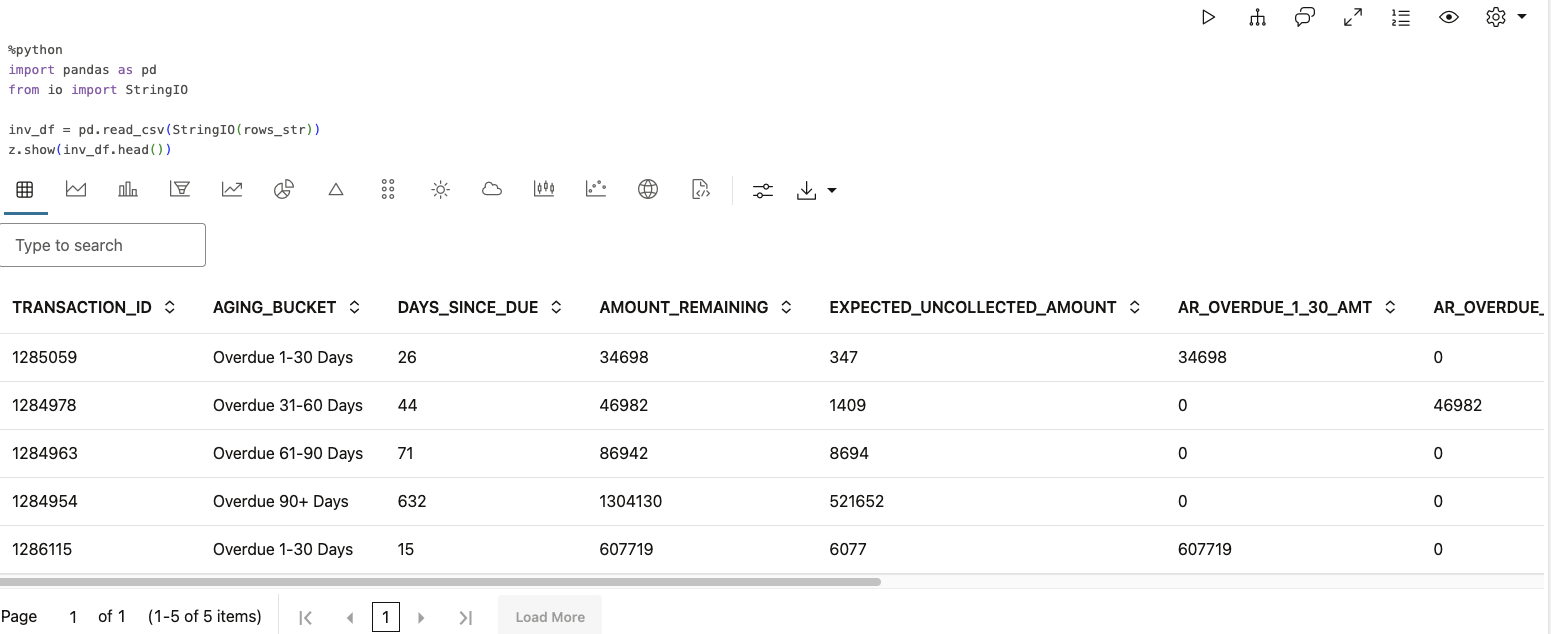
6. Convert the report output into a Panda’s DataFrame and display a few rows of the data. There are 150 rows in the full report:
%python

import pandas as pd
from io import StringIO

inv_df = pd.read_csv(StringIO(rows_str))
z.show(inv_df.head())
Categorical Data
The OML in-database algorithms automatically handle encoding of categorical variables. In our sample data, two columns (“AGING_BUCKET” and “FOLLOWUP_REQUIRED”) are strings, which we do not have to specifically handle this in our code to use them with in-database algorithms.
Train and Predict
7. Next, build the model and predict the result using the in-database algorithm with the following steps:.
- Create a table using the Pandas DataFrame “invdf”:First check whether the table exist. If it exists, drop it and then call oml.create method by passing the Pandas DataFrame “inv_df”.
- Load the table data into OML DataFrame “data_prep” by using the split function. The split function uses 80:20 ratio for training and test data.
- Declare X_train to hold all columns from the training set portion except “FOLLOWUP_REQUIRED” (predictors only). For y_train we only use “FOLLOWUP_REQUIRED” (target column) column from the training set portion. We declare test_data to hold all the test set portion of data.
- Declare setting variable to be of type dictionary with key as “GLMS_SOLVER” (Generalized Linear Model) and value as “dbms_data_mining.GLMS_SOLVER_QR”. More info on Generalized Linear Model is available through documentation.
- While invoking olm.glm function we use “classification” option to indicate we are interested in the linear regression. We then train the model by calling glm_mod.fit.
- After training the model, we invoke the score function to obtain the predictions using the test data set. While calling glm_mod.score, for predictors we use test_data.drop(“FOLLOWUP_REQUIRED”) (all columns except the column meant as target) and, for target we just use the “FOLLOWUP_REQUIRED”.
%python
import oml
try:
oml.drop('AR_INV')
except:
pass
oml_ar_inv = oml.create(inv_df, table = 'AR_INV')
data_prep = oml.sync(table = 'AR_INV').split(ratio=(.80, .20), seed = 1)
X_train = data_prep[0].drop('FOLLOWUP_REQUIRED')
y_train = data_prep[0]['FOLLOWUP_REQUIRED']
test_data = data_prep[1]
setting = {'GLMS_SOLVER': 'dbms_data_mining.GLMS_SOLVER_QR'}
glm_mod = oml.glm("classification", **setting)
glm_mod = glm_mod.fit(X_train, y_train)
z.show('Score: ' + str(glm_mod.score(test_data.drop('FOLLOWUP_REQUIRED'), test_data[:, ['FOLLOWUP_REQUIRED']])))
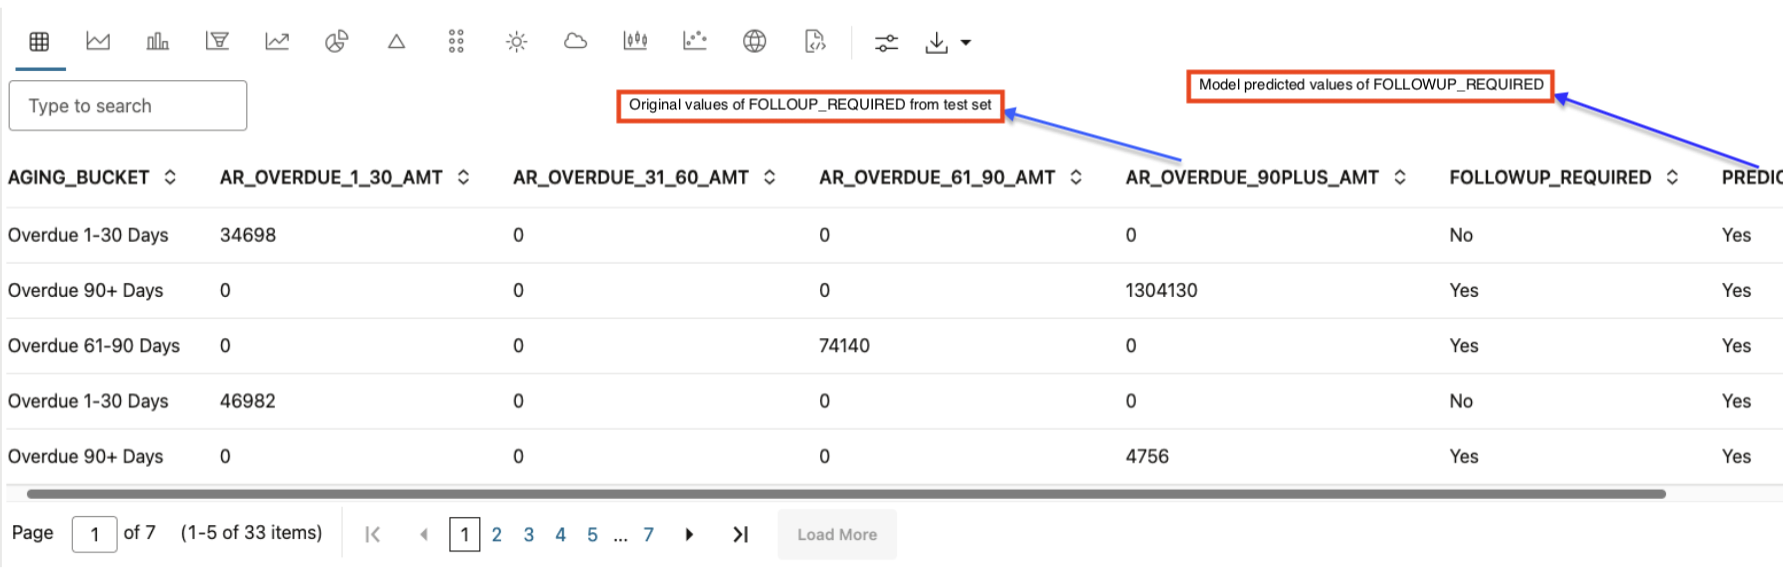
suppl_cols = ['AGING_BUCKET', 'AR_OVERDUE_1_30_AMT', 'AR_OVERDUE_31_60_AMT', 'AR_OVERDUE_61_90_AMT', 'AR_OVERDUE_90PLUS_AMT', 'FOLLOWUP_REQUIRED']
z.show(glm_mod.predict(test_data.drop('FOLLOWUP_REQUIRED'), supplemental_cols = test_data[:, suppl_cols]))
8. For larger data sets, the training data needs to cover maximum scenarios possible. It is because the performance of the model could change with more data provided for training or with use of a different data set for testing. Depending on the test results, the model may need tuning. As a last step of this OML Notebook paragraph, we display the test data along with the predicted data. The variable suppl_cols contains all the columns that we want to be part of the output, along with the original values of “FOLLOWUP_REQUIRED” in the test set, and the model predicted values (for “FOLLOWUP_REQUIRED).
Analyze the Results
9. The next step is to analyze the results through confusion matrix, score, classification report etc. As the last paragraph of this OML Notebook, deactivate the Conda environment.
%conda

deactivate

Conda environment 'conda' deactivated
Conclusion
Oracle Machine Learning and Autonomous Database provide a robust environment for machine learning with the full power of the database combined with Python (through OML4Py). External data brought into Autonomous Database can easily be converted into database tables, which can be accessed through SQL, R, and Python with the help of OML Notebooks.