Accessing and working with data from disparate sources is the first step in many data science, machine learning, and artificial intelligence projects. One of such data sources is data in Fusion applications. However, the data can only be accessed through Analytics Publisher. So how can you garner insights from this data and use it for your ML and AI projects?
In this blog, we will explain the process needed to pull data from an Oracle Analytics Publisher (formerly BI Publisher) report directly into Oracle Machine Learning (OML) notebooks. You will see how to access the report data (that is, the report’s output), then to save the output as a table in Autonomous Database so that the data is ready to be used in machine learning models. For subsequent action for building machine learning models, please refer to this blog.
Process overview
The process discussed here helps both Analytics Publisher and Oracle Machine Learning users, who need to access data output by Analytics Publisher. Steps involved in this process are as follows:
- Create the Conda environment for the third-party Python library named zeep
- Since the zeep library is required for accessing SOAP-based web services in Python, create the notebook by downloading and activating the Conda environment
- Invoke the “runReport” method of Analytics Publisher “ExternalReportWSSService” web service to access the report output (Note – Specify the Analytics Publisher report output type as CSV)
- Create a Pandas data frame using the report output
- Create the database table with the Pandas data frame
- Access the data through the DB table directly using Oracle Machine Learning for Python (OML4Py) or SQL
With this process the output is loaded into OML Notebooks using the Python interpreter. By doing this directly in OML Notebooks, there is no need to download/upload the report output locally, thus eliminating potential loss/misuse of the PI/Legislative/HIPPA/other confidential data that resides in Fusion Applications.
Create the Conda environment
To use third-party libraries in OML Notebooks, you first create a Conda environment and add the required libraries to it. This blog provides outline of how the Conda environment is created. For more information, refer to Announcing custom third-party Python and R packages for use on Autonomous Database and documentation for detailed steps and other available commands.
1. The Conda environment needs to be created with the “ADMIN” login within Oracle Machine Learning on Autonomous Database. Once created, it can be made available for other OML users.
2. After logging in as “ADMIN” user, create a notebook.
3. For this step create a new paragraph and specify the Conda interpreter using “%conda”. Then create and activate the Conda environment with the following commands.
%conda

create -n mypyenv -c conda-forge --strict-channel-priority python=3.12.6 zeep=4.3.1 activate mypyenv
4. The create command creates the environment with the Python version and specified packages.
Channels:
 - conda-forge
 - defaults
Platform: linux-64
Collecting package metadata (repodata.json): ...working... done
Solving environment: ...working... done

## Package Plan ##

  environment location: /u01/.conda/envs/mypyenv

  added / updated specs:
    - python=3.12.6
    - zeep=4.3.1

The following packages will be downloaded:

    package                    |            build
    ---------------------------|-----------------
    _libgcc_mutex-0.1          |      conda_forge           3 KB  conda-forge
    _openmp_mutex-4.5          |            2_gnu          23 KB  conda-forge
    attrs-25.1.0               |     pyh71513ae_0          55 KB  conda-forge
    brotli-python-1.1.0        |  py312h2ec8cdc_2         342 KB  conda-forge
    bzip2-1.0.8                |       h4bc722e_7         247 KB  conda-forge
    ca-certificates-2025.1.31  |       hbcca054_0         154 KB  conda-forge
    certifi-2025.1.31          |     pyhd8ed1ab_0         159 KB  conda-forge
    cffi-1.17.1                |  py312h06ac9bb_0         288 KB  conda-forge
    charset-normalizer-3.4.1   |     pyhd8ed1ab_0          46 KB  conda-forge
    h2-4.2.0                   |     pyhd8ed1ab_0          53 KB  conda-forge
    hpack-4.1.0                |     pyhd8ed1ab_0          30 KB  conda-forge
    hyperframe-6.1.0           |     pyhd8ed1ab_0          17 KB  conda-forge
    icu-75.1                   |       he02047a_0        11.6 MB  conda-forge
    idna-3.10                  |     pyhd8ed1ab_1          49 KB  conda-forge
    isodate-0.7.2              |     pyhd8ed1ab_1          23 KB  conda-forge
    ld_impl_linux-64-2.43      |       h712a8e2_4         656 KB  conda-forge
    libexpat-2.6.4             |       h5888daf_0          72 KB  conda-forge
    libffi-3.4.6               |       h2dba641_0          52 KB  conda-forge
    libgcc-14.2.0              |       h767d61c_2         828 KB  conda-forge
    libgcc-ng-14.2.0           |       h69a702a_2          52 KB  conda-forge
    libgomp-14.2.0             |       h767d61c_2         449 KB  conda-forge
    libiconv-1.18              |       h4ce23a2_1         696 KB  conda-forge
    liblzma-5.6.4              |       hb9d3cd8_0         109 KB  conda-forge
    liblzma-devel-5.6.4        |       hb9d3cd8_0         370 KB  conda-forge
    libnsl-2.0.1               |       hd590300_0          33 KB  conda-forge
    libsqlite-3.49.1           |       hee588c1_1         894 KB  conda-forge
    libstdcxx-14.2.0           |       h8f9b012_2         3.7 MB  conda-forge
    libstdcxx-ng-14.2.0        |       h4852527_2          53 KB  conda-forge
    libuuid-2.38.1             |       h0b41bf4_0          33 KB  conda-forge
    libxcrypt-4.4.36           |       hd590300_1          98 KB  conda-forge
    libxml2-2.13.6             |       h8d12d68_0         674 KB  conda-forge
    libxslt-1.1.39             |       h76b75d6_0         248 KB  conda-forge
    libzlib-1.3.1              |       hb9d3cd8_2          60 KB  conda-forge
    lxml-5.3.1                 |  py312he28fd5a_0         1.3 MB  conda-forge
    ncurses-6.5                |       h2d0b736_3         871 KB  conda-forge
    openssl-3.4.1              |       h7b32b05_0         2.8 MB  conda-forge
    pip-25.0.1                 |     pyh8b19718_0         1.2 MB  conda-forge
    platformdirs-4.3.6         |     pyhd8ed1ab_1          20 KB  conda-forge
    pycparser-2.22             |     pyh29332c3_1         108 KB  conda-forge
    pysocks-1.7.1              |     pyha55dd90_7          21 KB  conda-forge
    python-3.12.6              |hc5c86c4_2_cpython        30.1 MB  conda-forge
    python_abi-3.12            |          5_cp312           6 KB  conda-forge
    pytz-2025.1                |     pyhd8ed1ab_0         182 KB  conda-forge
    readline-8.2               |       h8c095d6_2         276 KB  conda-forge
    requests-2.32.3            |     pyhd8ed1ab_1          57 KB  conda-forge
    requests-file-2.1.0        |     pyhd8ed1ab_1          10 KB  conda-forge
    requests-toolbelt-1.0.0    |     pyhd8ed1ab_1          43 KB  conda-forge
    setuptools-75.8.2          |     pyhff2d567_0         760 KB  conda-forge
    tk-8.6.13                  |noxft_h4845f30_101         3.2 MB  conda-forge
    tzdata-2025a               |       h78e105d_0         120 KB  conda-forge
    urllib3-2.3.0              |     pyhd8ed1ab_0          98 KB  conda-forge
    wheel-0.45.1               |     pyhd8ed1ab_1          61 KB  conda-forge
    xz-5.6.4                   |       hbcc6ac9_0          23 KB  conda-forge
    xz-gpl-tools-5.6.4         |       hbcc6ac9_0          33 KB  conda-forge
    xz-tools-5.6.4             |       hb9d3cd8_0          88 KB  conda-forge
    zeep-4.3.1                 |     pyhd8ed1ab_1          76 KB  conda-forge
    zstandard-0.23.0           |  py312hef9b889_1         410 KB  conda-forge
    zstd-1.5.6                 |       ha6fb4c9_0         542 KB  conda-forge
    ------------------------------------------------------------
                                           Total:        64.3 MB

%conda

conda activate mypyenv
5. The “activate” command makes the newly created environment active for use in subsequent paragraphs. At any given point, you can have one active Conda environment. As a best practice, deactivate the environment at the end of the notebook for better resource utilization. The commands above create and activate a new environment named “mypyenv” with Python 3.12.6 and zeep installed.
The following NEW packages will be INSTALLED:
  _libgcc_mutex      conda-forge/linux-64::_libgcc_mutex-0.1-conda_forge
  _openmp_mutex      conda-forge/linux-64::_openmp_mutex-4.5-2_gnu
  attrs              conda-forge/noarch::attrs-25.1.0-pyh71513ae_0
  brotli-python      conda-forge/linux-64::brotli-python-1.1.0-py312h2ec8cdc_2
  bzip2              conda-forge/linux-64::bzip2-1.0.8-h4bc722e_7
  ca-certificates    conda-forge/linux-64::ca-certificates-2025.1.31-hbcca054_0
  certifi            conda-forge/noarch::certifi-2025.1.31-pyhd8ed1ab_0
  cffi               conda-forge/linux-64::cffi-1.17.1-py312h06ac9bb_0
  charset-normalizer conda-forge/noarch::charset-normalizer-3.4.1-pyhd8ed1ab_0
  h2                 conda-forge/noarch::h2-4.2.0-pyhd8ed1ab_0
  hpack              conda-forge/noarch::hpack-4.1.0-pyhd8ed1ab_0
  hyperframe         conda-forge/noarch::hyperframe-6.1.0-pyhd8ed1ab_0
  icu                conda-forge/linux-64::icu-75.1-he02047a_0
  idna               conda-forge/noarch::idna-3.10-pyhd8ed1ab_1
  isodate            conda-forge/noarch::isodate-0.7.2-pyhd8ed1ab_1
  ld_impl_linux-64   conda-forge/linux-64::ld_impl_linux-64-2.43-h712a8e2_4
  libexpat           conda-forge/linux-64::libexpat-2.6.4-h5888daf_0
  libffi             conda-forge/linux-64::libffi-3.4.6-h2dba641_0
  libgcc             conda-forge/linux-64::libgcc-14.2.0-h767d61c_2
  libgcc-ng          conda-forge/linux-64::libgcc-ng-14.2.0-h69a702a_2
  libgomp            conda-forge/linux-64::libgomp-14.2.0-h767d61c_2
  libiconv           conda-forge/linux-64::libiconv-1.18-h4ce23a2_1
  liblzma            conda-forge/linux-64::liblzma-5.6.4-hb9d3cd8_0
  liblzma-devel      conda-forge/linux-64::liblzma-devel-5.6.4-hb9d3cd8_0
  libnsl             conda-forge/linux-64::libnsl-2.0.1-hd590300_0
  libsqlite          conda-forge/linux-64::libsqlite-3.49.1-hee588c1_1
  libstdcxx          conda-forge/linux-64::libstdcxx-14.2.0-h8f9b012_2
  libstdcxx-ng       conda-forge/linux-64::libstdcxx-ng-14.2.0-h4852527_2
  libuuid            conda-forge/linux-64::libuuid-2.38.1-h0b41bf4_0
  libxcrypt          conda-forge/linux-64::libxcrypt-4.4.36-hd590300_1
  libxml2            conda-forge/linux-64::libxml2-2.13.6-h8d12d68_0
  libxslt            conda-forge/linux-64::libxslt-1.1.39-h76b75d6_0
  libzlib            conda-forge/linux-64::libzlib-1.3.1-hb9d3cd8_2
  lxml               conda-forge/linux-64::lxml-5.3.1-py312he28fd5a_0
  ncurses            conda-forge/linux-64::ncurses-6.5-h2d0b736_3
  openssl            conda-forge/linux-64::openssl-3.4.1-h7b32b05_0
  pip                conda-forge/noarch::pip-25.0.1-pyh8b19718_0
  platformdirs       conda-forge/noarch::platformdirs-4.3.6-pyhd8ed1ab_1
  pycparser          conda-forge/noarch::pycparser-2.22-pyh29332c3_1
  pysocks            conda-forge/noarch::pysocks-1.7.1-pyha55dd90_7
  python             conda-forge/linux-64::python-3.12.6-hc5c86c4_2_cpython
  python_abi         conda-forge/linux-64::python_abi-3.12-5_cp312
  pytz               conda-forge/noarch::pytz-2025.1-pyhd8ed1ab_0
  readline           conda-forge/linux-64::readline-8.2-h8c095d6_2
  requests           conda-forge/noarch::requests-2.32.3-pyhd8ed1ab_1
  requests-file      conda-forge/noarch::requests-file-2.1.0-pyhd8ed1ab_1
  requests-toolbelt  conda-forge/noarch::requests-toolbelt-1.0.0-pyhd8ed1ab_1
  setuptools         conda-forge/noarch::setuptools-75.8.2-pyhff2d567_0
  tk                 conda-forge/linux-64::tk-8.6.13-noxft_h4845f30_101
  tzdata             conda-forge/noarch::tzdata-2025a-h78e105d_0
  urllib3            conda-forge/noarch::urllib3-2.3.0-pyhd8ed1ab_0
  wheel              conda-forge/noarch::wheel-0.45.1-pyhd8ed1ab_1
  xz                 conda-forge/linux-64::xz-5.6.4-hbcc6ac9_0
  xz-gpl-tools       conda-forge/linux-64::xz-gpl-tools-5.6.4-hbcc6ac9_0
  xz-tools           conda-forge/linux-64::xz-tools-5.6.4-hb9d3cd8_0
  zeep               conda-forge/noarch::zeep-4.3.1-pyhd8ed1ab_1
  zstandard          conda-forge/linux-64::zstandard-0.23.0-py312hef9b889_1
  zstd               conda-forge/linux-64::zstd-1.5.6-ha6fb4c9_0

Downloading and Extracting Packages: ...working... done
Preparing transaction: ...working... done
Verifying transaction: ...working... WARNING conda.gateways.disk.delete:unlink_or_rename_to_trash(182): Could not remove or rename /opt/conda/conda-meta/charset-normalizer-2.0.4-pyhd3eb1b0_0.json.  Please remove this file manually (you may need to reboot to free file handles)
done
Executing transaction: ...working... done
#
# To activate this environment, use
#
#     $ conda activate mypyenv
#
# To deactivate an active environment, use
#
#     $ conda deactivate
6. Once the environment is created, the next step is to save it in Object Storage. This way, other OML users can use this environment. The command below uploads “mypyenv” to Object Storage and makes it available for OML4Py users.
%conda

upload --overwrite mypyenv --description 'Install Libs Needed To Access AP Report WS ' -t application 'OML4PY'

Uploading conda environment mypyenv
Upload successful for conda environment mypyenv
Download and activate the Conda environment
7. The following commands download the Conda environment from object storage and make it available for use. This code needs to be at the beginning of a new notebook (created by non-admin user) before invoking other Python code.
%conda

download mypyenv --overwrite
activate mypyenv

Downloading conda environment mypyenv
Download successful for conda environment mypyenv

Conda environment 'mypyenv' activated
The next step is to import the required packages.
%python

import requests
from zeep.transports import Transport
from zeep import Client
from zeep import helpers
8. You then need to create the other variables needed for the HTML request to be processed.
The “WSDL” variable holds the URL used to invoke the web service. The “<server_name>” needs to be replaced with your server.
Also, the “user_name” and “passwd” variables need to be assigned with your user credentials. The bip_report_request dictionary is created to pass the required attributes with proper values to invoke the report.
For this invocation, the report is expected to reside in “/Custom/ADB_OML/RP_Ledgers.xdo”. Change the “reportAbsolutePath” accordingly for your scenario. The “sizeOfDataChunkDownload” is set to “3000”, to pull 3,000 bytes in one go. The “attributeFormat” is set to CSV as we would be loading the report output into Pandas data frame with “read_csv” method.
%python

WSDL = "https://<server_name>/xmlpserver/services/ExternalReportWSSService?wsdl"
user_name = "???"
passwd = "***"

bip_report_request = {
    'reportAbsolutePath': '/Custom/ADB_OML/RP_Ledgers.xdo',
    'sizeOfDataChunkDownload': '3000',
    'byPassCache': 'False',
    'flattenXML': 'False',
    'attributeFormat': 'csv'
}
As per the Fusion Application BI Publisher Best Practices document, the maximum allowed output size is 300 MB for “runReport()” method of “ExternalReportWSSService”. As the sample report output in this example is well below 3,000 bytes, no extra code is required to handle different chunks of data; however, for large data volume, you will need to use chunking. In addition to this, for all Analytics Publisher web service calls, there is a 5-minute limitation for the query/process to complete (after which the Analytics Publisher would abort the call).
For output beyond 300 MB, you may consider using other web services like “ScheduleReportWSSService” with chunking enabled or CSV files available in Oracle Universal Content Management through BI Cloud Connector extracts. Chunking should be used for all scenarios while loading data into Autonomous Database.
Access the report output
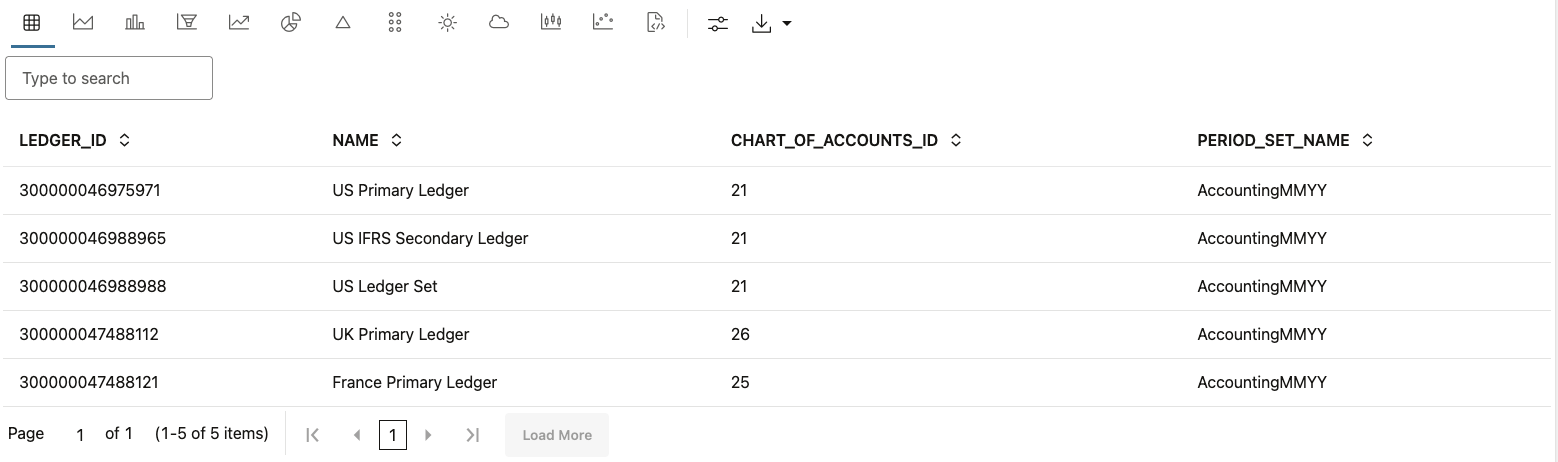
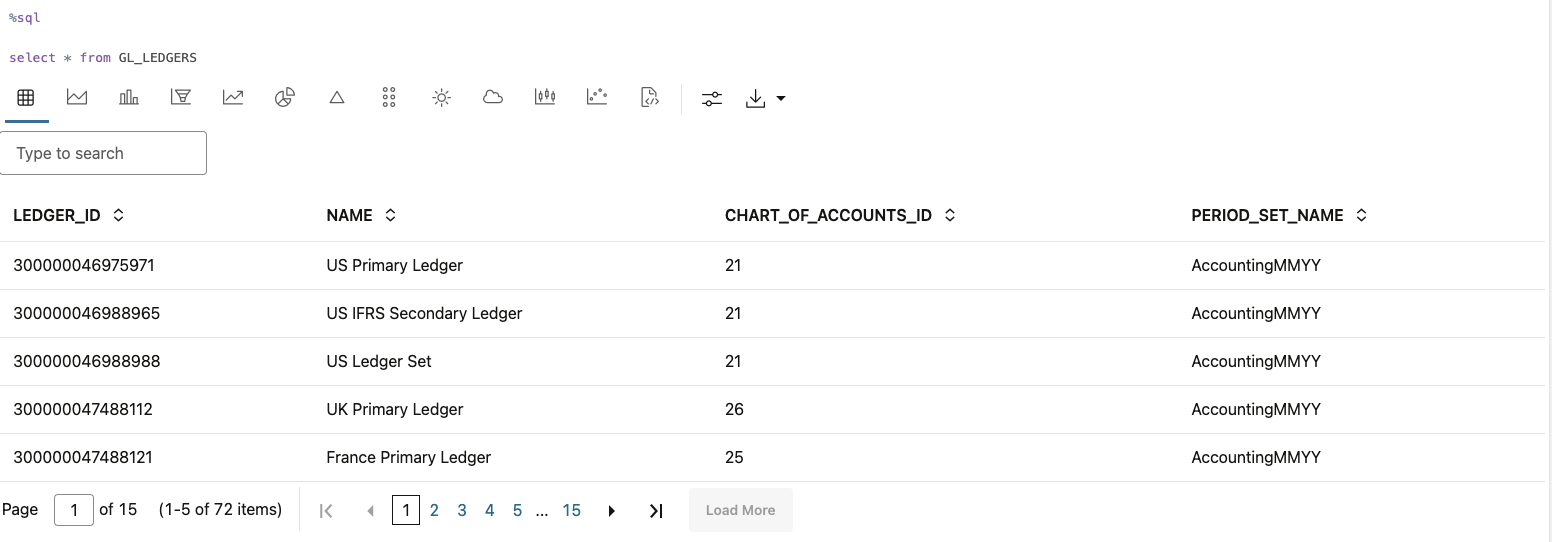
The below sample report is based on the GL_LEDGERS table of Fusion Applications Vision database, a demo (fictitious data) database for Fusion Applications. The report is created to generate CSV output from Analytics Publisher.
9. In the next notebook paragraph, obtain a session, authorize it, get a handle for the client, and invoke the web service. This is done by a call to the “ExternalReportWSSService” provided by Analytics Publisher and variable “WSDL” declared in the previous paragraph holds the full URL. The first line obtains a session, which is authorized with the user credentials declared above. We then create the zeep “Transport” object by passing the session obtained. The “Transport” object is used to obtain a zeep “Client” object by passing the WSDL URL and the transport object created.
%python

bip_session = requests.Session()
bip_session.auth = (user_name, passwd)
bip_transport = Transport(session=bip_session)

bip_client = Client(wsdl=WSDL, transport=bip_transport)
bip_rep_result = bip_client.service.runReport(reportRequest=bip_report_request, appParams="")
10. Run the “runReport” service by passing the “bip_report_request” dictionary for attributes. The next paragraph handles the output returned by the report. The “helpers.serialize_object“ converts the byte code returned by the report so that it can be converted into plain text (CSV) later. The “ExternalReportWSSService” returns the output encrypted. It then obtains the byte code from the now serialized output into “rows_byte”. This byte code is then converted into string data by invoking the “decode” function and storing it in “rows_str”. Finally, close the HTTP session that you obtained earlier.
%python

bip_rep_result_dict = helpers.serialize_object(bip_rep_result, target_cls=dict)

rows_byte = bip_rep_result_dict['reportBytes']
rows_str = rows_byte.decode()

bip_session.close()
Process report output and create a database table
11. The next step is to process the report output and create a database table. First, import OML4Py (oml) and Pandas packages and then print the report’s string output.
%python

import pandas as pd
import oml
from io import StringIO

z.show(rows_str)

LEDGER_ID,NAME,CHART_OF_ACCOUNTS_ID,PERIOD_SET_NAME
300000046975971,"US Primary Ledger",21,AccountingMMYY
300000046988965,"US IFRS Secondary Ledger",21,AccountingMMYY
300000046988988,"US Ledger Set",21,AccountingMMYY
300000047488112,"UK Primary Ledger",26,AccountingMMYY
300000047488121,"France Primary Ledger",25,AccountingMMYY
300000047546403,"UK Secondary Ledger",21,AccountingMMYY
300000047566111,"France Secondary Ledger",21,AccountingMMYY
300000048443131,"US Corp Ledger Set",21,AccountingMMYY
300000048443133,"Close Monitor Set",21,AccountingMMYY
300000074983539,"China Primary Ledger",137,AccountingMMYY
300000075526540,"China Secondary Ledger",21,AccountingMMYY
300000075887689,"Progress US Primary Ledger",138,"GOV Calendar"
300000075935688,"GASB34 Secondary Ledger",138,"GOV Calendar"
300000085666101,"Canada Primary Ledger",245,AccountingMMYY
300000094024319,"University US Primary Ledger",325,"GOV Calendar"
300000100509325,"Japan Primary Ledger",366,FiscalMMYY
300000100831269,"Japan Secondary Ledger",21,AccountingMMYY
300000101474319,"Healthcare US Primary Ledger",386,AccountingMMYY
300000107570320,"Belgium Primary Ledger",430,AccountingMMYY
300000107691109,"Switzerland Primary Ledger",21,AccountingMMYY
300000110509153,"Italy Primary Ledger",450,AcctCalMMYY
300000115625109,"Italy Statutory SL",490,AcctCalMMYY
300000116270105,"Corporate Primary Ledger",21,AccountingMMYY
300000117449137,"Fin Svcs US Primary ADB Ledger",512,AccountingMMMYY
300000117449147,"Fin Svcs UK Primary ADB Ledger",512,AccountingMMMYY
300000117819959,"Spain Primary Ledger",513,AcctCalMMYY
300000129460415,"Australia Primary Ledger",575,"ANZ Calendar"
300000129460424,"New Zealand Primary Ledger",575,"ANZ Calendar"
300000130210397,"Germany Primary Ledger",576,AccountingMMYY
300000131552112,"Netherlands Primary Ledger",430,AccountingMMYY
300000131989633,"Belgium Secondary Ledger",21,AccountingMMYY
300000132430623,"Fin Svcs USGAAP SL",512,AccountingMMMYY
300000132430629,"Fin Svcs UKIFRS SL",512,AccountingMMMYY
300000132744378,"Italy Secondary Ledger",490,AcctCalMMYY
300000136437848,"Fin Svcs USGAAP INS PL",512,AccountingMMMYY
300000136437851,"Fin Svcs USSTAT INS PL",512,AccountingMMMYY
300000136437854,"Fin Svcs IFRS INS PL",512,AccountingMMMYY
300000137440136,"Sweden Primary Ledger",597,AccountingMMYY
300000141993058,"Turkey Primary Ledger",620,AcctCalMMYY
300000150998360,"UAE Primary Ledger",1620,AccountingMMYY
300000157698798,"SAU Primary Ledger",1625,AccountingMMYY
300000157763971,"REPORTING PAB",21,AccountingMMYY
300000166621973,"US RC SLA EUR",21,AccountingMMYY
300000169127685,"PS US Close Ledger Set",138,"GOV Calendar"
300000172606735,"Poland Primary Ledger",2625,AccountingMMYY
300000173090667,"Healthcare Payor US PL",3627,AccountingMMYY
300000184410368,"India Primary Ledger",10625,FiscalMMYY
300000184410412,"India Secondary Ledger",21,AccountingMMYY
300000195964379,"Mexico Primary Ledger",15626,AccountingMMYY
300000202882023,"Germany Secondary Ledger",21,AccountingMMYY
12. Then, convert the string output into a Pandas data frame. The “read_csv” function of Pandas takes either a CSV file saved and available locally or a serialized object to create the data frame. For this purpose, pass the “rows_str” to “StringIO” to create the serialized object and print a few rows of the data frame.
%python

df = pd.read_csv(StringIO(rows_str))

z.show(df.head())
13. As the next step, create the GL_LEDGERS table in the Autonomous Database using our Pandas data frame. It’s a good practice to use “oml.drop” to drop the table first, before creating it with the Pandas data frame.
%python

try:
    oml.drop("GL_LEDGERS")
except:
    print("Couldn't drop table GL_LEDGERS as the table does not exist.")

oml_df = oml.create(df, table="GL_LEDGERS", dbtypes = ['NUMBER(18)', 'VARCHAR2(30)', 'NUMBER(18)', 'VARCHAR2(15)'])
14. Check whether the table is accessible by adding a SQL paragraph and running a select command against the newly created table.
%sql

select * from GL_LEDGERS
15. As the last step, deactivate the Conda environment.
%conda

deactivate
Conclusion
The process above demonstrates how to directly access the output from Analytics Publisher report using OML Notebooks and OML4Py. The process helps addressing possible security concerns and data vulnerability because it does not store the report output locally. Any Analytics Publisher users with “BI Consumer” role can use this process to pull and further analyze their data within a single notebook as well as build in-database machine learning models.
You can also use the steps in this blog to create Python code that create a database table that can be used not only by Python but also by SQL and R paragraphs as well.
Note that although Analytics Publisher also provides a REST API for data access, the process in this blog only addresses SOAP web service. Stay tuned for a future release which certifies the REST API for Fusion cloud pods.