Introduction
Many Kubernetes workloads still expect a filesystem, even when their data lives in object storage. In this post, we show how to mount an OCI Object Storage bucket directly into a pod using OCIFS. Compared to earlier approaches — using a PVC with a CSI driver or embedding the Object Storage SDK in your app — this gives you a filesystem-like interface without changing application code, while keeping mount behavior and lifecycle under your control.
We use OCIFS for this. OCIFS is a FUSE-based client that exposes an OCI Object Storage bucket as a POSIX-like filesystem—to give pods a simple, file-oriented view of object data. OCIFS handles the authentication and validation, and passes the mounted path so your application can read and write files without any code changes.
The rest of the post walks through a practical deployment: the YAML for the initContainer and application container, how to pass credentials safely, and how to choose read-only or read-write modes. This provides a repeatable pattern you can drop into your cluster to make object data feel local, without turning your application into a storage client.
Configuring the environment
First, create a Docker image containing the required OCIFS utility. Below is an example using Oracle Linux 9 and the appropriate YUM repository (as instructed in the OCIFS installation options):
File oci-included-ol9.repo
[ol9_oci_included]
name=Oracle Software for OCI users on Oracle Linux $releasever ($basearch)
baseurl=https://yum$ociregion.$ocidomain/repo/OracleLinux/OL9/oci/included/$basearch/
gpgkey=file:///etc/pki/rpm-gpg/RPM-GPG-KEY-oracle
gpgcheck=1
enabled=1
File ocidomain:
oci.oraclecloud.comFile ociregion:
.us-ashburn-1File region:
.us-ashburn-1Note: These files were copied from an OCI instance running OL9, from paths /etc/yum.repos.d/oci-included-ol9.repo and /etc/yum/vars/*. If you are building the image on an OCI instance, you can copy the files from your instance. Also, please note that in this example, the required binaries are only available from the OCI network—so you should use an OCI instance when working with OCIFS, you could also follow the steps described in the ocifs repository.
The image definition used for the container:
Dockerfile
FROM oraclelinux:9-slim
COPY oci-included-ol9.repo /etc/yum.repos.d/
COPY ocidomain ociregion region /etc/yum/vars/
RUN microdnf install ocifs && \
    microdnf clean all
ENTRYPOINT ["/bin/ocifs"]
Note: Build and push this image to your OCI registry for use in your tenancy, this image will be used later for initContainer definition.
Deployment
Using principal authentication in Kubernetes
For OCI Object Storage and OCI Container Registry authentication, several options are available. In this example, Instance Principal Authentication is used to demonstrate how they seamlessly integrate together in OCI.
The blog assumes the OKE cluster is already provisioned, tag namespaces should also be defined and assigned to OKE cluster and nodes, all within a compartment.
In addition, a dynamic group and a set of policies in IAM are required (but take into consideration the policies and dynamic groups could be adapted to different scenarios).
The dynamic group was defined using tag and compartment based definition as follows:
# my-dyngroup-oke
# Description: Dynamic group to manage access for OKE nodes in compartment abc
# Matching rule:

all { tag.my-namespace.my-tag.value='my tag value', instance.compartment.id='ocid1.compartment.oc1..<unique ID>' }
For more informaton about dynamic groups refer to the page: Creating a Dynamic Group.
Policies to grant access to the object storage service and grant access to pull images from private container repositories:
Allow dynamic-group my-dyngroup-oke to use objects in compartment my-compartment
Allow dynamic-group my-dyngroup-oke to read repos in compartment my-compartment
For more information on policies please refer to pages: Policies to Control Repository Access and Policies for Object Storage.
Finally, the minimal YAML for the demo application is applied in kubernetes:
$ kubectl apply -f app.yaml
---
apiVersion: apps/v1
kind: Deployment
metadata:
  name: myapp
  labels:
    app: myapp
spec:
  replicas: 1
  selector:
    matchLabels:
      app: myapp
  template:
    metadata:
      labels:
        app: myapp
    spec:
      containers:
        - name: producer
          securityContext:
            privileged: true
          image: oraclelinux:10-slim
          command: ['sh', '-c', 'sleep infinity']
          volumeMounts:
            - name: myapp
              mountPath: /mnt/bucket
              mountPropagation: "Bidirectional"
      initContainers:
        - name: ocifs
          image: <my region, e.g.: us-ashburn-1.ocir.io>/<tenancy>/<registry-path>/ocifs:latest
          restartPolicy: Always
          args: ['-f', '--auth=instance_principal', 'oci-bucket', '/mnt/bucket']
          securityContext:
            privileged: true
          volumeMounts:
            - name: oci-bucket
              mountPath: /mnt/bucket
              mountPropagation: "Bidirectional"
      volumes:
        - name: oci-bucket
          emptyDir: {}
Replace placeholders with your actual configuration values. For example purposes, sleep infinity command was used, the respective image and command should be used instead.
Additionally, note an extra requirement to mount a bucket using this method: some OCIFS mount options require extra configuration at the node level in /etc/fuse.conf. For example, if you want to use the allow_other option, you need to uncomment the user_allow_other line in the configuration file on the node where your application will run. If you use a different tool, ensure you review and enable any necessary options in fuse.conf as well.
$ kubectl get pods
NAME                     READY   STATUS    RESTARTS   AGE
myapp-57db96b5bf-9mzj2   2/2     Running   0          14s


$ kubectl describe pod myapp-57db96b5bf-9mzj2
Name:                 myapp-57db96b5bf-9mzj2
Namespace:            default
...

Init Containers:
  ocifs:
    ...
    Args:
      -f
      --auth=instance_principal
      oci-bucket
      /mnt/bucket
    State:          Running
      Started:      Wed, 17 Dec 2025 16:11:14 +0000
    Ready:          True
    ...
    Mounts:
      /mnt/bucket from oci-bucket (rw)
    ...
Containers:
  producer:
    ...
    Command:
      sh
      -c
      sleep infinity
    State:          Running
      Started:      Wed, 17 Dec 2025 16:11:18 +0000
    Ready:          True
    ...
    Mounts:
      /mnt/bucket from oci-bucket (rw)
      ...
Conditions:
  ...
Volumes:
  oci-bucket:
    Type:       EmptyDir (a temporary directory that shares a pods lifetime)
    Medium:
    SizeLimit:  <unset>

Events:
  Type    Reason     Age   From               Message
  ----    ------     ----  ----               -------
  Normal  Scheduled  94s   default-scheduler  Successfully assigned default/myapp-57db96b5bf-9mzj2 to 100.100.239.57
  Normal  Pulling    93s   kubelet            Pulling image "us-ashburn-1.ocir.io/<namespace>/ocifs:latest"
  Normal  Pulled     86s   kubelet            Successfully pulled image "us-ashburn-1.ocir.io/<namespace>/ocifs:latest" in 7.051s
  Normal  Created    86s   kubelet            Created container: ocifs
  Normal  Started    86s   kubelet            Started container ocifs
  Normal  Pulling    85s   kubelet            Pulling image "us-ashburn-1.ocir.io/<namespace>/oraclelinux:10-slim"
  Normal  Pulled     82s   kubelet            Successfully pulled image "us-ashburn-1.ocir.io/<namespace>/oraclelinux:10-slim" in 2.641s (2.641s including waiting). Image size: 95233477 bytes.
  Normal  Created    82s   kubelet            Created container: producer
  Normal  Started    82s   kubelet            Started container producer
To verify the mount, SSH into the node running your application and check that the mount is present:
# ssh opc@<my-node-ip>
[opc@oke-node-1 ~]$ mount -v
...
oci-bucket on /var/lib/kubelet/pods/6d6154e1-1a1a-45be-810d-95e3ec4cb72c/volumes/kubernetes.io~empty-dir/oci-bucket type fuse.ocifs (rw,nosuid,nodev,relatime,user_id=0,group_id=0,default_permissions)
...
Or you can validate creating a simple file in your application mount:
$ kubectl exec -it myapp-57db96b5bf-9mzj2 -c producer -- bash

bash-5.2# ls /mnt
bucket
bash-5.2# cd /mnt/bucket/
bash-5.2# echo "hello world" > hello.txt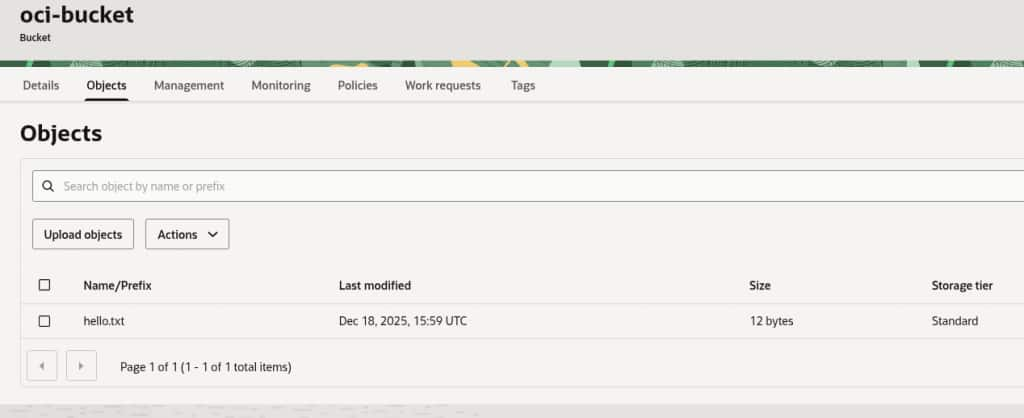
Important notes
- Ensure that the oci-bucket mount target and paths are consistent across both containers.
- The OCIFS init container runs before the main application and mounts the bucket to the shared volume, making it accessible immediately to the application.
- OCIFS supports multiple types of authentication, this blog uses Instance Principal Authentication as Secret Key usage has been demonstrated in other blogs, but use the authentication method that better suits your needs.
- The example deployment uses
privileged: truein thesecurityContextsection of the pod specification to enable OCIFS to mount the Object Storage bucket. Running containers in privileged mode grants them elevated permissions on the host, which can introduce security risks. Before using privileged containers in production, review your organization’s security policies and Oracle’s cloud security guidelines to ensure compliance and minimize risk.
Troubleshooting
- Mount Errors: If the OCIFS init container fails, run
kubectl logs <pod> -c ocifsto inspect detailed logs, you can also increase debug verbosity customizing the arguments used to launch the container as per the documentation of OCIFS with"--debug=all", not that multiple levels are available, also, take a look at the page OCIFS Known Issues for more information in specific problems.
Example using --debug=all option for OCIFS deployment:
$ kubectl logs -f myapp-57db96b5bf-9mzj2 -c ocifs  # View logs for the OCIFS init container

*   Trying 169.254.169.254:80...
* Connected to 169.254.169.254 (169.254.169.254) port 80 (#0)
> GET /opc/v2/instance/region HTTP/1.1
Host: 169.254.169.254
Accept: */*
Date: Wed, 17 Dec 2025 16:14:35 GMT
User-Agent: OCIFS/1.2.0-6
Authorization: Bearer Oracle
...- Access Denied while mounting the bucket: Double-check dynamic group membership, IAM policies, and network security rules.
- File Not Found: Confirm the bucket name and path are correct and that the init and main containers are mounting the same shared volume and are in Running state.
Looking forward
As cloud-native adoption continues to grow and data-driven workloads become increasingly common, securely and natively integrating object storage into Kubernetes workloads remains a key area of innovation and interest. The use of OCIFS for mounting OCI Object Storage inside Kubernetes clusters offers flexibility and simplicity today, but there are several developments on the horizon worth monitoring (see ocifs for more information and oci-cloud-controller-manager to see available OKE controllers). It’s important to continuously assess emerging tools, cloud features, security recommendations and architectural practices. Staying informed and adaptable will ensure your workloads remain secure and performant.
References
For more information, see the following resources: