Oracle Integration Prebuilt Solutions (Accelerators and recipes) are pre-assembled automation solutions built on top of rich Oracle Integration business process automation toolkit. These business automation solutions can be delivered seamlessly through the Oracle Integration store for easy customer access right from the Oracle Integration home page. The prebuilt solutions presents tremendous opportunity for the global vendors to demonstrate their USP through automated solutions in the enterprise market. As an example, for an ISV it is all about expanding their customer reach by demonstrating their business solution play with the Oracle and non-Oracle SaaS applications through the prebuilt solutions. At the same time, for the global solution implementor (GSI) it is all about demonstrating their skill & knowledge in the space of business process automation through the prebuilt solutions. To learn more about the business opportunity please refer to my previous blog on Accelerate your business with Oracle Integration Prebuilt Program. I hope you are excited to publish the prebuilt solution, so let’s now dive into the details on how to publish the prebuilt solution.
Let’s first talk about the pre-requisites for publishing the prebuilt solutions.
- Reach out to Oracle support to enable producer feature flag (oic.intg.accelerator.producer) and staging feature flag (oic.common.enable.staging-accelerators)
- Learn more about the Oracle Integration prebuilt solutions BARTA standards
- Familiarise yourself with Oracle Integration Project
Before we delve into the details, let’s take a look at the high-level process you can use to publish the prebuilt solution on the Oracle Integration store.
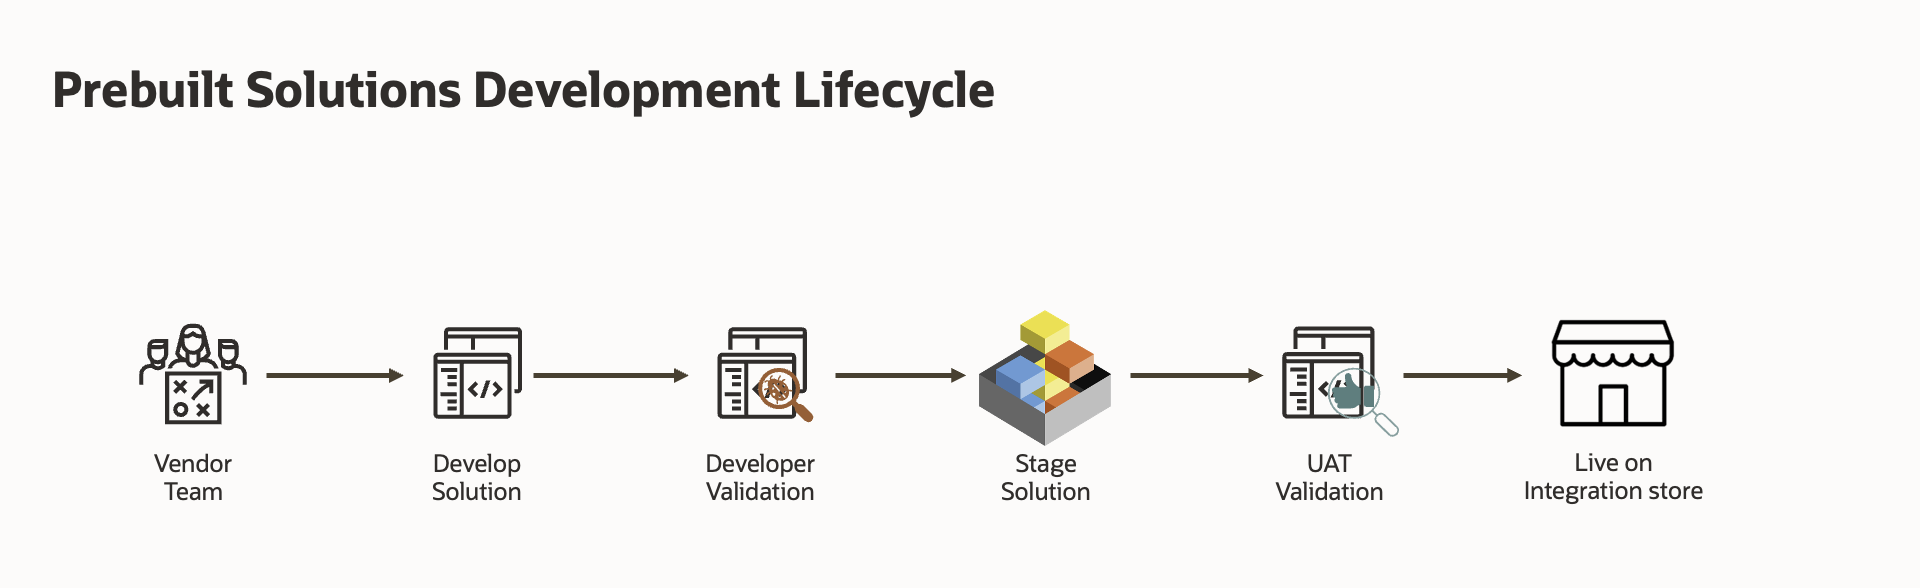
Step 1 (Develop solution)
Let’s talk about how one can go about developing a prebuilt solution, the first key step is to start with the Oracle Integration project. Oracle Integration project offers an intuitive user interface that places all the prebuilt solution components that you need in a single container, called as project. There, you design, manage, define deployment and observe related components. A project provides tons of innovations and improvements resulting into a streamlined development & deployment process for your prebuilt solutions, to learn more about the Oracle Integration projects go here.
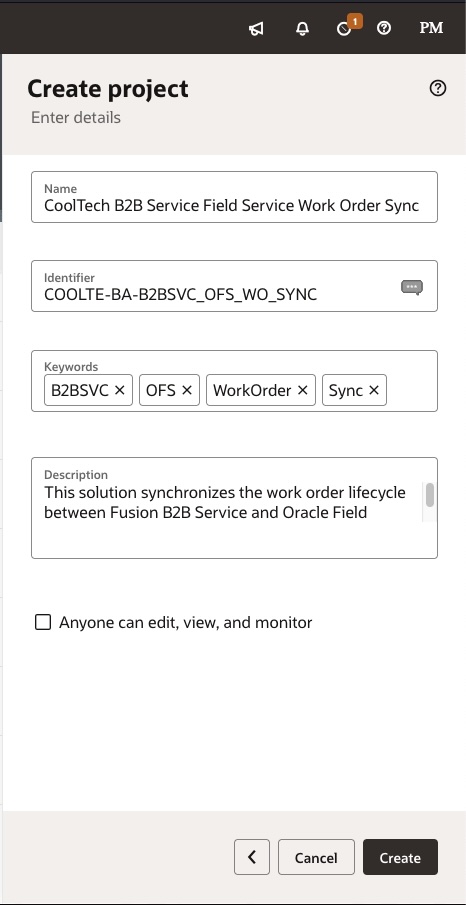
Let’s start by creating a new project, but before that please take note we have a naming standards to follow for the Oracle Integration project for it to qualify as a prebuilt solution. I have listed the naming standards for the project below, please refer to the BARTA standards documented shared above for a complete naming standards & coding best practices of the prebuilt solutions.
| Resource | Attribute | Value |
|---|---|---|
| Project | Name | “<Vendor Name> <Source Service> <Target Service> <BusinessSolutionName>” |
| Project | Value | Syntax: Example: |
This is how your create project dialog will look like for the prebuilt solution between Oracle B2B Service and Field Service for the work order sync by a Vendor named “CoolTech”.
Now that you have created the project, you can start developing your prebuilt solution by adding connections, integrations, lookups, etc. as required for your business process automation solution. Integration developer can leverage rich, secure & diverse prebuilt adapters library to connect with the endpoint of their choice. Once you are connected to the endpoints of your choice you can leverage the robust orchestration capabilities to design your solution. As solution is getting built you can always perform developer testing of the solution to make sure your solution is working as desired / meeting your customers business needs.
Step 2 (Bundle Prebuilt Solution)
Now that you have developed and tested your automation solution on the Oracle Integration, and you would like to proceed with preparing to publish the prebuilt solution. The next important step is to define the deployment, Oracle Integration project deployment becomes the basis for delivering the solution. This is where you define which all integrations you want to ship, which version you want to ship, which version of integrations work as a pack, this enables you as a producer to make sure your solution works as expected on the consumer environment, you can refer to the documentation link to learn more about the Oracle Integration project deployments.
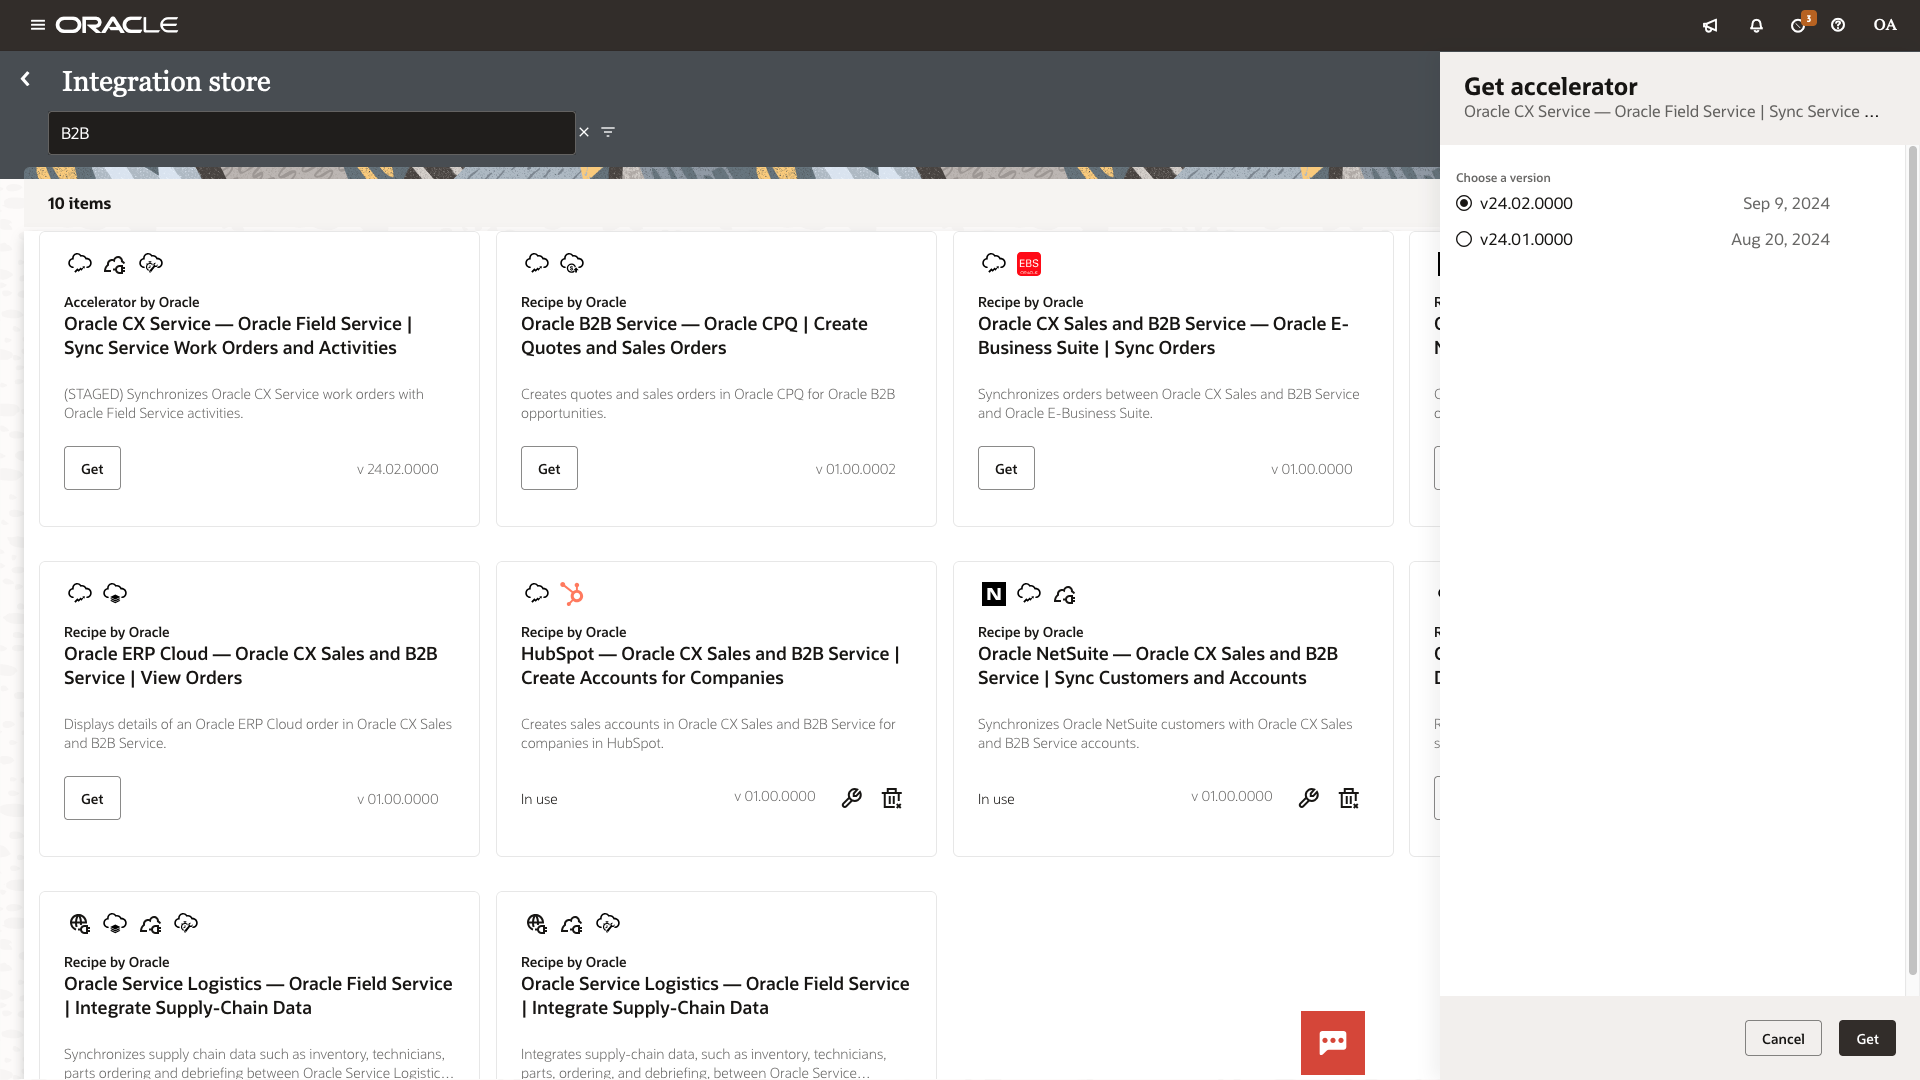
Let’s take an example to better understand the relationship between a prebuilt solution and the Oracle Integration project deployment, to start go to the Oracle Integration home page and install any recipe from the store, Oracle Integration team has migrated all the package based recipes to the Oracle Integration project so that customers can leverage the innovation available through the project. As an example I am going to install one of the accelerator shipped by the Oracle SaaS team i.e. “Oracle CX Service — Oracle Field Service | Sync Service Work Orders and Activities“. As you click on the “Get” button, you can see the delivered versions of an accelerator on the side panel. Let’s install the desired version of the accelerator by selecting version radio button and clicking on the “Get” button.
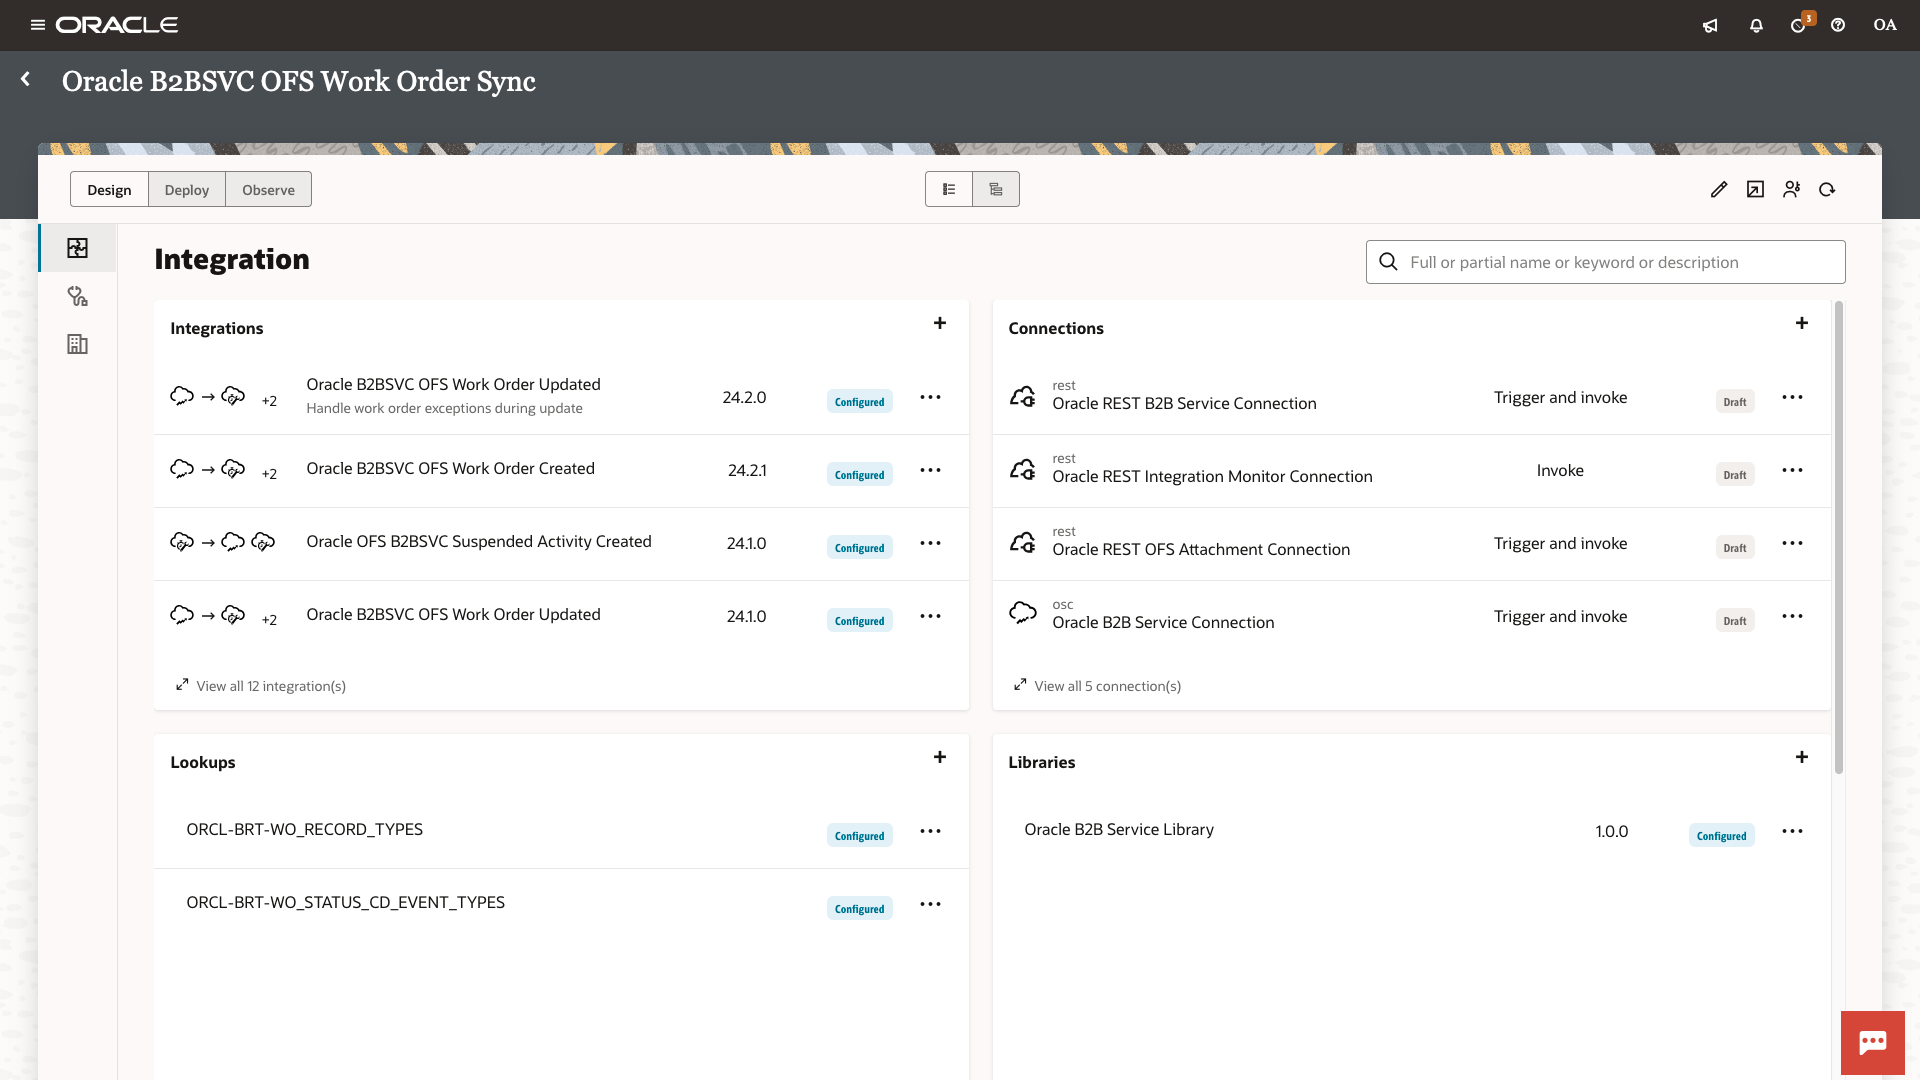
As solution gets installed, you can access the solution from the Projects menu. As you open the project you will see all the resources (integrations, connections, lookups, etc.) required for the prebuilt solution are found in one place.
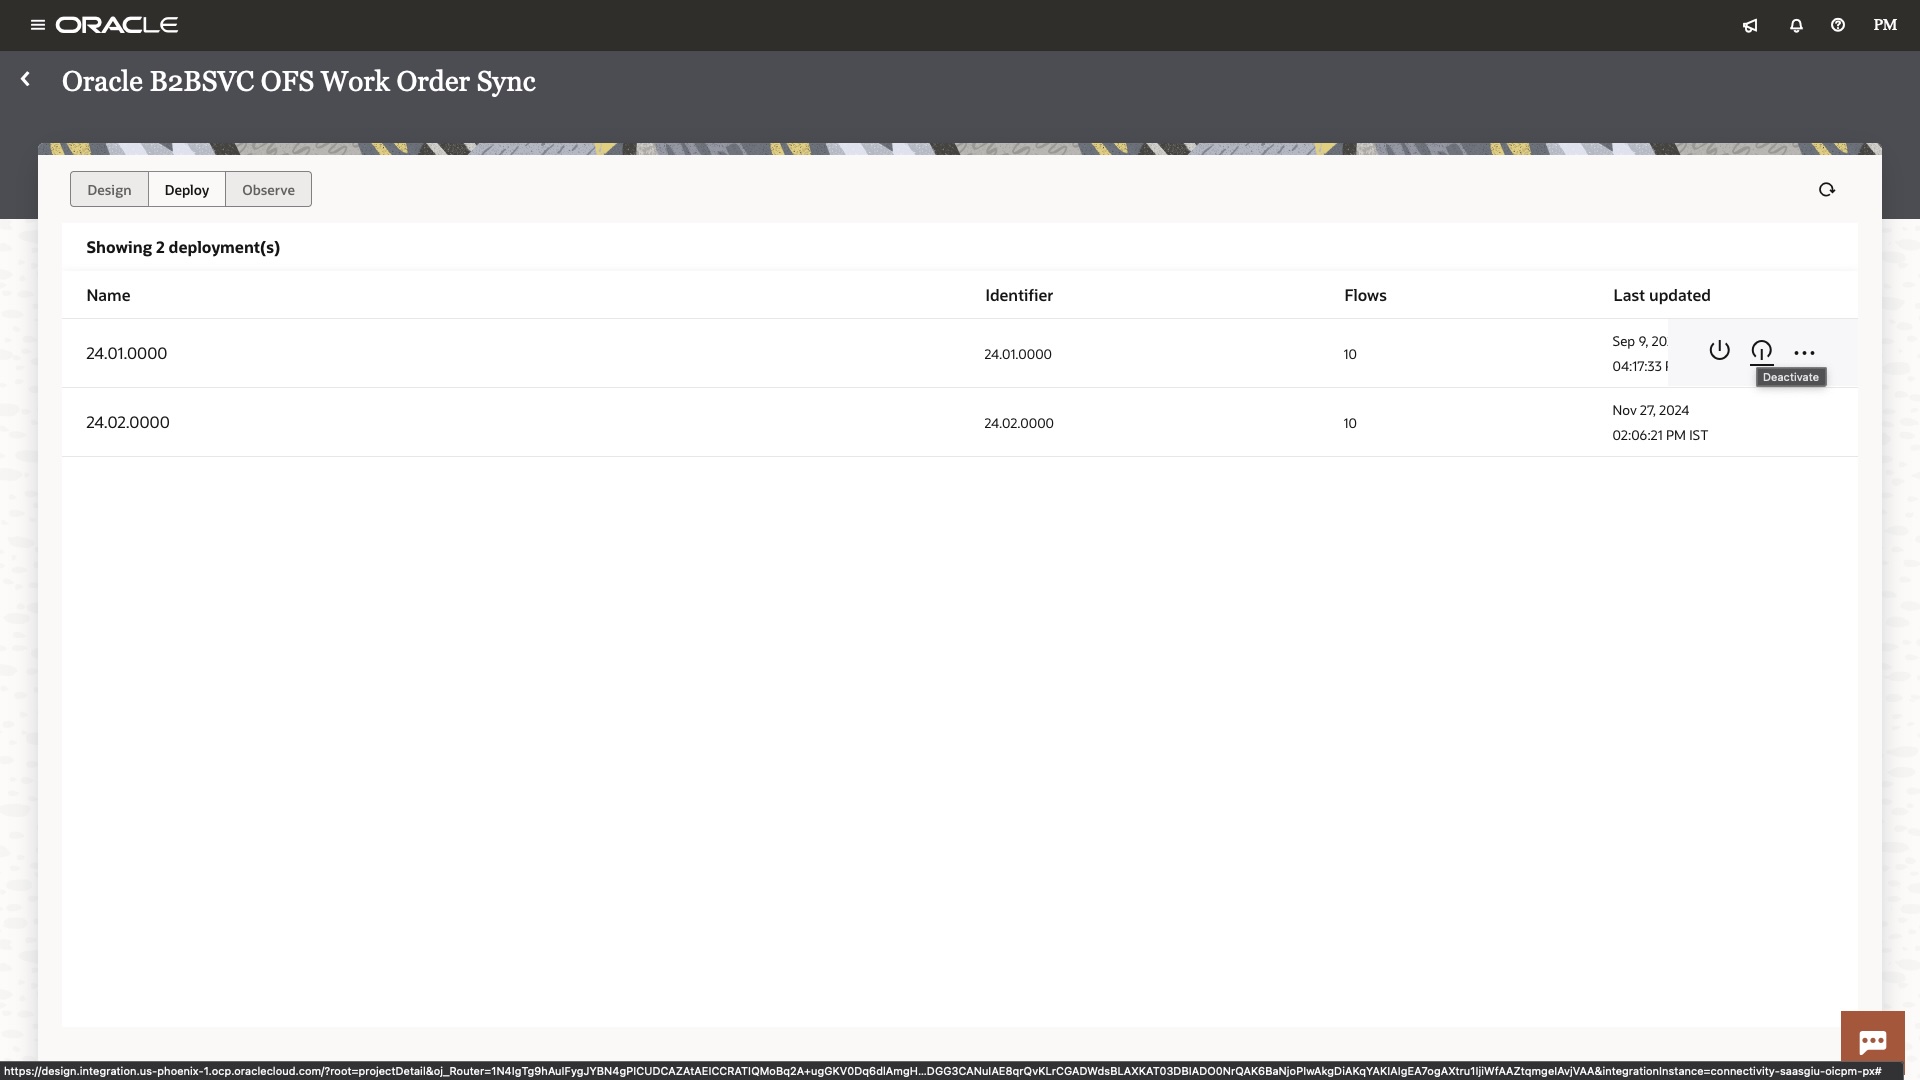
Now let’s go to the Deploy section to understand how this prebuilt solution was bundled and delivered through the Oracle Integration store.

As you can see from the above there are two deployments in the project. This is because I have installed two versions of the prebuilt solution viz. 24.01 and 24.02 If you click on the deployment you will see the integration versions which are part of the deployment, this enables the producer to select or predefine or package the group of artefacts that constitute the prebuilt solution version.
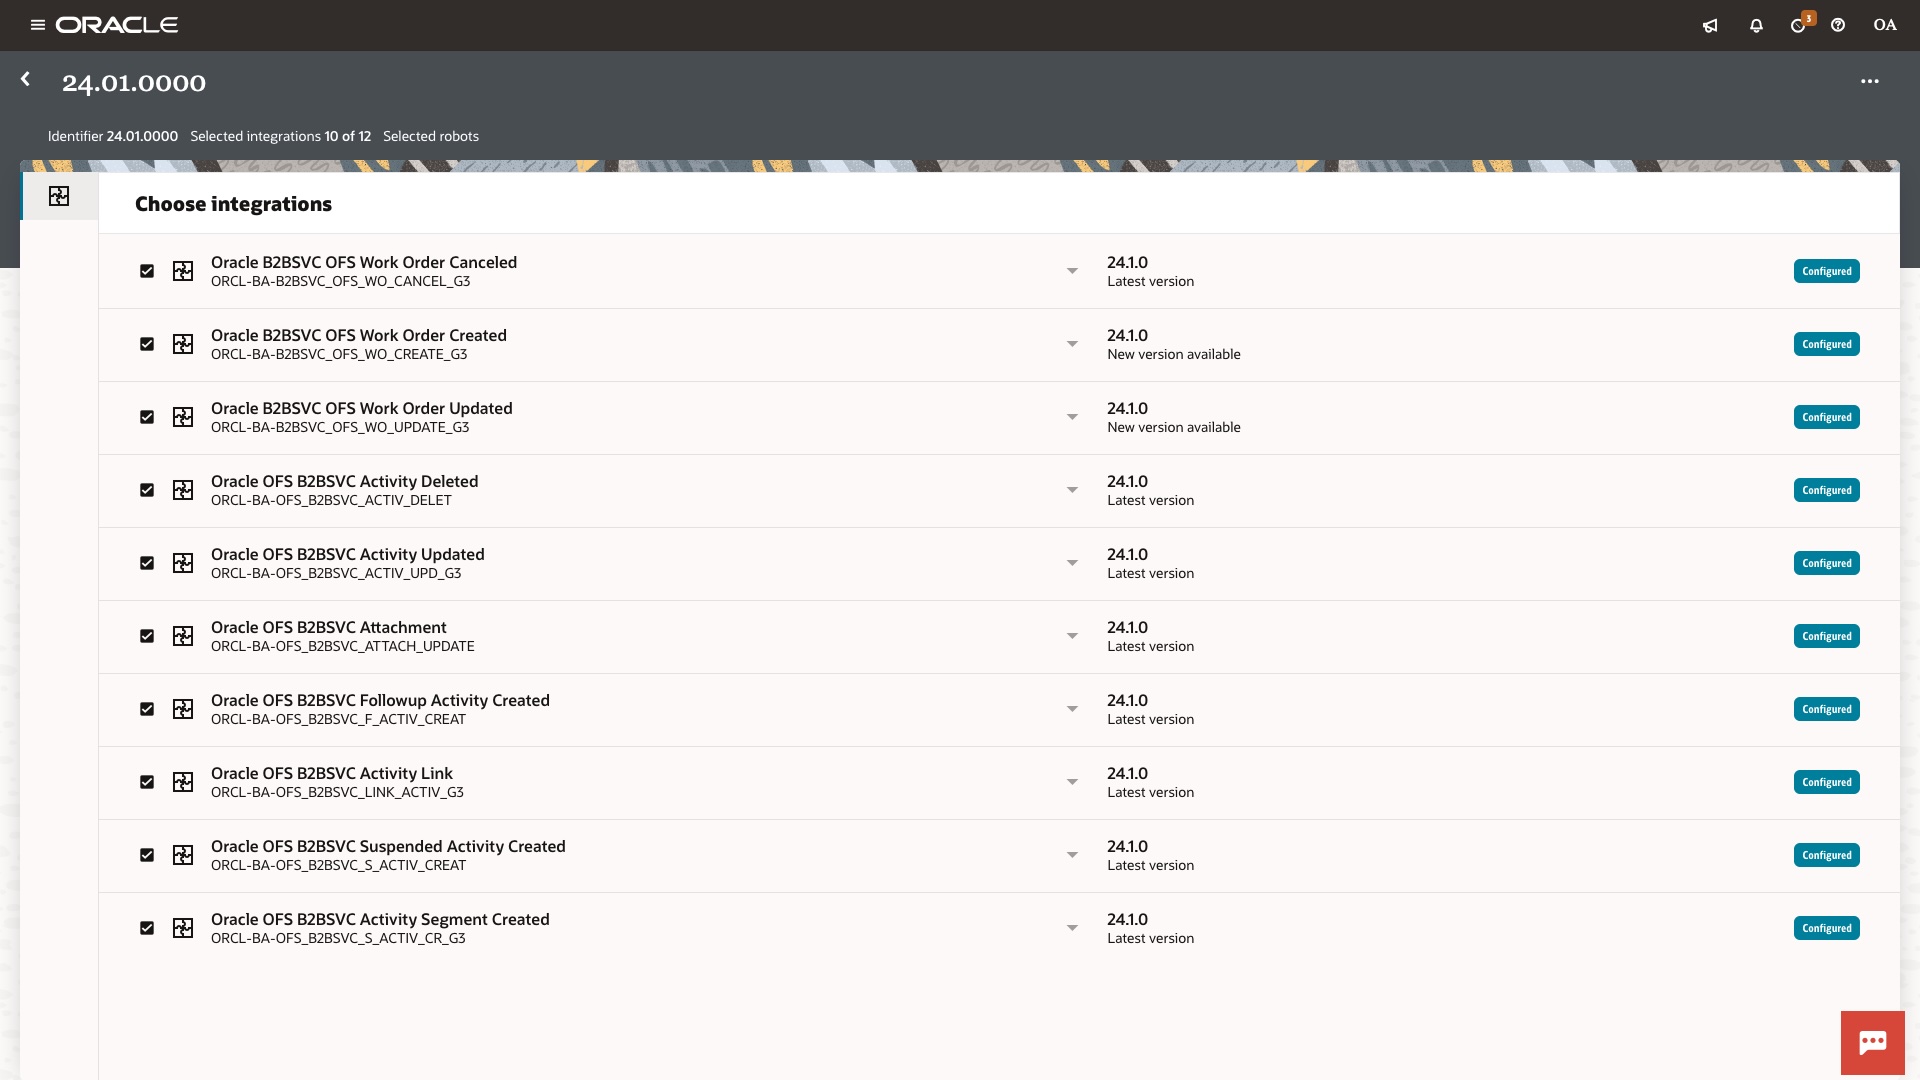

As you can see from above both versions 24.01 and 24.02 of the prebuilt solution constituted 10 integrations however 24.02 includes latest version of the Oracle B2BSVC OFS Work Order Created flow. Oracle Integration project deployment enables producer to deliver the multiple versions of the prebuilt solution with flexibility and confidence. Here are some key points to note for the Oracle Integration project deployment and prebuilt solutions:
- Prebuilt solution version has one to one relationship with the Oracle Integration project deployment
- Oracle Integration project deployment name is what consumer shall see on the integration store as a version
- Customer can activate or deactivate a prebuilt solution version by activating or deactivating the deployment
I hope you got the idea about relationship between Oracle Integration project and prebuilt solution version, you would use the Oracle Integration project deployment to bundle your prebuilt solution. As you have defined the deployment you are done with bundling the prebuilt solution, lets now move to staging the prebuilt solution.
Step 3 (Stage Prebuilt Solution)
Let’s now talk about staging the prebuilt solution, by staging we mean publishing the solution to the Oracle Integration store in a staging mode so that as a producer you can go through the user acceptance testing of the solution before you go live with your solution. The first step for staging the solution is exporting your solution as a recipe of accelerator from the Oracle Integration project. Let’s go to your solution Oracle Integration project, click on export icon on the top right panel of the project screen.
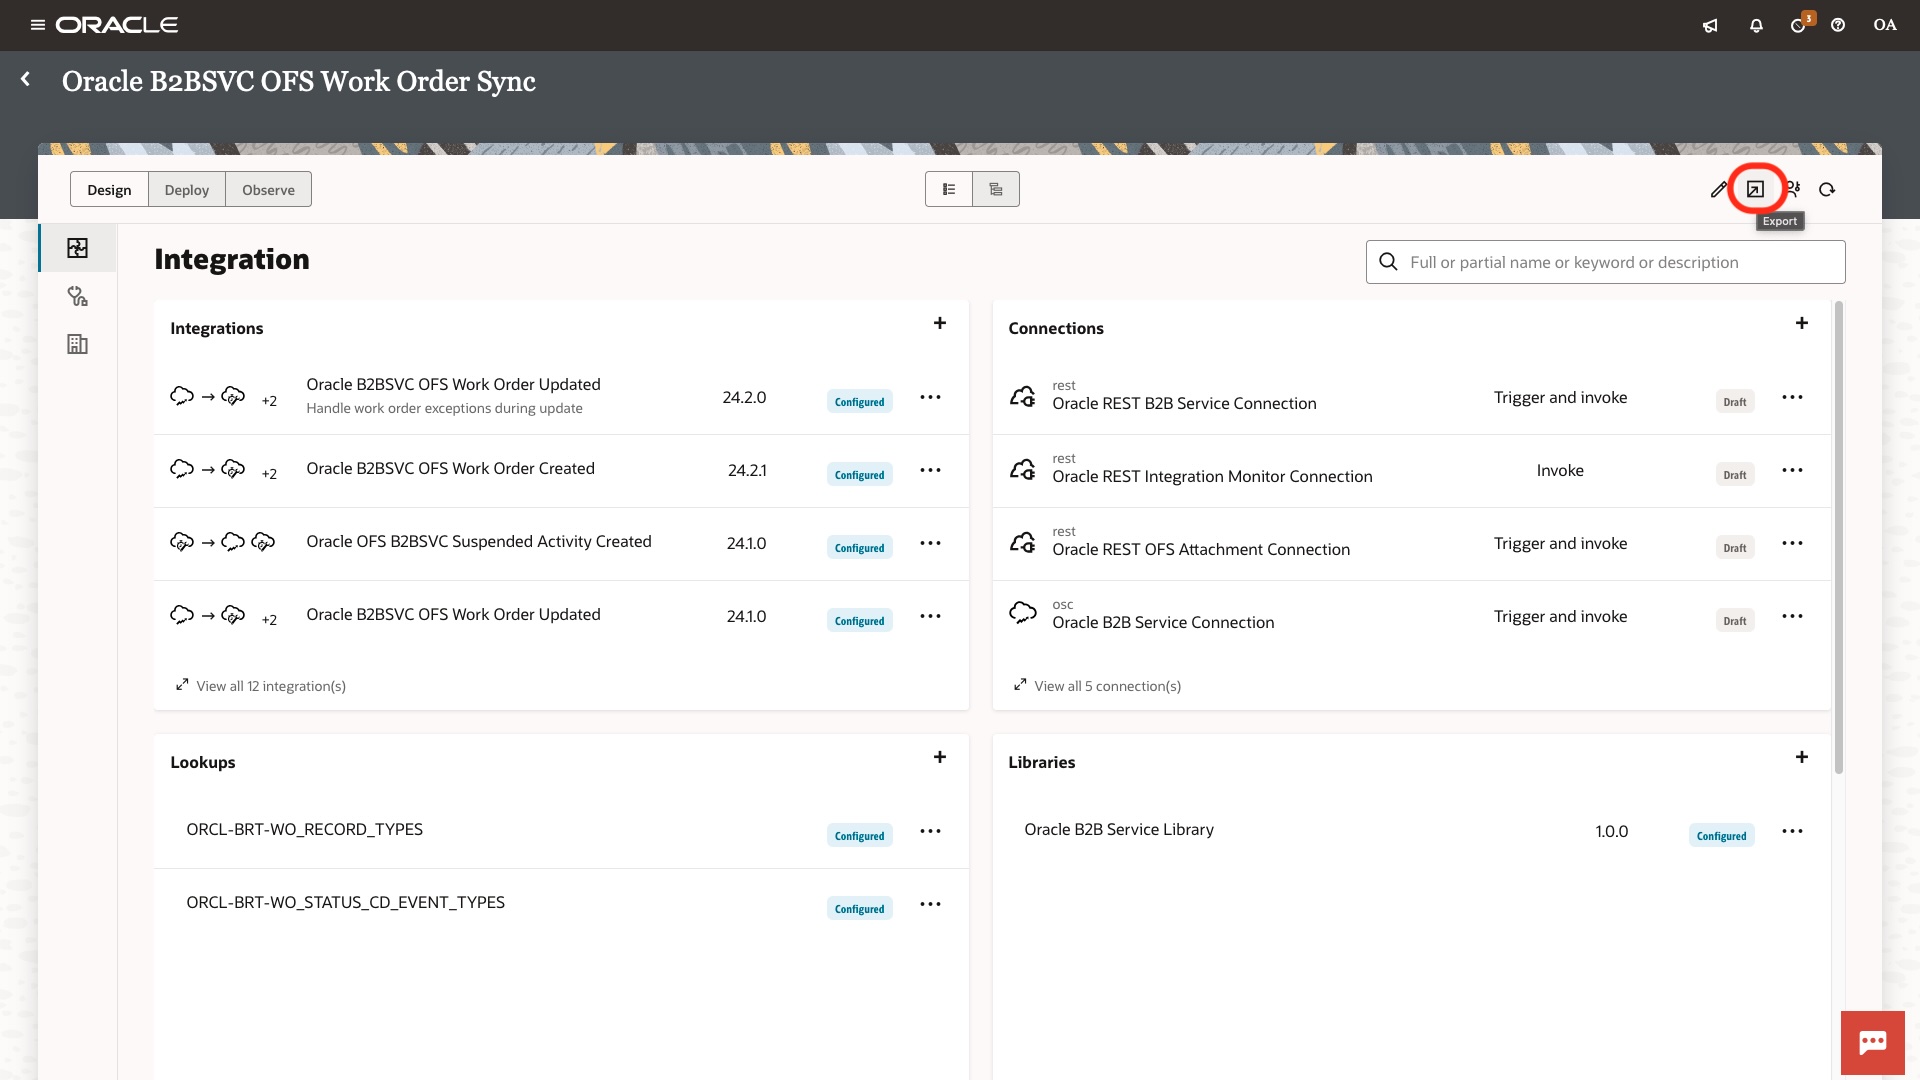
As you click on the export, you will be prompted with the following side panel.
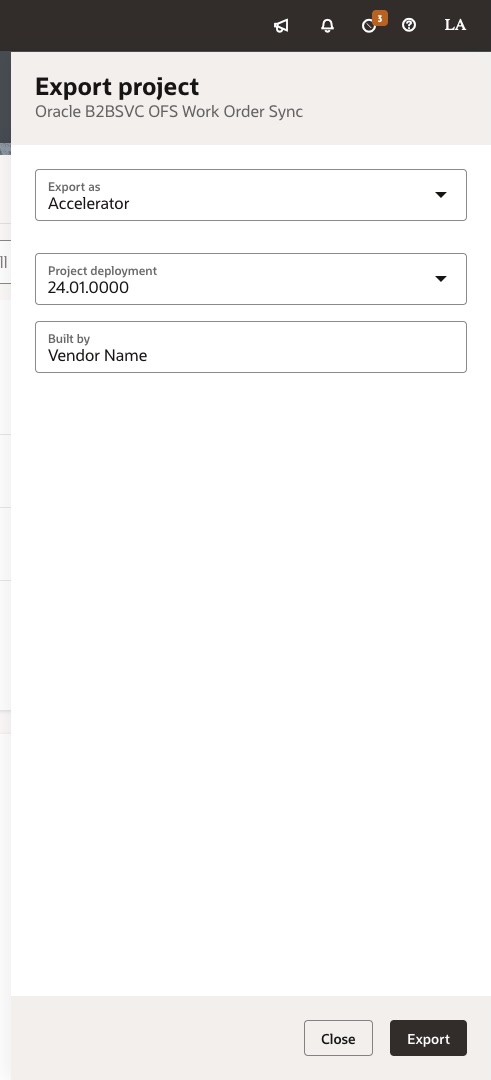
You need to select / enter following information as you export your solution:
- Select export as a “Recipe” or “Accelerator” as per your prebuilt solution type
- Select Project deployment from the available deployments
- Enter your brand name in the Built by Field.
As you click on the “Export” button, Oracle Integration shall export the solution in a .car file, you need to share the file along with the below information to stage a prebuilt solution.
| Attribute | Value |
|---|---|
| Name of the prebuilt solution |
Name of the prebuilt solution adhering to the naming standards as documented in BARTA standards |
| Description of the prebuilt solution |
Description of the prebuilt solution adhering to the naming standards as documented in BARTA standards |
| Documentation Link |
This can be a generic portal URL for staging, however for solution to go live this needs to be a proper page where consumers / customers can learn about how to use the prebuilt solution. |
| Keywords |
This can be a comma separated values of keywords by which you want users to search for the prebuilt solution. As an example order synchronisation solution between ERP and Shopify can have keywords like Oracle ERP, Shopify, Order Sync, Realtime, etc. |
| Staging OCI Region |
This can be any OCI region such as us-phoenix-1, us-ashburn-1, ap-singapore-1,ap-sydney-1, eu-frankfurt-1, etc. |
| Staging OIC instance OCID |
You can provide upto two OIC 3 instance ocid, your solution shall be staged only on these instances |
| Restricted Accelerator |
Y/N (Please note Y is only supported for the accelerators, if you are publishing recipe this value has to be N) |
| Terms of use |
Terms of use for the prebuilt solution, for staging this can be a generic text. However for publishing the solution this has to be a text reviewed by your legal team defining support SLA terms for your solution |
| Vendor support URL |
This can be a generic portal URL for staging, however for solution to go live this needs to be a support URL or a support email contact where customers can reach out to publish the solution |
Step 4 (Validate Prebuilt Solution)
As you have developed, bundled and shared the prebuilt solution artefact for staging, let’s talk about how you can perform user validation of the prebuilt solution as a consumer. This is important as it gives you an idea of how exactly your end users are going to find, install and configure the prebuilt solution. As you share the prebuilt solution car file export along with the requested information, Oracle is going to stage the solution on the requested OCI region or Oracle Integration instance as requested by the you.
Once the solution is staged, you can easily find the solution by navigating to the Integration store from the Oracle Integration home page by clicking on the “Browse store” button. On the Integration store you can easily search for your solution by typing in one of the keywords shared by you for staging the solution. As an example by typing in sales on the search box, I can see following solutions on the store.
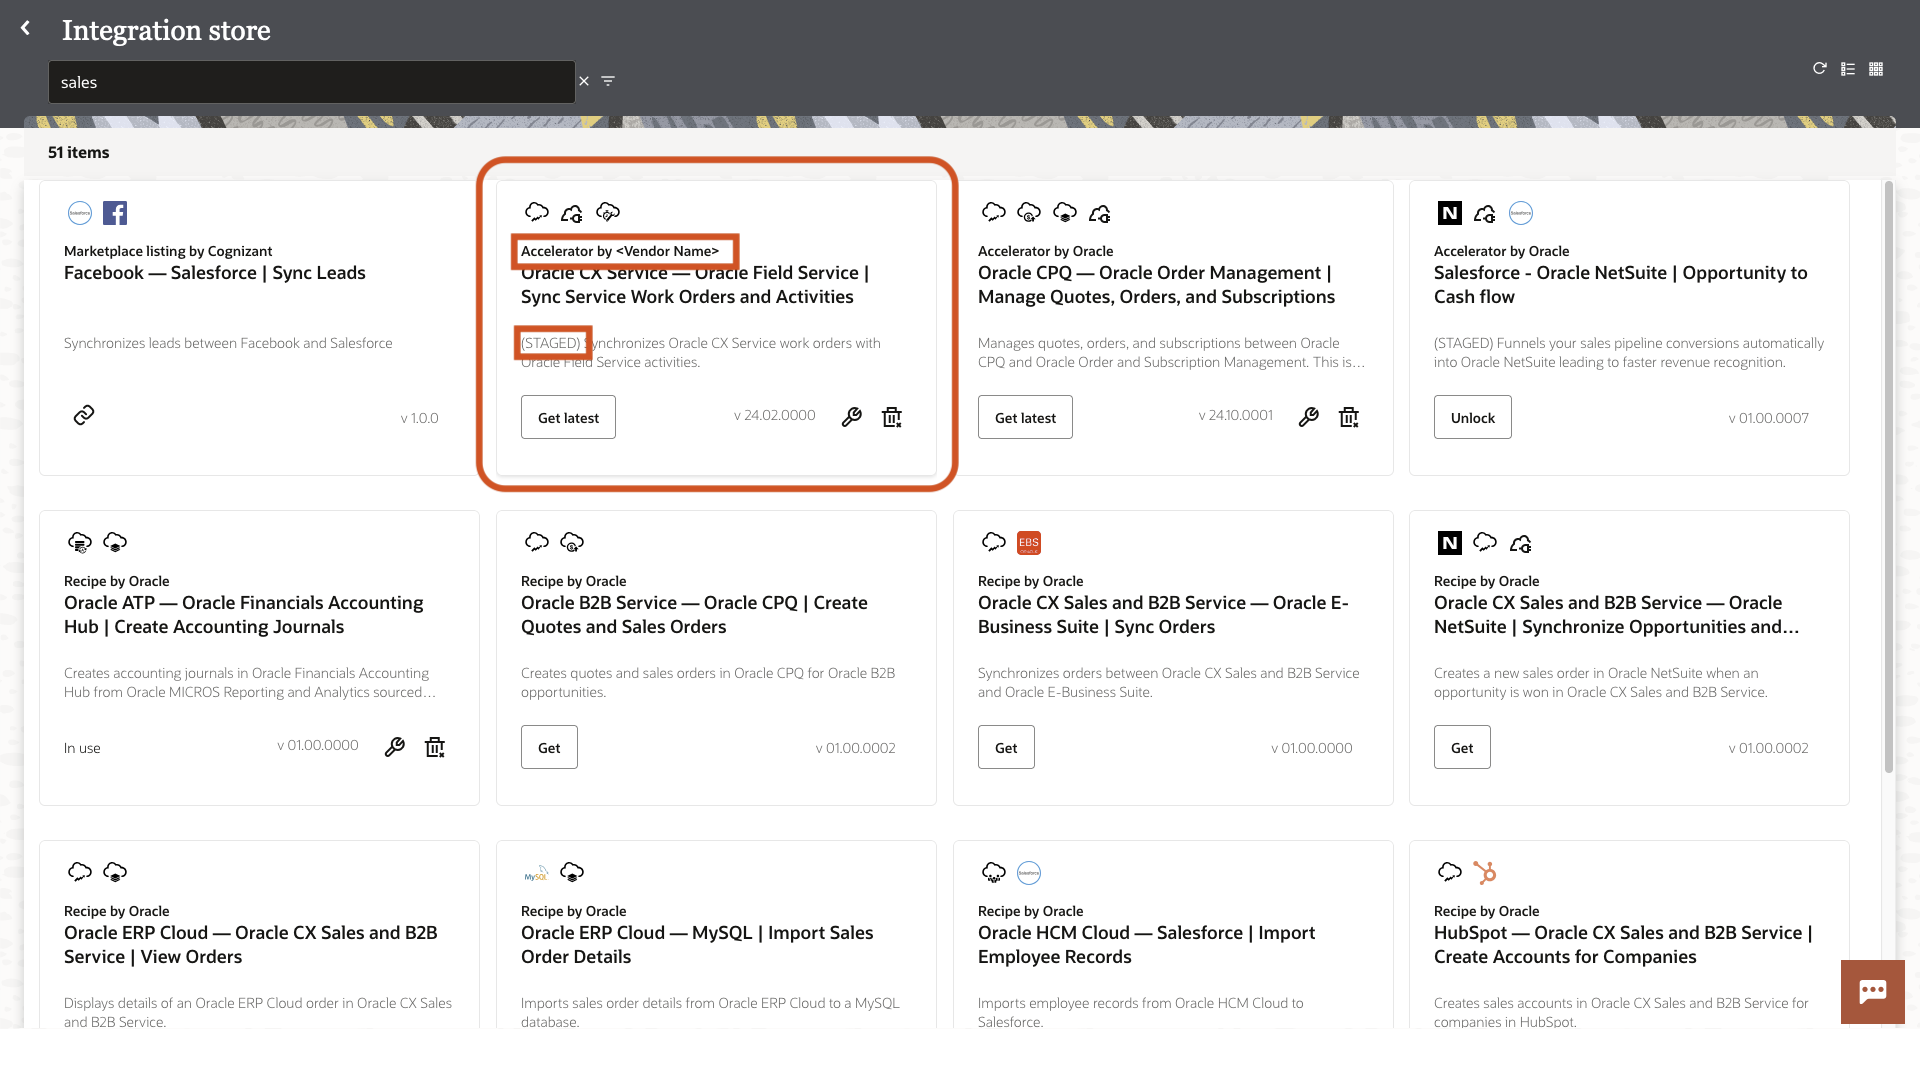
Let’s take a look at the highlighted solution for an example, this solution is staged and is denoted by a pretext of “(STAGED)” in the description and it has been published by an external Vendor likewise your solution once staged shall be visible along with the rest of solutions with your Vendor brand. if you click on the tile you will find extra information available for the accelerator as shown below.
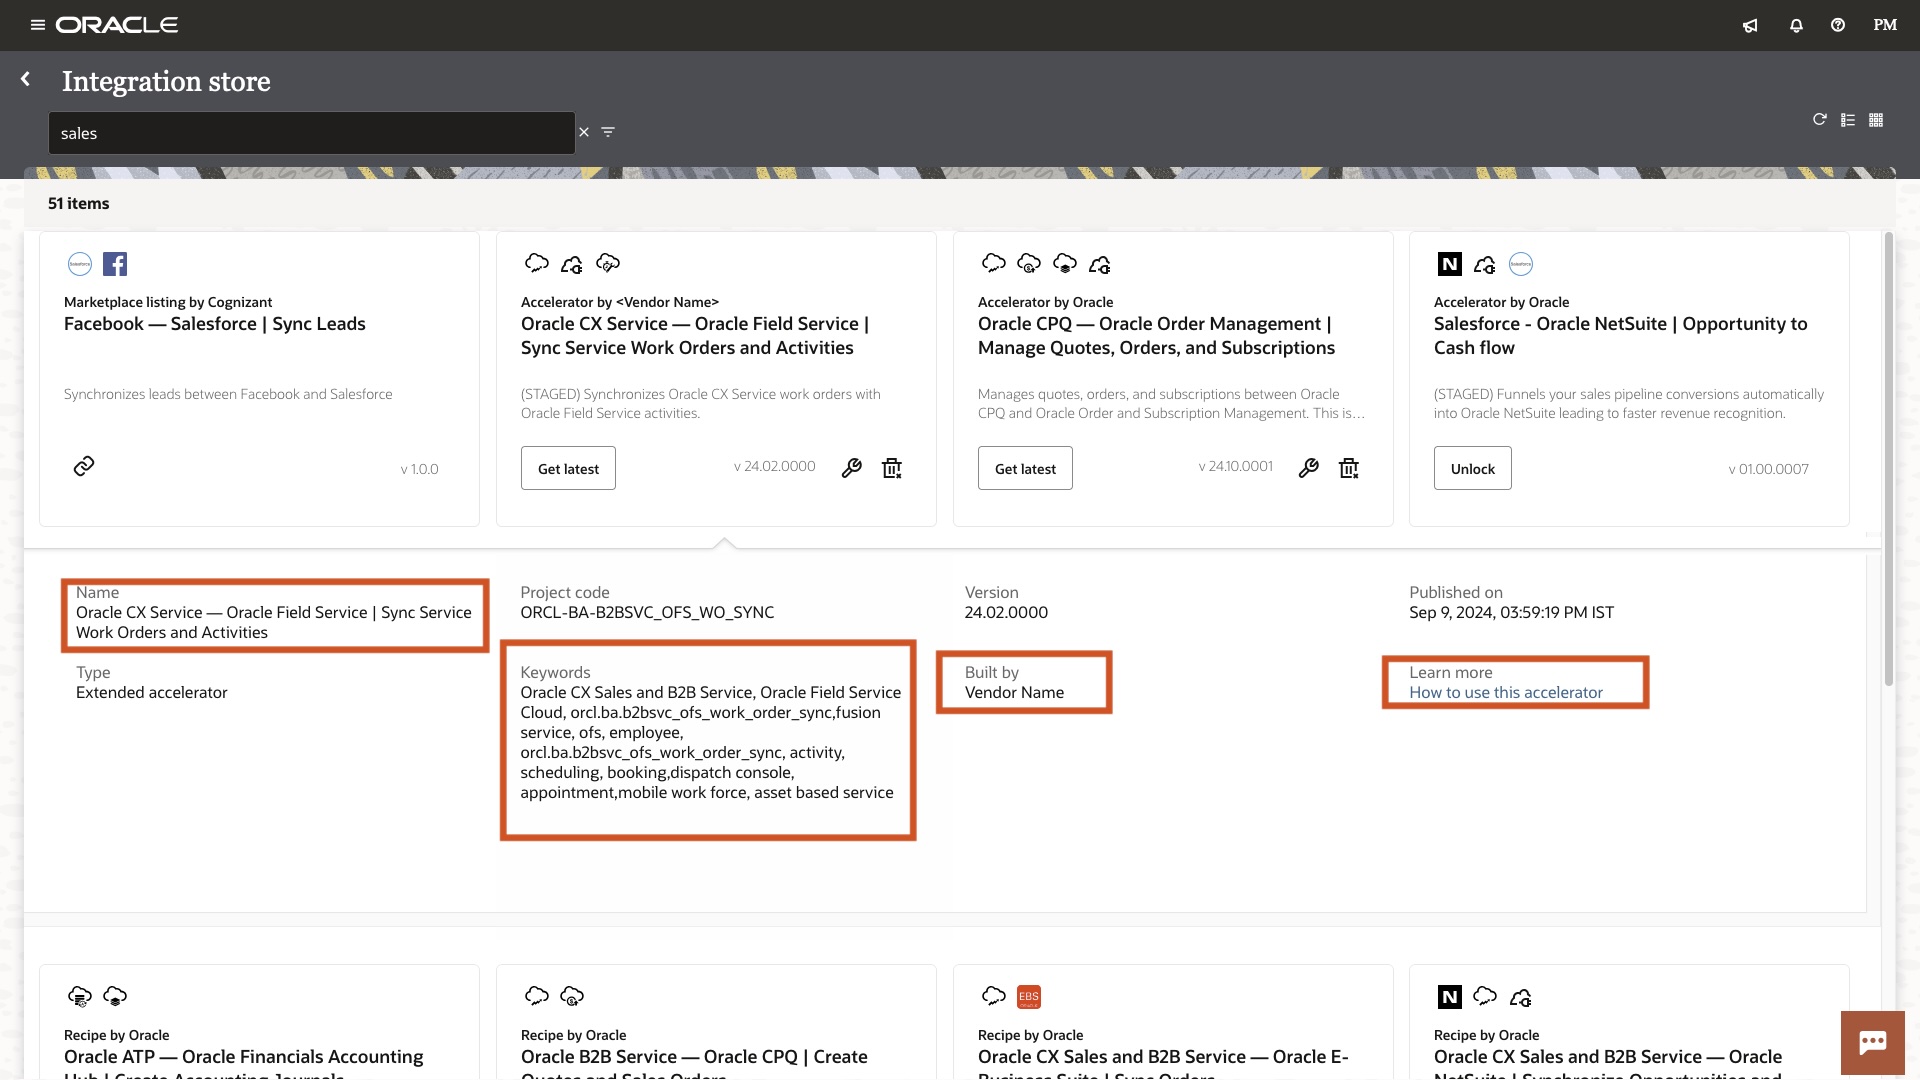
As you can see from the above expanded tile, it list the solution name, type, keywords, built by, how to use the accelerator as highlighted above. If you can recollect we collected all these information from you while staging the solution and is used by the consumer to get accustomed with the solution.
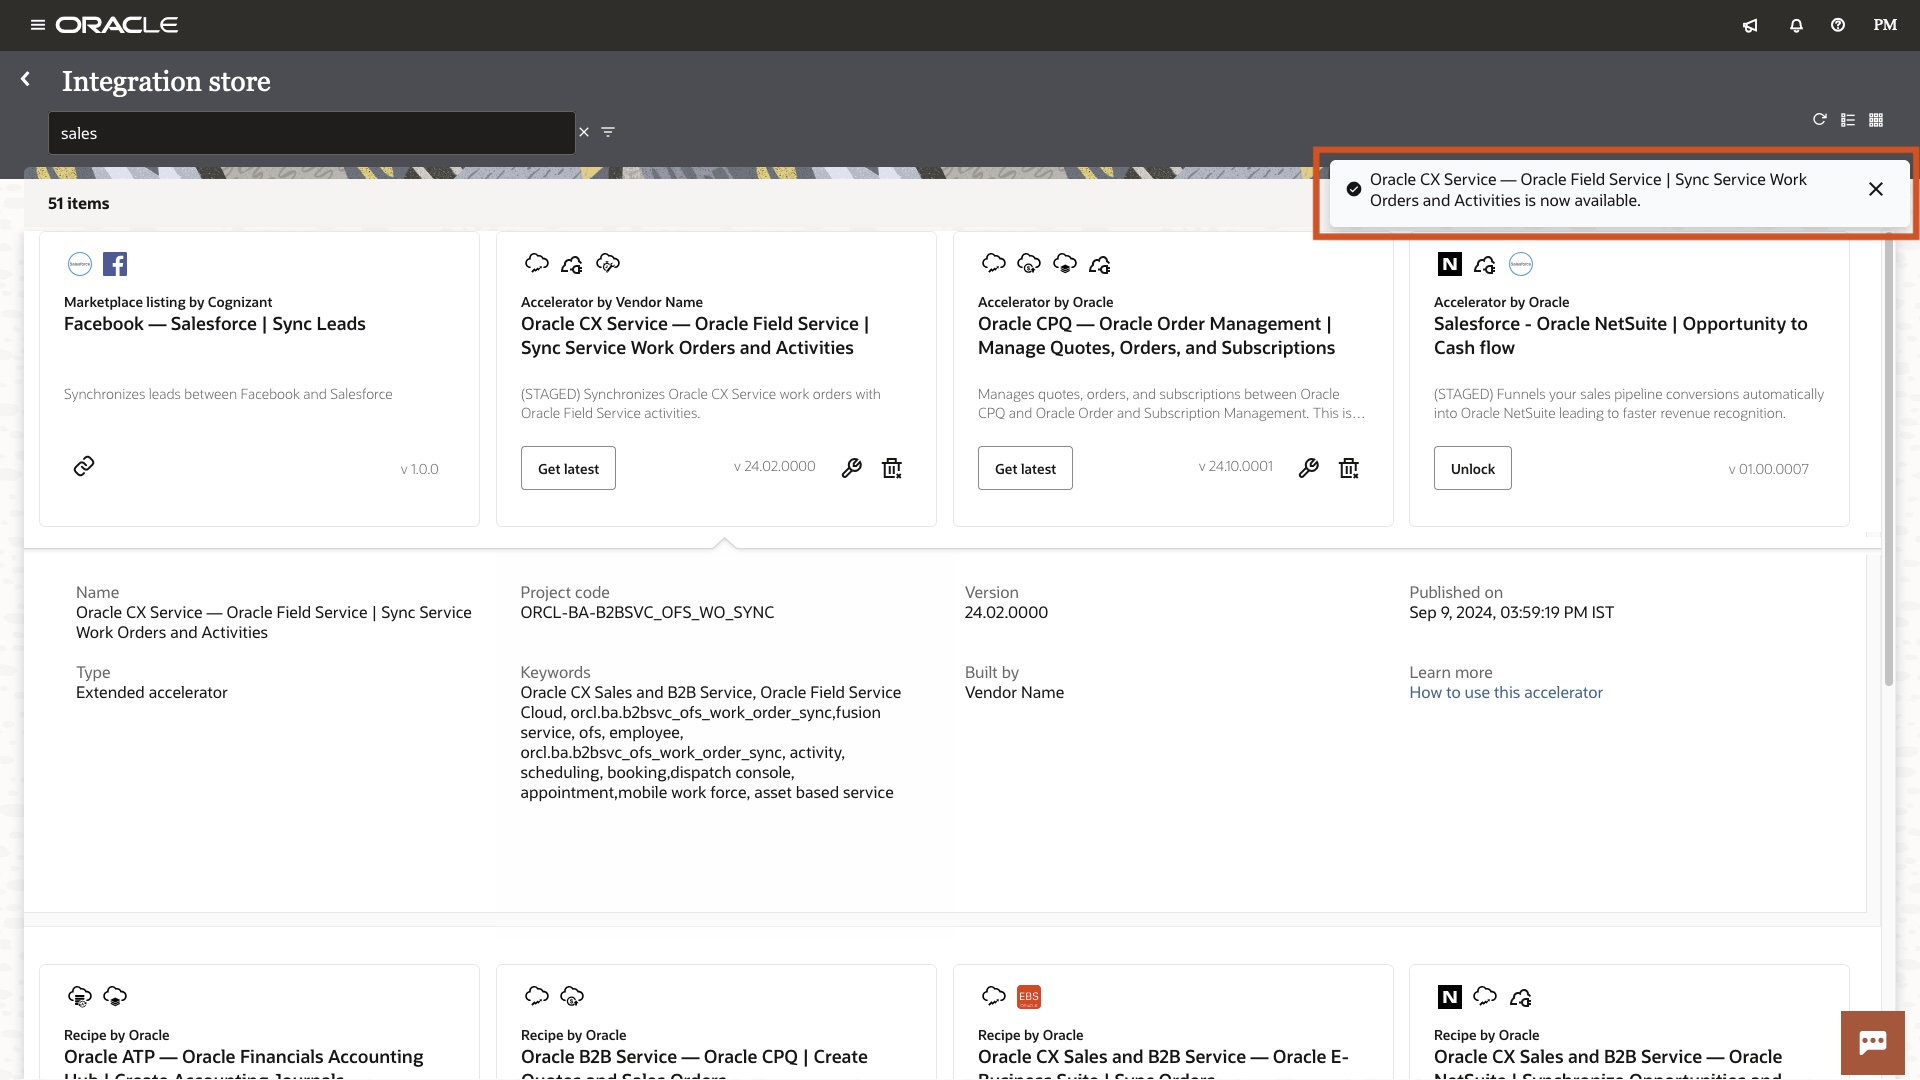
Now let’s talk about installing the solution, to install one needs to click on the “Get” or “Get latest” button as displayed on the tile. Just for a clarification the “Get” button appears when solution is not yet installed and will install the solution on the current Oracle Integration service instance. At the same time the “Get latest” button appears if solution is already installed and latest version has been published by the producer. One point to note as a producer you need to stage each version of the solution before you go live just to make sure your solution is working.

As you can see from the above, on clicking the “Get latest” in my scenario I can see the available versions of a prebuilt solution on the side panel along with the Oracle terms of use and Partner terms of use to accept before I proceed with installing or updating the prebuilt solution. As I click on the “Get” button on the side panel the prebuilt solution shall be updated or fresh installed on my service instance and I will see a notification on my Oracle Integration screen.
As you open the project you can see entire solution on a single pane, you can deactivate old version and activate new version of the solution through project deployments.
Once you have configured and activated the desired prebuilt solution, you can perform a quick validation of the prebuilt solution and acknowledge the working of a solution to the Oracle team.
Step 5 (Go Live)
As you have validated the staged solution, to go live all you need to do is share the updated code artefact (i.e. exported accelerator/recipe from the Oracle Integration project) please note this is only needed if you have made any changes. Also confirm/share the below metadata information for the prebuilt solution as requested earlier.
| Attribute | Value |
|---|---|
| Name of the prebuilt solution |
Name of the prebuilt solution adhering to the naming standards as documented in BARTA standards |
| Description of the prebuilt solution |
Description of the prebuilt solution adhering to the naming standards as documented in BARTA standards |
| Documentation Link |
This can be a generic portal URL for staging, however for solution to go live this needs to be a proper page where consumers / customers can learn about how to use the prebuilt solution. |
| Keywords |
This can be a comma separated values of keywords by which you want users to search for the prebuilt solution. As an example order synchronisation solution between ERP and Shopify can have keywords like Oracle ERP, Shopify, Order Sync, Realtime, etc. |
| Restricted Accelerator |
Y/N (Please note Y is only supported for the accelerators, if you are publishing recipe this value has to be N) |
| Terms of use |
Terms of use for the prebuilt solution, for staging this can be a generic text. However for publishing the solution this has to be a text reviewed by your legal team defining support SLA terms for your solution |
| Vendor support URL |
This can be a generic portal URL for staging, however for solution to go live this needs to be a support URL or a support email contact where customers can reach out to publish the solution |
Once you share the above information with the final artefact, the Oracle team shall push the solution to the Oracle Integration store. Once live solution shall be visible on all the regions, and on all the Oracle Integration customers service instances. Please note publishing a prebuilt solution doesn’t have any dependency on the Oracle Integration release and can be done anytime.
I hope you found the blog helpful and are looking to accelerate your business by contributing to the Oracle Integration prebuilt solutions library.