Introduction
This is the final segment of this series. It will cover how to change the communication mode between the OAM Server and WebGate to Cert.
Oracle Access Protocol (OAP) Channel
This communication mode leverages the “Transport” (TCP) network layer to route and load balance requests. This communication mode is applicable for the OAM Server 12.2.x and the certified OAM 11.1.2.3.x and Higher WebGates.
Communication Mode
| CERT |
|
| Pros |
Cons |
|
|
Steps To Move To CERT Mode
Phase I Environment Information
When possible, it is a best practice to apply the following OAM Server patch before setting the Cert Mode Communication which will remove the necessity to use orapki to remove the expired SIMPLE mode certs from the cwallet.sso file.
Without this patch any time new/updated artifacts are generated, will require the removal of these SIMPLE Mode certs from the cwallet.sso file.
- Patch:36282327 WEBGATE AGENT REGISTRATION INSTALLS EXPIRING SIMPLE CERTIFICATES INTO THE AGENT ARTIFACTS
The testing information used for this blog is represented below. It does not indicate that the versions used are required.
| Product |
Version |
| Oracle Linux Server |
OEL 7.6 |
| JAVA |
jdk1.8.0_221 |
| OPENSSL |
OpenSSL 1.0.2k-fips 26 Jan 2017 |
| Oracle RDBMS |
19c |
| WebLogic (Infrastructure) (WLS) |
12.2.1.4.0 |
| Oracle Access Management (OAM) |
12.2.1.4.0 |
| Oracle HTTP Server/OAM WebGate |
12.2.1.4.0 |
Phase II Generating a Certificate Request and Private Key for OAM Server/Convert Server Key And Server Cert To DER Format
Background
The certified tool is openSSL. Oracle recommends the use openSSL rather than other tools to generate certificates and keys in PEM format. The common name for generating a certificate request for OAM server could be the host name of the OAM cluster’s load balancer for clustered environments and the name of the host where OAM server is deployed for the non-clustered environments. For this use case the openSSL that was used came with the UNIX operating system. Refer to the tab “Environment Information”.
Steps
The referenced commands are examples and will need to be modify to reflect the environment they are being used in.
1. Make a directory that will hold the certificate components that are created in this step to be used later on. The name of the directory can be anything. Phase I is used in this document for consistency when referencing the files used in this process related to the certificates.
A. $mkdir <OPENSSL_OUTPUT_FILE_DIRECTORY>
B. $cd <OPENSSL_OUTPUT_FILE_DIRECTORY>
2. Generate both the certificate request (aaa_req.pem) and Private Key (aaa_key.pem)
- aaa_req.pem is the certificate signing request generated by openssl to be sent to Certificate Authority (CA) to obtain signed server certificate.
- aaa_key.pem is the Private (RSA) key created by openssl that corresponds to the server certificate to be signed by the CA. Generated at the same time as the aaa_req.pem.
| Command Syntax |
openssl req -new -newkey rsa:2048 -keyout aaa_key.pem -out aaa_req.pem -utf8 -sha256
|
| Output |
Generating a 2048 bit RSA private key ……………………………………………..+++ …………….+++ writing new private key to ‘aaa_key.pem’ Enter PEM pass phrase: <First time entrance> Verifying – Enter PEM pass phrase: |
| Notes |
“You are about to be asked to enter information that will be incorporated into your certificate request. What you are about to enter is what is called a Distinguished Name or a DN. There are quite a few fields, but you can leave some blank For some fields there will be a default value, If you enter ‘.’, the field will be left blank.” *Remember this password as it will be needed later Step # |
| Results |
This step resulted in two new files being created …
|
3. Create CA that generates rootCA.key and aaa_chain.pem files.
- rootCA.key is the Private key created by openssl for the certificate authority cert. Generally this isn’t needed after the certificates are generated, and is only used when signing certificates using openssl
- aaa_chain.pem is the file containing the x509 certificate(s) that make up the CA certificate chain. When we create our own certificate authority, generally this will be a single certificate. This should contain all the certificates in the chain that validate the cert mode server certificate (but not the server certificate itself)
A. Run the below command:
| Command Syntax |
openssl genrsa -aes256 -out rootCA.key 4096
|
| Output |
openssl genrsa -aes256 -out rootCA.key 4096 Generating RSA private key, 4096 bit long modulus ……………………..++ ……………………………………………………………………………………………………………………..++ e is 65537 (0x10001) Enter pass phrase for rootCA.key: |
| Notes |
Remember this password as it will be needed later in step 4B |
| Results |
This step resulted in one new file being created … rootCA.key |
B. Run the below command:
| Command Syntax |
openssl req -x509 -new -nodes -key rootCA.key -days 7300 -sha256 -out aaa_chain.pem
|
| Output |
Enter pass phrase for rootCA.key: <SEE NOTES SECTION> You are about to be asked to enter information that will be incorporated into your certificate request. What you are about to enter is what is called a Distinguished Name or a DN. There are quite a few fields, but you can leave some blank For some fields there will be a default value, If you enter ‘.’, the field will be left blank. —– Country Name (2 letter code) [XX]: State or Province Name (full name) []: Locality Name (eg, city) [Default City]: Organization Name (eg, company) [Default Company Ltd]: Organizational Unit Name (eg, section) []:Support Common Name (eg, your name or your server’s hostname) []: Email Address []: |
| Notes |
pass phrase for rootCA.key: <The password used in step 4A> |
| Results |
This step resulted in one new file being created … aaa_chain.pem |
4. Submit the certificate request (aaa_req.pem) to a trusted CA to get a signed (aaa_cert.pem) certificate.
- aaa_req.pem is the certificate signing request generated by openssl to be sent to Certificate Authority (CA) to obtain signed server certificate.
- aaa_cert.pem is the file containing the x509 cert mode server certificate (public cert) which has been signed by a CA.
- aaa_chain.srl is serial number file…used by openssl to maintain the current serial number for signing certificates when using openssl as a CA. This is for openssl, not for any cert consumer (so OAM doesn’t care)
| Command Syntax |
openssl x509 -req -in aaa_req.pem -CA aaa_chain.pem -CAkey rootCA.key -CAcreateserial -sha256 -out aaa_cert.pem -days 500
|
| Output |
Signature ok subject=<VALUE> Getting CA Private Key Enter pass phrase for rootCA.key: |
| Notes |
pass phrase for rootCA.key: <The password used in step 4A> |
| Results |
This step resulted in two new files being created …
|
5. Convert aaa_cert.pem into DER format.
- Any .der file is the Same as .pem files, but encoded in a .der format. Just a different format for certificate files.
| Command Syntax |
openssl x509 -in aaa_cert.pem -inform PEM -out aaa_cert.der -outform DER
|
|
| Output |
None |
|
| Notes |
This is needed as the importcert.jar requires the DER format. |
|
| Results |
This step resulted in one new file being created … aaa_cert.der |
6. Convert aaa_key.pem into DER format.
Any .der file is the Same as .pem files, but encoded in a .der format. Just a different format for certificate files.
| Command Syntax |
$ openssl pkcs8 -topk8 -nocrypt -in aaa_key.pem -inform PEM -out aaa_key.der -outform DER
|
| Output |
Enter pass phrase for aaa_key.pem: |
| Notes |
Enter pass phrase for aaa_key.pem:<The password used in step 3> |
| Results |
This step resulted in one new file being created … aaa_key.der |
Summary
- In this section commands were run to generate, create, request, and convert formats for the certificates that will be used in setting up/configuring the CERT Mode communication. These steps produced the following files:
| Step 3
Step 4 A/B
Step 5
Step 6/7
|
Phase III Retrieving the .OAMKeystore password stored in UDM
Background
Retrieve the keystore credential with Oracle Enterprise Manager Fusion Middleware Control console. This password will be needed for importcert and keytool import steps.
Steps
1. Access and Log into the Oracle Enterprise Manager Fusion Middleware Control 12c console using the context URL, /em.
Example
http(s)://<HOST>:<PORT>/em
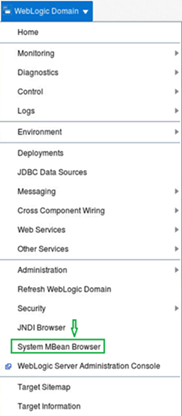
2. In the upper right hand corner select the drop down for Weblogic Domain and then select System MBean Browser.
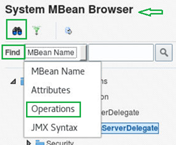
3. In the System MBean Browser Section Select the binoculars icon. Then select the Find section and from the drop down menu select Operations.
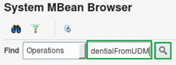
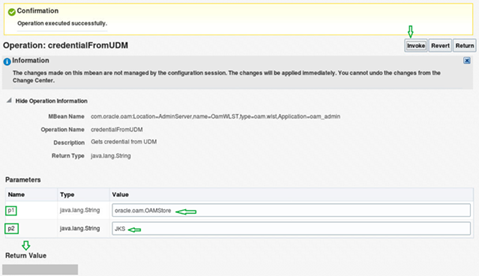
4. In the field next to the Find field, enter credentialFromUDM. Then select the Magnifying glass icon to search for that operation value.
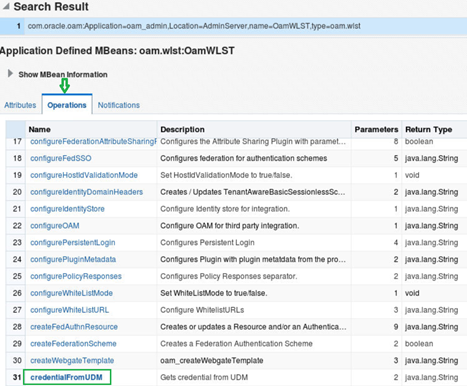
5. Scroll down the Operations tab until the credentialFromUDM operation is seen, then select it.
6. Note the following values are case specific and what is in the brackets () is not part of the value.
- In the p1 Value field enter oracle.oam.OAMStore (mapname)
- In the p2 Value field enter JKS (key)
- Select Invoke and the password is displayed in the Return Value section.
- The password is displayed in the Return Value pane.
Phase IV Importing the Trusted, Signed Certificate Chain Into the Keystore
Background
The Oracle-provided importcert tool is used to import existing private key, signed certificate (public key) files into the specified keystore format: JKS (client keystore format) or JCEKS (OAM Server keystore format; .oamkeystore for instance.).
The keystores associated with Access Manager accepts only PKCS8 DER format certificates:
- If you have PEM format certificates signed by your certificate authority (CA), the following procedure describes how to convert and then import these using the importcert shipped with Access Manager.
- If PEM format certificates are not available, create a certificate request and have it signed by your CA before beginning the following procedure.
When using the keytool utility, the default key pair generation algorithm is Digital Signature Algorithm (DSA). However, Oracle Access Management and WebLogic Server do not support DSA and you must specify another key pair generation and signature algorithm
At every restart of Admin servers, changes are pulled in from the database (DB) . Hence it is needed to execute the WLST functions “downloadAccessArtifacts and saveAccessArtifacts”, so that the CERT mode changes are updated in the database.
Preparation Steps
1. Confirm the the version of JDK the OAM application is using, as it may be different the the default than OS default JDK, by searching the setDomainEnv.sh script.
Example
grep ^SUN_JAVA_HOME=<OAM_<OAM_WLS_DOMAIN_HOME>>/bin/setDomainEnv.sh
- Should return something like the following:
SUN_JAVA_HOME=”<<LOCATION_JAVA_HOME>>”
2. At this stage, it’s advisable to extract and save the contents of the .oamkeystore. This will provide a baseline for reference.
Syntax
keytool -list -keystore <<OAM_WLS_DOMAIN_HOME>>/config/fmwconfig/.oamkeystore -storetype JCEKS
Output
Enter keystore password: (Password retrieved from “Phase III Retrieving the .OAMKeystore password stored in UDM)
3. Create a properties file called dbschema.properties. The location of the file can be anything. /tmp/ is used in this document for consistency when referencing the file used in this process.
—- properties file content —-
oam.entityStore.schemaUser=<SCHEMA_PREFIX>_OAM
oam.entityStore.schemaPassword=<password>
oam.entityStore.ConnectString=<jdbc connect string>
————
- To get the information needed or the “dbschema.properties” file refer to the <OAM_WLS_DOMAIN_HOME>/config/jdbc/oam-db-jdbc.xml
In the oam-db-jdbc.xml should see something like the following …
<url>jdbc:oracle:thin:@//<OAM_SERVER_FQDN:<SQLNET_PORT>/<DB_INSTANCE_NAME>/url>
<driver-name>oracle.jdbc.OracleDriver</driver-name>
<properties>
<property>
<name>user</name>
<value<SCHEMA_PREFIX>_OAM>/value>
</property>
4. Download the artifacts using offline WLST command:
The WLST for OAM is in the directory “<ORACLE_HOME>/oracle_common/common/bin”
- Note: It is important to use the WLST script from the OAM ORACLE_HOME so that the OAM-specific WLST commands can be run. WLST scripts from other FMW component installations will not load the necessary files and OAM-specific commands will then fail.
a. Start the WebLogic Scripting Tool (WLST)
- cd <ORACLE_HOME>/oracle_common/common/bin
- ./wlst.sh
| Initializing WebLogic Scripting Tool (WLST) … Welcome to WebLogic Server Administration Scripting Shell Type help() for help on available commands wls:/offline> |
b. Execute the downloadAccessArtifacts command
| Command Syntax |
downloadAccessArtifacts(domainHome=”<OAM_WLS_DOMAIN_HOME>”, propsFile=”/<PATH_NAME_PROPERTIES_FILE>”)
|
| Output |
Search on/for … “successfully written” |
| Notes |
In internal testing this step was not needed. It is suspected that the reason is the command has been run before in the environment. |
| Results |
The information in the database (DB) has been update to the appropriate files. STATUS=SUCCESS |
5. Unzip importcert.zip and locate the Readme file in the following location
- From the <ORACLE_HOME>/idm/oam/server/tools/importcert/README
a. cd to the <ORACLE_HOME>/idm/oam/server/tools/importcert
b. unzip importcert.zip
- This results in a “import.jar” file.
6. Modifying Content In Files
- Make/verify that the aaa_chain.pem, aaa_cert.pem, and aaa_key.pem only contain data that is between the BEGIN and END Tags.
- The location of these files are where the CERT files were created in Phase I.
- In the test environment used for this use case these files only had the information between the BEGIN ENCRYPTED PRIVATE KEY and -END ENCRYPTED PRIVATE KEY-, so no changes were needed.
| File Name |
Task |
Results |
| aaa_chain.pem |
|
—–BEGIN CERTIFICATE—– TEXT TEST TEXTTEXT TEST TEXTTEXT TEST TEXT
|
| aaa_cert.pem |
|
—–BEGIN CERTIFICATE—– TEXT TEST TEXTTEXT TEST TEXTTEXT TEST TEXT
|
| aaa_key.pem |
|
—–BEGIN ENCRYPTED PRIVATE KEY—– TEXT TEST TEXTTEXT TEST TEXTTEXT TEST TEXT
|
Steps To Import The Trusted Certificate Chain
1. Import the trusted certificate chain using the following command with details for the environment.
- Use the password value from the “Phase II password from UDM”
- If the – alias parameter is not used then the default value that will be used is “Mycert”.
aaa_chain.pem (keytool)
| Command Syntax |
keytool -importcert -file aaa_chain.pem -trustcacerts -alias <CERTMODE_ALIAS> -storepass -keystore <OAM_WLS_DOMAIN_HOME>/config/fmwconfig/.oamkeystore -storetype JCEKS When prompted “Trust this certificate? [no]:” answer Yes
|
| Output |
… Certificate was added to keystore |
| Notes |
Dump out keystore to confirm that the Alias was created … keytool -list -keystore <OAM_WLS_DOMAIN_HOME>/config/fmwconfig/.oamkeystore -storetype JCEKS -v | grep -A 20 -i <CERTMODE_ALIAS> Enter keystore password: the password value from the “Phase II password from UDM”) |
| Results |
Alias name: <CERTMODE_ALIAS>
|
2. Import the signed DER format certificates into the keystore using the following command with details for the environment.
- Use the password value from the “Phase II password from UDM”
aaa_key.der and aaa_cert.der (importcert)
| Command Syntax |
|
| Output |
Enter Keystore password : the password value from the “Phase II password from UDM”)
|
| Notes |
Dump out keystore to confirm that the Alias was created … Enter keystore password: the password value from the “Phase II password from UDM”) |
| Results |
Certificates imported to <OAM_WLS_DOMAIN_HOME>/config/fmwconfig/.oamkeystore
|
3. The WLST for OAM is in the directory “OAM ORACLE_HOME/common/bin”
- Note: It is important to use the WLST script from the OAM ORACLE_HOME so that the OAM-specific WLST commands can be run. WLST scripts from other FMW component installations will not load the necessary files and OAM-specific commands will then fail.
a. Start the WebLogic Scripting Tool (WLST)
- cd <ORACLE_HOME>/oracle_common/common/bin
- ./wlst.sh
| Initializing WebLogic Scripting Tool (WLST) … Welcome to WebLogic Server Administration Scripting Shell Type help() for help on available commands wls:/offline> |
b. Execute the saveAccessArtifacts command
| Command Syntax |
saveAccessArtifacts(domainHome=”<OAM_WLS_DOMAIN_HOME>”, propsFile=”/<PATH_NAME_PROPERTIES_FILE>”) |
| Output |
Did not record it |
| Notes |
None |
| Results |
The information in the the appropriate files has been update to the database (DB). STATUS=SUCCESS
|
After importing the certificates into the keystore, add the alias and password that specified earlier into Access Manager settings configuration in Oracle Access Management Console.
Access Manager Settings “Access Protocol”
1. In the Oracle Access Management Console, click Configuration at the top of the window.
2. In the Launch Pad tab, select Access Manager from the View drop-down menu in the Settings section.
3. In the Access Protocol Cert Mode Configuration section, fill in the alias and alias password details acquired in Step 9 of Section III.
• PEM keystore Alias: <ALIAS_VALUE_FROM_Step # of Section III>
• PEM keystore Alias Password:
4. Click Apply to save the configuration.
5. Close the Access Manager Settings tab
Server Instances
1. From the launch Pad Select the Server Instances
2. Select search
3. Select appropriate Server instance
4. In the Proxy section change the Proxy mode to Cert
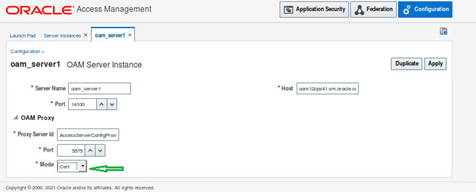
5. Click Apply
Note at this point the WebGates will cease to communicate with the OAM server.
6. Select OK
7. Select Yes to Confirm
8. Restart the OAM Server.
Phase VI Updating WebGate to Use Certificates
Editing/Updating Agent Registration
The Agent registration can be updated using the Oracle Access Management Console.
• When registering an Agent in Cert mode a field appears where can enter the Agent Key Password.
• When Editing/Updating an Agent/WebGate registration, the password.xml is updated only when the mode is changed.
• Editing the agent Key Password does not result in creation of a new password.xml. In Cert mode, once generated, password.xml cannot be updated.
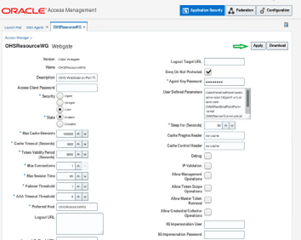
To update the communication mode in the WebGate Agent registration for one or more WebGates to use cert mode:
If the WebGates are updated in the OAM console an “Agent Key Password” will be required. It doesn’t matter what set this to, as it’s not actually used.
1. In the Oracle Access Management Console, click Application Security at the top of the window.
2. In the Launch Pad tab, click Agents.
3. On the Search page, define the criteria and open the desired agent registration, as described in “WebGate Search Controls”.
4. On the agent’s registration page, locate the Security options and click Cert.
5. Cert Mode: Enter the Agent key Password as specified in Step 5 of “Generating a Private Key and Certificate Request for WebGates”.
6. Click Apply to submit the changes.
This will create new updated Agent artifacts in the output directory.
• aaa_cert.pem
• aaa_key.pem
• cwallet.sso
• cwallet.sso.lck
• ObAccessClient.xml
• password.xml
• wallet (Directory)
cwallet.sso File
When Generating a Private Key and Certificate Request for WebGates the following files that were created:
• aaa_key.pem: <WebGate_Home>/webgate/ohs/tools/openssl
• aaa_cert.pem: The location where this was saved after receiving from CA
• aaa_chain.pem: The location where this was saved after receiving from CA
They are not to be copied to the WebGate Server, as they will be added to the cwallet.sso file in the agent artifacts. The artifacts are created in the <DOMAIN_NAME>_HOME/output/<AGENT_NAME>/ directory, using the orapki command on the OAM Server.
1. Viewed the contents of the cwallet.sso
a. export JAVA_HOME=<LOCATION_JAVA_HOME>
b. Run Command
| Command Syntax |
<ORACLE_HOME>/oracle_common/bin/orapki wallet display -wallet ./ Example ./orapki wallet display -wallet <OAM_WLS_DOMAIN_HOME>/output/<AGENT_NAME>/wallet
|
| Output |
Oracle PKI Tool : Version 12.2.1.4.0 |
| Notes |
|
| Results |
Shows current content of the cwallet.sso |
2. On the OAM server use the orapki utilty to add the certs to the cwallet.sso file
| Note The oripki tool has an issue multiple certificate chains in one PEM file, multiple certificates in one pem file. Orapki will just read the first and silently ignore the following certificate(s).
|
| 1. Command Syntax |
a. export JAVA_HOME=<location_java_home>
|
|
b.<ORACLE_HOME>/oracle_common/common/bin/orapki wallet add -wallet <DOMAIN_NAME>_HOME/output/<AGENT_NAME> -cert <OPENSSL_OUTPUT_FILE_DIRECTORY>/aaa_cert.pem -trusted_cert -auto_login_only |
|
|
c. <ORACLE_HOME>/oracle_common/common/bin/orapki wallet add -wallet <DOMAIN_NAME>_HOME/output/<AGENT_NAME>/wallet -cert <OPENSSL_OUTPUT_FILE_DIRECTORY>/aaa_cert.pem -trusted_cert -auto_login_only |
|
| Notes – Viewed the contents of the cwallet.sso – Command Syntax |
<ORACLE_HOME>/oracle_common/bin/orapki wallet display -wallet ./ Example |
| Results |
cwallet.sso now contains the cert information |
3. Remove the SIMPLE mode certificates from the webgate’s cwallet.sso
This step will only be needed if the one off patch for internal Bug:36282327 has not been applied. As of te time of this note it is only avialable as a one off for certain 12.2.1.3.x versions of OAM an as a one off patch for 12.2.1.4.230317 and above. Note there iss no issue with 11g.
For more information refer to KM Note WebGates Using CERT Mode Communication Fail After March 24, 2024 (Doc ID 3003731.1)
a. (If not already set) export JAVA_HOME=<location_java_home>
b. Run the below 3 commands
- orapki wallet remove -wallet ./cwallet.sso -trusted_cert -dn “CN=NetPoint Simple Security CA – Not for General Use,OU=NetPoint,O=Oblix\, Inc.,L=Cupertino,ST=California,C=US” -auto_login_only
- orapki wallet remove -wallet ./cwallet.sso -user_cert -dn “CN=<USERNAME> -auto_login_only
- orapki wallet remove -wallet ./cwallet.sso -cert_req -dn “CN=<USERNAME> -auto_login_only
4. Viewed the contents of the cwallet.sso
<ORACLE_HOME>/oracle_common/bin/orapki wallet display -wallet ./
<ORACLE_HOME>/oracle_common/bin
Example
- export JAVA_HOME=<LOCATION_JAVA_HOME>
- ./orapki wallet display -wallet <OAM_WLS_DOMAIN_HOME>/output/<AGENT_NAME>/wallet
Newly Updated WebGate Artifacts
Note that after updating the WebGate security mode to cert, the WebGates will STOP WORKING UNTIL NEW CERT MODE ARTIFACTS ARE COPIED TO THE WebGate INSTANCE.
At this point, the artifacts can then be copied to the WebGate instance directory. It’s important to note that for OHS 12c, when updating the method used for communication with the OAM server it will be need to delete the cached ObAccessClient.xml file from the <DOMAIN_NAME>_HOME/servers/<ohs_instance_name>/cache directory, as otherwise the WebGate will continue trying to use the old security mode. For more infrormation refer to KM note “Oracle Access Manager (OAM) After Changing the Oracle Access Protocol (OAP) Communication Mode To CERT, Accessing A Protected Resource Fails “HTTP-500 Internal Server Error (Doc ID 2990211.1)”
1. Copy the following updated Agent Artifact files as follows:
• ObAccessClient.xml
• cwallet.sso
• wallet (Directory)
From:
<ORACLE_HOME>/output/AGENT_NAME
To:
Staging
<OHS_WLS_DOMAIN_HOME>/config/fmwconfig/components/OHS/<OHS_INSTANCE_COMPONET_NAME>/webgate/config
Runtime (has instances in it)
<OHS_WLS_DOMAIN_HOME>/config/fmwconfig/components/OHS/instances/<OHS_INSTANCE_COMPONET_NAME>/webgate/config/
2. Restart the webserver, and the WebGate should come up using cert mode.
Phase VII Validating Cert Mode Is Successful
1. End-User Access Confirmation
- Verify that end users can access the protected application through the WebGate after the mode change.
2. Validate ObAccessClient.xml
| Action |
Location / Results |
| Validate the ObAccessClient.xml (WebGate in question) in the OHS webgate “cache” directory |
<OHS_WLS_DOMAIN_HOME>/servers/<OHS_INSTANCE_COMPONET_NAME>/cache <SimpleList> |
3. Optional Verification (NAP/OAP Communication) – Turn On Trace for the WebGate
- Quick Start Guide to Enabling Enhanced Logging for the Oracle Access Manager (OAM) 11g/12c Components (Doc ID 2463852.1)
a. Edit file oblog_config_wg.xml and modify the parameters “LOG_THRESHOLD_LEVEL” to LOGLEVEL_TRACE and “BUFFER_SIZE” to 0 (This ensures the trace information is not buffered and flushed instantly)
| oblog_config_wg.xml -Default Setting |
<DOMAIN_HOME>/config/fmwconfig/components/OHS/COMPONENT_NAME/webgate/config/ |
|
<CompoundList … !– Buffer up to 64 KB (expressed in bytes) of log entries before flushing to the file. –>
|
<CompoundList … !– Buffer up to 64 KB (expressed in bytes) of log entries before flushing to the file. –>
|
b. Look in the resulting log for “_security=ObSecurityMode_Cert“
- grep “_security=ObSecurityMode_Cert” webgate.log
CONN_MGMT TRACE 0x00000203/ade/syseng_NGAMAC_12.2.1.4.210430_LINUX.X64_Bundle_PatchView_13/ngamac/src/palantir/aaa_client/src/watcher_thread.cpp:308 “Function entered” _TraceName^ObWatcherThread::ValidateConnections _aaaClient^object{ObAAAServiceClient:0x7FA7A400B980{_debug=false}{_maxConnections=1}{_maxSessionTime=3600}{_encrypted=false}{_connectTimeout=-1}{watcherId=674}{_wait4FailoverInMillis=5000}{_clientRequestRetryAttempts=1}{_security=ObSecurityMode_Cert}{_readConfig=false}{_passPhraseIsSet=false}{_accessClientPasswd****************************************reshold=1}{_setKeepAlive=true}{_keepAliveTimeInMin=2}{_isFipsMode=false}{_isFipsSimpleMode=false}{_isNZTraceEnable=false}{_invalidateAAAClient=false}{_checkEndPointValidity=true}{_numOfLivePrimaryConnections=1}{_installDir=/<OHS_ORACLE_OME>/wlserver/../webgate/ohs}{_passPhrase=}{_myErrorCode=ObObAAAClientErrorCode_UnknownError}}
The presence of these key words indicates successful legacy NAP/OAP communication.
c. After verification, remember to disable TRACE logging to avoid excessive log data generation.
Wrap up
This concludes the 7 part series that discussed common topics for the Oracle Access Manager (OAM) WebGate component.
- Certification
- Software Downloads
- Installation
- Configuration
- Registration
- Highly Available Architecture
- Communication
- Changing to OPEN mode
- Changing CERT mode
Typically, these functions are for the OAM Administrator along with their Network Administrator, but can be used by any person as an example of how to complete the same task in a desired environment.
The main focus was to provide a reference that helps understand, implement, and maintain the OAM and WebGate communication.
- Helpful KM Reference Note – Oracle Access Manager (OAM) WebGate (WG) Resource Guide (Doc ID 2884819.1)
Related Articles:
- Oracle Access Manager (OAM) WebGate Guide – Part One – Getting Started – This is the first part in a 7 part series of blogs that discuss common topics for the Oracle Access Manager (OAM) WebGate component.
- Oracle Access Manager (OAM) WebGate Guide – Part Two Certification And Logistics – This is the second part in a 7 part series of blogs that discuss the Oracle Access Manager (OAM) WebGate component topics: Certification, Availability, and Download Location.
- Oracle Access Manager (OAM) WebGate Guide – Part Three – WebGate Installation/Configuration/Registration – This is the third part in a 7 part series of blogs that discusses certifications and logistics for the Oracle Access Manager (OAM) WebGate component.
- Oracle Access Manager (OAM) WebGate Guide – Part Four – WebGate Highly Available (HA) Architecture – This is the fourth part in a 7 part series of blogs that discuss the Oracle Access Manager (OAM) WebGate component with respect to how it communicates with the OAM server.
- Oracle Access Manager (OAM) WebGate Guide – Part Five – WebGate Communication – This is the fifth part in a 7 part series of blogs that discuss the Oracle Access Manager (OAM) WebGate component with respect to how it communicates with the OAM server.
- Oracle Oracle Access Manager (OAM) WebGate Guide -Part6 – Changing The Oracle Access Protocol (OAP) Communication Mode To Open – This is the sixth part in a 7 part series of blogs that discusses the Oracle Access Manager (OAM) WebGate component with respect to how it communicates with the OAM server.