Oracle has long recommended the use of HIGH REDUNDANCY (HR) ASM disk groups for the best data protection on Exadata. HR disk groups triple mirror each extent of data across multiple storage servers and different disks to ensure that data is available during planned and unplanned downtime.
Exadata customers may also choose to use NORMAL REDUNDANCY (NR) ASM disk groups, which double mirror each extent. The most common reason customers choose normal redundancy is that it increases the available storage capacity, which can be very useful in circumstances such as non-production environments; however, it comes at a cost: lower data protection.
Let’s consider a real-world example, an environment that has been deployed with a +DATA disk group configured in HIGH REDUNDANCY. Each extent of every file has three mirrors spread across three different servers and three different disks. If we take one of these servers down, say we’re applying a software update, there are still two copies of each extent available for the database to perform I/O against. If, during the period the server is being updated, a disk fails in one of the other servers, there is still one copy of the extents available, allowing the database to remain available.
If, on the other hand, the disk group had been configured in NORMAL REDUNDANCY, a disk failure while one server was already offline for an update would result in a database outage, as ASM will immediately dismount the disk group.
While this behavior is well-known and understood, some customers, after experiencing the above scenario with NR disk groups, realize they value availability higher than capacity.
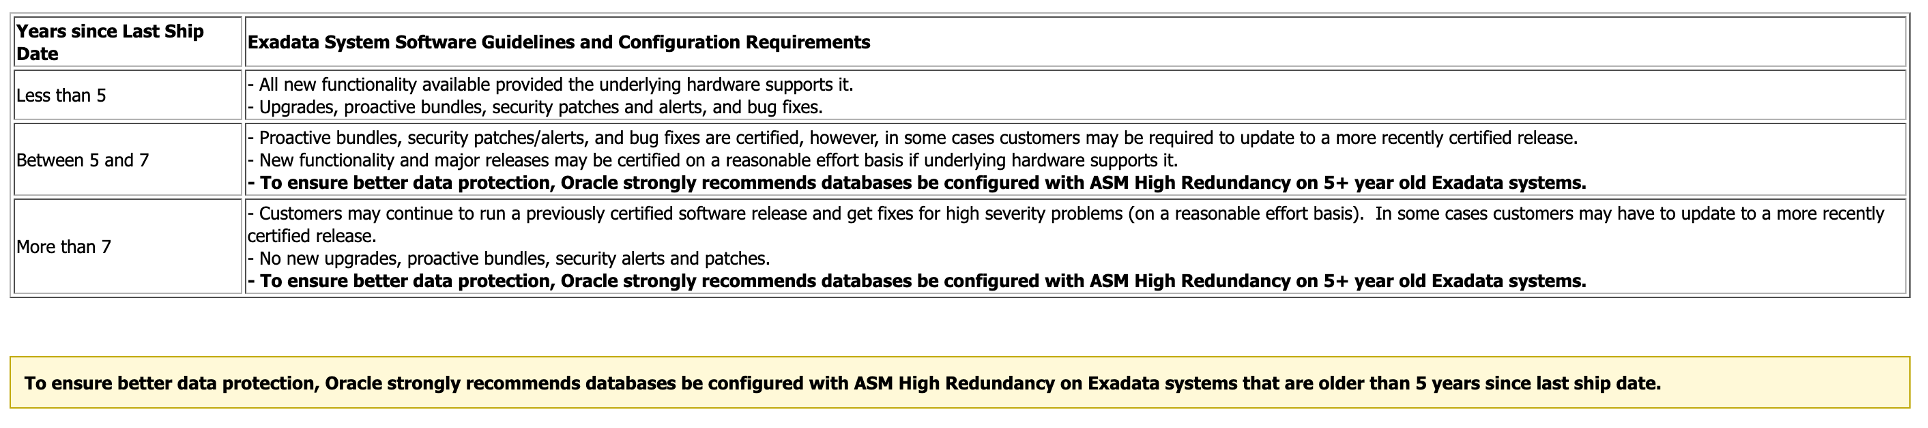
Another reason customers want to move from NORMAL REDUNDANCY to HIGH REDUNDANCY is our additional strong recommendation that disk groups be configured as HIGH REDUNDANCY on Exadata systems 5 years and older. (See MOS note Exadata System Software Certification and Error Correction (Doc ID 2075007.1)).
So, how do you get from normal to high redundancy?
One way is to recreate your disk groups with HR. This involves moving all the files (database data files, online redo, archive logs, backups, etc.) out of the disk group, dropping it, recreating it with high redundancy, and putting all your files back in. Depending on your environment, this may be possible, but for most customers, it’s likely that the effort, not to mention the database downtime, makes recreation of the disk groups unpalatable.
If you have a Data Guard standby database, you could recreate it after recreating the disk groups, switching over, and then re-creating the old primary database. However, this assumes that every database has a Data Guard standby, which is not always the case for non-production databases.
Enter Flex Disk Groups
Back in Oracle Database 12c Release 2 (12.2), we added a very cool solution to the challenge of moving from normal to high redundancy without needing to recreate disk groups and all the associated work I outlined above: ASM Flex Disk Groups.
In a nutshell, Flex Disk Groups allow files to define their redundancy rather than the disk group defining it for all files. Let me put that another way. Typically, the +DATA disk group is defined as HIGH REDUNDANCY. This means all files in the disk group will be triple-mirrored. If the disk group had been defined with NORMAL REDUNDANCY, the files would all be double-mirrored. Flex disk groups allow files of both redundancy types in the same disk group.
Flex Disk Groups do two core things: 1 – they move the redundancy attribute from the disk group to the file; and 2 – they allow the disk group to store files with different redundancies. You will also see similar capabilities in Exascale, where the storage pool and vault allow for files of both redundancies, and the file “owns” its redundancy attribute.
What’s nice about Flex Disk Groups is that an existing disk group can be converted to FLEX REDUNDANCY without needing to remove data or recreate the disk groups!
Prerequisites
Before we convert any disk groups, let’s start with a few points. The Maximum Availability Architecture team has tested the conversion of NORMAL REDUNDANCY to FLEX REDUNDANCY with the following best practices:
- Always run Exachk before (and after) changing any infrastructure configuration to validate the current configuration and make sure there are no unaddressed failed checks, especially in the storage tier (ASM and storage servers)
- The disk group being converted must have its compatible.rdbms and compatible.asm attributes set to 19.0 or higher. Be careful here, as these attributes control the database and ASM versions that the disk group can be used by. If you have older databases that you are in the process of upgrading to 19c or 23ai, you will probably want to wait to complete that work first.
- The disk group being converted to FLEX needs to have sufficient capacity to allocate the third extent of any files that will change from NORMAL to HIGH redundancy. Sufficient capacity is also needed to complete the rebalance. See MOS note Understanding ASM Capacity and Reservation of Free Space in Exadata (Doc ID 1551288.1).
- For systems with fewer than five storage servers, five additional voting (quorum) disks need to be configured to store the Partner Status Table (PST) once the conversion is complete. You can use the Exadata quorumdiskmgr utility to achieve this.
- For better availability, databases created on a NORMAL REDUNDANCY disk group are configured with two redo log members in each redo log group: one in +DATA and the other in +RECO. The log member in the +RECO disk group can be removed once the conversion is complete.
Once the above has been met, we can proceed to update the file templates.
Check the current disk group redundancy
In this environment, I’ve elected (against best practice) to use NORMAL REDUNDNACY for my DATA, RECO and SPARse disk groups. We’re going to convert the DATA disk group in this post, but the process is the same for the others.
SQL> select group_number, name, type from v$asm_diskgroup;

GROUP_NUMBER NAME                TYPE
------------ ------------------- ------
           1 DATA                NORMAL
           2 RECO                NORMAL
           3 SPAR                NORMAL
Flex Disk Group File Templates
Before we convert the disk group, we need to update its system templates to the desired redundancy, in this case, HIGH. You can see the current definition of the system templates with the following query in ASM. (Don’t forget to change the disk group name in the subquery).
SQL> select name, redundancy
     from v$asm_template
     where system = 'Y'
     and group_number = (
         select group_number from v$asm_diskgroup where name = 'DATA'
     )
     order by name;

NAME                           REDUND
------------------------------ ------
ARCHIVELOG                     MIRROR
ASMPARAMETERFILE               MIRROR
AUDIT_SPILLFILES               MIRROR
AUTOBACKUP                     MIRROR
AUTOLOGIN_KEY_STORE            MIRROR
BACKUPSET                      MIRROR
CHANGETRACKING                 MIRROR
CONTROLFILE                    MIRROR
DATAFILE                       MIRROR
DATAGUARDCONFIG                MIRROR
DUMPSET                        MIRROR
FLASHBACK                      MIRROR
FLASHFILE                      MIRROR
INCR XTRANSPORT BACKUPSET      MIRROR
KEY_STORE                      MIRROR
OCRFILE                        MIRROR
ONLINELOG                      MIRROR
PARAMETERFILE                  MIRROR
TEMPFILE                       MIRROR
VOTINGFILE                     MIRROR
XTRANSPORT                     MIRROR
XTRANSPORT BACKUPSET           MIRROR
MIRROR in this context means NORMAL REDUNDANCY.
Now we have our starting point, and a list of templates, we can update them using the ALTER DISK GROUP … MODIFY TEMPLATE command. For example:
ALTER DISKGROUP DATA MODIFY TEMPLATE DATAFILE ATTRIBUTE (HIGH);
In the above example, we’ve told the disk group that any datafile in the disk group should use HIGH REDUNDANCY instead of MIRROR or NORMAL REDUNDANCY.
As our disk group is still defined as a NORMAL REDUNDANCY disk group, this is just a metadata operation.
The order of updating the templates before converting the disk group to FLEX is important as converting the disk group first will lead to multiple rebalance operations, meaning more data is moved, and the elapsed time of the overall process is lengthened.
Converting A Disk Group to FLEX Redundancy
Converting an existing disk group to FLEX REDUNDANCY is very easy. Simply use the CONVERT REDUNDANCY TO FLEX clause of the ALTER DISKGROUP command in ASM!
SQL> ALTER DISKGROUP DATA CONVERT REDUNDANCY TO FLEX;
Let’s check the v$asm_diskgroup again.
SQL> select group_number, name, type from v$asm_diskgroup;

GROUP_NUMBER NAME                TYPE
------------ ------------------- ------
           1 DATA                FLEX
           2 RECO                NORMAL
           3 SPAR                NORMAL
And that’s it! Well, almost.
At this point, we’ve updated the file templates for the disk group and converted it to FLEX REDUNDANCY, but the files themselves haven’t had the third extent allocated yet. They’re still only double-mirrored.
You can check this by querying V$ASM_FILE
SQL> select GROUP_NUMBER, FILE_NUMBER, TYPE, REDUNDANCY
     from v$asm_file
     where group_number = (
           select group_number from v$asm_diskgroup where name = 'DATA'
     );

GROUP_NUMBER FILE_NUMBER TYPE                                 REDUND
------------ ----------- ------------------------------------ ------
           1         253 ASMPARAMETERFILE                     MIRROR
           1         255 OCRFILE                              MIRROR
           1         256 PASSWORD                             MIRROR
           1         257 PASSWORD                             MIRROR
           1         258 OCRBACKUP                            MIRROR
           1         259 OCRBACKUP                            MIRROR
           1         260 OCRBACKUP                            MIRROR
           1         261 ASMVDRL                              MIRROR
           1         262 ASMVOL                               MIRROR
           1         263 PASSWORD                             MIRROR
           1         264 CONTROLFILE                          MIRROR
           1         265 ONLINELOG                            MIRROR
           1         266 ONLINELOG                            MIRROR
           1         267 PASSWORD                             MIRROR
           1         268 DATAFILE                             MIRROR
           1         269 DATAFILE                             MIRROR
           1         270 DATAFILE                             MIRROR
           1         271 DATAFILE                             MIRROR
           1         272 DATAFILE                             MIRROR
           1         273 DATAFILE                             MIRROR
           1         274 DATAFILE                             MIRROR
           1         275 TEMPFILE                             MIRROR
           1         276 DATAFILE                             MIRROR
           1         277 DATAFILE                             MIRROR
           1         278 CONTROLFILE                          MIRROR
           1         279 ONLINELOG                            MIRROR
           1         280 ONLINELOG                            MIRROR
… (list shorted for readability)
           1         293 PARAMETERFILE                        MIRROR
           1         294 ONLINELOG                            MIRROR
You can see above that even though the disk group is now a flex disk group, the files are still written to the disk group in NORMAL REDUNDANCY.
Rebalance
The final step in the conversion process is to have ASM write the third extent mirror to disk. To do this, we need to kick off a rebalance.
SQL> ALTER DISKGROUP DATA REBALANCE;
The elapsed time it takes to complete the rebalance will depend on the amount of data that needs to be written and the ASM rebalance power limit for the disk group. As always, you can monitor the rebalance by querying GV$ASM_OPERATION.
Once the rebalance is complete, your files will be changed from MIRROR to HIGH. As before, you can check this in V$ASM_FILE.
SQL> select GROUP_NUMBER, FILE_NUMBER, TYPE, REDUNDANCY
     from v$asm_file
     where group_number = (
           select group_number from v$asm_diskgroup where name = 'DATA'
     );

GROUP_NUMBER FILE_NUMBER TYPE                                 REDUND
------------ ----------- ------------------------------------ ------
           1         253 ASMPARAMETERFILE                     HIGH
           1         255 OCRFILE                              HIGH
           1         256 PASSWORD                             HIGH
           1         258 OCRBACKUP                            HIGH
           1         259 OCRBACKUP                            HIGH
           1         260 OCRBACKUP                            HIGH
           1         261 ASMVDRL                              HIGH
           1         262 ASMVOL                               HIGH
           1         263 PASSWORD                             HIGH
           1         264 CONTROLFILE                          HIGH
           1         266 ONLINELOG                            HIGH
           1         268 DATAFILE                             HIGH
… (output truncated for readability)
We’ll also quickly check the v$asm_diskgroup again so we can see the we still have a FLEX REDUNDANCY disk group.
SQL> select group_number, name, type from v$asm_diskgroup;

GROUP_NUMBER NAME                TYPE
------------ ------------------- ------
           1 DATA                FLEX
           2 RECO                NORMAL
           3 SPAR                NORMAL
That’s it! Really!
Too Long; Didn’t Read
So, what have we learned?
Flex Disk Groups offer a straightforward and effective solution for Exadata customers who want to increase data protection without the disruption of recreating disk groups. Traditionally, customers who chose NORMAL REDUNDANCY did so to maximize available storage, especially in non-production environments. However, as systems age or after experiencing outages, many customers realize the value of HIGH REDUNDANCY and seek a way to transition. Flex Disk Groups make this possible by allowing redundancy to be defined at the file level instead of the disk group level, enabling mixed redundancy within a single disk group.
The conversion process is simple: update the file templates, convert the disk group to FLEX REDUNDANCY, and then run a rebalance to allocate the third mirror for the files. Performing the steps in this order also avoids multiple rebalance operations that will delay the disk group conversion. As long as prerequisites are met, such as appropriate compatibility settings and sufficient capacity, this can be done without downtime and minimal data movement. Once complete, files in the disk group will benefit from the improved availability that comes with HIGH REDUNDANCY!