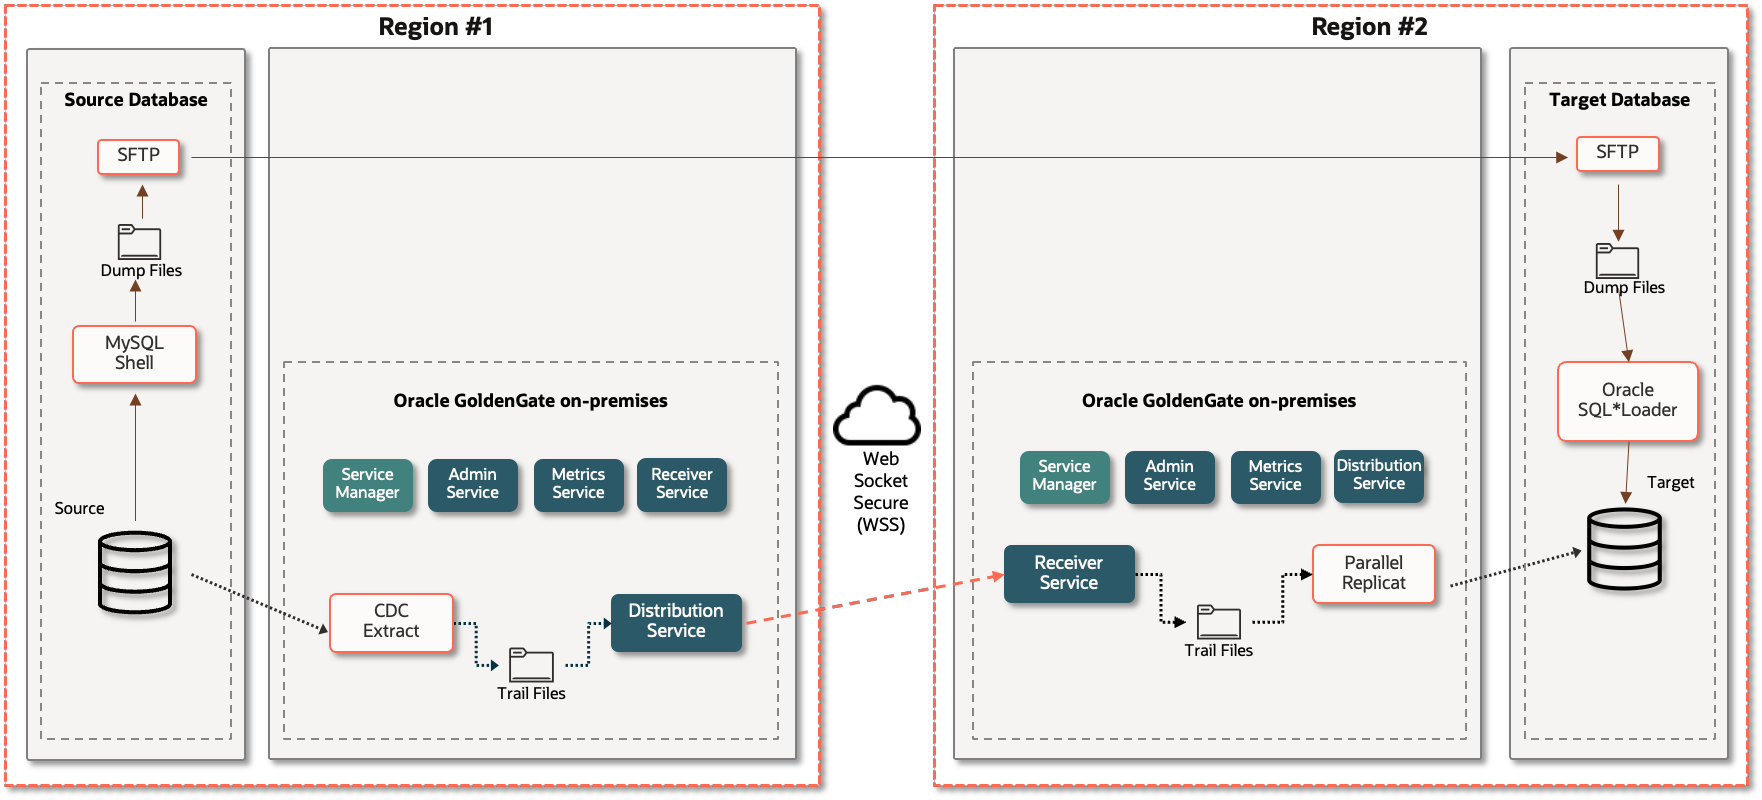
In many organizations, Oracle databases power critical systems; order management, billing, customer profiles, while MySQL drives e-commerce, content management, web-based, or healthcare applications. Bridging the two often means moving not just data, but live transactions, with precision.
That’s where Oracle GoldenGate comes in.
Setting up replication between MySQL and Oracle starts with instantiation, capturing a consistent snapshot of the MySQL data to initialize Oracle, while preparing for real-time synchronization.
Whether replicating healthcare information to a data warehouse, syncing e-commerce data across regions, or migrating legacy apps, instantiation is the first critical step.
In this article we shall demonstrate the MySQL precise instantiation method to create a heterogeneous (MySQL to Oracle Database) replication implementation without taking an application or database outage.
Prerequisites
Before starting the instantiation process, the source and target OGG Hubs and the source and target database environments need to be configured to enable replication. Not executing these steps often leads to setup failures, inconsistent data, or unsupported configuration errors.
- Convert MySQL tables to Oracle : Oracle GoldenGate does not provide database conversion tools. To convert your MySQL tables, views, stored procedures, and functions to Oracle you will need to select a utility to perform this task. There are numerous utilities available, such as Oracle SQL Developer and SQLines.
- Install OpenSSL on source OGG Hub : Oracle GoldenGate 23ai for MySQL requires that OpenSSL 1.1 are present on the Oracle GoldenGate server prior to creating a deployment. See the Oracle GoldenGate documentation for details.
- GoldenGate Installation : Install the latest patch release of Oracle GoldenGate 23ai (Microservices Architecture) for MySQL and Oracle. See the Oracle GoldenGate documentation for details regarding software installation and patching.
- This article only applies to Oracle GoldenGate for MySQL Compatible Databases release version 23.9.0.25.07, or above.
- Create Deployments for MySQL and Oracle GoldenGate : Create the source and target Oracle GoldenGate deployments. See the Oracle GoldenGate documentation for more details.
- Database version : Ensure your source (MySQL) and target (Oracle) databases are up to date with patch releases.
- Database Configuration :
- Prepare the MySQL source database for Oracle GoldenGate. See the Oracle GoldenGate documentation for MySQL specifics.
- Prepare the target Oracle database for Oracle GoldenGate. See the Oracle GoldenGate documentation for Oracle specifics.
- Install MySQL Shell : Install MySQL Shell to access the source (MySQL) database. For details, see the MySQL documentation.
Instantiate and Replicate
With the prerequisites out of the way, next we will:
- Dump the source MySQL database schema data.
- Create and start the source Oracle GoldenGate Change Data Capture Extract and Distribution Path.
- Instantiate the target Oracle tables using Oracle SQL*Loader.
- Create and start the target Oracle GoldenGate Parallel Replicat.
Source Data Dump
We will use the MySQL Shell Schema Dump Utility to perform a consistent data dump. This utility achieves this by creating a consistent read snapshot. This snapshot serves as our precise point-in-time reference for the source database, guaranteeing a transactionally consistent dump that is isolated from concurrent DML operations.
The command to execute the data only dump is:
The option selections in the above command do the following:
- dataOnly:true : Includes only the data files for the dumped items.
- compression:”gzip” : Use gzip compression when writing the output data files.
- dialect:”csv-unix” : Specify a set of field and line-handling options for the format of the exported data file. For this option: (1) lines are terminated by a line feed, (2) fields are terminated by a single quote, (3) fields are enclosed by a double quote, and (4) fields are escaped by a slash.
- chunking:false : By default, data for each table is split into multiple files. Setting this option to false creates one data file for each table (and makes loading the data into the Oracle target a lot easier).
For more details on the Schema Dump Utility options, see the MySQL Shell documentation.
To run the Schema Dump Utility:
- Start MySQL Shell and login to the database.

- Switch to JavaScript mode.

- Execute util.dumpSchemas.

Get Extract Starting Position
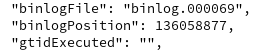
When the dump completes, exit MySQL Shell. Go to the output directory and look for a file named @.json.

Using cat, or your favorite utility, display the contents of the @.json file and look for three lines of text labeled “binlogFile”, “binlogPosition”, and “gtidExecuted”. This is the precise binlog position we shall use to start the Oracle GoldenGate Extract. Copy and save this information.
Source GoldenGate Processes
Change Data Capture Extract
Login to the Administration Service of the Oracle GoldenGate for MySQL Hub server, create and start a Change Data Capture (CDC) Extract.
For this demonstration, the parameter settings are:
USERIDALIAS [ogg database use alias], DOMAIN OracleGoldenGate
TRANLOGOPTIONS ALTLOGDEST REMOTE
EXTTRAIL xm
— Every 20 minutes, report the count of records
— processed since Extract start to the process
— report file.
— Rate reports the number of operations per second
— The report file also contains DELTA throughput which is
— the number of records since the last report divided by
— the time since the last report
REPORTCOUNT EVERY 20 MINUTES, RATE
TABLE [source database].*;
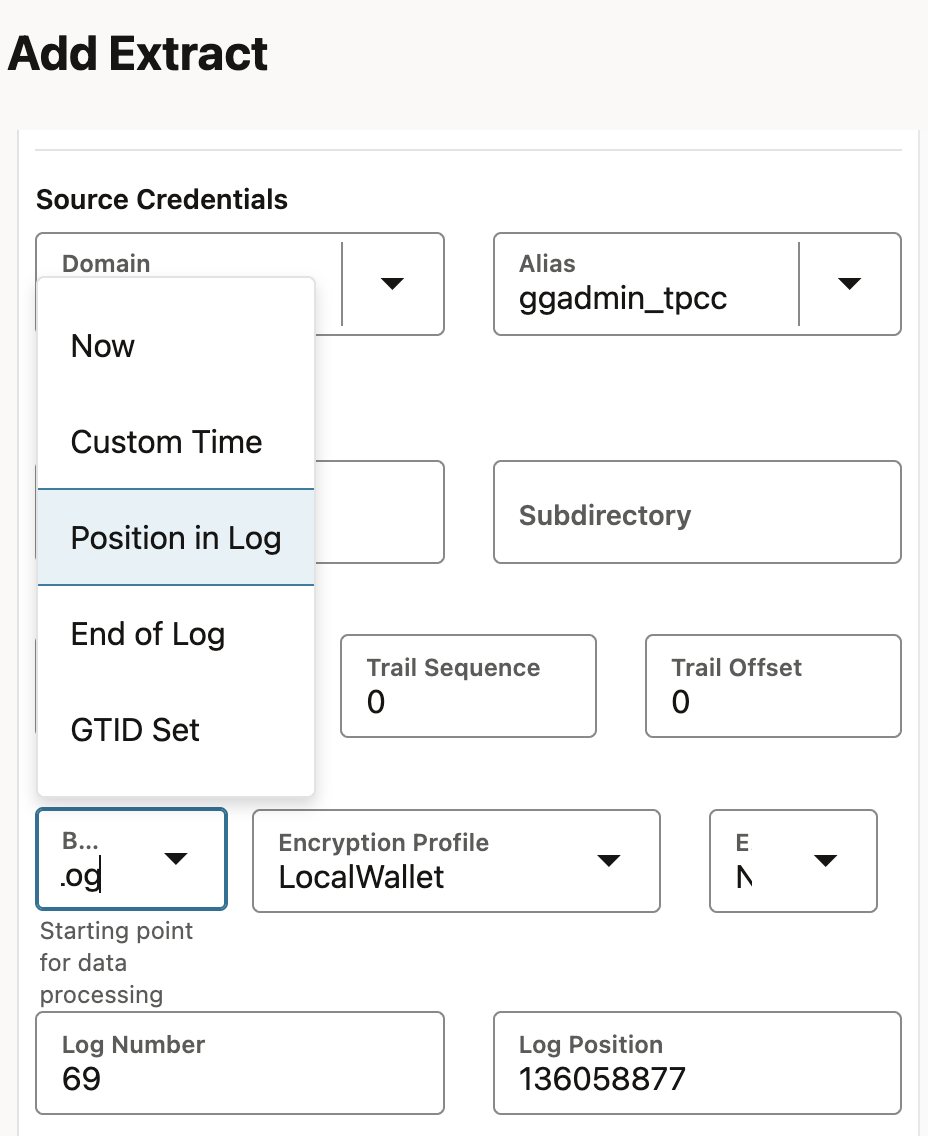
In the Oracle GoldenGate for MySQL Administration Service WebUI Add Extract pane, select the option Position in Log and enter the binlogFile and binlogPosition values copied from the @.json file.
Note: If your database is GTID enabled, enter the gtidExecuted value copied from the @.json file.
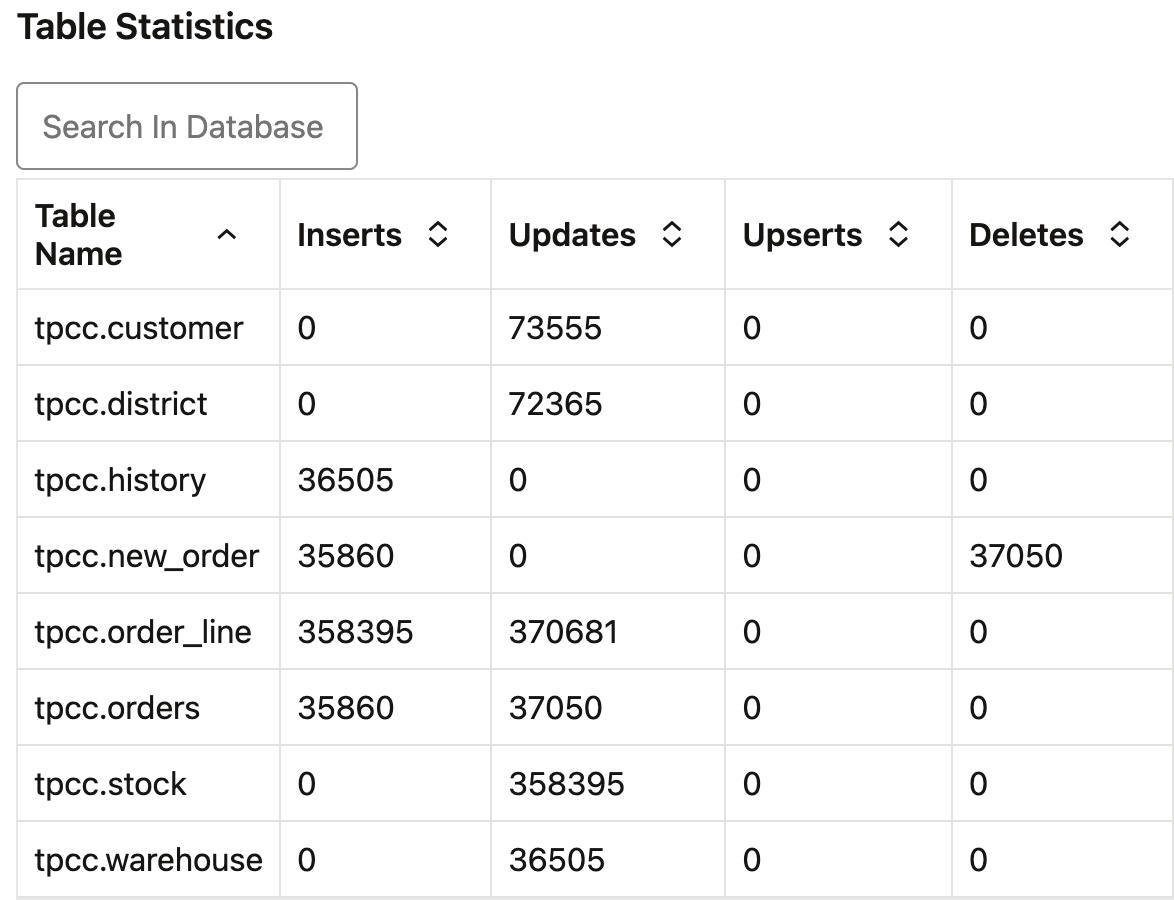
Extract Statistics will show data is being captured.
Distribution Path
Create and start a Distribution Path from the source Oracle GoldenGate Hub server to the target Oracle GoldenGate Hub server as specified in the Oracle GoldenGate documentation.
Instantiate Target
We are now ready to instantiate the target Oracle database.
Go to the MySQL Shell output directory. The data dump files are all labeled with the “.gz” suffix.

Move these files to a location on the Oracle Database server, or a server which can be used to load the Oracle target tables.
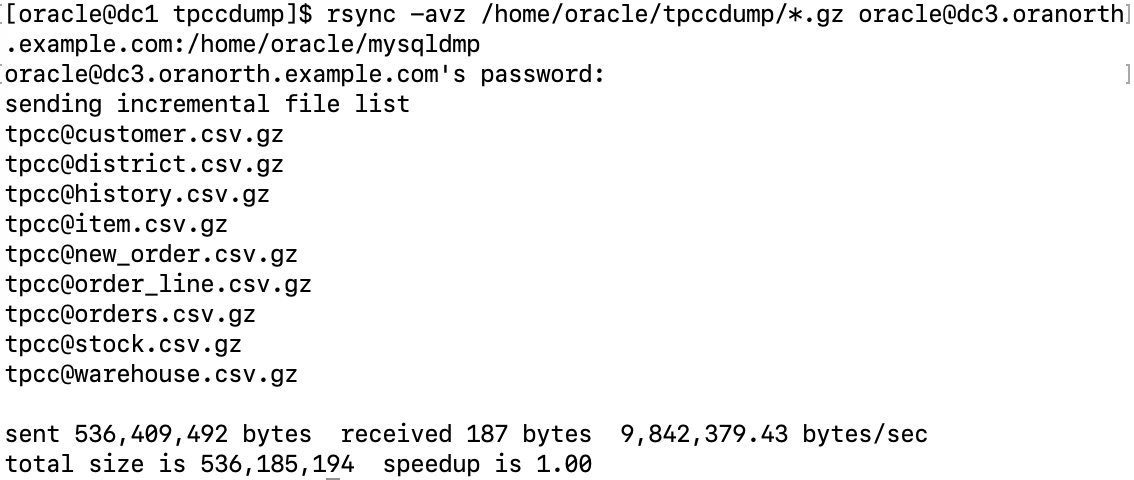
Login to the server where the files were moved and decompress the data files.

Oracle SQLoader
We shall be using Oracle SQL*Loader to instantiate the target tables. SQL*Loader requires a control file for each data file being loaded. A sample control file for loading one of our demo tables is shown below.
infile ‘tpcc@customer.csv’ “str ‘\n'”
into table customer
fields terminated by “,” optionally enclosed by ‘”‘
(
C_ID,C_D_ID,C_W_ID,C_FIRST,C_MIDDLE,C_LAST,C_STREET_1,C_STREET_2,C_CITY
,C_STATE, C_ZIP,C_PHONE,
C_SINCE date ‘YYYY-MM-DD HH24:MI:SS’,
C_CREDIT,C_CREDIT_LIM,C_DISCOUNT,C_BALANCE,C_YTD_PAYMENT,C_PAYMENT_CNT,
C_DELIVERY_CNT,
C_DATA char(500) nullif C_DATA=BLANKS
)
It is beyond the scope of this article to fully explain the usage of SQL*Loader; however, there are several things we must consider before attempting to load the MySQL data. (For more information on how to use SQL*Loader, refer to the Oracle Database Utilities documentation.)
MySQL DATETIME Data Type
Several of the source tables contain MySQL DATETIME data. You must specify the correct (MySQL) input format for each column; such as shown above, C_SINCE date ‘YYYY-MM-DD HH24:MI:SS’.
NULL Data
MySQL Shell denotes NULL data in its output via the characters, \N. SQL*Loader does not understand this, so we need to check all the csv files to find any with this characteristic. We can use grep for this.
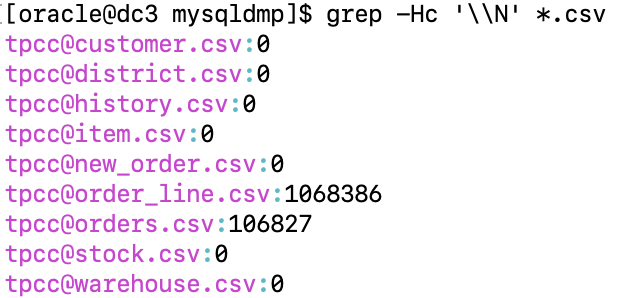
As shown above, for our demonstration database, the dump data for order_line and orders each contain NULL. In the control file for these tables, we must account for this by specifying:
As an example, here is our control file for the orders table:
infile ‘tpcc@orders.csv’ “str ‘\n'”
into table orders
fields terminated by “,” optionally enclosed by ‘”‘
(
O_ID,O_W_ID,O_D_ID,O_C_ID,
O_CARRIER_ID NULLIF (O_CARRIER_ID = “\\N”),
O_OL_CNT,O_ALL_LOCAL,
O_ENTRY_D date ‘YYYY-MM-DD HH24:MI:SS’
)
Run SQL*Loader
Execute SQL*Loader to load the csv data into the target Oracle tables. The command to do this is:
Instead of executing one load process at a time from our shell, we created a script.

Here’s the script we used:
read dbuid
echo -n “Enter database user password: ”
read -s dbpwd
echo
sqlldr ${dbuid}/${dbpwd} control=customer_loader.ctl DIRECT=TRUE &
P1=$!
sqlldr ${dbuid}/${dbpwd} control=district_loader.ctl DIRECT=TRUE &
P2=$!
sqlldr ${dbuid}/${dbpwd} control=history_loader.ctl DIRECT=TRUE &
P3=$!
sqlldr ${dbuid}/${dbpwd} control=item_loader.ctl DIRECT=TRUE &
P4=$!
sqlldr ${dbuid}/${dbpwd} control=new_order_loader.ctl DIRECT=TRUE &
P5=$!
sqlldr ${dbuid}/${dbpwd} control=order_line_loader.ctl DIRECT=TRUE &
P6=$!
sqlldr ${dbuid}/${dbpwd} control=orders_loader.ctl DIRECT=TRUE &
P7=$!
sqlldr ${dbuid}/${dbpwd} control=stock_loader.ctl DIRECT=TRUE &
P8=$!
sqlldr ${dbuid}/${dbpwd} control=warehouse_loader.ctl DIRECT=TRUE &
P9=$!
wait $P1 $P2 $P3 $P4 $P5 $P6 $P7 $P8 $P9
When the SQL*Loader jobs complete, check for files with the suffix “.bad”. These files contain data that was not loaded. This must be addressed, or you will be missing data.

Target GoldenGate Processes
Parallel Replicat
With the target Oracle tables now instantiated, we can create and start the Oracle GoldenGate Parallel Replicat. Login to the Administration Service of the Oracle GoldenGate for Oracle Hub server and create a Parallel Replicat.
For this demonstration, the parameter settings are:
USERIDALIAS [ogg database login alias] DOMAIN OracleGoldenGate
— Every 20 minutes, report the count of records
— processed since Extract start to the process
— report file.
— Rate reports the number of operations per second
— The report file also contains DELTA throughput which is
— the number of records since the last report divided by
— the time since the last report
REPORTCOUNT EVERY 20 MINUTES, RATE
MAP [source database].*, TARGET [pdb].[schema].*;
Viewing the Parallel Replicat statistics shows data is being applied to the target tables.
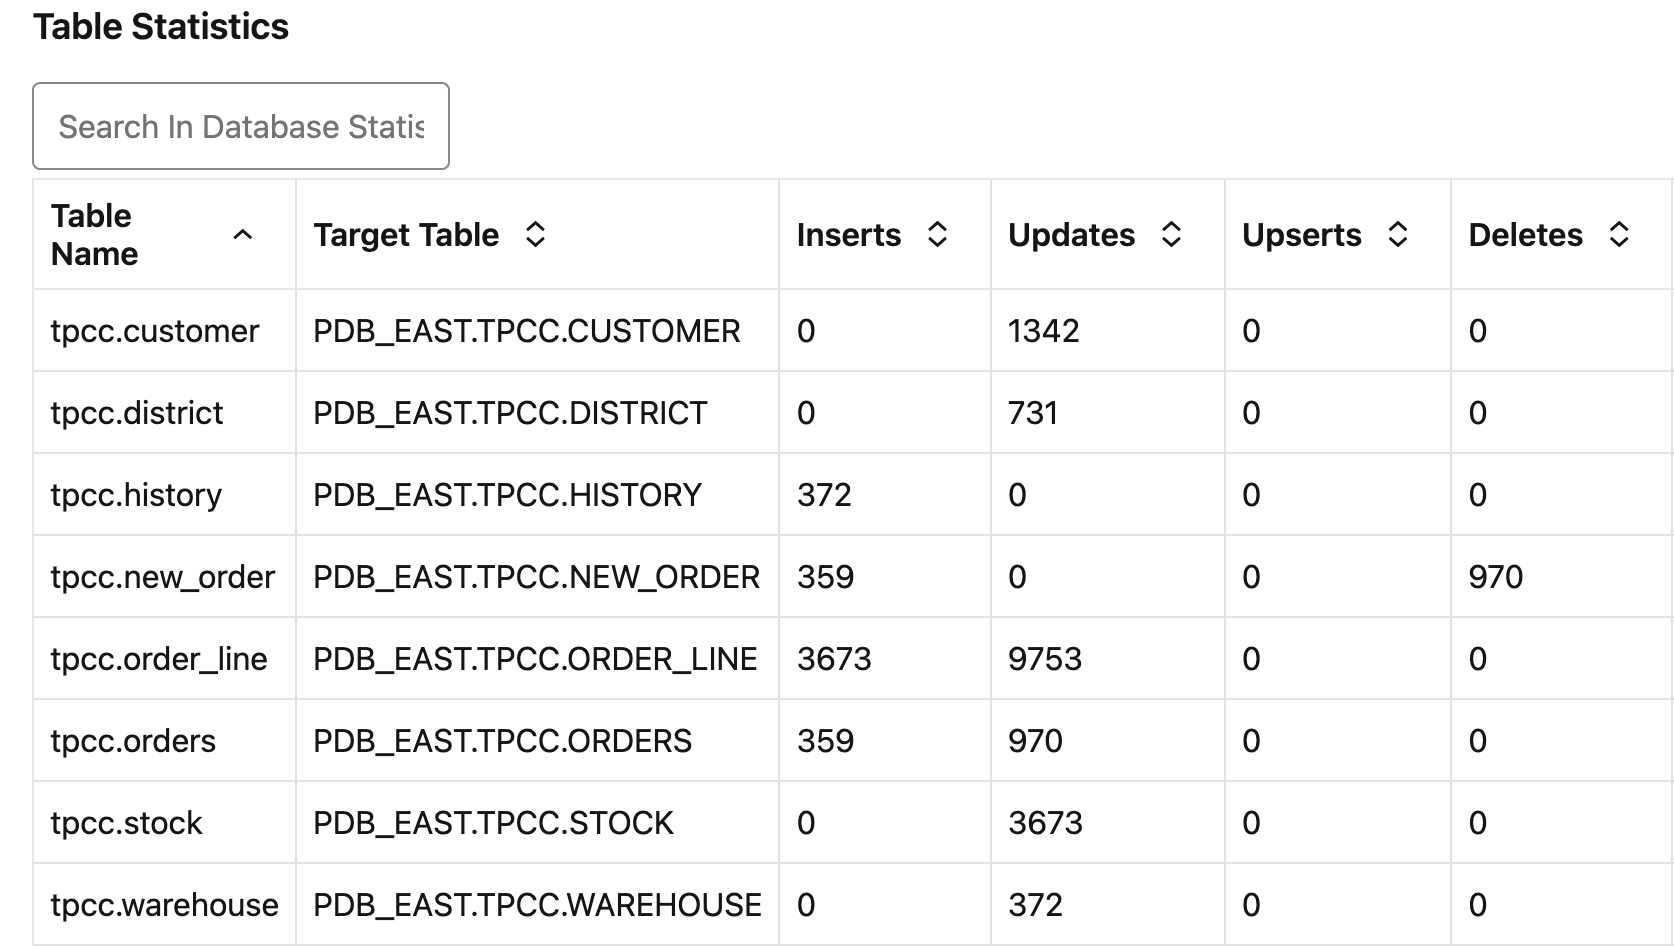
Allow the Parallel Replicat to apply the queued data; we are now done.
Post Instantiation Activities
There are several activities that should be performed post instantiation:
- Validate the target data
- The target data should be validated for accuracy.
- We encourage the use of Oracle GoldenGate Veridata for this task. Oracle GoldenGate Veridata may be used for heterogeneous compare and repair with minimum impact to the database and application users as table are not locked during compare operations. Data comparisons can be performed against source and target databases with, or without, real-time data replication.
- Delete the MySQL dump files.
- Delete the SQL*Loader logs and data load files.
- Create a Trail Purge Task in the Administration Server WebUI for each Oracle GoldenGate Hub to ensure disk space is freed when Oracle GoldenGate Trails are consumed.
Summary
In this article we presented detailed steps to perform precise instantiation of an Oracle target database from a source MySQL database and enabled real-time replication using Oracle GoldenGate. To learn more about Oracle GoldenGate functionality, you may refer to:
- The Oracle Integration Services GoldenGate web site.
- The Oracle Data Integration blog site.
- The Oracle GoldenGate YouTube channel.
- Oracle GoldenGate A-Team articles.