Continuous operation of critical data verification systems is essential to maintain data integrity and support business requirements. Tolerance for hardware failures, network interruptions, or software anomalies must be built into the architecture to prevent unplanned downtime. High Availability (HA) addresses these challenges by enabling systems to recover from faults and maintain service continuity.
Within Oracle GoldenGate Veridata, HA is a key consideration. Both the Veridata Server and Agent components support multiple configuration options to ensure persistent availability. This article details a practical approach for implementing High Availability with Veridata, focusing on methods that enable uninterrupted and reliable data verification.
To bring this setup to life, the following components are essential:
- Deploy Veridata on two servers: One server acts as active, the other as standby for failover.
- Set up a MySQL repository: Use a commercial version of MySQL 8.0.34 or later for Veridata metadata storage.
- Configure a shared file system: Ensure logs, reports, and OOSXML files from the active server are accessible to the standby server during switchover.
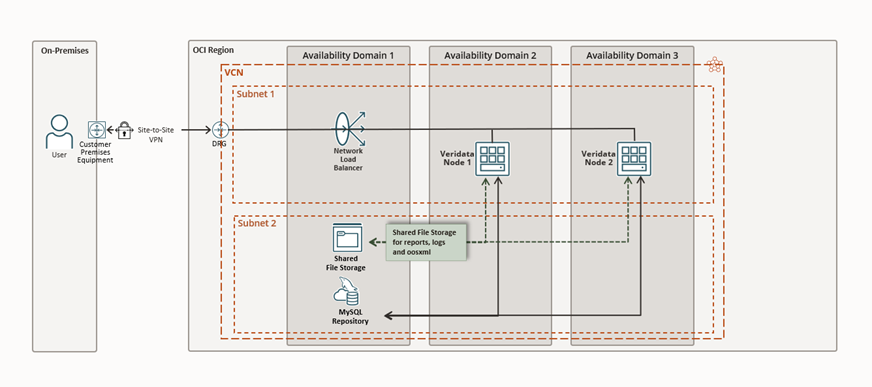
In the Cloud, this setup becomes even more streamlined. Oracle Cloud Infrastructure (OCI) offers all the building blocks needed to support a highly available Veridata deployment. The two Veridata servers run on OCI Compute instances.
A shared file system, powered by OCI File Storage, ensures that critical logs and reports are always accessible.The Veridata repository resides in OCI’s managed MySQL service, meeting the required version and performance standards. And to tie it all together, an OCI Network Load Balancer intelligently routes traffic to the active server, keeping the service responsive, even during a failover.
Deploy Veridata 23.4 on two OCI Compute instances.
Start by configuring the OCI MySQL Database as the shared repository. Then, create an OCI File Storage system and attach it to both OCI Compute instances designated for the Veridata servers. This ensures shared access to logs, reports, and OOSXML files during failover.
To set up Veridata in this highly available configuration, you can follow the official installation guide, Installing and Running Oracle GoldenGate Veridata, which provides step-by-step instructions.
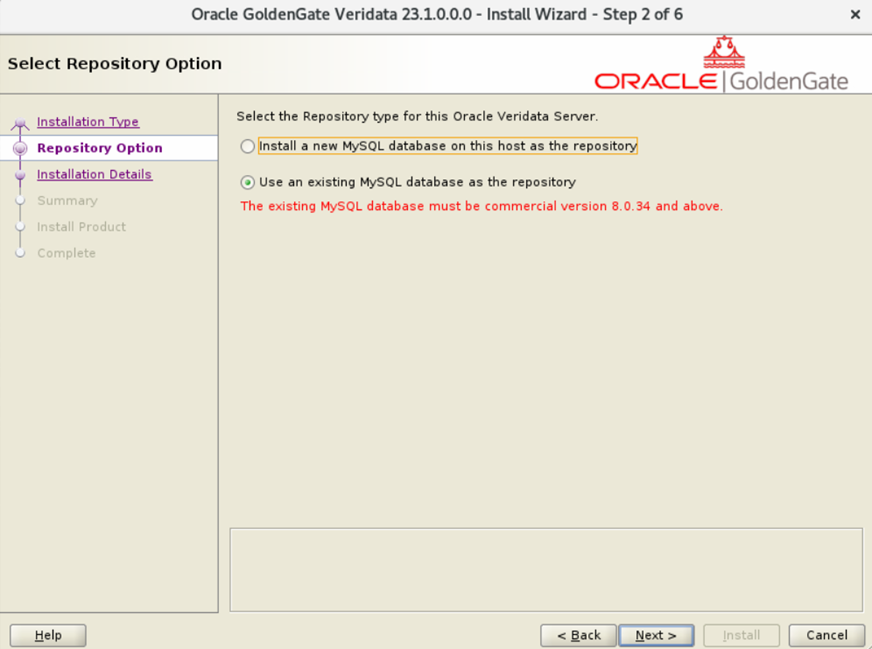
As you go through the guide, make one key adjustment: in Section 3.1, Step 4, select “Using an existing MySQL database as the repository” and configure both Veridata servers to use the shared OCI MySQL repository.
Additionally, ensure consistency across both servers by using the same ports, directory structures, and naming conventions.
If you’re starting with an older version of Veridata, it’s important to patch it to version 23.4. Our Veridata Product Manager has detailed the patching steps in the blog and the link to download the 23.4 patch (Patch: 37960961):
Oracle GoldenGate Veridata 23c – How to apply patch?
Latest builds for GoldenGate Veridata, Enterprise Manager Plug-in and Studio
Once the Veridata servers are installed, and before running Configuration Assistant step, a few important adjustments are needed to ensure all runtime files like logs, reports, OOSXML, and wallet files are stored in the shared file system accessible by both servers.
-
Configure Report File Location
Edit the veridata.cfg file located in <veridata_home>/config/veridata directory. Update server.veridata_data to a shared location on both servers.
# SERVER PARAMETERS
# While using relative paths need not startwith any forward(/) or backward(\) slashes.
# Base for relative paths is Veridata domain home directory
# Refer the above guidelines for specifying the paths

server.veridata_data   /mnt/veridata-shared/veridata/reports
-
Set Wallet File Path
Open the jps-config-jse.xml file in <veridata_home>/config directory and change the wallet location to the shared path on both servers.
Also set he environment variable to override the wallet path to
export CREDENTIAL_LOCATION=<path>
<serviceInstances>
        <serviceInstance name="credstore" provider="credstoressp" location="/mnt/veridata-shared/config">
            <description>File Based Credential Store Service Instance</description>
        </serviceInstance>
    </serviceInstances>
-
Align Repository Configuration
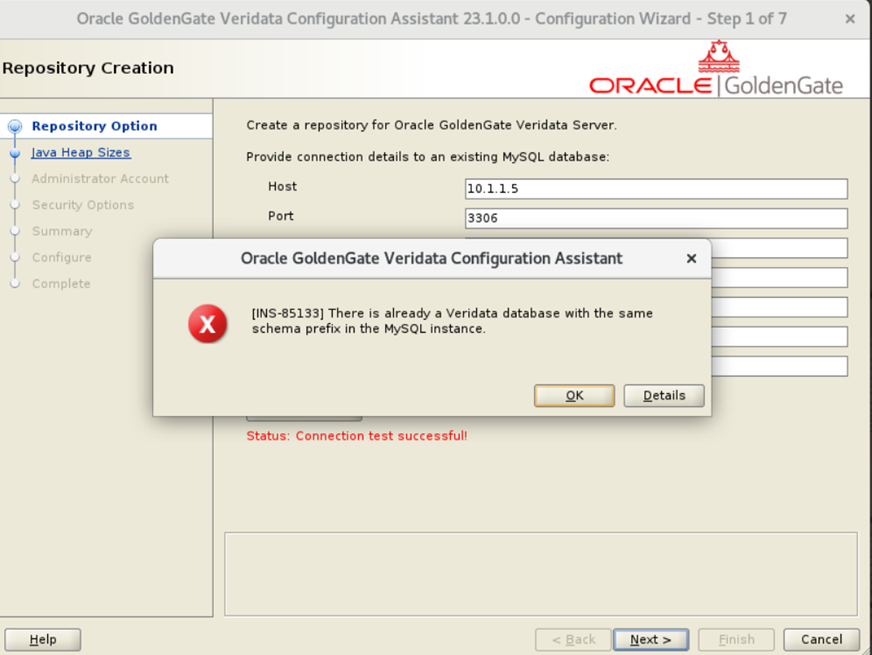
For the third change, first complete the Veridata Configuration Assistant step and finish the installation. Then, edit the oggvdt_cainput.properties file in the <veridata_home>/config directory to make sure both servers point to the same shared repository.
**Note: While configuring the second Veridata server, the setup may reject the shared repository, returning an error as shown in the below image. As a workaround, use a different Veridata username and schema prefix during installation. Once setup is complete, you can manually update the configuration to point to the correct shared repository using this above step and after all 3 changes restart both the veridata servers.
These three changes ensure both Veridata servers operate consistently with shared file access, enabling smooth transitions during failover.
Conclusion
By configuring Veridata with a shared repository, file system, and dual-server setup, you can achieve a reliable High Availability environment. This ensures seamless failover, continuous data verification, and minimal downtime for critical business operations.
For further details, refer to the official installation guide and related GoldenGate Veridata resources.