In GoldenGate Microservices, deployment can be configured to operate in either a secure or unsecured mode. Opting for secure deployment utilizes SSL/TLS protocols, which provide robust encryption to safeguard the communication channels. This means that data transmitted between clients such as web browsers, the AdminClient, and various APIs to the GoldenGate host is effectively protected against interception and unauthorized access. Furthermore, secure communication can also be established between two GoldenGate hosts, ensuring that all data exchanged is encrypted and secure. This configuration is essential for maintaining the integrity and confidentiality of sensitive information during transmission.
A secure deployment does not automatically establish a secure connection between the GoldenGate host and the Oracle Database server for capturing or applying purposes. This secure connection is critical as it ensures that all data transmitted between the two servers is encrypted, safeguarding sensitive information from potential unauthorized access. Without this encrypted data transmission, the integrity and confidentiality of the data in transit could be compromised, exposing it to various security threats. Therefore, it is essential to manually configure secure connectivity to achieve a fully secure deployment environment.
This article provides step-by-step procedures for establishing a secure TLS (Transport Layer Security) connection between your GoldenGate Deployment and the Database host. We will begin by configuring the wallet, adding certificates in the database host, and reconfiguring the listener to accept the TLS protocol connections. Next, we will copy the wallet to the GoldenGate host, configure it in the GoldenGate host, and finally, test the connectivity.
Transport Layer Security (TLS) helps keep your connections secure between an Oracle Database client and server by encrypting data. You can choose between a self-signed certificate or one from a public Certificate Authority (CA).
Using Distinguished Name (DN) matching to ensure you connect to the right server is recommended. While you can customize TLS settings, sticking with the default options for optimal security is usually best.
The examples in this article use self-signed certificates, but you can just as easily use proper certificate authority certificates if you prefer.
Full Documentation on GoldenGate Data in Transit Security: https://docs.oracle.com/en/middleware/goldengate/core/23/coredoc/secure-data-transit.html
1. Create root wallet and self signed root CA certificate.
In this step, the script will use orapki to create the wallet, generate the self-signed certificate and export the trusted certificate for use by the client trust store.
export DBUSR_PWD=”XXXXXX”
export ORACLE_HOME=/opt/oracle/product/19c/dbhome_1
export TLS_DIR=/etc/ORACLE/WALLETS/ORCLCDB/2E9B0F48D8E60B3BE063670034ACADE0/tls
export ROOT_TLS_DIR=${TLS_HOME}/tls/certificates/rootCA
export DB_TLS_DIR=${TLS_HOME}/tls/certificates/db_wallet
export WALLET_DIR=${TLS_DIR}
1.1. Create the wallet files
1.2. View the contents of the wallet, it should be empty
User Certificates:
Trusted Certificates:
1.3. Create the self-signed certificate for the rootCA wallet
1.4. The directory should have cwallet.sso and ewallet.p12 files
-rw——- 1 oracle oinstall 0 Feb 24 21:44 cwallet.sso.lck
-rw——- 1 oracle oinstall 3984 Feb 24 21:44 ewallet.p12
-rw——- 1 oracle oinstall 0 Feb 24 21:44 ewallet.p12.lck
1.5. View the contents of the wallet, it should have a user and a trusted certificate
User Certificates:
Subject: C=US,CN=ROOT
Trusted Certificates:
Subject: C=US,CN=ROOT
1.6. Export the rootCA trusted certificate for use in creating the DB wallet
orapki wallet export -wallet /opt/oracle/tls/certificates/rootCA -dn ‘C=US,CN=ROOT’ -cert /opt/oracle/tls/certificates/rootCA/rootCA.crt -pwd ${DBUSR_PWD}
1.7. View the contents o the rootCA.crt file:
MIICuzCCAaMCEG7/liFst0sbxPi3Itm1RE0wDQYJKoZIhvcNAQELBQAwHDENMAsG
A1UEAxMEUk9PVDELMAkGA1UEBhMCVVMwHhcNMjUwMjI0MjE0NDIyWhcNMzUwMjI0
MjE0NDIyWjAcMQ0wCwYDVQQDEwRST09UMQswCQYDVQQGEwJVUzCCASIwDQYJKoZI
hvcNAQEBBQADggEPADCCAQoCggEBAIEBLRyKcY5FmbLAhV4W/8BpKTbqnj2tS0p9
9yNTfPFecf3+Zcl6tSaH1KRRUIylMUCxbG4jPhGX49rj6DFPsGs0gCvSfPdgYIAI
zyRhonjmbJ+1yG4rU+TagveU/qnBgYvhcSzgf2EsGbtEBt8mhcNSudMRDjE7ytI6
q7tkKppQd06g7iGfMXvyBxzpVzOuyJ7i1pfjVH9DHlGwE+VLP0nuTqE6lurGaSrE
nyhEaQPumx1n9POoPm0NdlHJhBG9RtOkfRM4T0tq1T8QYhDMWUwfZQj32tjOH10H
Sm2hd1li8JKZMEmOKTAwvri3vROOo/YY/yoGMrpdSlr3vRETGGUCAwEAATANBgkq
hkiG9w0BAQsFAAOCAQEALd9rbavZcXStHtYsiBS7mIxkURZKh5oW3VACkvOT250/
kcdP3O+NYFoRyWdSOTWfu63BpizUPVDTWB1bgmrdP81FddFqRf7VeC3wgukSECb+
at/IQY39mk92aZQliOtfMo/x3lefDLuozvC8gYxFB8ii36ZTddAvEvffP5tfaIuW
1RMlwybWcroVzAwqkM6Eke7U/71ff+ad3cuaamRNEHQUjlD7cjAQvtJWe9rJ50dn
tD3oBtMWIwpci8ygOBtRlnnPads2vpMTB2rXGeSbe64dyQPQUYcWFGAOk7mzkdL8
FRMGO2kTfzq4NHF+65B528X8ter4NHYeO6ky3+am8g==
—–END CERTIFICATE—–
2. Create database server wallet and create certificate request.
Next, you will create the DB wallet and certificate request to be signed by the rootCA. This step also imports the rootCA trusted certificate into the DB wallet.
2.1. Create the wallet files
2.2. Add the rootCA trusted certificate to the DB wallet
2.3. Create the DB server user certificate
2.4. Export the DB certificate signing request
2.5. View the contents of the wallet, it should have a Requested certificate and a Trusted certificate
Subject: CN=dbsec-lab,OU=dbsecdemo,O=LiveLabs,L=Austin,ST=Texas,C=US
User Certificates:
Trusted Certificates:
Subject: C=US,CN=ROOT
2.6. View the contents of the certificate request file:
MIICrjCCAZYCAQAwaTELMAkGA1UEBhMCVVMxDjAMBgNVBAgTBVRleGFzMQ8wDQYD
VQQHEwZBdXN0aW4xETAPBgNVBAoTCExpdmVMYWJzMRIwEAYDVQQLEwlkYnNlY2Rl
bW8xEjAQBgNVBAMTCWRic2VjLWxhYjCCASIwDQYJKoZIhvcNAQEBBQADggEPADCC
AQoCggEBAJwPHoCbz0Nwx1sxVZOE43DJFGKrWiY3hEjtD5fJIv4X/vdF1r07M0/Z
N6HOUiaNW7+rFRJ3O51bCVDe1Mf0CeZsVOkXFzE9Eel/Hoh98u9iNcrdCpgl7Atv
xf8/CLjmypDMbM2bgswtc1+2COxWriJS7/FRHT1My5cbtrgD/TIFCcnN0uWfXE+1
xgq+k5STyf4N+2svLDbCmEntHxXu8d2kt79zXnQTSXrLIGfXiBp3SlccialU5Wmv
N2yVe98qQ3p64GcJZzDTgXeSp3iiJxiFQRHXmx6by2pr7roUDV57iS6p5BcilQ7g
3gKFm2gScfRv9dcgkDCYt0oByrwRt7kCAwEAAaAAMA0GCSqGSIb3DQEBCwUAA4IB
AQBjrzwPKjJ6gW+XMViJxplRs8mRuZ9/iOq8guDNt62EHfMmruzlQxfuoDF+KBdB
12FiTsG2+S9gu1yD0AkjwJNIUO58ZscOqDwUI5FhEn3F9mNYeUudcAg4pLaMZ8gF
+0mHMaLohACG3MH0EVC6LVdS18YMgnaYIvyaxeNX0++XHjSUuvwAb1WsAvGPFfbb
eD1kPSGRtt9E+dSS+FHbxrxoCRLi+muTR0Dxgh14X4EWItojESZss7RmgWUg0BoT
8Kj+v5FXpoIX+ew5Gwa10EAn8xnWtXCUDfE43IpsatBT3Yag8T46by/TWWqi9YZL
bCL6ogDJii3j6OQ3Ki8duegH
—–END NEW CERTIFICATE REQUEST—–
2.7. Check all files
bash-4.4$ pwd
/opt/oracle/tls/certificates
bash-4.4$ ls -lRt
.:
total 8
drwxr-xr-x 2 oracle oinstall 4096 Feb 24 21:49 db_wallet
drwxr-xr-x 2 oracle oinstall 4096 Feb 24 21:44 rootCA
./db_wallet:
total 12
-rw——- 1 oracle oinstall 1012 Feb 24 21:49 dbsecdemo.csr
-rw——- 1 oracle oinstall 3293 Feb 24 21:49 cwallet.sso
-rw——- 1 oracle oinstall 3248 Feb 24 21:49 ewallet.p12
-rw——- 1 oracle oinstall 0 Feb 24 21:49 cwallet.sso.lck
-rw——- 1 oracle oinstall 0 Feb 24 21:49 ewallet.p12.lck
./rootCA:
total 12
-rw——- 1 oracle oinstall 1008 Feb 24 21:44 rootCA.crt
-rw——- 1 oracle oinstall 4029 Feb 24 21:44 cwallet.sso
-rw——- 1 oracle oinstall 3984 Feb 24 21:44 ewallet.p12
-rw——- 1 oracle oinstall 0 Feb 24 21:44 cwallet.sso.lck
-rw——- 1 oracle oinstall 0 Feb 24 21:44 ewallet.p12.lck
bash-4.4$
3. Sign database certificate with root CA certificate.
Now, you will have the rootCA sign the DB server user certificate. This provides validity to the certificate. If it is not signed by a public root, or intermediate, certificate authority (CA), or an organization’s root, or intermediate, CA, then the certificate may not be trustworthy.
3.1. Create the wallet files
3.2. View the signed server user certificate
—–BEGIN CERTIFICATE—–
MIIC+TCCAeECAQAwDQYJKoZIhvcNAQELBQAwHDENMAsGA1UEAxMEUk9PVDELMAkG
A1UEBhMCVVMwHhcNMjUwMjI3MDQzOTU4WhcNMzUwMjI3MDQzOTU4WjBpMQswCQYD
VQQGEwJVUzEOMAwGA1UECBMFVGV4YXMxDzANBgNVBAcTBkF1c3RpbjERMA8GA1UE
ChMITGl2ZUxhYnMxEjAQBgNVBAsTCWRic2VjZGVtbzESMBAGA1UEAxMJZGJzZWMt
bGFiMIIBIjANBgkqhkiG9w0BAQEFAAOCAQ8AMIIBCgKCAQEAnA8egJvPQ3DHWzFV
k4TjcMkUYqtaJjeESO0Pl8ki/hf+90XWvTszT9k3oc5SJo1bv6sVEnc7nVsJUN7U
x/QJ5mxU6RcXMT0R6X8eiH3y72I1yt0KmCXsC2/F/z8IuObKkMxszZuCzC1zX7YI
7FauIlLv8VEdPUzLlxu2uAP9MgUJyc3S5Z9cT7XGCr6TlJPJ/g37ay8sNsKYSe0f
Fe7x3aS3v3NedBNJessgZ9eIGndKVxyJqVTlaa83bJV73ypDenrgZwlnMNOBd5Kn
eKInGIVBEdebHpvLamvuuhQNXnuJLqnkFyKVDuDeAoWbaBJx9G/11yCQMJi3SgHK
vBG3uQIDAQABMA0GCSqGSIb3DQEBCwUAA4IBAQAWBkVQeZHuctwJuD9KzU37vOaS
rc5BMivfc2ifki7wN8sEuWFHorZastXpH1MAU2Ahksoo5TPX7j6T7m23T1c137cV
ipl8Y9lc0B7H1xrinw4roUwLMkF3xQsH7RFI3JueCxYPwFgEi2sQF0DMFykbIyZ5
z3/h5PwIqsQFX7uFSlkM08Ztw8bDC9lZBfI4lXybjgOnLOck+qFWfphBldcnQNdC
v8ChL6tU2zf4WjsD6QNr8ZfHl4qeGecPY90CIUJle8XwLVBUq3+YUuUtSt0hjIl2
hKpCscHOn30VKjZySoBn0YsiXtW5yZPmy6lE6aaSGsSKgaJMYdxawI3neLti
—–END CERTIFICATE—–
4. Add CA root certificate and database server certificate to database wallet.
After generating the signed DB user certificate, import it to the DB wallet. In this step, you will see that the DB server user certificate changes from a “requested certificate” to a “user certificate”.
4.1. Before importing, the DB server user certificate is still marked as Requested
Subject: CN=dbsec-lab,OU=dbsecdemo,O=LiveLabs,L=Austin,ST=Texas,C=US
User Certificates:
Trusted Certificates:
Subject: C=US,CN=ROOT
4.2. Import the signed DB server user certificate into the DB wallet
4.3. After importing, the DB server user certificate is now a user certificate
User Certificates:
Subject: CN=dbsec-lab,OU=dbsecdemo,O=LiveLabs,L=Austin,ST=Texas,C=US
Trusted Certificates:
Subject: C=US,CN=ROOT
5. Import CA root certificate into client trust store (Linux, Windows only)
Now that you have your signed DB server user certificate, you will deploy it to your DB wallet root location. The DB will use the WALLET_ROOT parameter to look for it’s wallet-related information, including tde and tls. Then you will copy the DB wallet, with the signed certificate the default directory Oracle GoldenGate would search for the wallet, /u02/Deployment/etc/ssl in the GoldenGate host.
The ‘WALLET_ROOT’ parameter now must be set in the Database initalization parameter.
This is a static parameter, the DB will be restarted.
Set “wallet_root” parameter as “/etc/ORACLE/WALLETS/ORCLCDB/2E9B0F48D8E60B3BE063670034ACADE0/tls”
5.1. This is a static parameter, the DB will be restarted.
prompt . Set “wallet_root” parameter as “${WALLET_DIR}”
alter system set wallet_root = ‘${WALLET_DIR}’ scope= spfile;
prompt . Reboot the DB
shutdown immediate;
startup;
prompt . Show the modified parameters
show parameter wallet_root;
exit;
EOF
———————————— ———– ——————————
wallet_root string /etc/ORACLE/WALLETS/ORCLCDB/2E9B0F48D8E60B3BE063670034ACADE0/tls
5.2. Identify the GUID for PDB1, this will be the directory we use for our wallet location
select guid from v\$containers where name = ‘ORCLPDB1’;
EOF
——————————–
2E9B0F48D8E60B3BE063670034ACADE0
5.3. As root, create the DB server wallet directory on the OS
5.4. Copy wallet files to the DB wallet location
cp -v /opt/oracle/tls/certificates/db_wallet/ewallet.p12 /etc/ORACLE/WALLETS/ORCLCDB/2E9B0F48D8E60B3BE063670034ACADE0/tls
cp -v /opt/oracle/tls/certificates/db_wallet/cwallet.sso /etc/ORACLE/WALLETS/ORCLCDB/2E9B0F48D8E60B3BE063670034ACADE0/tls
5.5. Change ownership of ORACLE directory to oracle user
ownership of ‘/etc/ORACLE/WALLETS/ORCLCDB/2E9B0F48D8E60B3BE063670034ACADE0/tls/cwallet.sso’ retained as oracle:oinstall
ownership of ‘/etc/ORACLE/WALLETS/ORCLCDB/2E9B0F48D8E60B3BE063670034ACADE0/tls/cwallet.sso.lck’ retained as oracle:oinstall
ownership of ‘/etc/ORACLE/WALLETS/ORCLCDB/2E9B0F48D8E60B3BE063670034ACADE0/tls/ewallet.p12.lck’ retained as oracle:oinstall
ownership of ‘/etc/ORACLE/WALLETS/ORCLCDB/2E9B0F48D8E60B3BE063670034ACADE0/tls’ retained as oracle:oinstall
5.6. Copy the DB wallet files to the GoldenGate host
scp ogg@ogg237W:/opt/oracle/tls/certificates/db_wallet/cwallet.sso /u02/Deployment/etc/ssl
chown -R ogg:ogg /u02/Deployment/etc/ssl
5.7. On GoldenGate Host, create the wallet
orapki wallet create -wallet /u02/Deployment/etc/ssl -auto_login -pwd ${DBUSR_PWD}
orapki wallet display -wallet /u02/Deployment/etc/ssl -pwd ${DBUSR_PWD}
Oracle PKI Tool Release 23.0.0.0.0 – Production
Version 23.0.0.0.0
Copyright (c) 2004, 2025, Oracle and/or its affiliates. All rights reserved.
Requested Certificates:
User Certificates:
Subject: CN=dbsec-lab,OU=dbsecdemo,O=LiveLabs,L=Austin,ST=Texas,C=US
Trusted Certificates:
Subject: C=US,CN=ROOT
6. Monify the listener.ora and sqlnet.ora in the Database Host.
- Database Host is the server in this scenario
6.1. Modify the listener.ora and sqlnet.ora in the Database host
bash-4.4$ cat /opt/oracle/product/19c/dbhome_1/network/admin/listener.ora
SID_LIST_LISTENER =
(SID_LIST =
(SID_DESC =
(SID_NAME = ORCLCDB)
(ORACLE_HOME = /opt/oracle/product/19c/dbhome_1)
(GLOBAL_DBNAME = ORCLCDB)
)
)
LOGGING_LISTENER = OFF
SSL_CLIENT_AUTHENTICATION = FALSE
LISTENER =
(DESCRIPTION_LIST =
(DESCRIPTION =
(ADDRESS = (PROTOCOL = TCP)(HOST = db19W)(PORT = 1521))
(ADDRESS = (PROTOCOL = TCPS)(HOST = db19W)(PORT = 1522))
)
)
TRACE_LEVEL_LISTENER = OFF
6.2. Modify sqlnet.ora in the database host
bash-4.4$ cat /opt/oracle/product/19c/dbhome_1/network/admin/sqlnet.ora
NAMES.DIRECTORY_PATH= (TNSNAMES, EZCONNECT, HOSTNAME)
DISABLE_OOB=ON
SSL_CLIENT_AUTHENTICATION = FALSE
6.3. Bounce the listener
7. Modify the tnsnames.ora and sqlnet.ora GoldenGate host.
- GoldenGate host in this scenario is the client.
7.1. Modify the tnsnames.ora in the GoldenGate host
[ogg@ogg237W etc]$ cat /u02/Deployment/etc/tnsnames.ora
ORCLPDB1=
(DESCRIPTION =
(ADDRESS = (PROTOCOL = TCP)(HOST = db19W)(PORT = 1521))
(CONNECT_DATA =
(SERVER = DEDICATED)
(SERVICE_NAME = ORCLPDB1)
)
)
ORCLPDB1_TLS =
(DESCRIPTION =
(ADDRESS = (PROTOCOL = TCPS)(HOST = db19W)(PORT = 1522))
(CONNECT_DATA =
(SERVER = DEDICATED)
(SERVICE_NAME = ORCLPDB1)
)
)
ORCLCDB_TLS =
(DESCRIPTION =
(ADDRESS = (PROTOCOL = TCPS)(HOST = db19W)(PORT = 1522))
(CONNECT_DATA =
(SERVER = DEDICATED)
(SERVICE_NAME = ORCLCDB)
)
)
7.2. Modify sqlnet.ora in the GoldenGate Host
[ogg@ogg237W etc]$ cat /u02/Deployment/etc/sqlnet.ora
SQLNET.EXPIRE_TIME = 1
NAMES.DIRECTORY_PATH= (TNSNAMES, EZCONNECT, HOSTNAME)
SSL_CLIENT_AUTHENTICATION = FALSE
WALLET_LOCATION =
(SOURCE =
(METHOD = FILE)
(METHOD_DATA =
(DIRECTORY = /u02/Deployment/etc/ssl)
)
)
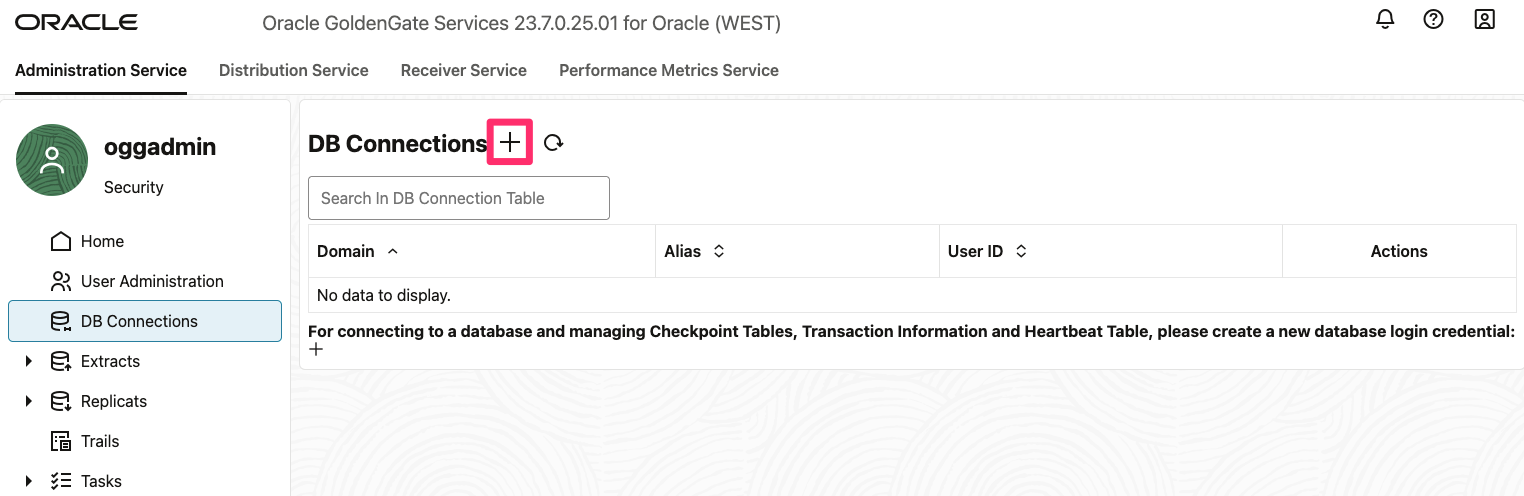
8. Let’s test the connectivity with GoldenGate WEbUI trying to connect to the TLS secure port (1522).
8.1. Create a connection
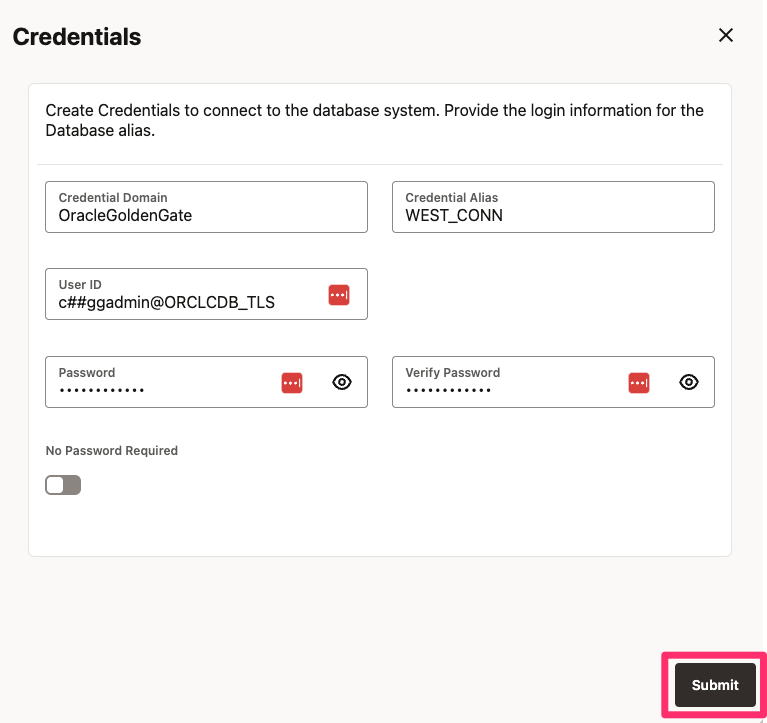
8.2. Enter Alias, User ID and password to connect to the database with TLS, note the TNS entry in the User ID
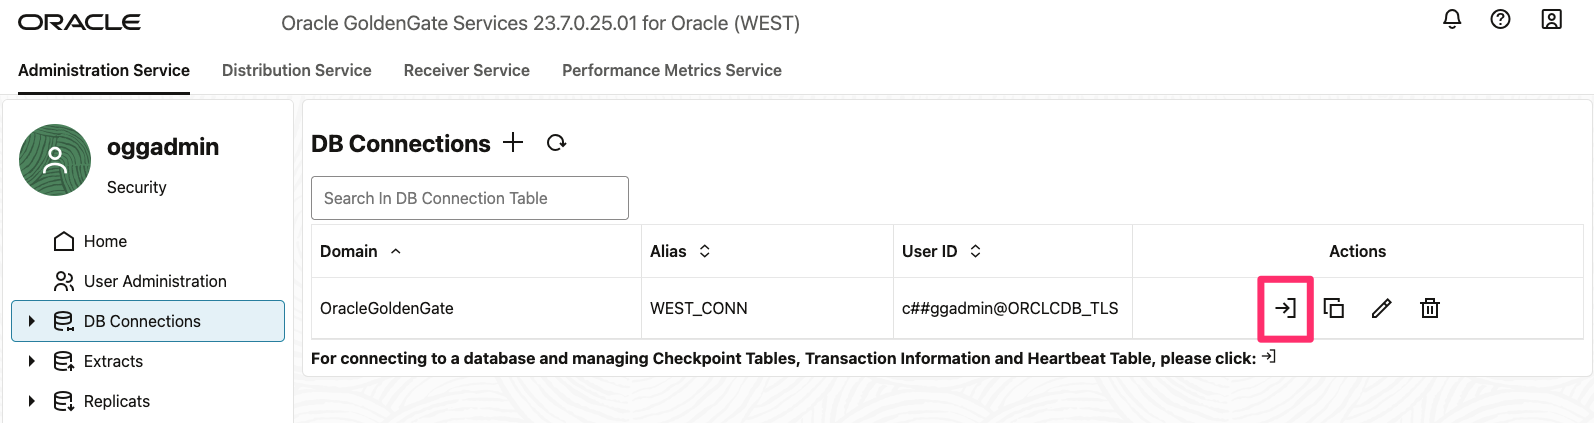
8.3. We can now see the credention created and let’s test it
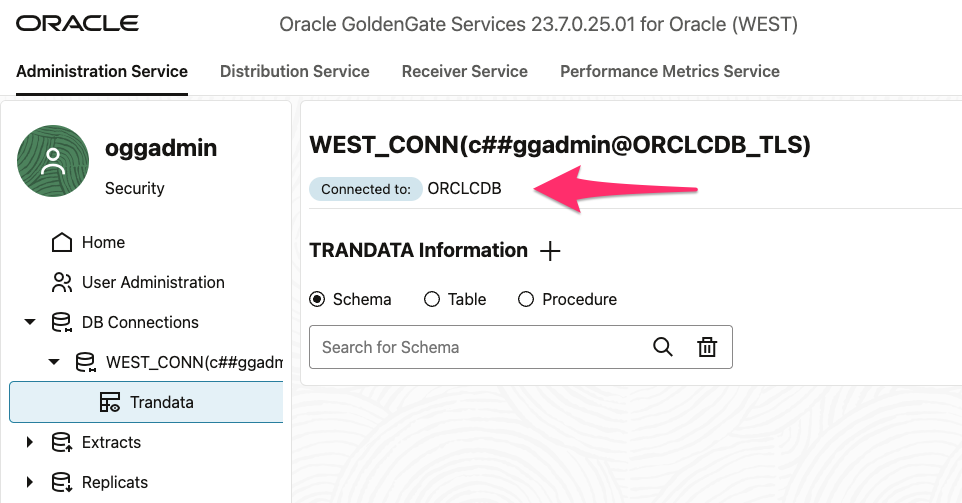
8.4 Connection established sucessfully
8.5. Verify if the connectivity is encrypted from Goldengate Hub to the Database Server
[ogg@ogg237W etc]$ sqlplus c##ggadmin/${DBUSR_PWD}@orclcdb_tls
SQL*Plus: Release 21.0.0.0.0 – Production on Mon Mar 3 23:27:44 2025
Version 21.11.0.0.0
Copyright (c) 1982, 2022, Oracle. All rights reserved.
Last Successful login time: Mon Mar 03 2025 21:32:10 +00:00
Connected to:
Oracle Database 19c Enterprise Edition Release 19.0.0.0.0 – Production
Version 19.19.0.0.0
SQL> SELECT sys_context(‘USERENV’, ‘NETWORK_PROTOCOL’) as network_protocol FROM dual;
NETWORK_PROTOCOL
——————————————————————————–
tcps
Conclusion
Using TLS for Oracle GoldenGate to Oracle Database connections provides:
- Data Encryption (Prevents intrusion)
- Authentication (Prevents unauthorized access)
- Compliance (Meets security standards)
- Data Integrity (Prevents tampering)
- Secure Replication (Over public networks & cloud)
- Credential Protection (Secures login details)
Enabling TLS in GoldenGate ensures secure, encrypted, and compliant replication of mission-critical data.
It is not the purpose of this article to discuss data at rest within the database; however, you can explore the documentation on TDE for that.
Oracle TDE (Transparent Data Encryption) is an Oracle Database security feature that provides encryption for data at rest. It automatically encrypts data stored in tablespaces, columns, and redo logs without requiring changes to applications.