Machine learning has become a pivotal aspect of modern data science, empowering businesses to extract valuable insights and make informed decisions. However, managing the end-to-end machine learning lifecycle can be complex, involving tasks such as data collection, model training, deployment, and monitoring. In this blog, we explore how MLflow, a popular open-source platform for managing the ML lifecycle. It can be integrated with MySQL and Oracle Cloud Infrastructure (OCI) Data Science to streamline machine learning workflows and enhance collaboration among data scientists and engineers. Jupyter Notebooks enable data scientists and data engineers to create, visualize, collaborate, and debug data engineering and data science applications. You can write these applications in Python, Scala, and PySpark and you can also connect a Data Science notebook session to Data Flow to run applications.
MLflow is an open-source platform that offers a comprehensive solution for managing machine learning projects. It comprises three primary components:
- MLflow Tracking: Enables users to log and track experiments, parameters, and metrics, providing complete visibility into model performance.
- MLflow Projects: Organizes machine learning code and dependencies into reusable projects, ensuring reproducibility across different environments.
- MLflow Models: Facilitates model packaging and deployment, making it easy to share models and integrate them into various applications.
OCI MLflow (see here for quickstart) can use OCI Object Storage as the cloud storage solution for logging and storing machine learning models, we will use the oci-mlflow git repository as the basis for the tracking server. We will illustrate how to use MySQL as the backing store for our MLflow tracking server. This blog will deploy MLflow on OCI Container Instance service and use it during your ML project with a notebook in OCI Data Science. We use OCI Data Science to develop, train, tune, and deploy a Scikit-learn based ML model (random forest). During our ML workflow, we track experiment runs and our models with MLflow.
OCI MLflow enables OCI users to use OCI resources to manage their machine learning usecase life cycle. The table below summarizes the mapping between the MLflow features and the OCI resources that are used.
| MLflow Use Case |
OCI Resource |
| User running machine learning experiments on notebook, logs model artifacts, model performance etc |
Data Science Jobs, Object Storage, MySQL |
| Batch workloads using spark |
Data Flow, Object Storage, MySQL |
| Model Deployment |
Data Science Model Deployment |
| User running machine learning experiments on notebook, logs model artifacts, model performance etc |
Object Storage, MySQL |
Overall Architecture
The overall architecture to support the MLflow tracking server is shown below, we will also utilize OCI Data Flow the serverless Spark offering in our notebooks.

Authentication and authorization
The Data Science notebook needs to create and run OCI Data Flow applications, this is done using resource principal, you can define this using dynamic groups or the ‘allow any-user’ policy statements (allow datasciencenotebooksession to manage dataflow-family and object-family) and . Check this blog here on setting up the details – the documentation is here.
MLFlow Tracking Server Setup
This blog uses the OCI container instance service to host the MLFlow Tracking Server, it could also be done using Terraform and OCI Kubernetes or a dedicated compute instance, here we will see the mechanics of running this on OCI’s Container Instance service (this is like AWS Fargate).
Build the Container
Build the OCI MLFlow Container Image. For that we need to clone the OCI-mlflow repository.
git clone https://github.com/oracle/oci-mlflow.git |
Change the directory to oci-mlflow > container-image. Now build the image using the following commands.
# The image-name should be in the pattern - {region}.ocir.io/{tenancy}/oci-mlflow:{tag}
# Eg. docker build -t iad.ocir.io/mytenancy/oci-mlflow:latest --network host -f container-image/Dockerfile .
docker build -t {region}.ocir.io/{tenancy}/oci-mlflow:{tag} --network host -f container-image/Dockerfile . |
You will also need to push the image to the OCI Registry in your tenancy, check this tutorial here for setting up your environment and performing ‘docker push’.
Remember and check the Security rules of the subnet that your container instance is using (if port 5000 is not open for you to access you will not be able to view the MLflow tracking server UI). Note to add the ingress rule where all TCP protocols are allowed to port 5000.
Create MySQL Instance
Now before running the tracking server we need to set up a MySQL Instance so that when we open the MLFLow Tracking UI we can get the previously logged models. You can do this from anywhere including OCI Cloud, create the database from OCI Console for example with these steps;
- Open Services.
- Go to Databases and click DB systems.
- Create a Database system with a name. Don’t forget to set username and password.
- At last look for the see advanced options. Choose Networking tab and choose a hostname (e.g. mlflowdb)
- Wait for the Database to be provisioned and proceed to the next steps after getting running status.
Create a database inside the MySQL instance
In the OCI Cloud Shell run the following;
mysqlsh <Username>@<DBSystemEndpointIPAddress> |
After this enter the password which you mentioned while creating the database. Now change the Js to SQL by typing \sql then create a database.
CREATE DATABASE mlflow; |
Use ctrl+D to exit.
Run the Tracking server, save this JSON to your compute node and change the values for;
| Property |
Description |
Example |
| imageUrl |
imageUrl for the OCI MLflow container that has been pushed to OCI Registry (or is external). |
|
| MLFLOW_DEFAULT_ARTIFACT_ROOT |
Artifact root for MLflow tracking server |
|
| MLFLOW_ARTIFACTS_DESTINATION |
Artifact destination for MLflow tracking server |
|
| MLFLOW_BACKEND_STORE_URI |
Database URL URO |
mysql+mysqlconnector://user:password@mysql_database_ip:3306/databasename |
| compartmentId |
Compartment identifier to create container instance in. |
ocid1.compartment.oc1.tbd |
| availabilityDomain |
Availability domain. |
nDUb:US-ASHBURN-AD-1 |
| shape |
Shape for container instance. |
CI.Standard.E4.Flex |
| subnetId |
Subnet identifier to connect container instance to. |
ocid1.subnet.oc1.iad.tbd |
Here is an example payload, store in file /tmp/ci_mlflow.json (you can also download here in this gist);
- {
- “containers”: [
- {
- “imageUrl”: “iad.ocir.io/namespace/oci-mlflow:latest“,
- “displayName”: “container-20230731-1429-1”,
- “environmentVariables”: {
- “MLFLOW_HOST”: “0.0.0.0”,
- “MLFLOW_GUNICORN_OPTS”: “–log-level debug”,
- “MLFLOW_PORT”: “5000”,
- “MLFLOW_DEFAULT_ARTIFACT_ROOT”: “oci://bucket@namespace/folder/“,
- “MLFLOW_ARTIFACTS_DESTINATION”: “oci://bucket@namespace/folder/“,
- “BACKEND_PROVIDER”: “mysql”,
- “MLFLOW_BACKEND_STORE_URI”: “mysql+mysqlconnector://user:password@mysql_database_ip:3306/databasename“,
- “MLFLOW_SERVE_ARTIFACTS”: “1”
- },
- “definedTags”: {},
- “freeformTags”: {}
- }
- ],
- “compartmentId”: “ocid1.compartment.oc1.”,
- “availabilityDomain”: “nDUb:US-ASHBURN-AD-1”,
- “containerRestartPolicy”: “ALWAYS”,
- “shape”: “CI.Standard.E4.Flex”,
- “shapeConfig”: {
- “ocpus”: 1,
- “memoryInGBs”: 4
- },
- “vnics”: [
- {
- “subnetId”: “ocid1.subnet.oc1.iad.”,
- “displayName”: “MLflowVNIC”,
- “isPublicIpAssigned”: true,
- “skipSourceDestCheck”: true
- }
- ],
- “displayName”: “container-instance-mlflow”
- }
Run the following commands to run the tracking server at port 5000 in the Cloud Shell (change the region to your region, also the file name where you saved the above JSON to);
oci raw-request --target-uri "https://compute-containers.us-ashburn-1.oci.oraclecloud.com/20210415/containerInstances" --http-method=POST --request-body file:///tmp/ci_mlflow.json
Now Open a browser and search for this domain. http://<InstancePublicIP>:5000. A tracking server UI opens up, as shown here;
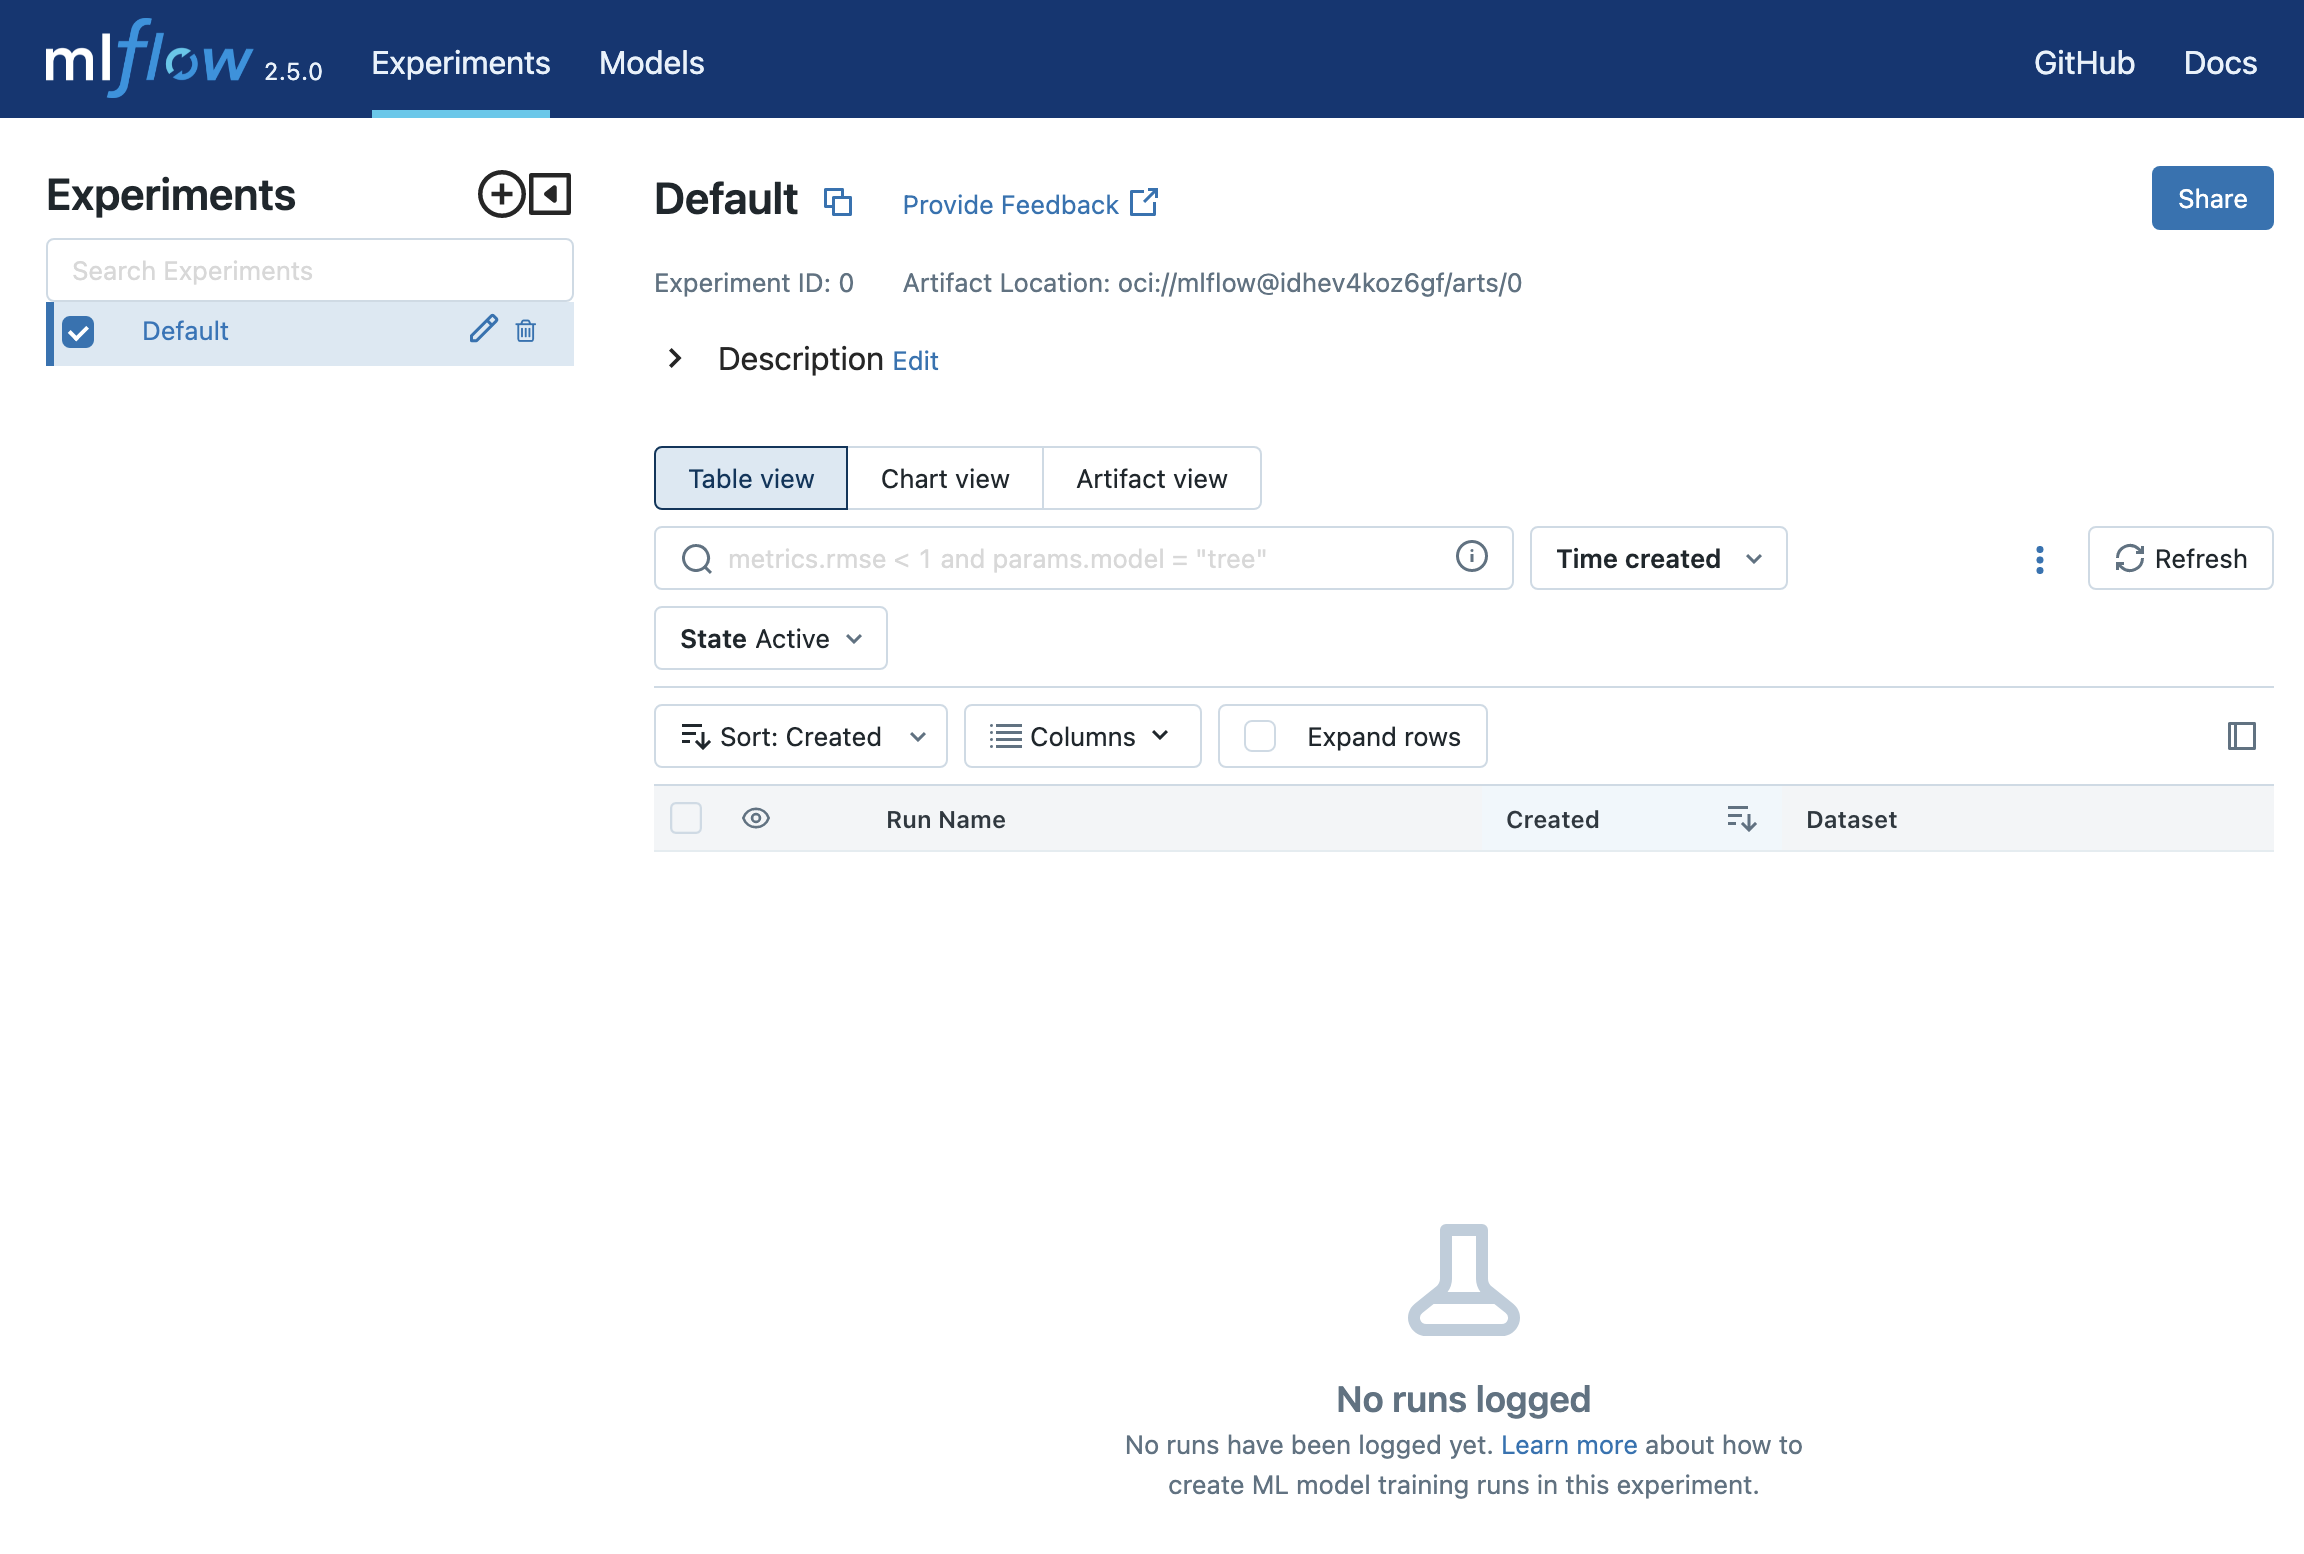
Don’t worry if there are no entries in the run section. That’s it all defined, let’s look at it in action, we will do this in a OCI Data Science notebook and configure our session to use OCI Data Flow!
Running Data Science over Data Flow
To use Data Flow over Data Science follow these steps:
- Create or open a new Data Science Notebook. You can create a notebook session by creating one: Analytics & AI > Data Science > Create Project > Create Notebook session > Click the notebook > Open
- You would see a launcher. Choose the Terminal.
- Run the following commands in the Terminal.
odsc conda install -s pyspark32_p38_cpu_v2 |
source activate /home/datascience/conda/pyspark32_p38_cpu_v2 |
- Now create a new Notebook from the launcher. On the upper right corner click on the kernel.
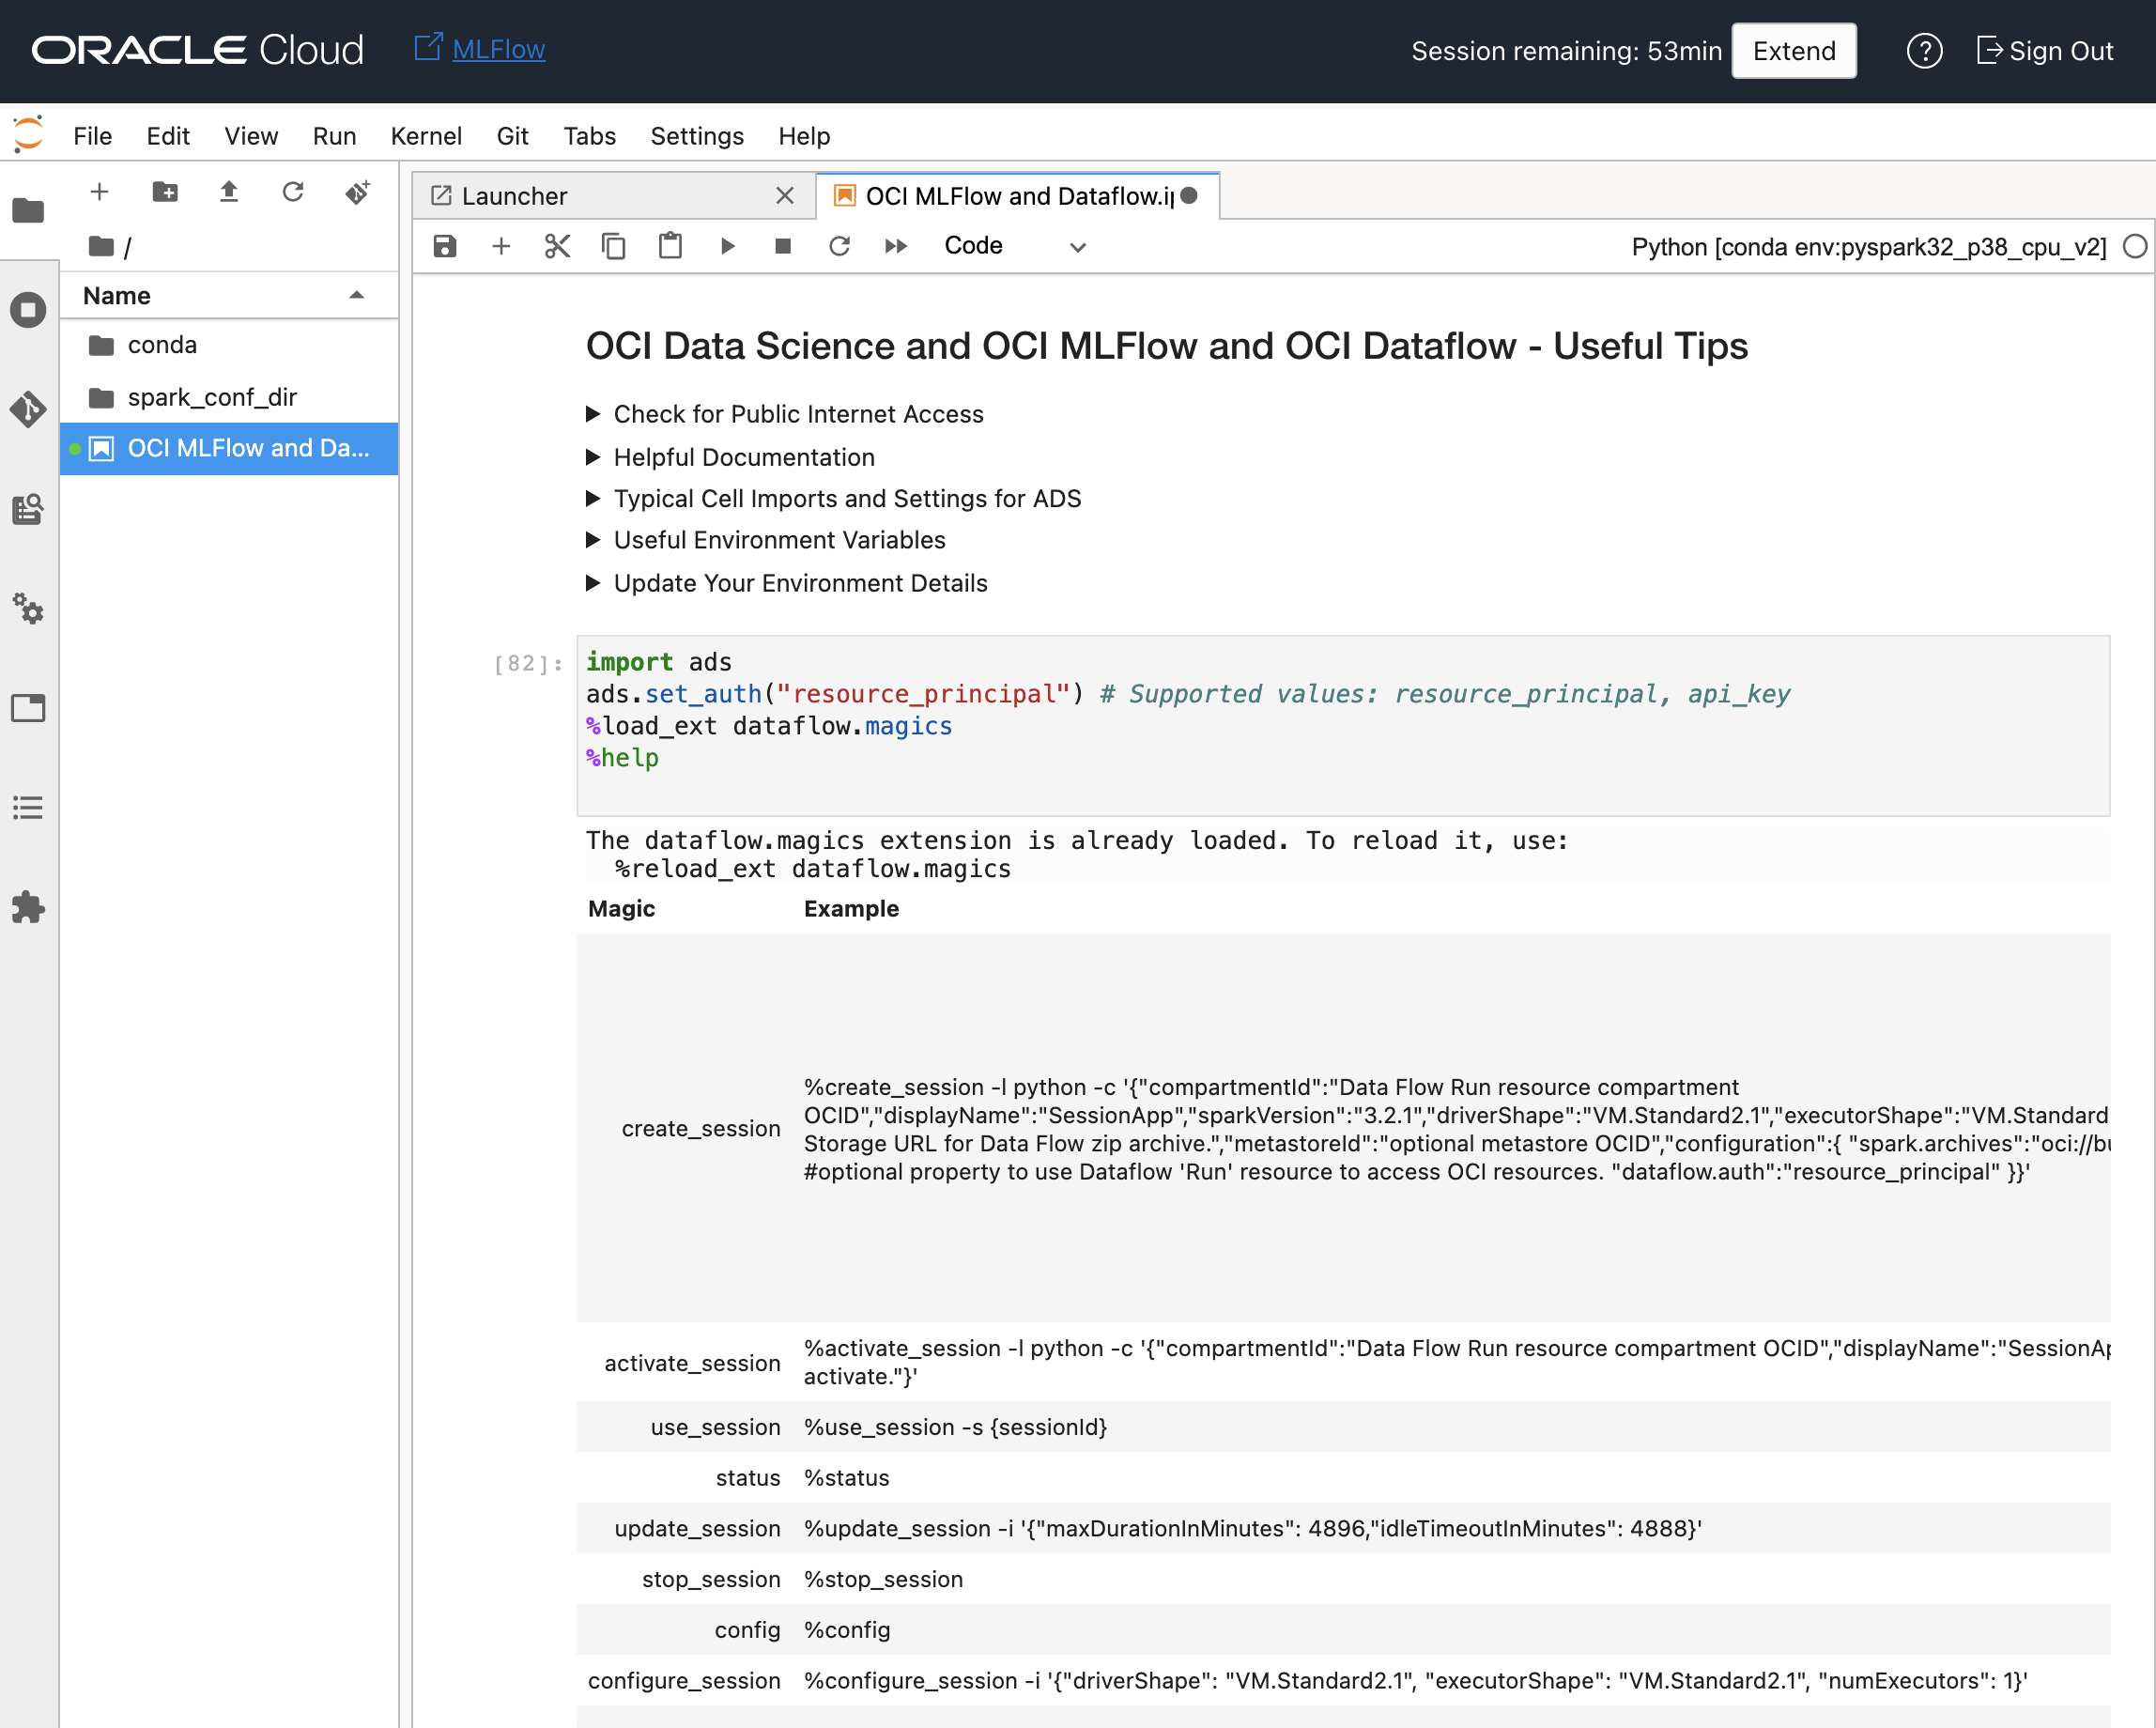
- Run the following commands which setup the dataflow extension for running Spark via OCI Dataflow and also the authentication mode is going to be via resource principal.
import ads
ads.set_auth("resource_principal") # Supported values: resource_principal, api_key
%load_ext dataflow.magics
%help |
You need to upload an Archive.zip(contains all your libraries) to one of the bucket. This was my requirements.txt file for this demo when I built the archive file for this demo;
mlflow
oci-mlflow
scikit-learn
I then followed the instructions to build and archive file here;
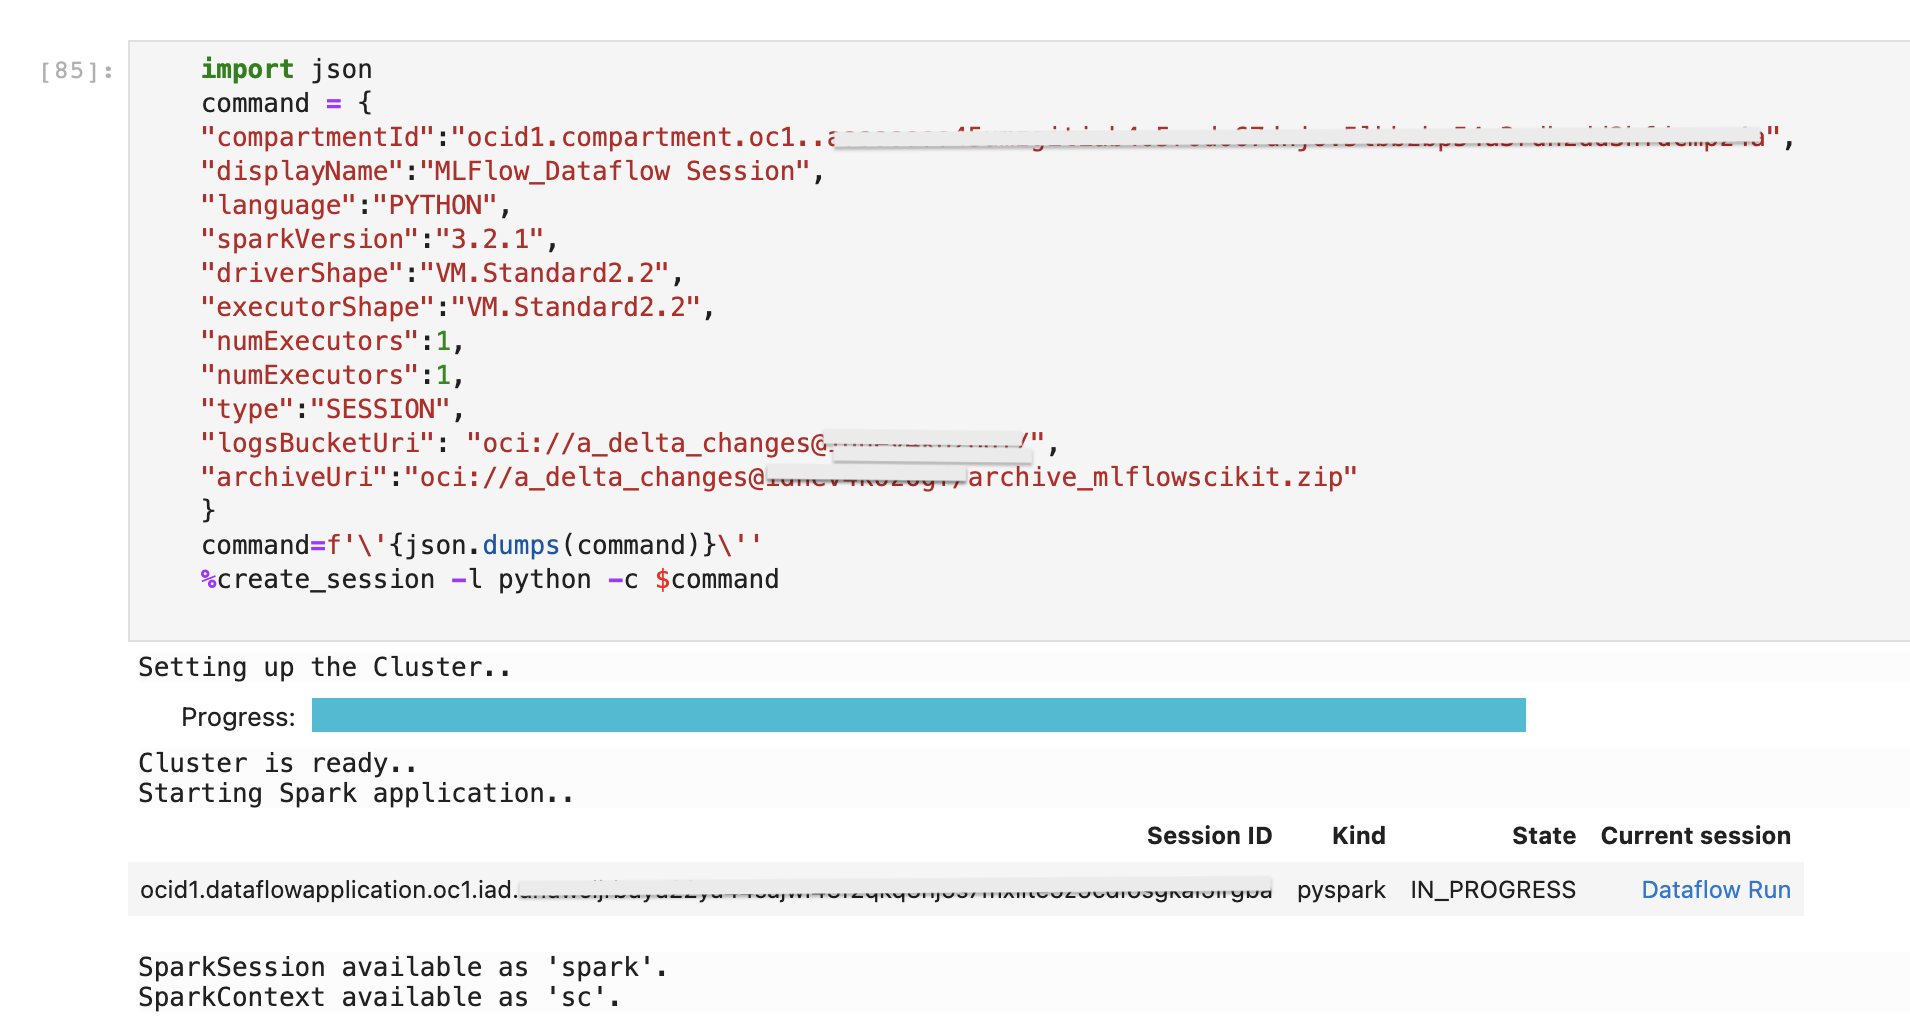
Then run the below command by replacing compartmentID, logsBucket, archiveURI in it to where you uploaded the dependency archive.
import json
command = {
    "compartmentId": "<compartmentID>",
    "displayName": "MLFlow_Dataflow_Session",
    "language": "PYTHON",
    "sparkVersion":"3.2.1", \
    "driverShape":"VM.Standard2.2", \
    "executorShape":"VM.Standard2.2", \
    "numExecutors":1,
    "numExecutors": 1,
    "type": "SESSION",
    "logsBucketUri": "oci://<bucket_name>@<namspace>/",
    "archiveUri": "oci://<bucket_name>@<namspace>/archive.zip"
}
command = f'\'{json.dumps(command)}\''
%create_session -l python -c $command |
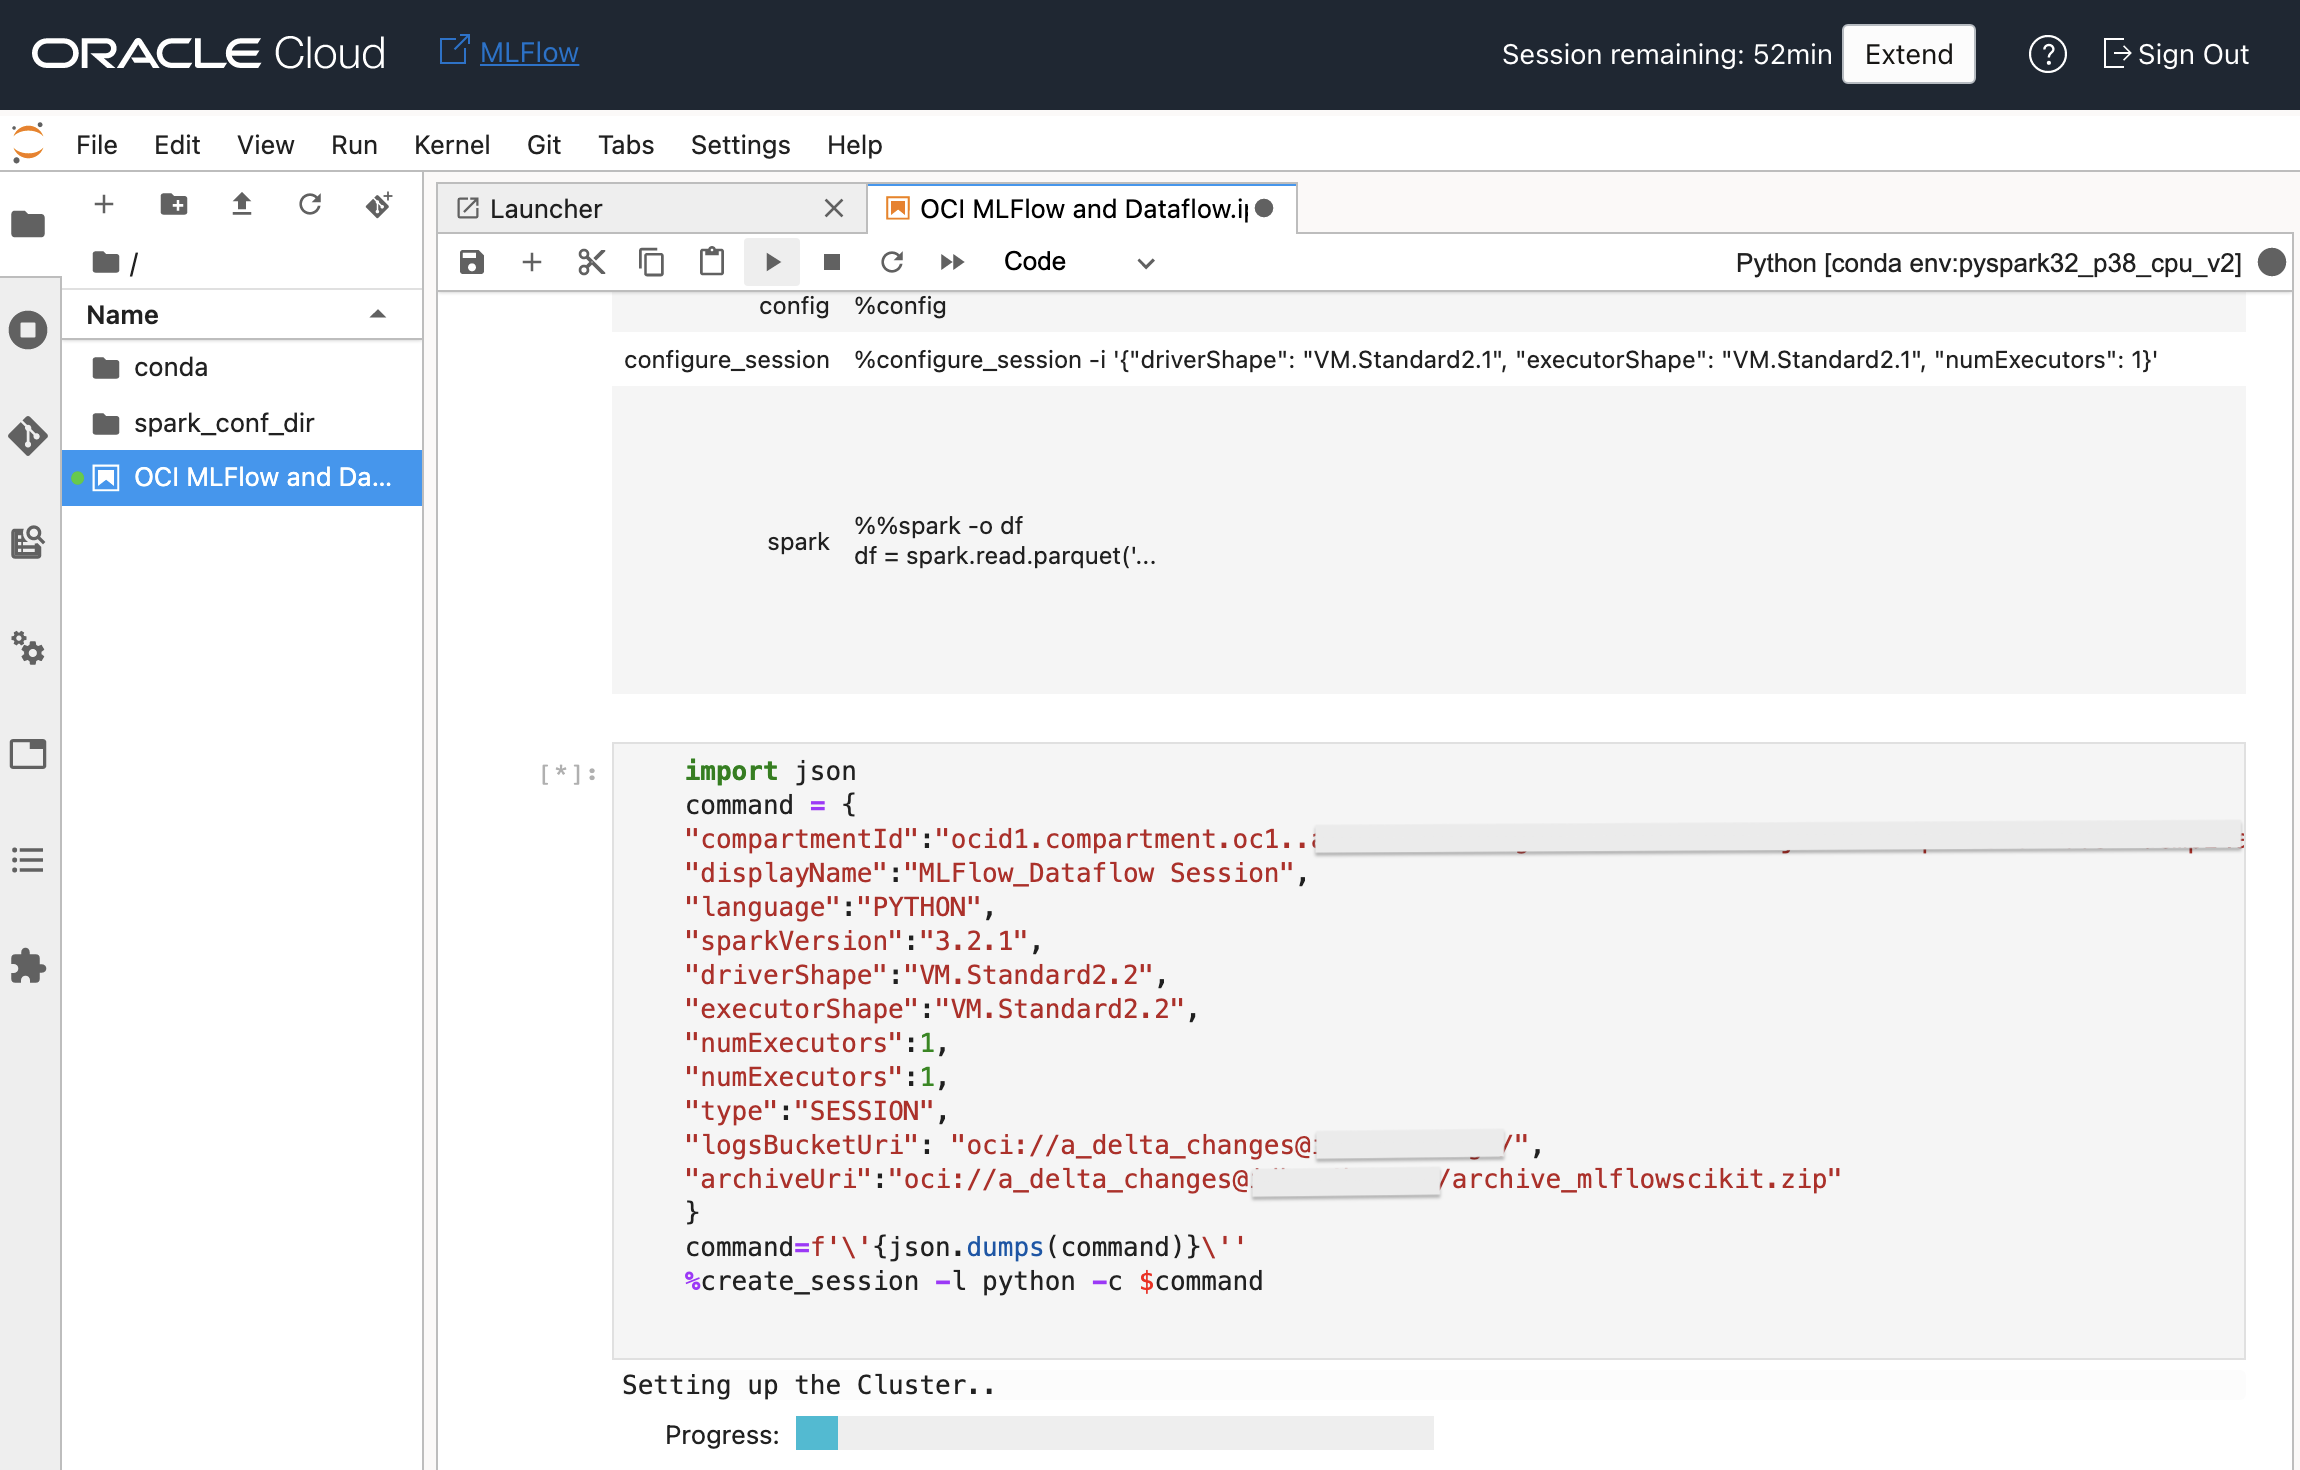
This will create an OCI Dataflow application behind these scenes for the notebook session, if you open the OCI Data Flow console page, you will see the application defined;
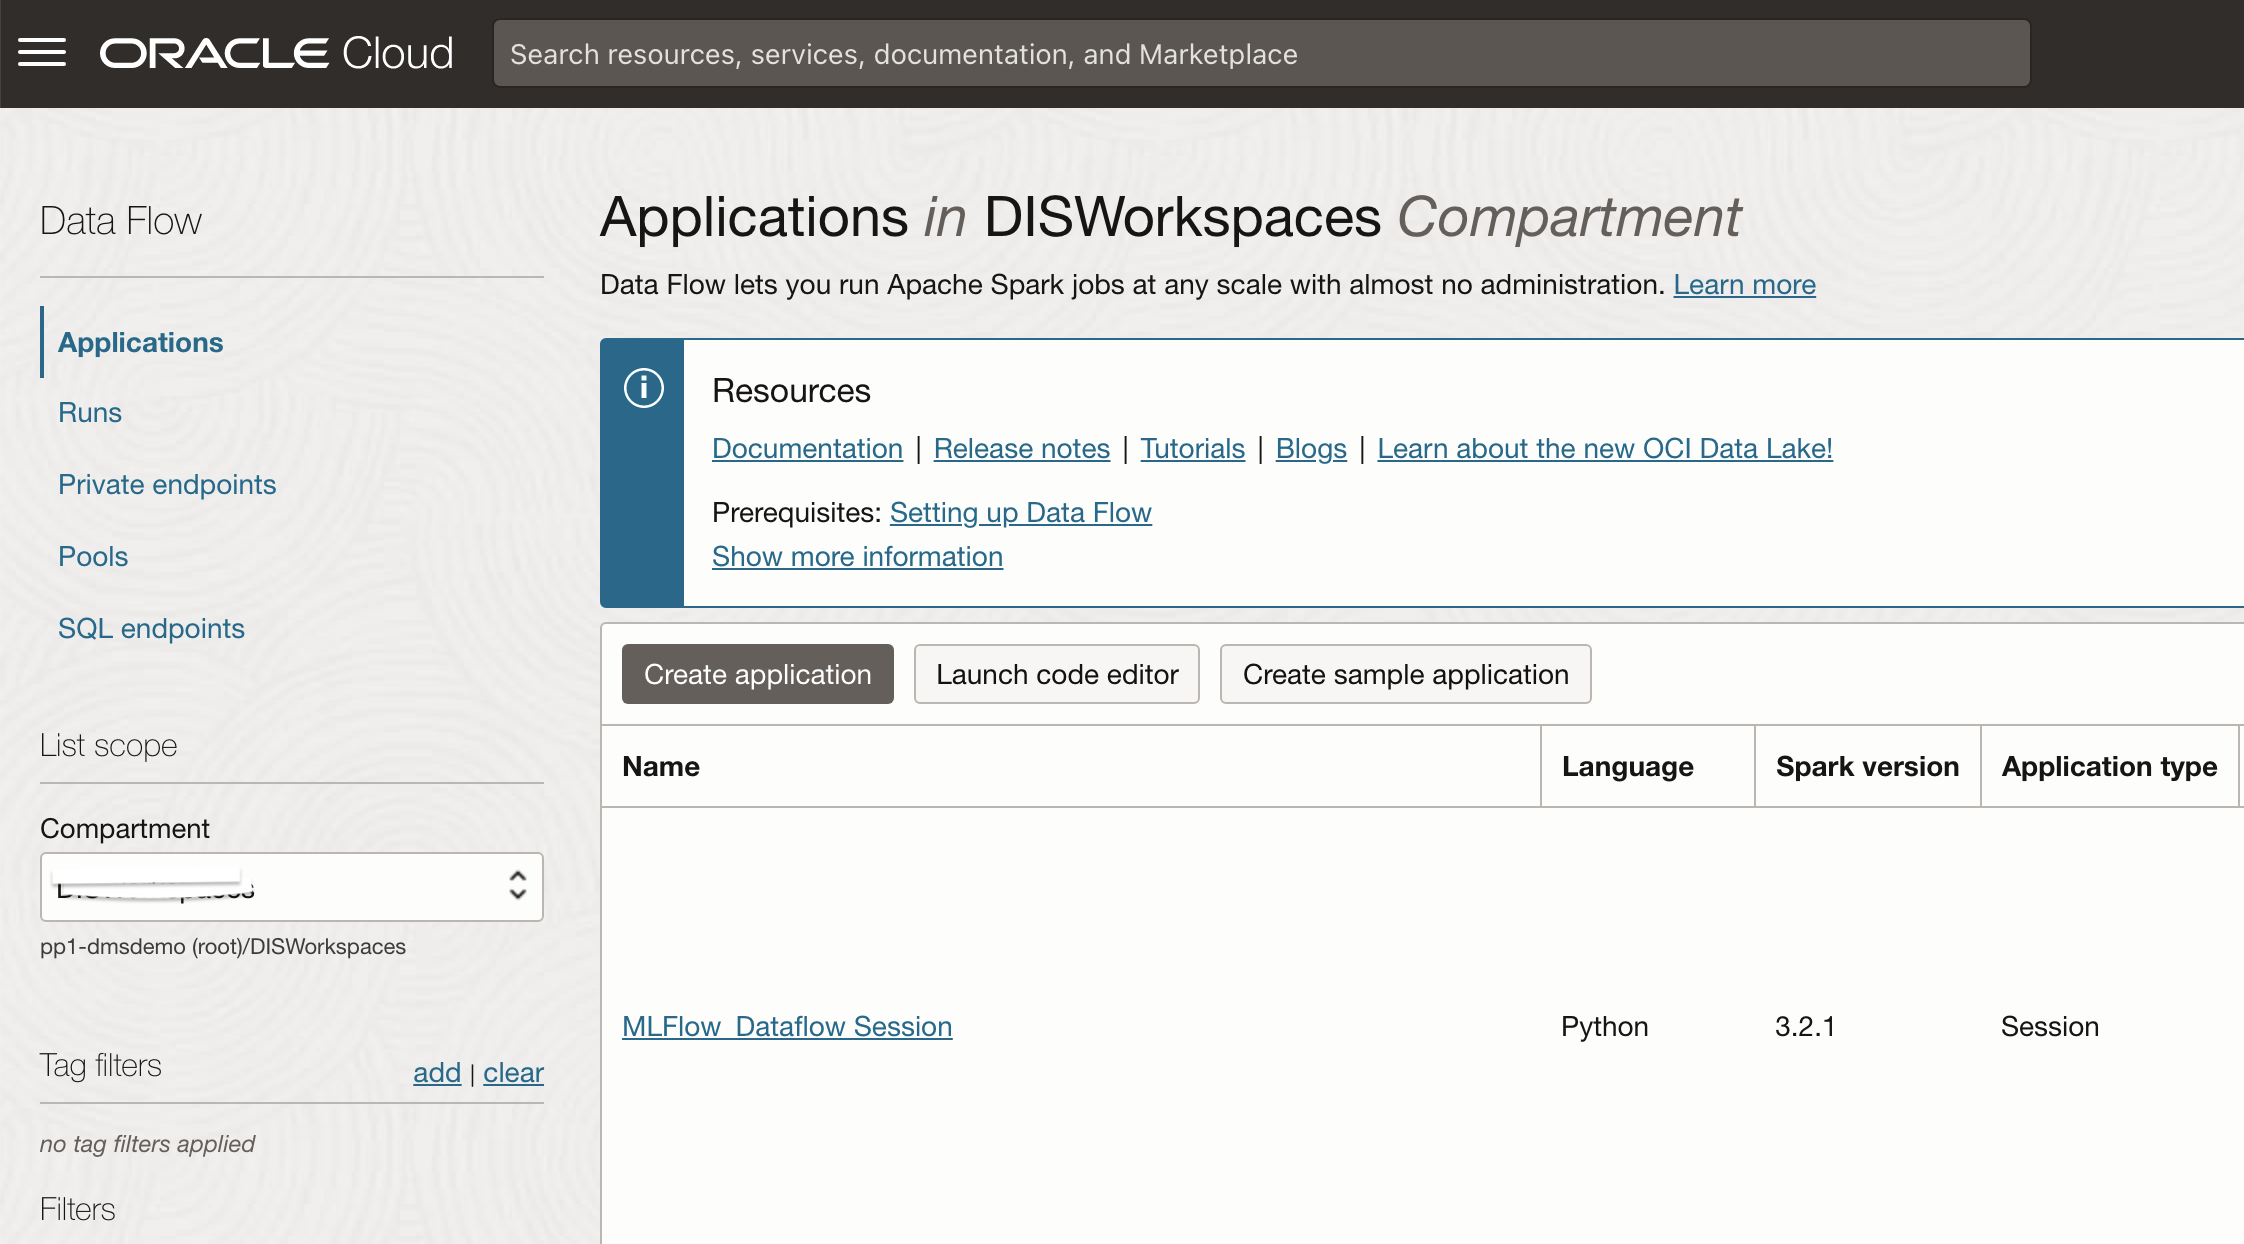
You will also see a run activated. This will take some time to complete – to speed up you should look at the pools feature in OCI Dataflow.
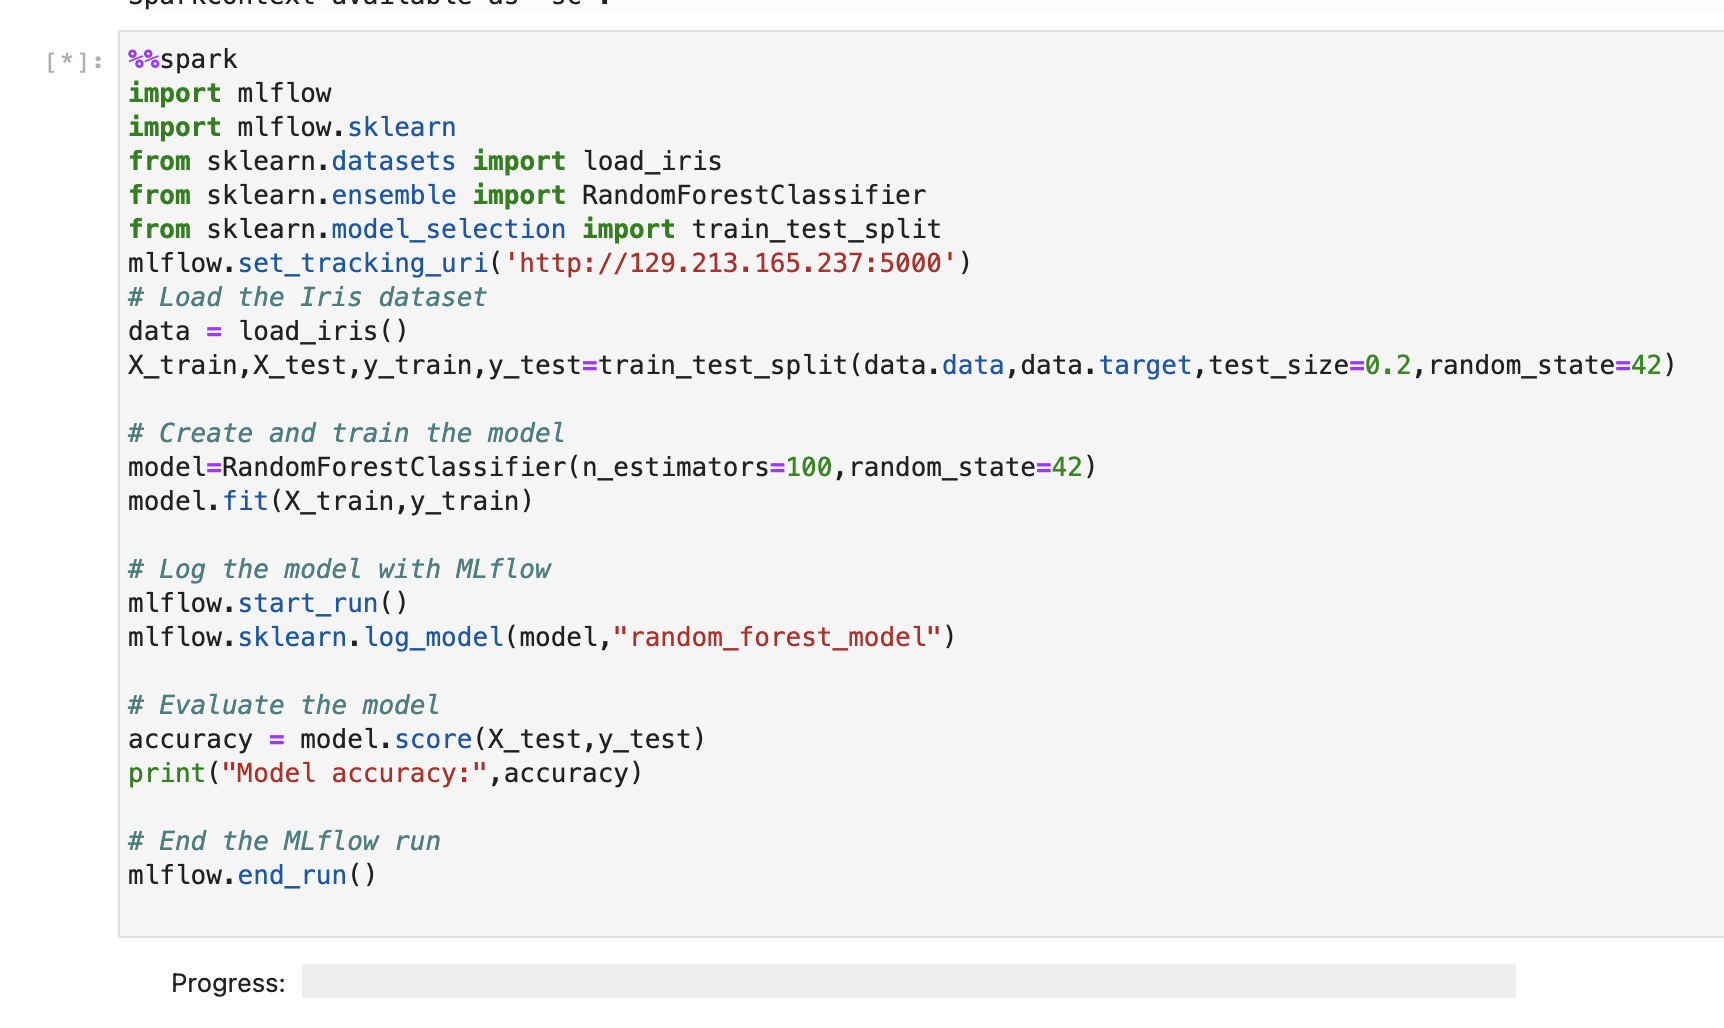
Now you can start by adding %%spark to the code. Now run your notebook code with the uri mentioned. Below is an example code which logs models in a compute instance with Public IP and port 5000.
%%spark
import mlflow
import mlflow.sklearn
from sklearn.datasets import load_iris
from sklearn.ensemble import RandomForestClassifier
from sklearn.model_selection import train_test_split

mlflow.set_tracking_uri('http://ipaddress:5000')
# Load the Iris dataset
data = load_iris()
X_train, X_test, y_train, y_test = train_test_split(data.data, data.target, test_size=0.2, random_state=42)
# Create and train the model
model = RandomForestClassifier(n_estimators=100, random_state=42)
model.fit(X_train, y_train)
# Log the model with MLflow
mlflow.start_run()
mlflow.sklearn.log_model(model, "random_forest_model")

# Evaluate the model
accuracy = model.score(X_test, y_test)
print("Model accuracy:", accuracy)
# End the MLflow run
mlflow.end_run() |
Here is the code in aciton;
After this has completed, the experiment will have been stored in your MLflow tracking server;
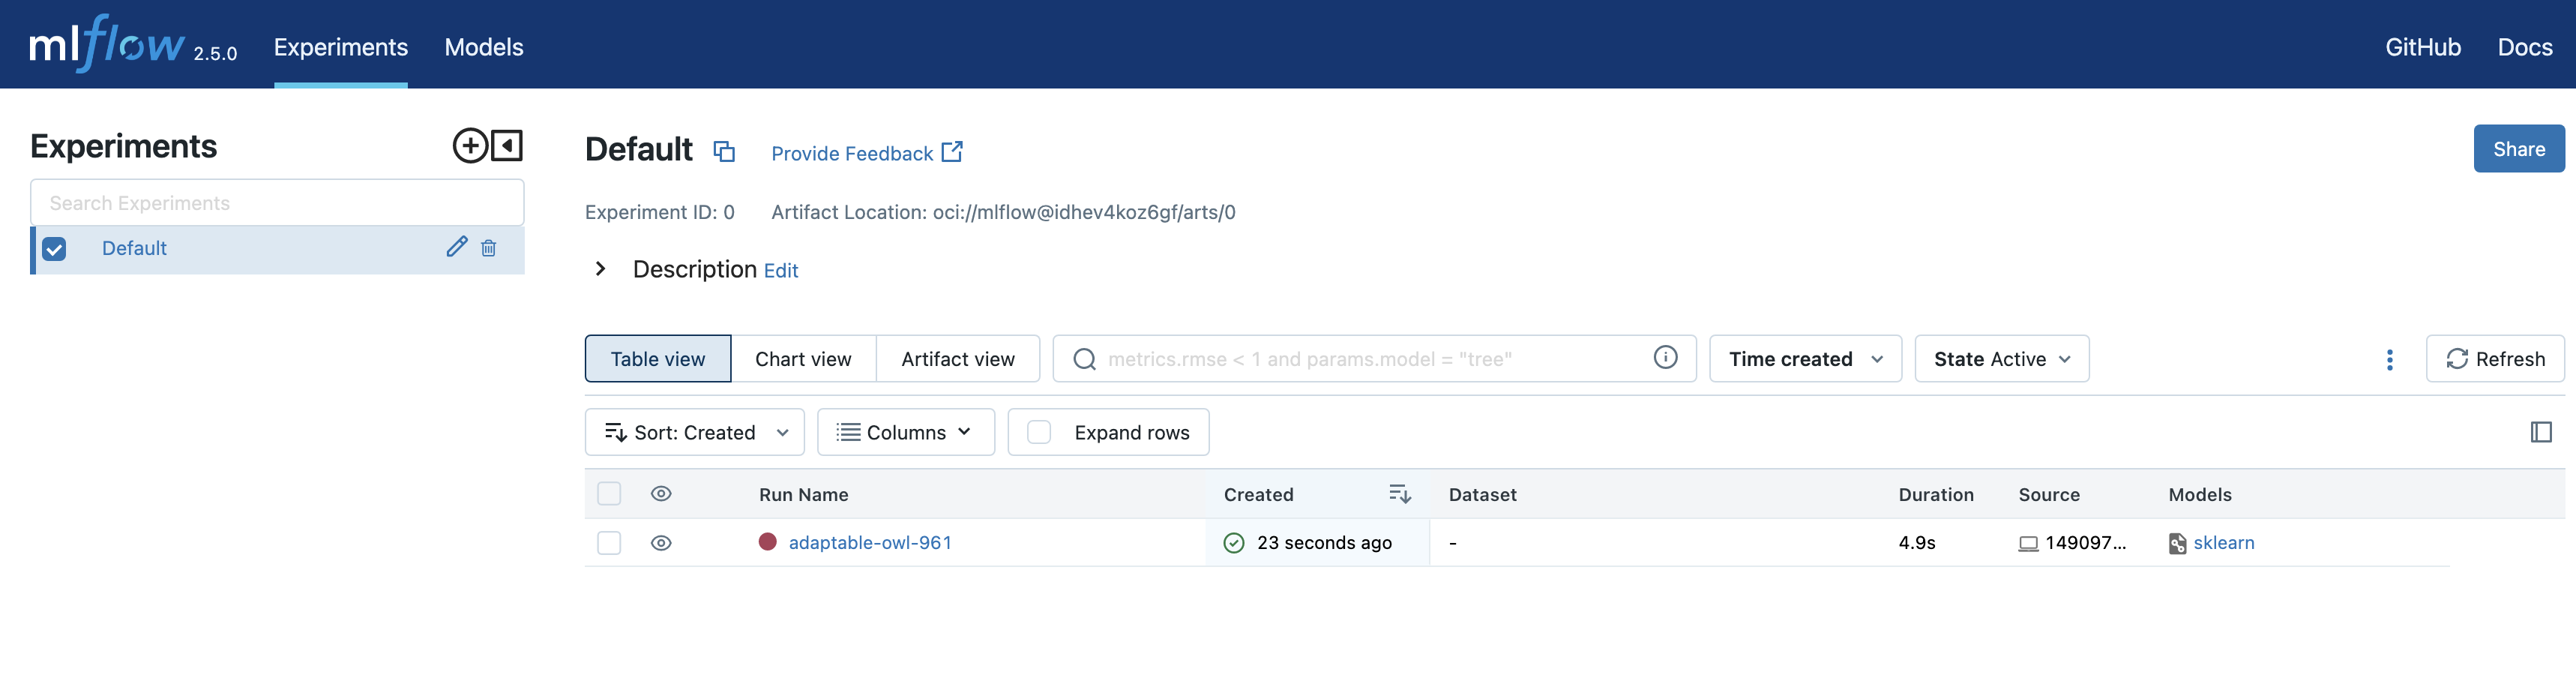
You can continue using other MLflow APIs to save / load models and all of the standard MLflow lifeycle patterns to move from development through testing and production.
That’s the end of today’s blog. Thanks for reading!
See for yourself
As you can see, you configure Data Science notebooks to run applications interactively against Data Flow. Watch the tutorial video on using Data Science with Data Flow Studio. Also see the Oracle Accelerated Data Science SDK documentation for more information on integrating Data Science and Data Flow. More examples are available from Github with Data Flow samples and Data Science samples. There’s a great blog here also worth checking out on using Data Science notebooks with OCI Data Flow.
To get started today, sign up for the Oracle Cloud Free Trial or sign in to your account to try OCI Data Flow. Try Data Flow’s 15-minute no-installation-required tutorial to see just how easy Spark processing can be with Oracle Cloud Infrastructure.