In this article we shall demonstrate the use of the Oracle GoldenGate precise instantiation method to create a homogenous (Microsoft SQL Server to Microsoft SQL Server) replication implementation without taking an application or database outage.
This article is valid only for Oracle GoldenGate Microservices Architecture for SQL Server release version 23.8 and above. Precise instantiation is not available in Oracle GoldenGate versions prior to 23.8. Please refer to the Oracle GoldenGate documentation for additional details regarding Microsoft SQL Server precise instantiation.
Prerequisites
Before we get started, there are several actions that must be completed which we will not demonstrate in this article.
- Install the 23.8 version of Oracle GoldenGate Microservices Architecture for SQL Server, or upgrade an existing 23ai installation.
- See the Oracle GoldenGate documentation for details regarding software installation and patching.
- Create source and target Oracle GoldenGate Microservices deployments.
- See the Oracle GoldenGate documentation for details regarding deployment creation.
- Create the Oracle GoldenGate database user with appropriate privileges.
- See the Oracle GoldenGate documentation for specifics regarding database user create and database settings required to enable replication.
Database
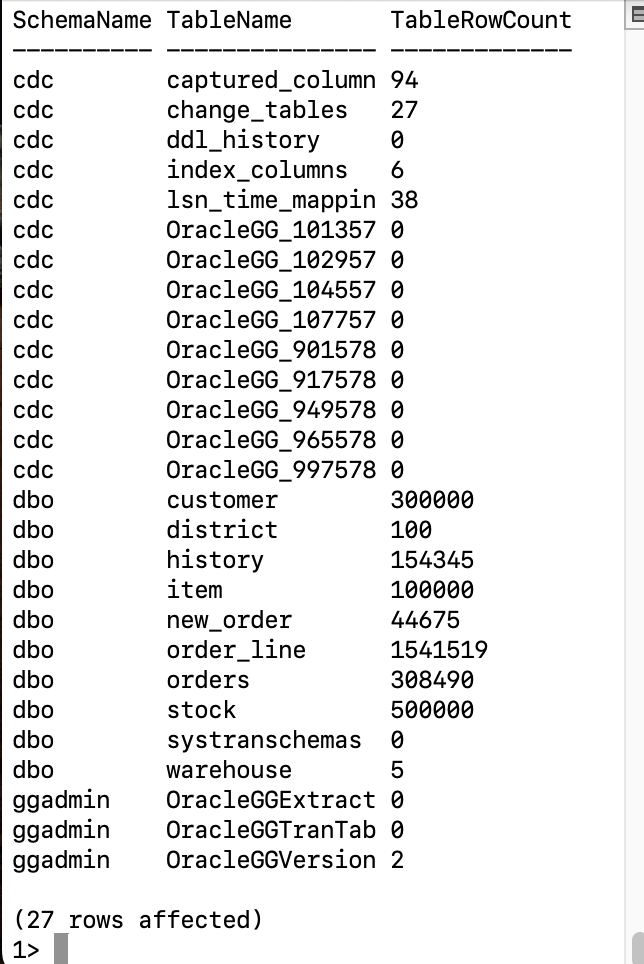
For this demonstration we will be using the TPROC-C database with real time activity occurring. The database consists of nine tables. Image 1 presents a snapshot view of these tables and the number of rows contained within each; while the query was used to retrieve this information.
USE tpcc;
go

SELECT cast(s.name as varchar(10)) AS SchemaName,
       cast(t.name as varchar(15)) AS TableName,
       cast(SUM(p.rows) as varchar(10)) AS TableRowCount
FROM sys.schemas AS s
JOIN sys.tables AS t ON t.schema_id = s.schema_id
JOIN sys.partitions AS p ON p.object_id = t.object_id
GROUP BY s.name, t.name
ORDER BY SchemaName, TableName;
go

It’s a good practice to know details about the source and target tables as their metadata structure will affect Oracle GoldenGate replication efficiency. Likewise, for instantiation, it is good to take a snapshot of the number of rows per tables. The Oracle GoldenGate Initial Load Extract is a single threaded process that performs a “select *” operation for each table in alphabetical order. This select returns all rows, which are then moved downstream through the replication path to the target database. While effective, this is not very efficient. Knowing how many rows of data need to be replicated to the target during instantiation allows you to make informed decisions about the instantiation process as databases with a large number of tables and/or tables with a large number of rows will take a large amount of time to replicate.
For instantiation and replication to function efficiently, we also need to know if the replicated tables have primary keys, unique constraints, or foreign keys. We can check the target database for these charateristics
The query to check for primary keys (PK) and unique constraints (UC) on the target tables is shown below and Image 2 displays the returned data for our sample database.
USE tpcc;
go

SELECT cast(OBJECT_NAME([object_id]) as varchar(20)) AS TableName,
       cast(name as varchar(25)) AS IndexName,
       is_unique AS UC,
       is_primary_key AS PK
FROM sys.indexes
WHERE OBJECT_SCHEMA_NAME([object_id]) like 'dbo'
ORDER BY TableName;
go
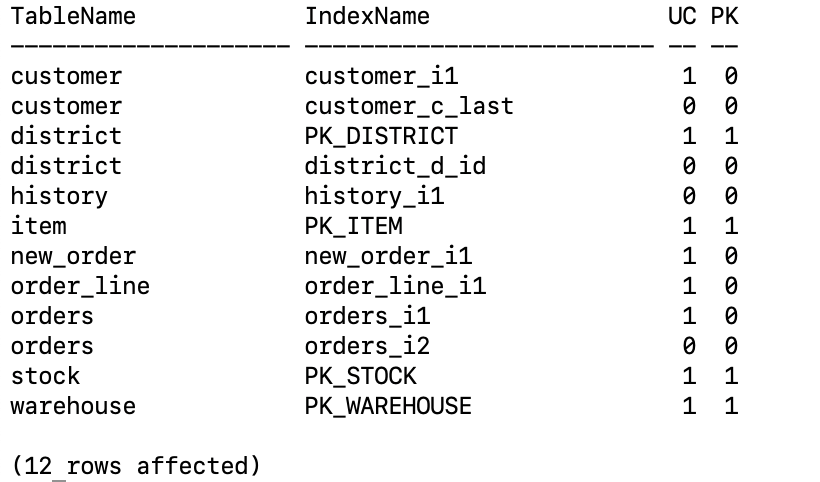
In the output, “1” indicates the table has a PK and/or a UC.
Tables without a PK or UC, like the table history, pose a challenge for replication. These tables have no uniqueness, so Oracle GoldenGate Extract will capture all source column data and Replicat will utilize all table columns when replicating Update and Delete operations. Furthermore, these operations will result in full table scans within the database which not only slows down replication but also impacts database resources.
To minimize this impact, you should attempt to identify columns within the table data that make Update and Delete operations unique and specify the Oracle GoldenGate MAP parameter option KEYCOLS to create a pseudo key for replication. To learn more about KEYCOLS, refer to the Oracle GoldenGate documentation.
The following query was used to check for foreign key (FK) relationships (also refered to as parent-child) on the tables in our sample database and Image 3 depicts the returned values.
SELECT cast(OBJECT_NAME(parent_object_id) as varchar(20)) AS ParentTable,
       cast(OBJECT_NAME(referenced_object_id) as varchar(20)) AS ChildTable,
       cast(OBJECT_NAME(constraint_object_id) as varchar(25)) AS ForeignKeyConstraint
FROM sys.foreign_key_columns
ORDER BY ParentTable;
go

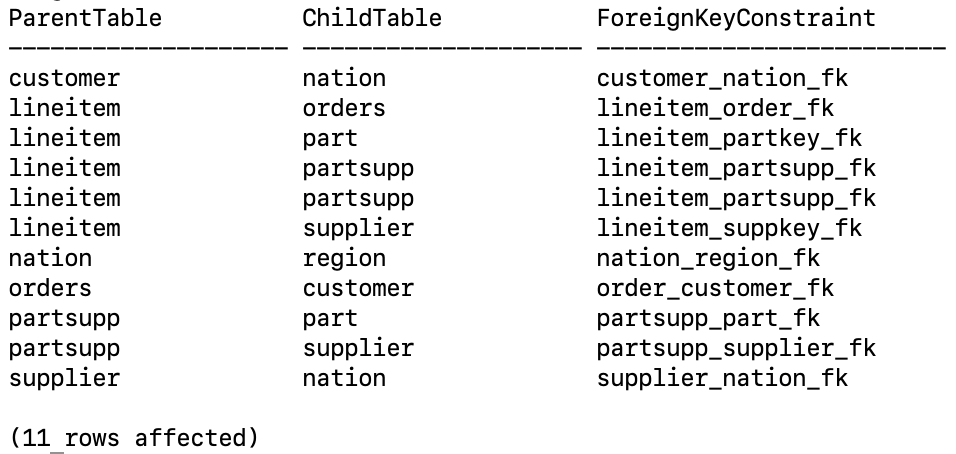
As shown in Image 3, there are no FK constraints in our sample tpcc database. Image 4 depicts what the query output will show if FK constraints exist (this data is from a sample TPROC-H database in the same Microsoft SQL Server installation).
Because the Oracle GoldenGate Initial Load Extract processes source tables in alphabetical order, it is highly recommended that FK constraints in the target database be disabled during the instantiation process to prevent abnormal Replicat termination (ABEND) due to FK constraint violations.
Source Side Instantiation Steps
Add Trandata
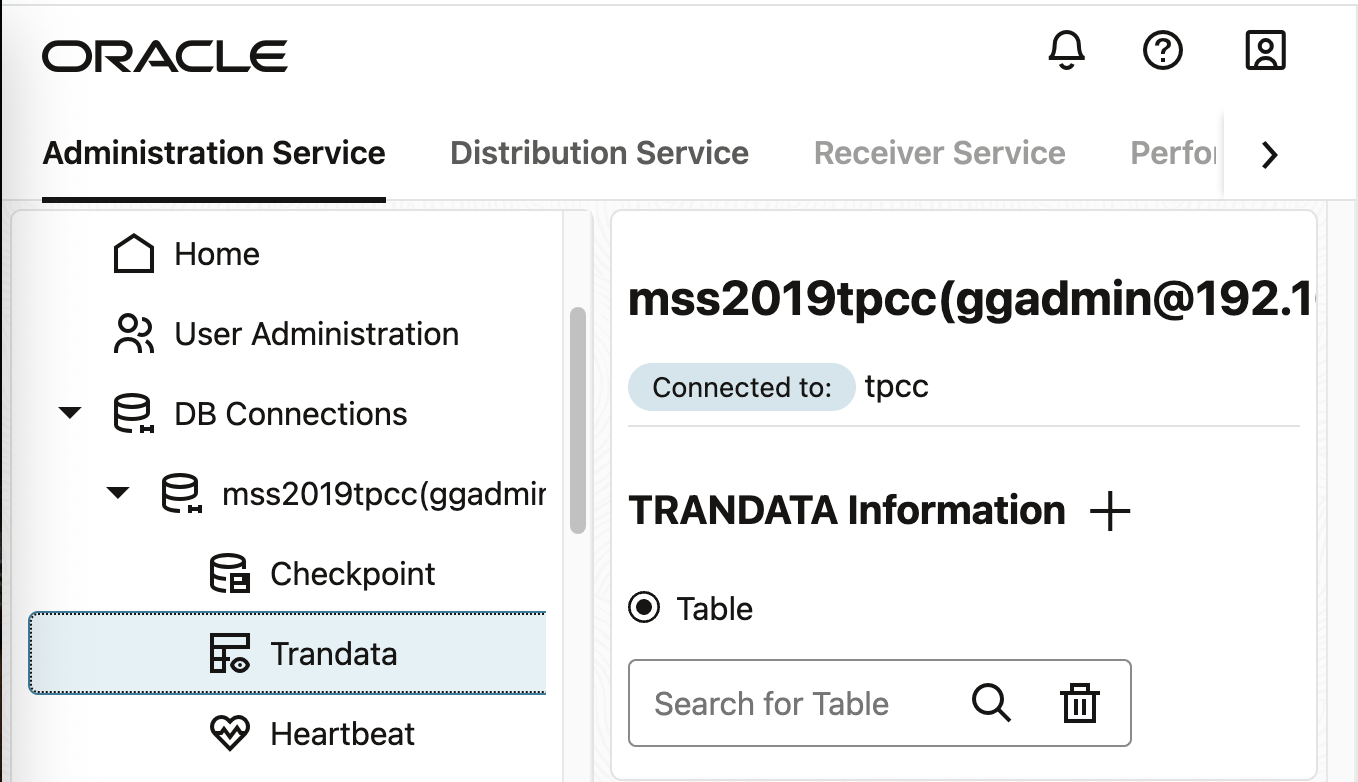
In the Oracle GoldenGate Microservices Administration Services WebUI, select DB Connections and then open the connection to the source database. Select Trandata as shown in Image 5.
Select the + button in the field labeled TRANDATA Information. A window labeled Trandata will slide open. Enter either a single table name in the Table Name field or a wildcard for all tables. We’ll be using a wildcard.

Select the Submit button to execute. Open the Notifications window to see execution status. In the Trandata Information window, you can verify all tables have been enabled by doing a search. In the Search for Table field, enter dbo.* and select the magnifying glass.

Reexecuting the previous query, we see new tables have been created which show Microsoft CDC Replication for Oracle GoldenGate has been enabled in the database. To learn more about CDC Supplemental Logging refer to the Oracle GoldenGate documentation.
Enable Microsoft Snapshot Isolation
Oracle GoldenGate Precise Instantiation utilizes the Snapshot Isolation function of the Microsoft SQL Server Database. Per the Microsoft database documentation, when snapshot isolation is enabled:
“A unique transaction sequence number identifies each transaction, and these unique numbers are recorded for each row version. The transaction works with the most recent row versions having a sequence number before the sequence number of the transaction. Newer row versions created after the transaction has begun are ignored by the transaction.
The term “snapshot” reflects the fact that all queries in the transaction see the same version, or snapshot, of the database, based on the state of the database at the moment in time when the transaction begins. No locks are acquired on the underlying data rows or data pages in a snapshot transaction, which permits other transactions to execute without being blocked by a prior uncompleted transaction. Transactions that modify data do not block transactions that read data, and transactions that read data do not block transactions that write data, as they normally would under the default READ COMMITTED isolation level in SQL Server.”
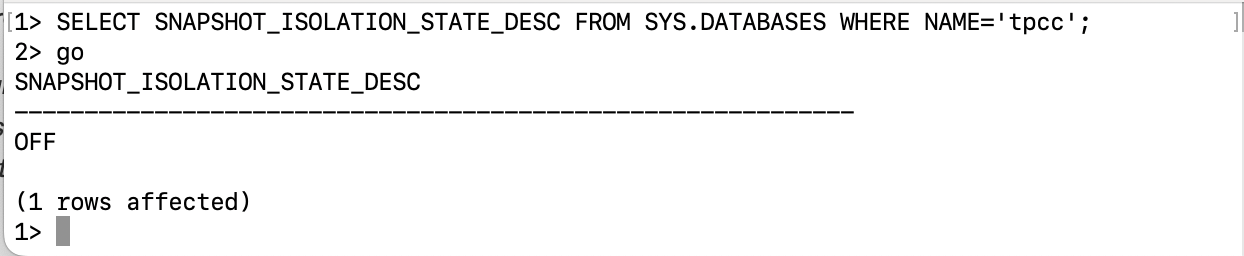
To check if snapshot isolation is enabled in the database, we’ll execute the query:
SELECT SNAPSHOT_ISOLATION_STATE_DESC FROM SYS.DATABASES WHERE NAME='tpcc';
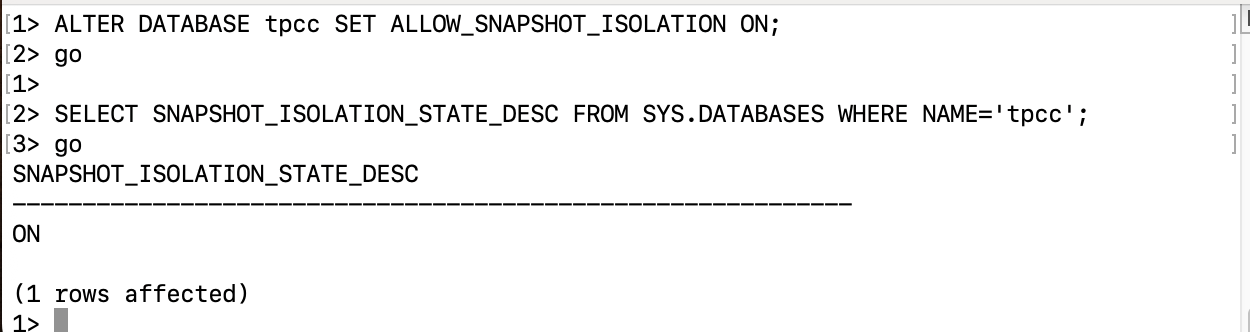
To enable snapshot isolation in the database, we’ll execute the query:
ALTER DATABASE tpcc SET ALLOW_SNAPSHOT_ISOLATION ON;
GoldenGate Microservices Purge Task
Data that is required by Extract to reconstruct transactions are stored in a series of SQL Server CDC system tables, along with Oracle GoldenGate objects that are used to track operation ordering within a transaction. These tables require routine purging to reduce data storage within the database. As part of enabling supplemental logging using TRANDATA, Microsoft SQL Server creates a Change Data Capture Cleanup job, however this job is unaware that an Oracle GoldenGate Extract may still require data from these CDC system tables and can remove that data before the Extract has a chance to capture it.
To remedy this situation, Oracle GoldenGate for SQL Server requires that a Purge Change Data task be created. This task will purge CDC staging data while ensuring that no data is purged that the Extract has yet to process.
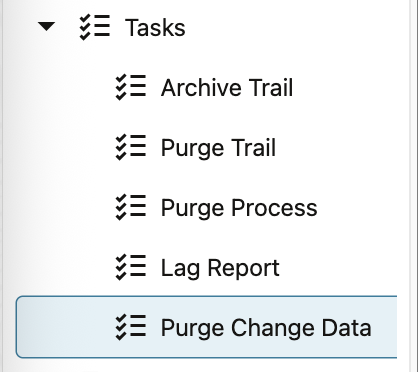
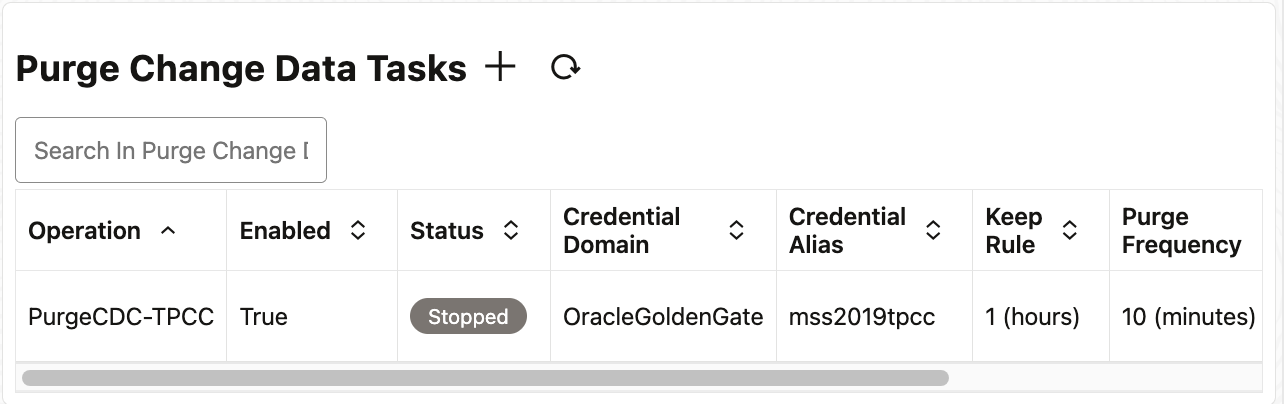
In the Oracle GoldenGate Microservices Administration Services WebUI, select Tasks and then select Purge Change Data as shown in Image 11.
In the Purge Change Data Tasks pane, select the + button to create a new task.
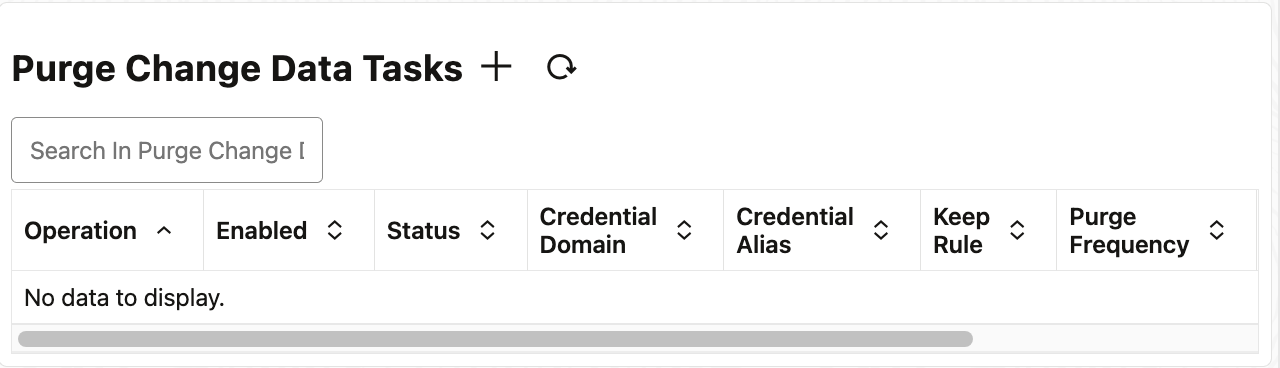
A new window labeled Create a new Purge Change Data task will slide out. Enter a name for the task, select the database access credentials, and provide the keep rules and purge frequency (we went with the defaults).
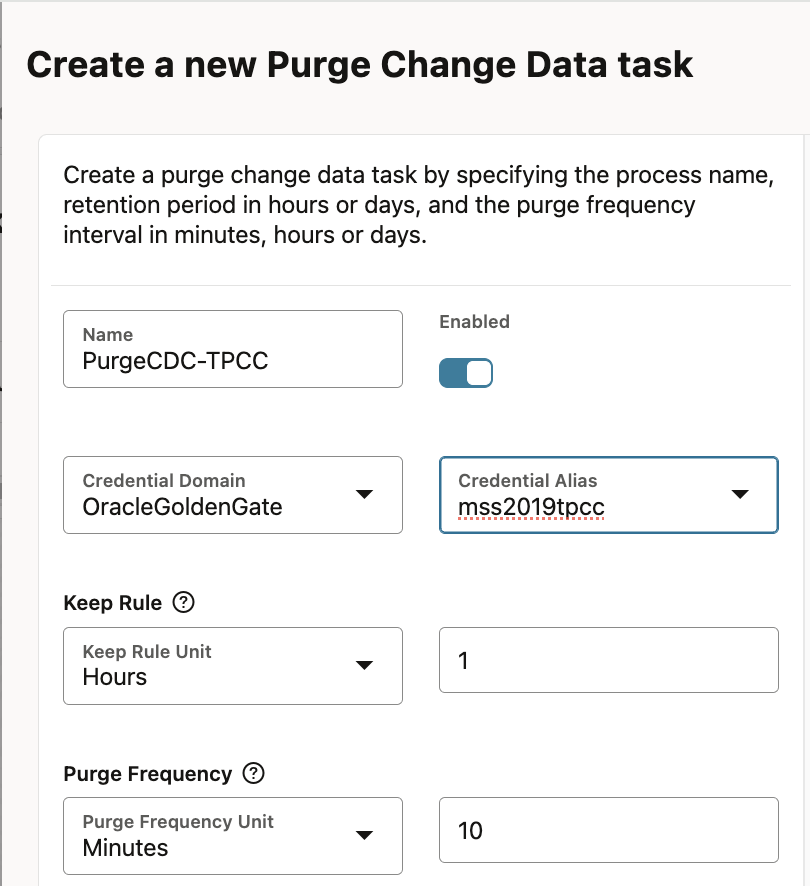
Select the Submit button to create the task.
Initial Load Extract
Create an Initial Load Extract. The parameters we’ll be using for source instantiation capture are shown below.
EXTRACT iltpcc
USERIDALIAS mss2019tpcc_src, DOMAIN OracleGoldenGate

-- Create 2Gb initial load trail files.
-- Purge if the file exists
EXTFILE ic, megabytes 2000, PURGE

-- Use precise instantiation
INITIALLOADOPTIONS USESNAPSHOT

-- Every 10 minutes, report the count of records processed since
-- Extract start to the process report file.
-- Rate reports the number of operations per second
-- The report file also contains DELTA throughput which is
-- the number of records since the last report divided by
-- the time since the last report
REPORTCOUNT EVERY 10 MINUTES, RATE

-- Select from all tables in the dbo schema.
TABLE dbo.*;
Start the Initial Load Extract. When it completes reading from every table it will automatically shutdown.
Open the Initial Load Extract report file and scroll to the last page to see the instantiation LSN and the number or rows read from each table. The instantiation LSN message will look similar to the one shown below.
Copy the LSN and save it, you will need it when creating the CDC Extract.
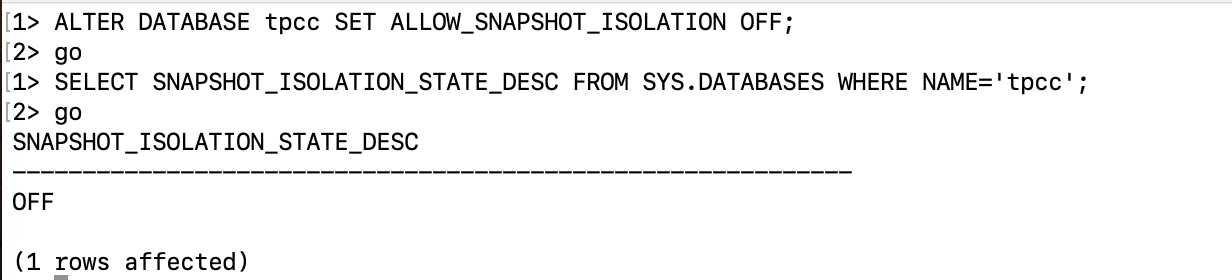
Disable Microsoft Snapshot Isolation
At this point, Microsoft Snapshot Isolation is no longer required by Oracle GoldenGate. If it was disabled initially in the database, you may turn it off by executing the command:
ALTER DATABASE tpcc SET ALLOW_SNAPSHOT_ISOLATION OFF;
CDC Extract
Create a Change Data Capture (CDC) Extract to capture real time database operations. In Step 2 of the WebUI CDC Extract creation process, select Position in Log as the Extract Options starting point. Enter the Instantiation LSN we previously copied from the Initial Load Extract Report file into the field Position in Log as shown in Image 16.

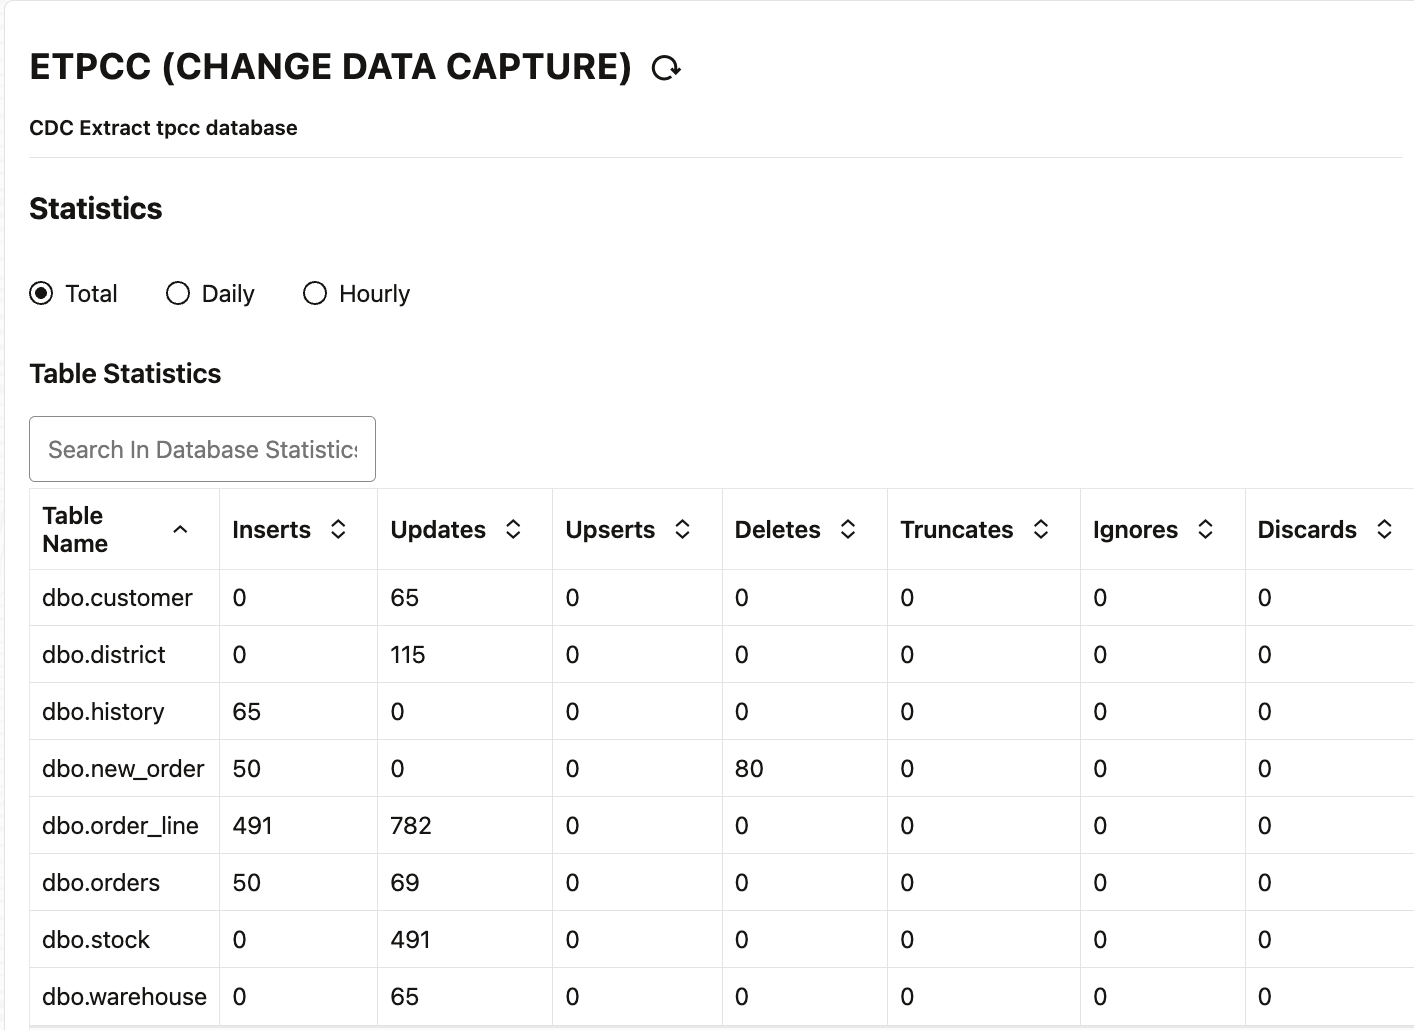
Start the CDC Extract, review the WebUI statistics pane to verify that data is being captured.
Distribution Path
Create and start two Distribution Paths, one for Instantiation Trail data and one for CDC Trail data, from the source Oracle GoldenGate Hub server to the target Oracle GoldenGate Hub server as specified in the Oracle GoldenGate documentation.
Target Oracle GoldenGate Hub System
If you are unfamiliar with how to create Replicats, please refer to the Oracle GoldenGate documentation.
Apply Initial Load Data
Before continuing, there are a couple of things we should understand about the data contained within Oracle GoldenGate Initial Load Trails and how it affects downstream processing.
- Because the Initial Load Extract selects data direct from the source tables, there are no transaction records in the Initial Load Trail files.
- Oracle GoldenGate does not have an Initial Load Replicat, data created by the Initial Load Extract is applied using our CDC Replicats.
Because CDC Replicat uses transaction boundary records from the Trail when creating its data apply transaction, a fake transaction id is generated for all of the data within the Initial Load Extract Trail. The transaction id is comprised of the Tral file sequence number, RBA, and timestamp of the first Trail record. The transaction end boundary is determined by the following:
- Replicat reaches end of file (EOF) in each Trail being processed, or
- The record count read by Replicat reaches the number specified by the Oracle GoldenGate setting, MAXTRANSOPS, which defaults to 10,000,000 records.
Knowing this, we need to make adjustments to the Replicat used for Initial Load Data apply; especially if we’re using Parallel Replicat. If we do not adjust the Replicat apply characteristics, Replicat will appear to be “hung” as it will not report statistics and will not checkpoint until the large transaction commits.
The Parallel Replicat settings we’ll use to apply the data from the Initial Load Trail are shown below.
REPLICAT ilcc
USERIDALIAS mss2019tpcc_tgt DOMAIN OracleGoldenGate

-- Set minimum number of Appliers to 1 and spawn
-- up to 6 to improve initial load performance.
-- When everything has been applied, only 1 Applier
-- will be running, signaling initial load is complete.
MIN_APPLY_PARALLELISM 1
MAX_APPLY_PARALLELISM 6

-- Every 10 minutes, report the count of records processed since
-- Extract start to the process report file.
-- Rate reports the number of operations per second
-- The report file also contains DELTA throughput which is
-- the number of records since the last report divided by
-- the time since the last report
REPORTCOUNT EVERY 10 MINUTES, RATE

-- Organize similar SQL statements into arrays and apply
-- them at an accelerated rate.
BATCHSQL

-- Large transactions should be broken into pieces of
-- specified size and applied concurrently.
SPLIT_TRANS_RECS 10000

MAP dbo.*, TARGET dbo.*;
Start the Replicat. Note, the Replicat will not stop when it has completed applying the Initial Load Data. There are a couple of ways to determine if instantiation is complete.
1. Compare the Replicat checkpoint with the file size.
If you have access to the Oracle GoldenGate Hub server, obtain the file information for the Trails read by Replicat. In the image below, we have two Trail files that contain our Initial Load Data. The last file created contains 1540 bytes of data (the fifth column in the output of the ls utility.)

We compare this to the current checkpoint information reported by Replicat in the Administration Service WebUI. Image 19 shows the Replicat Checkpoint is Trail ic, sequence 1, offset 1540. This equates to the disk file ic000000001 and Replicat has processed everything in that Trail file up to relative byte offset (RBA) 1540.
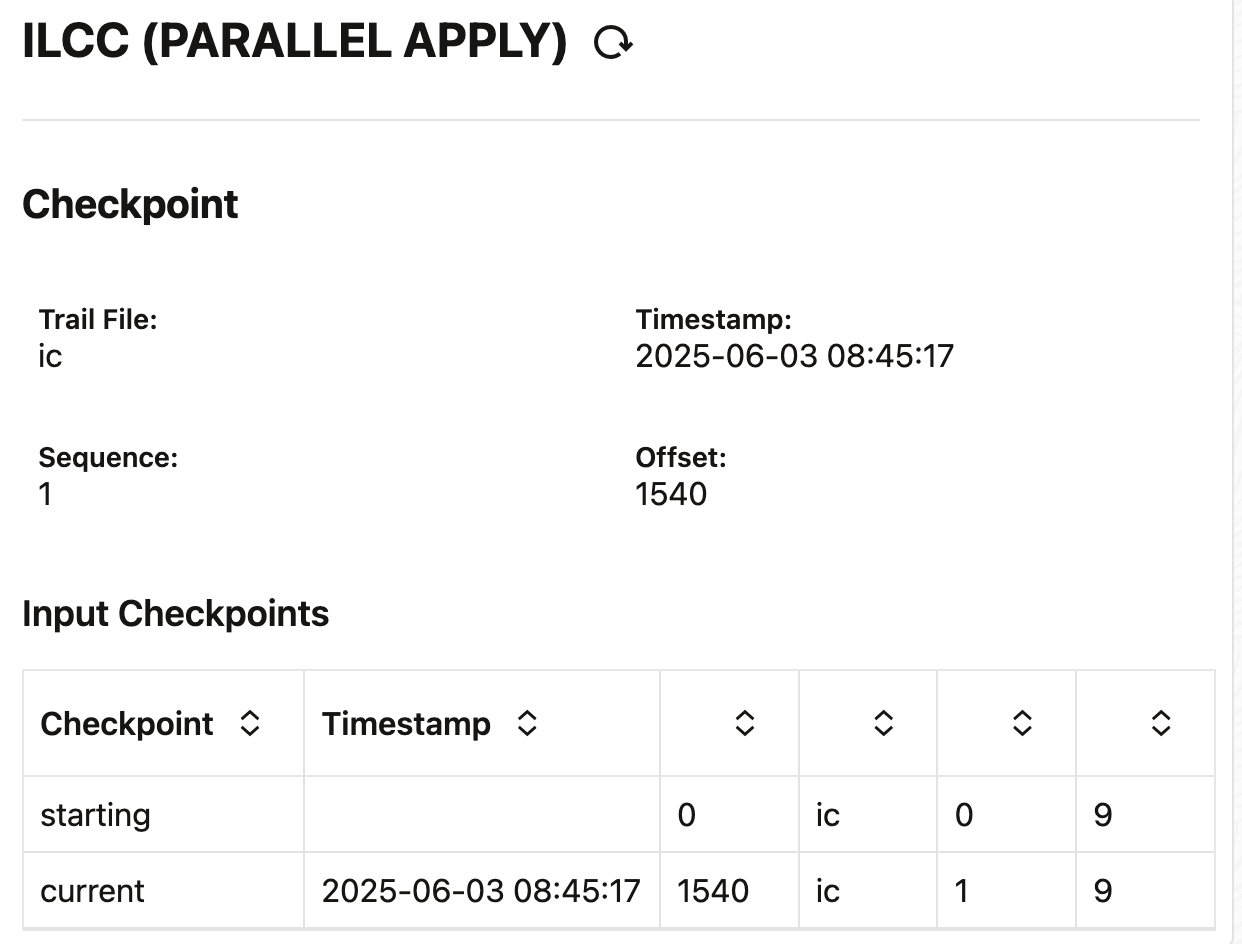
Comparing this to the disk file details in Image 18, we can ascertain that Replicat has applied all outstanding Initial Load Data.
2. Compare Initial Load Extract table statistics with Replicat statistics.
When the Initial Load Extract stopped, details about the number of records selected from each table where written to its report file.
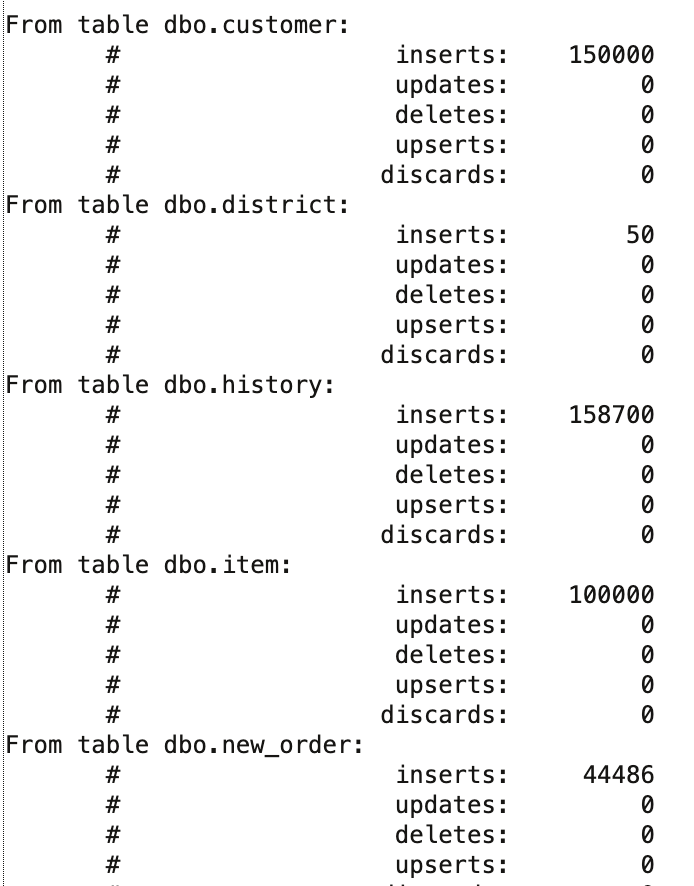
Compare the Initial Load Extract table statistics with the total statistics of the Replicat.
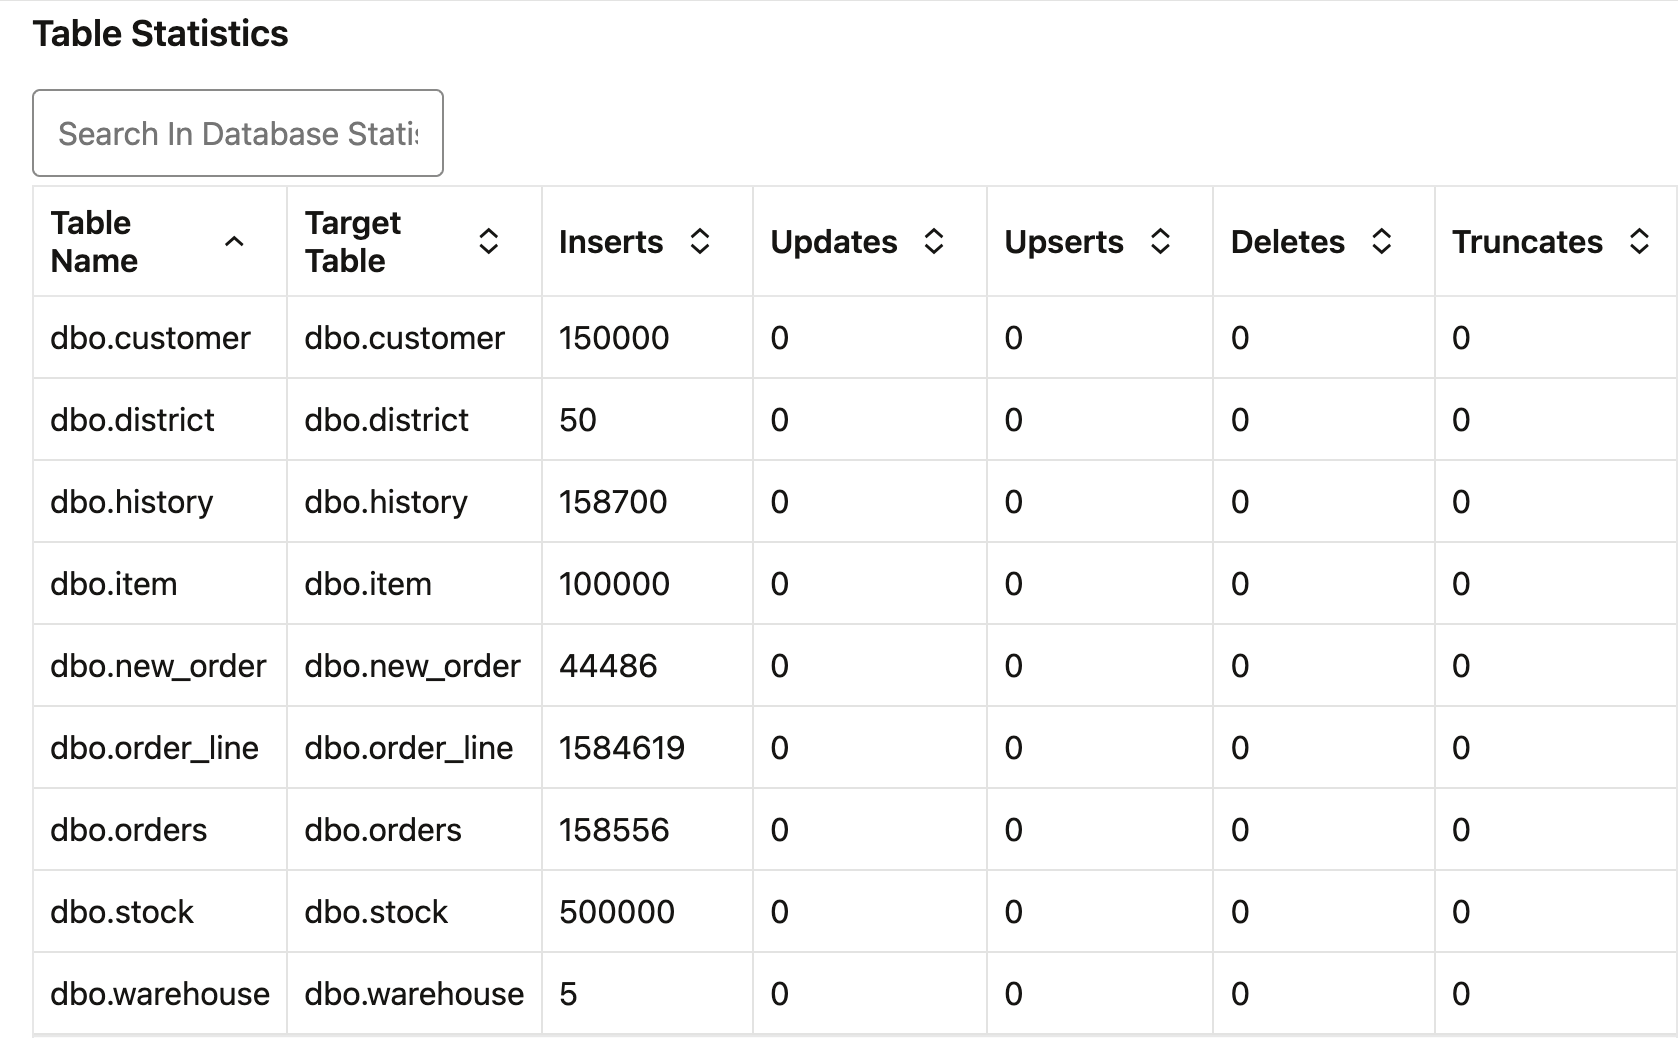
If the record counts reported by Initial Load Extract and Replicat match, instantiation is complete.
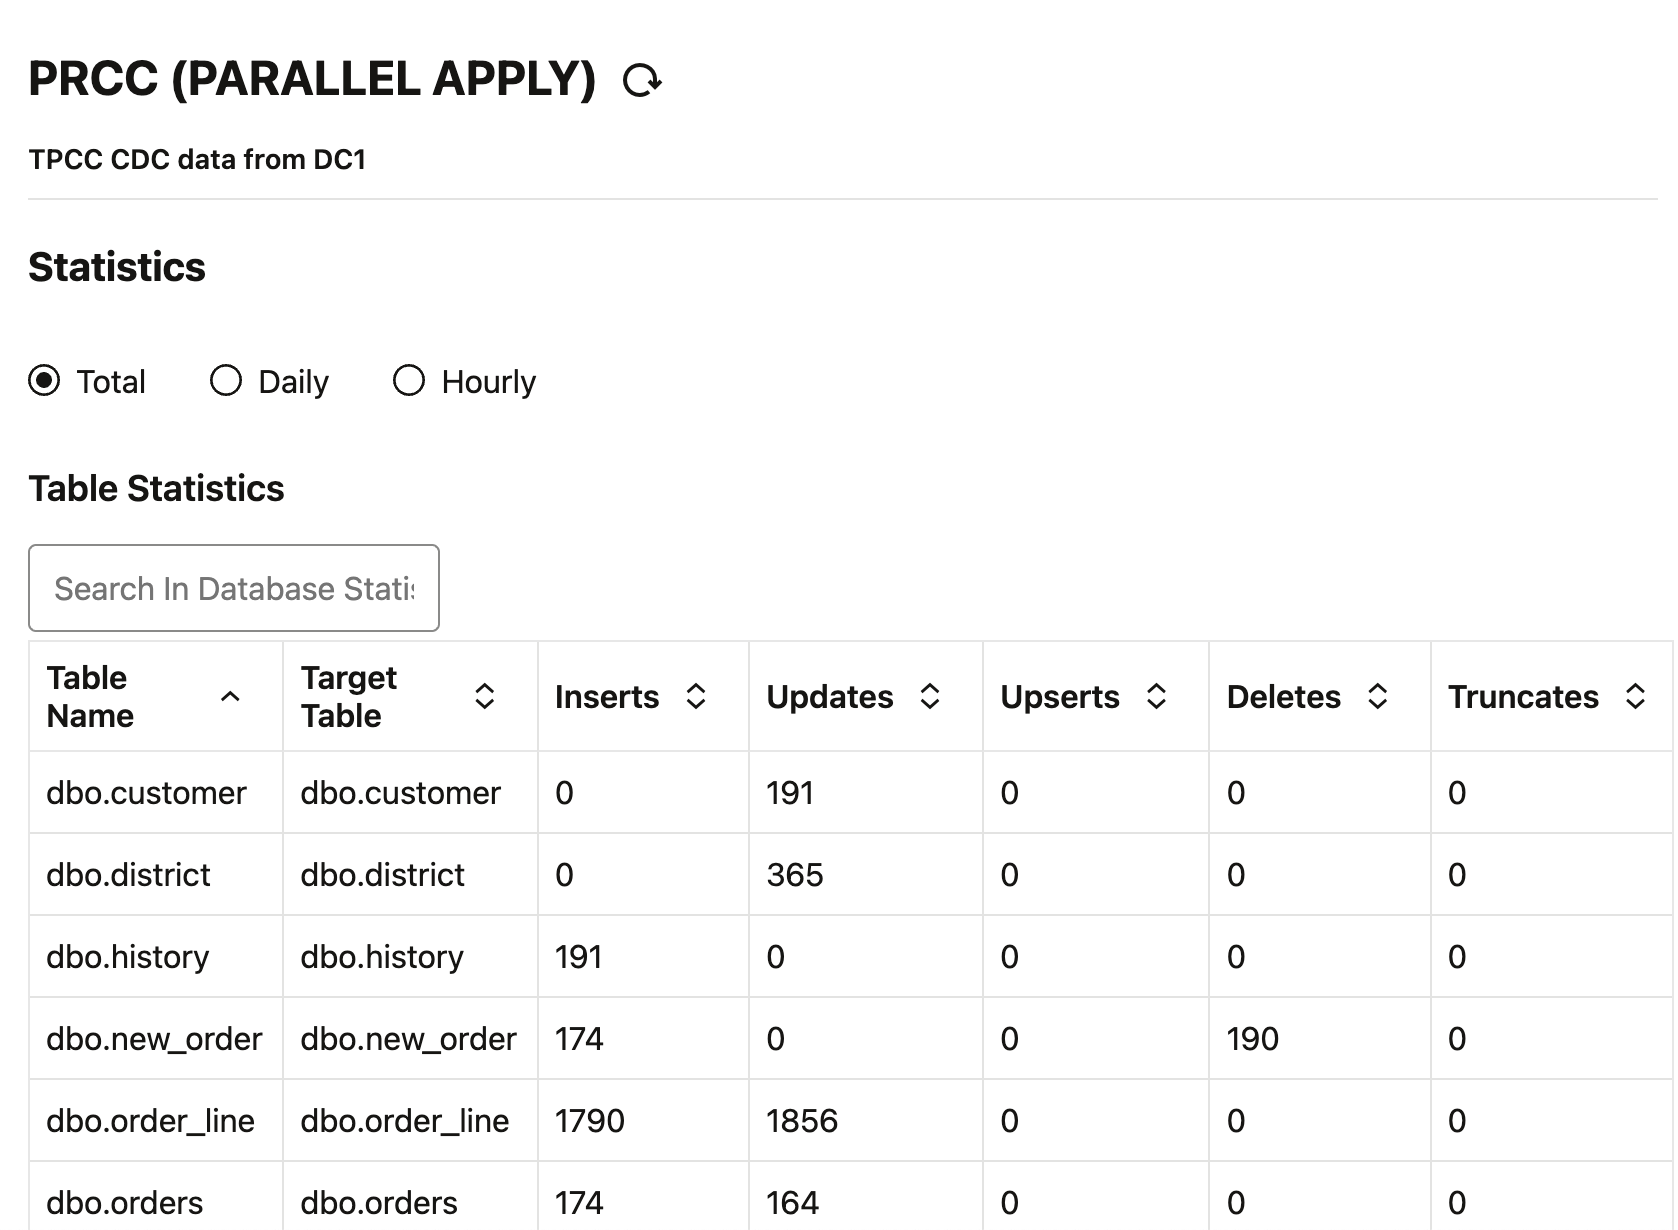
Apply CDC Data
Once instantiation has completed, create a CDC Replicat and begin applying queued and real time data. Below are the Parallel Replicat parameters settings we’ll use.
REPLICAT PRCC
USERIDALIAS mss2019tpcc DOMAIN OracleGoldenGate

-- Every 60 minutes, report the count of records processed since
-- Extract start to the process report file.
-- Rate reports the number of operations per second
-- The report file also contains DELTA throughput which is
-- the number of records since the last report divided by
-- the time since the last report
REPORTCOUNT EVERY 60 MINUTES, RATE

-- Organize similar SQL statements into arrays and apply
-- them at an accelerated rate.
BATCHSQL

-- Large transactions should be broken into pieces of
-- specified size and applied in parallel.
SPLIT_TRANS_RECS 10000

MAP dbo.*, TARGET dbo.*;
Start the Replicat. View the Replicat statistics to verify data is being applied to the target tables.
Post Instantiation Cleanup
We recommend the following to clean up the Oracle GoldenGate installations post instantiation:
- Stop and delete the Replicat used to apply instantiation data.
- Stop and delete the Distribution Path used for transmitting instantiation data.
- Delete the Initial Load Extract.
- Create a Trail Purge Task in the Administration Service WebUI for each Oracle GoldenGate Hub to ensure disk space is freed when Oracle GoldenGate Trails are consumed.
Summary
In this article we presented detailed steps to perform precise instantiation of a Microsoft SQL Server target database from a source Microsoft SQL Server database using Oracle GoldenGate. To learn more about Oracle GoldenGate functionality, you may refer to:
- The Oracle Integration Services GoldenGate web site
- The Oracle Data Integration blog site.
- The OracleGoldenGate YouTube channel.
- Oracle GoldenGate A-Team articles.