

Build a managed RAG assistant using OCI Object Storage, a knowledge base, an ingestion job, a RAG tool, and an agent endpoint.
Support teams often have the answer in product guides, runbooks, policies, and knowledge articles. The challenge is finding the right passage quickly and using it in a clear response.
This article shows how to build a retrieval-augmented generation, or RAG, assistant with OCI Generative AI Agents. The assistant retrieves information from documents stored in OCI Object Storage before generating an answer. This keeps responses grounded in your organization’s content instead of relying only on a model’s general knowledge.
By the end, you will have OCI resources organized in a dedicated compartment, source documents in Object Storage, a populated knowledge base, an agent with a RAG tool, and an endpoint that can return answers with citations.
Introduction to OCI Generative AI
The following video introduces the OCI Generative AI Agents workflow used in this solution. It provides useful context before the architecture and infrastructure configuration. The complete configuration sequence is included below, so watching the video is optional.
Architecture
The architecture separates document ingestion from runtime query processing.
- Ingestion flow: Content owners upload files to Object Storage. A data source identifies the selected bucket objects or object prefixes. An ingestion job processes the documents and stores retrieval-ready information in the knowledge base.
- Query flow: A client sends a prompt to the agent endpoint. The routing large language model, or LLM, selects the RAG tool. The tool retrieves relevant passages from the knowledge base, and its generation LLM produces the response.
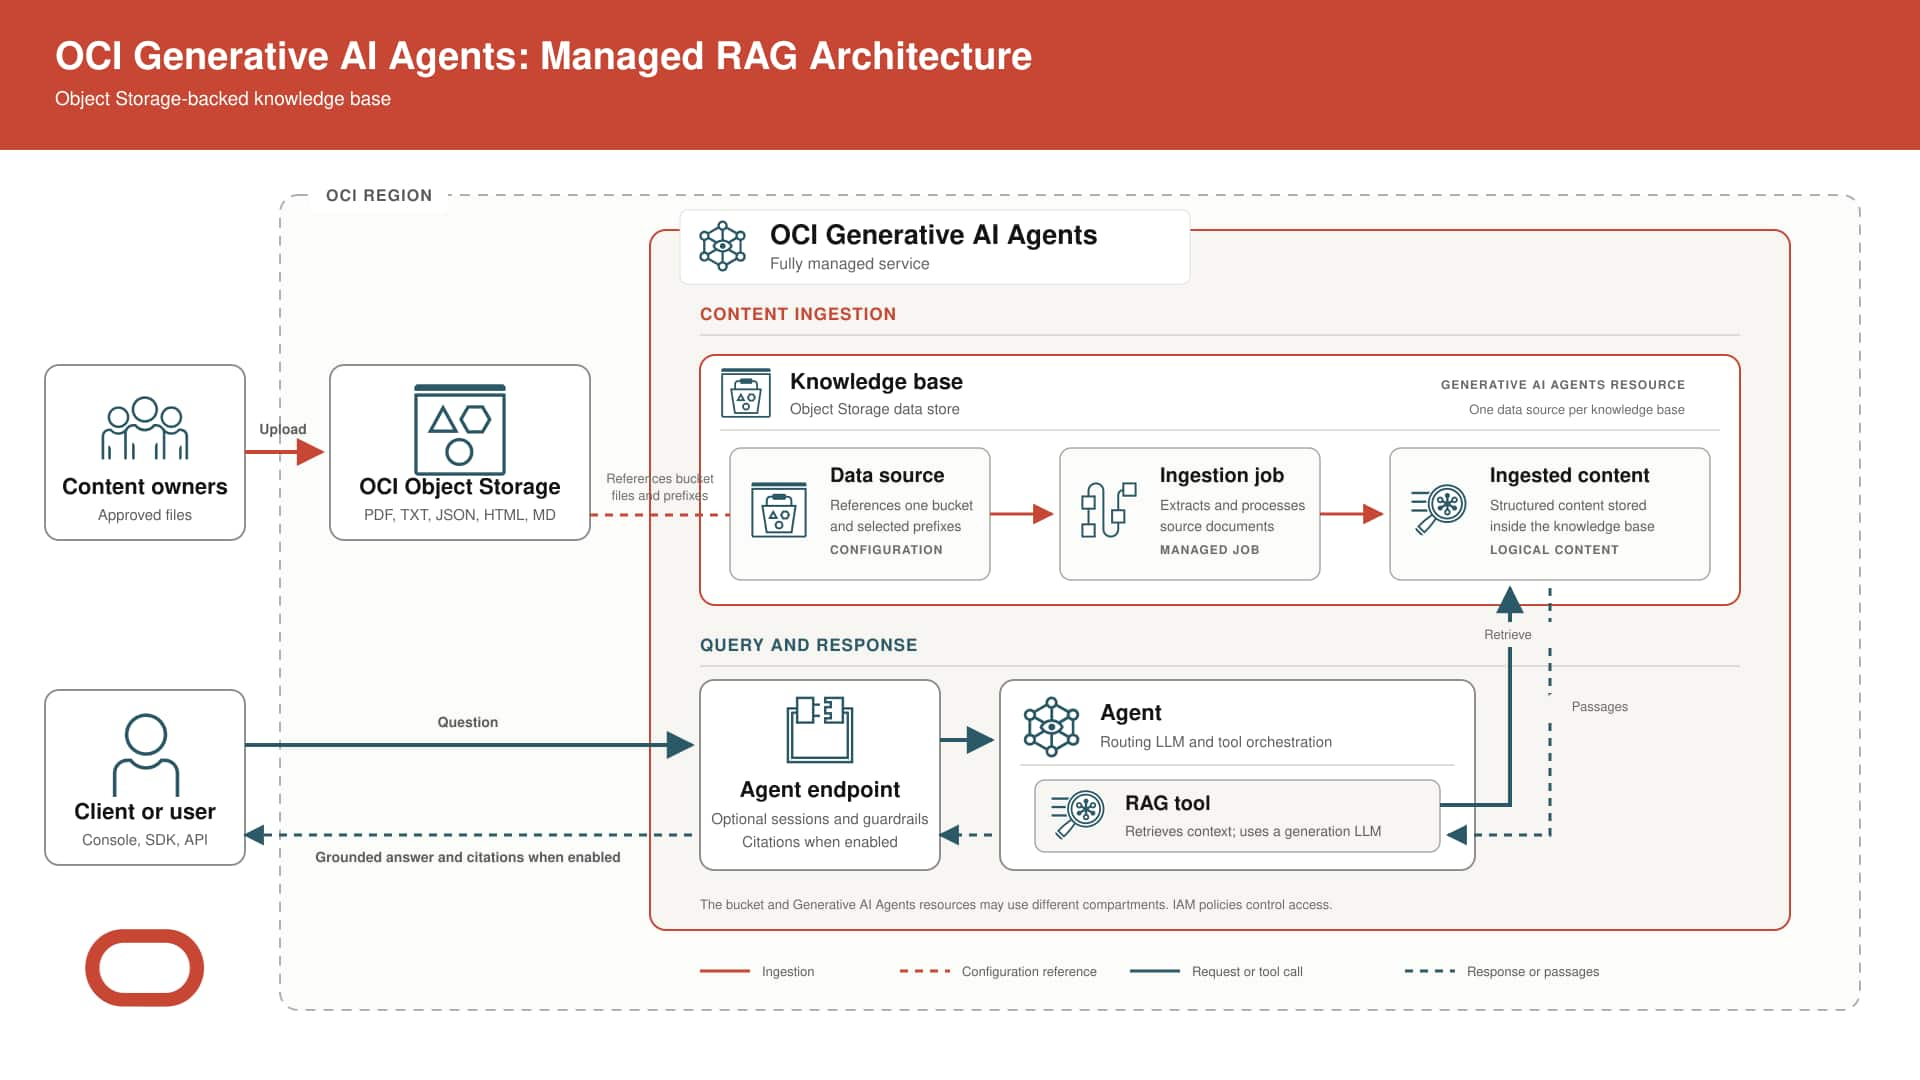
Object Storage remains the source of record. The ingestion job processes the selected content and adds retrieval-ready information to the managed knowledge base. At runtime, the agent retrieves relevant passages from that knowledge base before generating a response.
The diagram focuses on data flow. All resources are created inside an OCI tenancy and assigned to compartments for access control, ownership, and cost tracking.
Configure the OCI infrastructure
The example below uses one dedicated compartment named genai-rag. The Object Storage bucket, knowledge base, data source, ingestion jobs, agent, RAG tool, and endpoint are placed in this compartment. Keeping the first deployment in one compartment makes IAM and troubleshooting easier.
| OCI item | Example | Purpose |
|---|---|---|
| Tenancy | Your existing OCI tenancy | Top-level account and IAM boundary |
| Region | A region that hosts Generative AI Agents | Location for the service resources |
| Compartment | genai-rag | Access and ownership boundary for this solution |
| Object Storage bucket | genai-rag-source | Private storage for source documents |
| Object prefix | knowledge/ | Optional path used to group the selected documents |
1. Confirm the tenancy, region, and compartment
Sign in to the OCI Console and confirm that you are working in the correct tenancy. A tenancy is the top-level OCI account that contains identity domains, users, groups, policies, compartments, and cloud resources.
Use the region selector in the Console header to choose a region listed under Regions with Generative AI Agents. Object Storage and Generative AI Agents are regional services, so create the resources used by this solution in the selected region.
To create the compartment:
- Open Identity & Security, then select Compartments.
- Select the parent compartment. Use the tenancy root only if that matches your organization’s compartment design.
- Select Create Compartment.
- Enter
genai-ragas the name, add a clear description, and apply the required cost-center or ownership tags. - Create the compartment and copy its Oracle Cloud Identifier, or OCID. The OCID is required if you restrict the ingestion dynamic group to this compartment.
For a production environment, you can separate data and service resources into child compartments such as genai-rag-data and genai-rag-service. If you do, the IAM policies must grant Object Storage access in the data compartment and Generative AI Agents access in the service compartment.
Checkpoint: The Console is set to a supported region, and the target compartment exists in the correct tenancy.
2. Configure IAM access
Ask a tenancy administrator to create or use an IAM group for the people who will build and manage the solution. The administrator should create the policy in the tenancy root or in a parent compartment that can grant access to genai-rag.
The following compartment-scoped statements are a practical starting point for a controlled development environment. Replace the group name and compartment name with your values.
allow group <group-name> to manage genai-agent-family in compartment genai-rag
allow group <group-name> to manage object-family in compartment genai-rag
The first statement lets the group manage agents, knowledge bases, data sources, ingestion jobs, tools, sessions, work requests, and endpoints in the compartment. The second lets the group create the bucket and select its objects when configuring the data source. If your group belongs to a non-default identity domain, use the domain-qualified group name required by your IAM configuration.
For long-running Object Storage ingestion jobs, create a dynamic group for the ingestion resource principal. Use the compartment OCID copied in the previous section:
ALL {resource.type = 'genaiagentdataingestionjob', resource.compartment.id = '<genai-rag-compartment-ocid>'}Then allow that dynamic group to read the source objects:
allow dynamic-group <ingestion-dynamic-group-name> to read objects in compartment genai-ragIf the bucket is in a separate data compartment, change the last statement to reference that compartment. Users configuring the data source must also have Object Storage access in the bucket’s compartment.
The default routing and generation models do not require an additional model policy. If you select an on-demand OCI Generative AI model or a dedicated model endpoint, add the model access policy described in Getting Access to Generative AI Agents. Review these examples with your security team and reduce permissions for production roles where required.
Checkpoint: Builders can create Generative AI Agents resources and browse the bucket, while ingestion jobs can read the source objects.
3. Create the Object Storage bucket and upload documents
Open Storage, select Object Storage & Archive Storage, and then select Buckets. Set the list scope to genai-rag and select Create bucket.
Use a clear name such as genai-rag-source. Select the Standard storage tier so files are immediately available to ingestion. Keep the bucket private. Use Oracle-managed encryption unless your security requirements call for a customer-managed key. Object versioning is useful when source documents are updated frequently.
After the bucket is created:
- Open the bucket and select Objects.
- Select Upload.
- Optionally enter
knowledge/as the object name prefix to keep the RAG source set together. - Drag the files into the upload panel or select them from your computer.
- Select Upload and confirm that every object appears in the bucket.
The RAG tool Object Storage guidelines support PDF, TXT, JSON, HTML, and Markdown files. Each file must be 100 MB or smaller. Password-protected PDFs fail ingestion. Remove obsolete copies and duplicates before upload because conflicting content reduces retrieval quality.
One data source can use only one bucket. You can still limit the data source to selected files, folders, or object prefixes inside that bucket.
Checkpoint: The private Standard-tier bucket contains the approved source files in the intended prefix.
4. Create the knowledge base and data source
Open Analytics & AI, select Generative AI Agents, and then select Knowledge bases. Set the compartment to genai-rag and select Create knowledge base.
- Enter a name and description, and confirm the
genai-ragcompartment. - Select Object storage as the data store type.
- Under Data sources, select Specify data source and enter a name.
- Select the bucket compartment and the
genai-rag-sourcebucket. - Select all objects, select individual files and folders, or enter the
knowledge/object prefix. - Enable multimodal parsing only when the source documents contain charts or graphs that the assistant must use.
- Choose whether to start ingestion automatically. Leave this option unchecked if you want to verify the data source before starting the first job.
- Select Create.
A knowledge base supports one data source. Update that data source when the object selection changes rather than creating another data source for the same knowledge base.
Checkpoint: The knowledge base is active and its single data source points to the correct bucket objects.
5. Run and validate the ingestion job
Open the knowledge base, select the data source, and select Create ingestion job. Enter a name, create the job, and wait for its status to change from Accepted.
Review the job status and status logs even when the job succeeds. Confirm that the expected files were processed. A job can complete with file-level failures caused by corrupted content, password-protected PDFs, inaccessible objects, unsupported content, or files over the size limit.
Correct the files or IAM policy and run a new ingestion job. Run ingestion again whenever source documents are added, replaced, or removed.
Checkpoint: The job succeeded, the expected files were processed, and no failure remains unexplained.
6. Create the agent and RAG tool
From Generative AI Agents, open Agents and select Create agent. Confirm the region and select the genai-rag compartment.
- Enter the agent name, description, and optional welcome message.
- Select the routing LLM. The default model is the simplest starting point. The routing LLM decides which tool handles a request.
- Create the agent, then open Tools and select Create tool.
- Select RAG, enter a name, and add concise custom instructions.
- Select the
genai-ragcompartment and the knowledge base created earlier. - Select the generation LLM. This model uses the retrieved passages to compose the answer.
- Create the tool and wait until it becomes active.
A useful custom instruction is: Answer from the retrieved content. If the content does not provide enough evidence, state that the answer is not available in the knowledge base.
Checkpoint: The active agent has a RAG tool connected to the populated knowledge base.
7. Create and configure the endpoint
Open the agent, select Endpoints, and then select Create endpoint. The endpoint is the managed interface used by the Console, SDK, CLI, or an application to send prompts to the agent.
Configure the endpoint deliberately:
- Sessions: Enable sessions when follow-up questions need conversation context. This choice cannot be changed after the endpoint is created.
- Citations: Enable citations so users can inspect the source behind each response.
- Trace: Enable trace during validation to inspect the request path and generated response.
- Guardrails: Configure content moderation, prompt-injection protection, and personally identifiable information protection according to your security requirements.
- Multilanguage: Enable this option when the assistant must support the languages available for the endpoint.
Create the endpoint and wait until it becomes active.
Checkpoint: The endpoint is active with the required session, citation, trace, language, and guardrail settings.
8. Test retrieval and responses
Use Launch chat or call the endpoint from your application. Prepare 10 to 20 representative questions that cover:
- A direct answer in one document
- An answer spread across several documents
- A question not covered by the source set
- Ambiguous wording
- Conflicting or outdated documents
- A follow-up question that depends on session context
For each response, verify the answer, citation, cited passage, and behavior when evidence is missing. Fix source documents and rerun ingestion before changing models or prompts. Retrieval quality depends first on the quality and consistency of the content.
Checkpoint: The endpoint returns accurate answers from the intended sources and clearly handles unsupported questions.
Final result
After the endpoint becomes active, use Launch chat to test the complete RAG flow. The following OCI Console view shows the finished agent returning a response from its configured knowledge base. The trace reports a successful request. Environment identifiers are redacted.
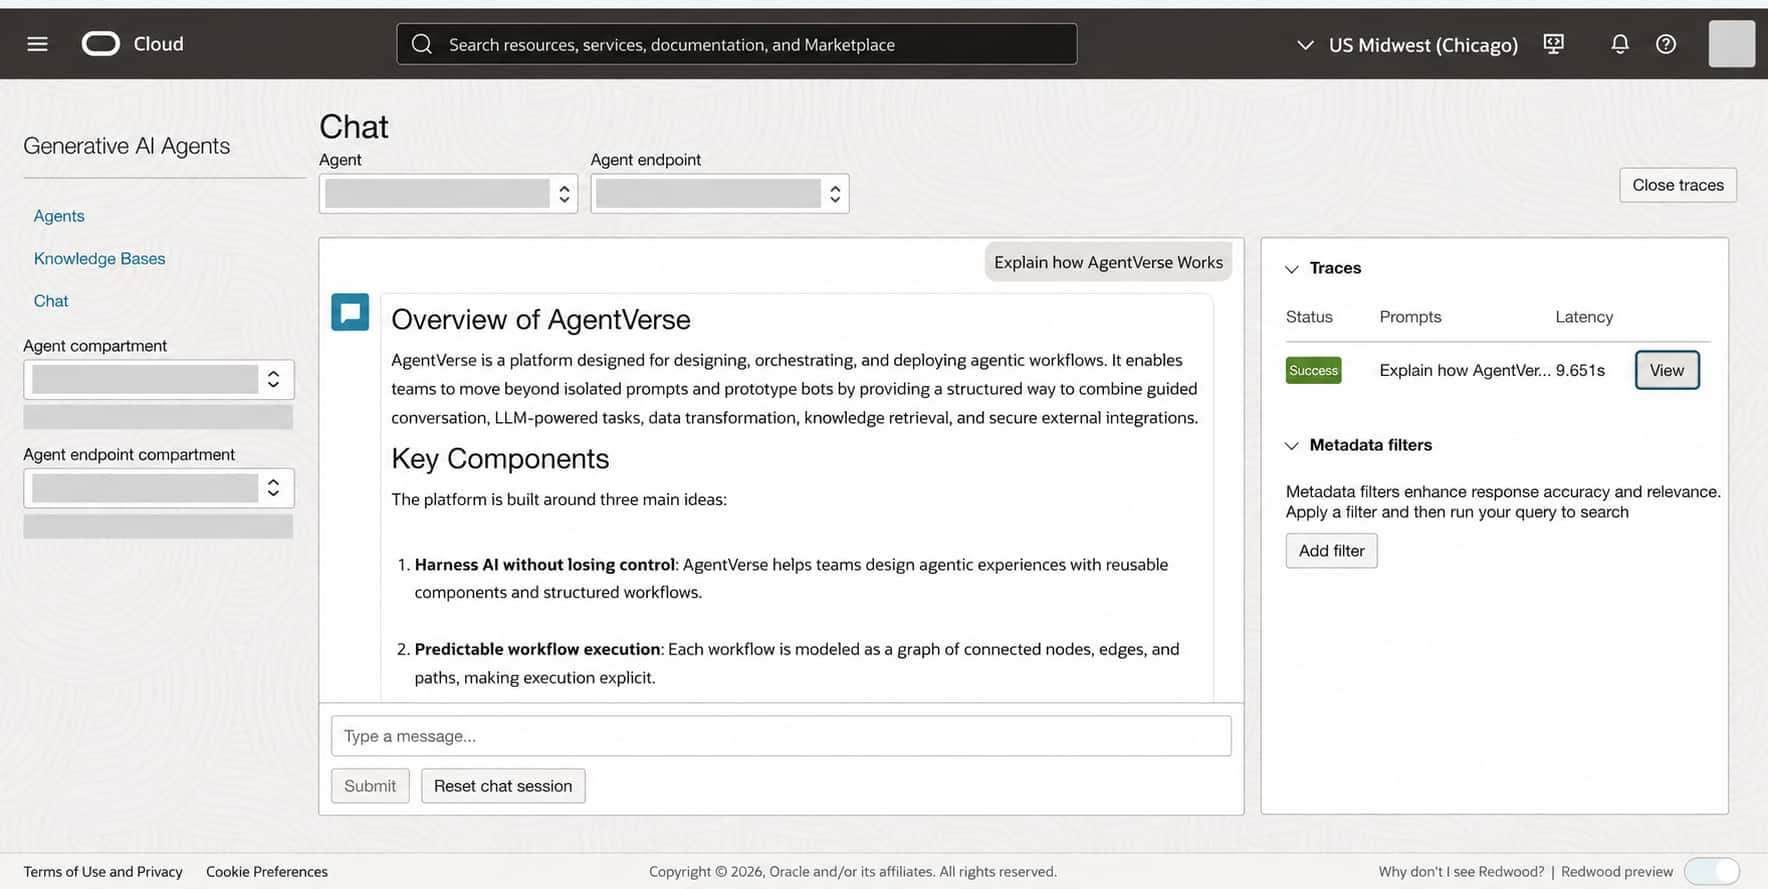
Select View in the trace panel to inspect how the request was handled. The trace below shows successful planning, a retrieval request to the knowledge base, and the subsequent response-planning stage. Environment identifiers, the model name, and internal planning content are redacted.
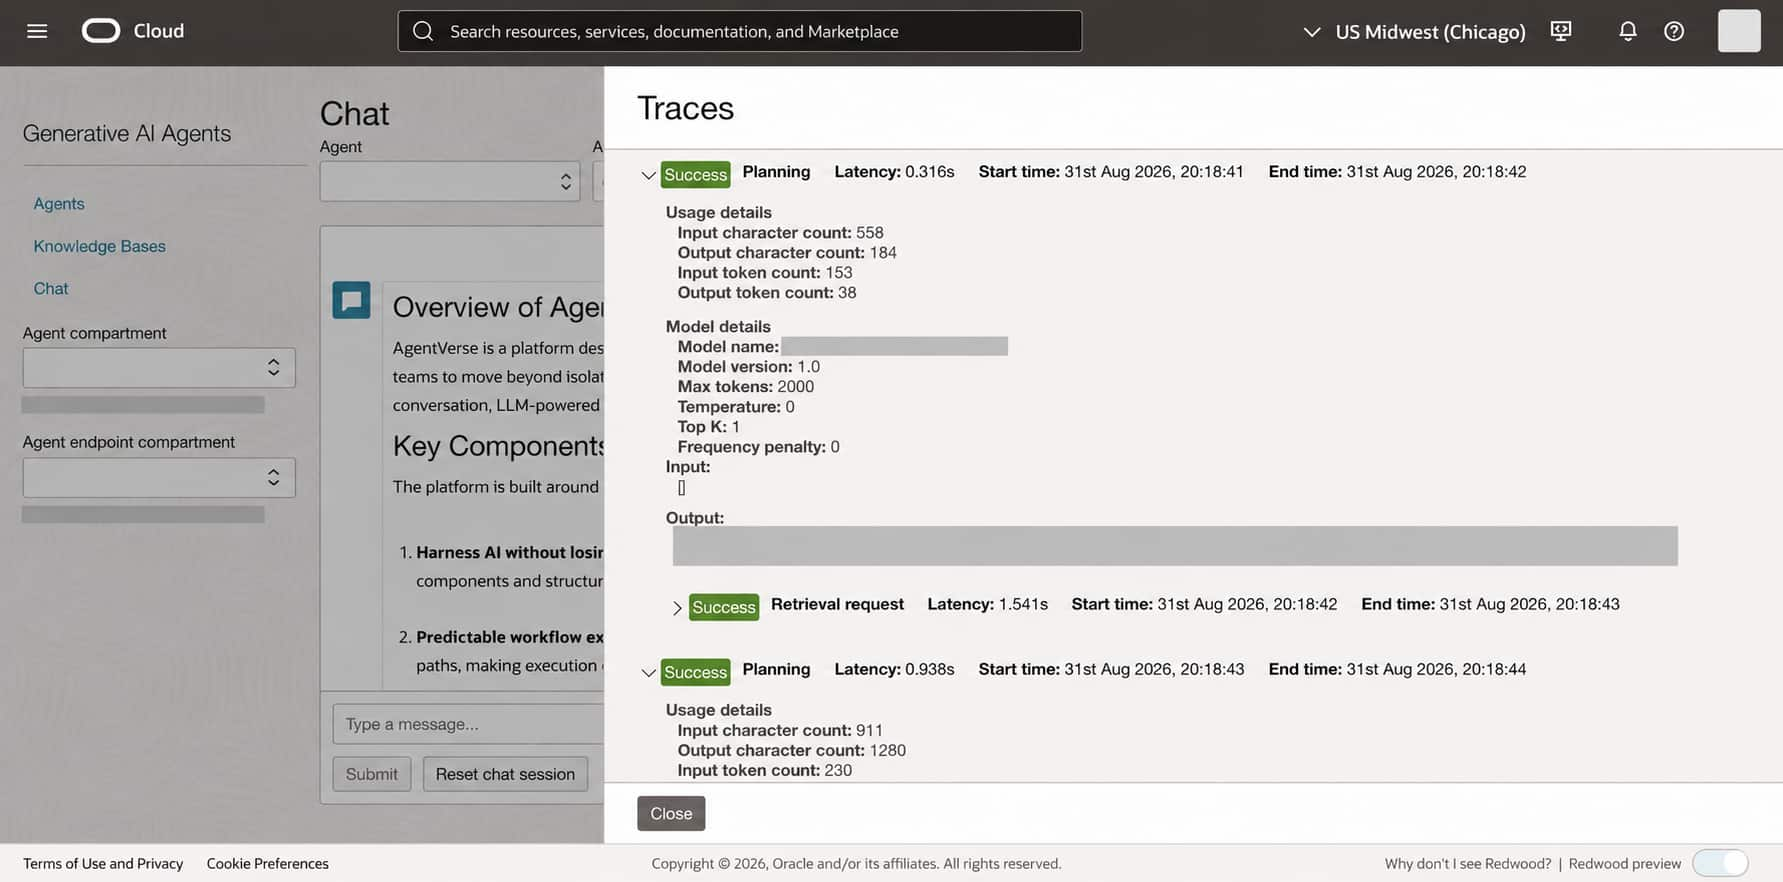
Together, these views confirm the complete runtime path: the endpoint receives the prompt, the agent plans the request, the RAG tool retrieves relevant content from the knowledge base, and the generation model produces the final response.
Conclusion
This design gives each OCI resource a clear responsibility. The tenancy provides the top-level identity boundary. Compartments organize resources and policies. Object Storage holds the source documents. The knowledge base prepares content for retrieval. The agent coordinates the RAG tool, and the endpoint exposes the assistant to users and applications.
Start with one region, one dedicated compartment, one curated bucket, and a focused test set. Separate compartments or add stricter policies after the data flow and retrieval quality are proven.
Resources
Tenancy, compartments, and access
Object Storage
- Create an Object Storage bucket
- Upload objects to a bucket
- Prepare Object Storage files for a RAG tool
Knowledge base and ingestion
Agent, RAG tool, and endpoint
